12. Skin Electronics
weekly assignment
Check out the weekly assignment here or login to your NuEval progress and evaluation page.
get inspired!
Check out and research alumni pages to betetr understand how to document and get inspired
- Beatriz Sandini TextileLab Amsterdam 2019-20_
- Vicky Luan
- hihi
- nono
Skin Electronics Notes
Making a Skin Sensor

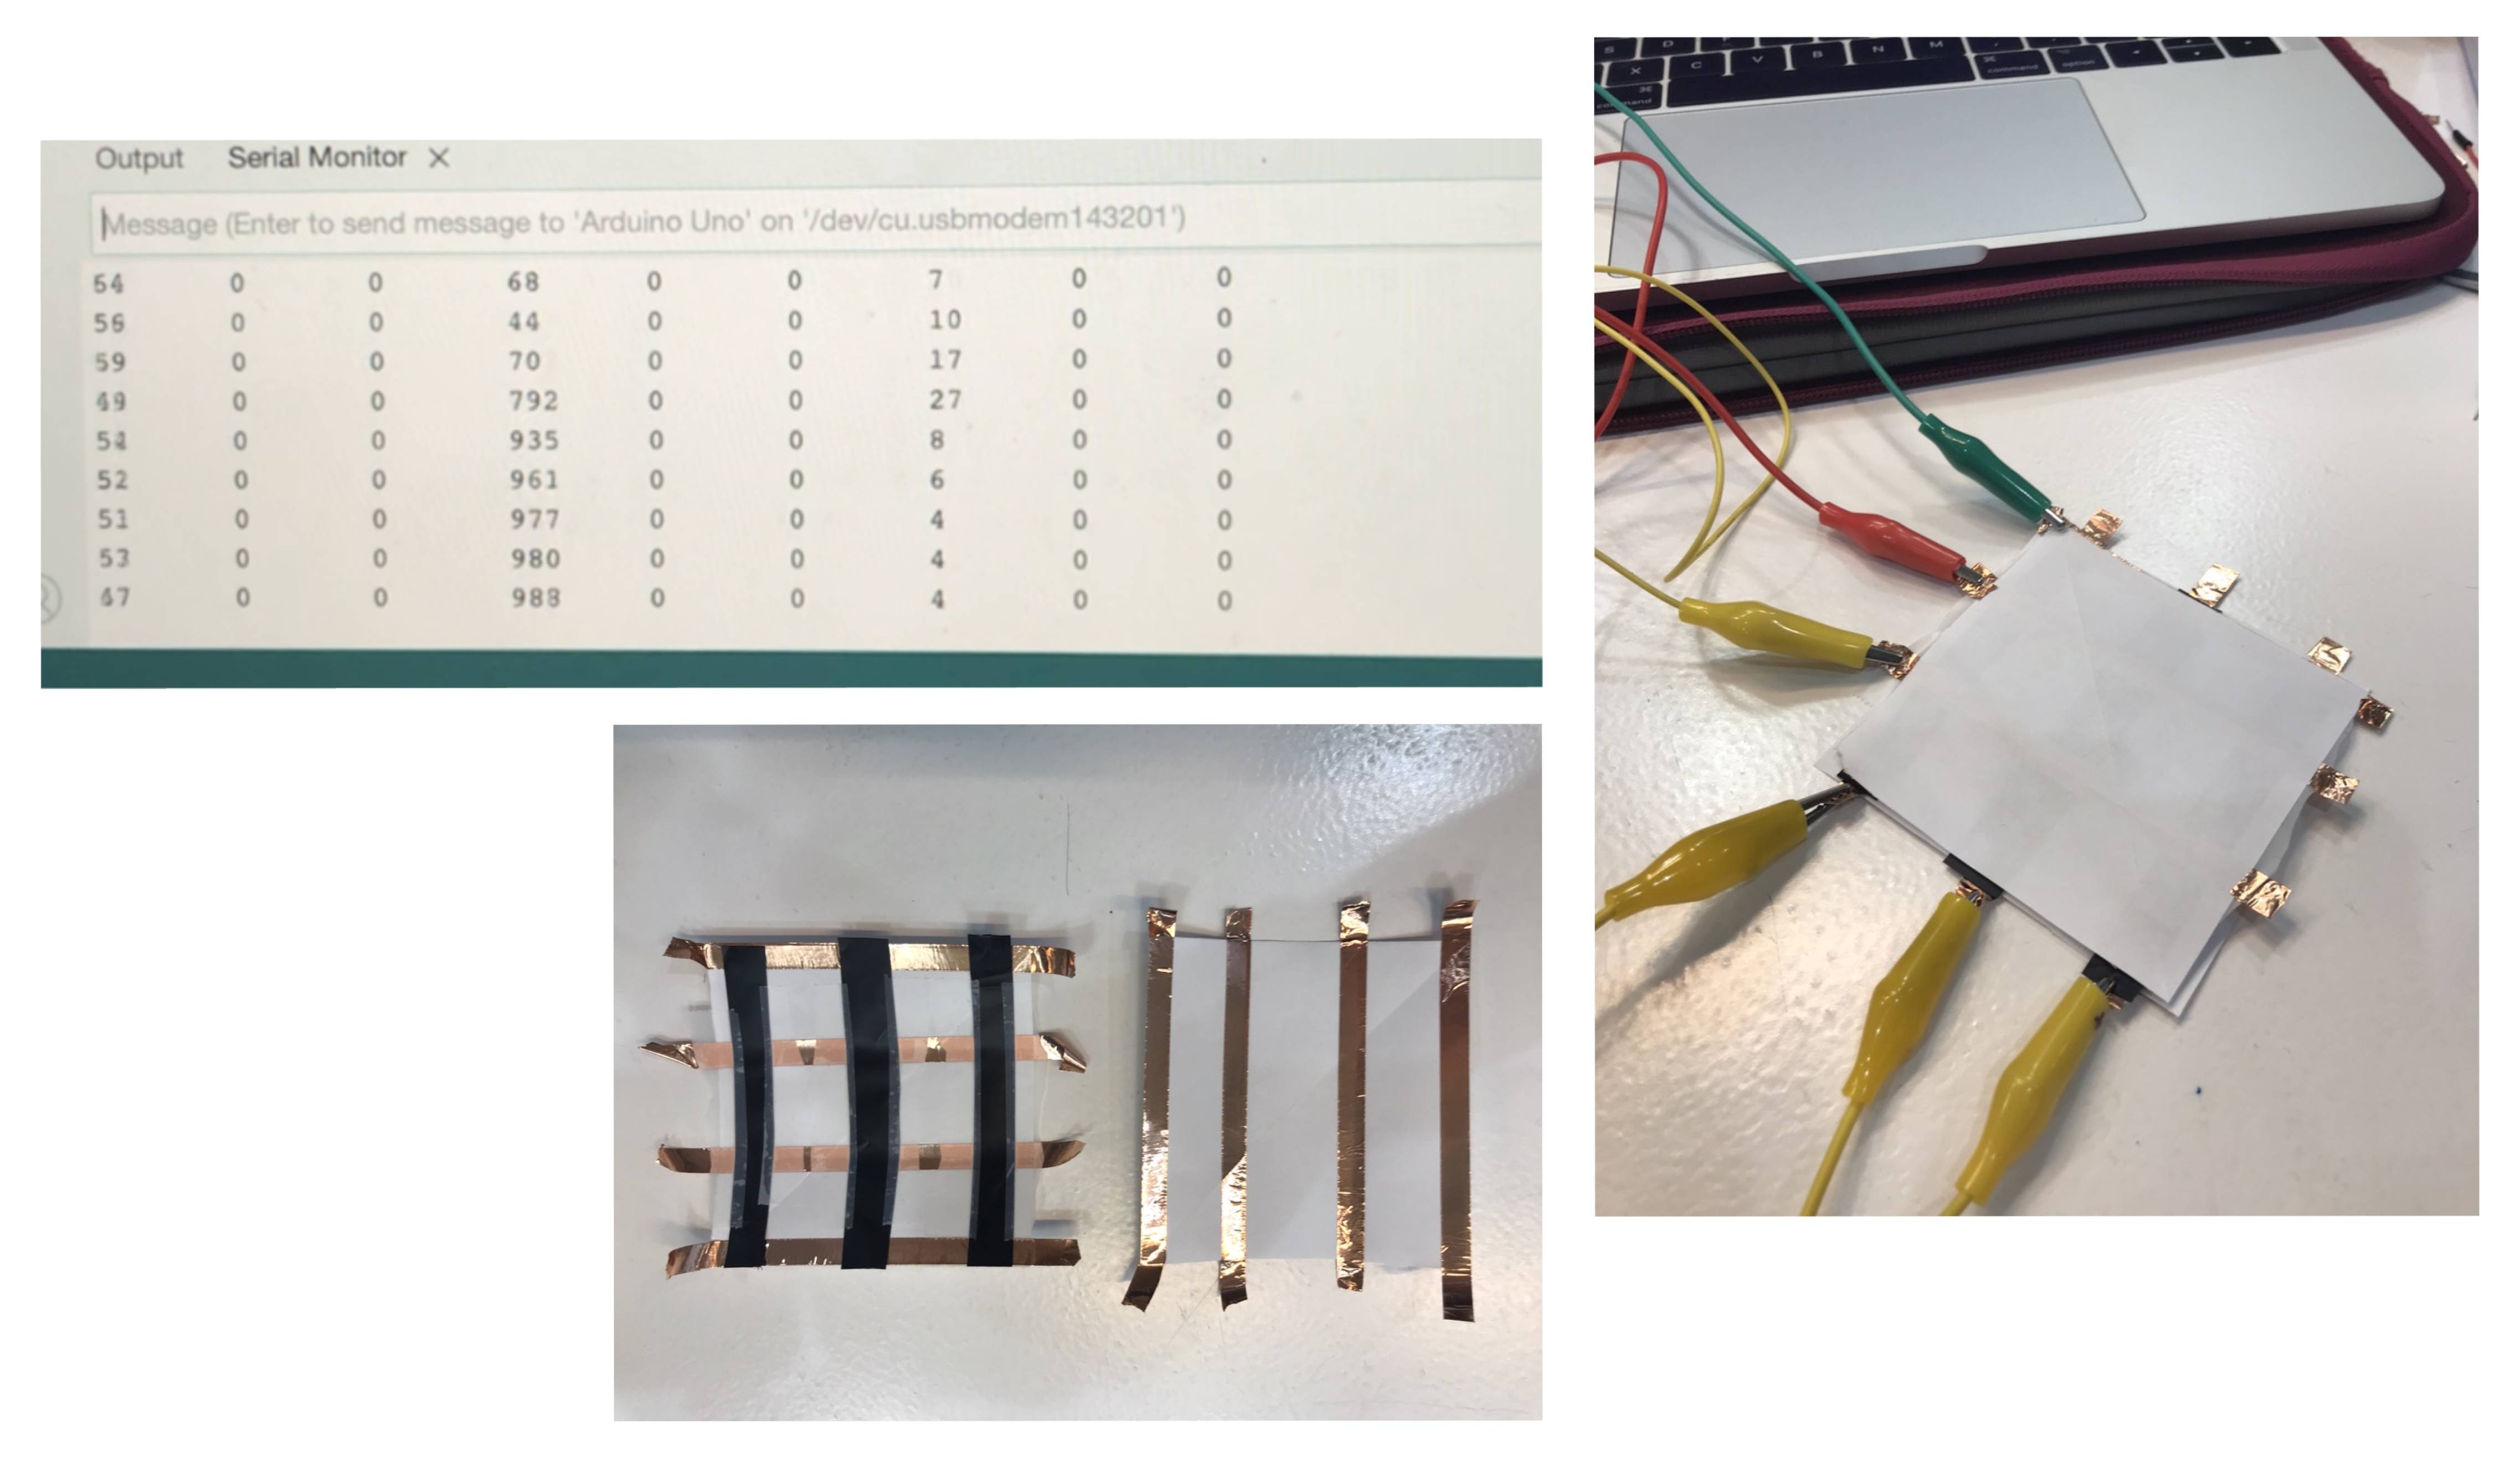
int sensorPin = A1;
int sensorValue = 0;
int pinD = 7;

void setup() {
  pinMode(pinD, OUTPUT);
  Serial.begin(9600);
}

void loop() {
  sensorValue = analogRead(sensorPin);
  Serial.println(sensorValue);
  delay(500);
}
References & Inspiration
Anti-Facial Recognition:
My initial starting point for this week was Dazzle Makeup, originally developed by Adam Harvey which was developed to help people to avoid being picked up by facial recognition (FR) softwares used with CCTV. This project was done over a decade ago now and so is no longer effective against the current FR models but I thought the looks created and the base idea were very interesting. Obviously I wasn’t going to be able to develop a genuine anti facial recognition (AFR) device in 2 days but I wanted to play around with some of the ideas that might help with this.
Here are some more links about dazzle makeup:
https://www.digitaltrends.com/news/cv-dazzle-makeup-facial-recognition-protests/
https://www.theguardian.com/world/2020/feb/01/privacy-campaigners-dazzle-camouflage-met-police-surveillance
https://www.popsci.com/technology/article/2010-03/designer-aims-develop-anti-face-recognition-camouflage/
I did some research into how FR systems work and some different products or suggestions to avoid them. In simple terms, FR systems map the distances between certain points on the face and then use this to identify the person based on the specific triangulation map. The main ways to prevent this are: to minimise the amount of information that have to map, to distort the information they receive and map or to distract of confuse them with something else that the mistakenly identify instead.
- “The first step in the process is data collection. This can be scraping the web for images of faces or using images from surveillance cameras. Second, images must be processed to remove background elements and/or crop the image to contain mostly a face. Third, a machine learning algorithm called a feature extractor is trained to identify notable facial features, transforming that into a vector, or list, of numbers. Fourth, the processed face images and feature vectors are stored in a reference database to allow for the final step, query matching, in which a facial recognition system extracts a feature vector from an unidentified picture and tries to match it to a face and vector in the reference database.” (https://physicalsciences.uchicago.edu/news/article/evaluating-anti-facial-recognition-tools/#:~:text=Several%20anti%2Dfacial%20recognition%20tools,features%20given%20another%20facial%20image.)
Example Anti Facial Recognition Products and Technologies:
Capable Knitwear:
This knitwear collection uses adversarial patch prints that confuse a recognition system into misidentifying the wearer usually as an animal instead. These are practical for everyday use and don’t disrupt the vision or face of the wearer making them one of the most useful.

Reflectacle:
These sunglasses use infrared blocking lenses and reflective lenses to block FR, they are very practical and low-key for everyday use.

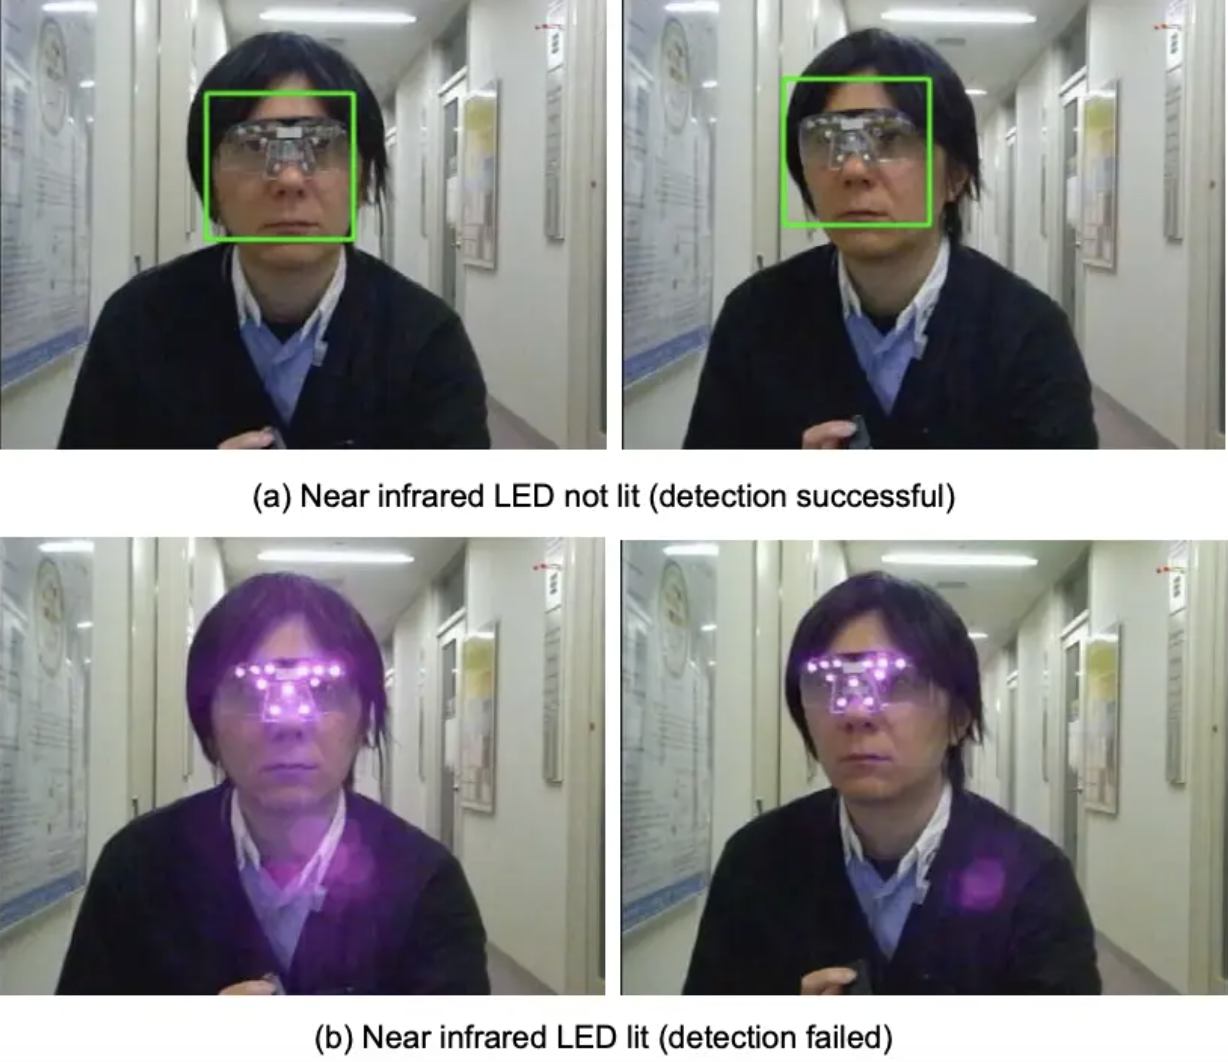
Privacy Visor:
These glasses use near-infrared LEDs that prevent FR from being able to identify the face of the wearer without affecting the vision of the wearer. These are practical and non-disruptive but not very low-key for everyday use.
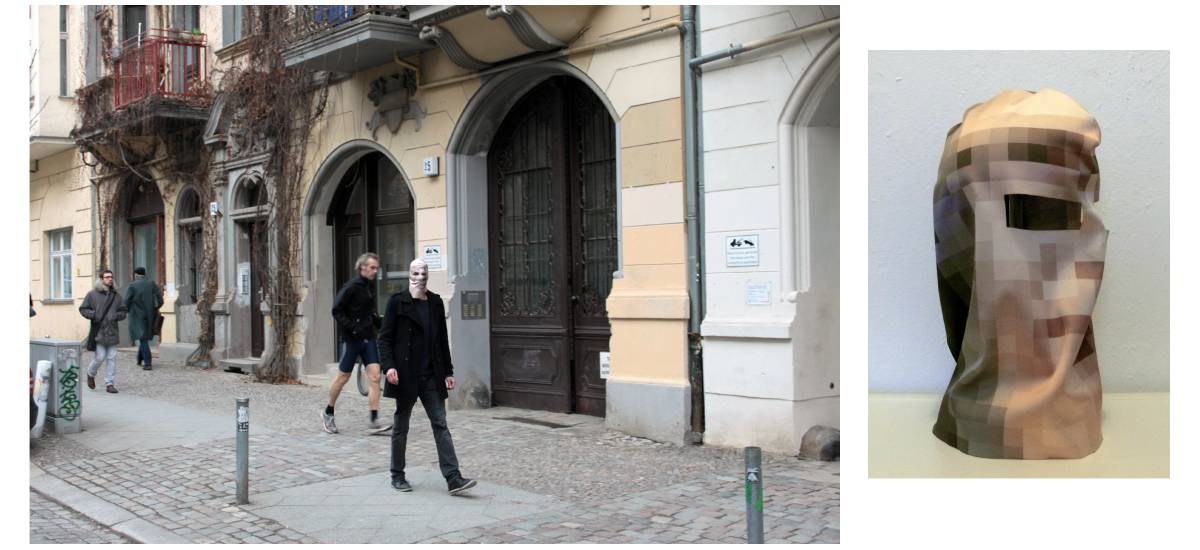
Pixelhead Balaclava:
This balaclava is printed to resemble a pixelated face. This works in the most basic way by just covering the face but I like the idea of the print too.
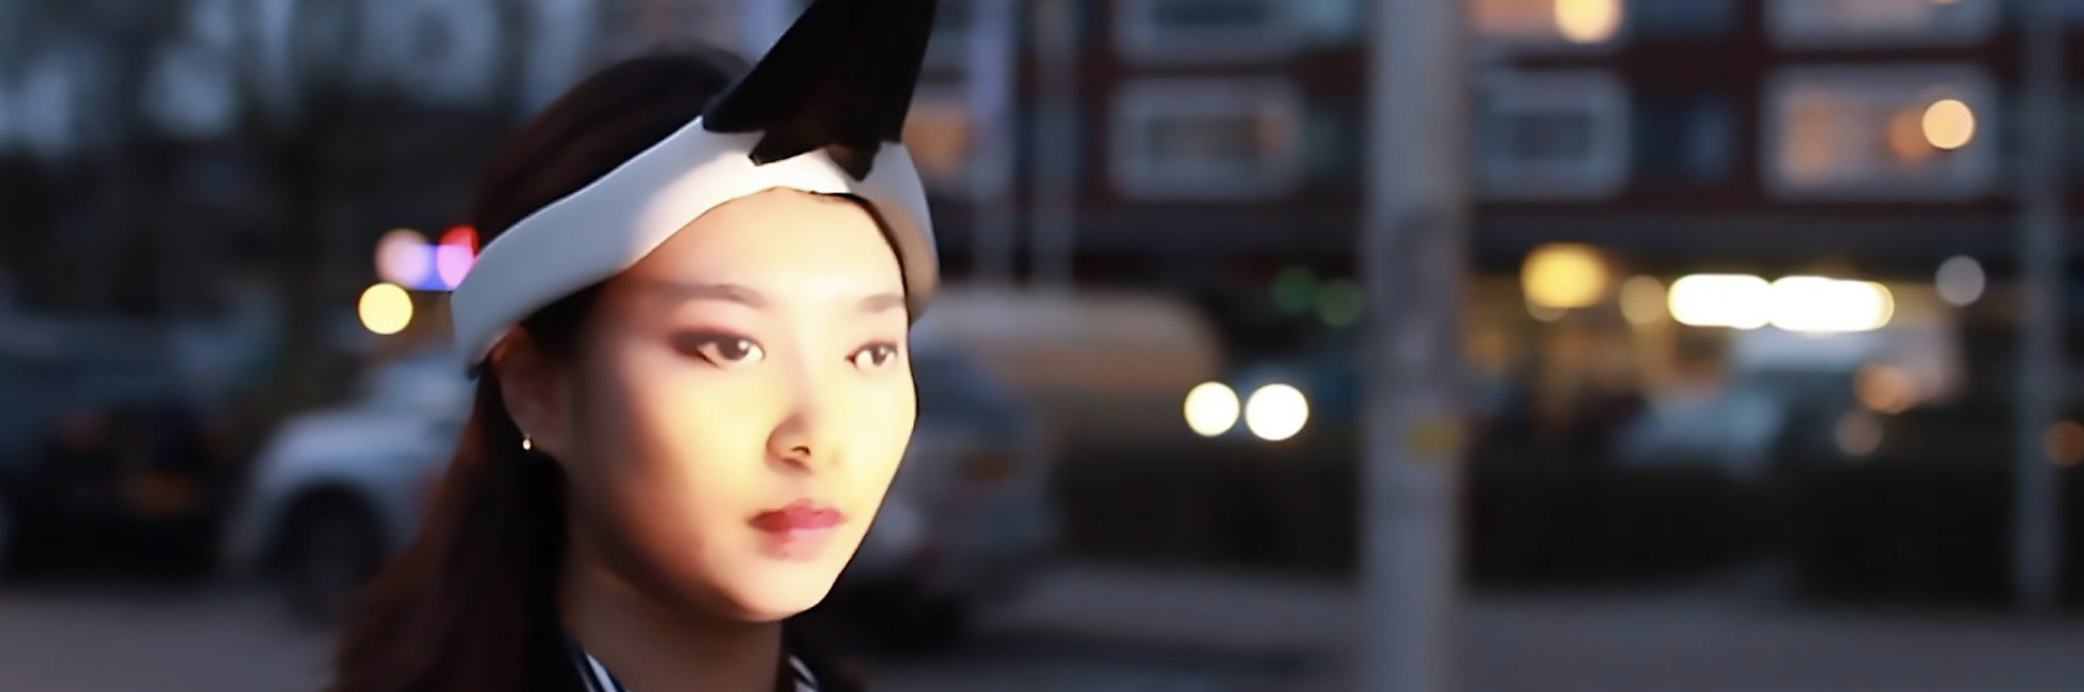
Wearable Face Projector:
This headpiece projects another face onto the face of the wearer so that they cannot be identified. This one is obviously an art piece not a practical suggestion but the idea and outcome are both very interesting.
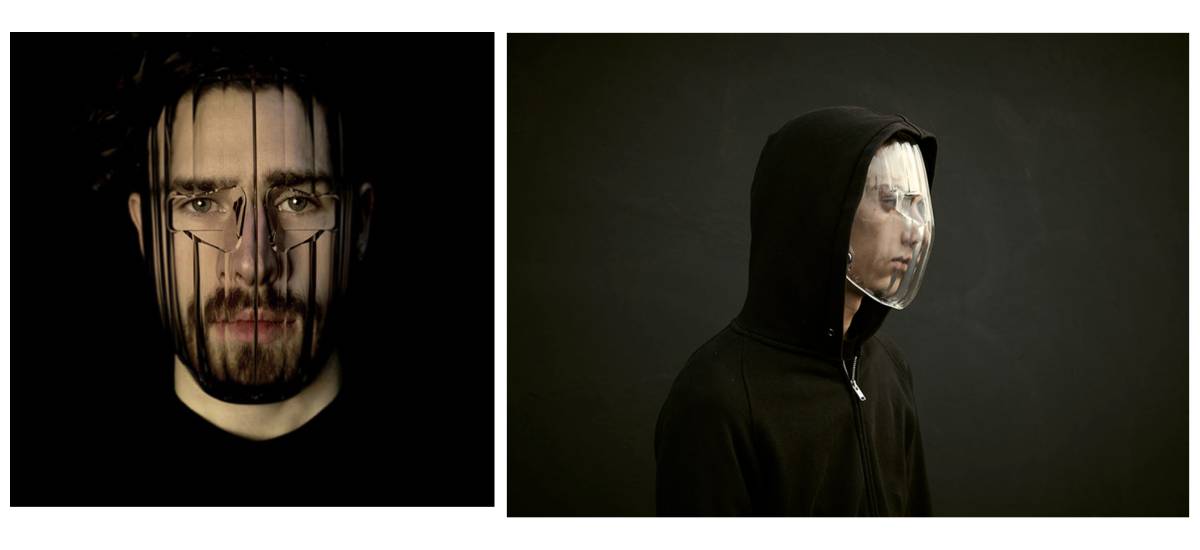
Surveillance Exclusion Mask:
This mask uses lens shaping to distort the face so it is unrecognisable for FR but still visible to people around for communication. I really like the method of distortion used here and the mask could be practical if not every day.
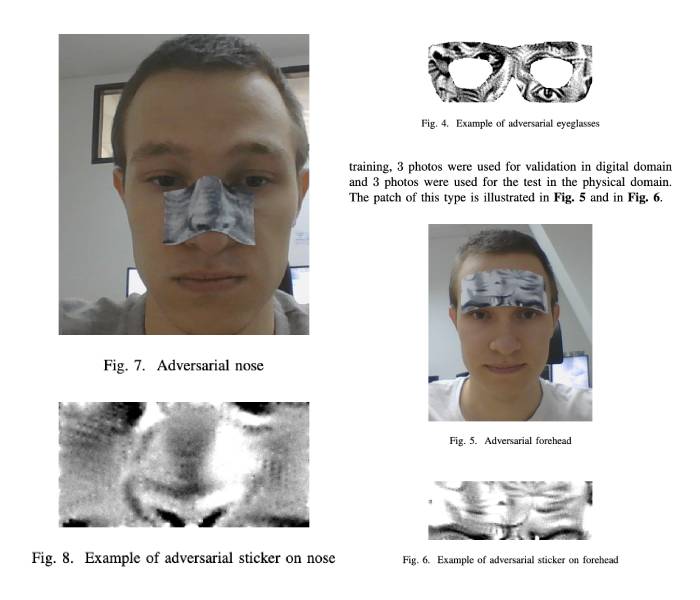
Adversarial Patches:
Adversarial patches work by tricking FR systems into either identifying a person as something else or by not recognising the presence of a person at all. They can be different sizes and patterns making them quite exciting for practical everyday application, on clothing primarily.

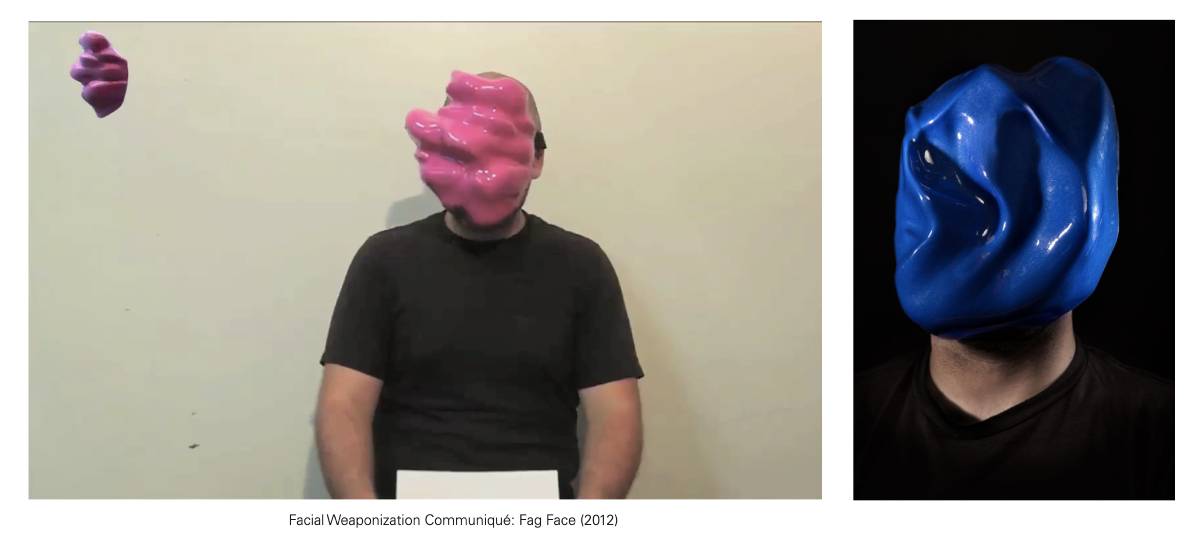
Facial Weaponization Suite:
This project by Zach Blas consists of a selection of ‘collective masks’ made using data from groups of participants. It is an interesting piece about the implications and biases of FR.
I also did a bit of reading about the politics and ethics of the proliferation of facial recognition, some article and extracts I would recommend are:
https://www.ssoar.info/ssoar/bitstream/handle/document/20067/ssoar-surveillance-2004-23-introna_et_al-picturing_algorithmic_surveillance_the_politics.pdf?sequence=1&isAllowed=y&lnkname=ssoar-surveillance-2004-23-introna_et_al-picturing_algorithmic_surveillance_the_politics.pdf
https://ojs.library.queensu.ca/index.php/surveillance-and-society/article/view/3343/3305
https://books.google.es/books?hl=en&lr=&id=KgUJ_5zoNasC&oi=fnd&pg=PP10&dq=facial+recognition+surveillance&ots=nDmDQqI2uP&sig=15YGJepOQaD33l8Hbd-uvKWmvRA&redir_esc=y#v=onepage&q=facial%20recognition%20surveillance&f=false
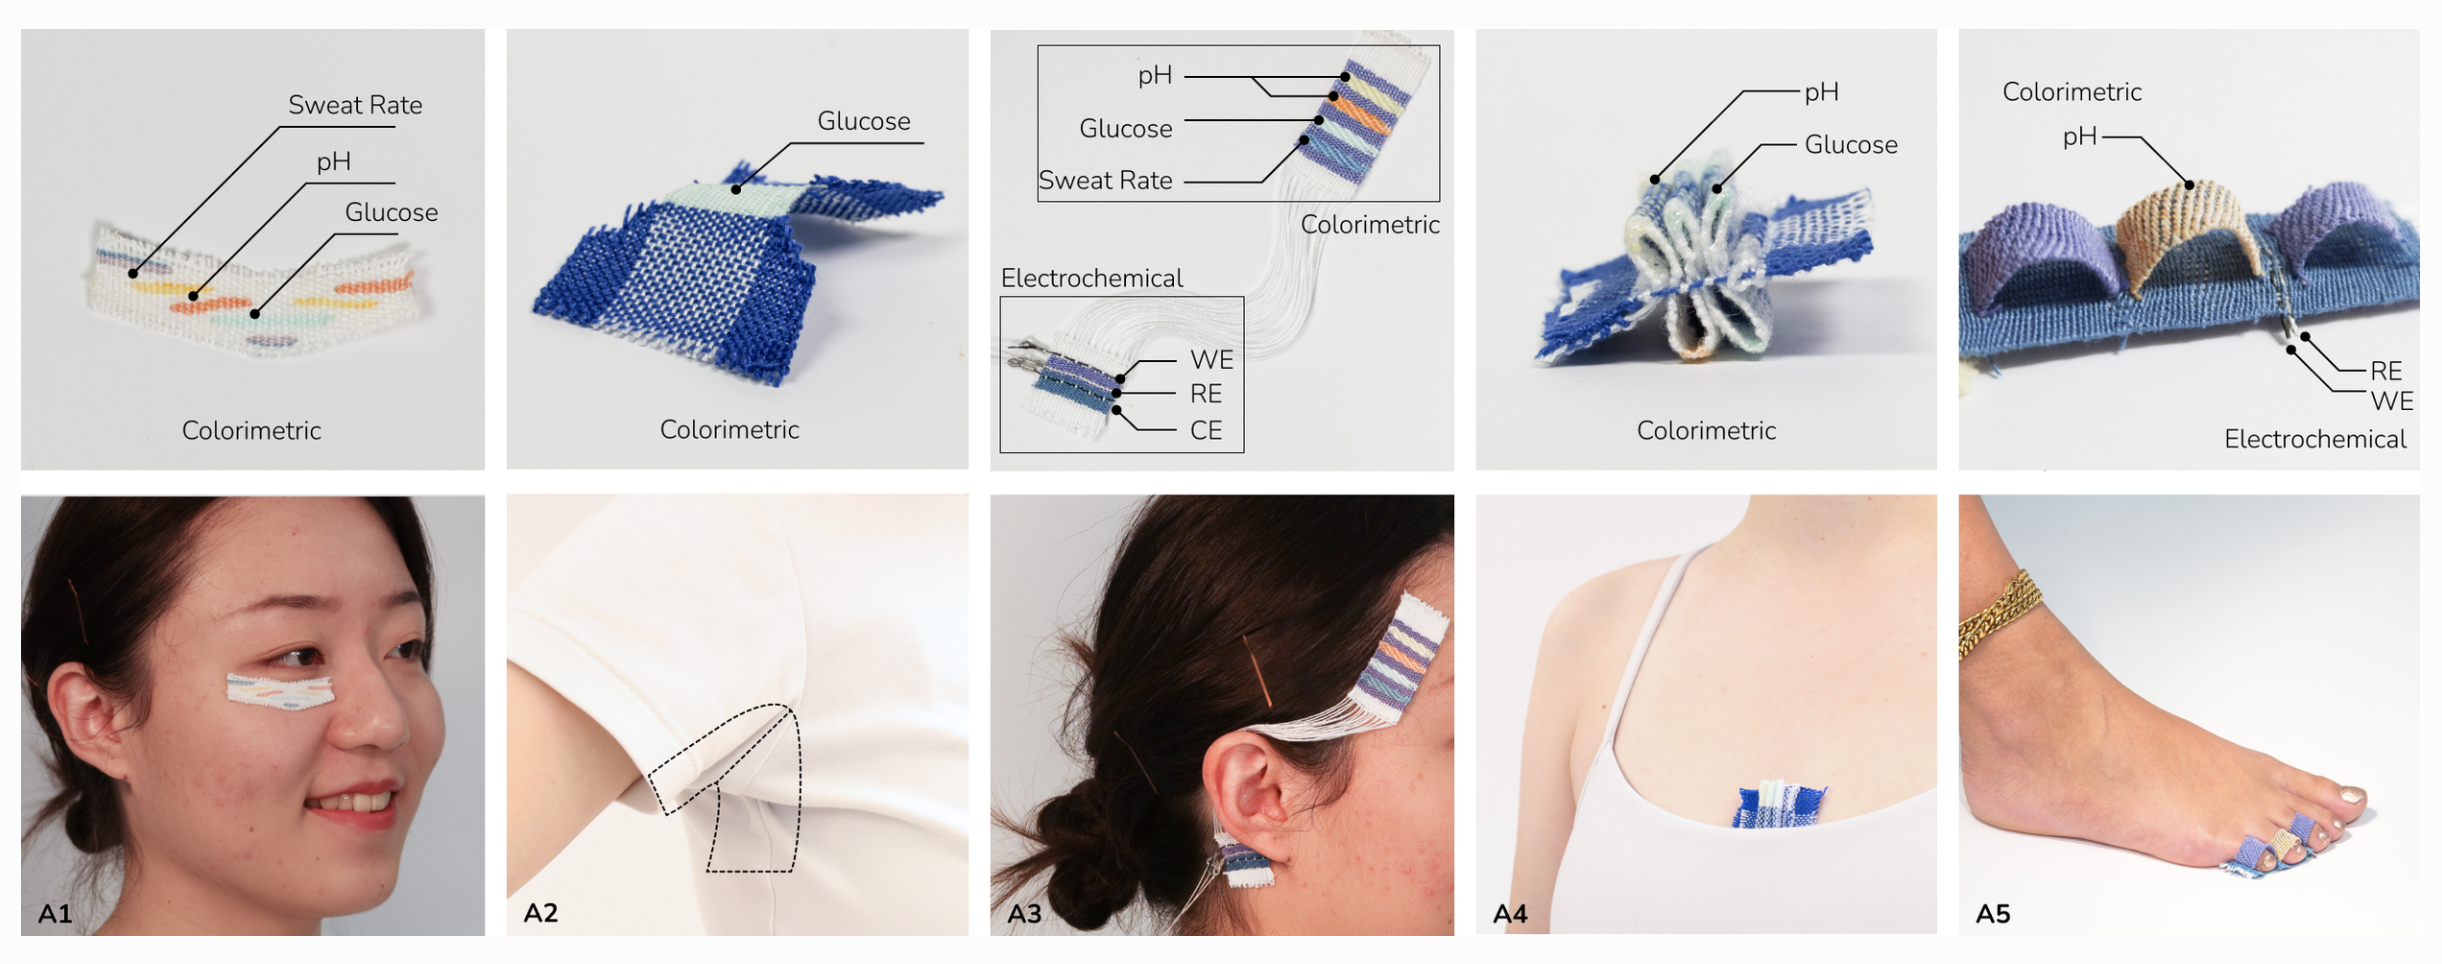
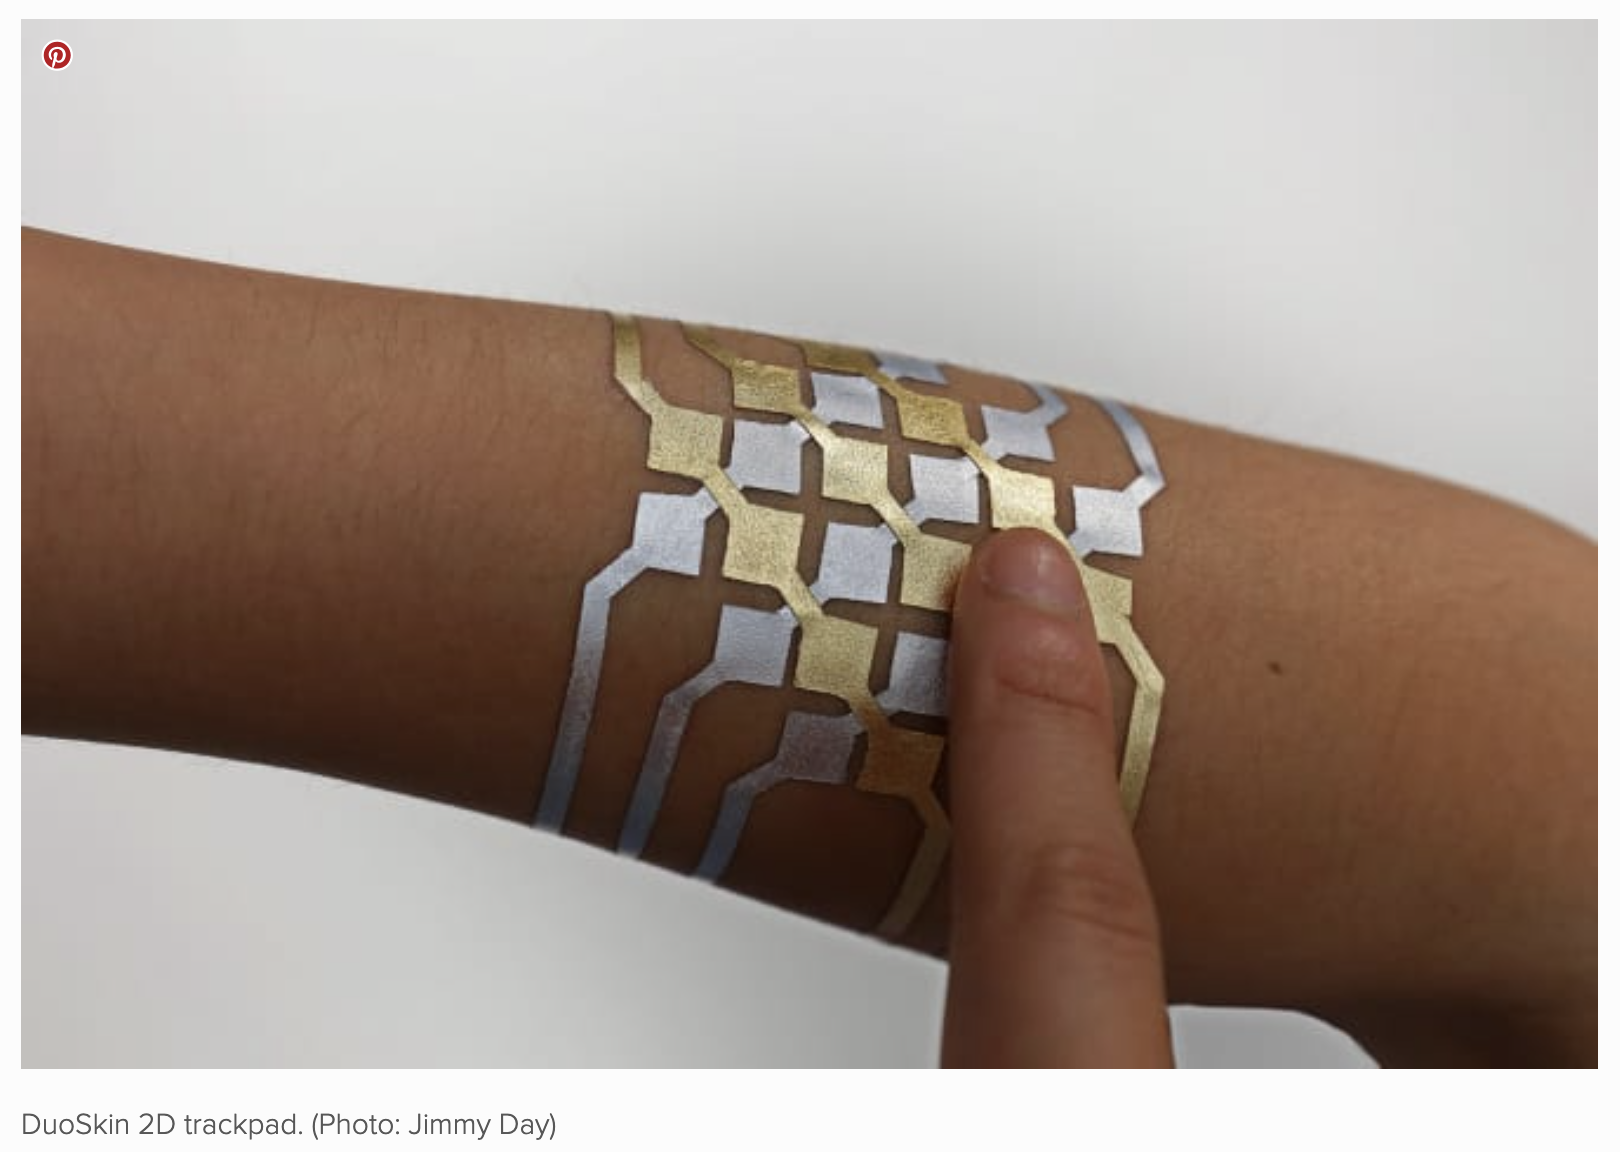
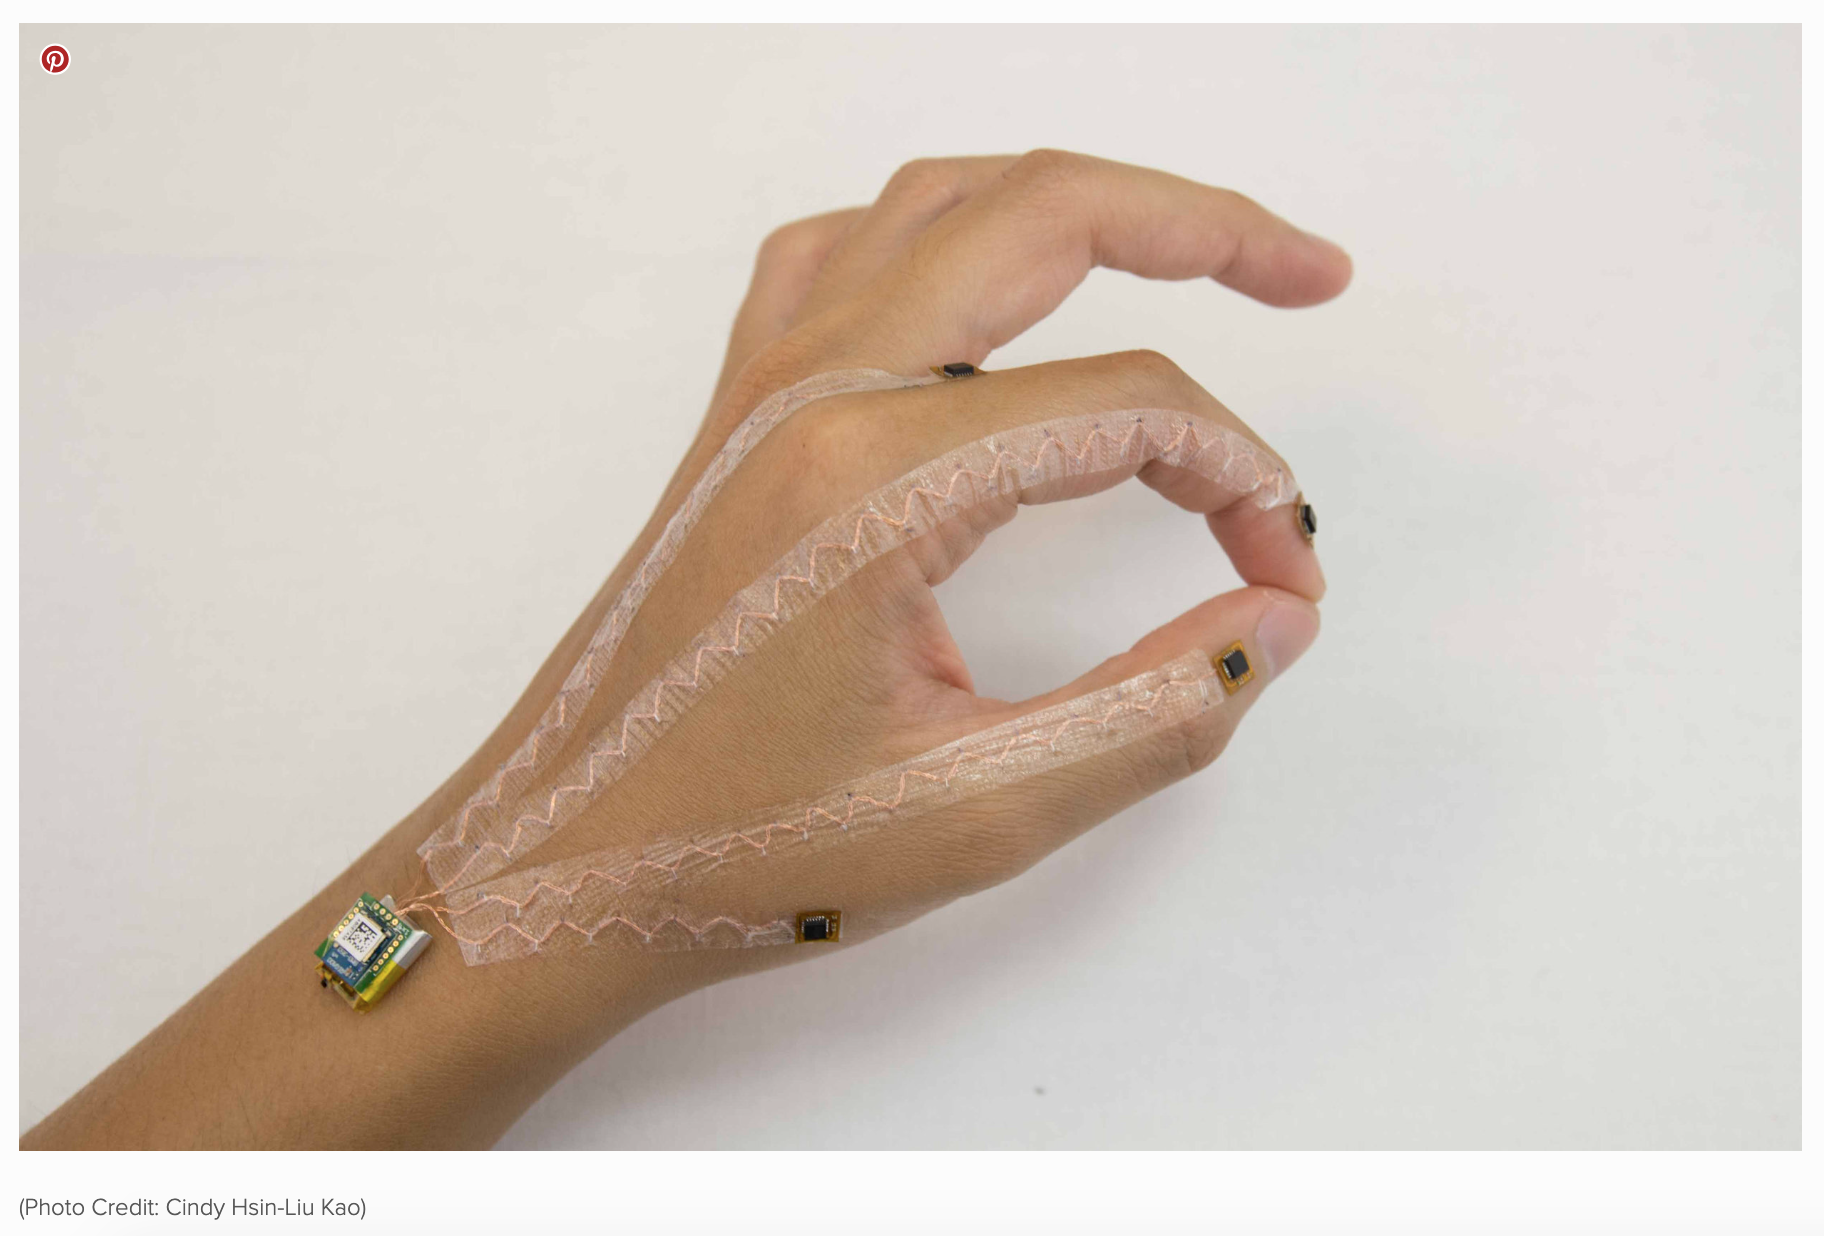
Skin Electronics Examples:
To help with this week I also had a look at some of the projects by Hybrid Body Lab. Some of my favourites were:
Tools
Process and
To start to narrow down these different approaches to AFR, I did a mind map of the different ways that they worked and how they could be combined.

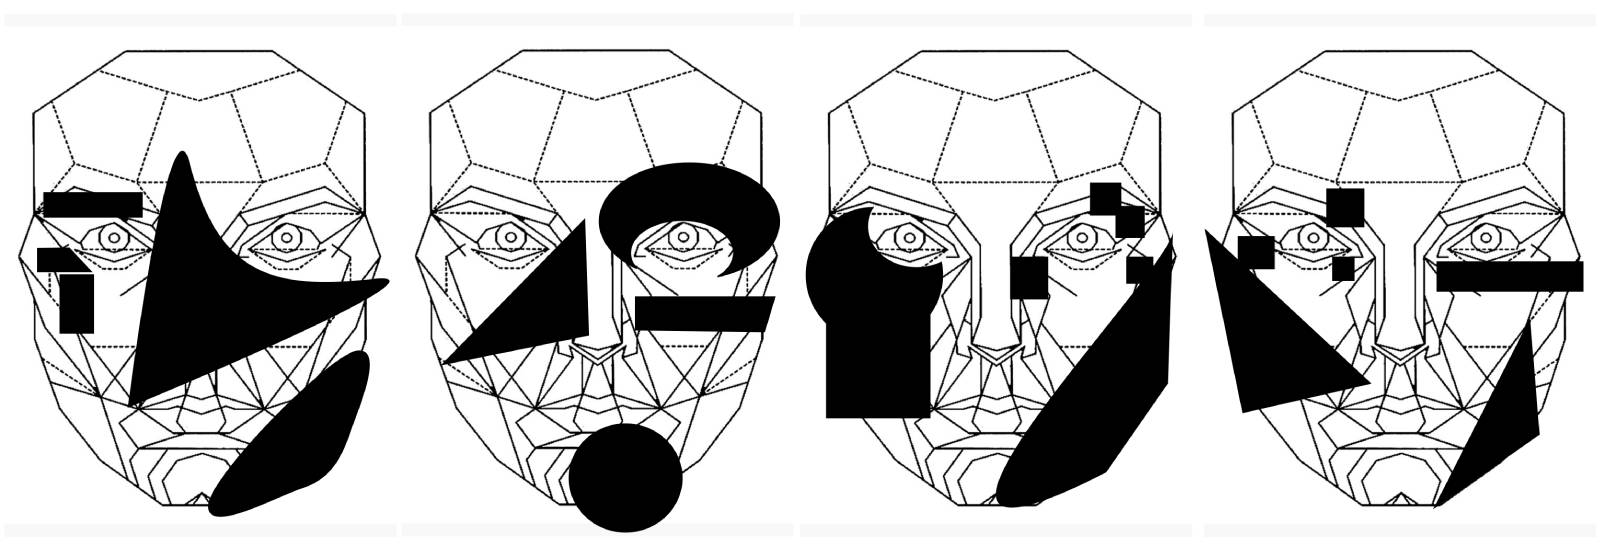
After this, I did some very quick sketches inspired by the shapes used in Dazzle Makeup with a range of coverages of the face.

I also did some quick collages on Inkscape with a similar idea of basic graphic patches covering parts of the face. Doing these collages in such a 2D way was really useful I think as it made it clear that what I was really trying to do was distort the shadows and distances between parts of the face which was very difficult with just a 2D drawing.
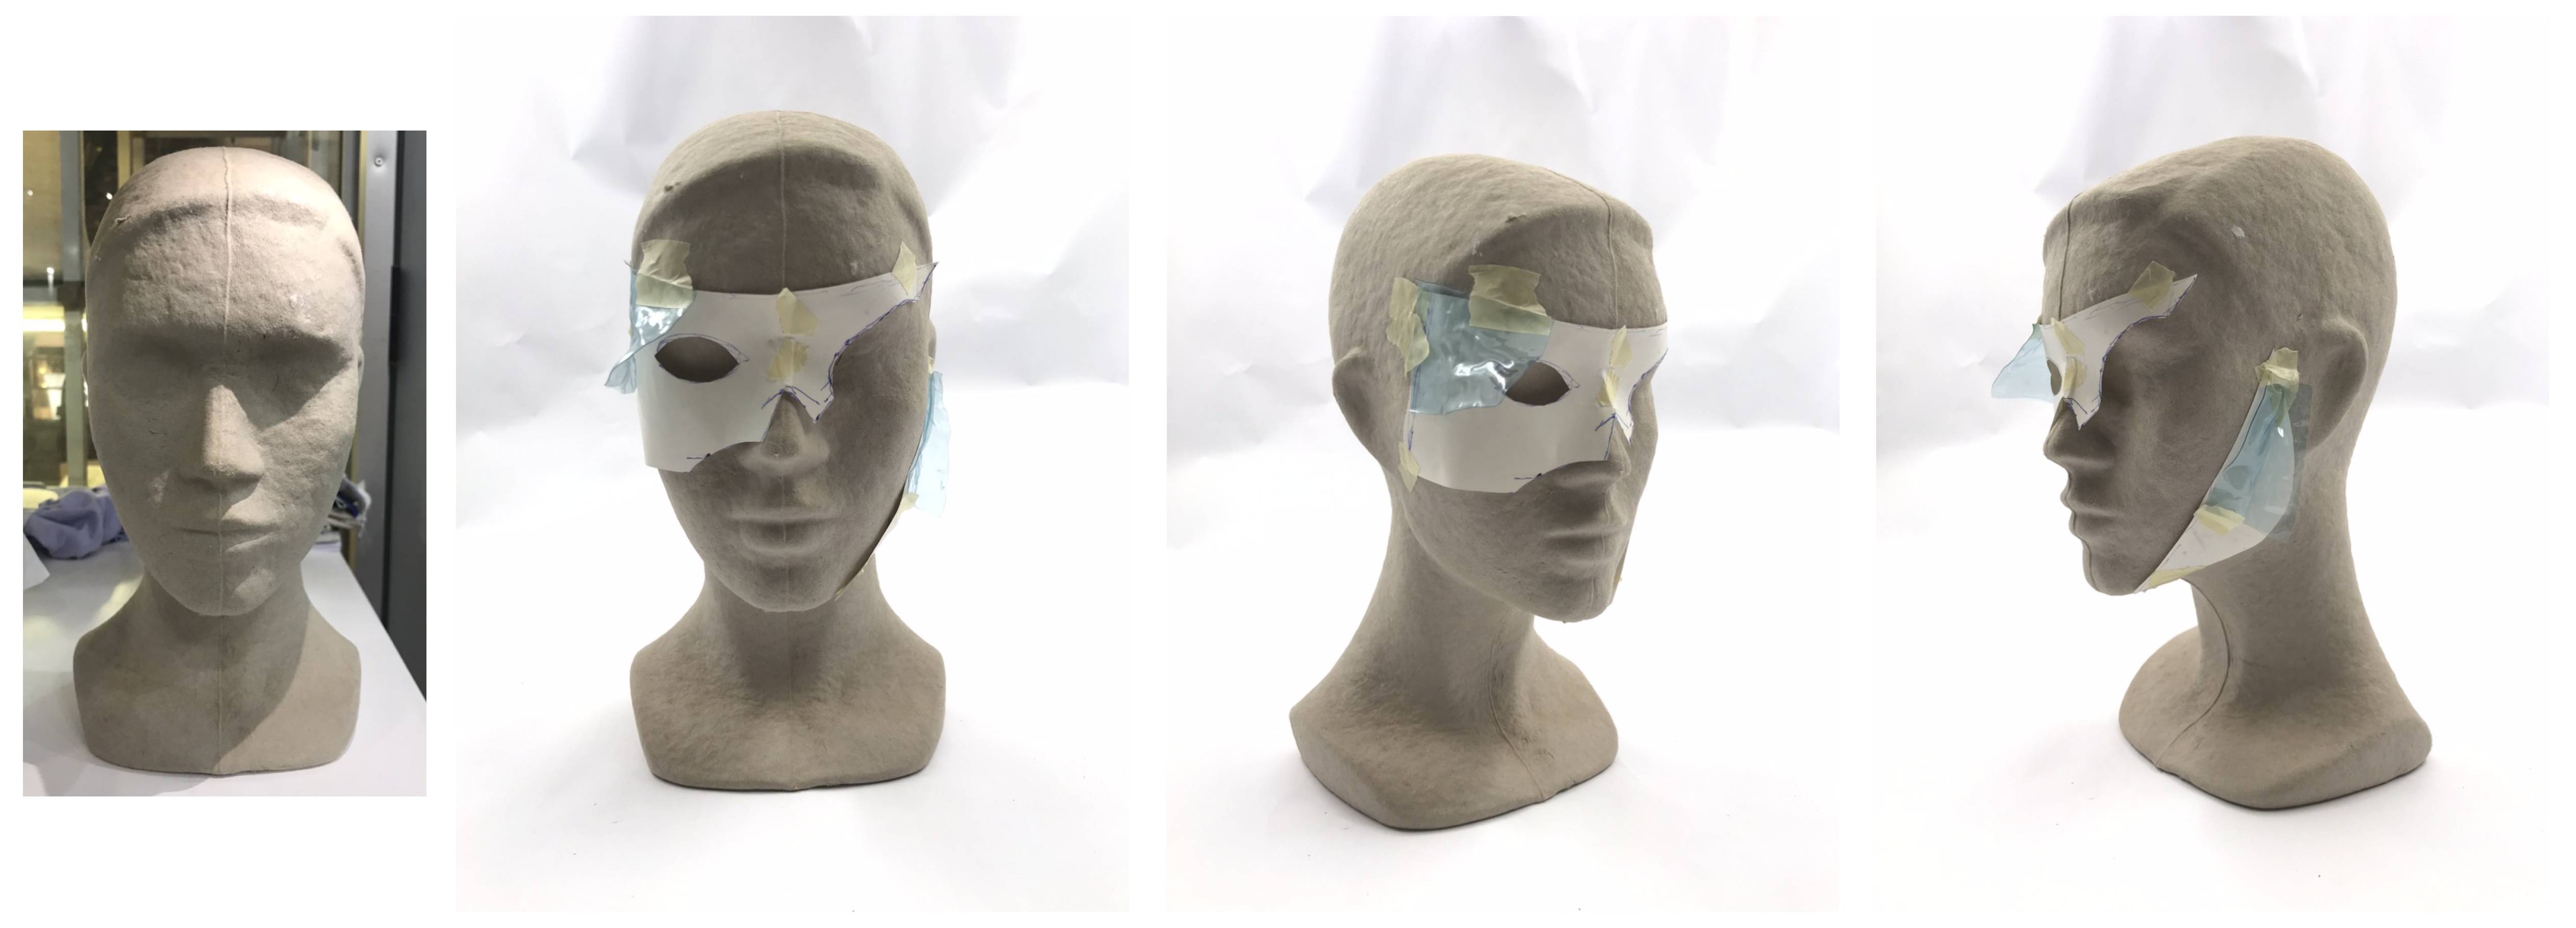
Taking this idea of shadow distortion as my starting point, I used a torch to light a model of a head that we had in lab from different angles to see the different shapes the shadows made each time. This did really change the way that certain features were accentuated, probable not enough to have any bearing on FR but I thought it would be a good place to start the design.
From here, I started playing around with different shaped patches and materials for the mask. I used paper here but I was envisioning a dark coloured sticker. I also tried incorporating some plastic shapes as I thought these could be used with LEDs to help disperse light over more of the face.

Shape Explorations
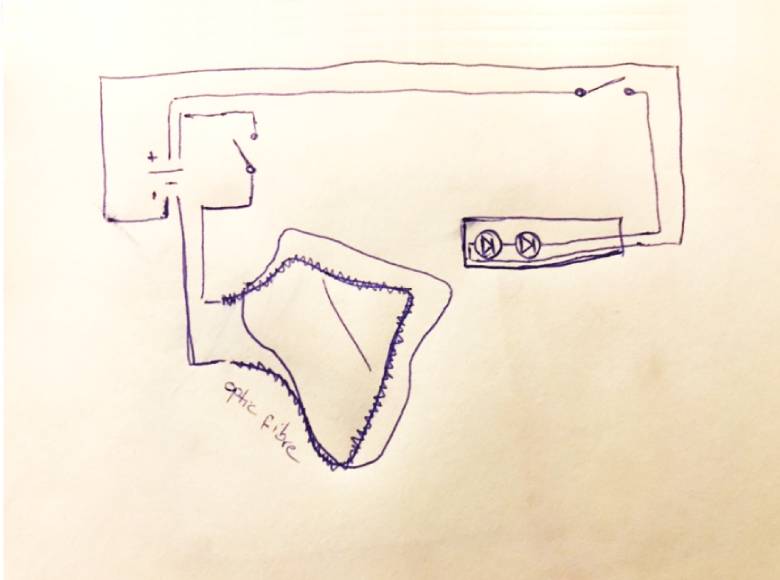
I came up with 3 main options that I wanted to explore more from this experimentation. The first one was inspired by the shadow form shown below and included a shaded patch above one eye with 2 LEDs in and another patch below the other eye with a plastic screen to disperse light from a nOOd.

Here is a quick drawing of how I would set up the circuit needed for this.
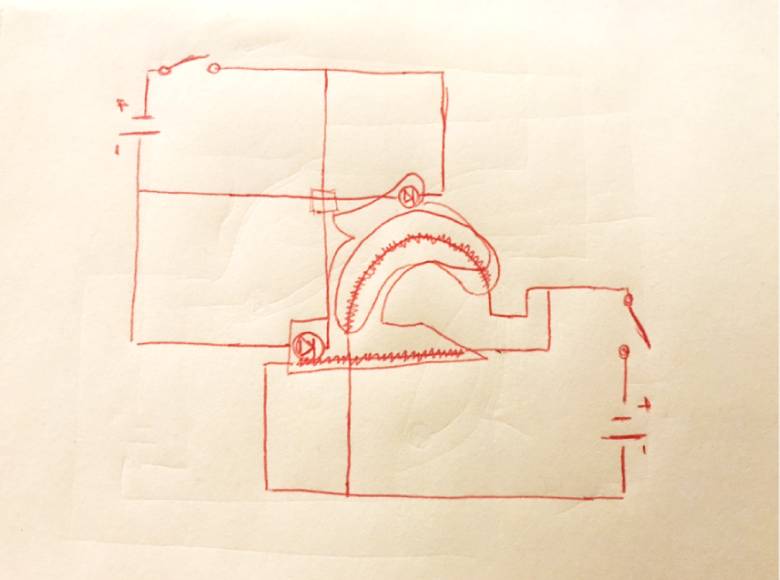
The second idea was based on a different shadow form from my photos and had a more superhero mask appearance with an added shaded patch along one side of the jawline. I also added some plastic shaped to this one to help visualise where I would want to place lights and how I would want them to project out from the face.
I drew a circuit for this one with 2 nOOds, one on each patch, and 3 LEDs, in this drawing, the 2 patched have separate switches but they could be combined into one easily.

The final idea I trialled was a much smaller mask that only covered the nose, part of ione eye socket and a section of one cheek. This one would only be able to help with AFR with a lot of help from the electronics as it left so much of the face uncovered but I thought it was really aesthetically interesting.

In the circuit for this one, I was picturing 2 nOOds again over the nose and above the lip with 2 LEDs, these would be very close to the eyes however this could work with infrared as these are visible to the human eye so it would be comfortable.
Material Tests
I did a very quick test with the 2 LEDs from a Neopixel, some dark card and some tape to see how this would work as a sticker composition. It stuck to my arm very well but neither the tape or the card allowed for much movement which wouldn’t be very well suited to use on the face. The Neopixels were also quite bulky.

I also tried using an infrared LED for the first time as these would be ideal for use on the mask as they would help to disrupt the FR systems but not bother the eyes of the wearer as you can’t see anything being emitted from them from that angle.
Prototype 1
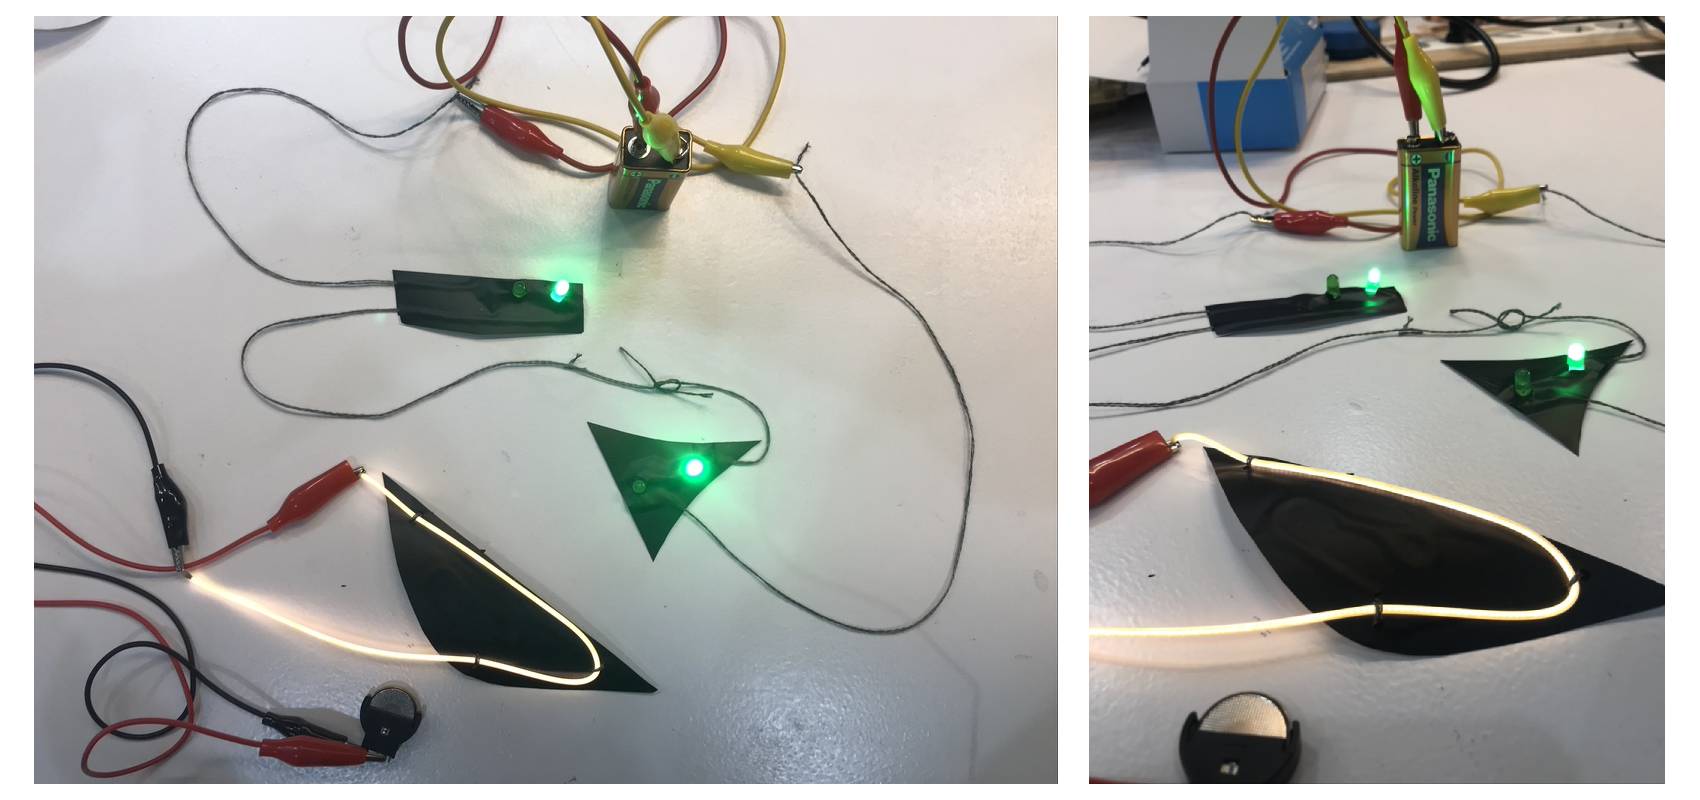
For next stage of prototyping, I settled on a combination of the 1st mask with the jaw piece from the second one added too. I cut these out of black sticker vinyl and added 4 LEDs with some silver tape so I could test the circuits.

I joined the bits of tape from the 2 patches with some conductive thread and attached them to a 3V battery with some crocodile clips. For some reason this only turned on 2 of the LEDs, I think I may have burnt the other 2 when testing them earlier. I also tested joining the nOOD to a 3V battery.
Prototype 2
I also tried to make a glasses like version of the patches that would be reuse-able. I made this with some wire and cardboard wrapped in strips of tape. For a first rapid prototype, I was quite happy with this but the fit on the face wasn’t perfect which made it quite unsecure.
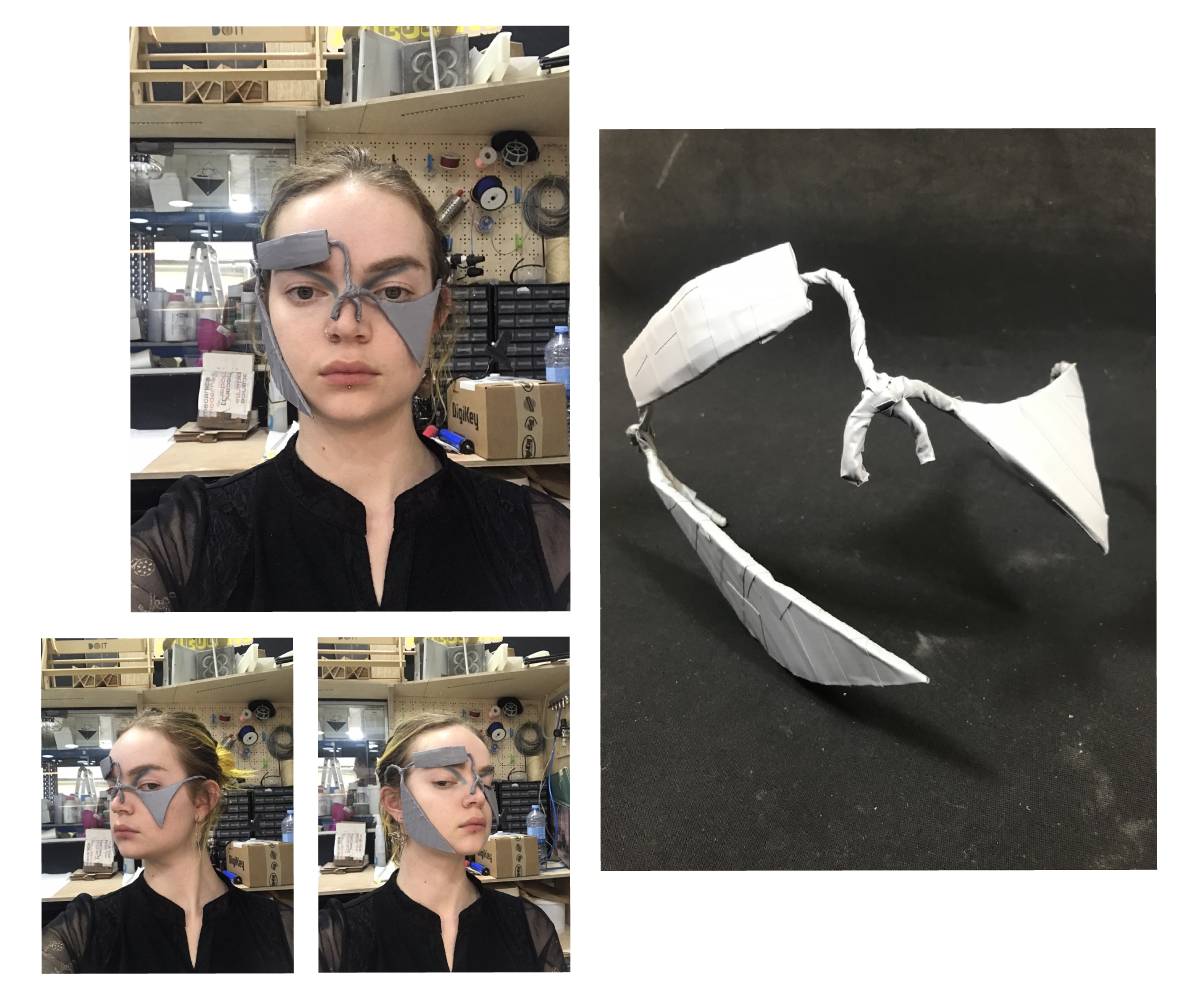
I would have like to continue developing this a bit as it may have been more useful as it would be easier to take on and off and meant that you could use it until the LEDs ran out or maybe even after rather than just one use like with the stickers.
Final Prototype
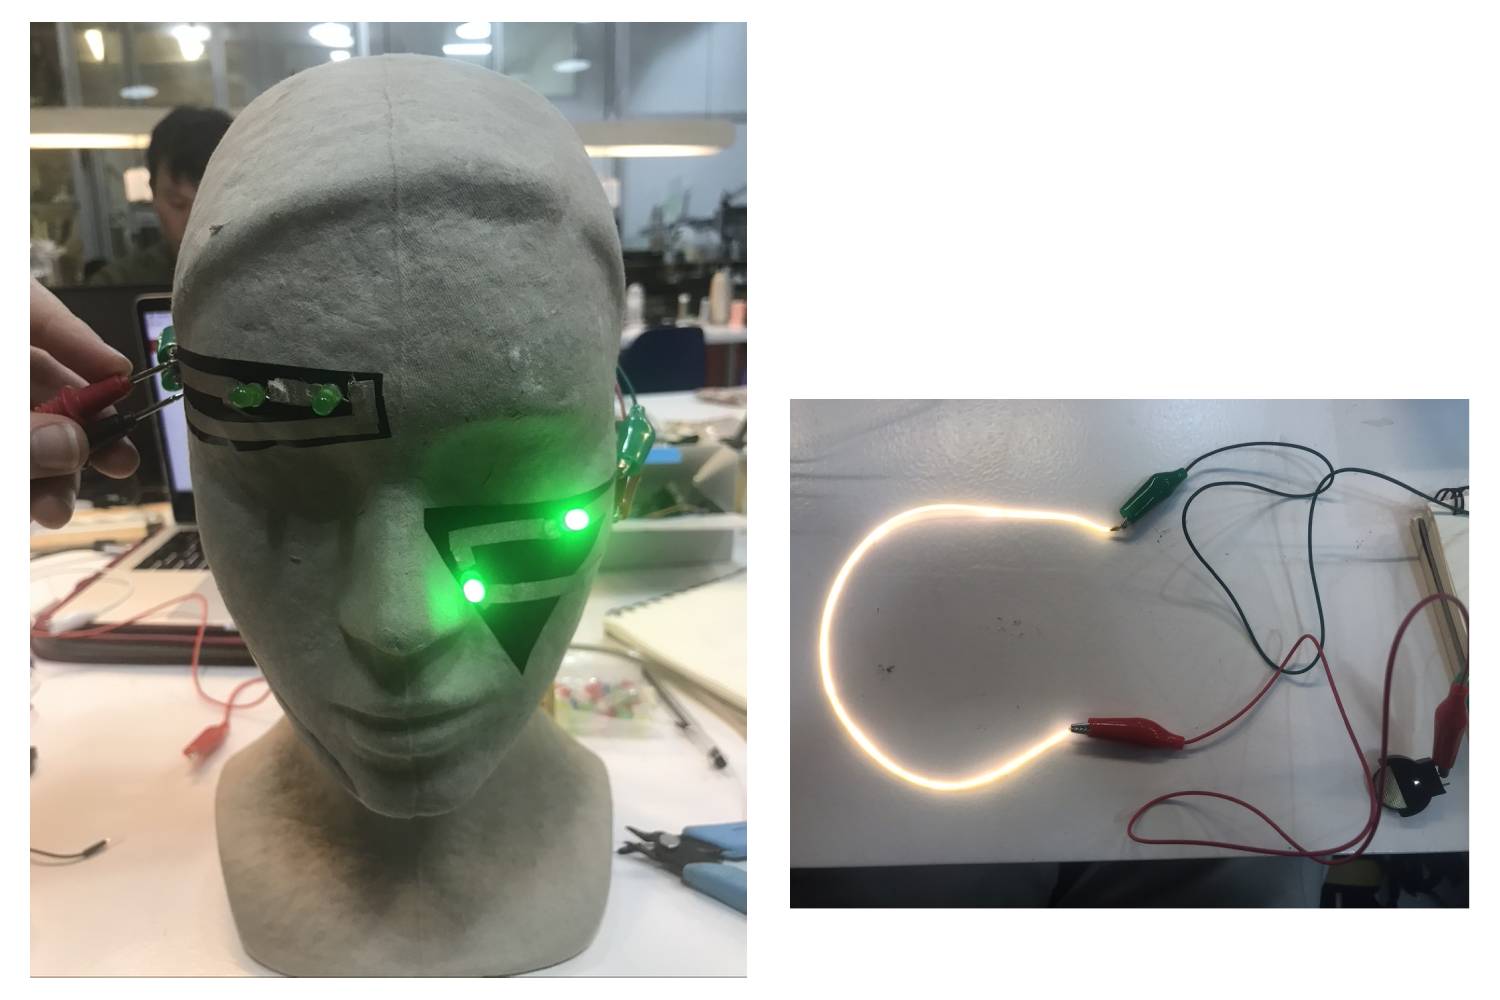
Due to time restraints, I decided to finish this week by continuing with the sticker version. To hide the circuit, I used 2 layer of the vinyl with hole cut in the top layer for the LEDs to poke through and joined them with conductive thread that was sandwiched in between the 2 layers. For the nOOd, I only used one layer and added a few tac stitches to secure it.

When I attached these to the batteries, only 2 of the LEDs lit up again which I think is probably due to them being burnt. Apart from this, the circuit worked well and was relatively simple so you wouldn’t have to wear too many wires.
Although the circuit was simple when it was just on the table, I hadn’t factored in some way of counteracting the pull from the weigh of the batteries on the conductive thread. This meant that the stickers weren’t sure secure at the edges and I would need to work on this if I was to take the project further.

Overall however, I was quite happy with this result. To take it further, I would have like to test it out with some actual FR softwares and have used the infrared LEDs.