Deliverables
Steps
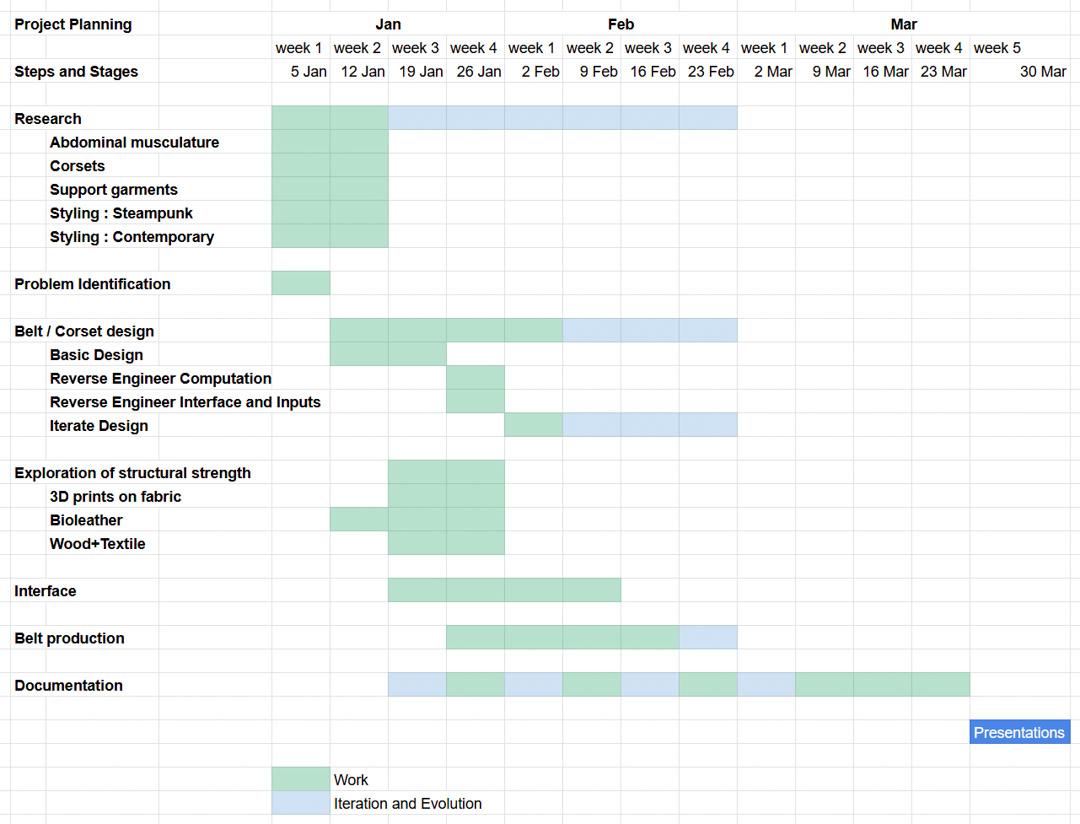
To achieve the end goals, the following steps and milestones will need to be crossed. These will also evolve in the course of this project.
Research :
- Into the physiological / anatomical strutures that the corset will be replacing/replicating
- Into Corsets, support garments, belts
- For stylisation, moodboards and research into Contemporary styles as well as my preference of Steampunk
Problem Identification / Definition :
- The issues with the current belt (✅DONE, Concept - WHY)
Design and Prototyping :
My approach will be to tackle this from both ends.
- Design a garment that works for me and parametrize it to be able to create variants
- Design a system that generates the garment based on input parameters and test it to get the right design
In reality, I suspect it will be a mix of the two, with aspects of the design being created and parametrized or the computation reverse engineered, then the design being reworked based on the computational output, and back and forth.
Step 1 : Study the musculature and imitate it in external structure from scratch, not taking reference of the existing garments.
Step 2 : Test and explore
- biomaterial for inserts, ribs, stiffening, as well as primary material
- 3d printing on fabric and wood+textile to understand structure
Once 1 and 2 are done, the rest of the design and process will have clarity in the details, and will flow from there.
Generator :
Once a sense of what the design looks like is in place, the generator will need to be created.
It will use one or both of
- p5.js
- Grasshopper
to take in inputs, dimensions, zones of strength/reinforcements, etc to give outputs which my include
- general cutting line of the garment
- shapes for reinforcement and strength that may be grown/crafted/lasercut
- locations of attachments and addons - buckles, holes, hooks, etc
Production :
Once the prototype and generator are in place, the final garment will be produced through the system, and a workflow will be established to make it repeatable atleast, and scalable as well.
Essentially
Research + Design → Prototype
Prototype + Generator → Production
GANTT
Support required
-
Biomaterials : This is an area I've only explored during Fabricademy, so here I may need help in working out appropriate recipes to get the required strength/flexibility etc properties. I intend to use both crafted materials based on Gelatin or Agar, as well as grown Bacterial Bioleather from Kombucha
-
Computational : Since I intend to use Grasshopper or Processing to create the generator, I may need help here - not for the software but more for working out the structures that need to be computed. However, this one I am fairly confident.
-
Documentation : I struggle with decent pictures, and video is anathema to me. This and the storytelling may be the toughest for me, since I can't science may way out of it.
BoM bill of materials
Draft / Approximation
Tools
Digital Fabrication - Lasercutter - 3D printer
Kombucha Bioleather growing - Trays - Covers
Crafted materials - Stove - Weighing scale - Molds - Basic tools - mixing cups, spatulae, etc
Textile tools - Needles - Snips
| Category | Item | Specification / Notes | Qty | Price |
|---|---|---|---|---|
| 1. Raw Materials – Kombucha Leather | ||||
| Culture | SCOBY starter | Mature kombucha culture | — | — |
| Sugars | White sugar / jaggery | Fermentation substrate | — | — |
| Tea | Black / green tea leaves | No flavour oils | — | — |
| Liquids | Filtered water | Chlorine-free | — | — |
| Reinforcement | Open-weave fabric / cheesecloth | Embedded strength layer | — | — |
| Conditioning | Glycerin | Plasticiser | — | — |
| Conditioning | Natural oils / wax | Final flexibility / waterproofing | — | — |
| 2. Kombucha Leather Growing Equipment | ||||
| Containers | Shallow fermentation trays | Food-grade plastic / glass | 2–4 | — |
| Covers | Breathable cloth covers | Muslin / cotton | — | — |
| Tools | pH strips / meter | For monitoring acidity | — | — |
| Environment | Drying rack / flat boards | For sheet curing | — | — |
| Sterilization | Spray bottle + alcohol | Mold control | — | — |
| 3. Bio-Resin Stiffeners (Structural Inserts) | ||||
| Polymer | Gelatin / Agar / Bio-resin base | For rigid panels | — | — |
| Plasticiser | Glycerin | Controls brittleness | — | — |
| Reinforcement | Cotton fabric / jute | Embedded fibre | — | — |
| Molds | Silicone molds / laser-cut trays | Corset rib geometry | — | — |
| 4. 3D Printing – Testing Phase | ||||
| Filament | PLA / TPU filament | Flexible + rigid testing | — | — |
| 5. 3D Printed Components – Final Build | ||||
| Filament | TPU (preferred) | Flexible load-bearing parts | — | — |
| Filament | PLA / PETG | Rigid anchor parts | — | — |
| Parts | Structural ribs / boning | Replace metal stays | — | — |
| Parts | Lacing eyelets / guides | Integrated channels | — | — |
| Parts | Back spine connectors | Modular locking spine | — | — |
| 6. Closures & Attachments | ||||
| Fasteners | Velcro strips | Sew-on / adhesive backed | — | — |
| Hardware | Buckles / sliders | Side & front closure | — | — |
| Hardware | Metal / bio-plastic buttons | Decorative + locking | — | — |
| Hardware | Clips / snap buttons | Emergency release | — | — |
| Thread | Heavy duty thread | Nylon / polyester | — | — |
| Tools | Needles / hand sewing tools | Manual finishing | — | — |
| 7. Assembly & Fabrication Tools | ||||
| Bonding | Bio-adhesive / contact cement | Kombucha-safe bonding | — | — |
| Pressing | Weights / clamps | Panel curing | — | — |
| Finishing | Edge burnisher / wax | Edge sealing | — | — |
Slide show, Story and Script
Midterm Slideshow
Find the other slideshows, story and video script, alongwith thematics and colours, on the Story Development page here
Fabrication files
The Fabrication files where needed are on the respective Process pages.