2. Digital bodies
Is it always going to be this way?
Am I always going to come away from every Fabricademy session in awe, energized... overwhelmed? The student introduction session felt like a Fab Academy Final Presentation to me. My Fabricademy compatriots are so accomplished and talented!!! As I described to a friend...
"It is good to be surrounded by stars...maybe their light will make me shine too!"
 Then there was Anastasia-sensei's lecture. The more she spoke the more my heart raced. And when the session ended at 1:00AM in Japan...I was too excited to sleep! Thoughts and ideas were popping in my head like fireworks.
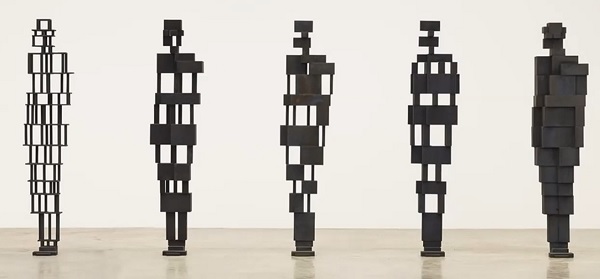
When I was an undergraduate, I studied Art History. I will never forget my first assignment when we were asked to write a 2-page paper on a Giocommetti sculpture at the Philadelphia Art Museum.
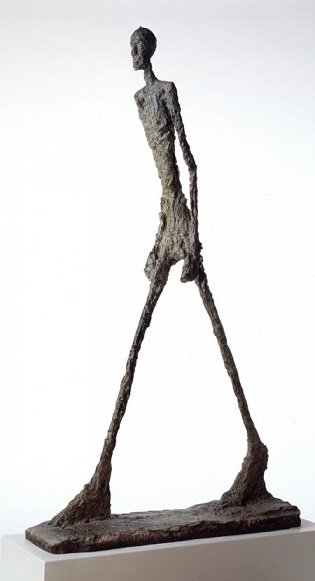
"2 pages??" I said to myself "It's just a tiny stick figure sculpture of a man!!!". I struggle do come up with 10 sentences to say about the sculpture, let alone 2 full pages. My first attempt to look at art with an Art Historical eye was a half-page paper where I described the obvious physical appearance of the sculpture.
"It is 40cm tall. It is made of bronze. The color is dark. The subject matter is a man who has been abstracted down to a stick figure...blah, blah, blah"
Thankfully, by the end of the first year...I did learn to 'see art'. I learned to look beyond the physical appearance...and understand such things as the artist's technical mastery and intent, the work's message, the cultural and historical context...and then finally, be able to express my own perspective and thoughts on the given piece of art.
It has been a long time since i allowed myself to contemplate...philosophically...about things. My daily life seems to insist that I look at everything with a pragmatic, technical, efficient, matter-of-fact mind. Getting 'philosophical' seems like a luxury I could not afford...maybe didn't seem necessary. How boring and sad right?
But hearing Anastasia-sensei's lecture...and observing how my amazing classmates look and think deeply about what they do...a dusty door to a closet in my mind opened...and a flood of thoughts came pouring out. I understand now that I must approach Fabricademy very differently from how I approached Fab Academy. For me...Fabricadmy will not be so much about gathering technical skills and knowledge...but a welcomed opportunity to research and consider...HOW and WHY I fabricate.
Think deeply...and act with meaningful intent.
Research & Ideation > The Body
I felt I had to watch Anastasia-sensei's lecture as second time...before I could move forward with this week's assignment. Before the tackle the pragmatic aspects for the week...to digitally make and fabricate a body...I really wanted to feel that I had a good grasp for myself of what BODY means.
Lecture Review
Highlights from Anastasia-sensei lecture as follows...
- The BODY has been represented and represented differently throughout history
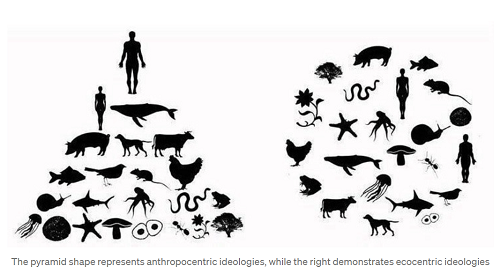
- Fabricademy > seeks to move away from Anthropocentric perspective
- Fashion Designer > use figure as canvas for design
- Mass Customization > digital tailor...highly customizable...accessible by everyone
- Move away from Ready-Made clothes and Sizing Standards
- Democratization of Clothing...subverting class distinction
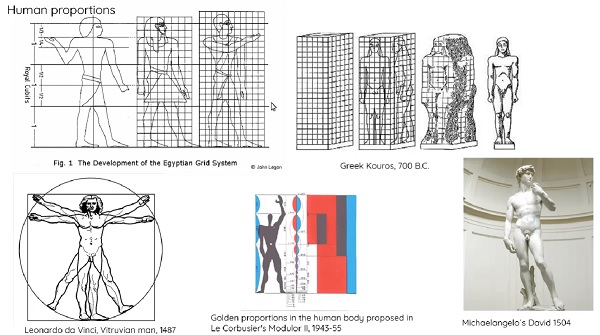
- The human perception of the BODY has changed throughout the year
- Egyptians > Rigid 2D Grid, Greek > 3D, DaVinci > ideal proportions, Le Corbusier > fascist
- Principles of Design: balance, proportion, rhythm, emphasis, and unity
- Anthropometry > measuring human individuals...for understanding human physical variation...a scientific tool...useful data for industrial design and ergonomics
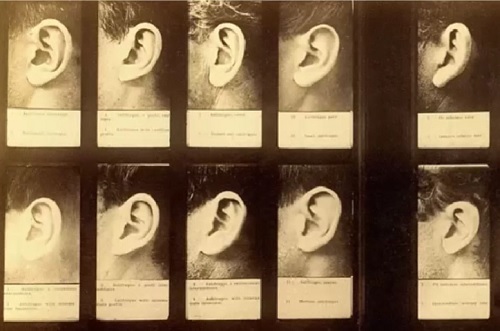
- Stereotypes of Human Body > changing over the years.
- What will be the representation of the human body in the future?
- Digital as a fashion gimmick? representation tool (visual only)? design tool? fabrication tool?
- Digital Fashion > Fabricant...Clothes for Avatars, NFTs
Fabricademy...looks at physical and digital 'Body' from a multi-disciplinary perspective
- NOT...the BODY from a Technical perspective or as a Tool for the designer
- RATHER...the body from an artistic, scientific, political perspective
- Medici Effect = intersection of ideas, concepts & culture
- Reminded me of MIT Building 20...the forebearers of Media Lab. Physical 'intersection' of people (and ideas) in the maze-like hallways of the temporary building.
"...the building was notoriously hard to navigate. This would often lead occupants astray into different offices and laboratories and provide chance opportunities for intellectual discussion. These informal hallway discussions would often lead to cross-departmental collaboration on new projects."
- Fabricademy > intersection of diverse cultures, disciplines & industries...for Collaborative Innovation
Objective for the week...seek to define BODY, DIGITAL...and DIGITAL Culture
Looking to Art for Inspiration
- Technology as a tool for art creation...body representation
- Tool limitations should not limit the creative process
- Technology can extend the possibility of artistic creation
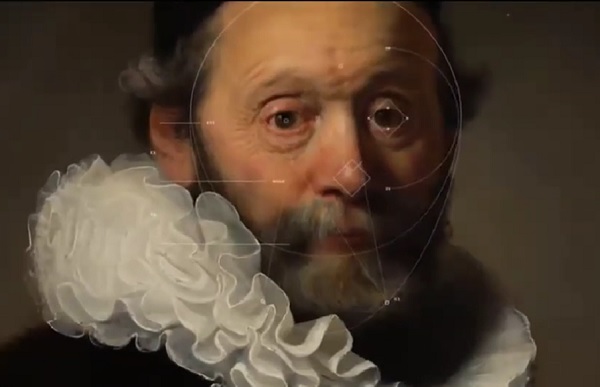
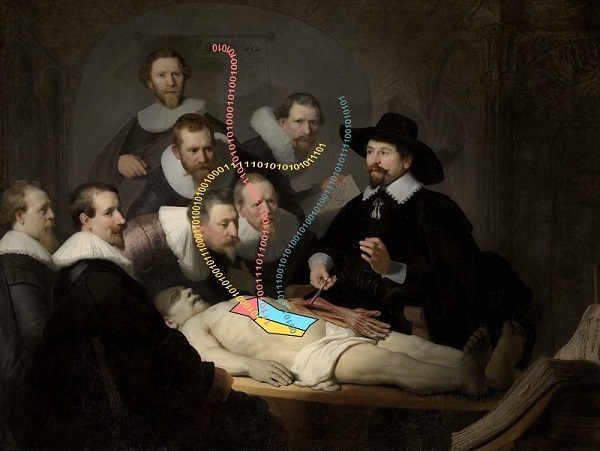
The Next Rembrandt Project
- The body heavily abstracted into geometric form
- Body as a place...not an object
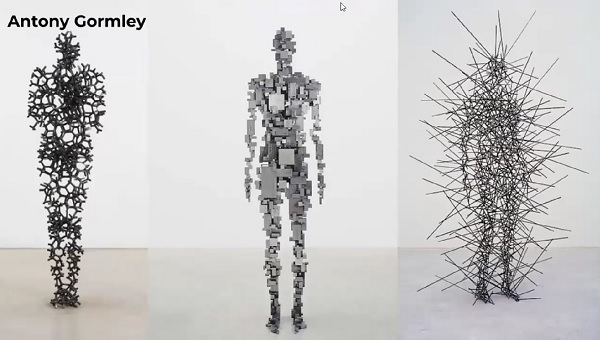
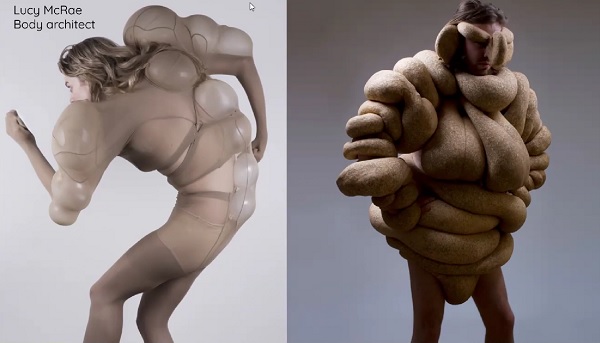
Anthony Gormley
- Self-conscious, hyper-realistic, super-sized sculpture...insist on the review and reconsideration of the body
-
The body sculpture...where the marks of creation, the marks of the tools are left to be witnessed
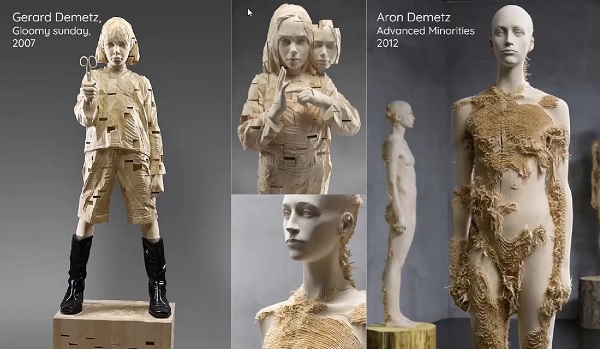
Gerard & Aron Demetz -
Violating the expected form of the body...make the viewer a bit uncomfortable

Anders Krisar -
Invading human form...like some sort of virus or cancer
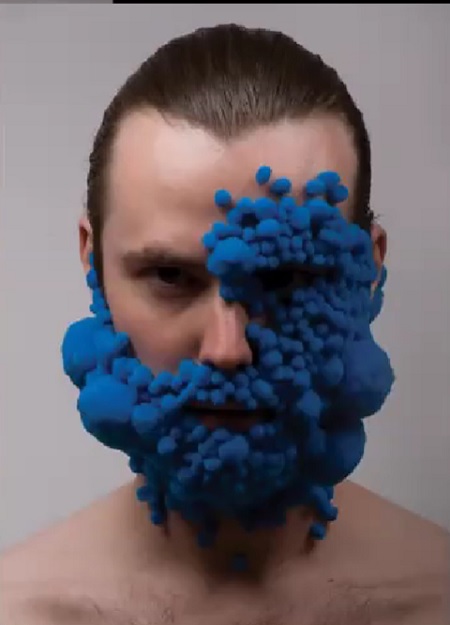
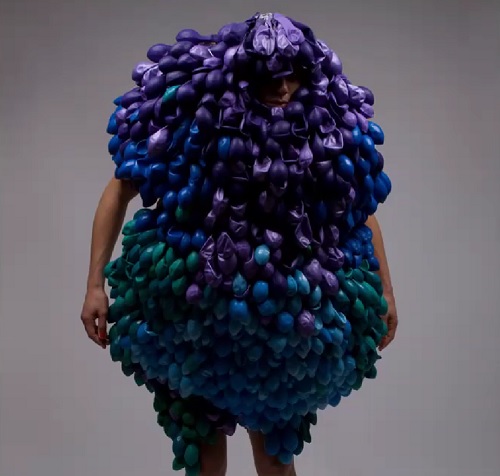
by Brian Hess -
Prosthetics > technological enhancements for the body
Victoria Modesta
- Unfinished bodies - 'Non Finito'...sculpted by robot arm
- What is 'craftsmanship' in an algorithmic world?
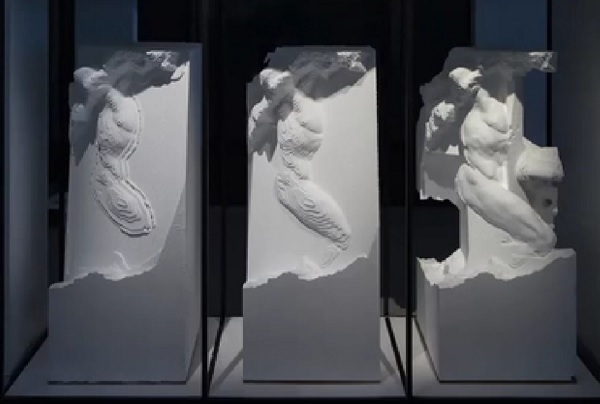
-
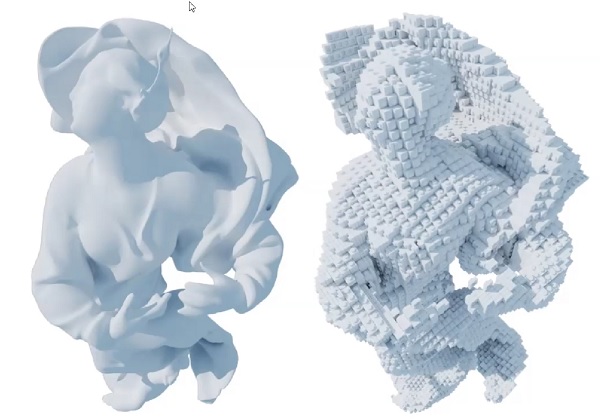
Lo-Poly Abstraction of the human body
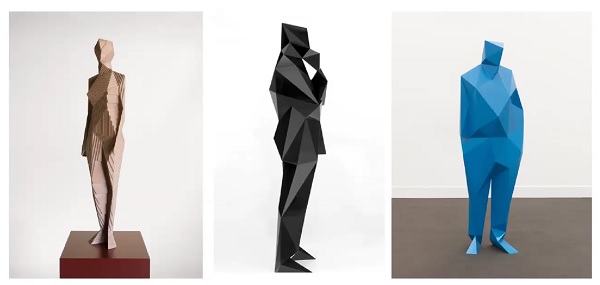
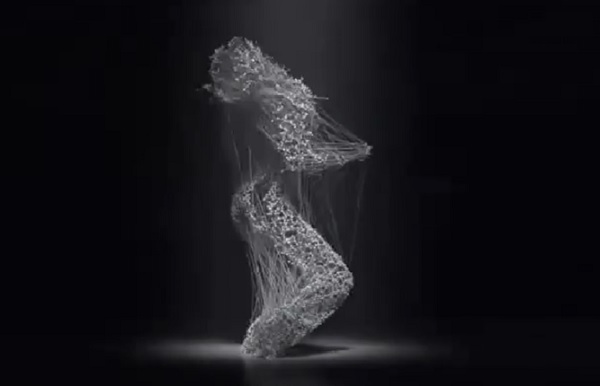
Xavier Veilhan -
Visualization of human lives intertwined with data
The BODY
I am not at all certain that this section of my documentation has ANYTHING to do with Fabricademy or the assignment for the week. But I felt strongly that I devote some time to consider the meaning of Body before moving forward with the fabrication work for the week.
Self = Body + Mind
It is my opinion that the discussion of the Body separate and apart from the Mind...is necessarily an incomplete discussion of the Self or the Individual. But perhaps in a discussion of the Self within Society a singular focus on the body maybe a legitimate approach.
Within the public realm, the mind can be hidden, but maintaining body privacy or identity sanctity is more difficult to do.
Objective > Subjective > Public Judgement
Isolated...the definition of self and by extension body...is ours and ours alone. Alone...we are perfect, ideal, and beautiful. We are as we believe ourselves to be. The objective (scientific) definition of body modified by our own subjective view of who we think we are as individuals.
In the collective, however, the definition of self and body becomes vulnerable to the perceptions, standards...and often judgements of others.
Is it possible for us to exist among others and not be measured or categorized by those that we encounter? Why does the act of observation, measurement, labeling and judgement of and by others seem to be unavoidable? Why do we have to make decisions about those that we encounter? Friend or Foe? Ally or Enemy? Attractive or Unattractive? Good or Bad? Can it be said that humans make judgements about their environment...including those they encounter...as a consequence of some primal survival instinct? Environmental assessment generates inputs necessary to make decisions about fight or flight...engage or avoid...love or hate?
The Public definition of Body is a function of the External Observer...a person, collective or even institution...who approaches the act of observation, definition and judgement with their unique set of personal bias.
The straight-forward, objective definition of the Body with Zero Level of Distortion...which gained color and dimensionality with the subjective viewpoint of the individual...receiving the The First Level of Distortion...now takes on countless possible threads of meaning as a multitude of others weigh in with their thoughts and opinions. The definition of the Body becomes a free-for-all activity...and meaning or truth becomes fluid and out of control. The Level of Distortion the objective meaning of the Body in the public realm grows exponentially.
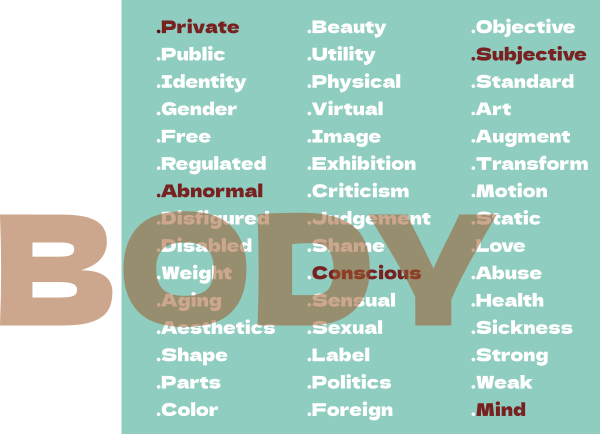
From the endless possibilities, I choose to define Body more narrowly by focusing on just a few qualifiers. It is my believe that any reasonably clear definition of Body should be...
- Subjective...the act of a single mind on their own body
- Private...rejecting the thoughts and opinions of outside observers
- Abnormal...rejecting the idea that a single standard is the norm while variations are aberrant...when it is the other way around
- Conscious...awareness of the individual body's existence and presence within an environment, including a society
- Mind...understanding that body and mind are an inseparable pair
In other words, I believe that the Body and its definition should ours and ours alone, that at this First Level of Distortion its meaning remains some coherence and tangible definition.
So bringing it all back to Fabricademy-reality and the assignment of the week...
If the concept of the Body should be individual and unique...sizing standards and mass manufacturing of apparel (which is a cost saving and profit enhancing technique of large apparel makers) are not acceptable. If digital fabrication techniques can lead to individual customization of apparel...then it is consistent with my understanding of the Body.
Whew! OK. I got that out of my system. I hope it makes sense when I re-read it in a few days. Time to move forward with making!!
Assignment - Digital Body

My interpretation of the assignment requirements...
- Learn the scanning workflow to generate digital assets
- Learn to manipulate scans to use it for digital fabrication
- Learn the lasercutter workflow
- Assemble a mannequin
- Stop motion animation of assembly
- Upload files
3D Scanning process > Photogrammetry
In Fab Academy, I used a Sense 3D Scanner to make a scan of my own head. The results were...not great. Documentation of the process can be found here.
For this week's scanning assignment, I want to try Photogrammerty. I like the idea that this scanning technology is not reliant on a single purpose device...but rather can make use of any digital camera or even mobile phone to generate needed images. Aside from having to rely on a proprietary device, the Sense 3D scanner also requires a propriety software (which is no longer being supported). I am not a fan of such restrictive ecosystems.
This Photogrammetry Tutorial Video was very helpful to me to learn this process.
Step 1 > Take a ton of photos
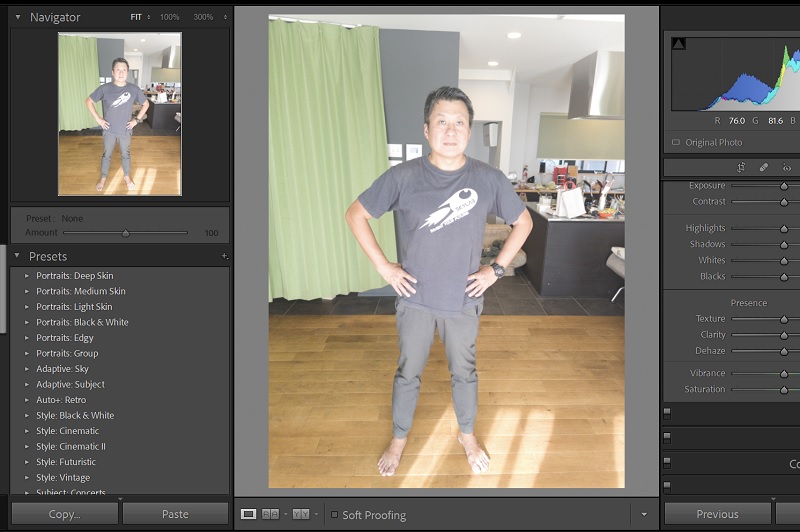
- With the help of a friend who has some expertise with Photogrammetry...117 photos were taken with a mobile phone (iPhone 13?). The tutorial recommends taking over 100 photos for the best results.
- To help ensure good results, he recommended an environment with even lighting without harsh shadows. We photographed in my living room next to a large window, with the curtains drawn.
- The wide-angle focal length of the mobile phone camera was perfect for this narrow space.
- I stood still in the middle of the room, while my friend took a continuous series of photos in a circle around me.
- We took care to maintain a constant distance between subject and camera...as well as constant angle of camera to subject.
- The whole process took about 5 mins.
Step 2 > Post-Process the Photos
While the images taken were all in good focus...the were all slightly over-exposed...probably a consequence of us taking photos in a rather dimly lit room and the phone camera over compensating. To generate a good Photogrammetry result, the images will have to have reasonably good exposure and mild contrast levels.
- The images were imported into Adobe Lightroom. while any photo editing software will do...I am familiar with Lightroom and in this instance, will make use of its batch editing feature.
- In Lightroom's develop module...I adjusted the image's exposure and contrast.
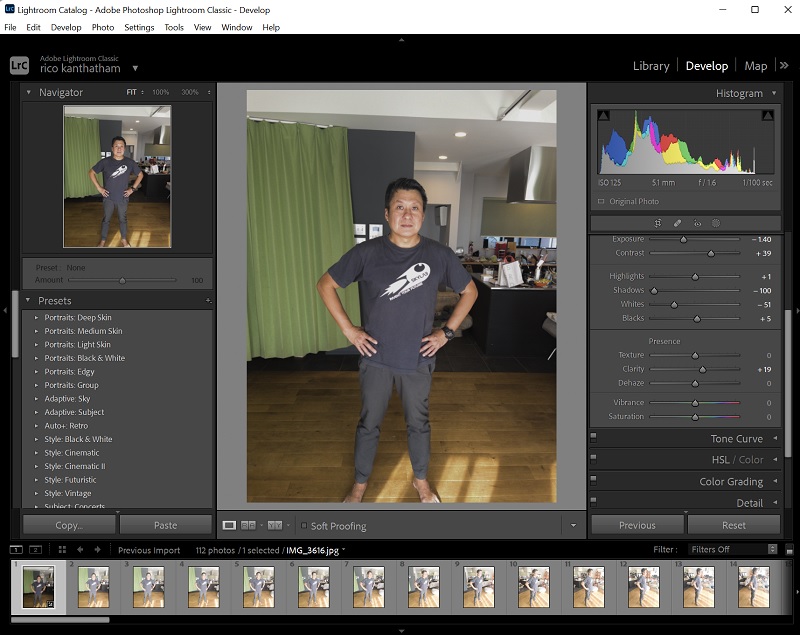
- This process took about 15 mins.
Step 3 > Import Images into Meshroom
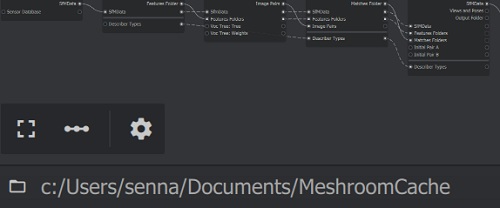
I downloaded and installed Meshroom photogrammetry software to do this step. Meshroom is a free software with a very intuitive interface. The software runs on Windows and Linux only...and requires a reasonably powerful CPU (Core i7) and an Nvidia GPU.
The results were reasonably good, in my opinion, and could have been better if the photo images were better.
- I imported all post-processed 177 images by dragging and dropping them all into Meshroom's image asset window on the left side.
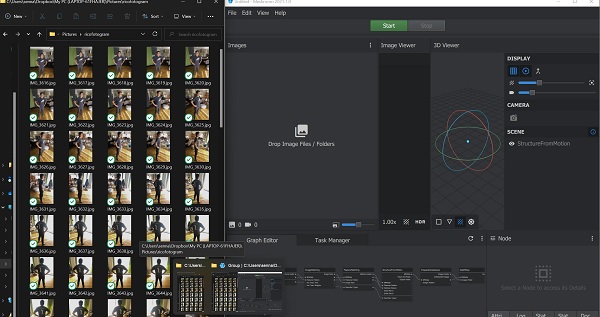
- With the images loaded...I did nothing else except prest the green START button at the top of the interface...and the Photogrammetry process begins.
- Because the software has to stitch and assemble 2D images into a spatial 3D representation...the process is CPU and GPU intensive...and takes a long time.
- The Photogrammetry Construction process took about 2hrs for me.
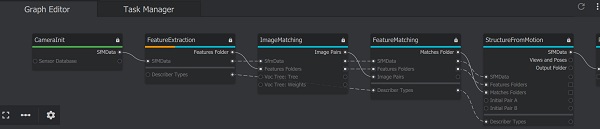
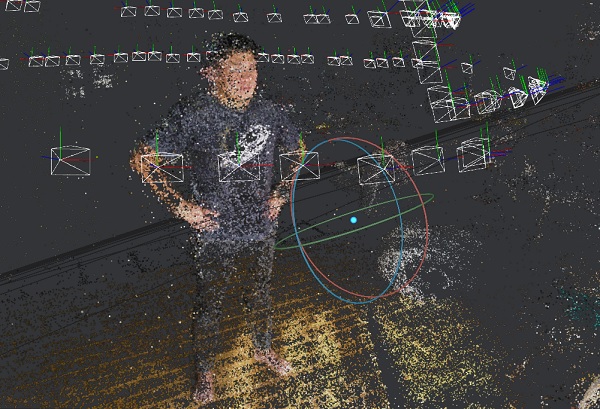
- It can be seen at the bottom of the interface...that Meshroom utilizes Procedural Nodes to do the image processing.
-
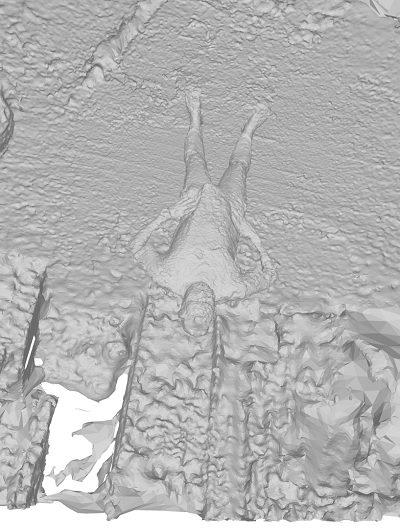
2hrs later...this image appeared
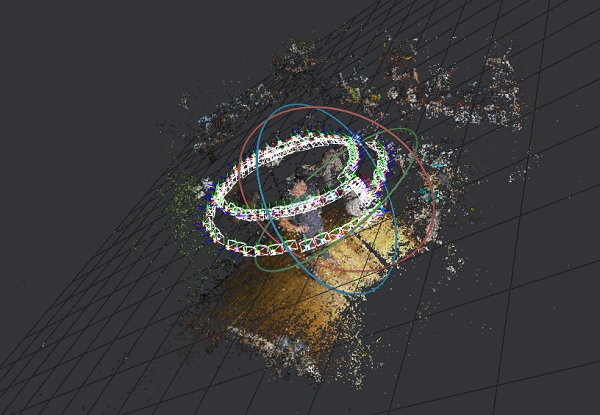
-
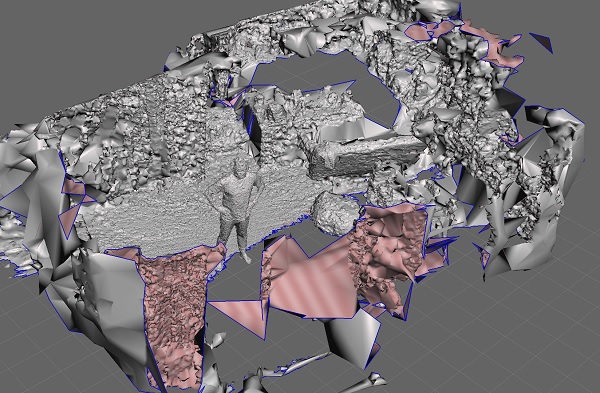
Among the cloud of spatial image representation...my figure can be seen. The white wireframe objects represent the camera locations. Note how continuous and consistent their positions are relative to one another!
- The 3D spatial data is outputted and saved in the MeshroomCache folder.
- Inside the 'Meshing' folder is a file called mesh.obj file...which is the file we will work with in the next step.
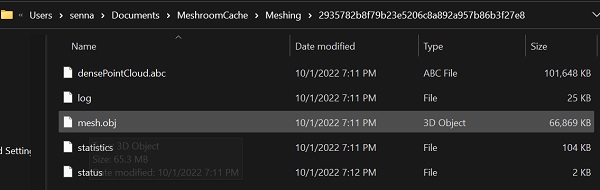
- The mesh.obj file contains geometry data only.
- Texture and color data is saved in MeshroomCache/texturing
Step 4 > View the Mesh.OBJ File - This is not a necessary step...can be skipped...but I wanted to know what the model looked like
- I used a browser based app called Online 3D Viewer to look at the OBJ file.
- To load the file, I just dragged and dropped the mesh.obj file
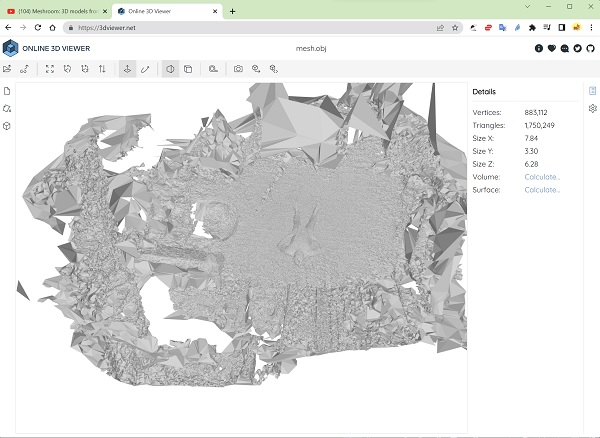
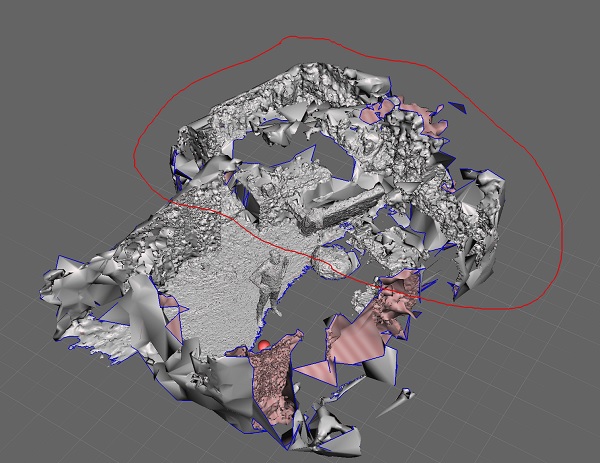
- I observed that there was A LOT of model data of the room I was standing in in addition to my figure...this will have to be deleted.
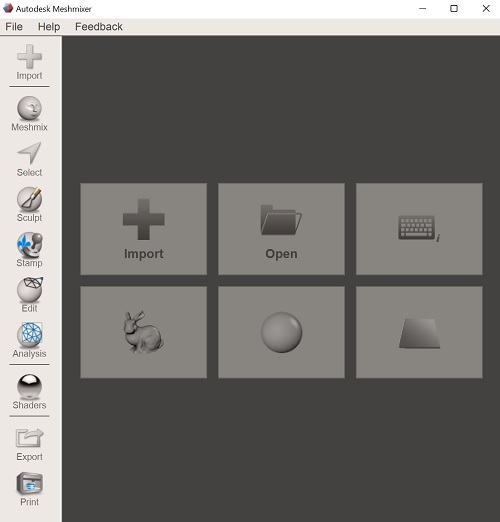
Step 5 > Mesh Mixer
In this step, I removed all the Photogrammetry data except for those belonging to the figure using another free software called Mesh Mixer
- Download and install Mesh Mixer by Autodesk. While the app is still available it is no longer under development or supported by Autodesk.
- Use the IMPORT button to load the mesh.obj file from Meshroom
- When imported, the model appears upside down in the display window.
- I flipped the model with Edit > Transform > Rotate
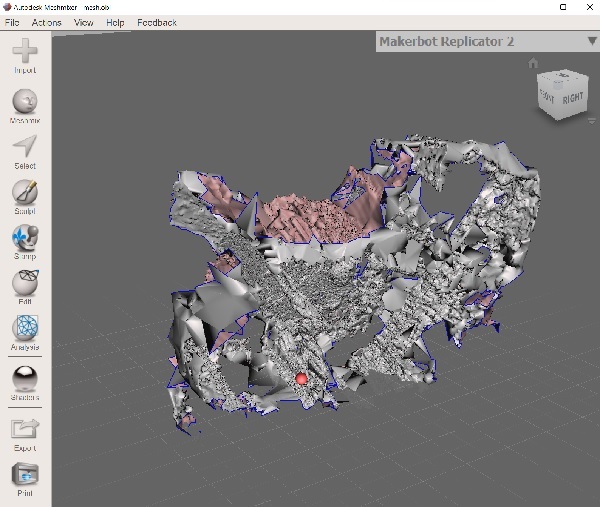
- To remove unwanted parts of the model...use Select > Lasso...then draw lasso around unwanted geometry...and click DELETE

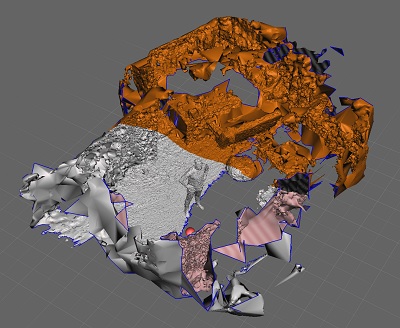
- Continued doing this until everything but the figure remained.
- The figure has one large obvious hole in the head area. Was my hair too dark to register?
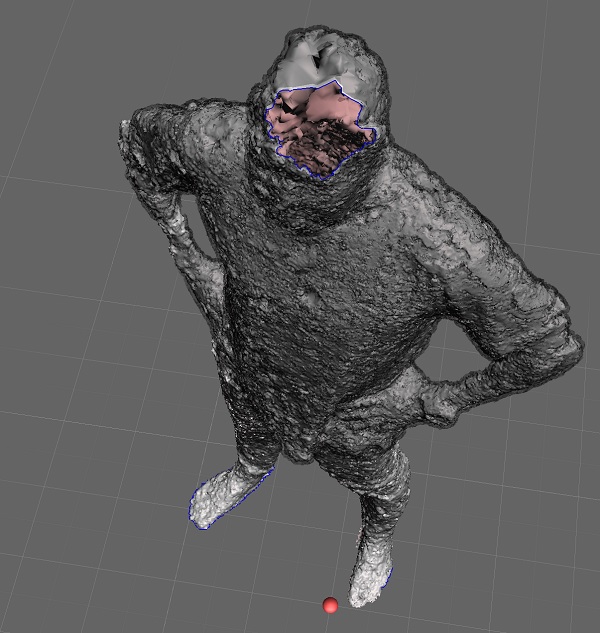
- To find all the holes in the model, I used...Analysis > Inspector.
- Pink and Blue balls appear where there are holes in the model.
- These holes will need to be filled before it can be used to for digital fabrication.
- Edit > Make Solid...to fill in hole in the figure
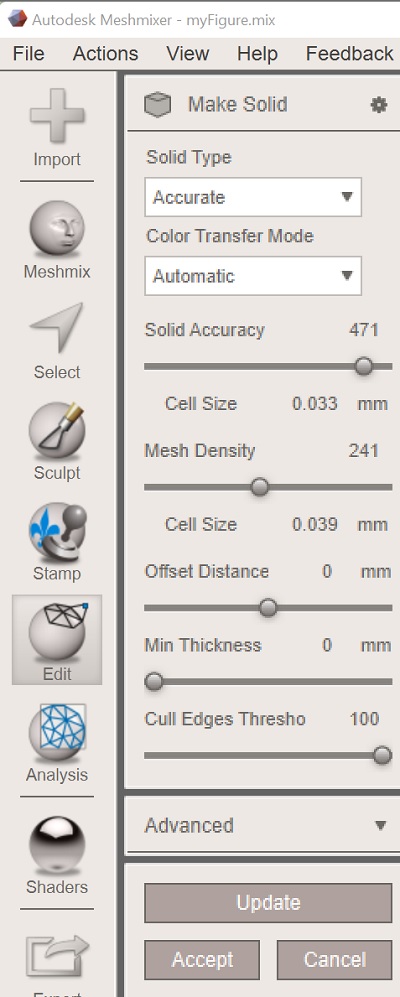
- Playing with the slider settings in the Make Solid function generated some interesting results!
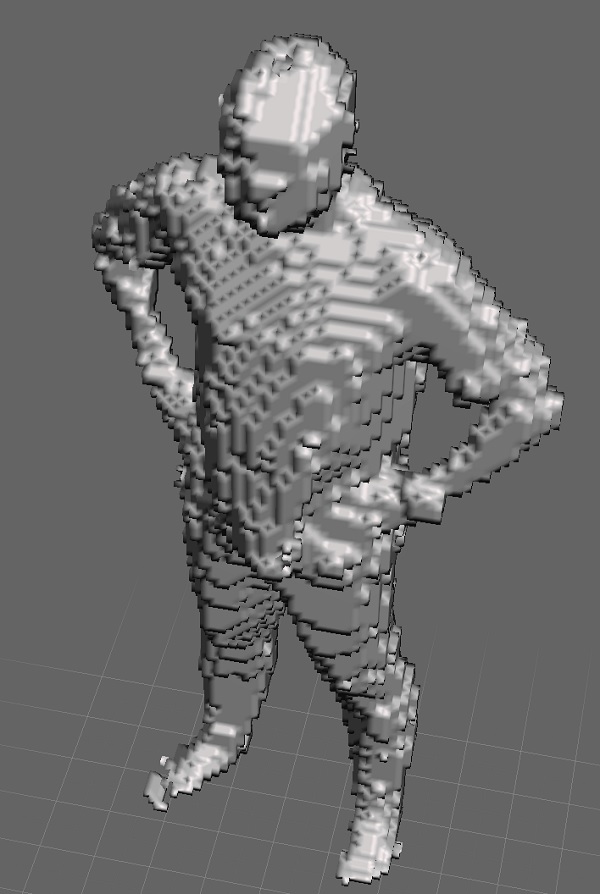
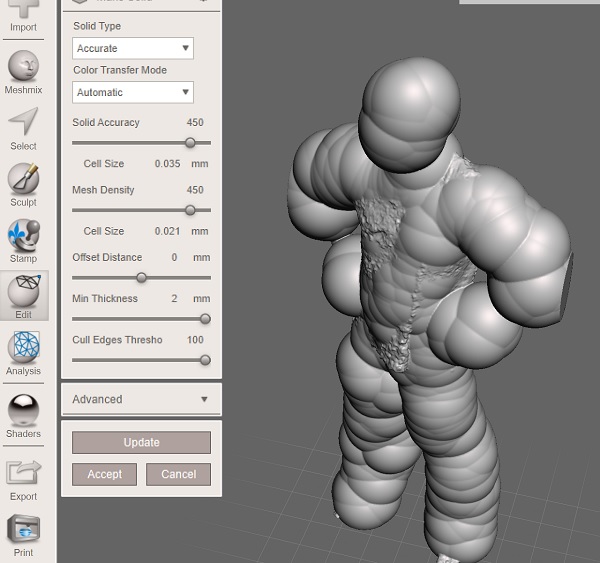
- The final figure model looks like this...

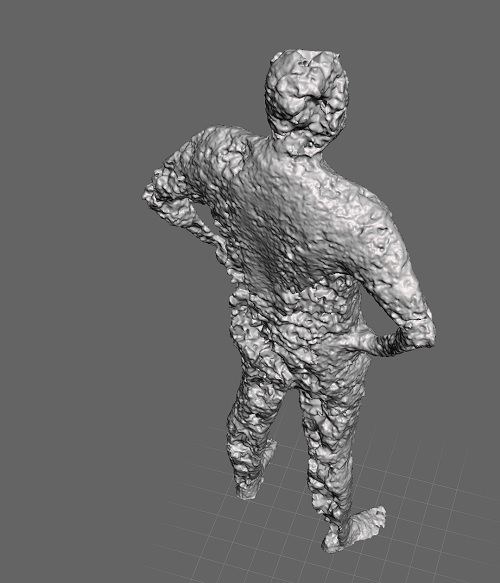
- The model is pretty rough...but I love it! It looks so organic and sculptural.
- It has uncanny Giocometti like characteristics. What a funny coincidence.
- A more smooth and photo-realistic model result would probably require better photos. Next time.
- The process took about 20mins.
- I exported the final figure as a Binary STL file
- .OBJ was also available as an option...but when I exported in this format, I noticed that the file size was DOUBLE that of the STL file.
- Here I learned the difference between OBJ and STL(and other 3D file formats).
- I know from experience that STL is widely used for 3D printing.
- OBJ will supposedly result in a cleaner export output...but since my model is so rough...I didn't see the need for additional model information.
Making Art
After checking with Fabricademy Coordinators, I learned that the Mannequin object that we are to produce for this week...
- "Will not be used as a scaffold for future textile work"
- "Does not have to be life-size"
- "Does not have to be full-body...can be a body part"
- "Does not have to be produced by a lasercutter"
As I am already very familiar with the Laser Cutter workflow, having learned and documented the process in Fab Academy during the Computer Controlled Cutting Assignment to make a Parametric Press-Fit Kit. I also made a mini surfboard using the Autodesk Slicer software and a lasercutter for my Wildcard Week project. As such, I chose to work on and document another process first...and produce a Body Object with a lasercutter if time is available.
Boolean Operations
I was very intrigued by the idea of questioning the meaning and definition of body...and utilizing digital technology to create a body simulacrum. Inspired by the lecture and the many artistic interpretations of the Body...I decided to explore the fabrication of an Artistic Digital Body as the primary focus of my assignment work this week.
My plan was to take the scanned model and make artistic sculptures from it...using techniques unique to digital 3D Modeling tools such as Boolean Operations.
Fusion 360
Fusion 360 is a parametric 3D modeling software. It is a reasonably advanced software with a great interface that allows us to make complex 3D forms that can then be exported for digital fabrication. I learned to use Fusion 360 in Fab Academy and thought that it might be a good tool to use for digital manipulation of the mesh figure.
- IMPORT the mesh.stl file
- After import, the mesh appears so dense, it appears solid black (...not a good sign)
- Fusion 360 is notorious for being unable to handle meshes with too many vertices and triangular facets.
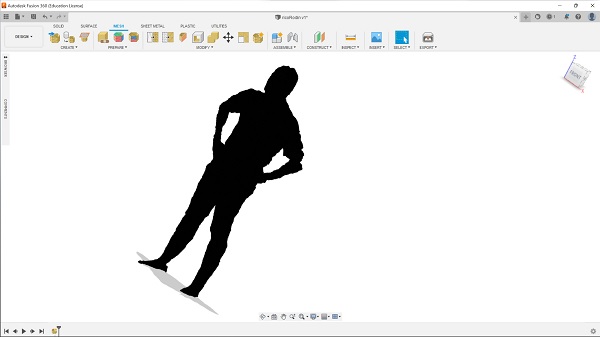
- A work around is to convert the mesh to a Fusion 360 object.
- I use Convert Mesh > parametric

- Fusion chokes and crashes on the mesh...doesn't respond
- Time to move to Blender...
Blender
Blender is a FREE, Open Source, incredibly powerful 3D modeling software. It is capable of not only modeling...but also fantastic at generating renders and animation as well. It is a bit of an intimidating software with a steep initial learning curve. But once the interface is learned...the power of the software can be unlocked.
Unlike Fusion 360, Blender is great at handling meshes. I didn't choose to use this software right away because my expertise on this software is not as high as for Fusion 360. But here I go.
- I imported the mesh.stl file into Blender using File > Import > STL
- The file loads quickly and without issue...(a good start!)
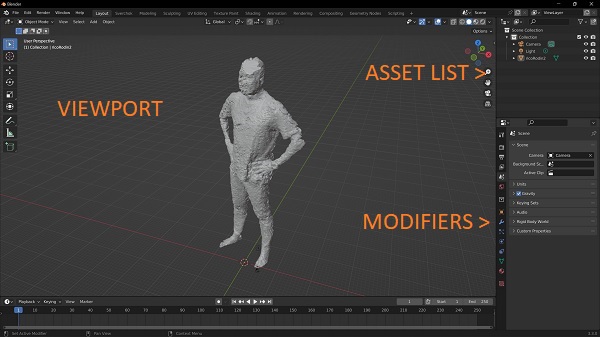
With the mesh loaded, I can use the mesh tools to further refine the model that Mesh Mixer generated. But since I am happy with the rough result, I will use other tools to digitally manipulate the figure in to artwork...and hopefully meet the assignment requirements.
In Blender, model manipulations are done using one or more modifiers. These Modifiers can be added, settings adjusted to achieve the desired effect...and previewed on the model. When all adjustments have been made...the Modifier can be Applied to the model 'permanently'.
Some useful Blender Commands is used often in this creation session...
- Shift + A...adds new objects to the scene
- Shift + D...to Duplicate selected object
- When Exporting individual objects as STL files for 3D printing...make sure the 'Selection Only' checkbox is checked
- Hold down CTRL for fine position translation
"Aspects of You"
I decided to create a series of Digital Bodies figures that utilizes different Blender Modifiers. Each figure will represent a different human state of being, namely...Heartless, Un/Balanced, Multifaceted and Ma.
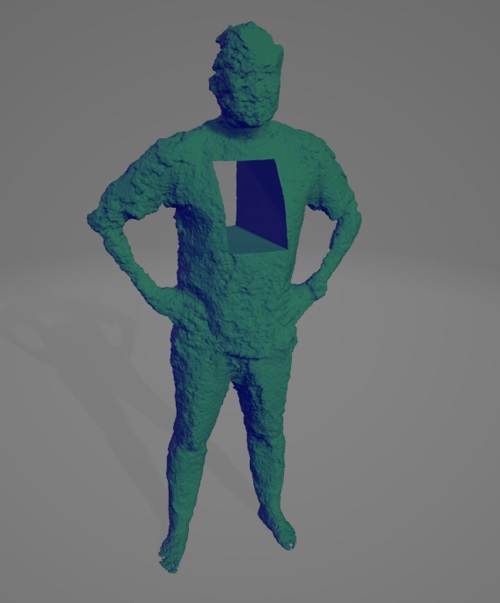
Heartless
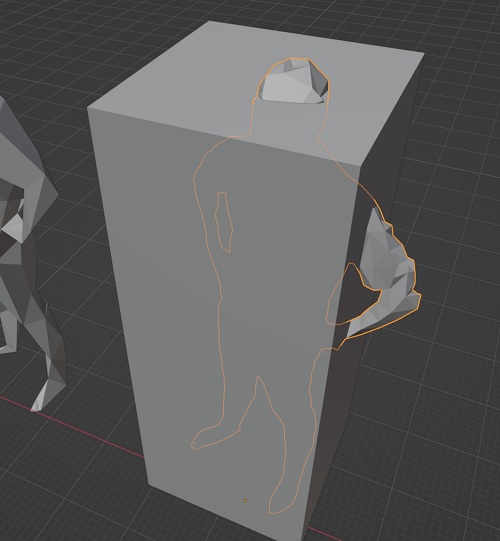
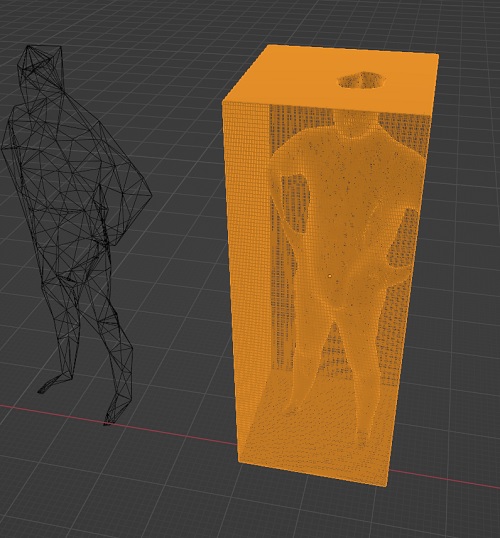
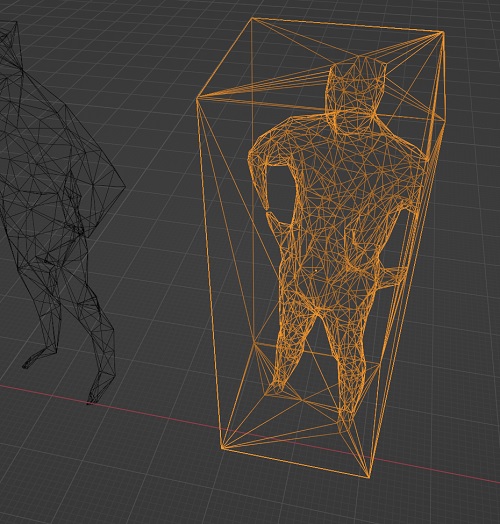
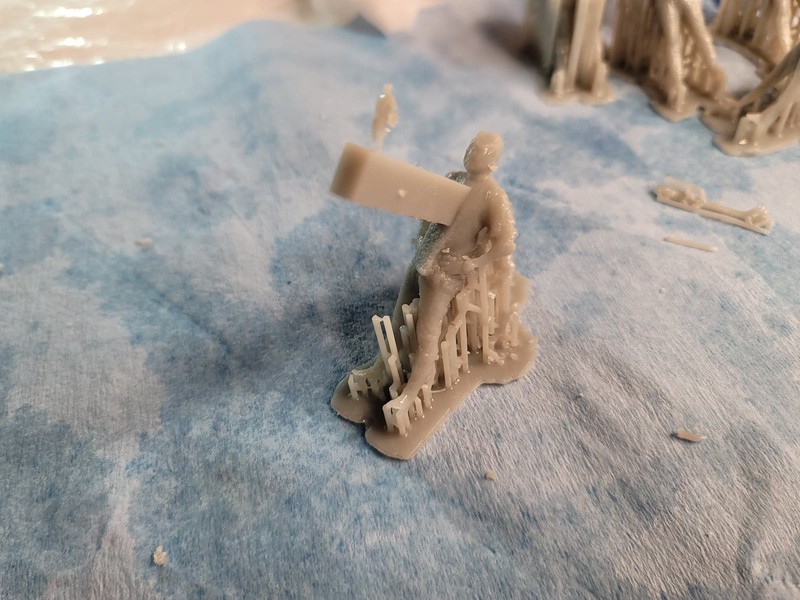
For Heartless, the figure is distorted by a simple, geometric form. A simple rectangular form is created and use to cut clean hole through the figure using the Boolean Difference modifier. A Boolean asks TRUE or FALSE questions. In this case, the Difference Boolean asks...if the rectangle form shares the same space as the figure (if it is TRUE), that area should be removed.
The procedure in Blender is as follows...
- Select the figure as the object to be manipulated
- In the Modifier menu (the blue wrench icon) select Add modifier > Boolean > Difference
- In the Boolean Difference settings choose Operand Type> Object, (cutting) Object > the Rectangle shape, Solver > Exact
The Boolean Difference operation will not be immediately noticeable. Hide or delete the cutting Rectangle shape to see the hole generated.
- CTRL + A to (permanently) Apply
I exported the resulting figure from Blender as an STL file, and preview the model using Microsoft 3D Viewer.
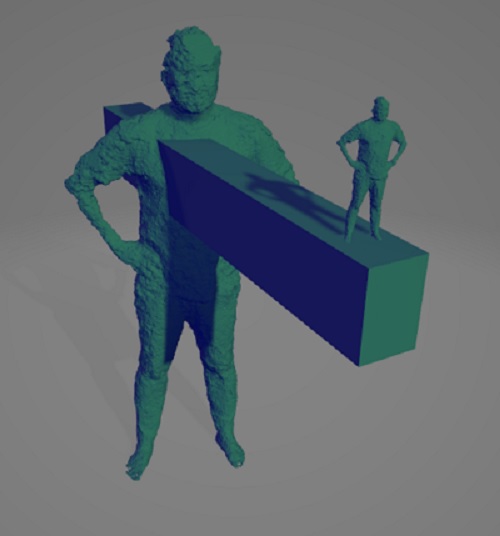
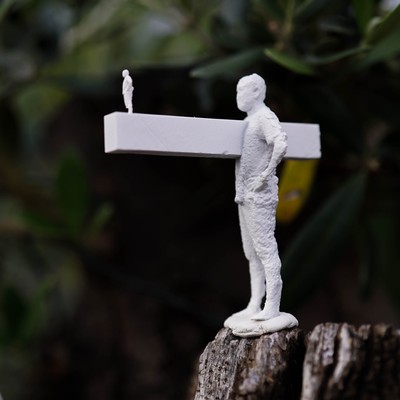
Un/Balance
For Un/Balanced, several digital manipulations were applied...Boolean Union, Duplicate and Scale Transform. A geometric 'Balance Beam' is added to the scene and joined with the figure. A duplicate of the figure is made and scaled down in size...then placed on top and at the opposite end of the 'Balance Beam' from the larger figure. This smaller duplicate is then joined to the beam.
The procedure in Blender is as follows...
- Add a simple cube to the scence with the SHIFT + A > Mesh > Cube command
- Scale Transform the cube to be a beam by scaling it in the Y-direction keying S + Y...then move the mouse to stretch the cube in the Y-direction.
- Raise the Rectangular Beam up to the chest area of the figure with the move in the Z-direction command by keying G + Z...then use the mouse to raise the Rectangular Beam into position.
- Select the figure as the object to be manipulated
- With the figure selected, key SHIFT + D to duplicate the figure
- Move the duplicated figure to the side by keying G
- With the duplicated figure selected...key S and use the mouse to scale transform the figure down to a small size
- With the large figure selected, in the Modifier menu (the blue wrench icon) select Add modifer > Boolean > Union
- In the Boolean Difference settings choose Operand Type> Object, (cutting) Object > the Rectangle Beam, Solver > Exact
- CTRL + A to (permanently) Apply
- Move the duplicated small figure into position on the Rectangular Beam by using the move command...keying G
- Selecting the small figure...repeat the application of the Boolean Union modifier...between the small figure and the Rectangular Beam
- CTRL + A to (permanently) Apply
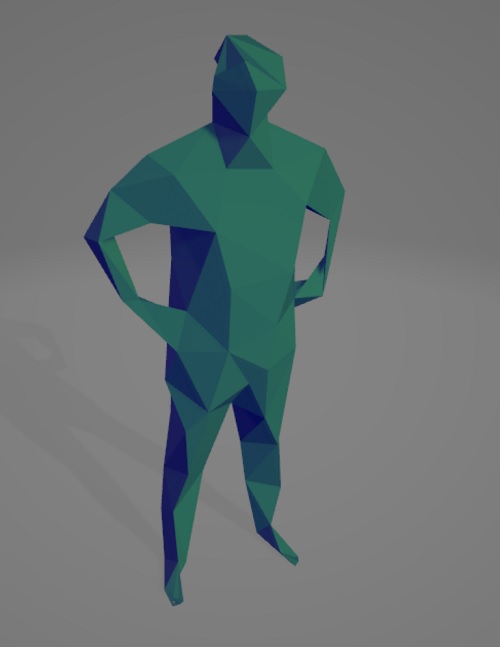
Multi-Facetted
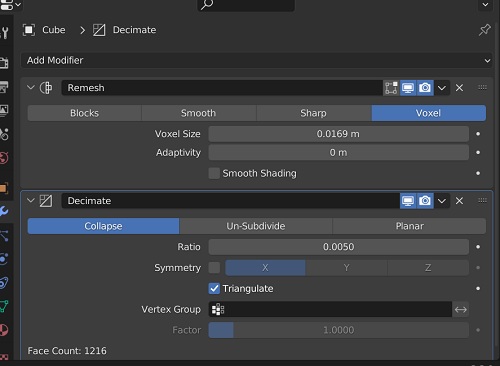
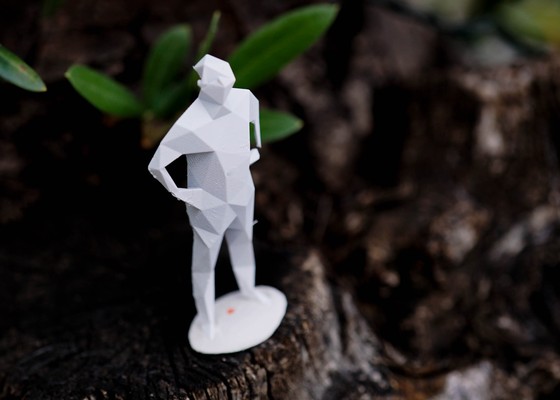
For Multi-Facetted the Decimate Modifier is used to reduce the number of mesh polygons from the 20,000+ it currently contains down to few hundred...generating a Lo-Poly model. The human form is made geometric.
The procedure in Blender is as follows...
- Select the figure
- In the Modifier menu (blue wrench) > Add Modifier > Decimate
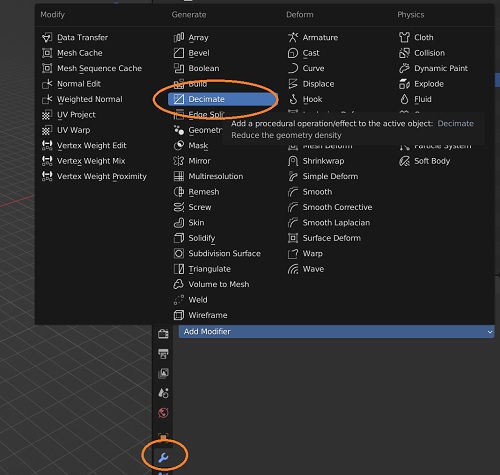
- In the Decimate settings panel choose...Collapse
- Adjust the Ratio down to 0.0005
- CTRL + A to (permanently) Apply
MA
The intent of MA, the Japanese world for...(no, not mother)...The Space Between. It is a poetic concept that describes things like...the pause between musical notes. For the Digital Body sculpture, I hope to create a sculpture that encapsultes the space that would taken up by a body. The body as the void it generates. For this, I hoped to use the Wireframe Modifier to generate a lattice that surrounds the space where the body would be. I was not entirely successful...
The procedure is as follows..
- Select: Figure > Decimate > Ratio 0.003
- Select: Block > Boolean > Difference > Figure as cutting tool
- CorrectiveSmooth modifier > Factor 1 > Repeat 136 > Scale 0 > Smooth Type = Simple
- Boolean Difference from Block
Blender Lattice Creation Tutorial
- Block...add Particle Systems modifier
- Source > Emit Source > Volume
- Distribution > Grid
- Resolution > 15
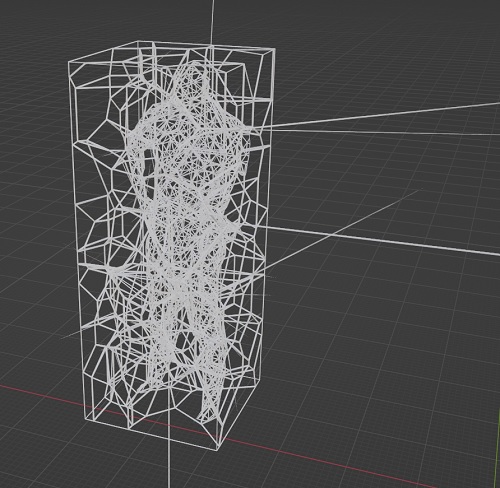
Cell Fracture Add On
- Own Particles
- Join fractured volumes
- get rid of duplicate faces and vertices...mesh > clean up > merge by distance > merge distance 0.1m
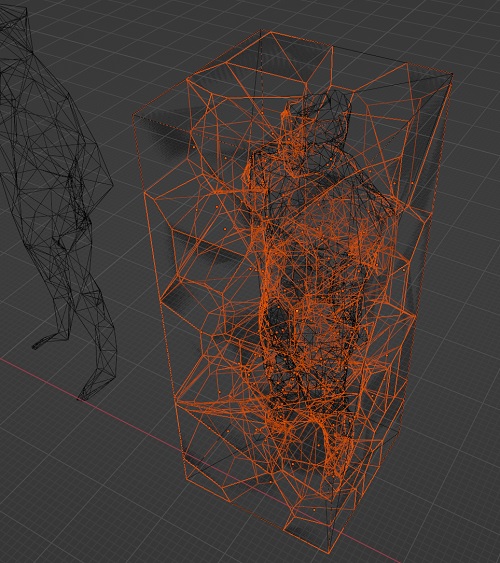
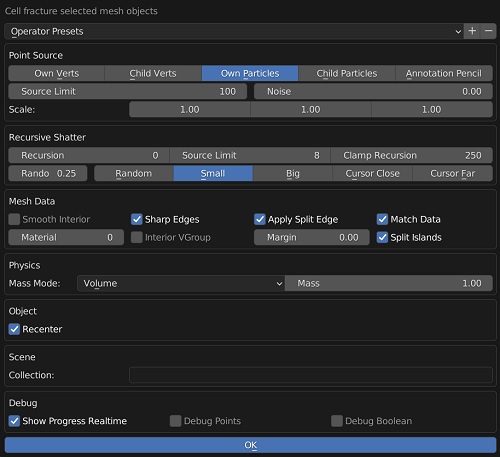
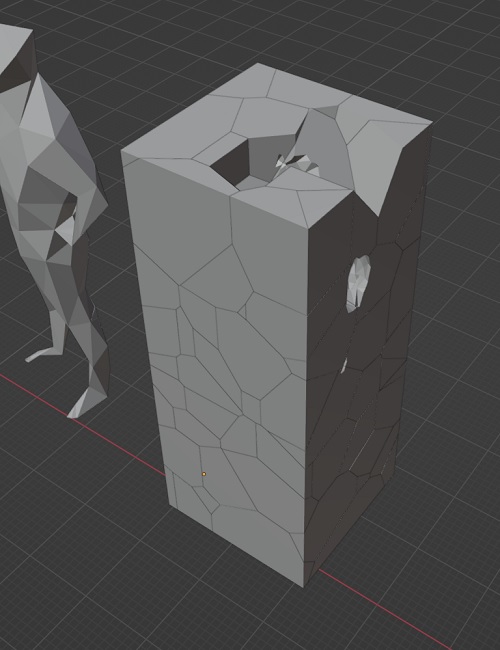
...a bit stuck at this stage and ran out of time. The aim was to turn the edges of the fractured cells and turn them into wireframe lines...then thicken them a bit to turn the cells into a lattice frame. Current results are not acceptable...strange spikey lines radiate from the model. Will come back to this later...
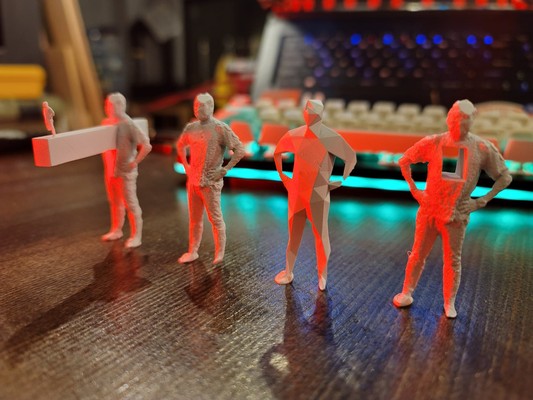
Resin Printing
With most of the models successfully created...it's time to fabricate!! To maintain the textures and details of the Digital Bodies...I have chosen to fabricate the figures in a 3D Resin Printer.
Slicer > Chitubox V1.9.0
I have to say from the onset...I HATE this software. I use it because at the moment I am not certain that there is a viable alternative. For whatever reason...all affordable Resin Printers utilize this horrible software.
On its best days, it slow. On a normal day...it is basically unresponsive. Searching the internet reveals no good solution. The best explanation is that the software conflicts with some process in windows that is not easy to identify.
I suppose now is the time to really spend some time to find the answer...or abandon the software for another.
The interface is simple...
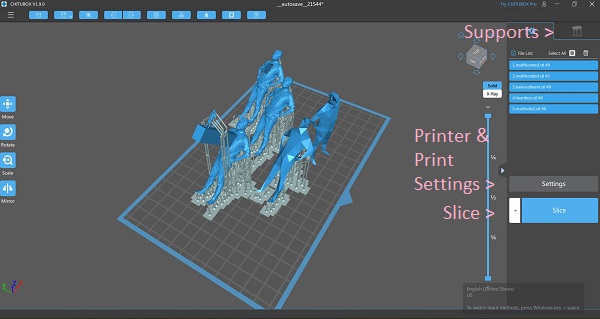
...as is the procedure.
- In 'Settings'...
- Select Printer > Set Printer Profile
- Select Resin > Set Print Profile (exposure time, lift speed, etc.)
- Load 3D models
- Distribute the 3D models on the 'Build Plate'...leaving space between each
- When Resin Printing...it is recommended that the models do not sit flat on the Build Plate but are instead leaned at a 45 degree angle to it. The side of the model that faces the build plate will be marred with support marks...so it should not be the side that has beautiful details that should be preserved. In this instance, I leaned the figures so that the backs of the figures are facing the Build Plate.v
- Specify the support settings for the models in the Supports menu.
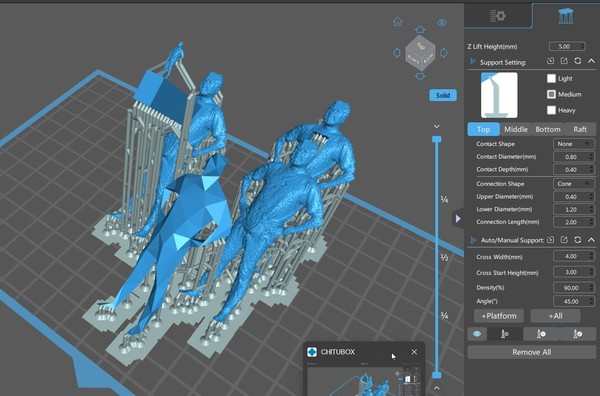
- Choose between Light, Medium or Heavy supports. Generally, Light supports for small models and Heavy supports for larger, heavier models.
- Choose the density of supports. A high percentage (90%) will help to ensure (but not guarantee) that the print will succeed...but will waste resin material and require a lot more time in post-processing to remove the supports and clean up the marks left by the supports. Generally, choose as low a percentage that you think you can get away with. **Around 60%-70% is a good starting point.
- Click +Platform or +All to calculate and generate supports for the models.
- Return to the previous screen to Slice then Save the model to a USB memory stick for prinitng on the resin printer.
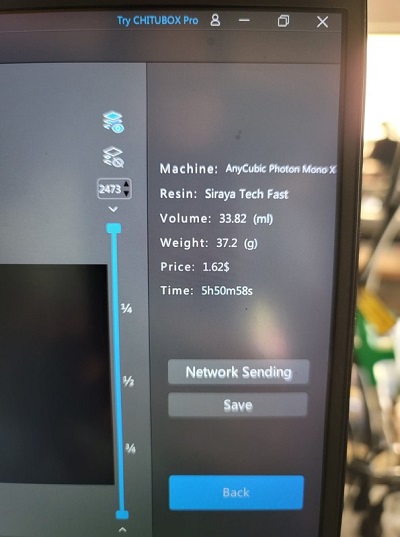
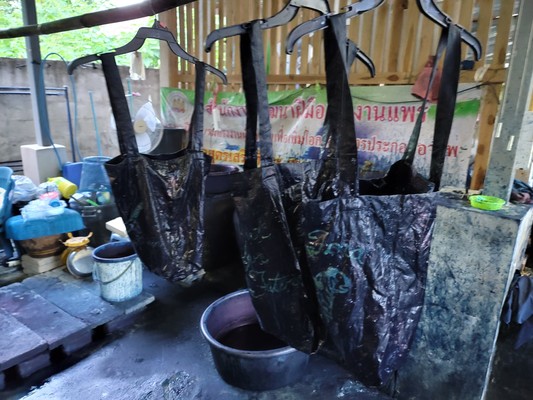
Resin > Sirayatech Fast Grey
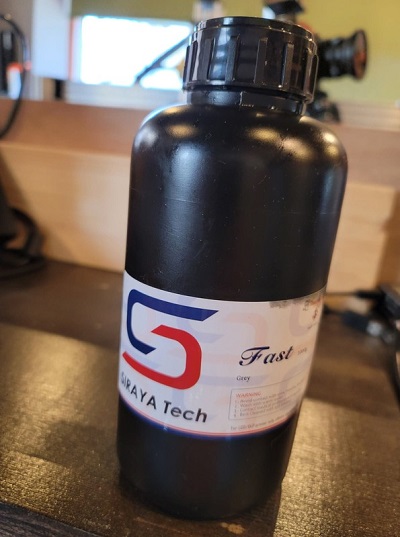 - Shake the Resin well then open the bottle and pour enough resin (as suggested by Chitubox after slicing is compelted) into the Printer's print vat. Let time pass so that the air bubbles has escape from the resin.
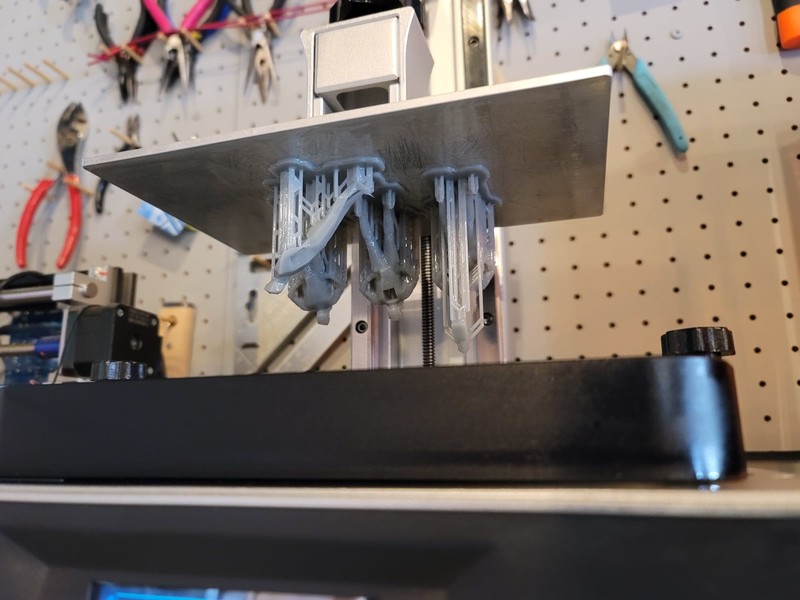
Resin Printer > Anycubic Photon Mono X

- Ensure that the build place is securely screwed into the z-motion gantry
- Place the UV cutting cover over the machine to prevent the resin from hardening
- In the printer control screen...find the model you want to print...then press Print
3hrs later...I discover that printing has inexplicably...stopped at 46%. The print has failed. Cry.
Print restarted.
6hrs later...the print has finished. All looks well this time.
-
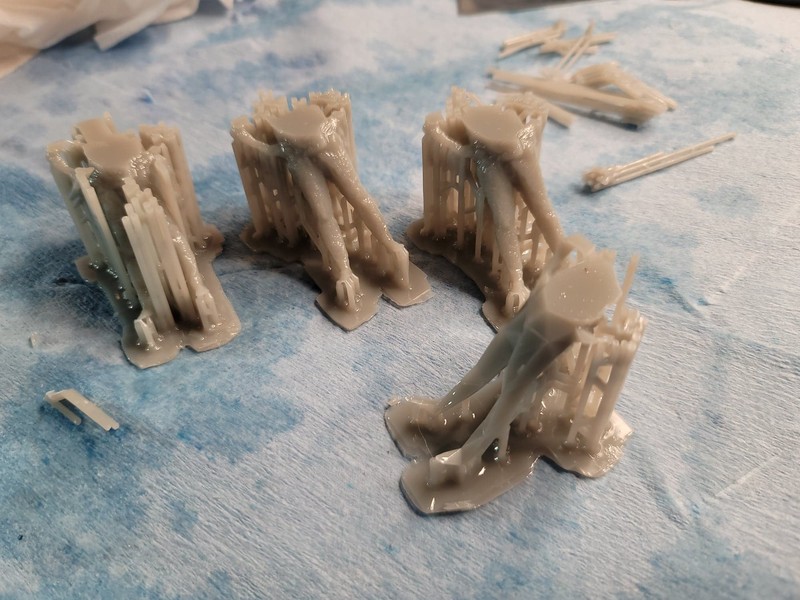
Time to cut away all the supports.

-
It took a full hour...to remove the supports for the 4 figures. I had accidentally specified 90% medium supports...too many and too stout...for the little models. The supports were very hard to remove and left many marks on the backs of the figures. These will have to be removed with a knife and sandpaper later...
-
Supports removed, the figures are washed in 90% IPA to remove any liquid resin from the surface of the figures.
-
Then the figures are put into a clear water container and left in the sun to UV cure for 30 mins.
-
Curing completed...the figures are washed in dishsoap to remove any oil or other film
- Dried with a paper towel...they are now ready for White Primer Coat
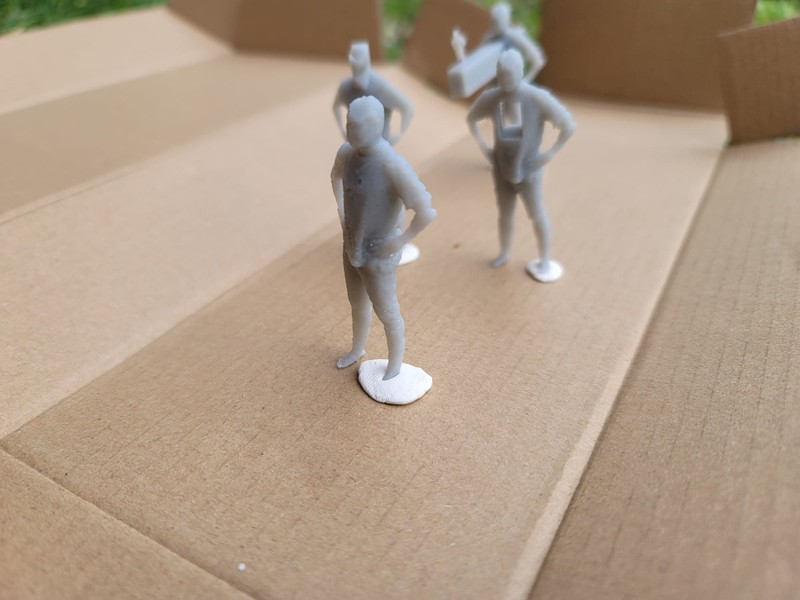
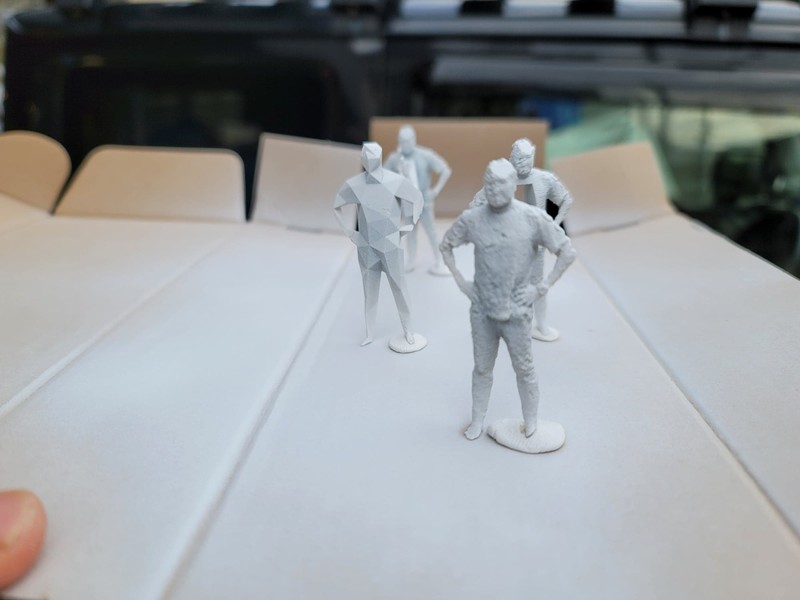
The Result
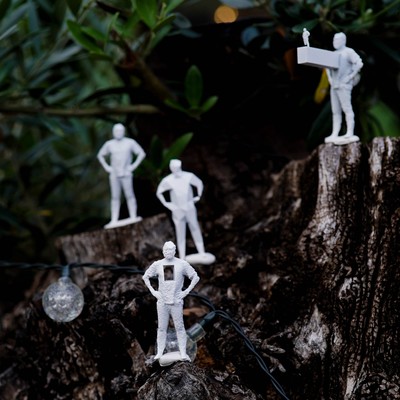
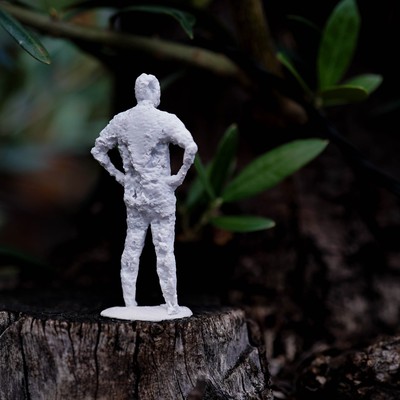
Base Figure
Heartless

Un/Balanced
Multi-Faceted
Lasercutting process
During my Fabacademy program, I learned to use the Lasercutter and the Autodesk Slicer software (to make a cardboard surfboard). Documentation for this work can be found here (lasercutting process) and here (Slicer software).
I understand that to complete this assignment, I still need to design, cut and assemble (recording a time-lapse video)...some part of the human body.
Out of curiousity, knowing that Autodesk Slicer is available but a deprecated software, I wanted to know what alternatives exist for slicing up a 3D model for lasercutter use. I was happy to discover...that a Laser Slicer Add-on is available for Blender by R G Southall! This add-on "...cuts up a Blender object and exports the slices to SVG files for cutting on a laser cutter or other post-processing.". So Blender seems to be a do anything software!!
I installed the add-on and tested it by doing the following...
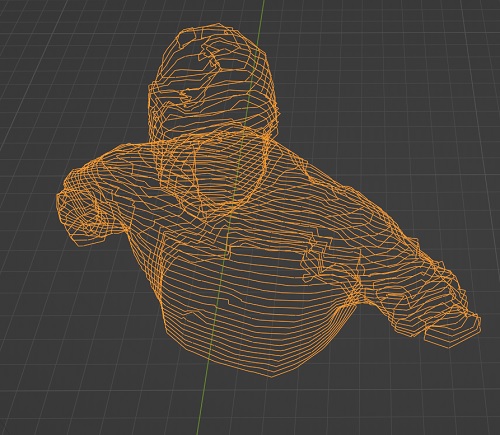
- Went back to Mesh Mixer to create a bust from my figure scan...then export it as a BINARY STL file.
- IMPORT the bust model into Blender.
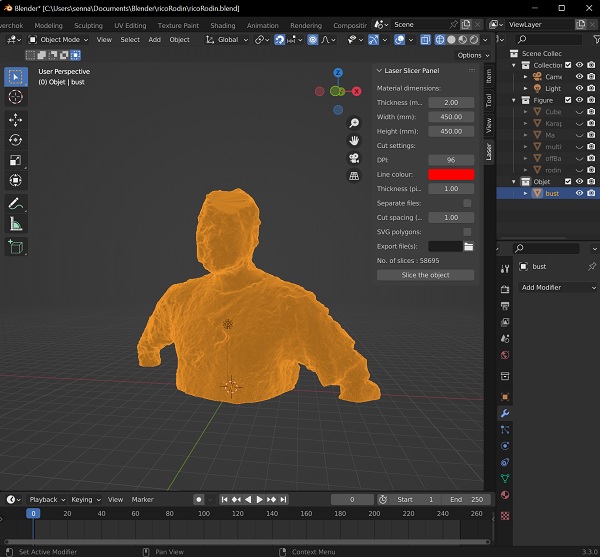
- Press the N key to access the Laser Slicer Addon settings menu
- Important settings adjustments (based on my initial understanding)
- Thickness...define the thickness of the slices in mm
- DPI...cut line resolution, higher best or laser cutting
- Thickness...line thickness in pixels
- Line Color...to match the requirements of the laser cutter software
- Separate Files...check, to have each slice as separate files
- Export File(s)...choose the output folder for SVG files
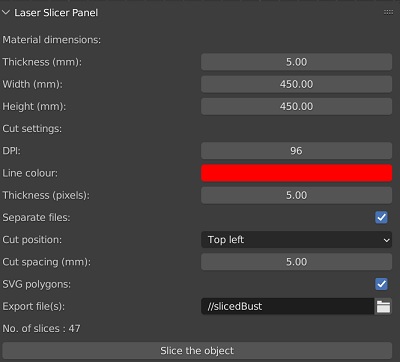
- I reduced the model size to be about 40cm wide...to make sure it fits into my lasercutter...and choose a 'Thickness' of 5mm
- But in Blender...a model this small make view orbiting and zooming...difficult. There is probably a solution for this that I am not aware of...
- Rather than reduce model size...I came realize that the 'Thickness' setting does not have to be exact...it can be relative...just use ANY thinkness to generate the desired number of cuts (indicated at the bottom).
Unlike Autodesk Slicer...Blender slicer does not generate attachment notchs automatically...extra work to add vertical elements and slot connections would be needed. Or it doesn't matter since this will be a stacked, not press-fit model...the pieces can be glued to one another.
- I will eventually find some time to make a small bust out of carboard to test this technique. But looks promissing
Additional Learning
Procedural Modeling > Blender + Sverchok
The Russian word for 'Cricket' is Sverchok. Sverchok is a free, add-on to provide Blender with Procedural Node functionality...very similar to Grasshopper. From everything that I have read on the internet...Sverchok can do most of what can be done by Grasshopper. Because I am a fan of FREE, open-source software...I will invest my time to learn Sverchok to do Procedural Node Modeling.
I found this free Sverchok tutorial e-book online called Code Plastic: Learn Sverchok. I have started reading the book and so far so good.
Hopefully, Sverchok will be a viable alternative to Grasshopper...and save me USD900 in software expense.
Learning for the week
A very enjoyable week for me, as I got to step out of my normal, very procedural (aka 'boring) way of thinking...and consider things from a different...more artistic and philosophical perspective. I enjoyed taking time to think about the Body and how digital tools can be used to interpret its conceptual form...to send a message.
From the assignment work point of view, I...
- Learned the Photogrammetry workflow. Very much like the fact that it is relatively easy to do with already available, multi-functional tools and free software. I definitely want to use this technique more...but next time focus on creating better images in more ideal light conditions.
- Spent more time learning the various Modifier features of Blender that I didn't know before.
- Spent more time with the Resin Printing workflow. For the purposes of Fabricademy...this 3D Printing tool may not be so useful...as the items it can create is rather small and the output is fragile. This fabrication technique is good for prototyping detailed versions of larger forms...seeing if the mesh model has any obvious problems.
- Happy to discover that Blender is also able to slice and produce 2D cut files with the Laser Slicer Addon...usable by laser cutters and probably other 2D CNC machines.
- Discovered to my happy surprise that the latest version of Inkscape is now able to export JPG (not just PNG) files.
- Learned how to add captions to images.
Links to Project Files
3D Printed Models
Blender Slicer Files
Additional References
Lo Poly Body > Blender
Lo Poly in Blender
Imphenzia
Modeling a Low-Poly Panda in Blender
UV Mapping & Unwrapping
Blender UV Mapping
Blender UV Unwrapping
- UV Mapping & Unwrapping = skinning 3D object onto 2D surface for texturing
Particle Body Animated
Blender Animated Bubble Body