3. Circular Open Source Fashion
Another fantastic Fabricademy week. An amazing and thought provoking lecture...and more introductions of shockingly talented classmates. I am humbled.
Class Notes
Zoe Romano gave an incredible lecture on Open source/Circular Fashion. Worth noting is Zoe's background which started with Philosophy, then Hacking Communities, then Digital Strategy and Communication for Corporation, then Arduino. After which she founded a design and fashion-focused makerspace that emphasized the connection of products with the local economy. Insisting that the context where you are making things should be understood...so that a collaborative community can be built.
The thematics...Non-proprietary technology, collaboration and community...reverberates throughout her subsequent lecture.
Zoe shared some of the projects she has worked on...
- Clotho...recycling/regenerating fibers to create EM radiation protecting clothing. The project is a gesture towards Circular Economy and a suggestion to corporations to take responsibility for the End of Life stage of their products. Incredible ideas!

- Centrino...a project to transform peripheral industrial areas into Circular Economy experimental grounds (in alignment with Fab City) and look into Short Supply Chain via local Tool and Material Recycling techniques. Connecting Stakeholders from Different Industries. The project specifically addresses the Collection and Recycling of Textiles.
Then challenged us to think more deeply about HOW and WHY 'Fashion' is produced...
- Kenneth P. Pucker was introduced as a champion of awareness campaigns such as...accurate and audited recording and transparency of carbon emissions impact by fashion corporations; the placebo reality of fashion retailer recycling programs (1% conversion rate) and their real purpose to generate 'guilt free' consumption; and the unaddressed Social Cost impact or Glass Ceiling limits of Fossil Fuel Alternatives. I found all these insights surprising and important.
Zoe challenged us to consider the question..."What type of 'Innovation' are you working on?"
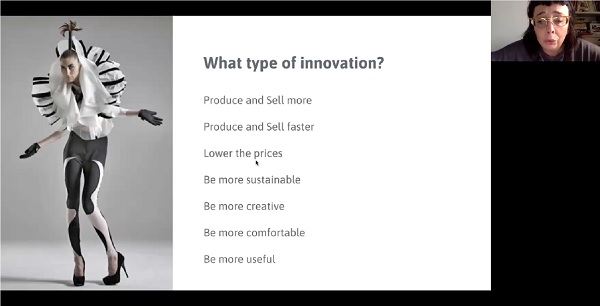
...and "How to work Collaboratively to make an Impact?"
Zoe shared that large fashion companies work on a 'Conglomerate' strategy. Large companies are increasingly utilizing Robots to manufacture clothing...at the expense of jobs for humans. The last idea was presented as a negative, but I struggle to see alternatives to this inevitability (trying to fight a tsunami)...not to mention human aversion to repetitive (non-creative) work.
Zoe then ranked various Waste Management initiatives...suggesting that production should be on an As-Needed rather than a Mass Production mindset.
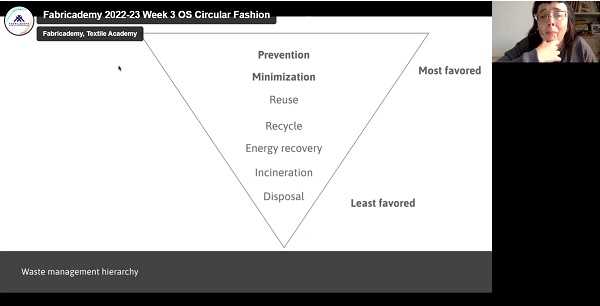
While I agree wholeheartedly, I feel that 'As-Needed' production methods would require societal scale behavioral change to be effective...shifting people away from 'want' to 'need'. Changing consumption behavior. A daunting task.
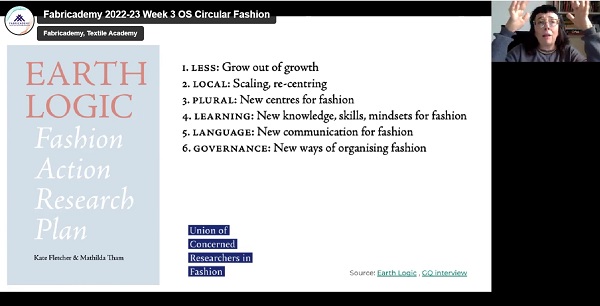
Then the thoughts of Kate Fletcher was introduced...as a new way of framing the fashion industry mindset. A treatise on fashion production in an Earth considerate way...primarily by rejecting common excepted ideas of Growth or Scaling. Without digging deeply into Ms. Fletcher's arguments, I see alignments with the former King of Thailand's Sufficiency Economy philosophy that eschews growth for growth sake, but seeks economic activity that generates equitable living for a country.
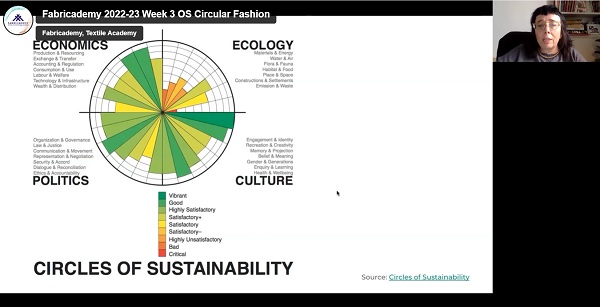
And then addressed the idea of Sustainability by qualifying fashion production in the context of Economic, Ecological, Political and Cultural impact implications.
Presenting Manufacturing 4.0, Zoe introduces a model of a new Fashion Manufacturing methodology that factors for all the issues that are important to her. A Distributed Factory.
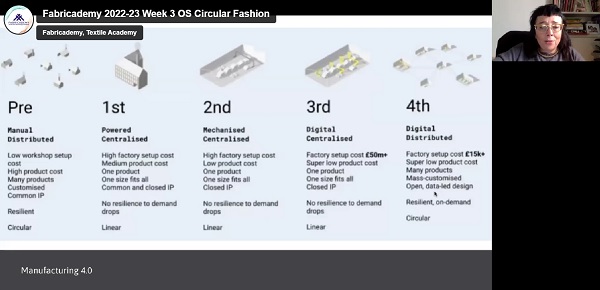
This, ofcourse, resonates with me deeply as it has strong similarities with the Fablab concept.Small fashion producers cannot compete without creating a Creative Collective to pool their resources.
Zoe then shifts to technology and the concept of Openness...where empowerment arises from knowledge sharing and Fragmentation of origin points. "Collaboration in an Open Framework".
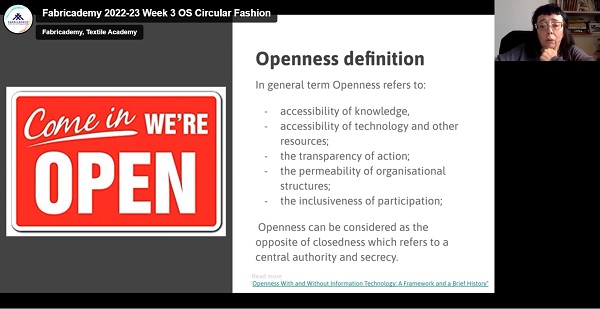
Fun Fact: The form (of a design) can be copied...but the tradmark cannot be copied.
Fashion houses operate on Secrecy and Authority...very much against Openness.

But Zoe suggests that ""Openness can be a competitive advantage"...can be a method to achieve local, sustainable and social justice aware fashion production. Fablabs as the space to explore this concept. But currently Fablabs are good for experimentation and creating human connections...not really set up to be production hubs.
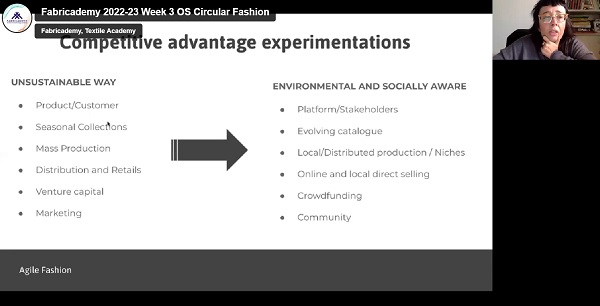
Agile Fashion...no division between the designer and the manufacturer...waste can be a design consideration from the start.
My Takeaway:
Don't Make Without Thinking Multi-Dimensionally About the Implications of Making and Make Collaboratively
Modular Fashion
So this week, we explore textile fabrication as a function of fabric modules. Utilizing small, interlocking modules...with materials that have inherent structural properties (some thickness and stiffness)...to create fashion accessories and garments. My notes from the session by Anastasia-sensei and Zoe are as follows...
- Tessellation and Interlocking...as fabric component assembly method...not sewing
- Tesselation...geometric modules that repeats to generate a pattern or a surface...the shape is consistent but sizes can change
- A thicker material...with some structural weightiness...like felt...is needed for Modular fabrication
- Understand material weight and weight bearing possibilities of the material...to know whether it would work for the technique.
- Scuba Knit (like neoprene)...great thickness!
- Connection between modules are accomplished via what I would describe as Darts and Slots...where the darts are inserted into and are captured by the slots.
- 2D or 3D structures can be produced with Modular and Tesselation technique...connecting many modules together in novel ways.
- Play with shapes and colors...to produce attractive and interesting results
- Prototype with paper before moving to final fabric material
- Use grids for design
- Wooly felt will smell bad when laser cut
- Leather is a great option for modular fashion
- Use SVGnest or Deepnest.io...automatic nesting software...to save material, reduce waste
Assignment

My simplified understanding of the assignment requirements as follows...
- Design a Tesselation Module
- Simulate interlocking and configurations digitally
- Use a lasercutter to fabricate the modules
- Test actual connections for holding and stretching strength
- Upload a PDF fabrication file in the correct scale + 1-5 photos with a white background
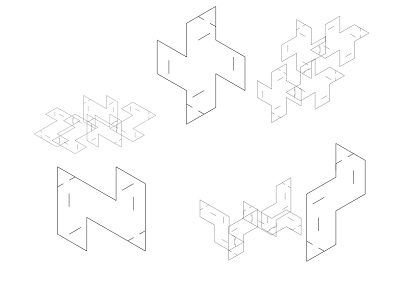
Research & Inspiration
From the examples shown to us during the class, I was particularly intrigued by the work of Eunsuk Hur. I was particular attracted to the 3-dimensionality of the designer's work.
Eunsuk Hur..."interchangeable modular systems that promote sustainable design. Inspired by fundamental geometric structure and patterns of growth in nature".
And while Googling 'Tesselation', I came across 3D Tesselated Origami (paper) surfaces. Not directly applicable to the week's assignment work...but a fascinating and inspirational discovery nonetheless.

Assignment Work
Reminder to Self: To see Webpage preview from Markdown script in Visual Studio Code...CTRL + SHIFT + V
I began by making some sketches of possible shapes for the tesselation modules.
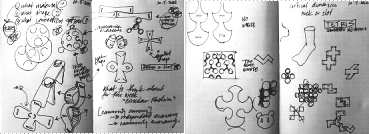
I considered shapes that would generate minimal or zero waste from the sheet of fabric when cut. Realized that the shape would need to fit within...be defined by some sort of grid...to achieve this end.
I also very much want my tesselation modules to be able to produce 3D surfaces when assembled.
3D. Organic. Sculptural...like a knitted scarf that uses really fat yarn.
(find a reference image )
Inkscape V1.2
As suggested during the lecture, I set to translate sketches to actual, machine cuttable shapes by drawing the shapes in a 2D design software...Inkscape.
I began by making a grid to control shape making...and chose to trying using a non-conventional, axiometric grid. In Inkscape, I enabled a background grid by going to...
File > Document Properties > Grids > New > Axiometric Grid
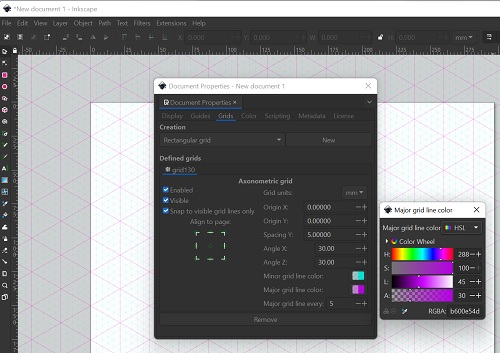
...and then tweaking the settings:
- Spacing Y > 5
- Minor grid line color > cyan
- Major grid line color > pink
Then I started drawing on the grid with the Bezier Curves and Straight Lines tool. I drew a few shapes...making sure the snap to grid toggle (magnet icon, upper right hand corner) is activated.
SHIFT + # to toggle grid ON/OFF
Darts & Slots are needed to connect the modules together. A Dart is a shape that would be inserted into and held in place by a Slot cut-out insertion point.
Adjust the stroke weight to 0.01mm...a thin line...for lasercutting. Then I duplicated the shapes with CTRL + D...and the Mirror tool to flip the shape. I made 3 copies of each shape...for prototype cutting and testing in paper.
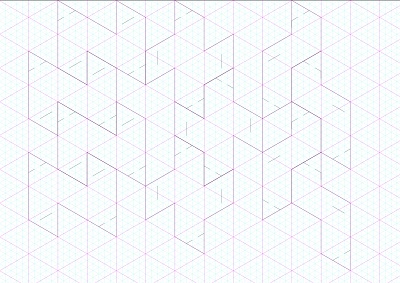
Export the cut-file as a PDF file...File > Save As > filename.pdf
Laser Cutter
I used a combination of the Muse 3D Lasercutter + Retina Engrave control software.
This image shows the Retina Engrave, lasercutter control software, interface.
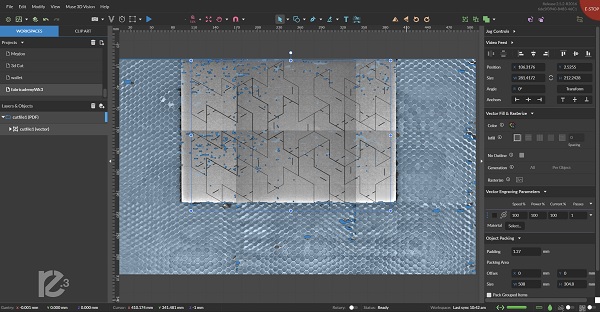
The Workflow is as follows...
- Turn on the Muse 3D Lasercutter > launch the Retina Engrave control software
-
Install the material to be cut (colored craft paper in this case) on to the lasercutter cut-bed
- I used some masking tape to hold the paper down...as some times the strong air-assist blower can move light weight objects on the cut-bed...resulting in mis-aligned cuts
-
Use Retina Engrave Capture Workspace (camera icon) feature to take a photo of the material on the cut-bed.
- Create a New Project (the Page+ icon) > give the new project a name > "fabricademyWk3"
- Import PDF cut-files into the project folder
- Clicking on the name of the cut-file in the project folder > the shapes will appear on the screen over the cut-bed image
- Drag and position the cut-file image over the material
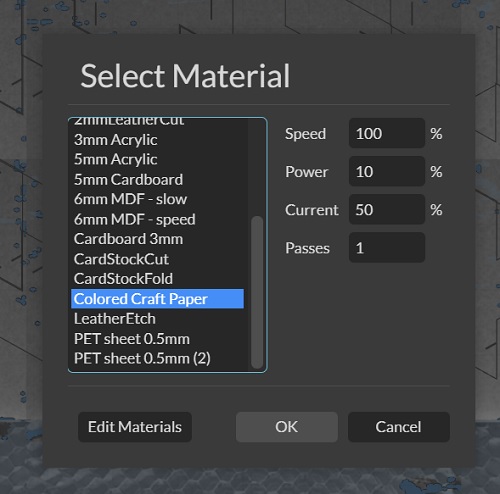
- Specify the lasercutter...movement SPEED, POWER and CURRENT % (100% is maximum)...as well as the number of cu PASS the lasercutter should perform
- Generally speaking, SPEED should be set as high as possible...to avoid the laser being in one spot for too long and causing the material to burn
- The POWER setting is set lower for easy to cut and thin materials...and vice versa for thicker material. Generally, one should use the lowest POWER percentage that will still result in the desired cutting performance. Use of high percentage laser often will shorten the life the the laser tube.
- The Current setting specifies the pulse rate of the laser. A higher percentage will basically have the laser firing continuously. A lower setting would mean the laser firing with some pause in between...resulting in a 'dash-line'...rather than a continuous line being cut. Similar to the POWER setting...using a high setting for CURRENT all the time will shorten the laser tube life.
- For cutting Colored Craft Paper I chose the following settings for the cut operation...SPEED = 100%, POWER = 10%, Current = 50%, PASS = 1. The settings were selected from a pre-saved list of materials that I had created in the past.
I placed the Colored Craft Paper on the cut-bed...using a bit of masking tape to hold down the paper so it won't move during cutting.
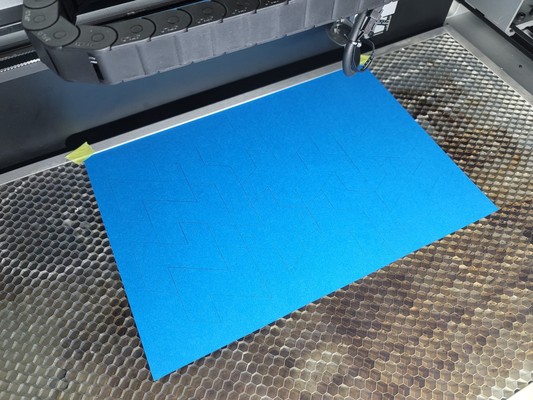
About 30 seconds later, the cut is complete.
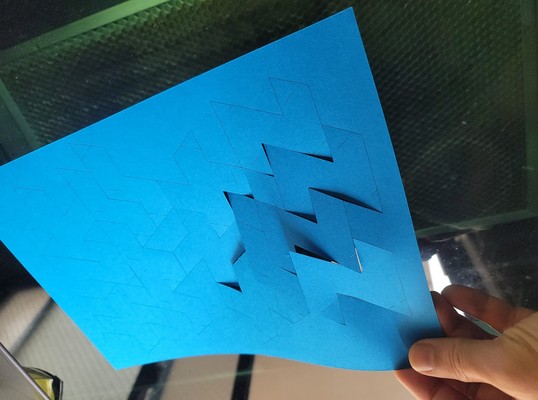
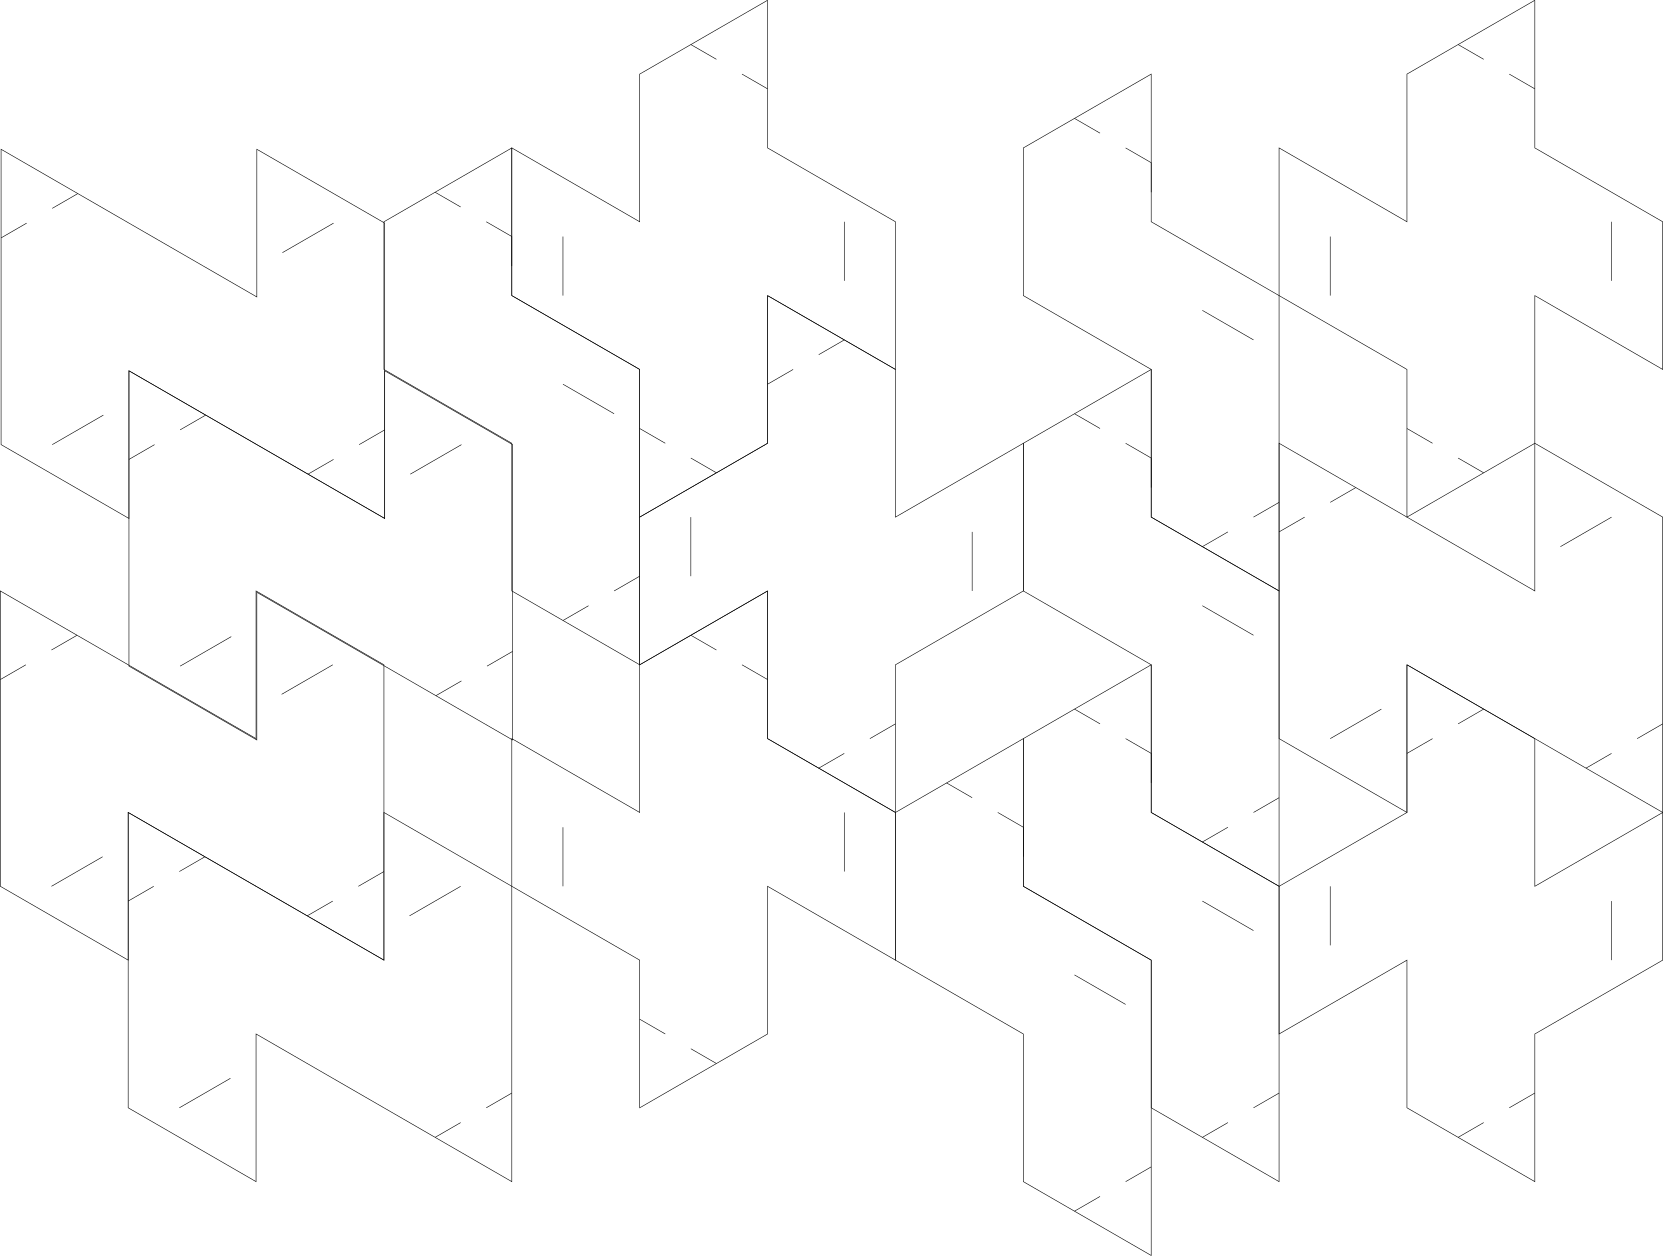
Tessalation Module > Version 1
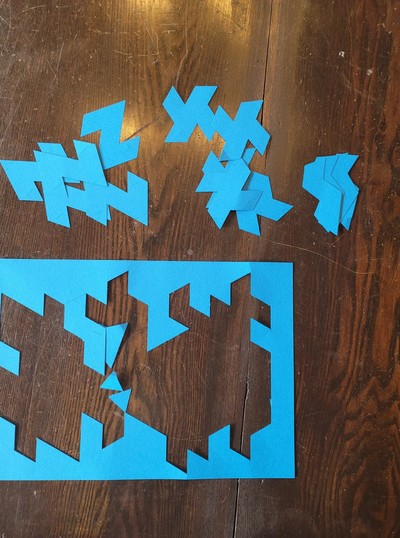
With the geometric shapes cut, I tried to assemble them into an interesting surface. With all 3 shapes, I realized that my randomly placed slots made no sense...it didn't aid the shape assembly into some sort of regular surface. So I disregarded the cut slots and just laid the shapes on top of one another to try to make a regular pattern.
I think I was too tired to think...because after about 15 minutes of trying to arrange the geometric shapes...I got a huge headache and lost interest. Being geometric patterns...the shapes needed to be arranged in some rational way...to produce a Tesselated Surface...but my tired brain was not up to the task of generating a logical, shape generating algorithm.
While the geometric shapes would achieve the Zero Waste goal, I couldn't think about how they would generate interesting 3D shapes.
Let's try something different.
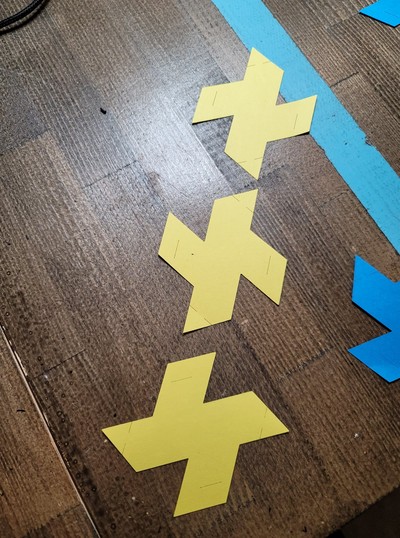
Tessalation Module > Version 2
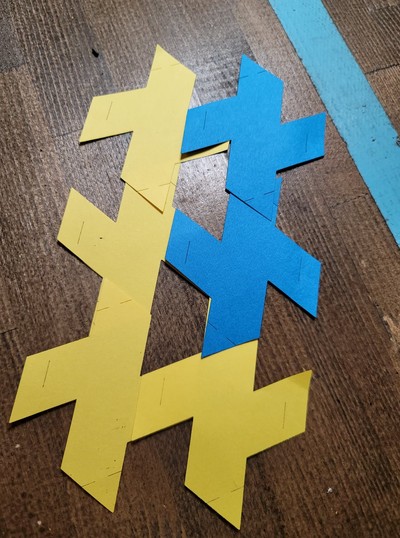
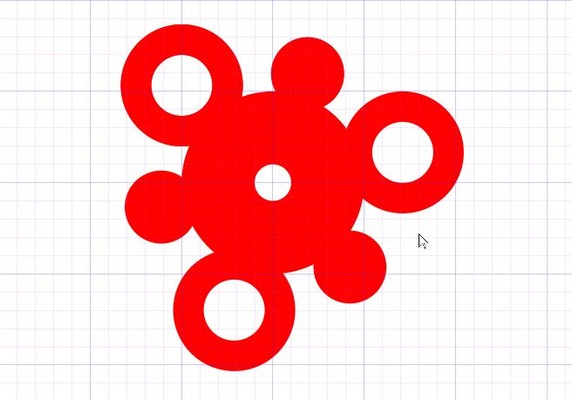
With time running short, I decided to abandon the geometric shapes and design another more organic shape similar to one I had in my sketches. The module vaguely resembles Molecules.
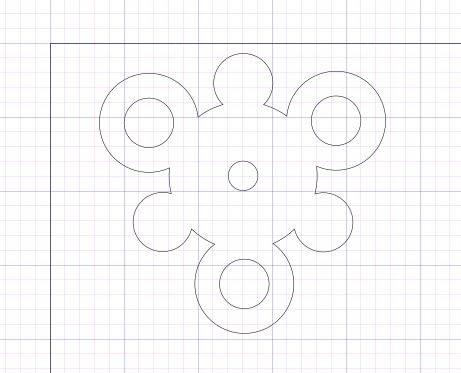
But I chose to design this shape not only for the appealing aesthetics. The design explores the elegance of shapes that could act both as a module Dart as well as Slot functions. The design also explores multi-directional connections that would allow for 3D shapes to be assembled.
To make the shape, I made good use of Inkscape's Tiled Clone and Boolean tools. With a large central circle drawn (with a small center hole for making a connection), I created 2 radial arrays of 2 types of smaller circles...to be the connection tabs. The larger of the radial circles is a dart but also has a hole cut into it that will serve as a slot. The smaller radial circles will be used to connect to the center connector slot of the large central circle.
(show the design process of the shape...)
To make the Radial Tiled Clones

Edit > Clone > Create Tiled Clones...
- Symmetry > P1: Simple Translation
- Shift > Shift x > Per Column > -100%
- Exponent > 1 for both Row and Column
- Rotation > must calculate then enter into Per Column cell...Angle = 360/number of desired radial clones
- Apply to tiled clones: Rows > 1, Columns > 3
Then click Create to make the clones.
With the radial outer circles made, I used...
Path > Union
...to combine one outer circle to the central circle one by one...until a single final shape results.
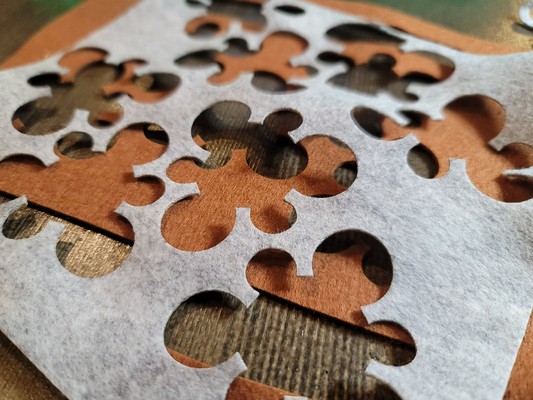
Similar to the geometric shapes...I exported this Tesselation Module as a PDF and added the file to the project folder in Retina Engrave.
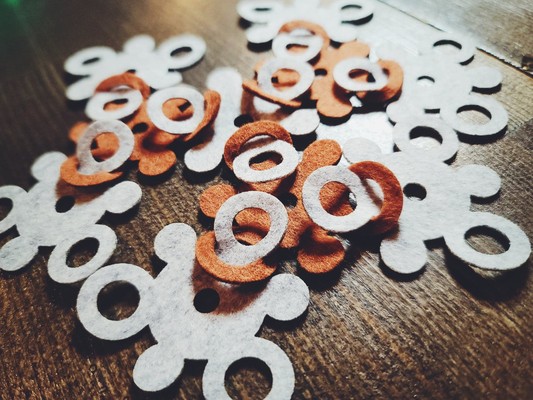
Then...copying the shape many times and arranging them on to of the material image...I cut out the shape.
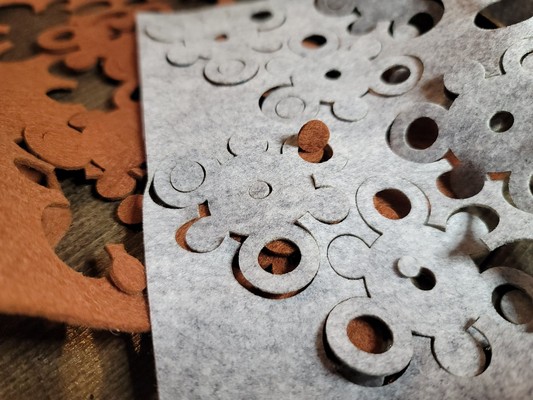
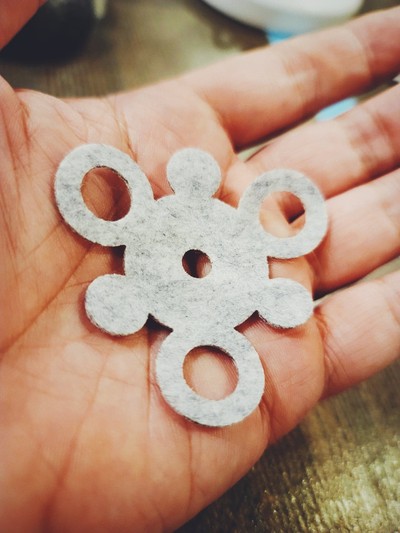
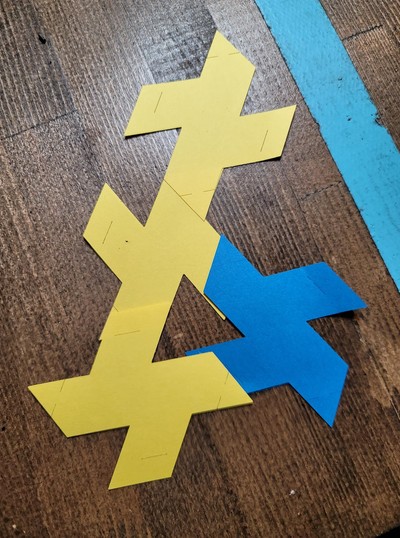
I was pleased with this lasercut result. The connections between the modules are easy to do and hold reasonably well...with both shape, the material's texture and frictional forces combining to keep the pieces connected. If I pull on the pieces with some force...the connection will fail...but I believe that this is more a limitation of the felt material than the design itself.
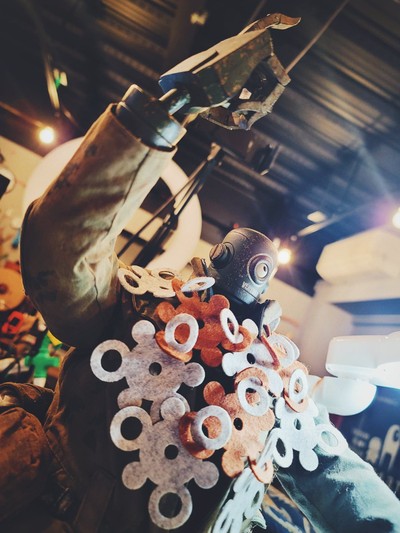
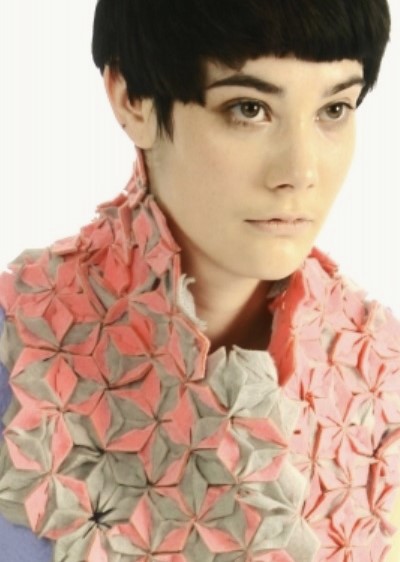
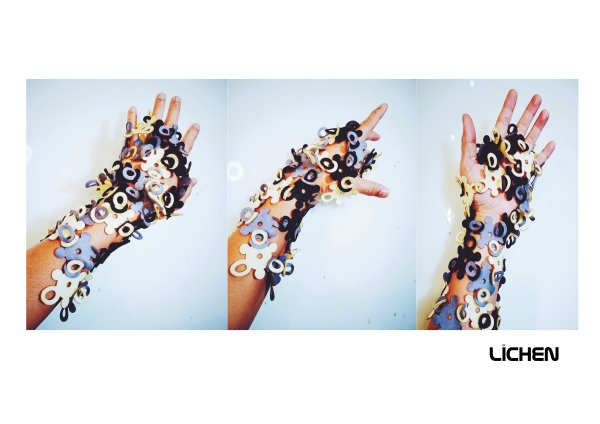
I connected the modules together (cut in two colors), and it made a fun, random, organic, 3D textile surface.
I draped it over one of my figures and I think it make a great result (my fashion sense is very poor...I know)! The circular loops also feels like an opportunity for some kind of mechanical closure...to make the connection stronger and more permanent.
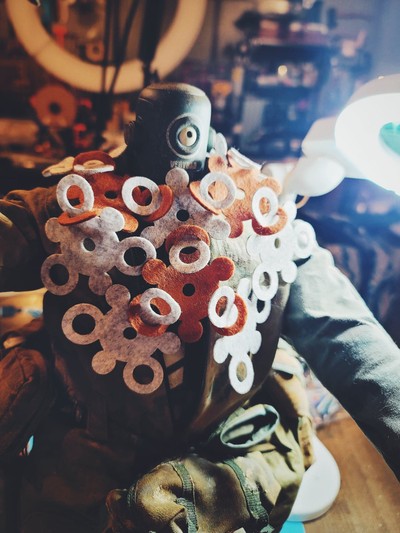
I think the assignment requires that I make a garment that can be worn by a human being. Ran out of time this week...so will have to come back to this at a later date. For now...this is as much as I got with an actual 'wearable'.
Learning Outcome
- Repetition is beautiful
- Modularity has the potential to create very organic shape with some randomness that results in evocative 'natural' style garments.
(no glues or sewing...how about knoting?)
Alumni Inspiration
So I didn't look at any of the pages below until AFTER I designed and cut my module. Not only are all the alumni amazing...their work really puts me in my place and reminds me that I am way out of my element. sigh.
Three in particular, I found captivating...
-
Noemi Carrier EchoFab Montreal 2020-21
-
Jessica Stanley TextileLab Amsterdam 2018-19 From Noemi and Jessica in particular...I learned that geometric patterns...when done correctly...can be used effectively to make a textile surface...even using thin materials!
-
Irene Caretti TextileLab Amsterdam 2018-19
Fabrication files

References
Tools
During the week, I participated in a number of the extra tutorial sessions and did some self learning. 3 tools in particular...
Blender + Sverchok
Reading the book Learning Sverchok...I am doing the tutorials and trying to get some expertise of this Procedural Node tool.
Rhino Tutorial
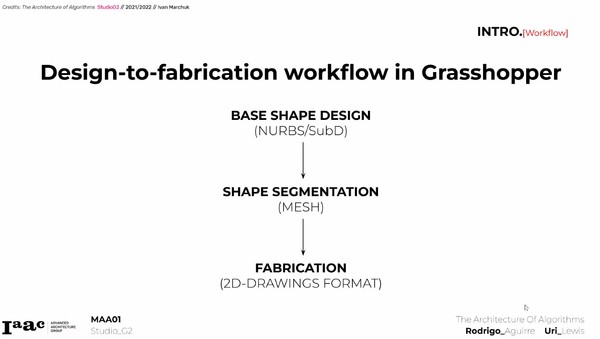


Not really having an idea as to what Rhino/Grasshopper (R/G) can do, I joined the many sessions on the software hosted by Rodrigo. It is my intent to see if the techiques being used in R/G for Fabricademy work can be replicated in Blender...a software I have some familiarity with.
My key takeaways from Rodrigo's tutorials, a few techniques will be heavily used in Fabricademy...
- Free-Form Surfaces...to simulate fabric
- Lofting...projecting from one 'free-form curves' to the next via a directional 'rail'
I came away with some level of comfort that most of what Rodrigo did with the R/G software can be...in theory...replicated by tools in *Blender.
Clo3D Tutorial
My first impression upon seeing Clo3D at work in the lecture by
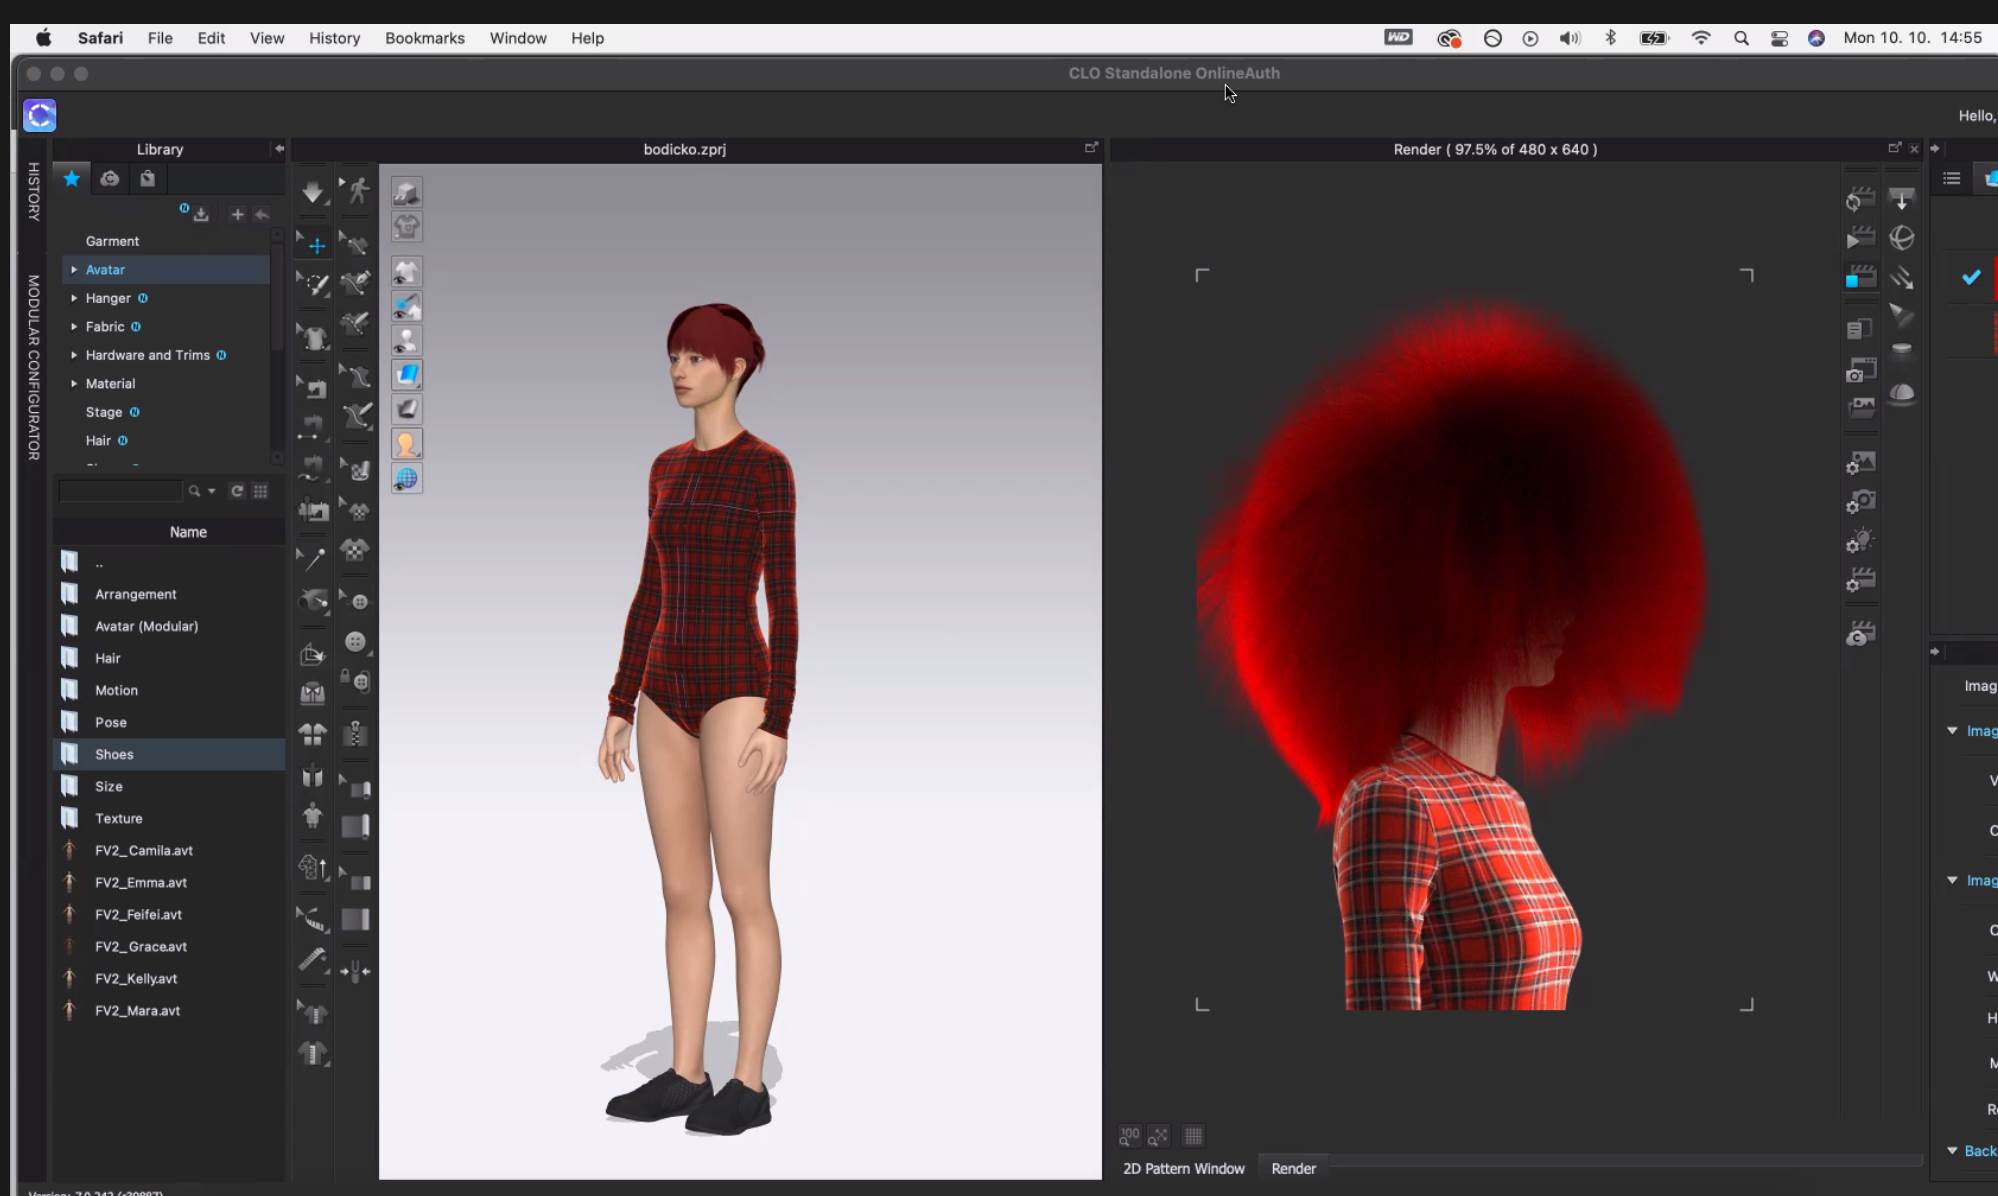
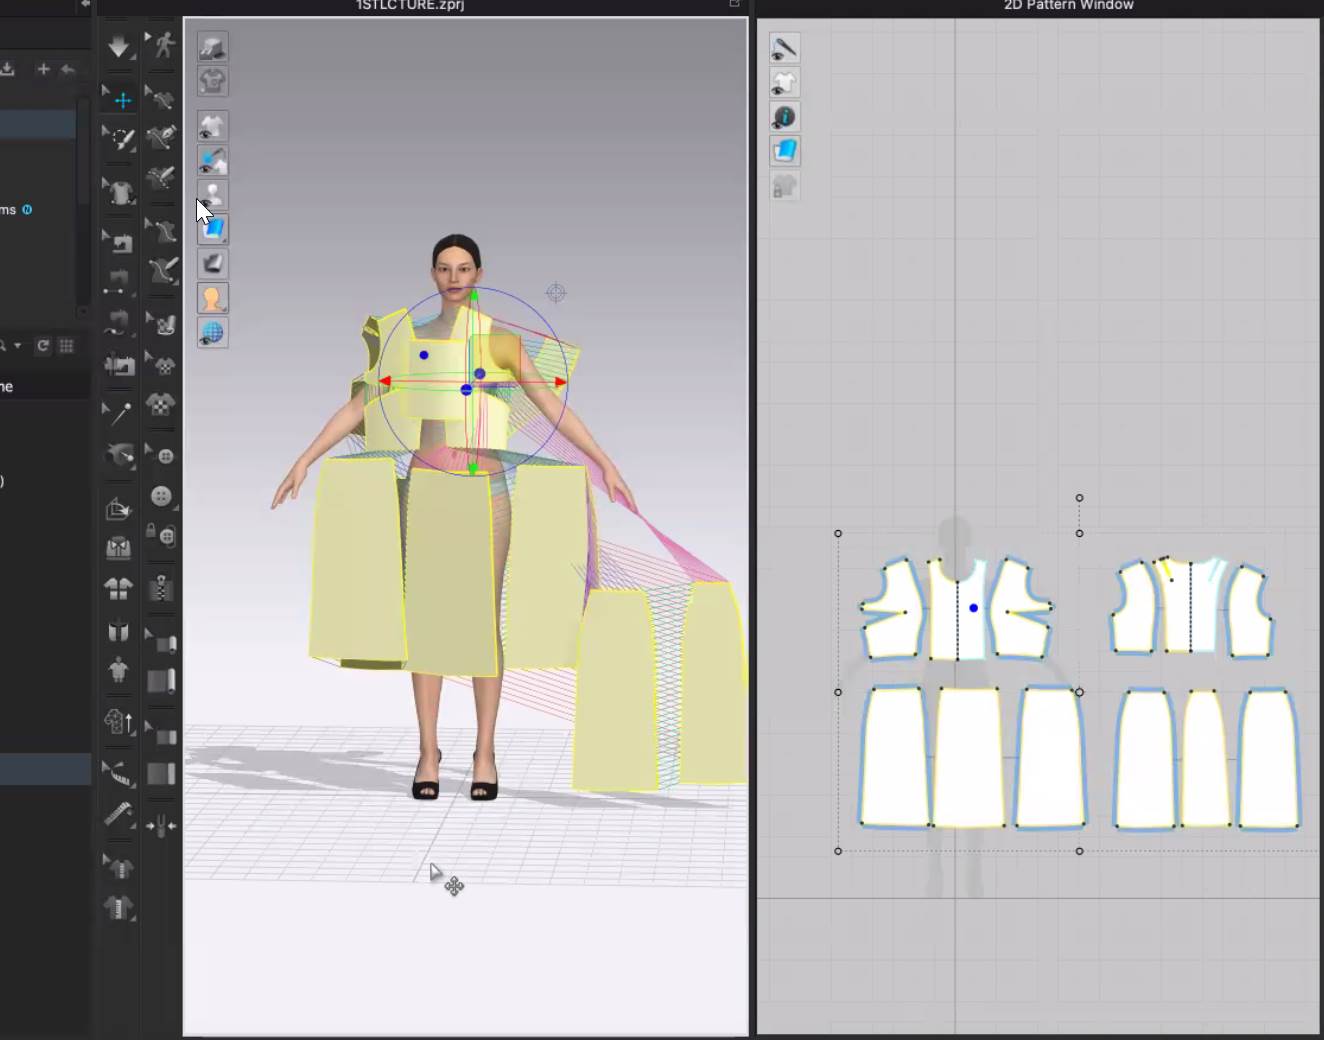
- Utilizes 3D 'Avatar' human representation...for testing fit of clothing pattern
- texture on surface
- pattern making
- rul file has extra info specific tro paTTERN MAKING
- imported bezier lines from Inkscape or Illustrator may have too many control points...this is not desireable...too many segments
- poseable figure...with interna armature
- simulated sewing...by joining eges
- mesh manipulation for final adjustment of pieces possible
- Adjust 'Particle Distance' > 20 default...lower number = more triangles...5 recommended to prep for rendering...>8 for animation
- Animate with 'Quad' not 'Triangles'...to make it less demanding on the CPU
-
Avatar appearance can be changed by editing the jpeg texture for the avator body
-
The Concept: Simulated Sewing helps save wasted fabric from failed real-world sewing projects
- Most of the steps can likely be done in Blender...except
- Add elastics
- Drape on virtual model
- Material behavior
Videos
Random Research
plastic umbrellas
plastic umbrella japan uses high frequency heat.