Deliverables
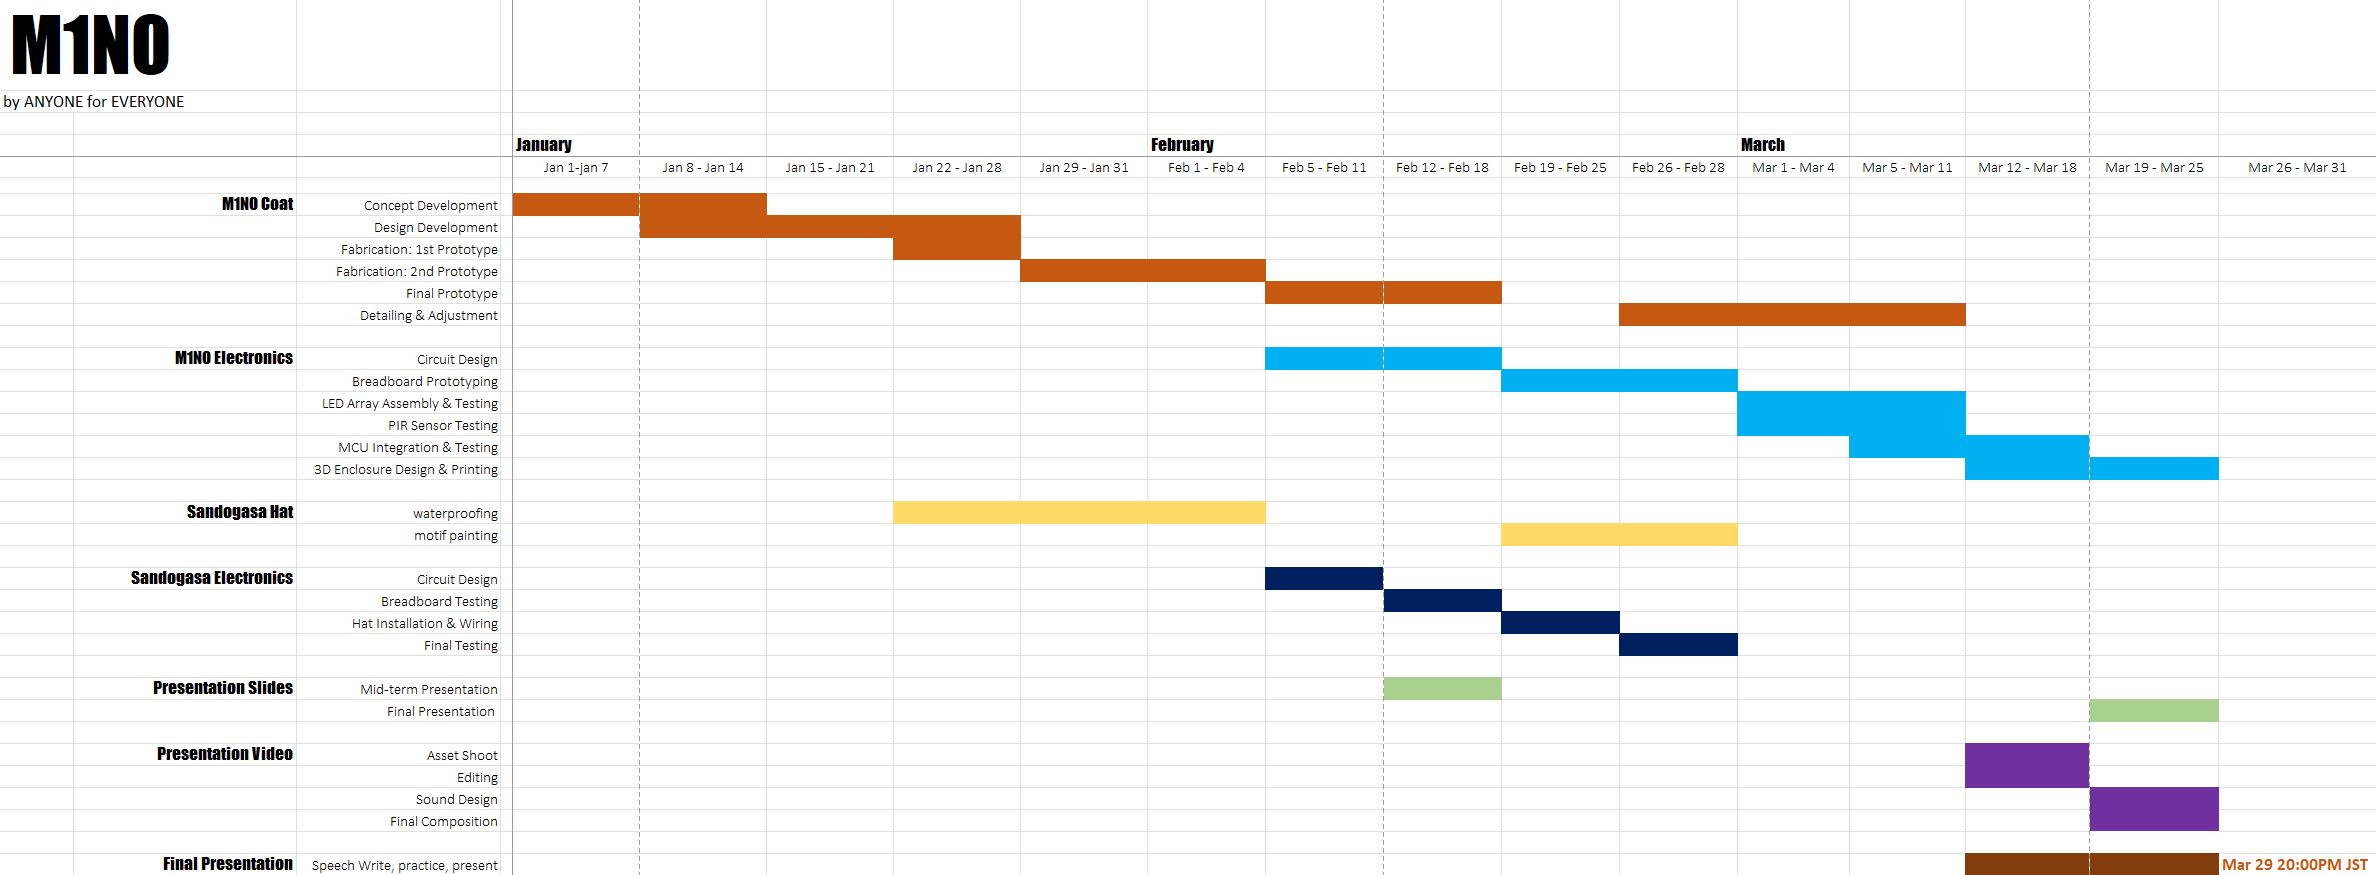
GANTT
BoM bill of materials
The Bill of Materials described below are all that is required to...
- Build a M1N0 coat
- Install an LED light array and control electronics inside the M1N0
- Install an RGB fan and control electronics on a Sandogasa hat
Materials
| Qty | Description | Price | Link | Notes |
|---|---|---|---|---|
| 2 | 8mm PE Rope 200m | 14.00 $ | local home center | |
| 2 | 1mm PE Cord 30m | 10.00 $ | local home center | |
| 1 | Parcord 100ft | 12.00 $ | local home center | |
| 1 | 6mm OD Clear Silicone Tubing 5m | 5.00 $ | local home center | |
| 2 | Arduino Nano MCU | 16.00 $ | amazon.com | 3pack |
| 2 | Perf PCB Board | 20.00 $ | amazon.com | 34pcs pack |
| 1 | Outdoor LED string | 15.00 $ | amazon.com | |
| 1 | RGB Computer Fan 120mm | 10.00 $ | amazon.com | 3pack |
| 2 | Rechargeable Lithium 9V Battery | 16.00 $ | amazon.com | 2pack |
| 1 | Outdoor LED string | 15.00 $ | amazon.com | |
| 1 | 22awg Wire 20m | 15.00 $ | amazon.com | |
| 5 | XH Connectors | 3.00 $ | amazon.com | 230pcs kit |
| 5 | SM Connectors | 4.00 $ | amazon.com | 200pcs kit |
| 2 | Female 2.54mm pitch Pin Header | 15.00 $ | amazon.com | 10pcs kit |
| 2 | Slide Switch | 3.00 $ | amazon.com | 20pcs kit |
| 2 | PIR sensor | 3.00 $ | amazon.com | 3pcs kit |
Slide show
Story telling script
I do not have the knowledge or skills to create a garment that is fashionable.
Fabricademy...has empowered me with enough skills and persepective to create a simple, utilitarian garment out of ordinary materials...that is thoughtful and sensitive to environmental and social issues.
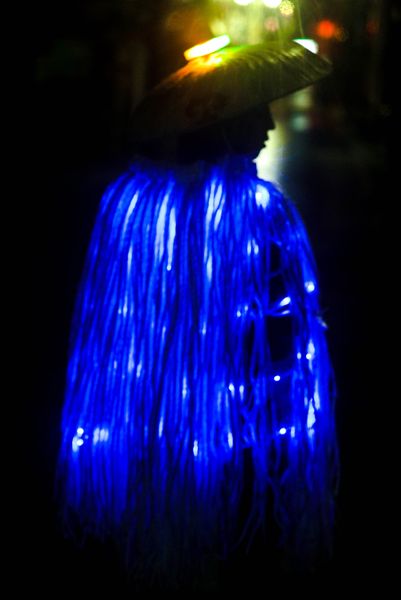
The M1N0 project is an electronically enhanced wearable that addresses the issues of textile waste and garment making accessibility by the masses. It's simplicity is both a reflection of my skill (or lack there of) but also a nod of appreciation to a tradition of garment making that is beautiful because of its humility and usefulness.
Key Explorations
- Abstraction > obscure the human body
- Precedent > historical design and fabrication reference
- Utility . emphasis on practicality and functionality
- Mythology > temporal agnostic form...not style
- Hybrid Fabrication > Analog & Digital fabrication
Key Intent
- Simple to fabricate
- Economically accessible by anyone
- Culturally coded
- Timeless
- Electronically enhanced
Storyboarding
Flow Thematic > from history to the future
- scene 1 Traditional Japanese flute music plays over a black screen...setting the atmosphere
- scene 2 A rudimentary 2D animation plays while expository text is displayed..."Learn from the PAST, refactor for the PRESENT...and FUTURE fiction"

- scene 3 The music changes as a blurry black and white image...suggestive of a Kurosawa movie from the 1970s appears

- scene 4 Still images transitions to motion pictures in black and white (heavily referencing Kurosawa)...emphasis on showing the M1N0 garment's form and flowing movement

- scene 5 A black screen transitions to a screen of spring flowers in full color...panning to see the M1N0 in full-color...in a traditional Japanese context

- scene 5 Stills and close-ups of the M1NO...showing form and details


- scene 6 The 'Traditional' section ends and fades to black
- scene 7 Slow music changes to aggressive modern music...cyberpunk still images shows the electronic enhanced M1N0 in its night guise

- scene 8 The electronic M1N0 is shown in motion...in the rain
- scene 9 The modern M1N0 end section ends with a black screen...the music transitions again to upbeat rap music...and the closing credit section rolls
 - scene 10 The video ends with a final shot of the modern M1N0 and Japanese kanji characters in red

FABRICATION FILES
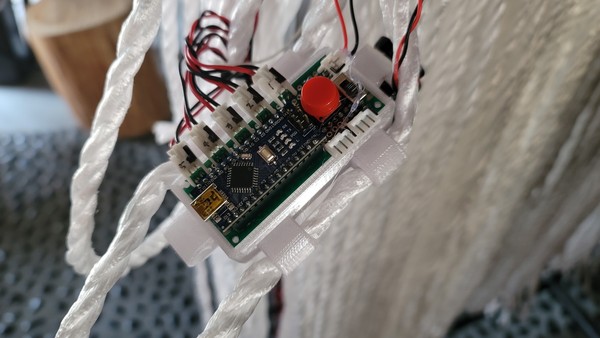
The M1N0 was primarily handcrafted...intentionally so, as the ability for the garment to be made by anyone was an important point. Some 3D printed parts were designed and fabricated to house and install electronic components into the M1N0.
 M1N0 PIR Case Top
M1N0 PIR Case Bottom
M1N0 PIR Case Top
M1N0 PIR Case Bottom
Project Code
The code below is loaded to the M1N0 controller computer and triggers its various functions
//M1N0 Final Project Control Program
//by Rico Kanthatham, Fabricademy 2023
//License: Creative Commons Non-Commercial Attribution

//Debug LED
const int ledPin = 13;

//LED String
const int LEDstrings[] = {5, 6, 9, 10, 11};
int brightness = 5;
int fadeRate = 1;
int delayShort = 100;
int delayLong = 100;
int size;

//PIR Sensor
const int inputPin1 = 2;               // input pin PIR sensor 1
const int inputPin2 = 3;               // input pin PIR sensor 2
int pirState1 = LOW;             // initial PIR1 state...no motion detected
int pirState2 = LOW;             // initial PIR2 state...no motion detected
int val1 = 0;                    // PIR1 read value
int val2 = 0;                    // PIR2 read value

//Button
const int buttonPin = 4;     // pushbutton pin number
int buttonState = 0;         // initial pushbutton state

void setup() {
  Serial.begin(9600);

  pinMode(ledPin, OUTPUT);
  pinMode(inputPin1, INPUT);
  pinMode(inputPin2, INPUT);
  pinMode(buttonPin, INPUT);

  size = sizeof(LEDstrings) / sizeof(int); //determine the size of the LED Strings Array

  for (int i = 0; i < size; i++) {
    pinMode(LEDstrings[i], OUTPUT);
  }
}

void loop() {

  //Status Quo expression of LED String Array
  for (int i = 0; i < size; i++) {
    slowFade(i);
  }

  //Check PIR sensor for detected motion
  sensor1();
  sensor2();

  //Check Button for press
  button();
}

//Slow Fade LED pattern
void slowFade(int s) {
  analogWrite(LEDstrings[s], brightness);
  brightness += fadeRate;

  if (brightness <= 5 || brightness >= 255) {
    fadeRate = -fadeRate;
  }
  delay(delayLong);
}

//Flash LED Pattern
void flash(int n) {
  digitalWrite(LEDstrings[n], HIGH);
  delay(50);
  digitalWrite(LEDstrings[n], LOW);
  delay(20);
}

//PIR sensor 1
void sensor1() {
  val1 = digitalRead(inputPin1);  // read input value
  if (val1 == HIGH) {            // check if the input is HIGH
    digitalWrite(ledPin, HIGH);  // turn LED ON
    for (int i = 0; i < size; i++) {
      flash(i);
    }
    if (pirState1 == LOW) {
      // we have just turned on
      Serial.println("Motion detected PIR1!");
      // We only want to print on the output change, not state
      pirState1 = HIGH;
    }
  } else {
    digitalWrite(ledPin, LOW); // turn LED OFF
    if (pirState1 == HIGH) {
      // we have just turned of
      Serial.println("Motion ended PIR1!");
      // We only want to print on the output change, not state
      pirState1 = LOW;
    }
  }
}

//PIR sensor 2
void sensor2() {
  val2 = digitalRead(inputPin2);  // read input value
  if (val2 == HIGH) {            // check if the input is HIGH
    digitalWrite(ledPin, HIGH);  // turn LED ON
    for (int i = 0; i < size; i++) {
      flash(i);
    }
    if (pirState2 == LOW) {
      // we have just turned on
      Serial.println("Motion detected PIR2!");
      // We only want to print on the output change, not state
      pirState2 = HIGH;
    }
  } else {
    digitalWrite(ledPin, LOW); // turn LED OFF
    if (pirState2 == HIGH) {
      // we have just turned of
      Serial.println("Motion ended PIR2!");
      // We only want to print on the output change, not state
      pirState2 = LOW;
    }
  }
}

//Button Action
void button() {
  // read the state of the pushbutton value:
  buttonState = digitalRead(buttonPin);

  // check if the pushbutton is pressed. If it is, the buttonState is HIGH:
  if (buttonState == HIGH) {
    // turn LED on:
    digitalWrite(ledPin, HIGH);
    for (int i = 0; i < size; i++) {
      flash(i);
    }
  } else {
    // turn LED off:
    digitalWrite(ledPin, LOW);
  }
}
How-Tos & Tutorials
Fabrication methods are reasonably well described in the Process pages of the M1N0's design development.