1. State of the art, project management and documentation
The first Fabricademy session was intense!
At the end of the session, I was inspired, in awe...and more than a little nervous. The example projects from previous Fabricademy projects were mind-blowing.


Here are the links to the fantastic Fabricademy projects by Haneen Ja'afreh and Maite Sosa.
Honestly, I can't help but feel a bit intimidated, since I cannot imagine that I would ever be able to do anything that amazing (fashion is not my forte). But the thought that I would learn just enough...to get somewhere within the vicinity of that level of coolness...makes me super excited and gives me some hope.
Assignment 1 Assessment Criteria
This is the link to the Fabricademy Assessment Criteria page.
The requirements for this weeks as follows...
Documentation
I know the value and importance of good documentation, having done it extensively during my Fab Academy program. But when I look back at my documentation back then...and I can't help but cringe. It really was not so good. I am aiming to do a much better job this time around.
As I remembered from my Fab Academy days, the process of setting up the documentation platform is complicated. In this week's documentation, I want to distill the process down to its essence, so that people new to the process can feel less overwhelmed than I did.
After sitting down and thinking about it a bit, I think the procedure can be thought of simply in the following way...
- The Objective > Documentation = create and maintain a personal website to track, record and share my Fabricademy work, exploration and progress
-
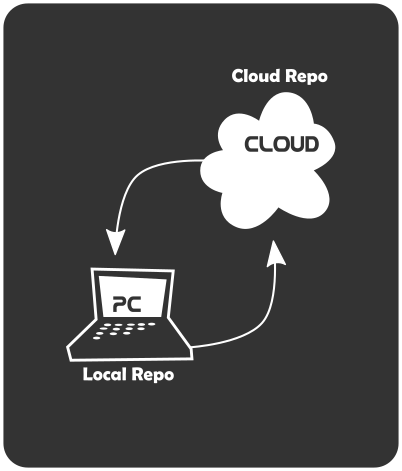
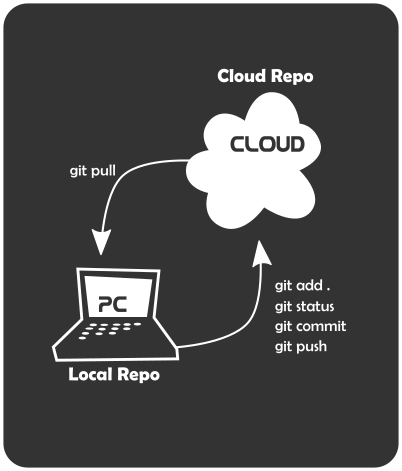
The Conceptual Framework > Create a copy of the Gitlab Cloud Repository (created by the Fabricademy Coordinators) that represents my Fabricademy website as a Local Repository on my PC.
- A Repository (or just Repo) is just a fancy word for all the folders and files that are used generate my website.
- Working locally on my PC, I push changes I make to my website files in my Local Repo to the Cloud Repo to update my website.
- Why work locally? While you CAN edit your website files in the cloud by logging into Gitlab...working locally means no internet connection is required and sometimes working on the cloud can be slow (bad internet connection, etc.). Working locally also means you have a local copy of ALL your files...in case Gitlab is inacessible or blows up!
-
The Tools >
- Git (Local to Cloud file transfer)
- Gitlab (Cloud Repository hosting platform
- MkDocs (HTML generator)
- Visual Studio Code (Text Editor on steroids!)
- Markdown (website scripting)
- MS Paint (Single image resize)
- XN Convert (Multiple image resize)
- Inkscape (graphics & annotation)
Let's talk about each tool in more detail...
Gitlab
Gitlab is the cloud-based website hosting and management platform (...at least this is how I think of it). The Fabricademy Coordinators allotted server storage space and created the bare-bones website for us students to get started...and all of it is hosted on the Gitlab platform.
In Gitlab, I can... - Make changes to my website...using Web IDE Markdown script editor - Track and troubleshoot merge requests and commits(request to update my website with recent changes I made) - Utilize Version Control functionality...allowing us to back track to a previous version of our website, if we made some huge mistake in the more recent change update.
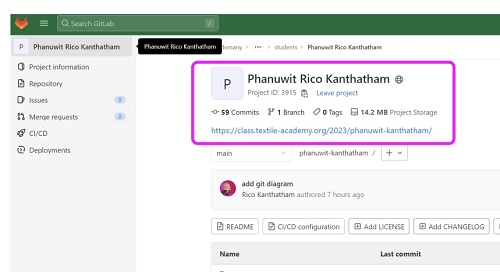
As Fabricademy students we login to Gitlab with our Fablabs.io credentials (username and password)...and we are greeted with an interface like this...
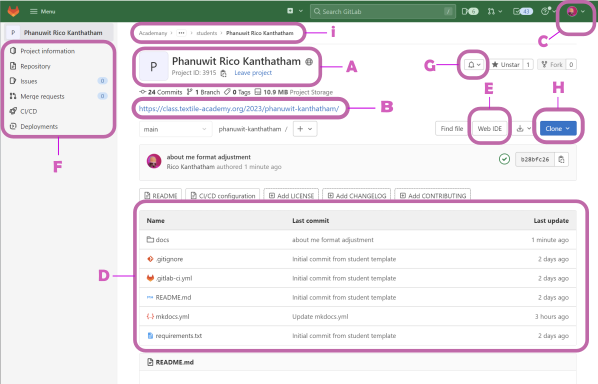
A. Your Name
B. Your Website URL
C. Your Profile and Preferences
D. Your Cloud Repository Files
E. Web IDE
F. Gitlab Tools
G. Email Notification Options
H. Repository Cloning Options
I. Your Gitlab File Path
At this early stage of the Fabricademy program, we will only need to use a few of Gitlab's functionalities, namely...
- Markdown scripting with Web IDE
- Markdown scripting will be discussed in the Markdown section below
- Add/Remove files or folders to/from your Cloud Repo
- Cloning your Cloud Repo to make a Local Repo
- Using Git + Gitlab...more on this later
- Check and troubleshoot any problems with website change updates (merge requests and commits)
Git
Git...is a Command Line Interface application that makes it possible to securely (via RSA encryption keys) transfer files back and forth between the cloud and local repositories.
Git can be downloaded here...
And here are instructions for Installing Git.
And here is a good tutorial website that goes over all things Git in detail.
Once installed, the actual program you will run is called Git Bash which looks like the terminal program on your PC. When the program is run, the interface looks something like this...
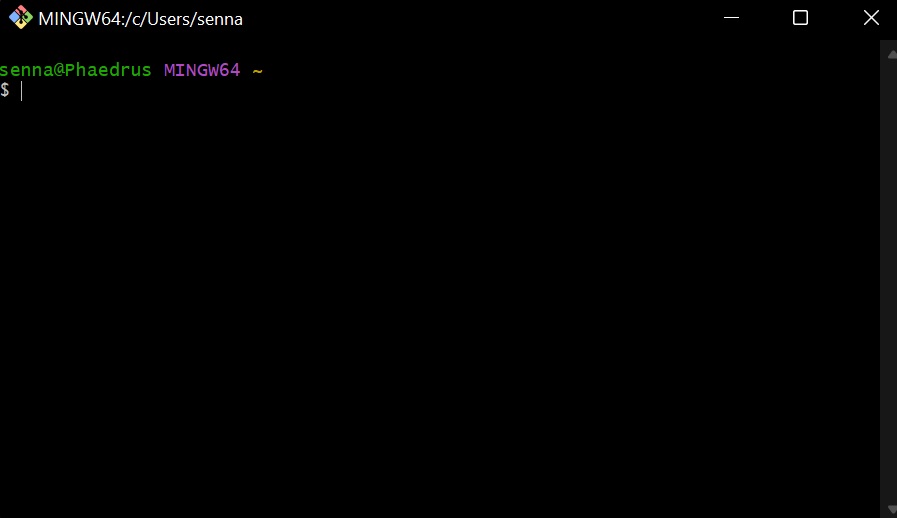
The appearance is a bit intimidating at first (it was for me!) as there is no buttons or menus that we are used to in a modern program. Git Bash is a Command Line Interface (CLI) program...which means that you type 'commands' at the 'prompt' (the $ symbol with the blinking cursor to the right) to get your PC to do something. In a week or two, you will feel very comfortable entering Git commands (I promise!).
We can check if Git was installed successful by entering the 'version' command. Type 'git --version' at the prompt and something like this should appear...

The good news is...when it comes to Git Bash...there are only a handful of commands that you will need to know as a casual user. And half of these are only used once...for setting up the secured link between your Cloud and Local Repositories. While the rest will be used VERY frequently as we build our documentation throughout the course.
Commands for Setup and Configuration
- git init
- git Config
- SSH_Keygen
- git Clone
Commands for Sending and Receiving Files to/from the Cloud Repository
- git pull
- git Add.
- git Status
- git Commit -m "some message"
- git Push
Creating A Local Repository
Creating a Local Repository basically means copying all folders and files of the Cloud Repository to your PC...AND establishing a secure link between the two repositories to allow file transfers between them (allowing them both to be kept up to date as change are made). This will be done using Git and Gitlab.
Step 1 - Choose a Local Storage Location
- Decide where in your PC hard-drive you will store your Local Repository
- The Cloud Repository is a collection of many files...so it is best that you create a folder on your PC to store all the files
- I created a 'Fabricademy' folder in my 'Documents' folder to store the Local Repository
Step 2 - Initialize & Configure Git in the Storage Folder
(The following instructions are for Windows users)
- Navigate to the newly created storage folder
- Right mouse click inside the folder > choose 'Git Bash Here'
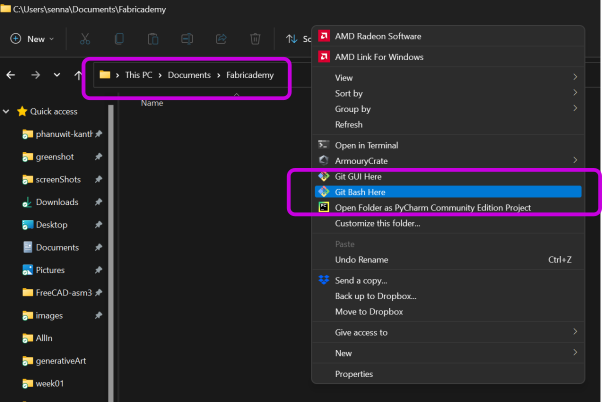
- A Git Bash terminal will open
- At the command prompt type > git init...then press ENTER
- A 'Initialized empty Git repository...' message should appear to confirm successful Local Repository folder creation

- Specify the 'User Name' and 'User Email' for the Local Repository
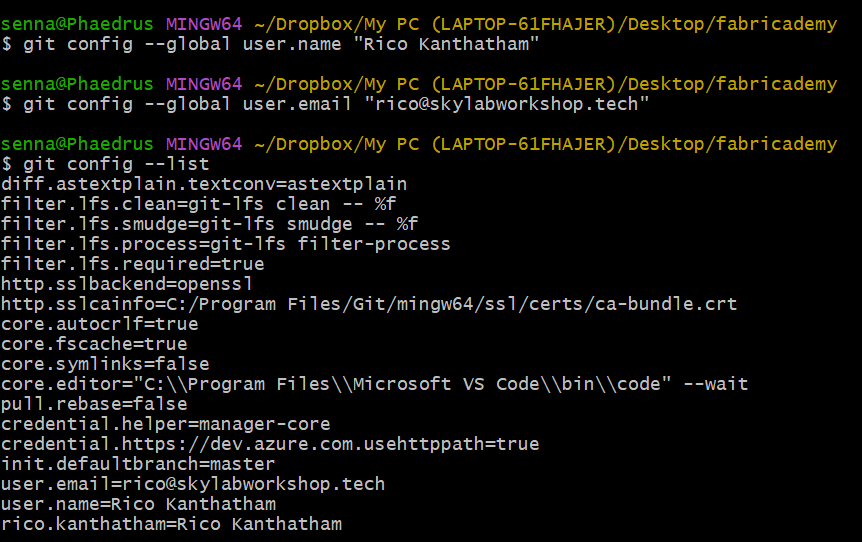
- At the command prompt type > git config -- global user.name "Your Name"...then press ENTER
- ...nothing will appear to confirm, but don't worry
- At the command prompt type > git config -- global user.email "Your Email"...then press ENTER
- At the command prompt type > git config --list...then press ENTER
- A bunch of computer gibberish will appear...with your name and email at the bottom...as confirmation.
- Git Bash configuration is complete!
Step 3 - Create An Encryption Key
To secure the transfer of files between the Global Repo and Local Repo it is necessary to create a SSH Encryption Key.
Without getting overly technical...a pair of SSH RSA encryption keys...a Public and Private...will be created. The Public key will be stored in Gitlab while the Private key will be stored on your PC. Secure file transfer between the cloud and local repos will be possible ONLY if these key pairs are present and match.
- In the Local Repo folder, right click to open Git Bash
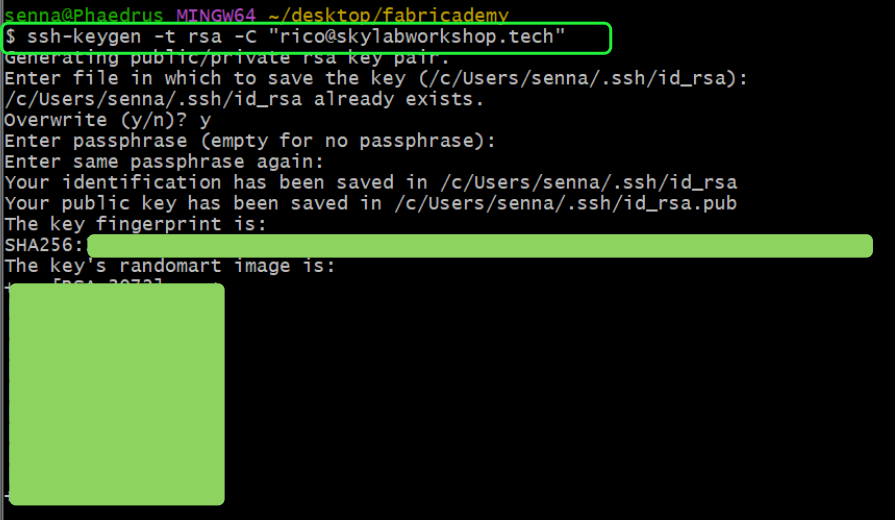
- At the command prompt type > ssh-keygen -t rsa -C "Your Email"
- Tip > make sure you type a capital 'C'
- You will be prompted to Overwrite an SSH key if you already had one...I did...I typed 'y' for 'yes'
- You will be prompted to enter a passphrase...this is optional...I recommend no passphrase (unless you really want an extra level of security) so just hit the ENTER key...twice.
- Your keys will be generated and confirmed with messages like you see below...
- Next...we will copy the Public key...to paste into Gitlab
- In the Git Bash terminal type > cat ~/.ssh/id_rsa.pub | clip...then press Enter
-
This will copy your Public key into the clipboard

-
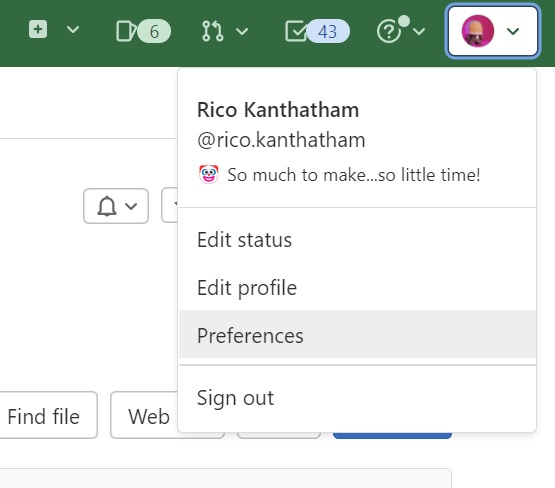
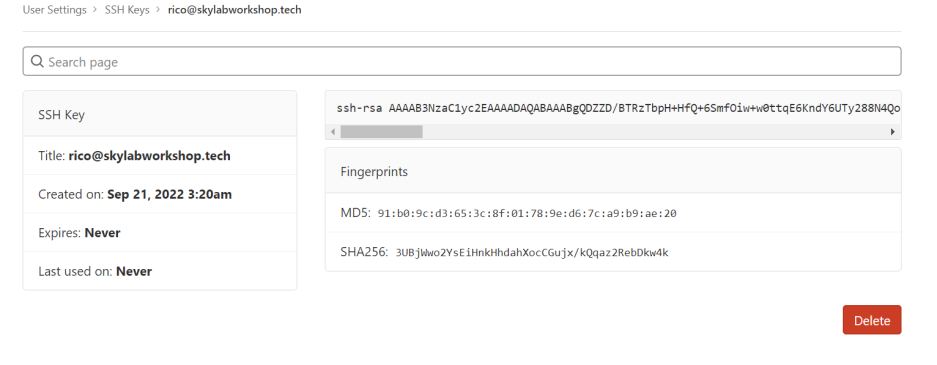
Log into your Gitlab account
- Click your avatar image to access the 'Preferences' menu
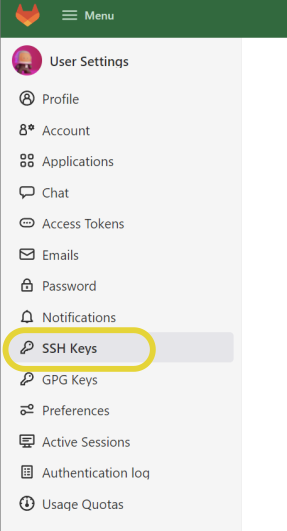
- The left context menu of Gitlab will change...choose 'SSH keys'
-
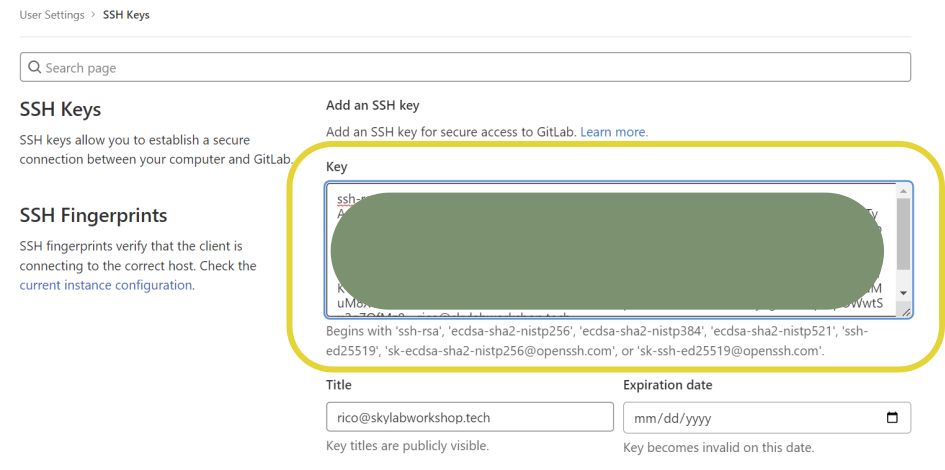
Paste the Public Key into the 'Key' window...then press 'Add Key'
-
A confirmation that your Public key was added should appear
- OK! The Local Repo and SSH RSA Keys have been created...the "Cloud Repo** can now be cloned.
Step 4 - Cloning the Cloud Repository
- In Gitlab, click the 'Clone' button and click the Copy URL button for 'Clone with SSH'

- In the Git Bash terminal of the Local Repo type > git clone...then paste the 'Clone with SSH' URL
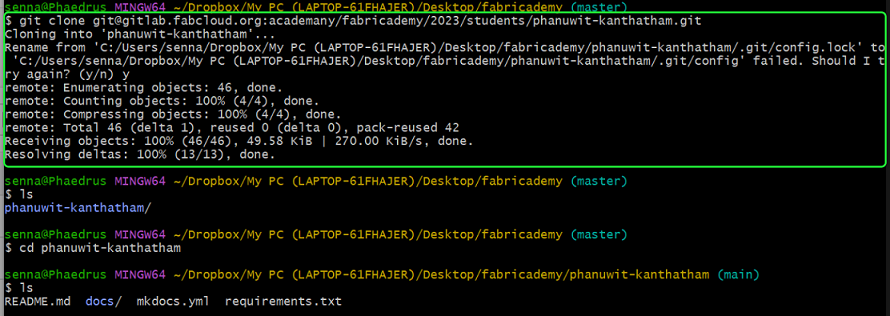
- When you see 'Resolving deltas: 100%. done.' The clone is finished
- The Local Repo folder in your PC should now be filled with the same folders as those in teh Cloud Repo
Step 5 - Local to Cloud Repo File Transfer The Local Repo has been cloned from the Cloud Repo. SSH RSA Encryption Keys have been created. It is now possible to transfer files between the 2 repos. As mentioned before, there are 5 Git Bash commands that will be needed to do this.
git Pull
- Updates the Local Repo with the contents of the Cloud Repo
- Since you will be doing all of the edits of the Repos...you will know if the Cloud or Local repo is the most current
- Use this command if the Cloud repo is more current than the Local repo
- Pulling from the Cloud repo will overwrite the contents of the Local repo
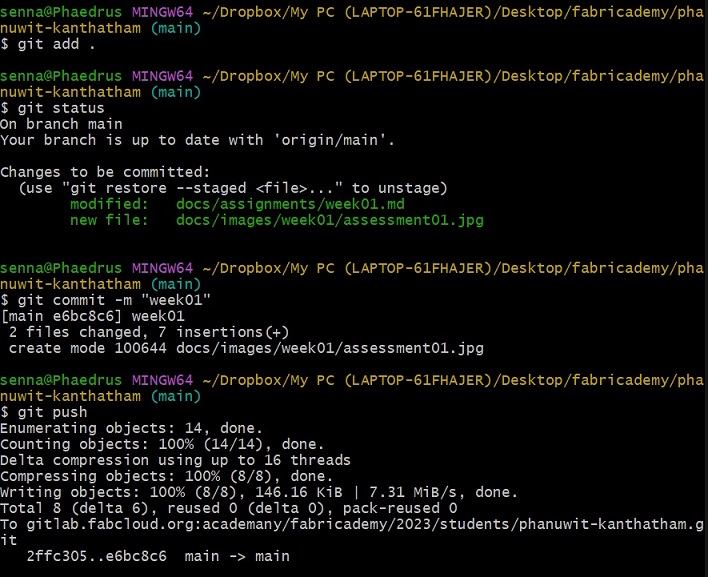
git Add .
- This is the 1st of a series of 4 commands you will enter to update the Cloud Repo with the Local Repo contents
- This command identifies and moves all files that have been changed (since the last website content update) into a 'Staging Area'
git Status
- This is the 2nd of a series of 4 commands...to update the Cloud Repo
- This command gives you some important information...
- Tells you what 'branch' you are on
- Tells you if your branch is up to date with the 'origin/main' branch
- Shows you what files are identified as having changed/been modified in the Staging Area
git commit -m "descriptive message"
- This is the 3rd of a series of 4 commands...to update the Cloud Repo
- This command basically says you are OK with files identified as changed/modified in the Staging Area...and are OK to 'commit' these as changes to the Cloud repo
- This command requires some message to be include...to describe the changes to be committed. This message will be useful if you have to backtrack your changes and figure what what and when changes were committed. A short description is recommended.
git push
- This is the last of a series of 4 commands...to update the Cloud Repo
- As the name suggest...this command pushes the committed changes from the Local Repo to the Cloud Repo
The whole process looks something like this in Git Bash
There is A LOT more that Git can do. Many more commands to give you other types of control regarding file transfer, etc. But the above 5 commands will get you through 95% of what you need to do with Git for Fabricademy.
Additional Git References
I discovered this YouTube video series by The Coding Train,Git & Github for Poets, that explains very well how to understand and use Git.
MkDocs
MkDocs is a website creation platform. I know very little about how websites are made, but enough to be able to say that it usually involves HTML scripting. So how does MkDocs allow us to generate websites using Markdown instead of HTML scripting language? I learned from mkdocs.org that MkDocs uses Python-Markdown library to "render documents to HTML". The Fabricademy Coordinators build our individual Fabricademy websites using the MkDocs platform.
In my repository is a file called 'mkdocs.yml'. This file is the configuration file for my website. Using the Web IDE and as recommended by the Coordinators, I made changes to the following lines of the mkdocs.yml file script...
- site_name
- site_description
- site_author
- theme: > pallette: > primary:
- theme: > pallette: > accent:
...replacing the default entry with my own personal information and choices. The 'primary' and 'accent' colors I chose were 'blue grey' and 'teal'...and were selected from the options specified in the Squidfunk website.
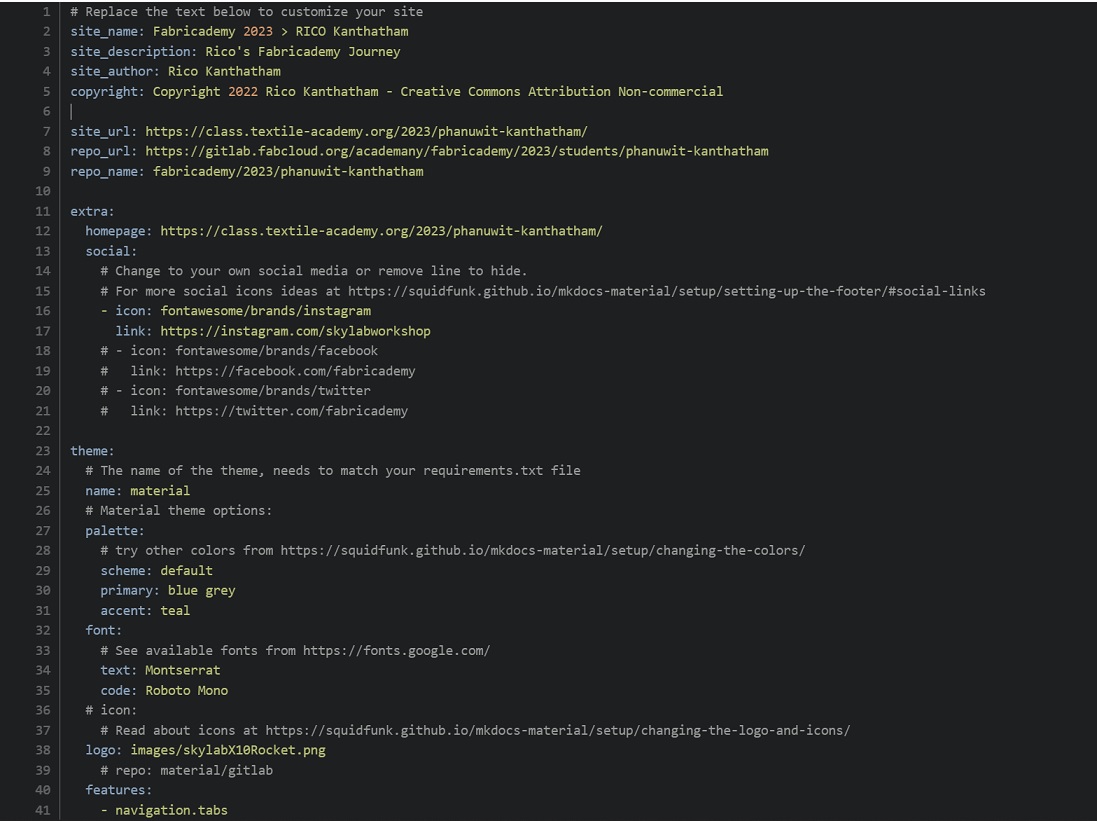
I also decided I wanted to change the default 'logo' to the logo of my lab...

Following the instruction on this page of the Squidfunk webpage. I entered the path to the image file at the line...
- theme: > icon: > logo:
...and deleted the path to the default icon image that appeared in the line 'icon:'
With all these changes made, I pushed the changes...but I received a 'merged failed' error. Yikes!
>Learning Opportunity Alert!!<
I had NO idea what I did wrong...and for sure would not have been able to solve this on my own.
Thanks a million to Fabricademy coordinator Julian, who observed my failed merge attempt who saw and understood the problem and provide me with a solution.
So it turns out that .yml files are indentation sensitive. The 'logo:' was indented one too many times...which caused a syntax error (a grammatical error in the YML language). That is, instead of...
- theme: > icon: > logo:
It should be
- theme: > logo:
...delete the 'icon:' line, and back indent 'logo' one level.
With this change made, commits were able to be merged again and I got all of my styling changes and my logo on my Fabricademy website!! Yay!!
Creating Website Content
OK, now that I have made changes to mkdocs.yml and styled my website a little. It's time to actually make some documentation!!! To create content for my Fabricademy website, I used 2 tools...an enhanced text editing or scripting program...and a scripting language.
For the scripting language, Markdown is the natural choice since MkDocs is the website platform.
For the scripting program, I choose Visual Studio Code.
Visual Studio Code
I will use Visual Studio Code to do my Markdown scripting. Visual Studio Code (aka VS Code) is a FANTASTIC...FREE...IDE (Integrated Development Environment) that can be used for writing programs in many different programming languages, not just Markdown. I have used VS Code to do my Arduino, C and Javascript programming as well...so I am very familiar with the software.
VS Code can be downloaded here...
VS Code just makes coding or scripting much much easier. Theoretically, scripting can be done in ANY text editor...even MS Word or Notepad. But VS Code is an 'enhanced' text editor...because it has special features that make code and script wriing more efficient, such as...
- Syntax highlighting
-
Text completion
-
Git functionality
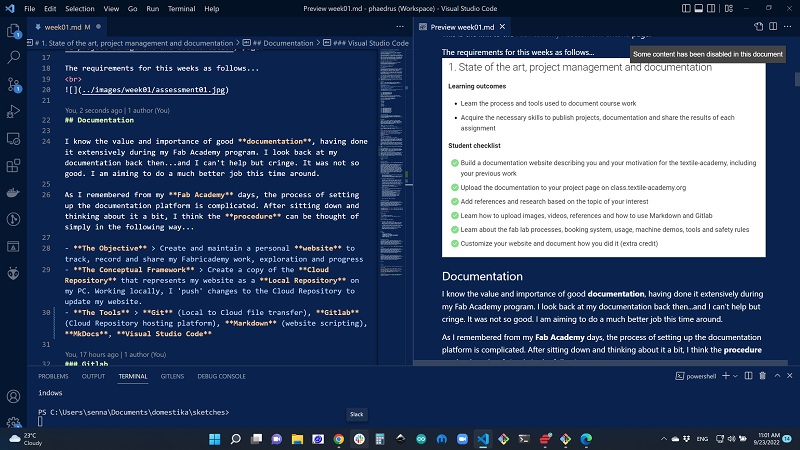
I also discovered that VS Code supports live preview of Markdown script. In Windows, type CTRL + SHIFT + V to generate a preview of Markdown webpage script. And if you use the split view feature (officially called Split Editor Right and toggled by the 2 rectangle icon in the upper right of the editor window)...you can see the live preview of your webpage along side your scripting window.
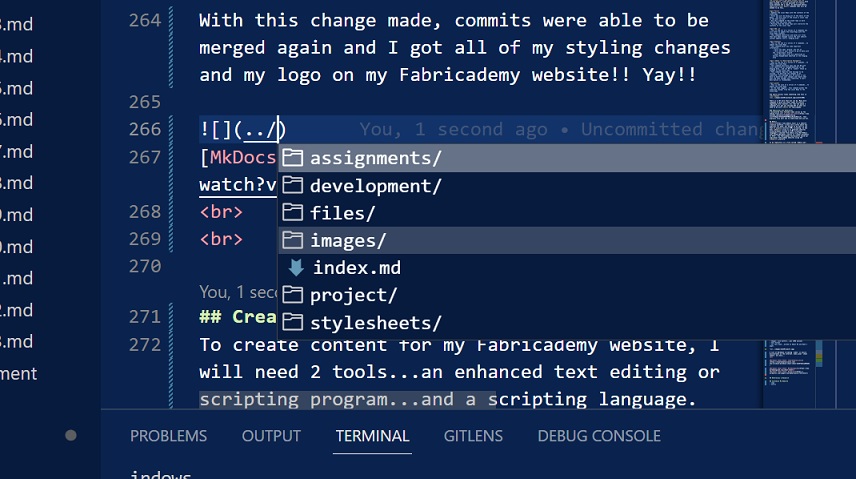
Another cool feature I discovered this week...dragging & dropping images into the Markdown document in VS Code. Holding down the SHIFT key...you can just drag and drop an image from your image folder into the Markdown code directly!! Once dropped, VS Code will automatically create the script with the file path to that image. Time saver!!
More on using VS Code to write Markdown script can be found at this VS Code + Markdown webpage
Markdown
Markdown is a scripting language used to generate webpage content...similar to HTML, but much much simpler. Markdown can be thought of as a simple programming language. Using combination keyboard symbols and characters...text can be formatted, and images and videos can be inserted or linked to...and organized to make a documentation website.
A list of all the Markdown scripting 'codes' can be found at this Markdown Cheat Sheet: Wordpress website.'
Other great 'cheat sheets' are here...
Markdown Cheat Sheet: towardsdatascience
Markdown Cheat Sheet: Markdownguide
I also learned how to use some HTML scripting (Yes! Markdown accepts HTML scripts!) to change the color of text in my document. Text color can be changed by wrapping the text in the following way...

For this 1st week of Fabricademy, I created content for my About Me and Week01 Assignment pages.
I inserted a large number of photos into the two pages I worked on, and following the advice of Fabricademy Coordinators, I did my best to keep each image file (PNG or JPEG file types) under 150KB in size...to ensure that I don't breach the maximum 10MB upload limit.
Image File Size Reduction
I made my image files smaller using 2 tools...MS Paint & XN Convert
MS Paint
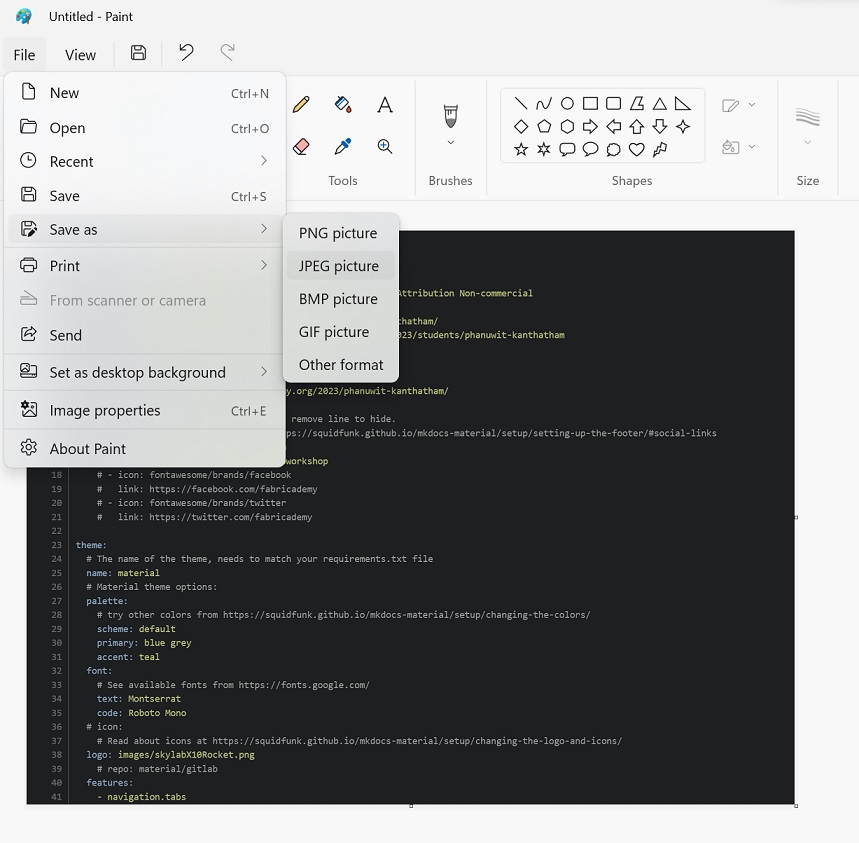
For resizing single images (usually screenshots), I open the image in MS Paint...and use the 'Crop' and 'Resize' tool in the 'Image' toolbar to reduce the file size. For Markdown use...the 'Pixels' option should be selected and an appropriate 'Horizontal' width should be entered (ex: 600)

Then the file is saved as a JPG file type (JPEG is good for images, PNG is good for graphics)
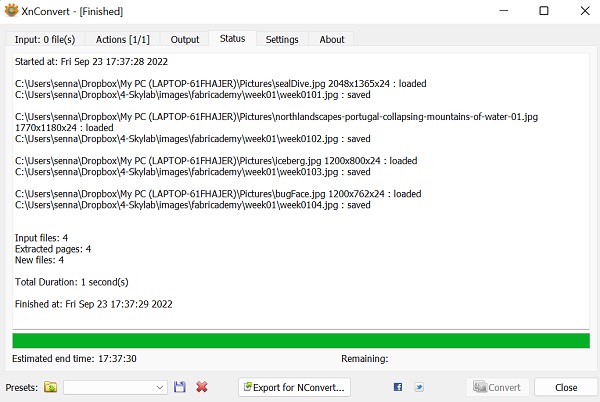
XN Convert
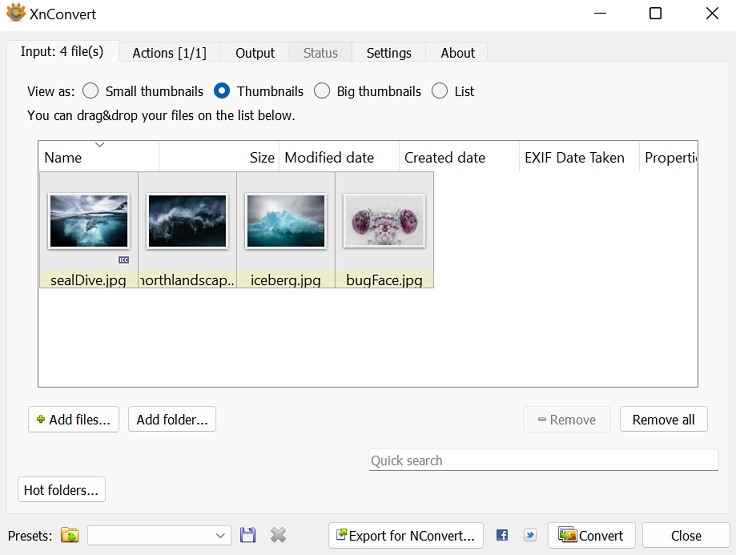
XN Convert is a free batch image converter software. 'Batch' means that several images can be resized simulaneously using the same settings. The software is fairly simple to use.
Step 1 - Drag & Drop images to be resized into the 'Input' tab window
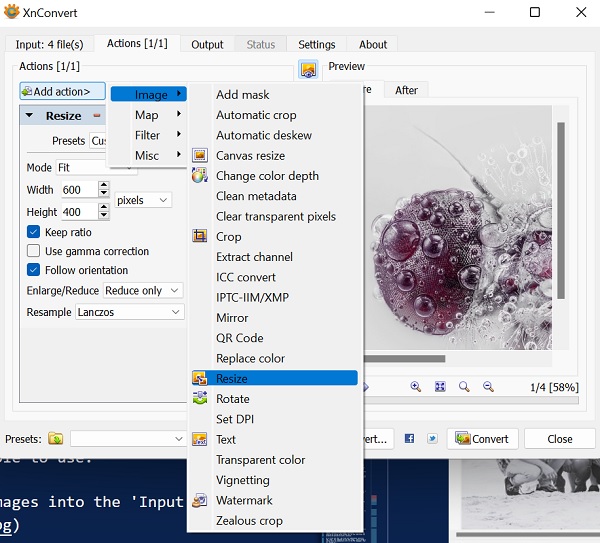
Step 2 - In the 'Actions' tab, select the action to be performed on the images. In this case, 'Image > Resize' is chosen.
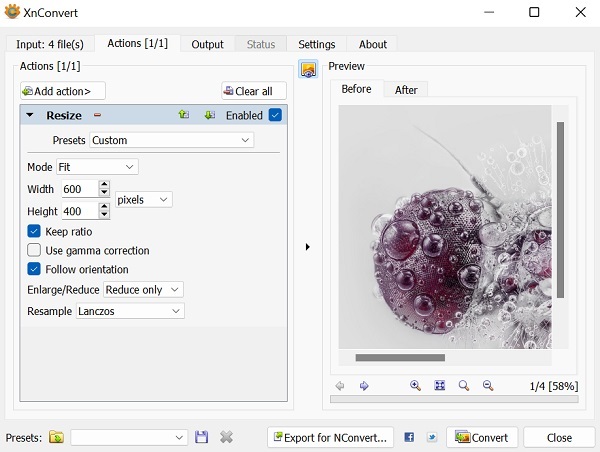
Step 3 - Specify the settings for the 'Resize' operation. In this case...
- Mode > Fit
- Width > 600px
- Keep Ratio
- Follow Orientation
- Enlarge/Reduce > Reduce only
- Resample > Lanczos
The image window on the right allows a preview of the image before and after resizing.
Step 4 - In the 'Output' tab...
- Specify the destination folder for image output
- Define the Filename > a name prefix followed by 2 hashmarks (which will be changed to sequential numbers)
- Specify the output format > JPG
- Specify the 1st index number that will be applie to the output filename
And some optional settings...
- Preserve color profile
- Delete original
- Clear the 'Input' file(s)
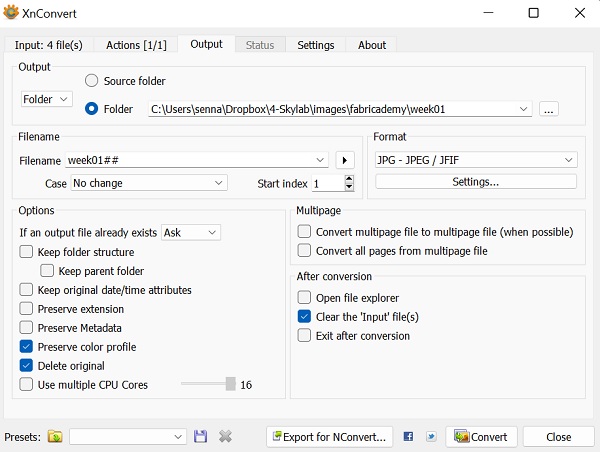
Step 5 - Click CONVERT to resize the images!
Creating Graphics
Part of my documentation workflow also involves generating graphics. I mainly use graphics for two purposes...annotate an image, make explanatory diagrams. To do these things, I use the software Inkscape. The program can be downloaded here...
Inkscape
Inkscape is a 'Vector' graphics tool. In simplest terms, 'Vector' graphics are image files...typically PNG, SVG file types...that have sharp edges and can scale in size up or down without losing resolution. 'Vector' graphics are generally high-contrast...sharp dark and light differences...and are not reliant on gradation or shading for definition. Example of vector graphics are icons and logos.
Inkscape is a VERY full featured, FREE, graphics tool...that I have been using for a long time. I find it fast and easy to use...and the more I use it, the more tools and cool things it can do I discover. New versions of the software are constantly being released.
There's nothing better than 'Free & Great!'.
Inkscape > Annotating Photos
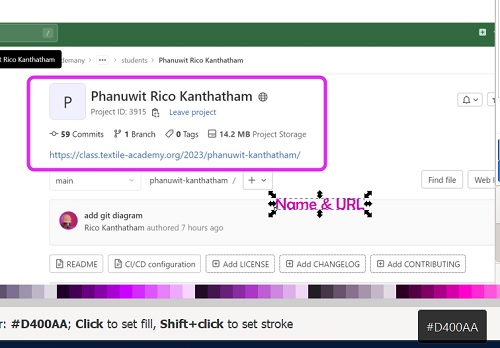
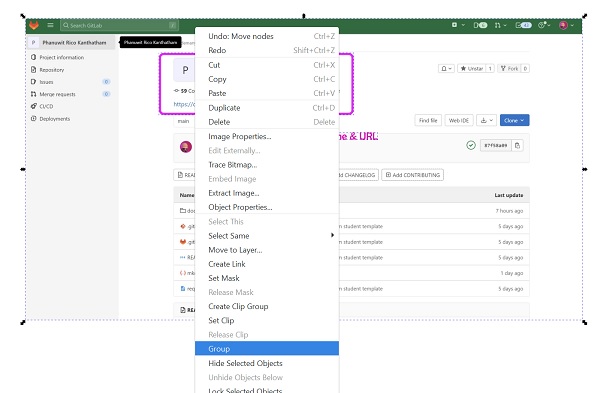
Sometimes, a picture says too much...and a bit of focus and explanation is required. When documenting, I use A LOT of screen shots...to explain the procedure of how I do things. Annotating a photo image for me usually means adding 'Focus Boxes' and 'Explanatory Text'. I tend to do this in the simplest and fastest way possible to get the maximum effect. Here is an example of a heavily annotated image I made in Inkscape for this week...
The basic process for annotating this image is as follows...
Step 1 > Import a Photo
Drag & Drop a photo into the Inkscape work area
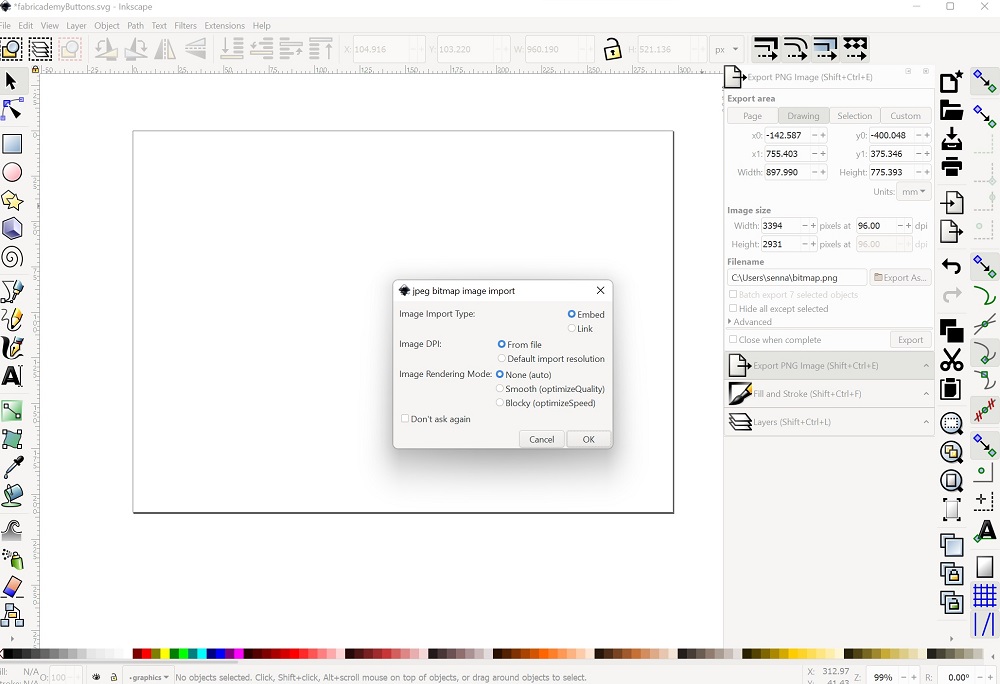
Click 'OK' on the dialogue box
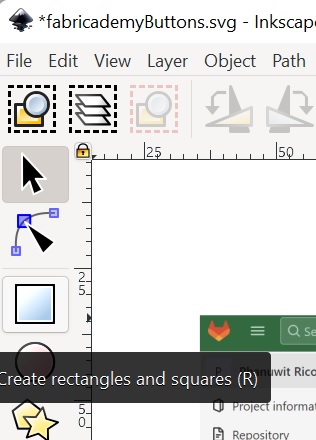
Step 2 > Draw a Rectangular 'Focus Box' on the Photo
Use the Create Rectangles & Squares tool to draw a 'Focus Box'
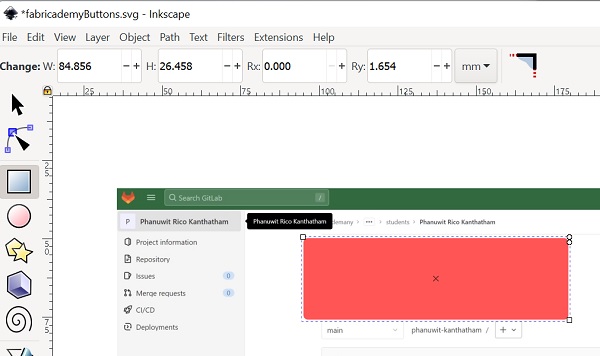
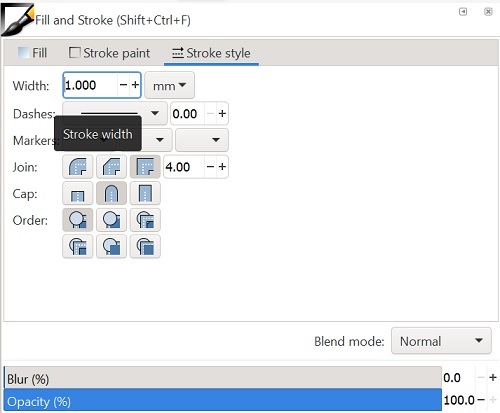
Adjust Fill & Stroke for the Selected Rectangle
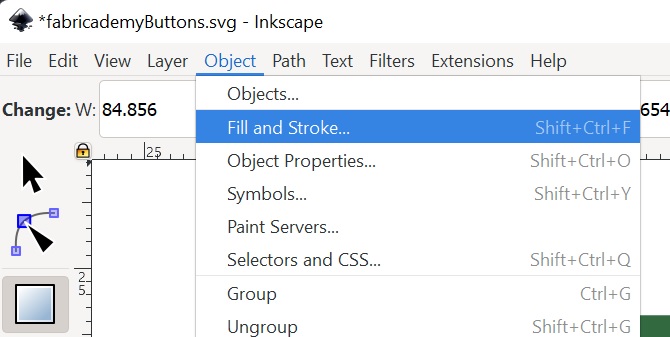
Object Menu > Fill and Stroke
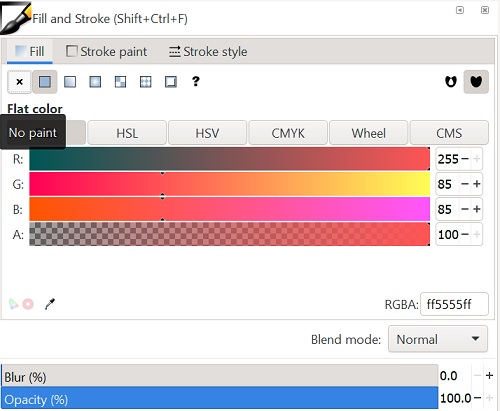
Fill > No Fill
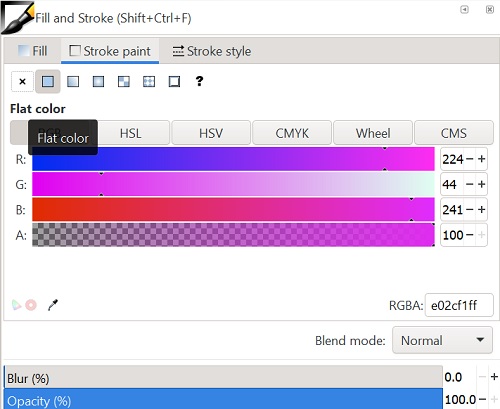
Stroke Paint > Flat Color > R: 244, G: 44, B: 241. A: 100
Stroke Style > Stroke Width: 1.0mm
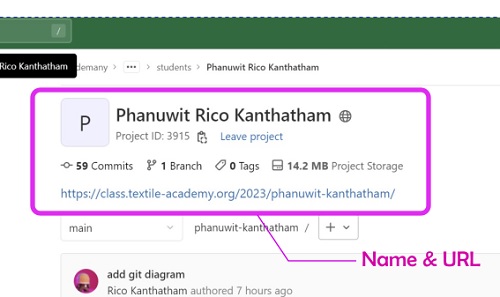
The result...
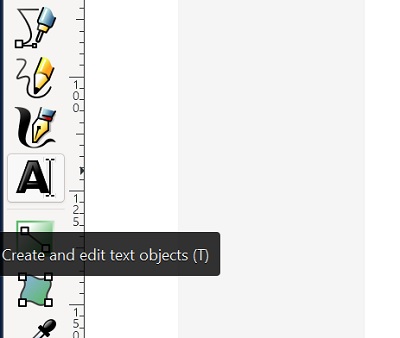
Step 3 > Add Text Annotation
Use the Text Tool
Write Text > "Name & URL"
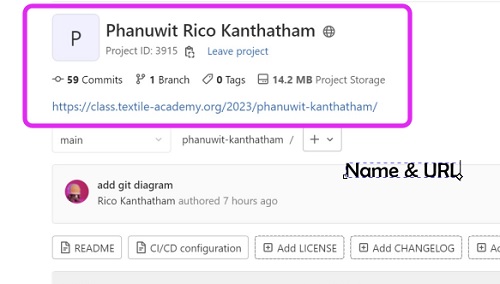
Choose Font & Font Size > Berlin Sans FB, Normal, 13pt
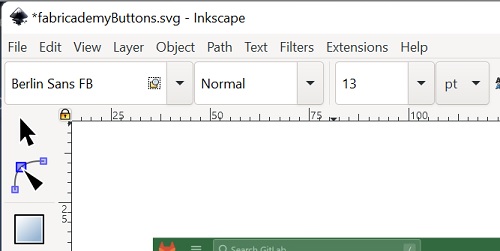
Choose Stroke Color from the bottom Color Palette > Pink
Use the Bezier Line tool > Add Leading Line...Fill & Stroke to change line color and stroke width
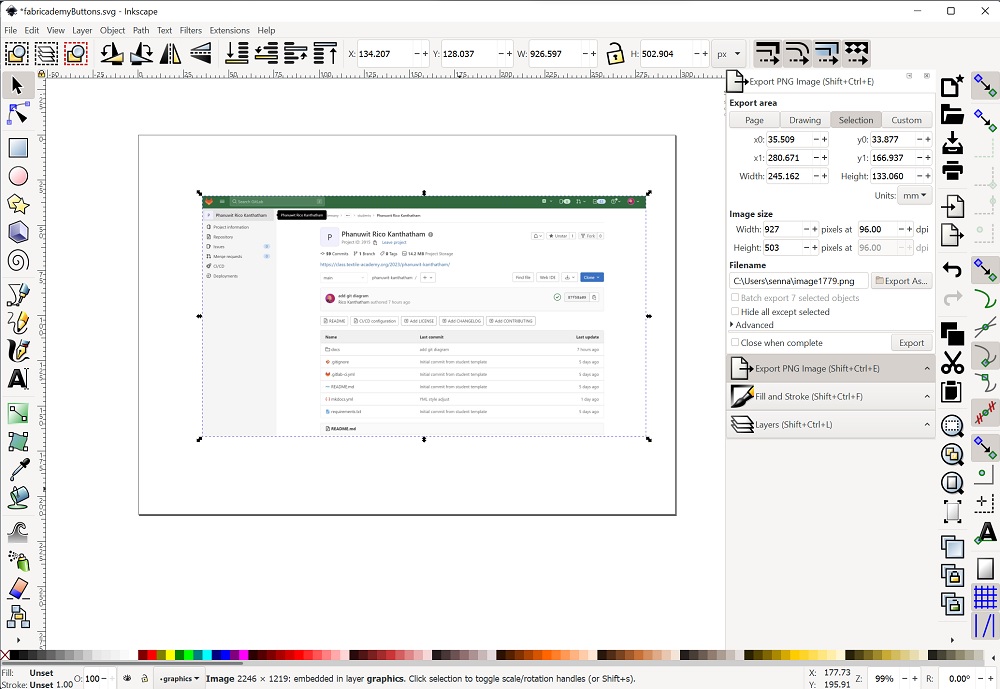
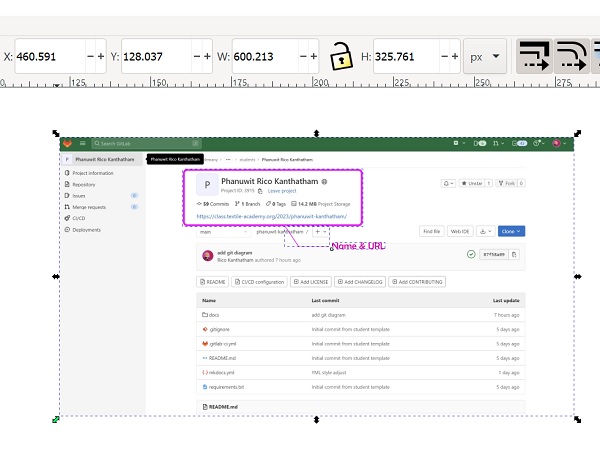
Step 4 > Size the image
Select all image elements and Group into one (...note the dotted line around the elements)
Hold CTRL button while dragging the corner scaling arrow > 600px wide (W at the top)
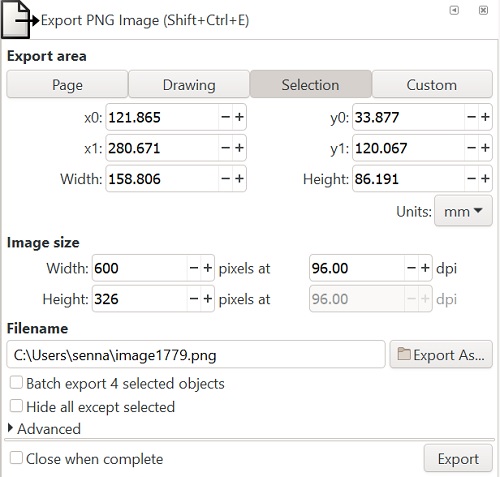
Step 5 > Export the image
Selecting the image to be exported...
Export menu
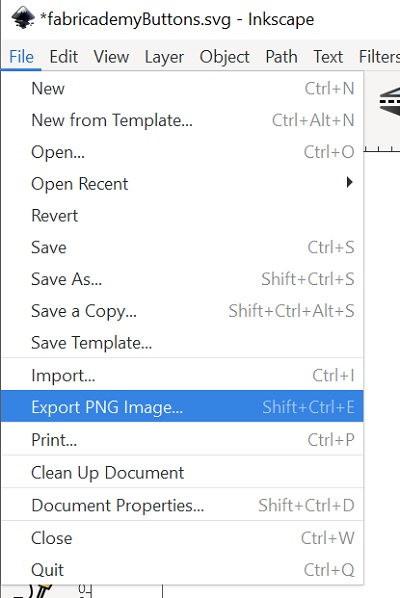
Choose > "Selection", 96 DPI, Filename & Destination folder > Click EXPORT
Inkscape > Vector Graphics
To make graphics and diagrams, such as these...
I use many of the same tools I use for annotation... - Bezier Line tool - Fill & Stroke Menu - Size - Export
...but also make good use of - Layer tool - Node adjustment tool
Drawing the Cloud
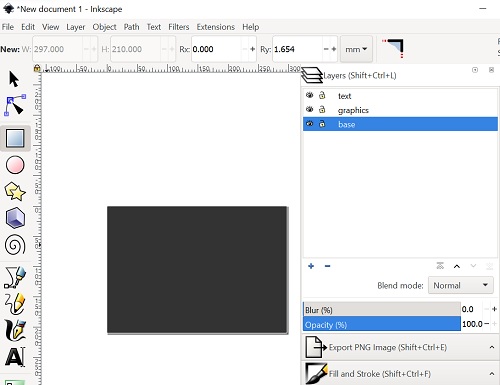
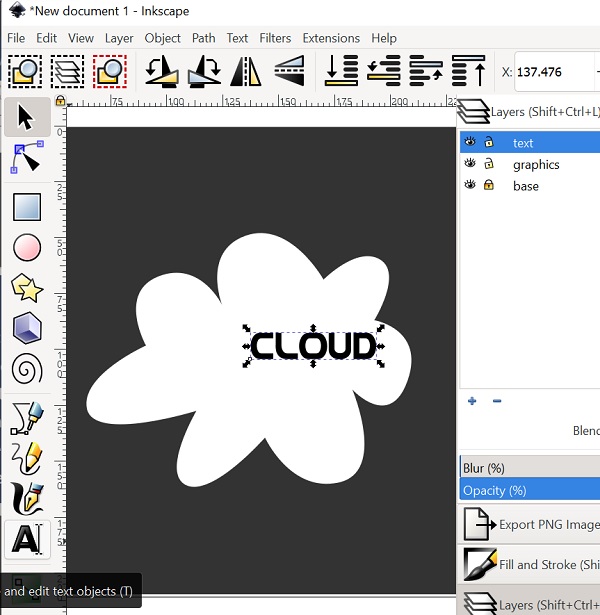
Step 1 > Setup Layers To manage my graphics, I usually start off by creating a few drawing layers...to categorize and separate the elements of my final graphic. Specifically, I create...
Base layer > for background colors or images
Graphics layer > for graphic shapes
Text layer > for descriptive text
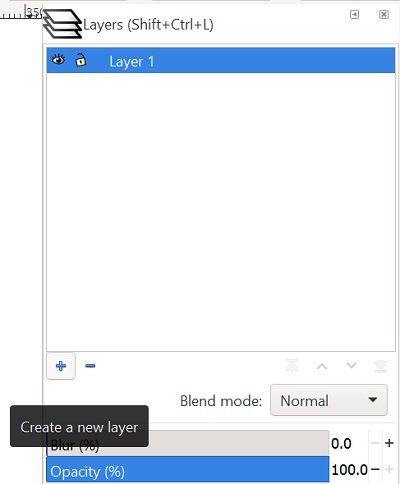
Layers are useful because they can be individually locked or made invisible...allowing you to work on elements of your graphic without disturbing others.
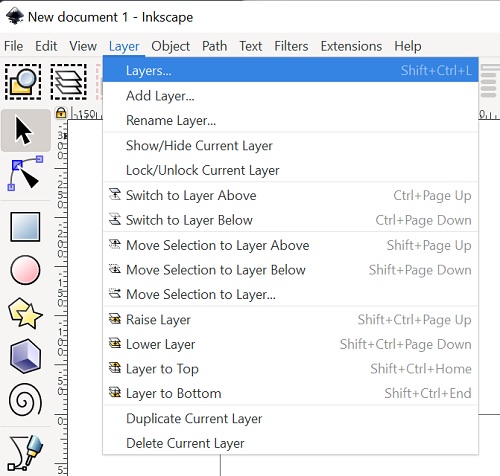
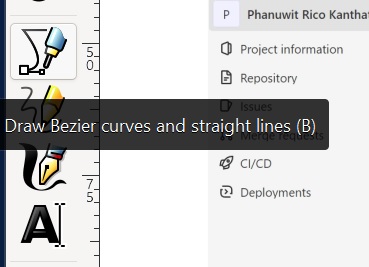
I make layers by clicking the '+' symbol.
Existing layers can be renamed by double-clicking on the name and editing it.
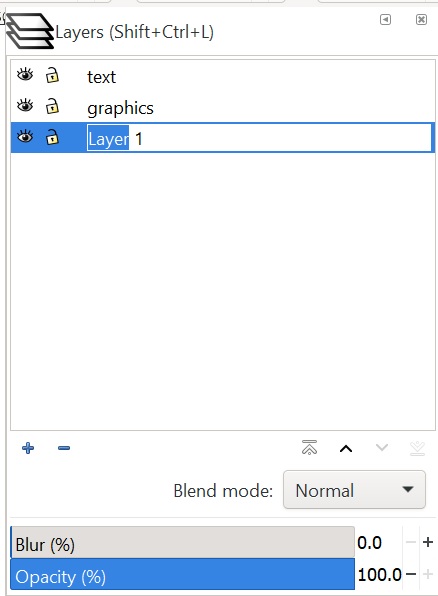
Note...the top most layer in the list will be displayed ON TOP of the lower layers...so the order matters. Think of each layer like a transparency with graphics on it. Graphics on the top transparency will cover graphics on the second layer, etc.
Reordering the layers is a simple matter of dragging the layer name above or below another name.
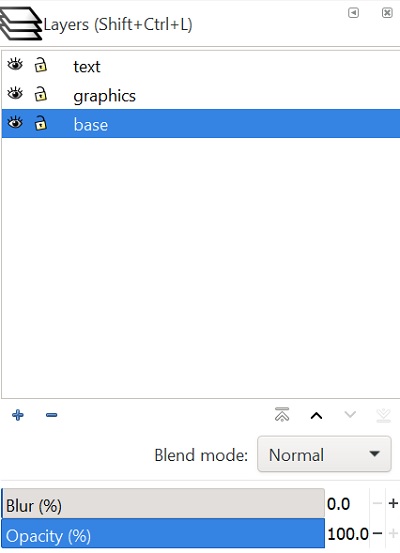
The layer name with the Blue Bar on top of it is the active layer...and any drawing done will be place here.
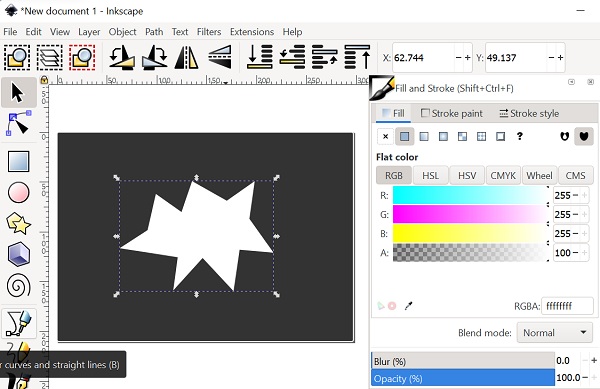
Step 2 > Bezier Tool to Make a Rough Shape
Time to draw. These days, I like to make graphics that are white on a grey background...so I will start by drawing a grey rectangle, in the 'Base' layer...to cover the entire page area. After drawing this background color...I usually lock the base layer by clicking on the lock icon.
Then...with a white fill and no stroke...I rough out the shape of my graphic quickly with the 'Bezier Line' tool.
Tip: enabling 'Snap to other points' is helpful.
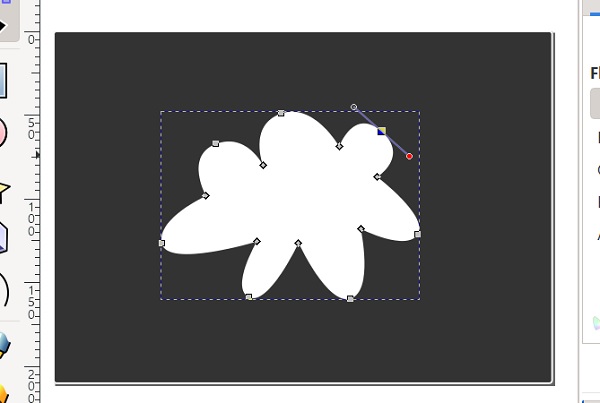
Step 3 > Adjust using Node Tool
The 'Node' adjustment tool will be used to change the rough shape into a good looking cloud graphic! Selecting the 'Node' tool will bring up a bunch of node adjustment options at the top.
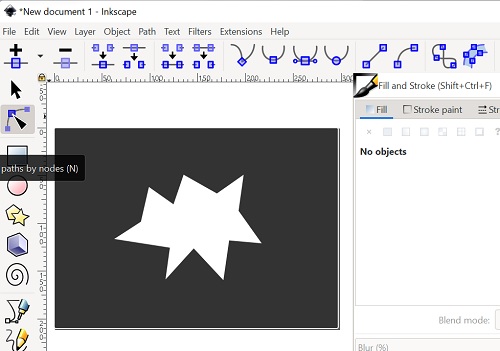
Now we can adjust the individual nodes in our graphic...in this case, turning spikey points into smooth curves. Click on the graphic with the Node tool pointer...select a node to modify...then select one of the node options above...
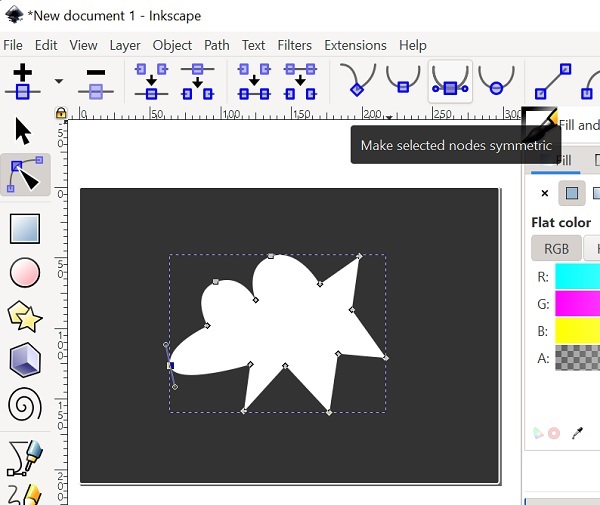
Once selected and turned into curves...the nodes can be moved and the curve adjusted with the handles that appear. Repeat this process until all the spikes are converted!
Step 4 > Add Text
To finish my graphic, I wanted to have the word 'cloud' on my cloud shape. So...in the Text layer, using the Text tool, selecting the Font and Font Size and Font Color...I added the word 'cloud'.
Step 5 > Group & Done!
With all graphic elements drawn, all that is left to do is to group all the elements together as one. To do this, drag a selection box around all the elements you want to group...right-click over the selection to bring up a menu...choose 'Group'.
Done!! The graphic is now ready to be EXPORTED.
Don't forget to SAVE!
Weekly Learning Outcome
- The documentation process is not new to me, so the tools and methods were familiar and the work this week was not too stressful (...famous last words!)
- I aimed to take my documentation skill to a higher level than before...and in this week, I tried to learn something new about YML scripting, establish a more efficient documentation workflow...and write more clear and succinct text. I am not quite sure I achieved these objectives this week...but I will keep at it.
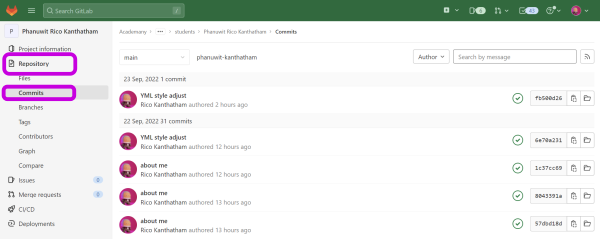
- I made TOO MANY commits!!! It's been a while, so I forgot that every time I commit changes to the Cloud Repo...all the files are saved again...as part of the Version Control feature. My Cloud Repo is already at 14MB+...which is way too large for just one week's worth of documentation content. I need to get comfortable with saving and previewing in VS Code...and pushing to the Cloud only a few times a week.
- From next week...I will be again in unfamiliar territory as the Fabricademy program shifts from logistics to hardcore digital textiles content. I nervously await next week's arrival!