10_OPEN-SOURCE HARDWARE - FROM FIBERS TO FABRIC
Wearable photobioreactor
A project by Hala Amer and Julija Karas at FabLab Barcelona.
Overview
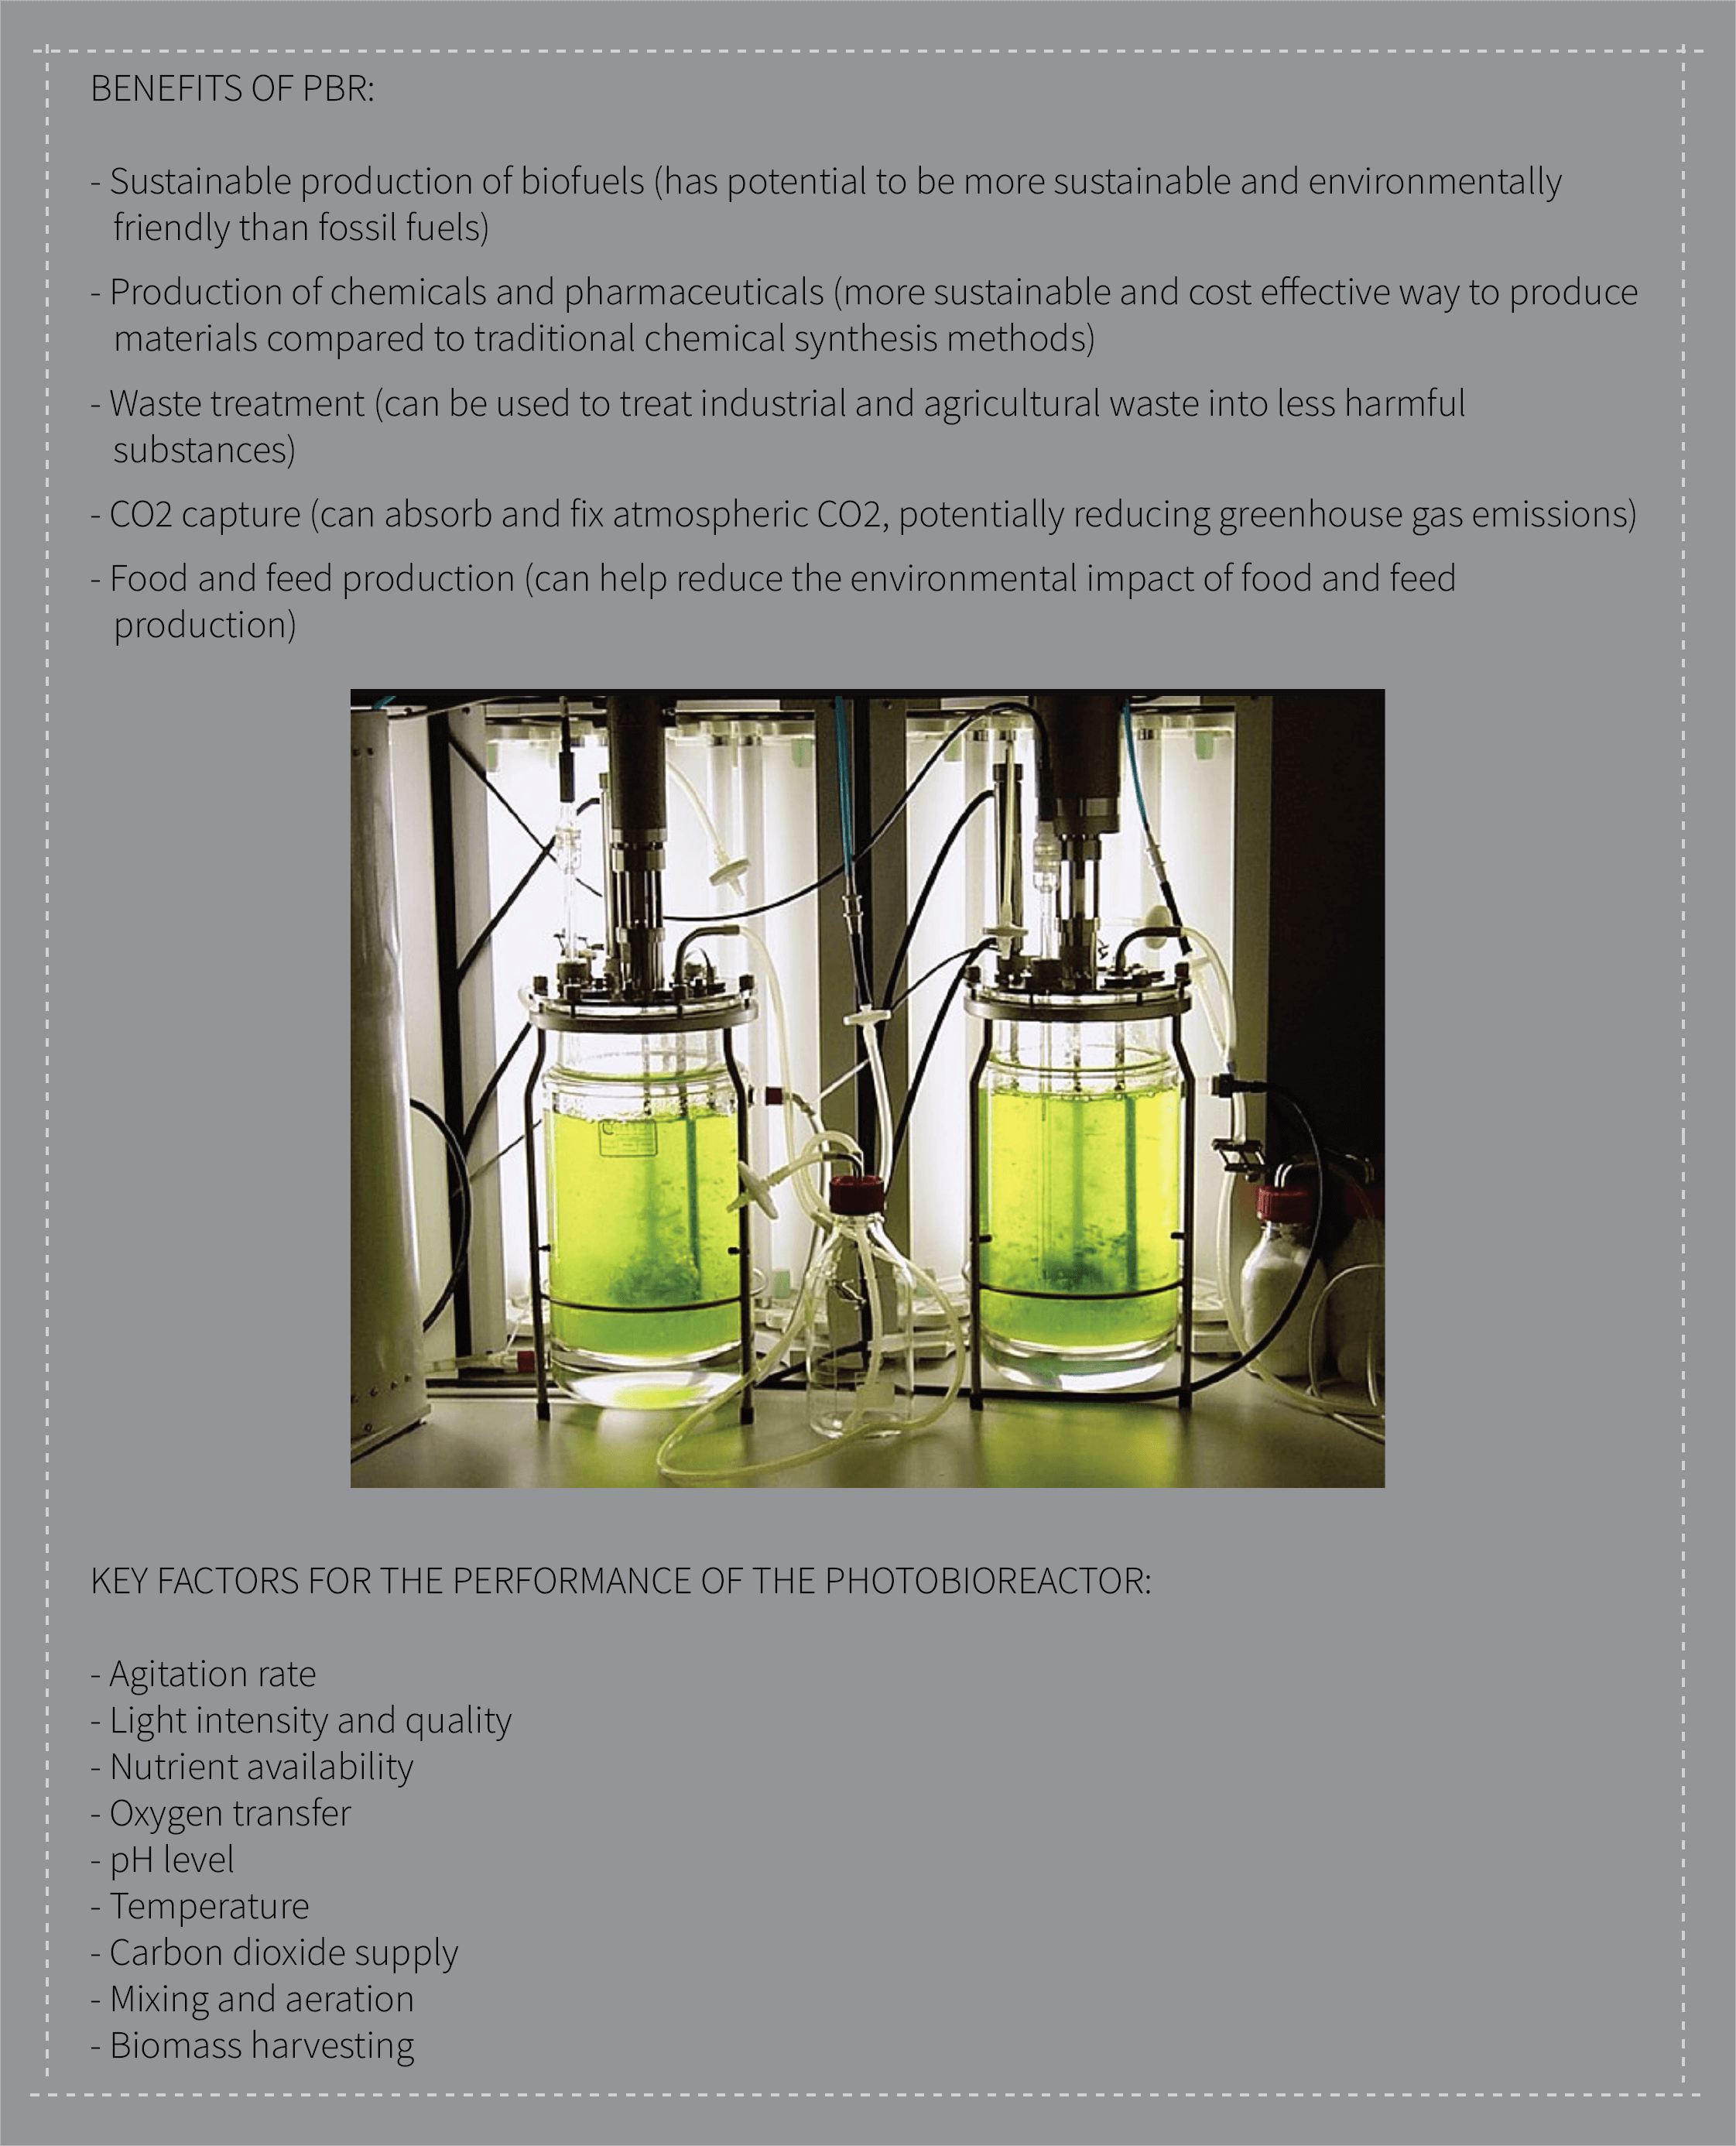
A photobioreactor is an installation for producing microorganisms outside their natural but inside an artificial environment. The prefix "photo" describes the bio-reactor's property to cultivate photothrophic microorganisms that grow using light energy.
It is a closed system that provides the necessary light, temperature, and other conditions for algae or other photothrophic organisms to grow and multiply.
It typically consists of a transparent container (such as a glass or plastic vessel) that is equipped with a light source and a system for controlling the temperature and other conditions. The algae are suspended in a liquid medium (such as water), and the light source is used to stimulate photosynthesis and promote the growth of the algae.
Phototrophic organisms, such as plants, mosses, microalgae, cyanobacteria and purple bacteria, use the process of photosynthesis to build their own biomass from light and carbon dioxide. The growing process can also synthesise pigments, proteins, lipids, carbohydrates, vitamins, and polysaccharides. These can now be produced at home or in other artificial environments, by utilising natural principles in a controlled environment of photobioreactors.
Types of Photobioreactors


Inspirational PBR projects using all the types.
Inspiration
For our PBR, we wanted to make it functional and wearable. We were very inspired by the speculative aspects of the project, like the work of Biobabes, where algae is an important part of our daily lives. We took inspiration from different projects and aesthetics and began designing our own.

-
Spirulina algae under microscope
Spirulina Algae Growing Conditions
It was also important for us that we can make the wearable fully functional. So we dove into researching about what conditions the algae needed to grow to be able to design the electrical components and circuits.
| Light Intensity and Quality | Spirulina thrives in high-intensity light, typically in the range of 5,000 to 15,000 lux. The light source should provide a spectrum that includes blue and red wavelengths, as these are most effective for photosynthesis.(blue range (425–450 nm) and red range (600–700 nm)) | |
| Temperature | Spirulina grows well in a temperature range of 30-35°C (86-95°F). Maintaining a stable temperature is crucial for optimal growth. Temperature fluctuations outside this range can negatively impact growth rates. | |
| pH Level | The pH level of the culture medium is important. Spirulina prefers slightly alkaline conditions, typically around pH 8.0-9.5. Regular monitoring and adjustment of pH may be necessary | |
| Nutrient Concentration | Spirulina requires nutrients such as nitrogen, phosphorus, potassium, iron, and trace elements for growth. The specific nutrient concentrations will depend on the strain of Spirulina and the composition of the growth medium. Nitrogen is particularly important, and sources like urea or nitrate can be used. | |
| Carbon Dioxide Supply | Spirulina utilizes carbon dioxide during photosynthesis. Ensuring a sufficient supply of CO2 is important for growth. Some photobioreactors may require CO2 injection to maintain optimal concentrations. | |
| Density Control | Monitoring and controlling the cell density of Spirulina in the photobioreactor is crucial. Overcrowding can lead to self-shading and reduced growth rates. | |
| Contamination Control | Contaminants such as bacteria, fungi, or other algae can negatively impact Spirulina cultures. Sterile conditions and proper sanitation practices are essential. | |
| Mixing and Aeration | Adequate mixing and aeration of the culture help to distribute nutrients and prevent settling of Spirulina cells. Gentle agitation or bubbling can be used to maintain a homogenous culture. |
Inoculation Density of Spirulina Algae
The amount of spirulina algae needed to grow in a 1-liter photobioreactor can vary based on several factors, including the specific strain of spirulina, growth conditions, and the goals of your cultivation. Generally, the inoculation density for spirulina cultures is measured in terms of cells per milliliter (cells/mL) or biomass concentration.
| Inoculation Density | Spirulina is often inoculated at concentrations ranging from 0.1 to 1.0 grams of dry biomass per liter (g/L) or 1 to 10 million cells per milliliter (cells/mL). The optimal inoculation density depends on factors like light intensity, temperature, and nutrient availability. |
| Inoculation Volume | In a 1-liter photobioreactor, you would typically start with a small volume of spirulina culture and allow it to grow to fill the reactor over time. For example, you might start with 100 mL of a culture with a certain concentration and allow it to grow under suitable conditions. |
| Nutrient Concentration | Spirulina requires nutrients such as nitrogen, phosphorus, and trace elements for growth. The nutrient concentration in the growth medium can also affect the growth rate. You need to ensure that the medium provides the necessary nutrients for the spirulina to thrive. |
| Light Intensity and Photoperiod | Spirulina is photosynthetic and requires light for growth. The intensity and duration of light exposure will influence growth rates. |
| Temperature | Spirulina generally grows well at temperatures between 30-35°C, but the optimal temperature can vary depending on the strain. |
The Photoperiod Cycle
| Continuous Light | Spirulina can be grown under continuous light conditions, meaning that the algae receive a constant light source throughout the day and night. This is common in outdoor open pond systems where natural sunlight is used. In this case, the photoperiod is essentially 24 hours of light. |
| Day-Night Cycle | In controlled indoor systems, a day-night cycle may be implemented to mimic natural conditions. A common photoperiod cycle is 16 hours of light followed by 8 hours of darkness. This allows the spirulina to photosynthesize and grow during the light period, while the dark period provides a rest period. |
| Light Intensity | The intensity of light is also a critical factor. Spirulina typically requires high light intensity for optimal growth. The light intensity should be within the range of 100 to 300 µmol photons m⁻² s⁻¹, although the specific requirements can vary. |
| Light Source | Natural sunlight, artificial lighting (such as LED lights), or a combination of both can be used as light sources. The choice of light source can impact the growth rate and nutritional content of the spirulina. |
| Monitoring and Adjusting | It's important to monitor the growth of spirulina and adjust the photoperiod and light intensity as needed. Conditions that are optimal for growth may vary depending on factors like temperature, nutrient availability, and CO2 concentration. |
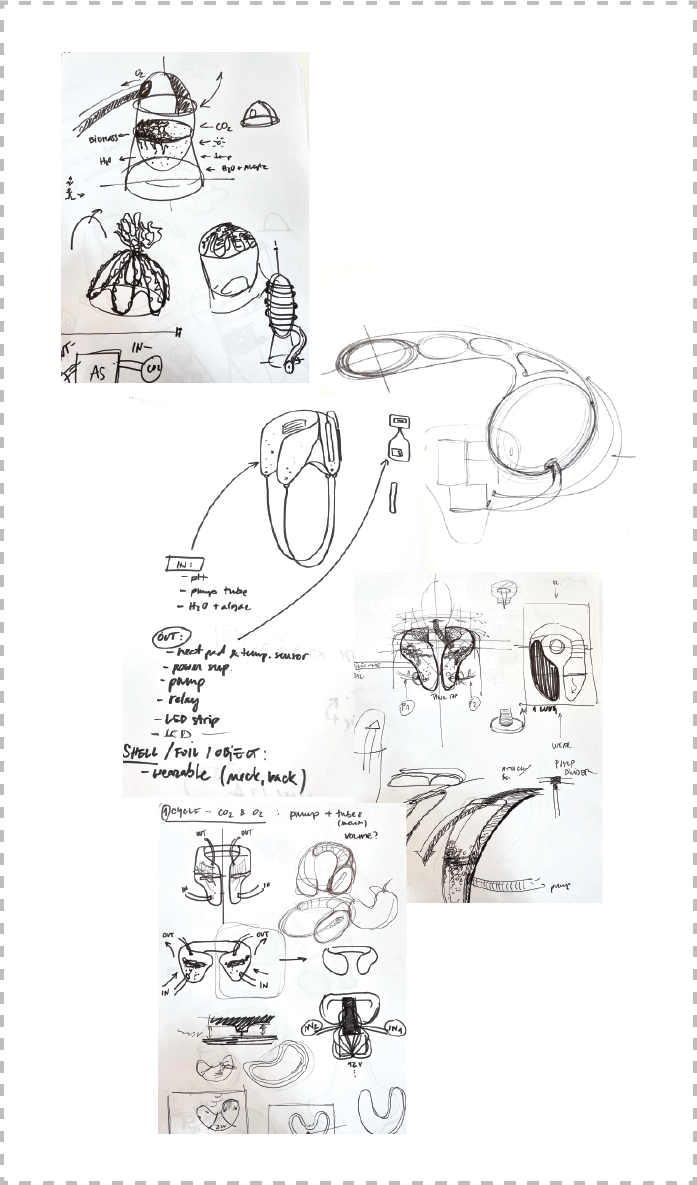
Sketches & Ideation
We started by putting down main components and the principles of how they work and what do they provide for the microorganisms. The inputs and outputs of a cyclical system were the main focus in designing a wearable.
Components & Bill of Materials
Depending on the information above and the documentation from other open-source proejcts we were able to identify the most important elements to allow the algae to grow. The areas were: regulating and maintaining a temperature, reading the pH levels, mixing or agitating the liquid mixture, light regulating and control.
| Component | Image | Quantity | Source | Info/Specs |
| Power Supply |  |
1 | Amazon (60EUR) | Model MS-75-12, Input Voltage: 110VAC/220VAC, Output Voltage: 12V, Output Current: 6.25A, Efficiency: 85%, Size: 110mm x 78mm x 35mm |
| Regulator | 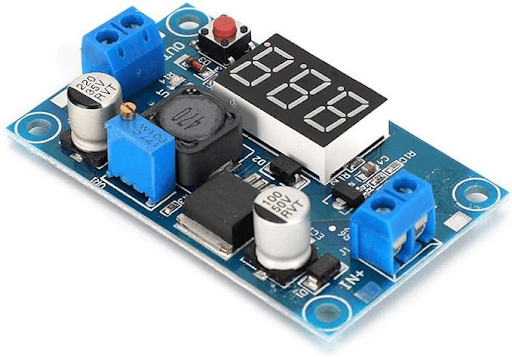 |
1 | Amazon(8 EUR) | Model LM2596, Power In: 4,5-38V, Power Out: 1.25-36,5V, Output current: 2A (max 3A), Working temperature: -40 a + 85 ºC, Operational frequency: 150KHz, Efficiency: up to 92%, Load regulation: +/-0,5%, Voltage regulation: +/-2,5%, Temperature protection: yes, Size: 62mm x 38mm x 15mm |
| Relay | 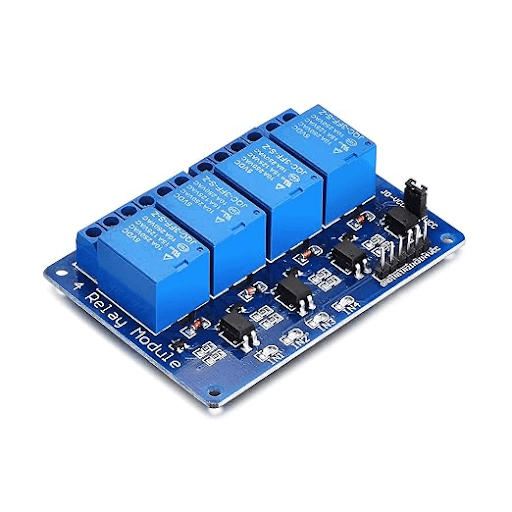 |
1 | Amazon(7 EUR) | 4 Channel Relay, Output: DC 30V/10A, AC 250V/10A, Size: 74mm x 45mm |
| Arduino | 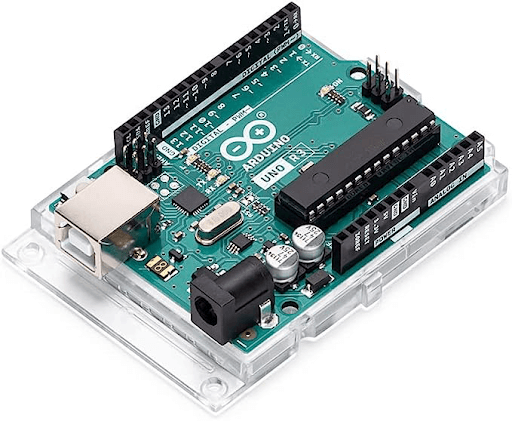 |
1 | Amazon(32 EUR) | Uno R3 |
| Pump |  |
1 | Amazon(21 EUR) | Model D2028 |
| Heating Pad | 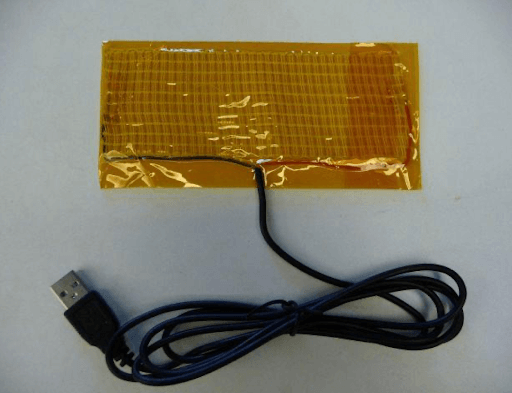 |
1 | unknown | Ultra Heating Fabric |
| Thermistor | 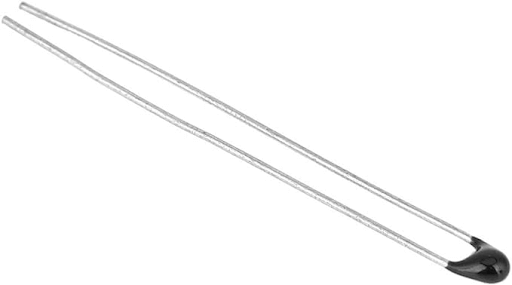 |
1 | Amazon(5 EUR) | 10k Ohm |
| Photoresistor | 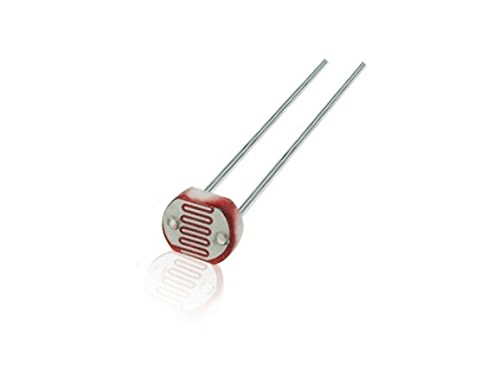 |
1 | Amazon(4 EUR) | |
| LED Strip |  |
27 count | Amazon(29 EUR) | |
| LCD | 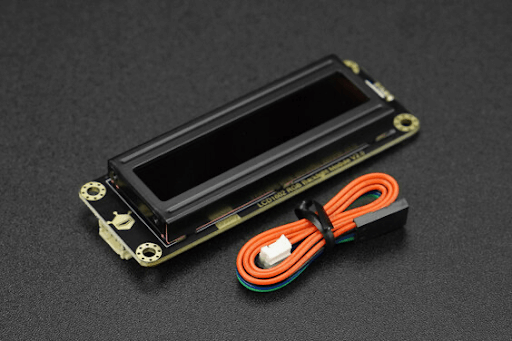 |
1 | DFRobot(11 EUR) | DFR0554 |
| Acrylic | 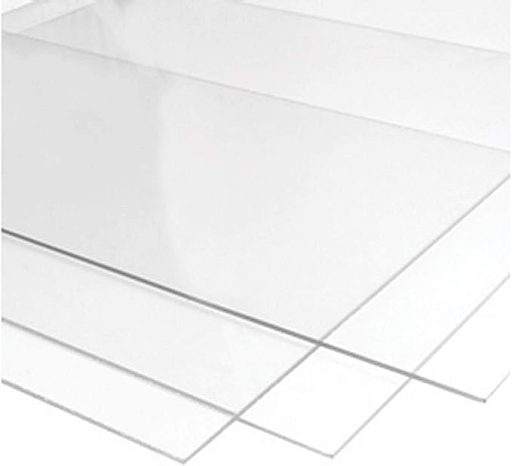 |
1 | Amazon(48 EUR) | 3 mm |
| Silicone |  |
1 | Formx (37 EUR) | Dragon Skin 10 Fast, Pot Time: 8 min, Cure Time: 75 min |
| Total Cost | 298 EUR |
Codes & Electronics
Pump
We used the pump to agitate the liquid and to keep the CO2 entering for the Algae's needs.
To control the pump's on and off timings we used a relay connected to the power supply, pump, and arduino.
Here's a video to learn more about this pump and how to connect it.
#define relayPin 2        // Relay
// Pump timing variables
unsigned long lastTime = 0;
unsigned long interval = 5000;
void setup() {
 Serial.begin(9600);
 pinMode(relayPin, OUTPUT);
}
void loop() {
 unsigned long currentTime = millis();
 if (currentTime - lastTime >= interval) {
   digitalWrite(relayPin, !digitalRead(relayPin));
   lastTime = currentTime;
 }
}
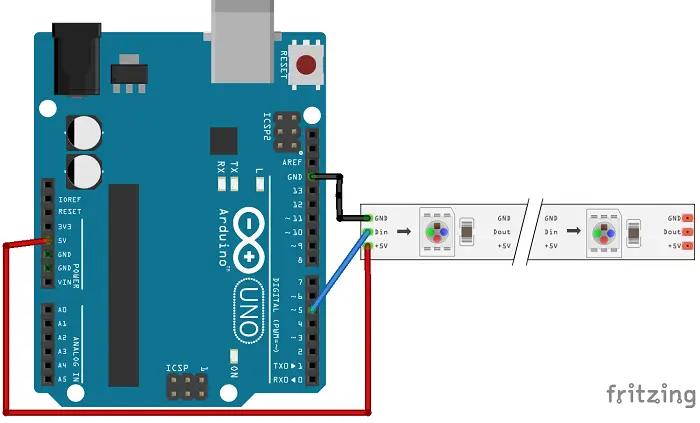
Light
Using a photoresistor and an LED strip to make sure the Algae has the correct luminosity at all stages.
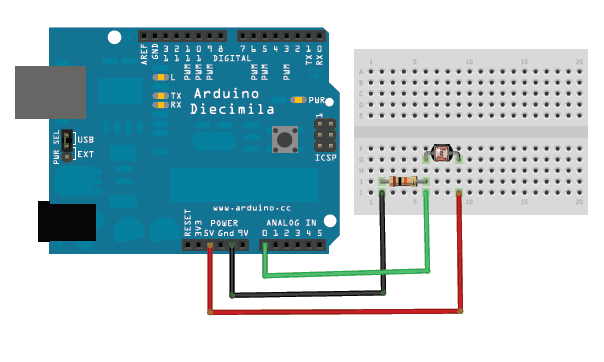
#include <Adafruit_NeoPixel.h>
#define pResistor_pin A2  // Photoresistor
#define LED_PIN 9         // LED strip
// Defining LED constant
#define LED_COUNT 60


int luminosity;     // Store value from photoresistor (0-1023)
int setpoint = 45;  // Set your desired temperature in Celsius
int Vo;


Adafruit_NeoPixel strip(LED_COUNT, LED_PIN, NEO_GRB + NEO_KHZ800);


void setup() {
 Serial.begin(9600);
 pinMode(pResistor_pin, INPUT);
 strip.begin();
 strip.show();
}


void loop() {
 luminosity = analogRead(pResistor_pin);
 static unsigned long previousMillis = 0;
 const unsigned long interval = 5000;
 unsigned long currentMillis = millis();
 if (currentMillis - previousMillis >= interval) {
   previousMillis = currentMillis;
   Serial.print("Luminosity: ");
   Serial.println(luminosity);
 }
 if (luminosity < 700) {
   for (int i = 0; i < strip.numPixels(); i++) {
     strip.setPixelColor(i, strip.Color(143, 0, 255));  //violet light #8F00FF
   }
   strip.show();
 } else {
   for (int i = 0; i < strip.numPixels(); i++) {
     strip.setPixelColor(i, strip.Color(0, 0, 0));
   }
   strip.show();
 }
}
Temperature
To maintain the temperature in the photobioreactor to the Algae's liking. We added a heating pad connected to a thermistor. The thermistor is used to maintain the heating pad at the optimal temperature. Keep in mind that the temperature in the code will be different to the temperature of the heating pad so make sure to adjust it accordingly.
In this we used the circuit created during the Wearables week with Citlali and connected the thermistor and heating pad to it, power supply, and arduino.
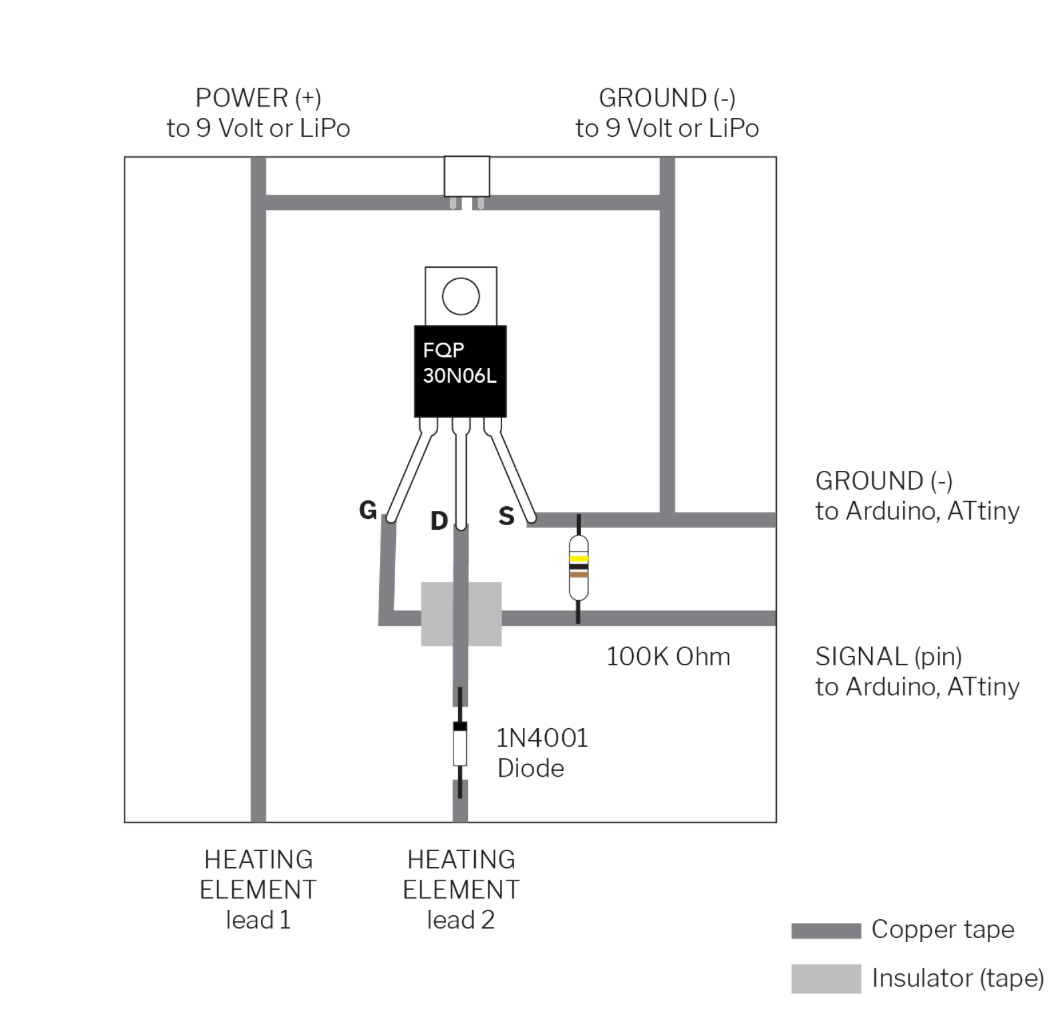
To maintain the heating pad at a specific temperature and regulating it there using a thermistor is a difficult code. I used a PID control system. "A PID controller seeks to keep some input variable close to a desired setpoint by adjusting an output. The way in which is does this can be 'tuned' by adjusting three parameters (Proportional,Integral,Derivative)."Arduino, Brett Beauregard
#define heat A1           // Heat Pad
// Temperature reading variables
float R1 = 10000;
float logR2, R2, T, Tc, Tf;
float c1 = 1.009249522e-03, c2 = 2.378405444e-04, c3 = 2.019202697e-07;


// PID Constants
float Kp = 10;   // Proportional gain
float Ki = 0.1;  // Integral gain
float Kd = 1;    // Derivative gain
float previousError = 0;
float integral = 0;


// Global variables for filtering
const int numReadings = 10;
static int readings[numReadings];
static int index = 0;
static int total = 0;


void setup() {
 Serial.begin(9600);
}


void loop() {
 Vo = analogRead(ThermistorPin);
 R2 = R1 * (1023.0 / (float)Vo - 1.0);
 logR2 = log(R2);
 T = 1.0 / (c1 + c2 * logR2 + c3 * logR2 * logR2 * logR2);
 Tc = T - 273.15;
 Tf = (Tc * 9.0) / 5.0 + 32.0;


 // PID Control
 float error = setpoint - Tc;
 integral += error;


 // Anti-windup - limit the integral term to a certain range
 const float integralWindupLimit = 100.0;
 integral = constrain(integral, -integralWindupLimit, integralWindupLimit);


 float derivative = error - previousError;


 // Calculate PID Output
 float output = Kp * error + Ki * integral + Kd * derivative;


 // Safety check - limit the output to prevent excessive heating
 const int maxOutput = 255;
 output = constrain(output, 0, maxOutput);


 analogWrite(heat, static_cast<int>(output));


 //display the serial.print with 5 second intervals without delay
 static unsigned long previousMillis = 0;
 const unsigned long interval = 5000;
 unsigned long currentMillis = millis();
 if (currentMillis - previousMillis >= interval) {
   // Save the current time
   previousMillis = currentMillis;
   Serial.print("Temperature: ");
   Serial.print(Tf);
   Serial.print(" F; ");
   Serial.print(Tc);
   Serial.println(" C");
   //Serial.print("PID Output: ");
   //Serial.println(output);
 }


 previousError = error;
}
Joint Code
Join all the connections one one circuit and join the codes as below. A tip to join on a circuit is by soldering all the 5V on the same line and the GND on the same line. That minimizes the number of traces floating around. Joining the codes above and printing on the LCD screen:
#include <Adafruit_NeoPixel.h>


//Defining pins used
#define pResistor_pin A2  // Photoresistor
#define LED_PIN 9         // LED strip
#define ThermistorPin A0  // Thermistor
#define heat A1           // Heat Pad
#define relayPin 2        // Relay


// Defining LED constant
#define LED_COUNT 60


int luminosity;     // Store value from photoresistor (0-1023)
int setpoint = 45;  // Set your desired temperature in Celsius
int Vo;


Adafruit_NeoPixel strip(LED_COUNT, LED_PIN, NEO_GRB + NEO_KHZ800);


// Pump timing variables
unsigned long lastTime = 0;
unsigned long interval = 5000;


// Temperature reading variables
float R1 = 10000;
float logR2, R2, T, Tc, Tf;
float c1 = 1.009249522e-03, c2 = 2.378405444e-04, c3 = 2.019202697e-07;


// PID Constants
float Kp = 10;   // Proportional gain
float Ki = 0.1;  // Integral gain
float Kd = 1;    // Derivative gain
float previousError = 0;
float integral = 0;


// Global variables for filtering
const int numReadings = 10;
static int readings[numReadings];
static int index = 0;
static int total = 0;


// End of defining everything above


void setup() {
 Serial.begin(9600);
 pinMode(pResistor_pin, INPUT);
 pinMode(relayPin, OUTPUT);
 strip.begin();
 strip.show();
}


// Defining the different component loops


void light() {
 luminosity = analogRead(pResistor_pin);
 static unsigned long previousMillis = 0;
 const unsigned long interval = 5000;
 unsigned long currentMillis = millis();
 if (currentMillis - previousMillis >= interval) {
   previousMillis = currentMillis;
   Serial.print("Luminosity: ");
   Serial.println(luminosity);
 }
 if (luminosity < 700) {
   for (int i = 0; i < strip.numPixels(); i++) {
     strip.setPixelColor(i, strip.Color(143, 0, 255));  //violet light #8F00FF
   }
   strip.show();
 } else {
   for (int i = 0; i < strip.numPixels(); i++) {
     strip.setPixelColor(i, strip.Color(0, 0, 0));
   }
   strip.show();  //}
 }
}


void pump() {
 unsigned long currentTime = millis();
 if (currentTime - lastTime >= interval) {
   digitalWrite(relayPin, !digitalRead(relayPin));
   lastTime = currentTime;
 }
}


void temp() {
 Vo = analogRead(ThermistorPin);
 R2 = R1 * (1023.0 / (float)Vo - 1.0);
 logR2 = log(R2);
 T = 1.0 / (c1 + c2 * logR2 + c3 * logR2 * logR2 * logR2);
 Tc = T - 273.15;
 Tf = (Tc * 9.0) / 5.0 + 32.0;


 // PID Control
 float error = setpoint - Tc;
 integral += error;


 // Anti-windup - limit the integral term to a certain range
 const float integralWindupLimit = 100.0;
 integral = constrain(integral, -integralWindupLimit, integralWindupLimit);


 float derivative = error - previousError;


 // Calculate PID Output
 float output = Kp * error + Ki * integral + Kd * derivative;


 // Safety check - limit the output to prevent excessive heating
 const int maxOutput = 255;
 output = constrain(output, 0, maxOutput);


 analogWrite(heat, static_cast<int>(output));


 //display the serial.print with 5 second intervals without delay
 static unsigned long previousMillis = 0;
 const unsigned long interval = 5000;
 unsigned long currentMillis = millis();
 if (currentMillis - previousMillis >= interval) {
   // Save the current time
   previousMillis = currentMillis;
   Serial.print("Temperature: ");
   Serial.print(Tf);
   Serial.print(" F; ");
   Serial.print(Tc);
   Serial.println(" C");
   //Serial.print("PID Output: ");
   //Serial.println(output);
 }


 previousError = error;
}


// Calling the three functions into the loop
void loop() {
 light();
 pump();
 temp();
}
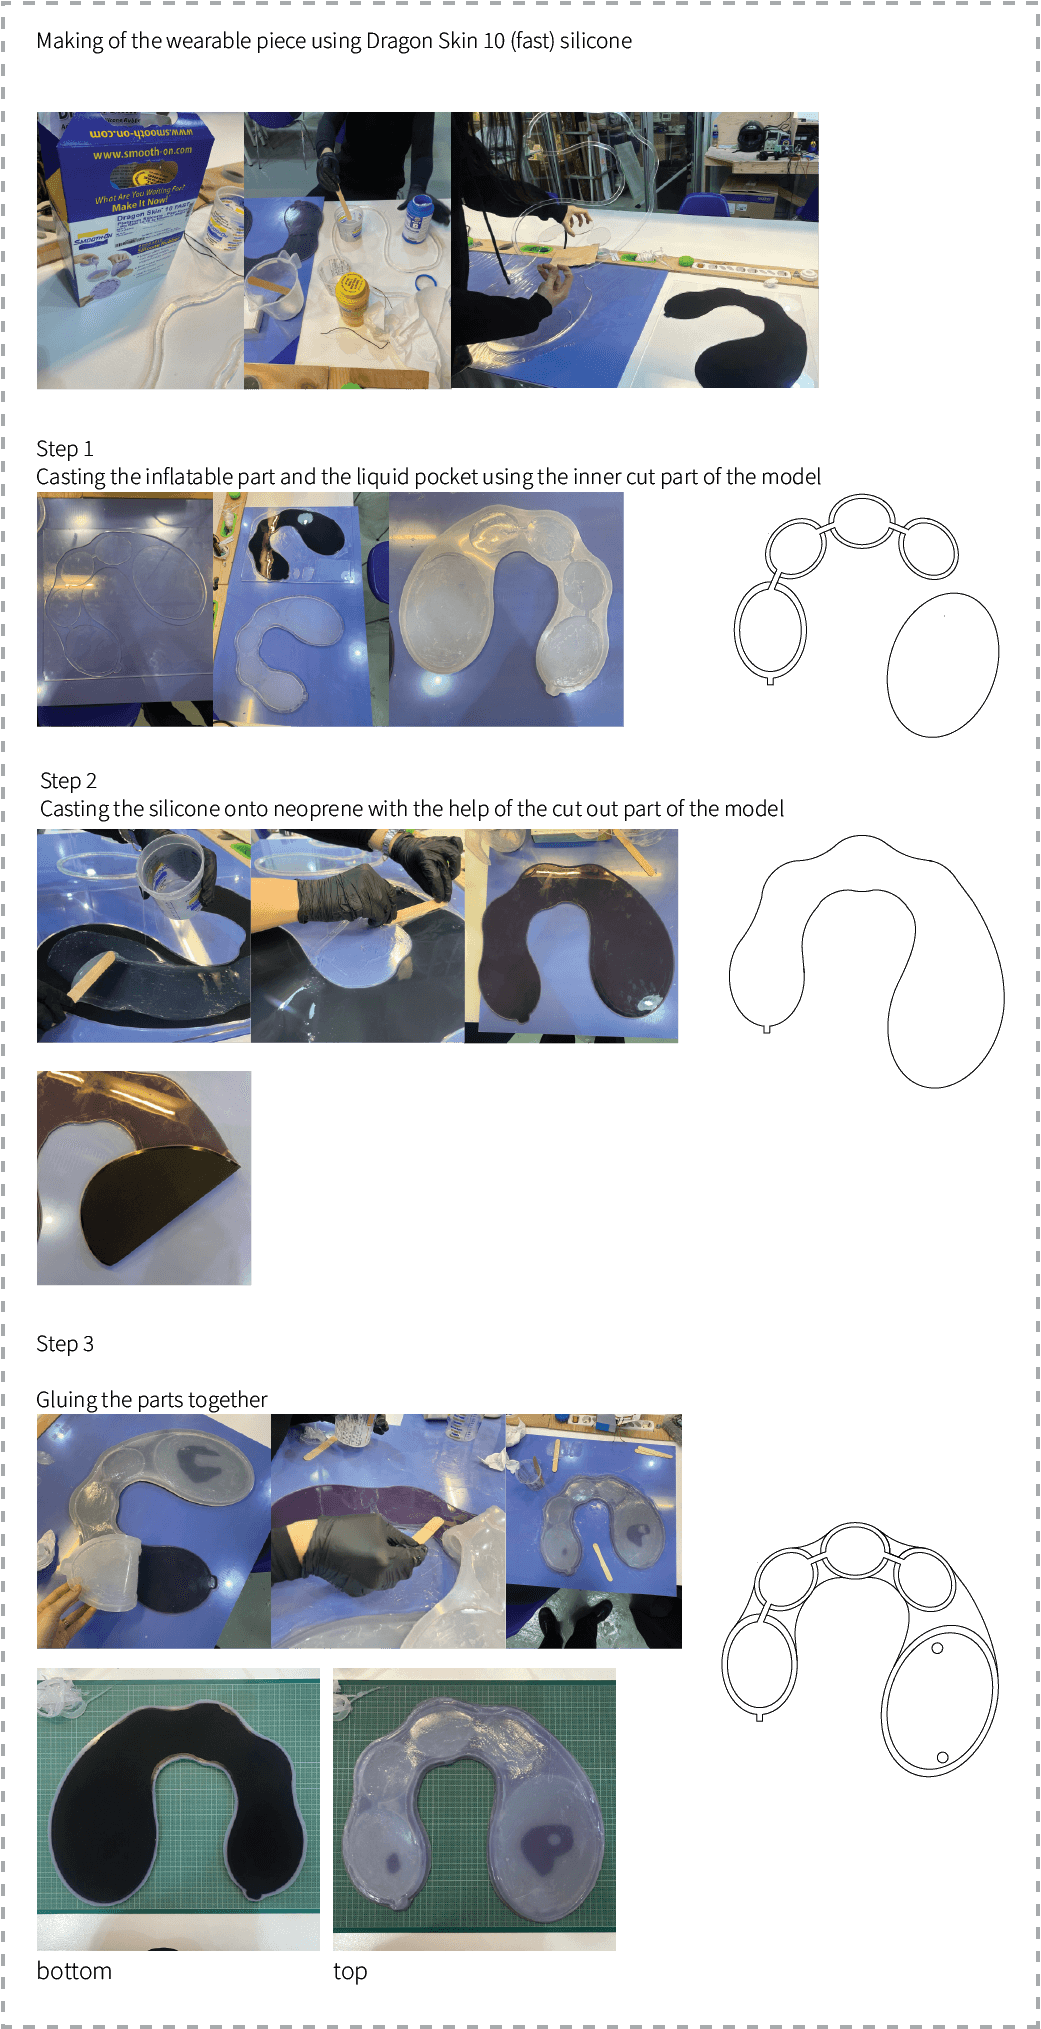
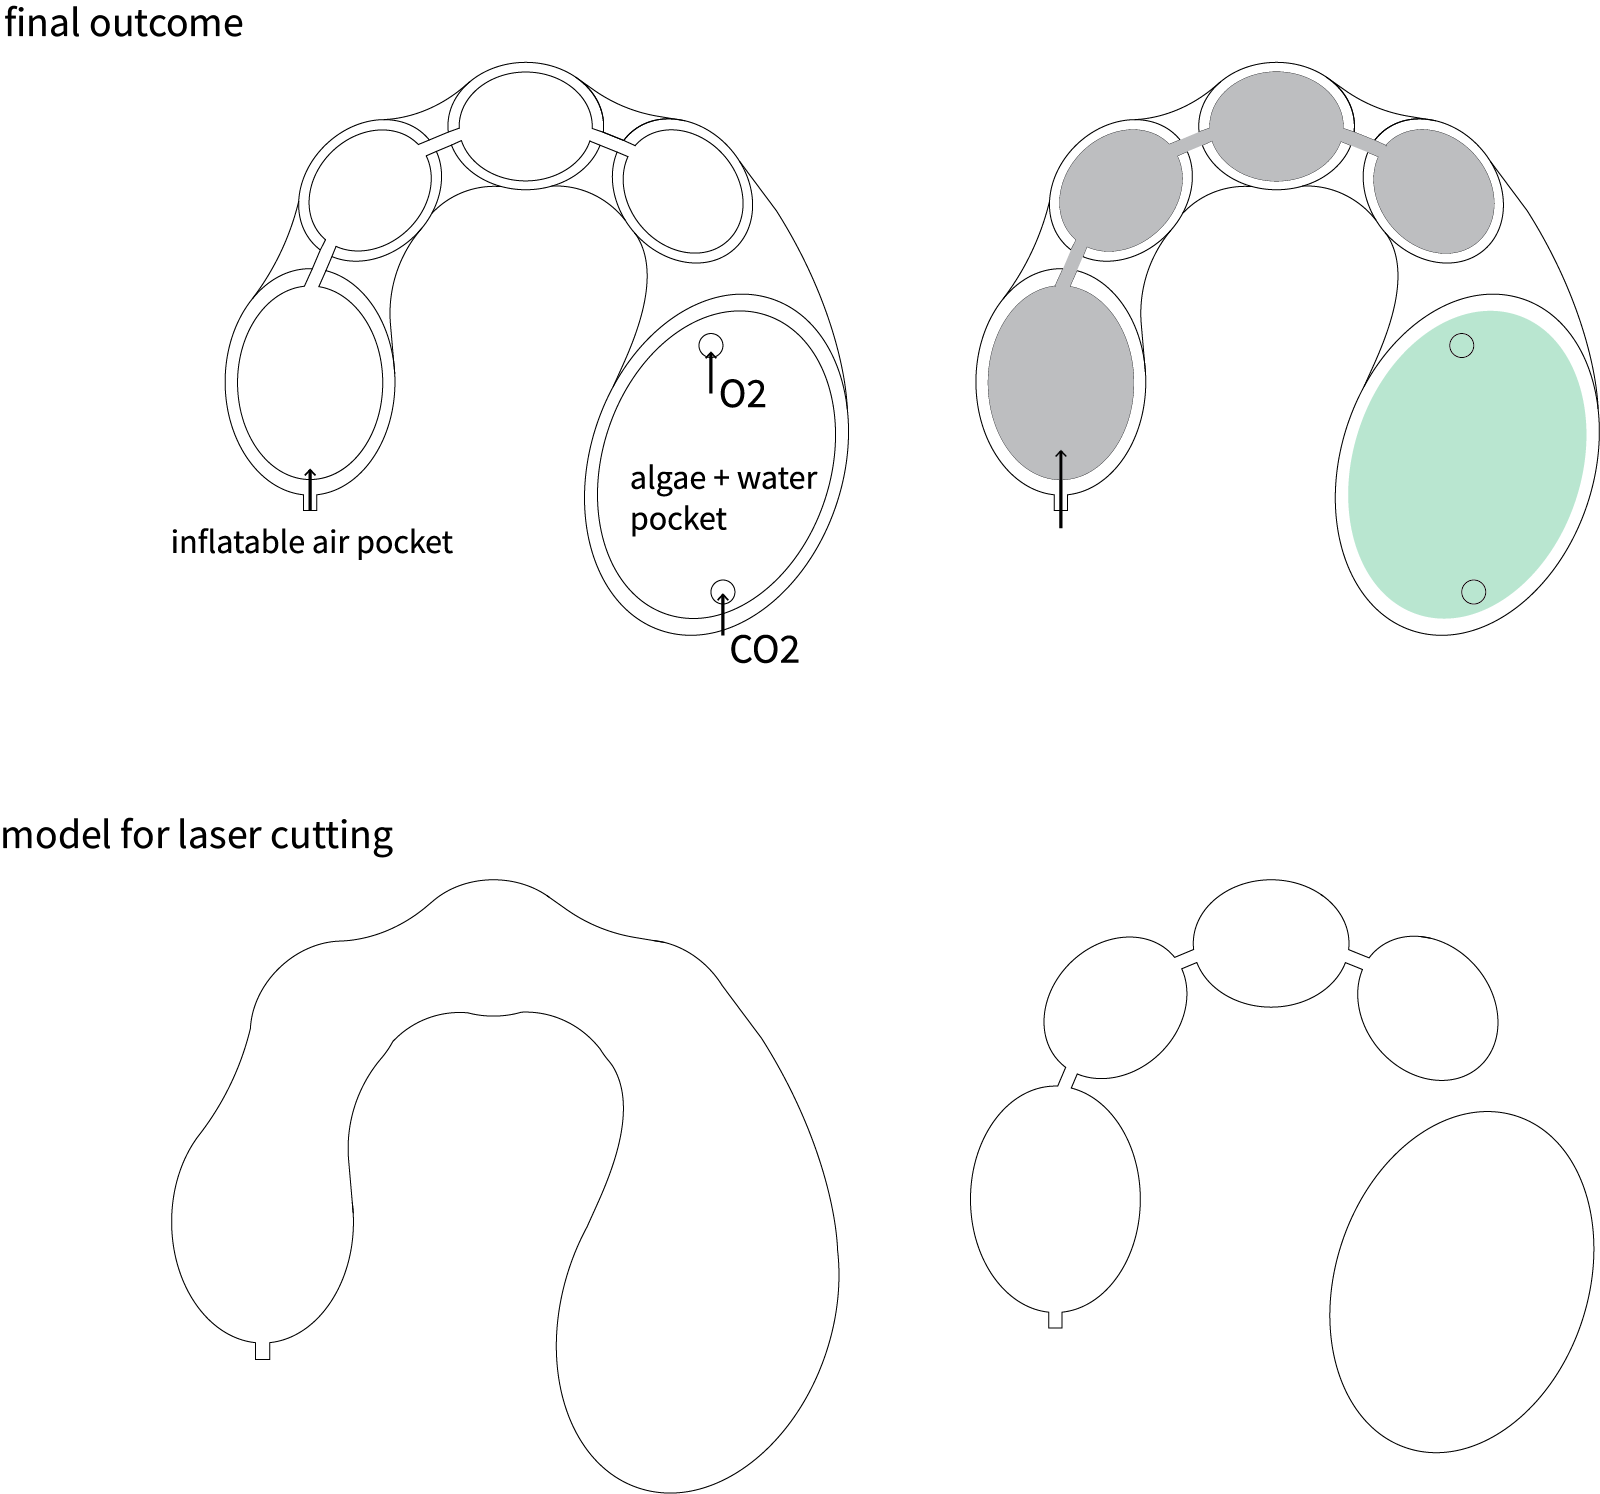
Making of the wearable
The week of soft robotics helped us a lot with the making of the wearable. The idea of a photobioreactor being worn as a symbiotic accessory between humans and algae, combines soft materials such as silicone and liquids into its formation.
Futuristic and speculative equipment worn around the shoulders consists of two main parts. The bottom one presents a base, where silicone is casted onto neoprene to achieve better tension properties of the wearable (once liquids are poured). The top part is meant to act as a pouch. A soft part that can expand and inflate, providing a flexible environment for algae to grow as well as being comfortable for the one who wears it.

Materials used:
-
Dragon Skin 10 (fast + super fast) silicone
-
Plexi glass for molds
-
Neoprene
-
Tubes to inflate and for pouring liquid into the algae pocket
-
Water + algae
-
Air
Process