4. B I O C H R O M E S
Living colours
Where do colours come from and what is their history ?
"Colour is fundamental to our experience of the world around us" - Kassia St Clair The Secret Lives of Colour
I N S P I R A T I O N
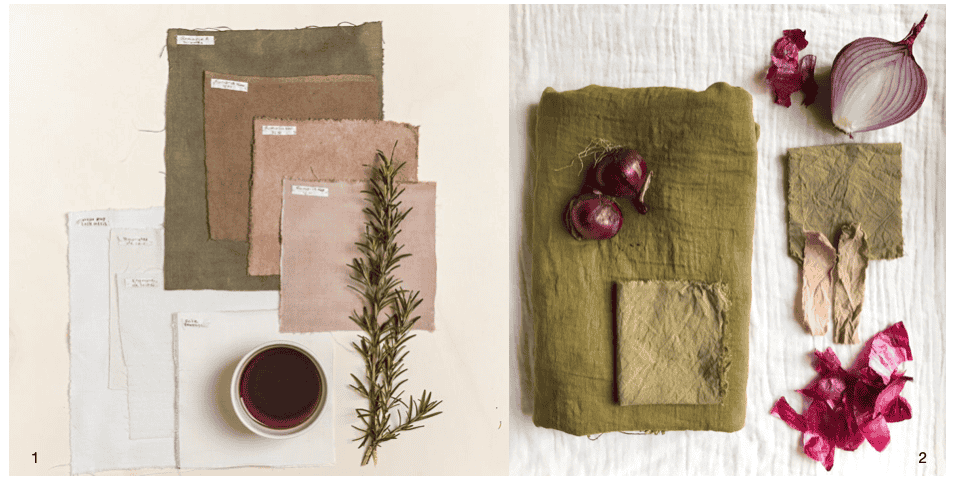
_ 1 Cdéco.fr
__ 2 Jamie Young @thebarefootdyer
___ 3 Mattricaria
____ 4 Natural dyes in India Journals of Color
R E S E A R C H
I N F O R M A T I O N / R E C I P I E S
Dyeing to tell you about weld!
Shepherd Textiles - Natural Dyes
Maiwa's Natural Dyes - What they are & how to use them
The Maiwa guide to Natural Dyes Downloadable PDF
Biochromes Lecture Fabricademy 2023-24
C O N T I N U E D _ R E A D I N G
The Secret Lives of Colour - Kassia St Clair
Interaction of color - Josef Albers
Wild Colour - The Complete Guide to Making and Using Natural Dyes - Jenny Dean
L E C T U R E _ N O T E S
Natural Sources of Colour
- Animal (insects, mollusca)
- Botanical
- Mineral (oxides, ochers, clay, soils)
- Baterial
- Funagl (mushrooms, mold)
Forms of Colour
- Ink (dense liquid, soluable, dispersed)
- Dye (liquid bath, soluable)
- Pigment (powder, insoluable in water)
N A T U R A L _ D Y E S
P R E P A R I N G _ F I B E R S
Types of fabrics
- Natural Fibers - (brilliant colours) e.g. wool, silk, angora, mohair, alpaca, camel
- Vegetable Fibers - (can achieve brilliant colours over time) e.g. cotton, linen, hemp
- Man-made fibers - (would not recommend with dying)
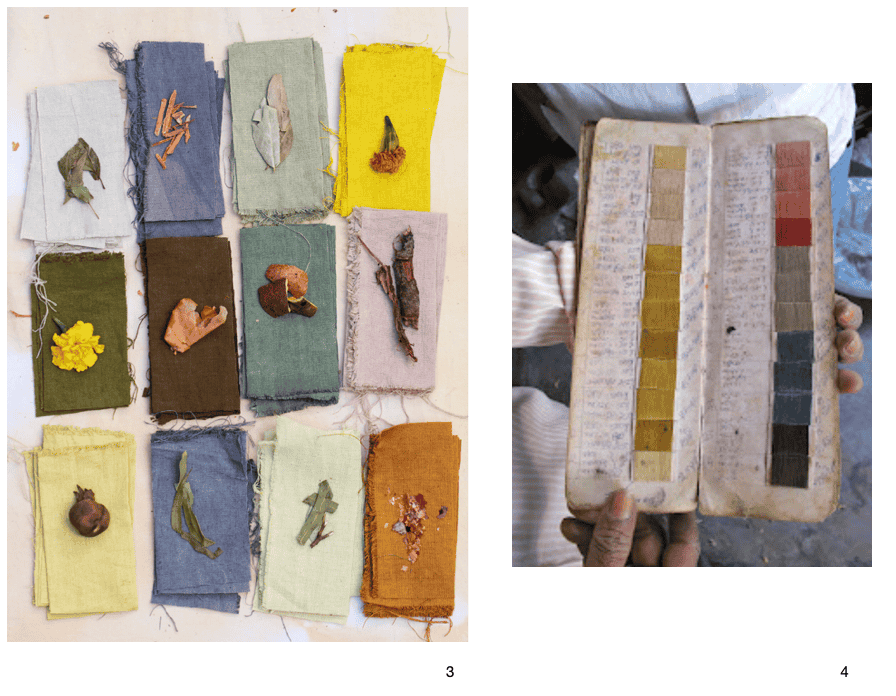
 _ 1 Organising & weighing wool 'fluffies' 10 grams each of Netherland wool + 5 grams of South American Merino wool
__ 2 Organising and bundling cotton yarn (roughly 3 grams each)
M E T H O D 1
Step 1 - W E I G H
Weigh fabrics when dry WoF = Weight of Fibers
Step 2 - S C O U R
Scouring is cleaning and removing the fibers from any dirt & oil.
- Place fibers into a large pot of water
- Add Soda (Sodium Carbonate) 10% WoF
- Simmer for approx 45 minutes - 1 hour. Stir occationally.
Allow fibers to cool down slowly and then rinse in hot water
NOTE
Rinse Fibers gently
Do not shock fibers (boiling hot from cold) - animal will felt
Boil Vegetable fibers
Step 3 - T A N
Tanning keeps colour in fabric for longer
- Use on vegetable fibers (cotton, linen)
- Sodium Carbonate, Oak galls, Tara Pods, Myrobalan, Sumac, Catechu, Pomegranate
Step 4 - M O R D A N T
Mordanting works as a catalyst to bind the dye pigments to the fibers. Modanting helps keep the colours intact and making more permanent.
- Boil enough water to cover all of your fibres (use tepid water for wool)
-
Add Alum (Potassium Aluminum Sulphate)
Animal fibers (wool) = 10-20 % WoF of Alum + 8 % WoF of Acid (Tartaric acid/ Cream of Tartar) Plant fibers (cotton) = 10-15 % WoF of Alum -
Mix thoroughly until dissolved.
- Wet your fibres.
- Simmer for 1 hour. Stir occasionally
- Remove and wash with water.
- If using leftover mordant water to mordant again, you assume the strength of the mixture is half the strength and calculate dependently.
- Cold Alum Mordanting - leave for 1/2 days

Cotton fabric mordanted 10-15 % WoF
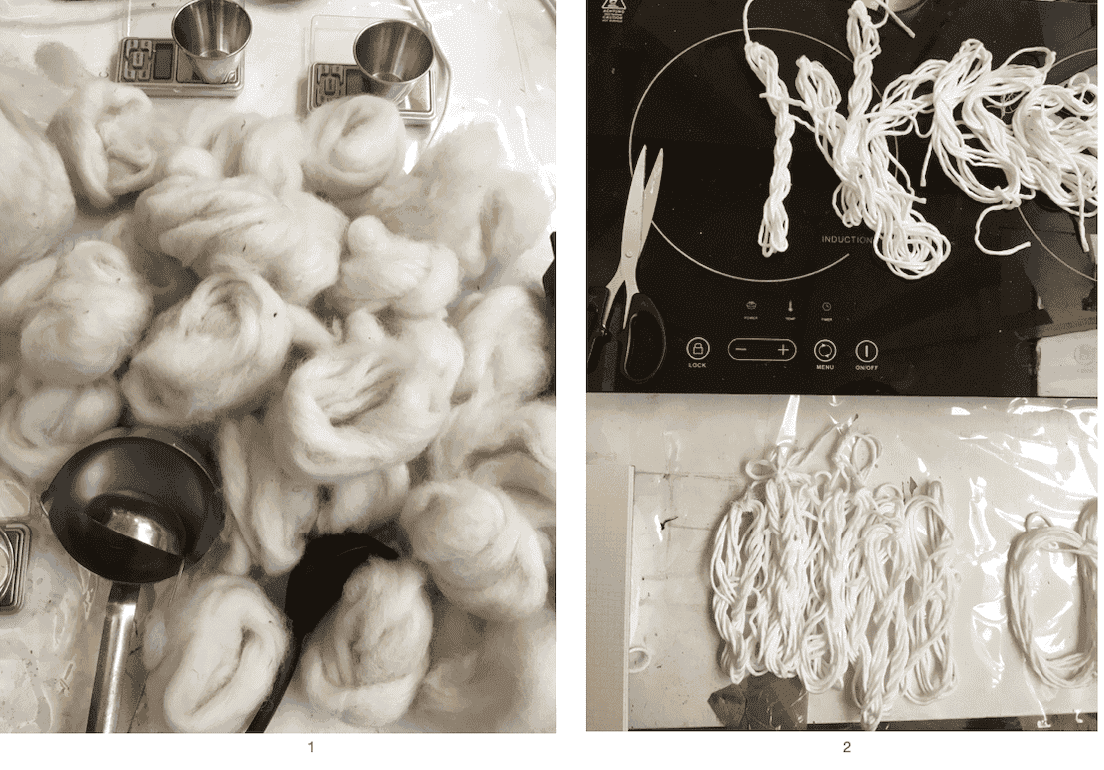
P R E P A R I N G _ D Y E S
Selection of various Dye Material
N A T U R A L _ D Y E _ M A T E R I A L
| Name | Dye Colour | Measurement | Dyestuff | Mordant | Fun Fact | Other Names |
|---|---|---|---|---|---|---|
| Sandalwood | Red | 100 % WoF | wood chips or powder | Alum | interesting for inks | Saunderswood |
| Rooibos | Soft peach | % WoF | tea leaves | Alum | ||
| Red Onion | green | 50 - 25 % WoF | skins | Alum (Copper or iron pre mordants affect colour) | contains tannins | |
| Madder | Red | 100 % Wof (red) 50 % (peach) | Roots | Both mordants and modifiers work. | Do not boil. Possibile to produce 25 shades with 1 dye bath | |
| Logwood | purple | 25 % WoF | dried chips | Alum=Purple, Iron=Dark, Copper=Blue hues | good for staining / painting | Campeche |
| St John's Wort | yellow/green | 100 % WoF | flowers, plant tops | Alum | Medicinal | Hypericum perforatum |
| Weld | Yellow (primary) | 20/30 % WoF +1/2 Sp Chalk | Stem and flower dye | Alum (copper or iron will effect final colour) | Very light and wash fast | Dyer's Rocket |
| Golden Onion | yellow/orange | 25 % WoF | skins | Alum | mix with other dyes e.g madder to intensify colour | |
| Hollyhock | pink/purple | 100 % WoF | Flowers (fresh or dry) | give pale results to vegetable fibers, react well to modifiers | ||
| Rubarb Root | yellow | 100 % (leaves), 50 % (roots) WoF | roots, leaves | natural mordant | ||
| Horse Chestnut | beige | 30 % WoF | outer shell | Alum | ||
| Cochineal | fusia/pink/purple | 5-10 % WoF | insect | Alum (brilliant colours), Cream of tartar (red) | Ground up | Carmine (lake pigment) |
| Sweet Pea | blue | 50 % WoF | flower | Alum | ||
| Alkanet | red/blue | 100 % WoF + 1 liter Ethanol (96%) | Root flakes | Alum | Extract dye using solvent (Ethanol), flakes can be extracted multiple times | |
| Avocado | gentle pink | 100 % WoF + half teaspoon Sodium Carbonate | pits (chop) and skins | soy binder | gently simmer |
R E C I P E S
Recipes used for dye experiments 2
| Dye Material | Measurment | Original Colour | Dye Colour |
|---|---|---|---|
| Red Onion Skins | 50g | Red | Green (mustard) |
| Madder | 100g | Brown | Red (various shades can be achieved) |
| Weld | 20g | Yellow/Green | Yellow (bright) |
| Sweet Pea | 20g | Blue/Purple | Blue/Purple (pale) |
| Holy Hocks | 20g | Black/Purple | Green (pale) |
| St.John's Wort | 30g | Brown/Green | Golden Green (pale) |
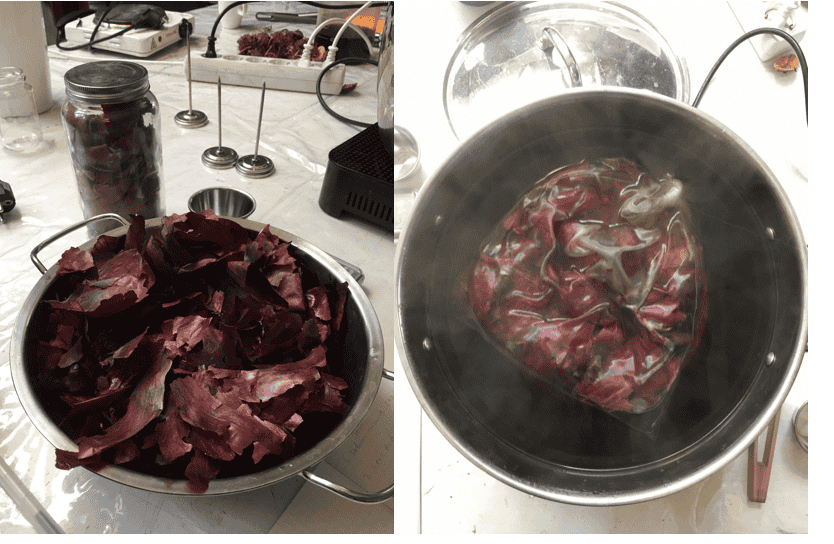
All recipes include
- 2 liters of water for dye bath
- Fabric bag for any loose dye material e.g. tea bag idea
- Rinse the fibers well and wash in pH-neautral solution.
- Some colours can be extracted in ethanol
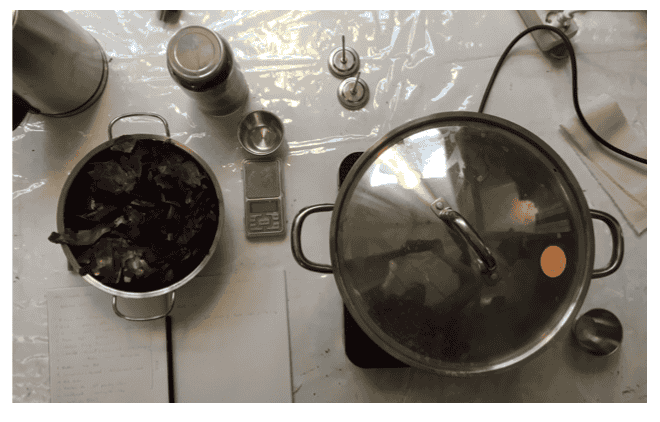
Set up for Dye Bath
Materials / Tools
Pots, hob, measuring scale, whisk, fabric bags, dye material, iron, citric acid, treated and prepared fabric
Onion Skins 50 % WoF measured out / Onion skins placed in bag in dye bath
R E S U L T S
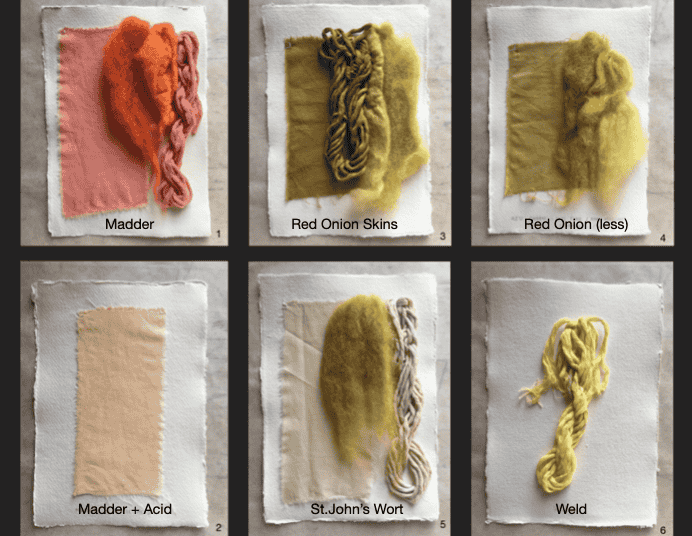
_ 1 Madder (100% WoF)
__ 2 Madder + Citric Acid (1%)
___ 3 Red Onion (50%)
____ 4 Red Onion less time (cotton) / non mordant (wool)
_____ 5 St. John's Wort (30%)
______ 6 Weld(60%)
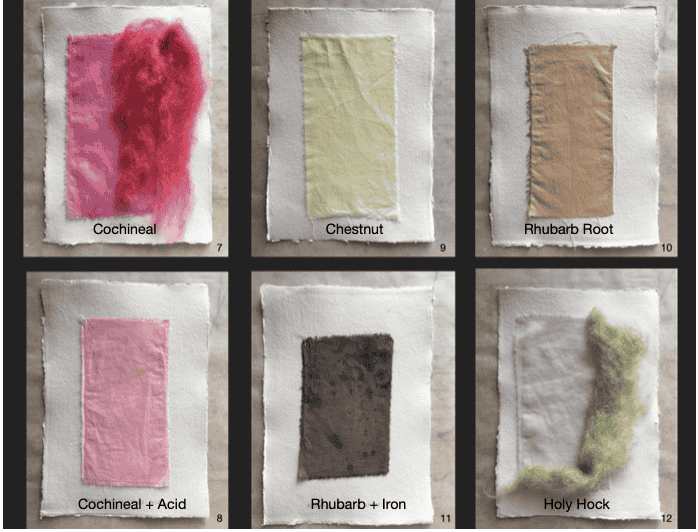
_ 7 Cochineal
__ 8 Cochineal + Cirtric Acid
___ 9 Horse Chestnut
____ 10 Rhubard Root (30%)
_____ 11 Rhubard Root + Iron
______ 12 Holy Hock (20%)
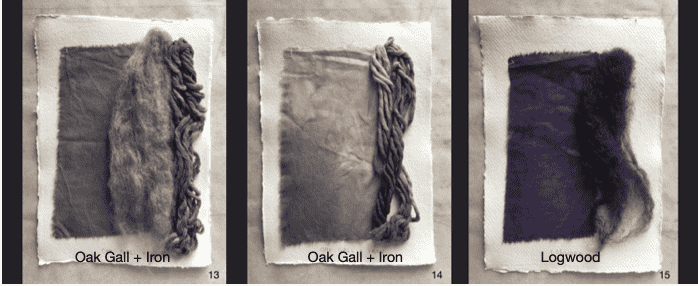
_ 13 Oak Gall + Iron (35%)
__ 14 Oak Gall + Iron(gradient)
___ 15 Logwood
M O D I F Y
Modifying dye colours
The use of modifiers extends the range of colours available from a single dye bath.
Can result in a dramatic or subtle colour change.
- To assess the colour change it is a good idea to keep some of the initial dye bath unmodified.
- Some modifiers change the pH value of the dye to make it more acidic or alkaline. Others act as after-mordants.
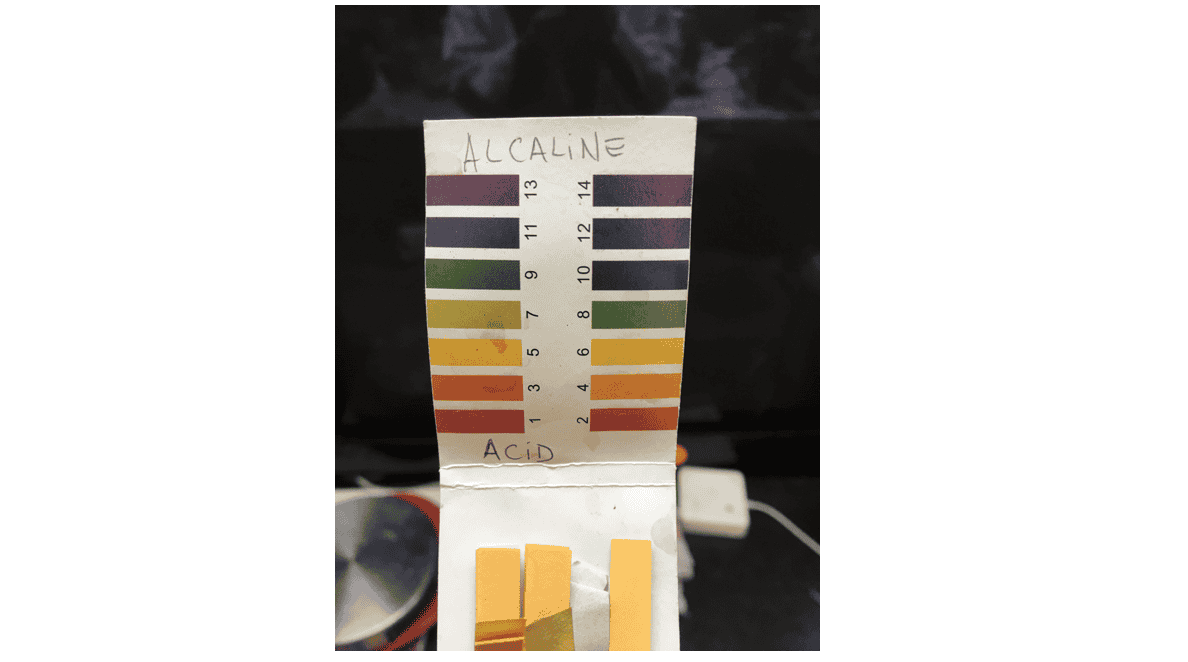
Using pH test strips is helpful to know how Acidic / Alkaline a solution is
Acidic Modifier =
- Usally turns colours to a lighter shade / more yellow in tone.
- Tends to change red tones to orange, and make purple dyes more red.
- Can be added to dye bath or separate pot of water.
- Can also be applied wthout heat, just soak fibers in cool solution until colour is right.
Alkaline Modifier =
- Usually make colour more pink in tone, but can change colours dramatically.
- e.g Elderberry purples and pinks become green, while rhubarb yellow turns light red.
- Apply to animal fibers without heat (otherwise fibers may damage / disintergrate).
- Vegetable fibers may be heated, or add modifier to dye bath.
Copper modifiers =
- Usually make colours more green / brown in tone (darker).
- Sometimes copper doesn't affect the shade, however it's addition will generally improve the fastness (usefull when a premordant has not been applied).
- If using as modifier = stir into bath, add wetted fiber and simmer for 10/15 minutes.
- Full after-mordanting effect = simmer the fibers for 30 minutes.
Iron modifiers =
- Tend to make the colours darker and more somber in tone.
- Improve the fastness of most dyes.
- Iron modification process called 'saddening'. Can turn yellows olive green and if used with dyes rich in tannin, it can make colours dark grey, almost black.
- Add to the dye bath or pot of water and stir it well. Can be applied without heat wo many plant dyes.
- Simmer for about 5 minutes (takes effect quickly)
Modifiers in Crystal form =
- Modifiers can also be used in powder / crystaline form.
- Add 1 or 2 teaspoons of powder or crystals to hot liquid and allow to dissolve.
Other Modifiers
- Clear Vinegar = acidic modifier.
- Ammonia, wood ash water = alkaline modifier.
- Homemade copper and iron liquors made as mordants can be used as modifiers.
Wood Ash water Recipe:

1. Remove the cold ashes from wood burning stove and place in plastic bucket.
2. Fill with cold water and leave ashes to steep for a week, until the liquid turns yellow and feels slimy.
3. Decant the liquid into a container without disurbing the ash sediment, stored indefinitely.
4. To use as modifier: add half a cupful to the dye bath or seperate pot of water.
Always rinse and wash well
P R E C I P I T A T I O N
Pigment Extraction - Precipitation of Dye Bath 3
Making used dye bath into pigments / inks = Recycling colours
Alum and Soda = dries dyes
R E C I P E
1 litre of dye bath
15 grams of Alum into residue dye bath (hot) & dissolve (feel it!)
7 grams of Soda (Sodium Carbonate) - roughly half of alum
- Add Soda a little bit at a time (bath will bubble + turn colour)
- Stir
- Place mixture in a coffee filter in a funnel / sieve to allow all of the liquid to pass through
- The remaining residue is the pigment extraction which will solidify / turn to powder over time
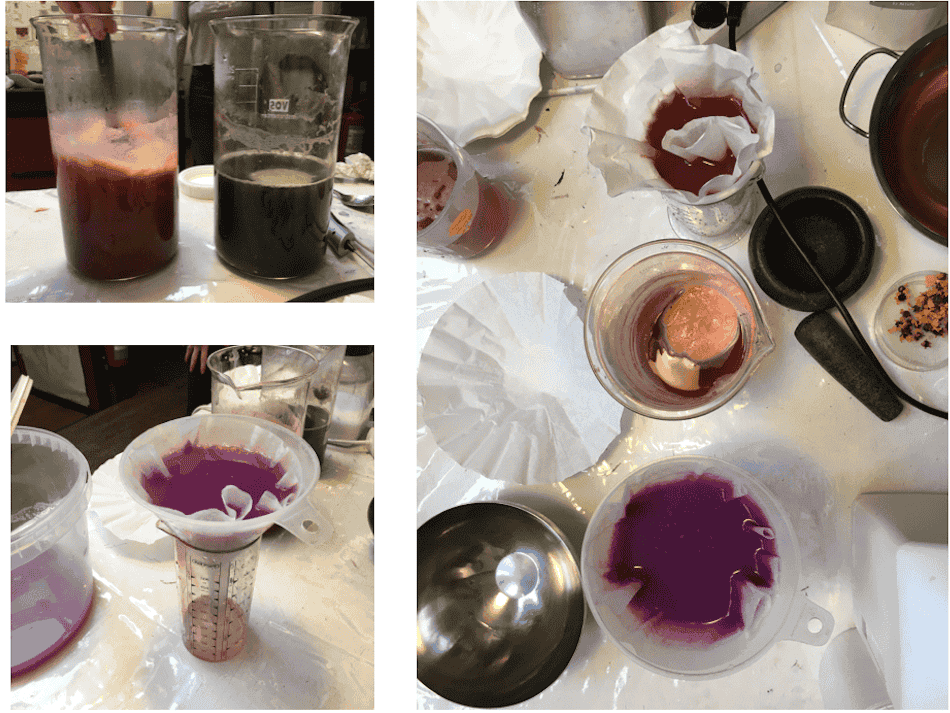
Precipitation Process
Possibilities to experiment
- Can start neutral or experiment with more Acid / Alkaline mixture
- Extract multiple times
- Experiment with chalk and citric acid
- Can screenprint with it
- Add gum to make more viscose
- Can seal in jar and keep printing
- Let dry completely = powder
- Add chalk to water to make dye stronger
Recipe to make Watercolour (I have not yet tried it for myself)
Watercolour

+ Gum Arabic (liquid) little bit
+ Glycerin / Honey (little bit)
+ muller (bathroom tile + stone/ glass on glass)

- Mull in 8's (creates viscosity)
- Ensure particles evenly dispersed
- Can add Acid / Alkaline to change colour
- Put in funnel + filter / sieve / fine mesh fabric
I N K S
Results of precipitating Madder, Cochineal rinse bath, Red Onion dye bath and St John's Wort dye bath.
I made tests using each dye residue and various mixtures to see the changes of colour / texture / application on acid free Khadi paper
- Dye Residue + Xanthan Gum
- Dye Residue + Xanthan Gum + 70% Ethanol
- Pure Dye Residue
- Dye Residue + + 70% Ethanol
- Dye Residue + Guar Gum
- Dye Residue + Guar Gum + 70% Ethanol
- Dye Residue + Guar Gum + Chalk
- Dye Residue + Chalk
- Dye Bath
- Dye Residue + Citric Acid
- Dye Residue + Iron Sulfate
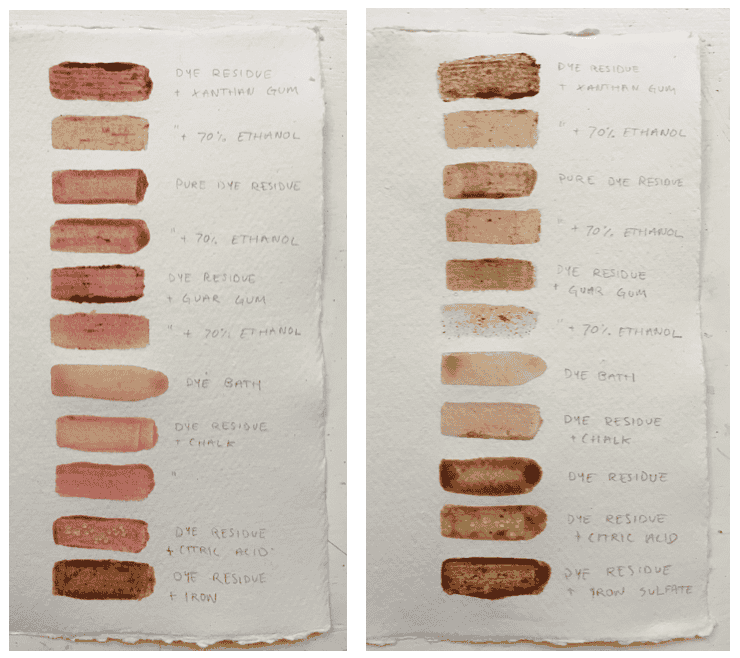
Madder / St John's Wort
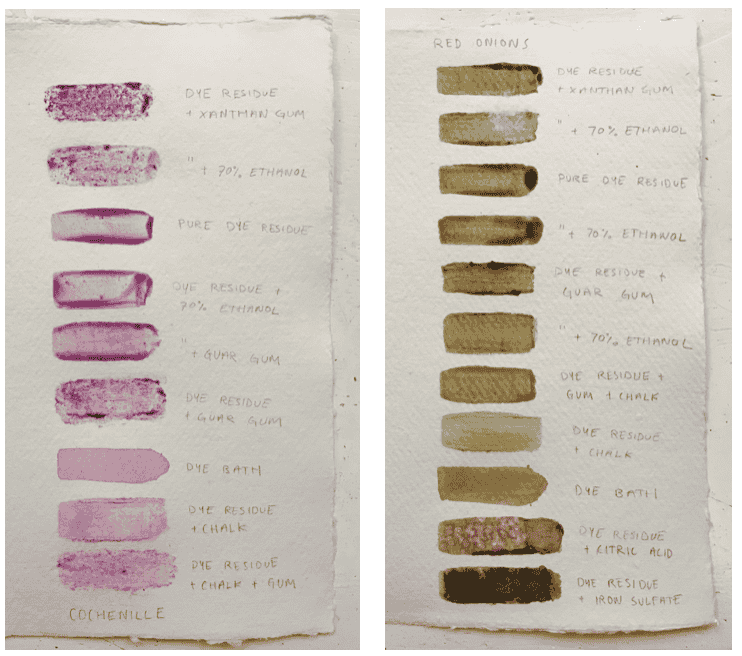
Cochineal / Red Onion Skins
B A C T E R I A
We experimented with bacteria dying using silk fabric & Serratia Marcescens bacteria 4
M E T H O D
Step 1 - Prepare Fabric
-
Gather & tie silk fabric in chosen shibori technique - Many tutorials and inspiration can be found online e.g. Seamwork.
I gathered mine with cotton thread in a circular pattern -
Place in fabric in Petri Dish
Step 2 - Sterilize
Methods of Sterilization = Heat, UV light, Alcohol, Acidity
- Sterilize table and tools using ethanol and paper towels.
Step 3 - Prepare Food
Food for bacteria
-
NA (Nutriend Agar) - Yeast Extract
-
Broth (Agar + Beef Extract)
Mix containers of food with 300 ml Distilled water (demineralised -> more consisent) + peanut butter + stir
| Food | Nutrient amount | Demineralized Water | Peanut butter |
|---|---|---|---|
| Nutrient Agar | 9,3 gr | 300 ml | 0,5 gr |
| Luria Broth | 7,5 gr | 300 ml | 0,6 gr |
Step 4 - Autoclave
Sterilize fabric petri dishes & food
- Isolate petri dishes with fabric inside autoclave bags & seal + put in autoclave
- Place food bottles in autoclave (bottles should be slightly open so that they do not explode in the pressure cooker but tight enough so that water doesnt get in)
- Autoclave 121 degrees C for 20 minutes
NOTE - AUTOCLAVE
- Ensure no obstructions
- Close with screws (pretty tight, double check)
- Safety valve up = open (steam can escape) down = closed (builds up pressure)
- Keep valve open (up) until temperature of autoclave reached 100 degrees C, then close it
- Needs to go below 90 degrees before you can open
Step 5 - Combine
- Bunsen Burner + alcohol = sterile environment (blue flame + ethanol create a bubble of sterilization)
- Pour the food on top of the fabrics in the petri dishes (within the sterile bubble).
- Using inoculation loop (sterilize under flame) collect some colonies of bateria and place on fabric (sterilising loop after)
- Seal petri dishes with parafilm tape.
- Place petri dishes in the incubator (helps to create a controlled temperature at 18-20 degree celcius).
We left petri dishes in incubator for 3 days.
Step 6 - Inoculate
Final step was to Inoculate and kill the bacteria
- Place petri dishes in Autoclave
NOTE
- Label - Important to note: Name, What is it, Date
- Always clean everything with alcohol
- Obide by rules of the lab (tie up hair, wash hands before entering and after leaving)
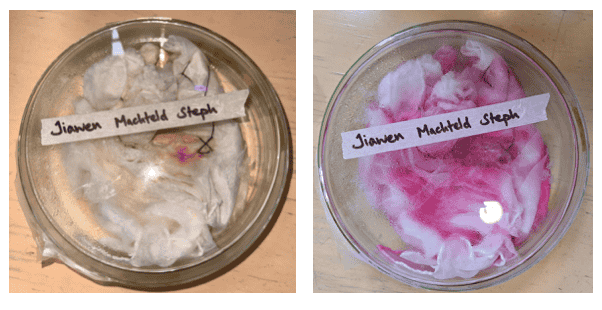
Images showing growth of bacteria over time
R E S U L T
Result of bateria dye on silk
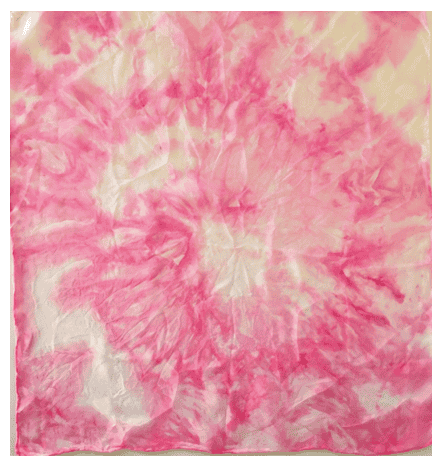
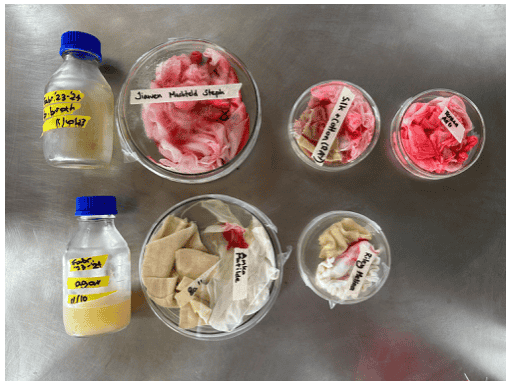
Image shows the different growths
Top - Luria Broth (Agar + Beef Extract) = Bacteria grew very well
Bottom - NA (Nutriend Agar) - Yeast Extract = Bacteria did not grow very well