9. Textile as scaffold
I was really inspired by the combination of biomaterials/biofabrication and electronics (biocircuits) and for that reason I started leaning towards these explorations in Wearables week 8 where I utilised one of my agar bioplastic 1 samples from Biofabricating materials week 6 to make a biospeaker and it worked amazingly!!! I also made a little plan from Wearables week 8 to make piezoelectric crystals and other crystals for this Textile as scaffold week that can be used as sensors in my electronic projects! The piezoelectric crystals came though when brainstorming for an idea that I had during E-textiles week 5 on a wearable project that uses the piezoelectric crystals as sensors that detect and amplify our heart beat when placed over arterial areas on the body.
I have been looking forward to this week because I decided to utilise the 3D scan and model of the hand/arm that I made during Digital Bodies week 2 as a reference to create a positive mold on our CNC machine, Beatrix. I was also really pleased with how my Coffee Orange leather biocomposite leather swatch from Biofabricating materials week 6 looks like after 3-4 weeks so I decided to use that recipe (based on Anastasia Pistofidou's Coffee Biocomposite Co03 recipe from Materiom and Coffee Bioleather Bag and recipe by Fabtextiles) and make a bigger piece of leather for experimenting with molding and digital fabrication techniques.
This week's assignment is:
-Document the concept, 3D model of the piece and document the design process
-Make two samples with 2 out of the 5 techniques to make a prototype of a textile form: fabric formwork with casting crystalization wood-textile resin-textile leather molding or other
-Document the process from CAD to CAMM, document how to use the CNC mill and prototype your textile composite
-Upload your 3D model and CAMM file
-Document the 2 processes you have followed step by side from design to machine and hands-on making, materials you used, your mistakes, failures and achievements
-Use 3D modeling software to simulate your fabric deformation
-For this assignment you will require to build up your tools (container for molding, vacuum bag set up, frames, matrix, recipients) and process for your workflow.
Research and Inspiration for technique 1 (Crystallisation)
Crystallising waste or non recyclable objects
I have been removing and collecting the elastic bands from the surgical masks for a good year and a half now, however, I left most of the back home, in Cyprus! I read somewhere that animals, birds, etc can get caught on these bands when left on the mask when discarded and also a lot of them end up in the sea where sea creatures can swallow them or inhale them or get caught them too! I managed to collect a good 30 pieces from the past couple of months and I make a little crocheted sample with them so I can further investigate whether I can grow crystals from waste materials.
Video of a short crochet demo from Adele. This little piece of crocheted elastic bands went into the Hibiscus coloured Epsom salt crystal jar on Friday the 19th of November. As I left the crystals undisurbed in the Biodesign centre, I still await the results until its Monday and I can go and see the result!
This stems from an idea I had a year and a half ago when I started brainstorming for a piece of artwork that will cpnsist of a glove with lace like cuffs made from crocheted elastic bands from the masks. Another recent idea is that I can make the glove part of the artwork by making a hand mold and use it to mold Kombucha SCOBY leather on.
Alice Potts-Sweat and urine crystals
I adore Alice Potts' way of thinking about our bio data. She utilises and instrumentalises sweat as a sustainable energy source and points out how sweat has been historically used in making jewelery, embellishment and conductivity to produce fibre optic technology. She has created a fibre optic light that transmits energy/light through the sweat crystals of 200 Athenian people. Her artist statement really inspired me!
My focus is on the importance of bodily function within the materiality looking at the interconnection between biology and materiality. With my innovations i aim to create new future thinking processes in all fields. Reminding people that our bodies are still our greatest technologies. My main focus as an Innovator is to work in collaboration with others to create a new sustainable future, whilst also educating others.
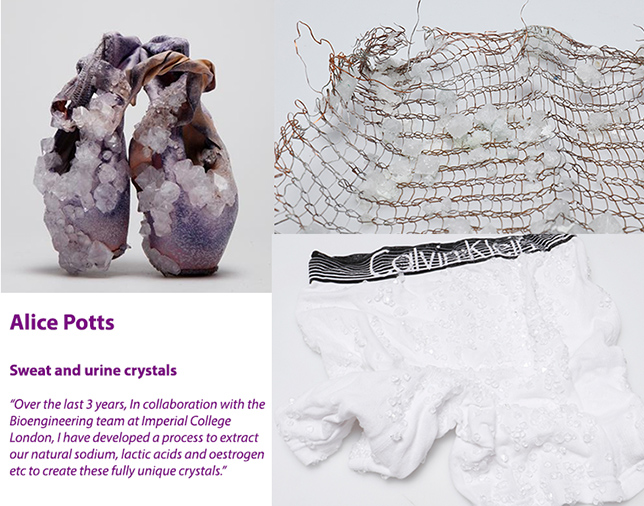
Photos from Alice Potts website.
Just like Alice Potts I thought of using my own biological data such as hair to make ball shapes that I can then crystallise and turn this widely discarded biodata or biological matter into a crystal or perhaps a sensor if I sew conductive thread through the balls!
EJTECH, Esteban de la Torre and Judit Eszter Kárpáti-Amorphous allotropes, 2016-Sensing touch and conductive crystals
Using grown crystals as capacitive sensors and sensing touch! I was inspired by this project from doing some research during last week's Wearables classes while researching for the application of a variety of crystals (piezoelectric and borax) as sensors for electronic experiments. If you go on the link above you can find STEP-BY-STEP instructions on how to make the crystals, a materials list, information on how to wire the crystal to ARDUINO, the ARDUINO code and the links to the capSense library used in this example.
AMORPHOUS ALLOTROPES from EJTECH on Vimeo.
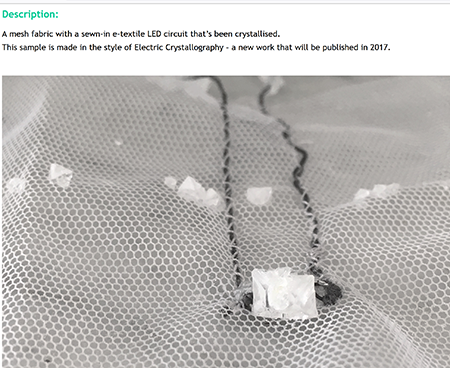
Loes Bogers crystal mesh and alum crystal LEDs
You can also find this Crystal mesh swatch by Melissa Coleman and Rachel Freire at the e-textile swatch exchange website from 2017 here. It provides a materials biil and explains the techniques used, how to prepare your circuit, how to prepare the crystal bath and tips on growing alum crystals on mesh!
Research and inspiration for my 2nd technique (moulding bioleather)
Leather moulding and human bodies
Inspiration from Anastasia's Textile as scaffold lecture
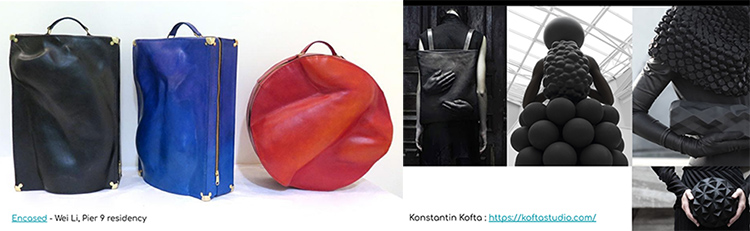
KOFTA studio leather handbags
Nature is not merely the external visible world, just as a real person is not the body we perceive and tend to be associated with.... And yes, there is still your material self, your food and your busy schedule, but…there is something that frees you into the joyous bliss of a moment, something you have found.
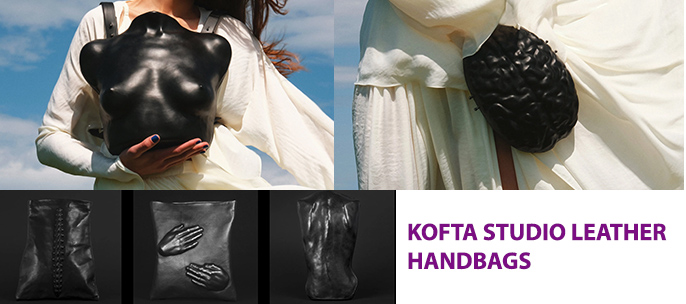
Moulded leather handbags in the SS21 "BODY PARTS" collection of KOFTA studio
Techniques and processes to mold leather
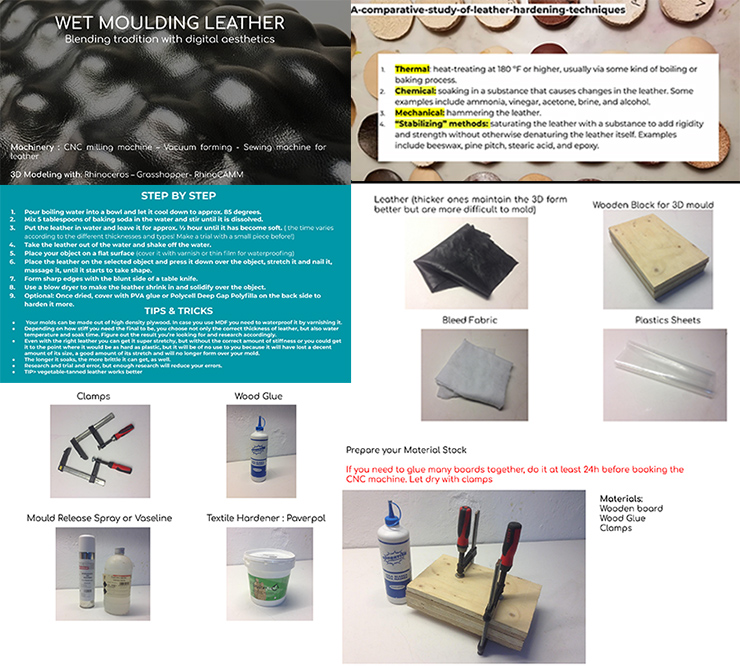
Step by step leather moulding process in Anastasia's Textile as Scaffold lecture
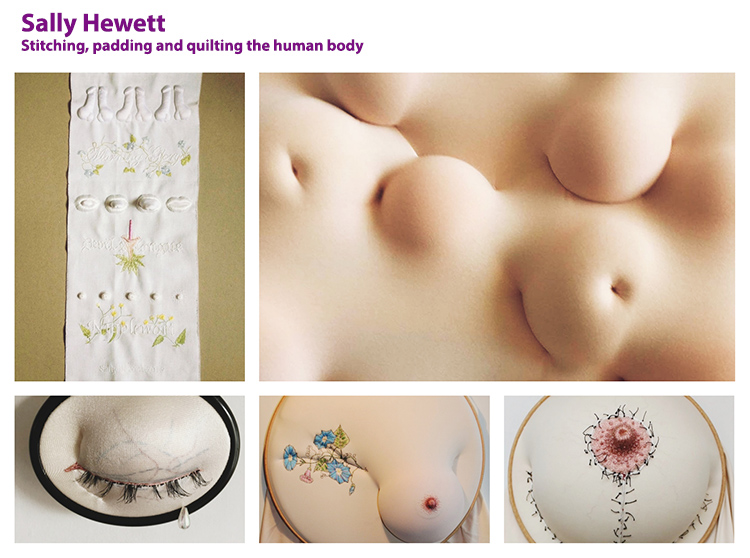
Sally Hewett Emdroidery-Stitching, quilting and padding the human body
I adore Sally Hewett's work not just because of her subject matter- BODIES- but also because of her materiality and how she combines her materials to represent the real experience and conditions of the human body! She uses stitching, quilting and padding techniques in her breathtaking artworks.
My practice centres around ideas of beauty and ugliness and the conventions which determine our definition of each. I am interested in how we see things and how we interpret what we see: does my particular way of representing bodies, using fabrics, stitching and embroidery, affect how the content of the work is seen? To some extent I see my work as an investigation of the divide between craft and art.
I love bodies. And it is not the conventionally beautiful bodies that take my eye, it is bodies which show their history, that have been altered by their experiences, that are decorated with bruises, scars, spots, stretch marks, freckles, pigmentation, veins. Bodies that have the marks of life on them. But also bodies which have been deliberately altered and decorated - by man rather than by life – scarification, tattoos, plastic surgery, fillers, etc. Are some characteristics of bodies inherently beautiful, or ugly, or disgusting? Or because we see everything through the veil of culture, fashion and convention is it almost impossible for us to see bodies objectively?
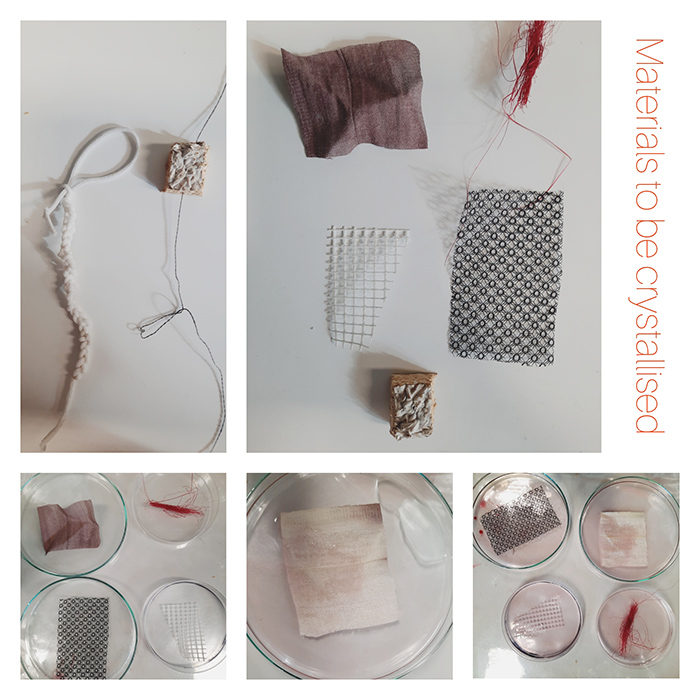
Experimenting with technique 1- Crystallisation
If you followed my inspiration and research above you can see that I wanted to experiment with crystallising materials with conductive threads and traces such as copper wire for experimenting with electronics and biocircuits as well as some waste or non recyclable materials such as the elastic mask bands and my biological data, hair! I also tried to crystallise a bracelet I made in Silver925 in Olatz's sugar crystals!
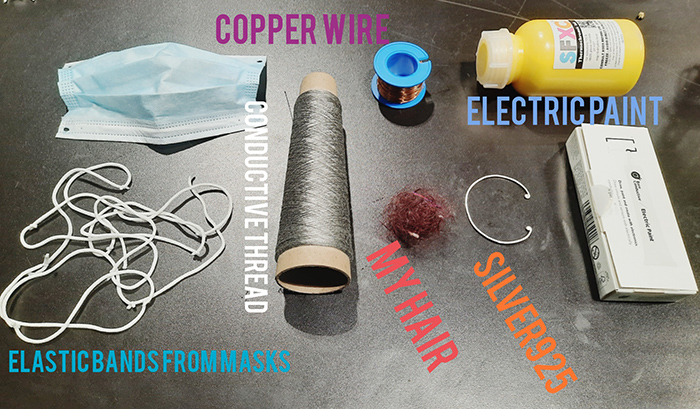
Materials to be crystallised! I added mycelium and Kombucha SCOBY leather to the list and some fabrics and fibres such as hemp, mesh lace, plastic mesh and thermochromic fabric
Piezoelectric crystal FAIL!
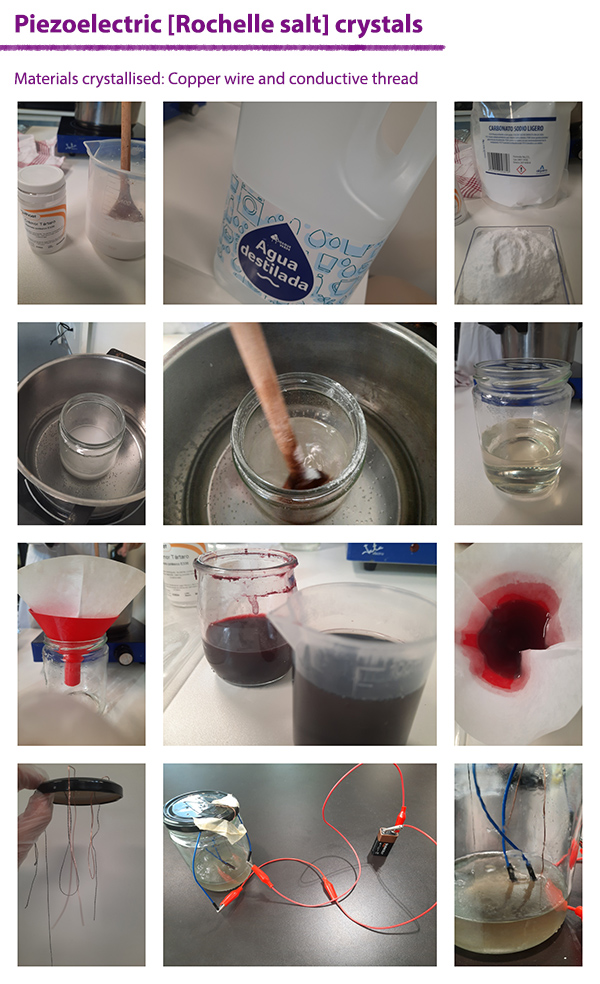
Piezoelectric crystals- from the Greek word- πιἐζω, which means to press or stress, and electricity which literally means producing electricity and energy when mechanically stressed. These crystals are otherwise known as Rochelle Salt crystals and can produce a comparatively large volume upon compression and are one of the first known natural sources and materials that can produce and exhibit electricity!
Recipe from rimstar.org
-200g Potassium Bitartrate (cream of tartar)
-120g Sodium Carbonate (Washing soda or washing ash) or 120g of Bicardonate Soda (baking soda)
-250 ml distilled water
-Beaker 500ml
-Pot
-Coffee filter
-Filter paper
-Thermometer
-Stove
-Small and large spoon
-Gloves
-Clear containers with lids
Process
-Base solution: 200g of Potassium Bitartate are being dissolved in 250 ml of distilled water
-The base solution has to be thorough stirred to make sure there is no sediment at the bottom of the beaker
-Finish solution: The beaker has to be places inside a pot filled with 2 cm of water. The pot is placed on a stove and slowly heated at around 80 degrees celsius or until the water starts simmering
-While the temperature is kept constant start adding half a teaspoon of Sodium Carbonate at a time while stirring it! The solution will fizz and bubble so constant stirring is crucial to this stage.
-Keep adding Sodium Carbonate till the solution no longer bubbles and the solution has turned into yellowish clear
-Filter the solution: While still hot filter the solution through a coffee filter inside a beaker of the same size. Then add the beaker back into the pot to boil in order to further evaporate the solution and concentrate it even more.
-Re-filter the solution: The solution is filtered again to make sure the contents are completely dissolved and no big pieces will end up in the bottom of our beaker or container.
-Add your materials  by suspending them onto a drilled lid or other structure and put them inside the final solution and then close the lid
-Keep the mixture in a cool place for several days
Notice how the base solution changes from milky (Potassium Bitartrate) before we add Sodium Carbonate and clear afterwards!
Here we have our Potassium Bitartarate (milky solution) in a water bath and we start adding Sodium Carbonate powder. Notice how the Potassium Bitartarate fizzes and reacts with the Sodium Carbonate powder! We keep adding Sodium Carbonate until there is no more fizzing and our solution turns to clear but a bit yellowish
Tips and tricks
-The crystals need direction to grow so you have to put an anode and a cathode inside
-When you connect the crystal to an EL DRIVER which converts 12V DC to 140V AC at 400Hz, the crystal emits an audible humming sounds! (more on this further up on the research and inspiration section)
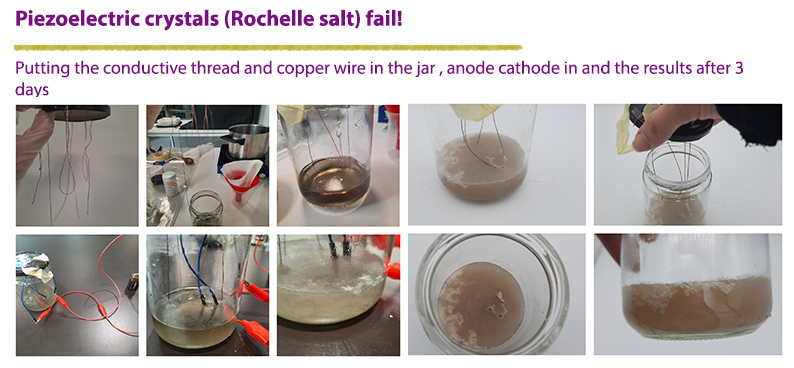
Results!
-As you can see this is a BIG FAIL! My crystals did not form on my conductive thread and copper wire and instead when I put the anode and cathode in for an hour the solution turned into a huge crystal that was stuck in the bottom of the jar!
Espom salt with Hibiscus dye crystals
Here is a picture of my the objects and materials I immersed in the Epsom salt solution!
Recipe
-Half a cup Epsom salt
-Half a cup really hot distilled water
-Food colouring or natural dye (I used my Hibiscus contentrate dye from ***Biochromes*** week 4)
-Beaker, cup, or small cup
Process
-In the beaker, add half a cup of Epsom salt with half a cup of VERY hot water for at least one minute (This created a highly saturated solution meaning that no more salt can dissolve in the water. Undissolved crystals will stay at the bottom of the beaker, cup, or glass)
-Add a couple of drops of your desired food colouring or natural dye
-Put the beaker in the refrigarator if you want small crystals or leave in room temperature for bigger crystals
-After a few hours you should have a beaker full of crystals
-Pour off the excess liquid to inspect your jewels!
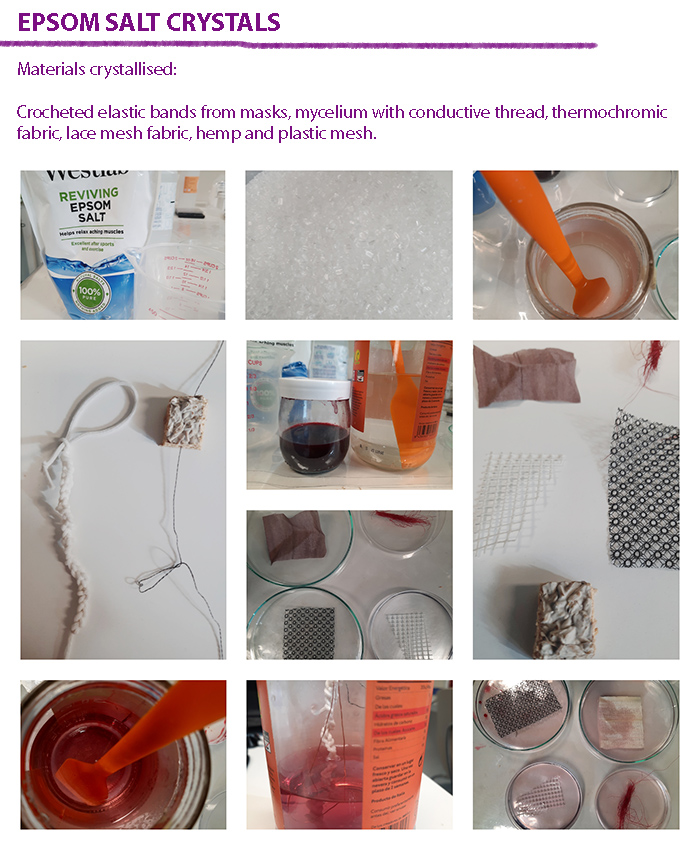
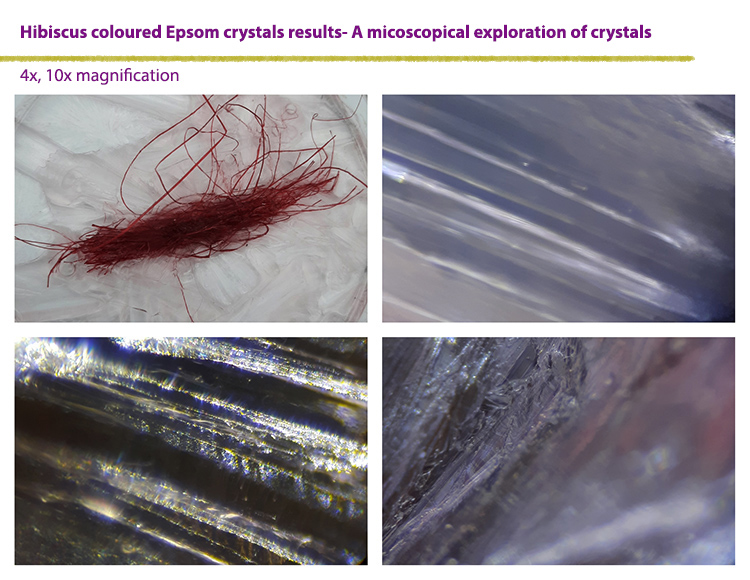
The results -The results were surprising because the petri dishes were fully crystallised with big chinks of crystals and all the fabric samples (mesh lace, hemp, thermochromic fabric and plastic mesh) were fully crystallised! -The mycelium crystals were smaller and numerous when dipped into a jar with the crystal solution instead on a petri dish! -The crocheted elastic band was crystallised internally with a lot of tiny crystals and the crystals only grew on the surface of the jar.
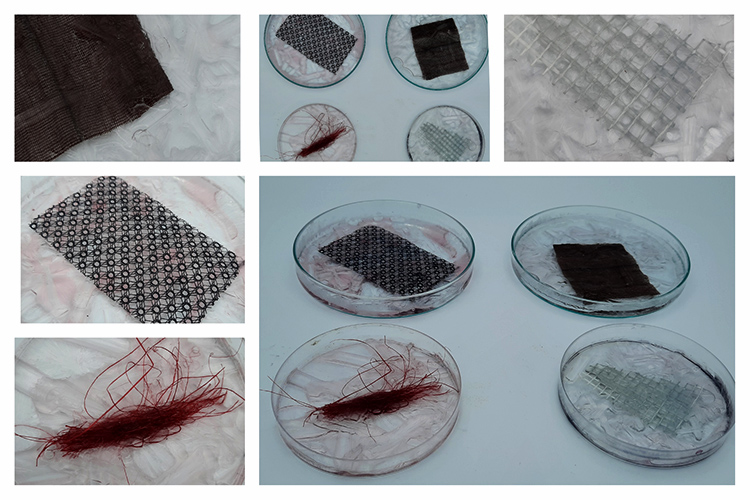

I also crystallised a piece of mycelium with a conductive thread sewn into it and these are the results! The crystals are tiny and numerous and more interesting than the large ones
Here i took out my elastic mask band crochet piece and one copper wire from the Hibiscus coloured Epsom salt solution. The crystals formed on the top layer around my materials as you can see. It has only crystallised a part of the crocheted piece and the crystals are tiny
Conductive Borax crystals
I was inspired by the project Amorphous Allotropes from the inspiration/research section above (or you can go here on e-textile swatch exchange website to see the project again.
Materials to be crystallised
-Conductive thread
-Copper wire
-Electric paint from Bare Conductive
-Kombucha SCOBY leather on conductive thread
-plastic mesh on conductive thread
Recipe
-Powdered Borax (9 tablespoons of Borax dissolved in 3 cups of water or in my case 6 cups of water and 18 tablespoons)
-A squeeze of Electric paint from Bare Conductive or any other food colouring of your choice
-Objects or threads of pipe cleaners to crystallise
-Glass beaker or other vehicle
-Large pot
Process
-I put the mixture directly into the pot with very low heat because I did not have a glass beaker(instead of putting it in a glass beaker that will go into 2litres of water in the pot) and started adding the Borax powder and stirring it whilst adding more powder
-I then added a squeze of my electric paint and stirred it well to make sure it has dissolved
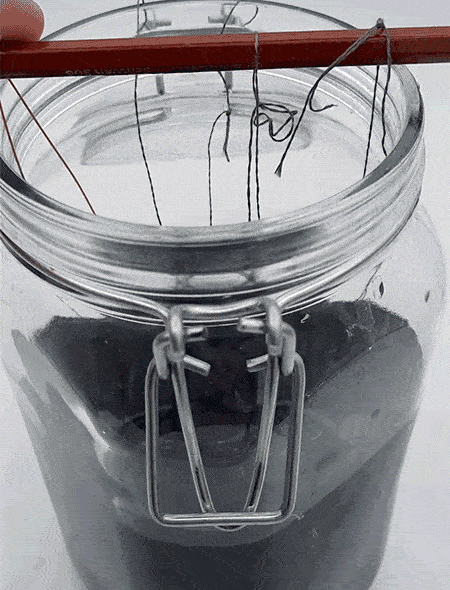
-I moved the contents in a glass jar, I added my materials inside by hanging them onto some pencils
-I left the solution covered in the jar to trap the heat inside (if you use the beaker inside the pot leave the solution on the element till it has gone cold to trap the heat inside as well)
-Let your object soak in the solution overnight undisturbed!

The results
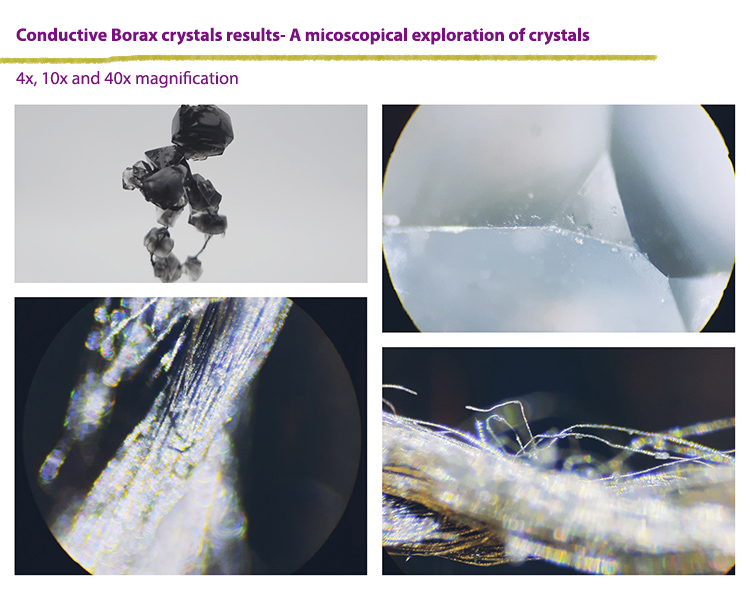
-The crystals were small and numerous on the conductive thread and we had only some on the copper wire! There are also some tiny crystals on the conductive thread but you can only see them with a microscope with a 10x magnification!!

-The kombucha scoby leather piece was not crystallised but it absorbed the conductive paint and changed colour and also went back to its original wet state!
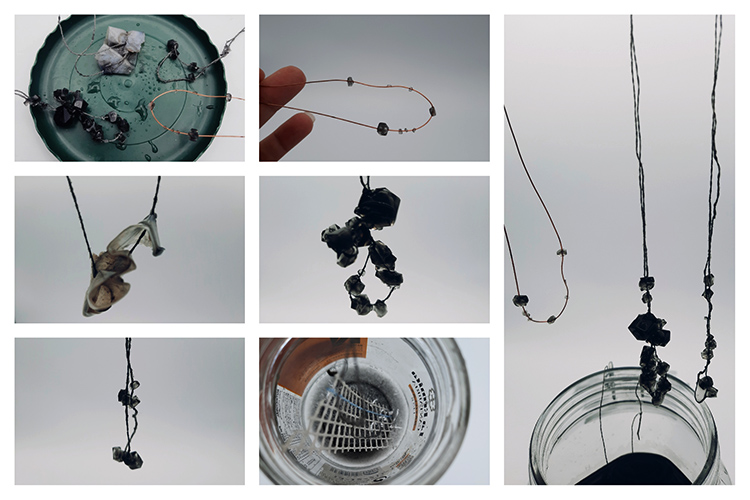
Taking the conductive thread and copper wire out the crystal jar
I took out one of my objects from the crystal jar and I noticed how went back to its original wet state before we dried it. I noticed it has absorbed some of the electric paint by bare conductive
Micro exploration of Epsom and conductive Borax crystals
And ofcourse I could not have finished this assignment without the help of one of my best friends! The microscope! I investigated my Epsom and conductive Borac crystals in 4x, 10x and 40x magnifications.
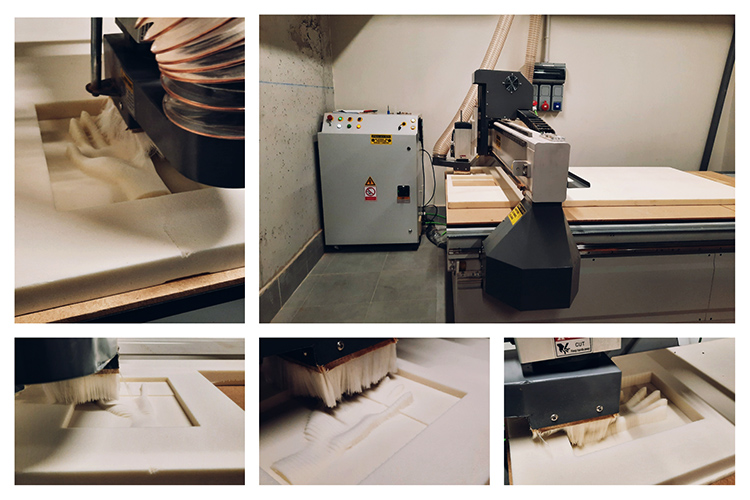
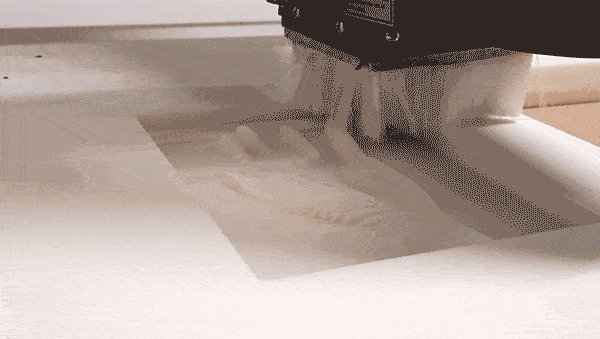
Experimenting with technique 2- Designing and prototyping a positive mold of a palm on CNC machine
Software- Rhinoceros
I imported the .obj file of the hand from Digital bodies week 2 into Rhinoceros. I started playing with the scale and with the commands Mesh Boolean split and Mesh Boolean union.
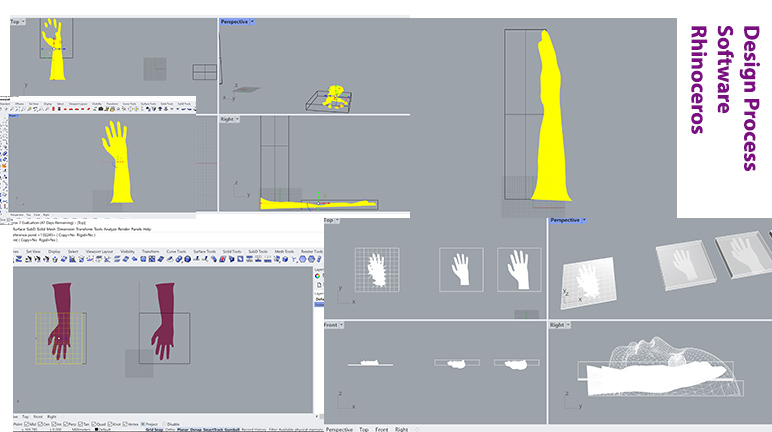
I checked out my model on Rhinoceros for one last time with our lab manager Julian to make sure it can be further optimised for the Ventric Aspire software that our CNC machine, Beatrix uses to read and inspect our designs! Below is a final screenshot of the model before we imported it into Vectric Aspire.
Software for CNC- Vectric Aspire
Our CNC machine, Beatrix works with the Vectric Aspire software and not the CAD-CAMM method. After I made my models on Rhinoceros I imported them into this software where I got to investigate all the different toolpaths for my cnc milling process.
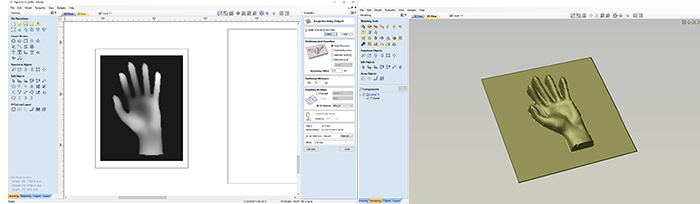
Final mold prototype simulation on Vectric Aspire
Video describing the final toolpath settings and showing the CNC milling simulation on Ventric Aspire. After you costumise and set up all the toolpaths for the machine you can then simulate the path of the CNC machine to see if your mold turns out okay
Hardware- material CNC milling process
Small note about the CNC process
-My 3D model could not be entirely milled with a 3 axis machine because there are way too many angles on the model! -There are different kinds of CNC milling machines
I took the redeference below from this website.
Most CNC milling machines are available with 3 to 5 axes— typically providing performance along the XYZ axes and, if applicable, around rotational axes. The X-axis and Y-axis designate horizontal movement (side-to-side and forward-and-back, respectively, on a flat plane), while the Z-axis represents vertical movement (up-and-down) and the W-axis represents diagonal movement across a vertical plane. In basic CNC milling machines, horizontal movement is possible in two axes (XY), while newer models allow for the additional axes of motion, such as 3, 4, and 5-axis CNC machines. Table 1, below, outlines some of the characteristics of milling machines categorized by the number of axes of motion.
Characteristics of Milling Machines by Axes of Motion
Number of Axes and Characteristics
3 axis CNC
-Capable of managing most machining needs
-Capable of producing the same products as machines with more axes
-Suitable for automatic or interactive operation, cutting sharp edges, drilling holes, milling slots, etc.
-Simplest machine setup (A)
-Only requires one workstation (A)
-Higher knowledge requirements for operators (D)
-Lower levels of efficiency and quality (D)
4 axis CNC
-Capable of operating on materials ranging from aluminum and composite board to foam, PCB, and wood
-Suitable for advertising design, art creating, medical equipment creating, technology research, hobby prototype building, and industrial applications
-Greater functionality than 3-axis machines (A)
-Higher levels of precision and accuracy than 3-axis machines (A)
-More complex machine setup 3-axis machines (D)
-More expensive than 3-axis machines (D)
5 axis CNC
-Multiple axes configurations available (e.g., 4+1, 3+2, or 5)
-Suitable for aerospace, architectural, medical, military, oil and gas, and artistic and functional applications
-Greatest functionality and capabilities (A)
-Depending on config., faster operation than 3-axis and 4-axis machines (A)
-Highest levels of quality and precision (A)
-Depending on config., slower operation than 3-axis and 4-axis machines (D)
-More expensive than 3-axis and 4-axis machines (D)
Note
Note 1: If applicable, “A” indicates advantageous characteristics and “D” indicates disadvantageous characteristic.
Note 2: Some milling machine (by axes) information courtesy of Technox Machine & Manufacturing Inc..
We used 2 different tools on our machine to make this prototype in low density foam
-ball nose 6mm bit
-end mill 6mm bit
Here is a link with the final Vectric Aspire CNC file for you to check out! :)
technical details about our CNC MACHINE, Beatrix
- We have a CNC Machine by HSD
- It has an HSD spindle, air cooled 6kw
- The model is the AT/MT 1090-140, 18000RPM, ER32
- The bed size is 1300mm by 2500mm
Finished positive medium density foam prototype
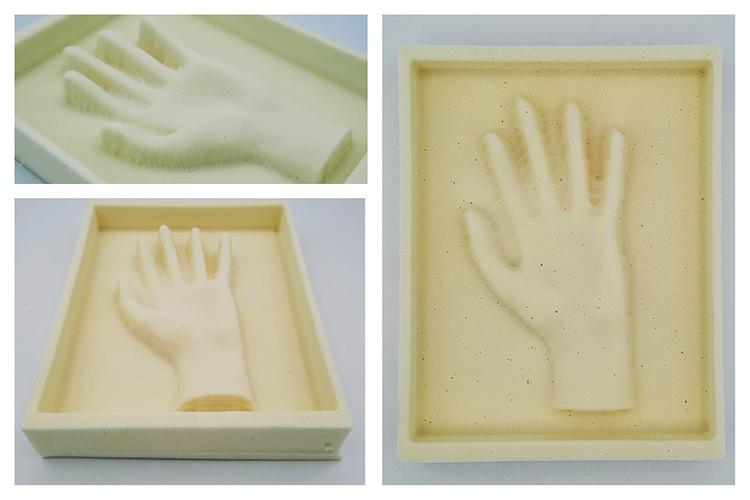
I will use the finished positive medium density foam prototype so I can combine it with plaster to get a negative mold! Then I am going to use the plaster negative mold to experiment with manipulating, moulding and embossing the form of my coffee orange leather.
3D models
Process of making coffee orange leather and molding it onto my negative plaster mold
Coffee orange leather- the making of
This is the same recipe I followed during Biofabricating materials week 6. If you follow the link here you can see my exploration and the recipe for 1 small piece of the leather. Now I have changed the recipe in order to make a larger batch. I have put the new proportions and the process for you again below! :)
Recipe as in FABTEXTILES website but with added orange and 15x for a 35-40 cm piece of leather
-30G sodium alginate
-30G dried coffee grains of any organic waste in powder
-30G grinded orange peels
-30G olive oil
-75G glycerin
-450G water
(everything is in grams using a precision scale)
-MIX for calcification
-21G of calcium chloride in 300ml of water
STEP-BY-STEP Process
1- Weight all the ingredients with a precision scale.
2- Mix the powder together with the glycerin and the olive oil.
3- Add the water and use a mechanical blender to obtain an homogeneous solution.
4- Cast in a silk screen print frame ( you can create your own using any textile and wood)
5- Mix the Calcium chloride with water in a sprayer bottle.
6- Spray the biomaterial on top and bottom with the calcium chloride solution.
7- Let the calcium chloride act for 5´ and rinse with clean water.
8- Let the composite sample dry in a dry and warm place for one week. Depending on the thickness and the size of the sample it may take longer. It will also vary due to the local temperature and humidity.
9- When the product is dry you can separate it from the frame.

Note: As the sample dries, it can become curved, so place it between two level surfaces and some weight on top so at the end we can obtain a really flat sheet
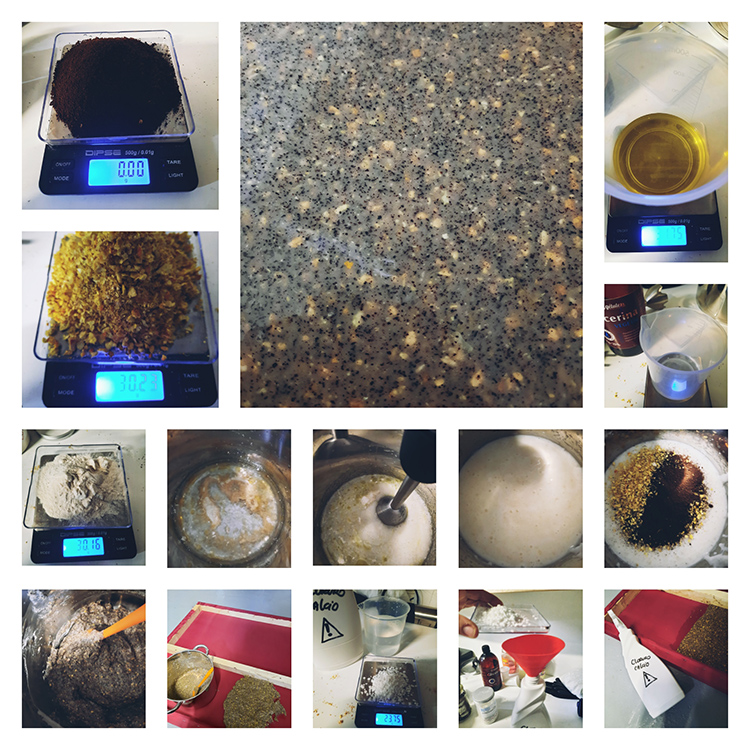
In the video I am in the final step of the process of smoothing my biomaterial leather in the handmade frame we have in the biodesign centre before spraying it with calcium chloride hydrate.
Negative plaster mold and moulding my material
In the next step I made a negative plaster mold from my positive prototype. Below you can see the steps for the plaster mold process!
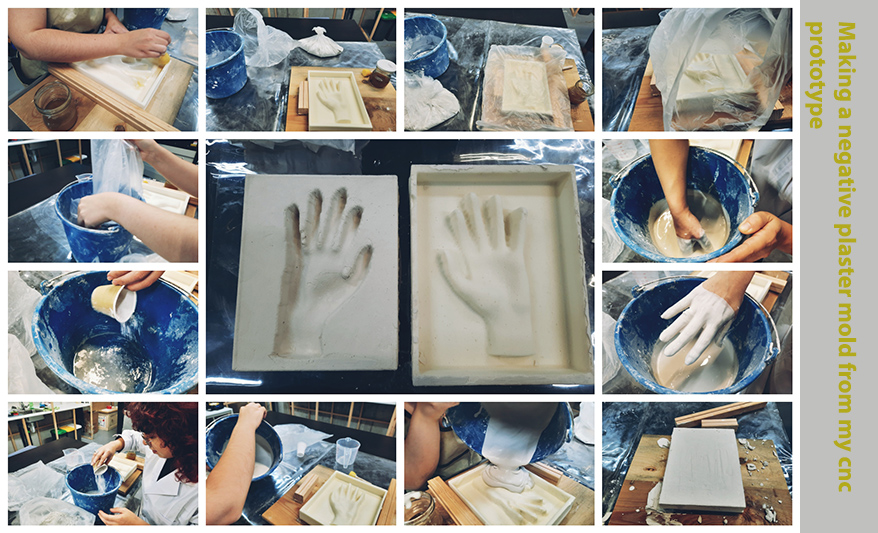
Some tips when working with plaster
-Put a bag over your mold and pour some water in there just like the photo above to measure the volume of water needed for your mold (in this way it will be easier to figure out how much plaster you need)
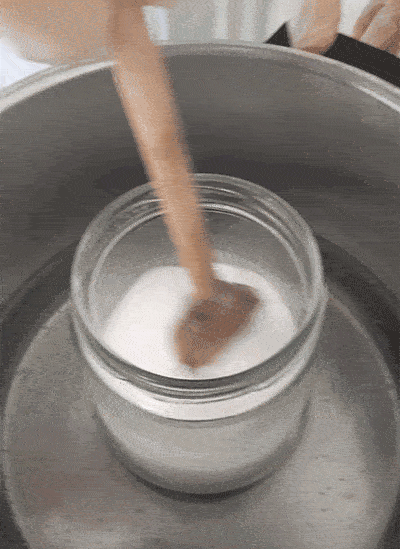
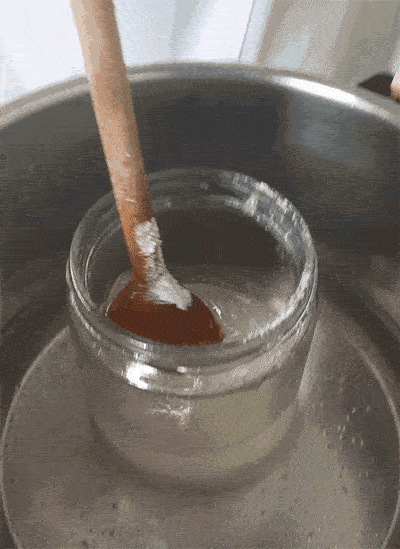
-Plaster to water ration: if you worked with plaster before you will already know that is better to kind of eye ball it. The moment you are putting the plaster in the water if you are putting it in circular motion just like the gif below you will have a uniform amount of powder everywhere and in that way you will know when to stop when you can kind of see that the plaster mountain is all under the surface)
-Put your hand inside the mix and only use some wrist action in order to feel and dissolve any lumps and make the mix more uniform to work with!
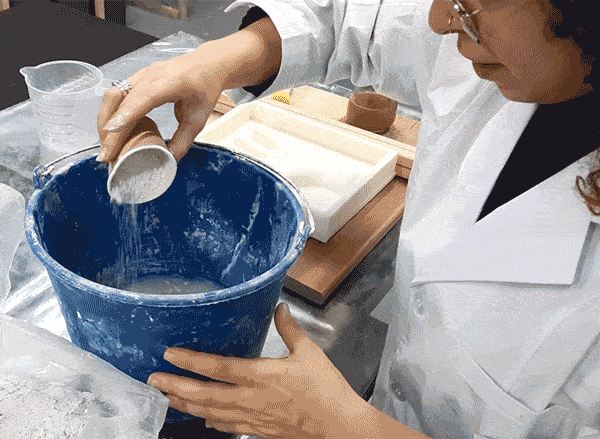
Plaster to water ratio and demonstrating the circular motion of adding the plaster to our calculated water amount. We do this to get an equal amount of plaster in our water so we can visually calculate how much plaster we need!
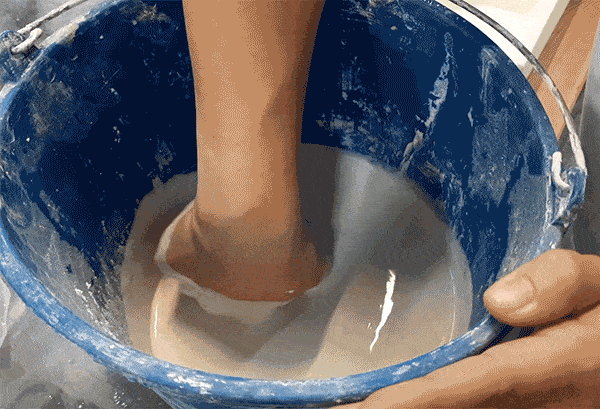
Mix your mixture using some wrist action like this gif is demonstrating!
Useful links
-Alice Potts website, Sweat crystals
-EJTECH, Amorphous Allotropes, e-textile swatch exchange
-Loes Bogers crystal mesh video
-Loes Bogers crystal LED's video
-Crystal mesh, by Melissa Coleman and Rachel Freire, e-textile swatch exchange
-Kofta studio, BODY PARTS SS21 COLLECTION