05 bioprinting
Bio-ink
Backgroud: Hydrogel is a type of polymer that can absorb and retain large amounts of water, they are commonly used as bioprinting inks due to its ability to support the growth and viability of living cells. They can be made from a range of different polymers (alginate, gelatin, chitosan, etc) and be crosslinked with following methods:
1) thermal Collagen, Gelatin, Poloxamer
2) photo-activated Pegda, GelMA, HAMA
3) chemical Alginate, Fibernogen, Silk
I decided to focus on hydrogel based on Sodium alginate since it is one of the most used bio-ink, low cost, and originates from algae that generally is seen as a sustainable source.
Sodium alginate-based bio-inks are chemically crosslinked with Calcium Chloride
* 2% Sodium Alginate
* water
* 2-3 drops of food colarant
* 3% Sodium Alginate
* water
* 2-3 drops of food colarant
* magnetic stirrer
* glas jars
* Sodium alginate combined with the food colorand  (Figure 1F).
* dissolved and vortexed at 60o C
* Once cooled, the hydrogel was placed in a syringe with a 1inch 27G needle for printing
reciepe from Duquesne University
Support bath
Are generally made from a jammed microgel which is a material that acts like a solid when still but transforms into a liquid when put under stress. hand-sanitizer is a good example of that. The reason why the air bubbles inside the bottle don't raise to the surface is that under low levels of applied stress, jammed microgel behaves like elastic solids trapping the bubbles inside the liquid, however, when we pump out the liquid through the nozzle it flows like a “normal” liquid.
Support baths have been made from a range of different microgels, but the most commonly used is gelatin.
* 4% Gelatin
* 0.16% Calcium chloride
* 500 ml water
* magnetic stirrer
* glas jars
* centrifuge
* fridge
* blender
* Dissolve the gelatin with 250 ml water at 55° C on magnetic stir plate
* Dissolve the calcium chlorid in the same water at 34° C on a magnetic stir plate
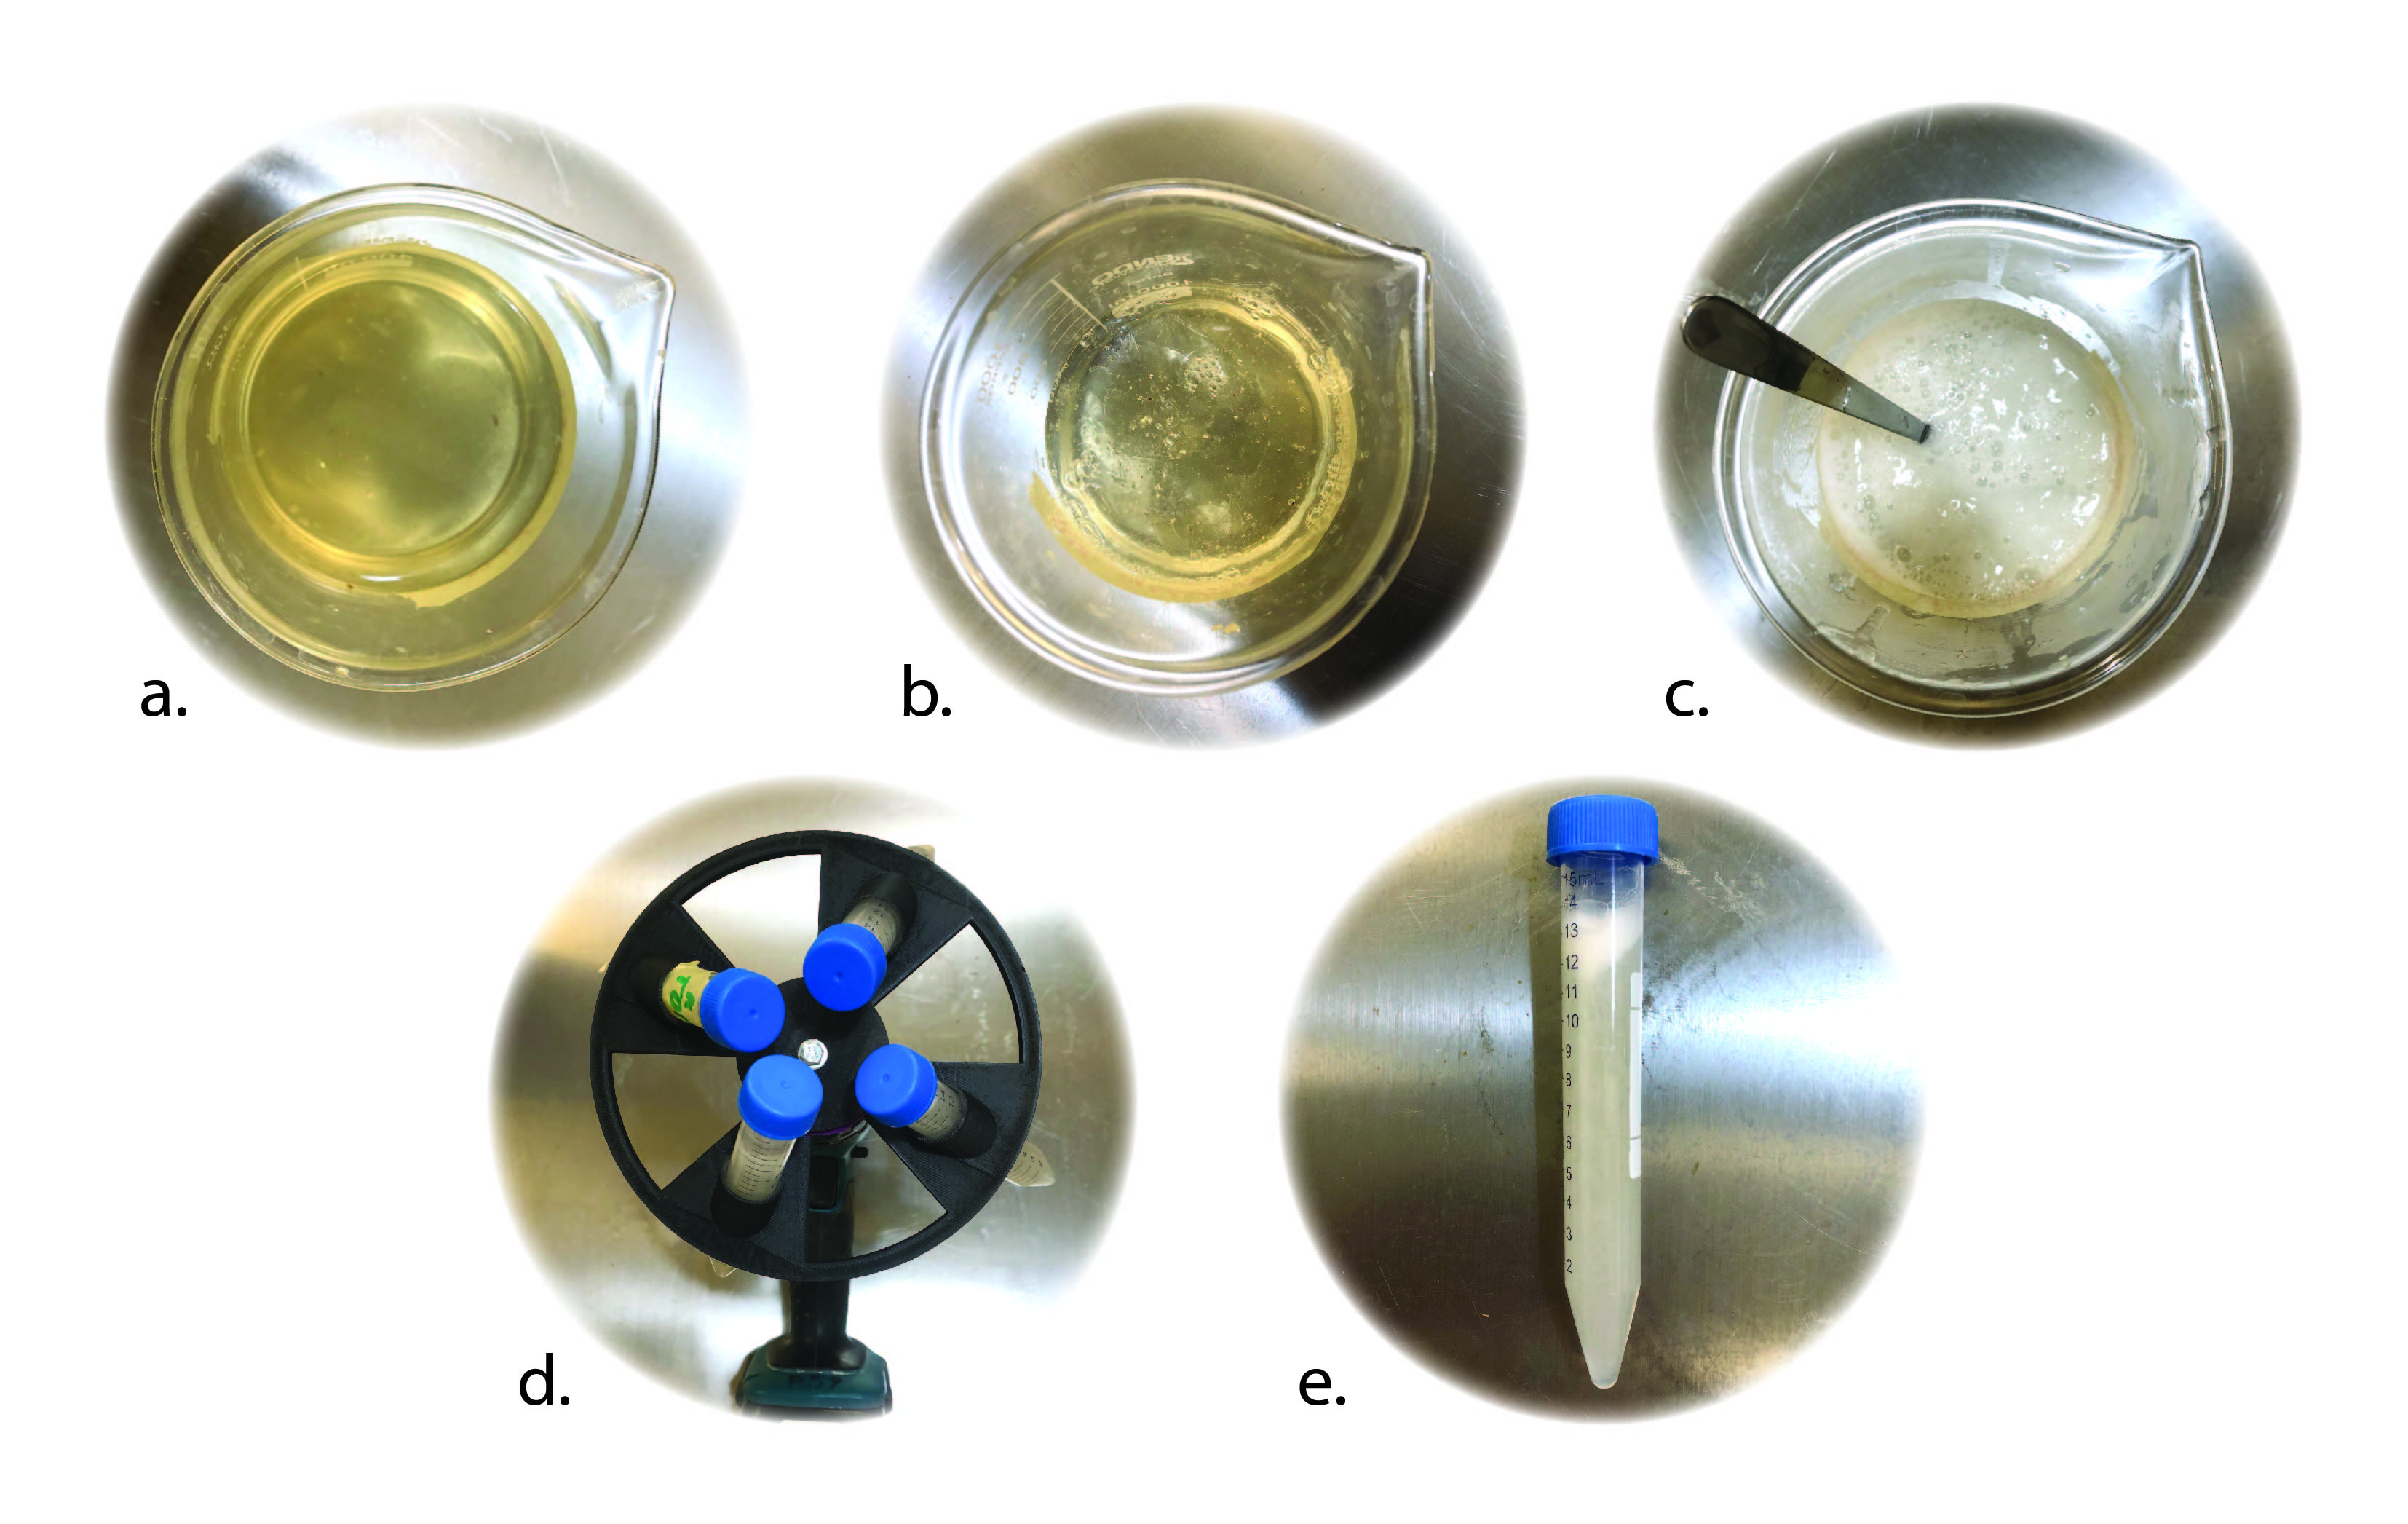
* Let the solution rest for 24 hours at 20 ° C (fig a)
* Mix in 250 ml calcium Chloride solution with the gelatin slurry (fig b)
* Place the solution for 1 hour in a fridge at 6 ° C (to avoid overheating)
* Blend the solution for 1 min using "pulse" mode (fig c)
* Move the solution into 15 ml centrifuge tubes
* Centrifuge the slurry 3 times (for 1-2 min) (fig d)
* for first and second cetrifuge extract the supernatant and the resuspended the gelatin with 0.16% (fig e)
* After the last centrifuge, the gelatin was not resuspended, but dislodged and placed in a petri dish for printing
* Cool the gelatin again in a fridge at 6° C
reciepe from Duquesne University
Printing process:
For the initial testing I used a handheld syringe connected to a compressor
step1: Connect compressor to syringe
step2: slowly increase pressure until desired extrussion pace
step3: "draw" with the syringe in the support bath
step4: when the print is ready carrefully pour 45°C 1% Calcium Cloride solution into the bath and place the mixture on a plate for 3 hours (or until the gelatin is fully dissolved and the print crosslinked)
 B1 wile crosslinking with Calcium Chloride
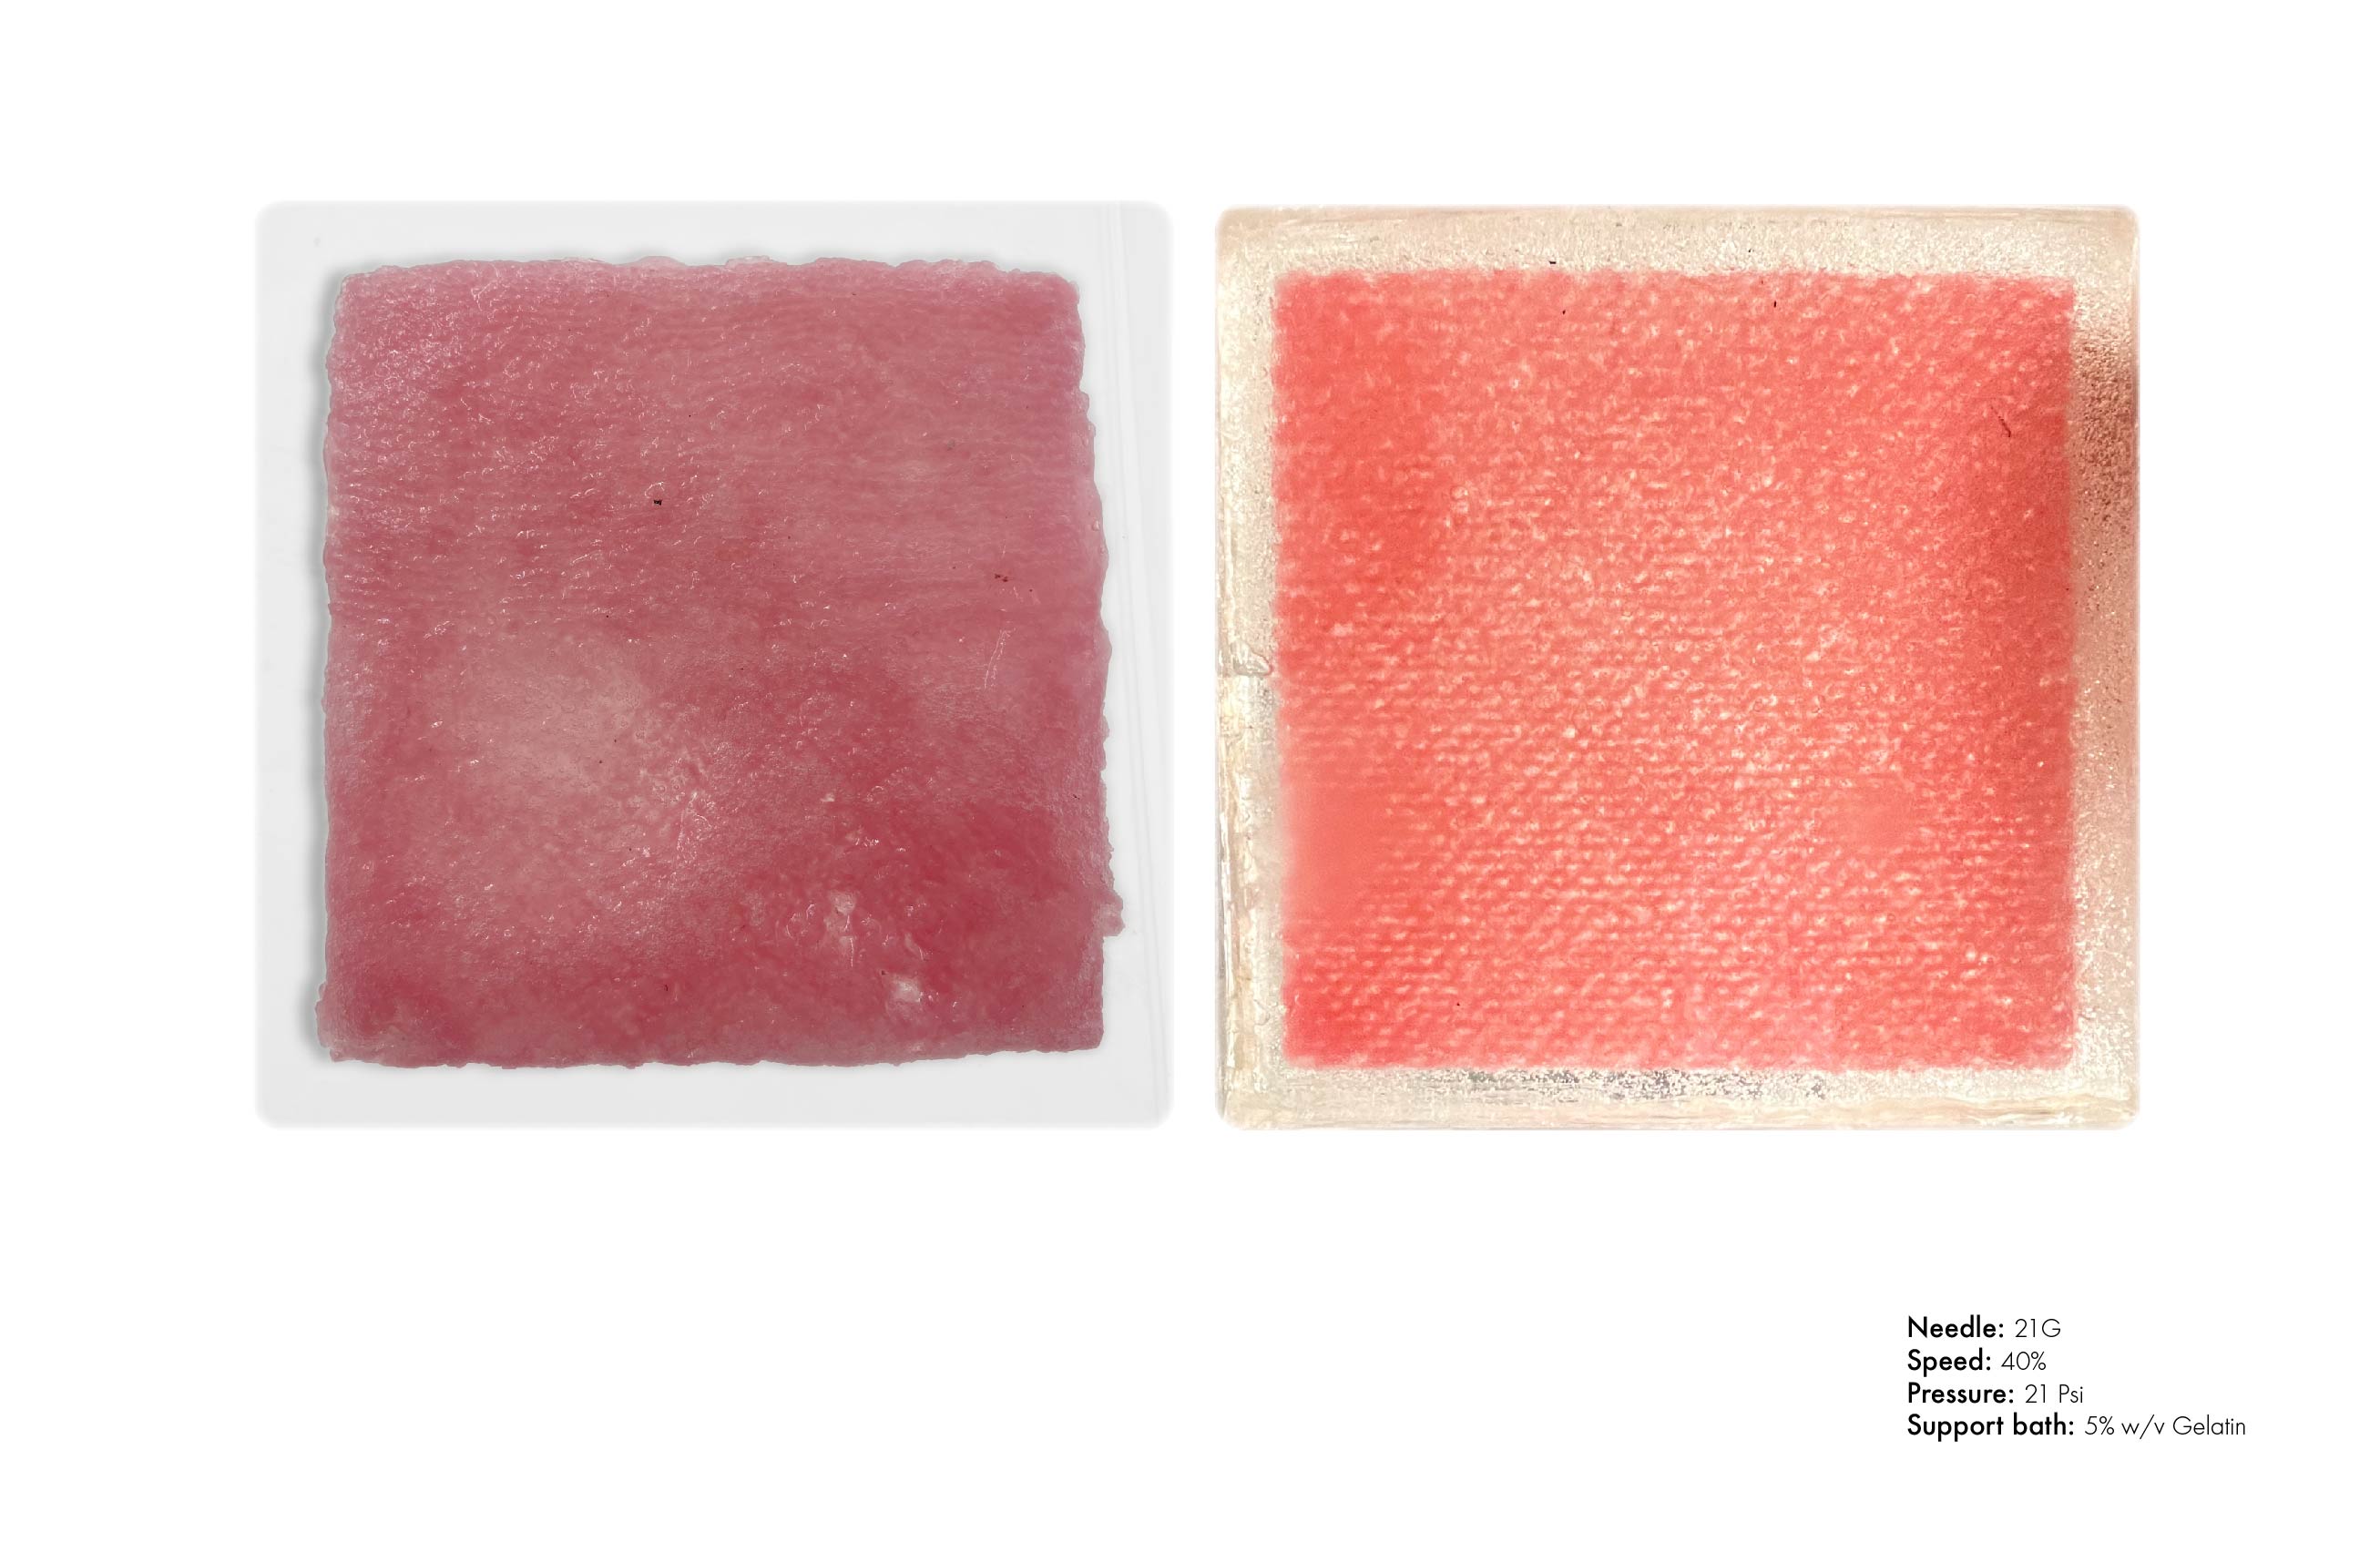
Settings:
Bio-ink B1
Pressure: 9 Bars
Nozzle: 27G
Bio-ink B2
Pressure: 40 Bars
Nozzle: 27G
Conclusion ink and support bath:
While developing the support bath I tried several different recipes (see PDF inks+bath) as well as simplifying the above recipe by removing the resuspension of calcium chloride but with a dissatisfying result. The video above shows a comparison between the earlier recipe (left) with the final recipe.
In the left video, we can see how the gel is breaking and moving by the force of the needle causing the print to deform.
Similarly, for the ink it seems the heating and magnetic stirring creates a much smoother ink, in earlier (see PDF) experiments using a simple hand blender the liquid and alginate caused sedimentation after 24 hours of resting.
bio-ink B2 was strong enough to hold its shape even without support-bath
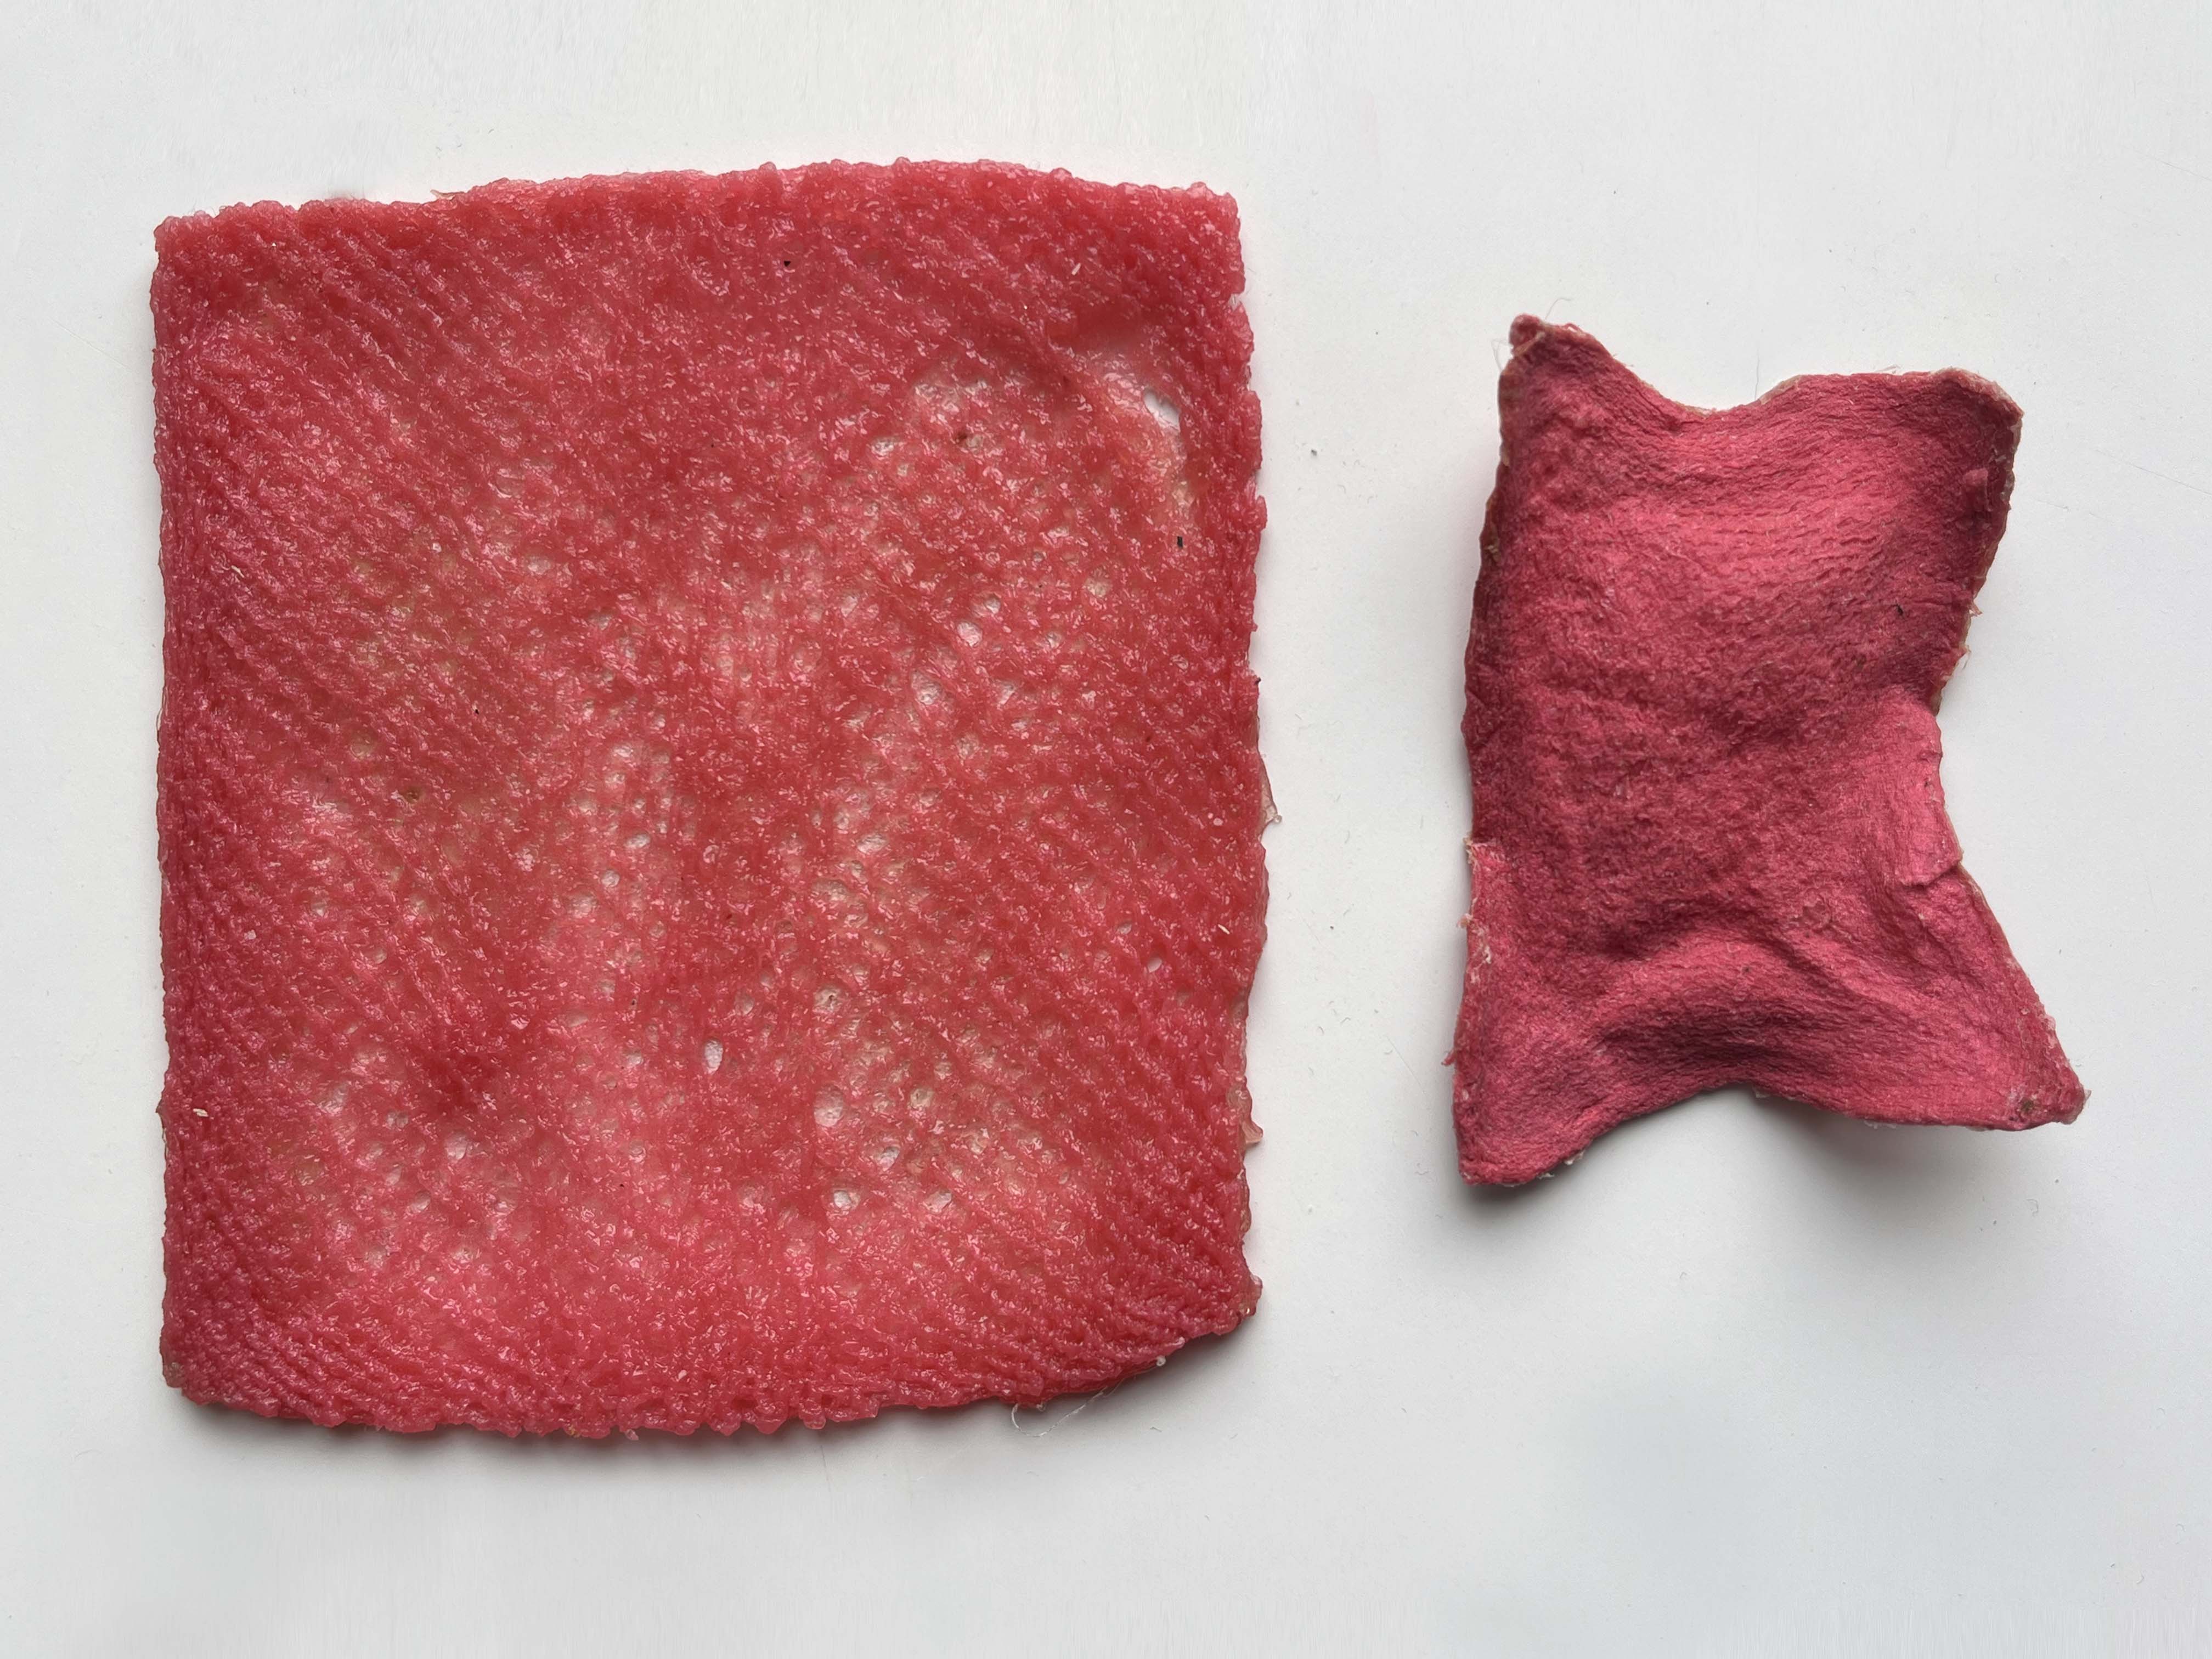
 drying
 dried
dried
ink+bath.pdf ¨¨
bio-printing:
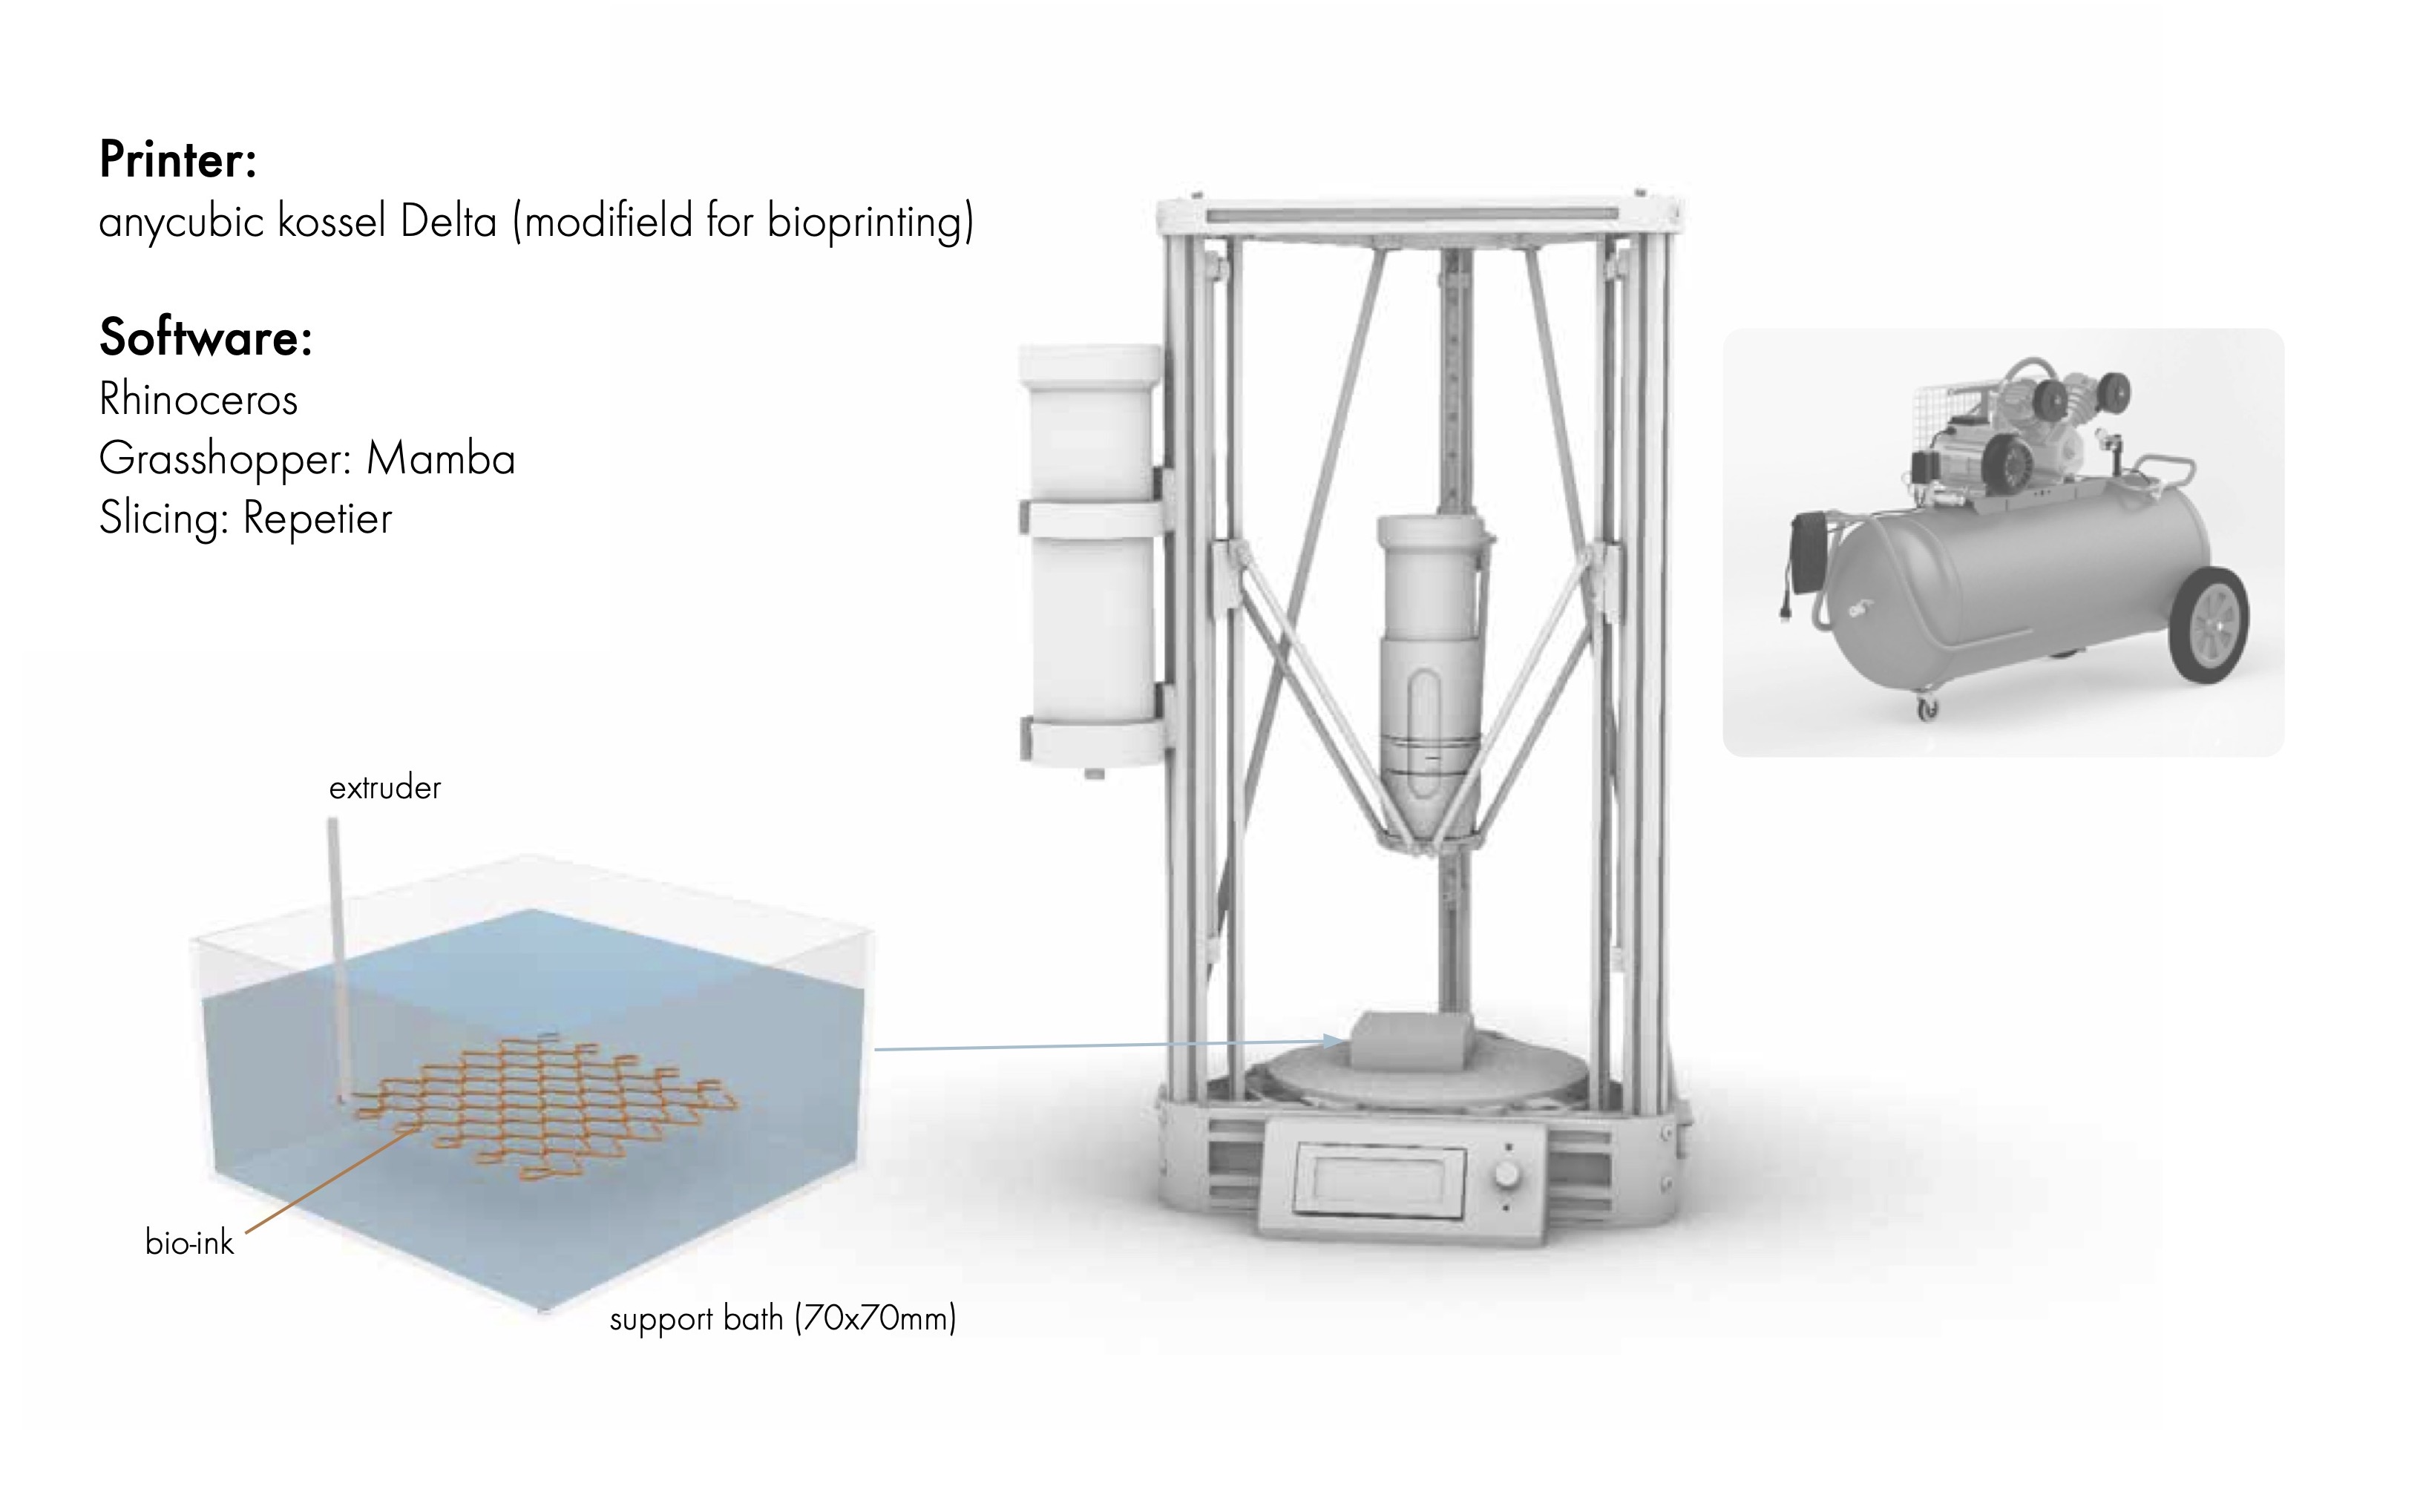
For the printing, I used a modified Delta desktop printer that we had in the lab.
All the artworks were developed in Rhino.
G-code was generated through the grasshopper plugin Mamba
This plugin is designed by eduardo chamorro (fablab Barcelona) for both generic 3D printer FDM(fused deposition modelling) & paste printers (ceramic-biomaterials with pressure or motor control), up to large-scale Robotic Fabricators using FFF technologies and running from Gcode or for simple path generator on them.
Slicing was done with Repetier an open-source slicing software.
The support bath was prepared in transparent 7x7x4cm containers.
Bio-inks were colored with Mica powder to differentiate from the support bath.
When printing in a support bath finding the right balance between the viscosity of bio-ink and support bath, print settings such as speed, pressure and the geometry of the artwork is crucial and takes some trial and error to perfect.
It is recommended to start with simple geometries and light straight lines before moving to more complex artworks.
Workflow:
soft/ hardware:
Step1: make artwork in Rhino.
Step2: set z-0 in Repetier
Step3: Generate G-code in Mamba
Step4: Export G-code to Repetier
Step5: connect the printer to the computer and compressor.
Step6: test air pressure (adjust accordingly)
Step7: print
Step8: crosslink print (cure)
Step8: dry
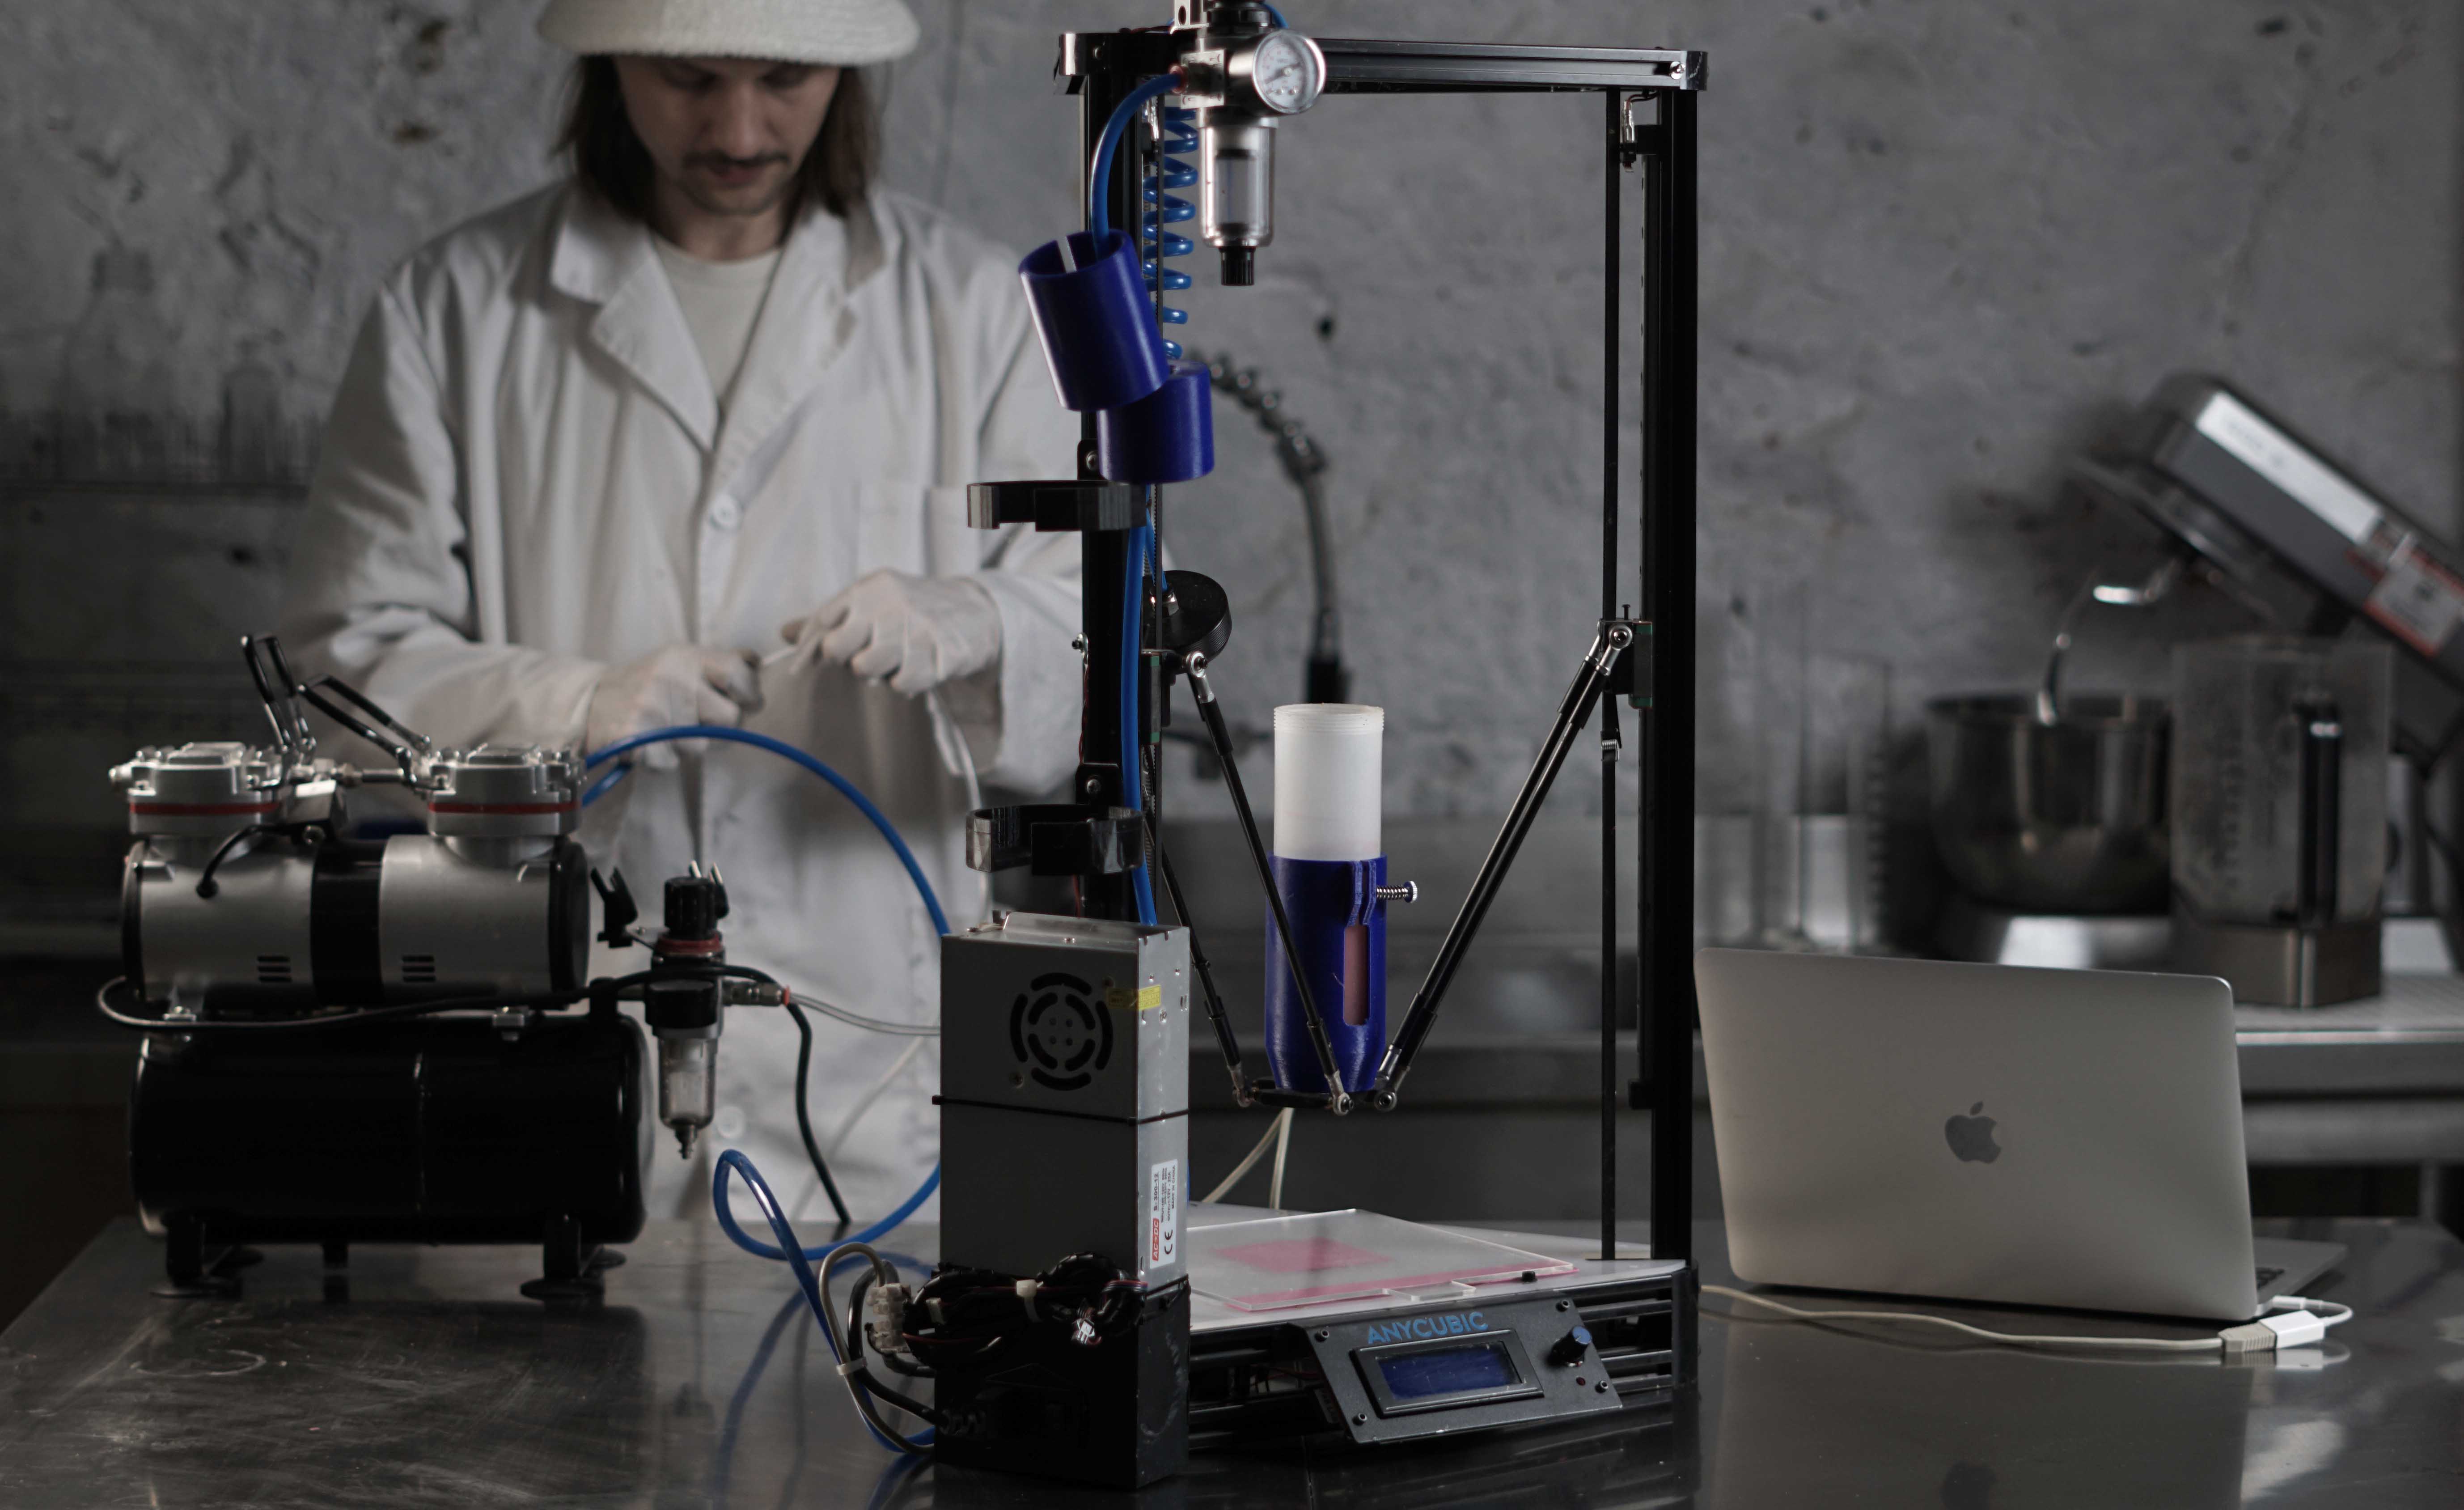 printer set-up
material prep:
* 2% v/w Sodium Alginate
* 2% v/w Glycerin
* purified SCOBY paste
* 0.5% v/w  Mica powder
* 2% v/w Sodium Alginate
* 2% v/w Glycerin
* 6.1% v/w  SCOBY powder
* 0.5% v/w  Mica powder
* distilled water
* magnetic stirrer
* glas jars
* polymers, plastizers and colorant combined
* dissolved and vortexed at 40o C for minimum of 30 min
short video describing the process

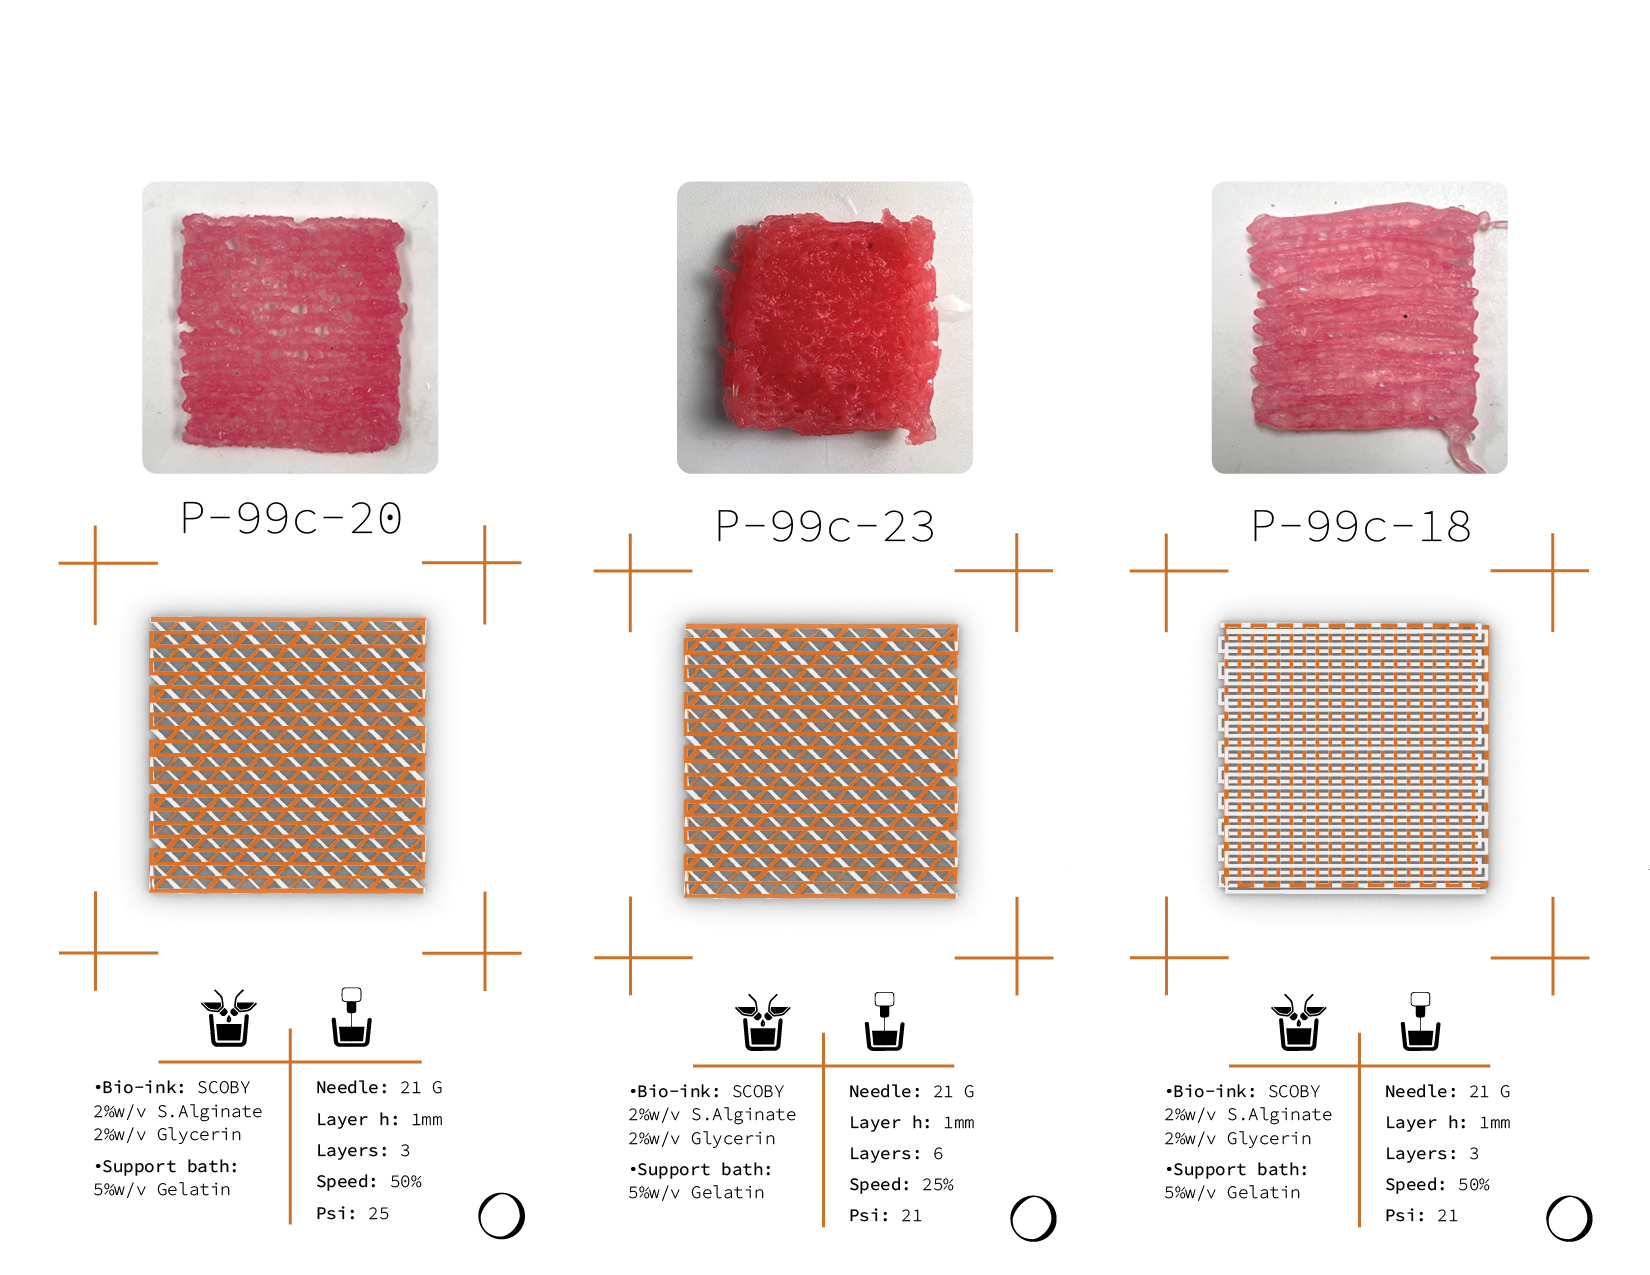
Results:
During my printing experiments, I mainly focused on variations of two different artworks one knit and one woven inspired geometry. One of the bigger differences between them was that for the knit-inspired one I could use the original support bath recipe with 0.16% calcium chloride this made the removal of the print much easier since the print was slowly curing while printing, the problem with this solution is that it is not possible to cross “old” print lines since the needle would “drag” previous lines. It also made timing challenging since the overlapping points had to glue together before the print had cured something that would become more and more challenging the bigger the artwork I would experiment with.
For the woven artwork, I, therefore, excluded calcium chloride from the artwork.
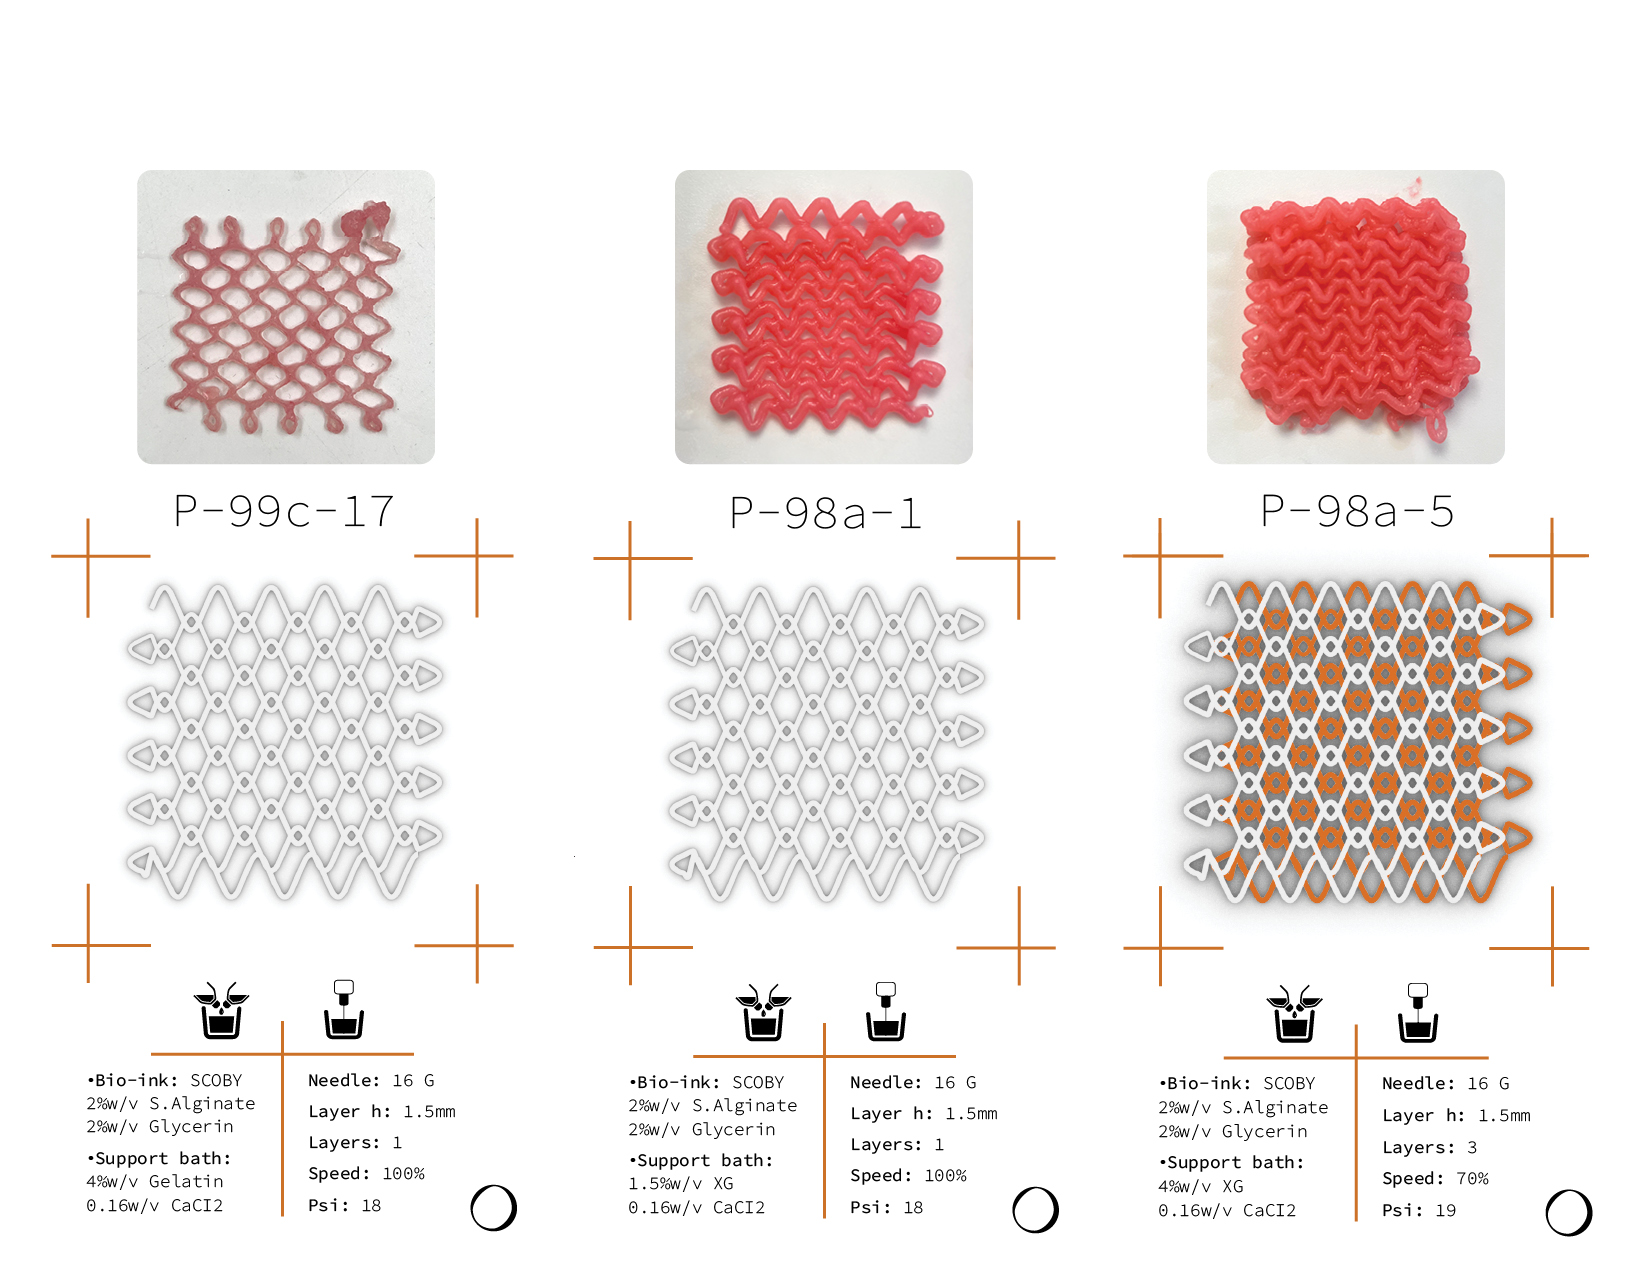 variations of “knit” artwork
The challenge with this artwork was to print fast enough that the contact points was “sticking” with each other keeping in mind that the faster the printing speed the bigger “cave” the needle leave behind causing inaccuracy in the print.
 variations of “woven” artwork
Excluding the calcium chloride from the suspension bath opened up a lot more freedom in the artwork and however releasing the print without destroying the geometry was challenging. The best method seemed to be to put the support bath into a water bath slowly heating up the gelatin just under melting point and then carefully pouring hot Calcium chloride from the top. Leave the print in calcium chloride solution for a minimum of 30 min.
Experiments with scaling up the container from 70x70 to 160 x 160 mm were also made. Using the woven artwork.
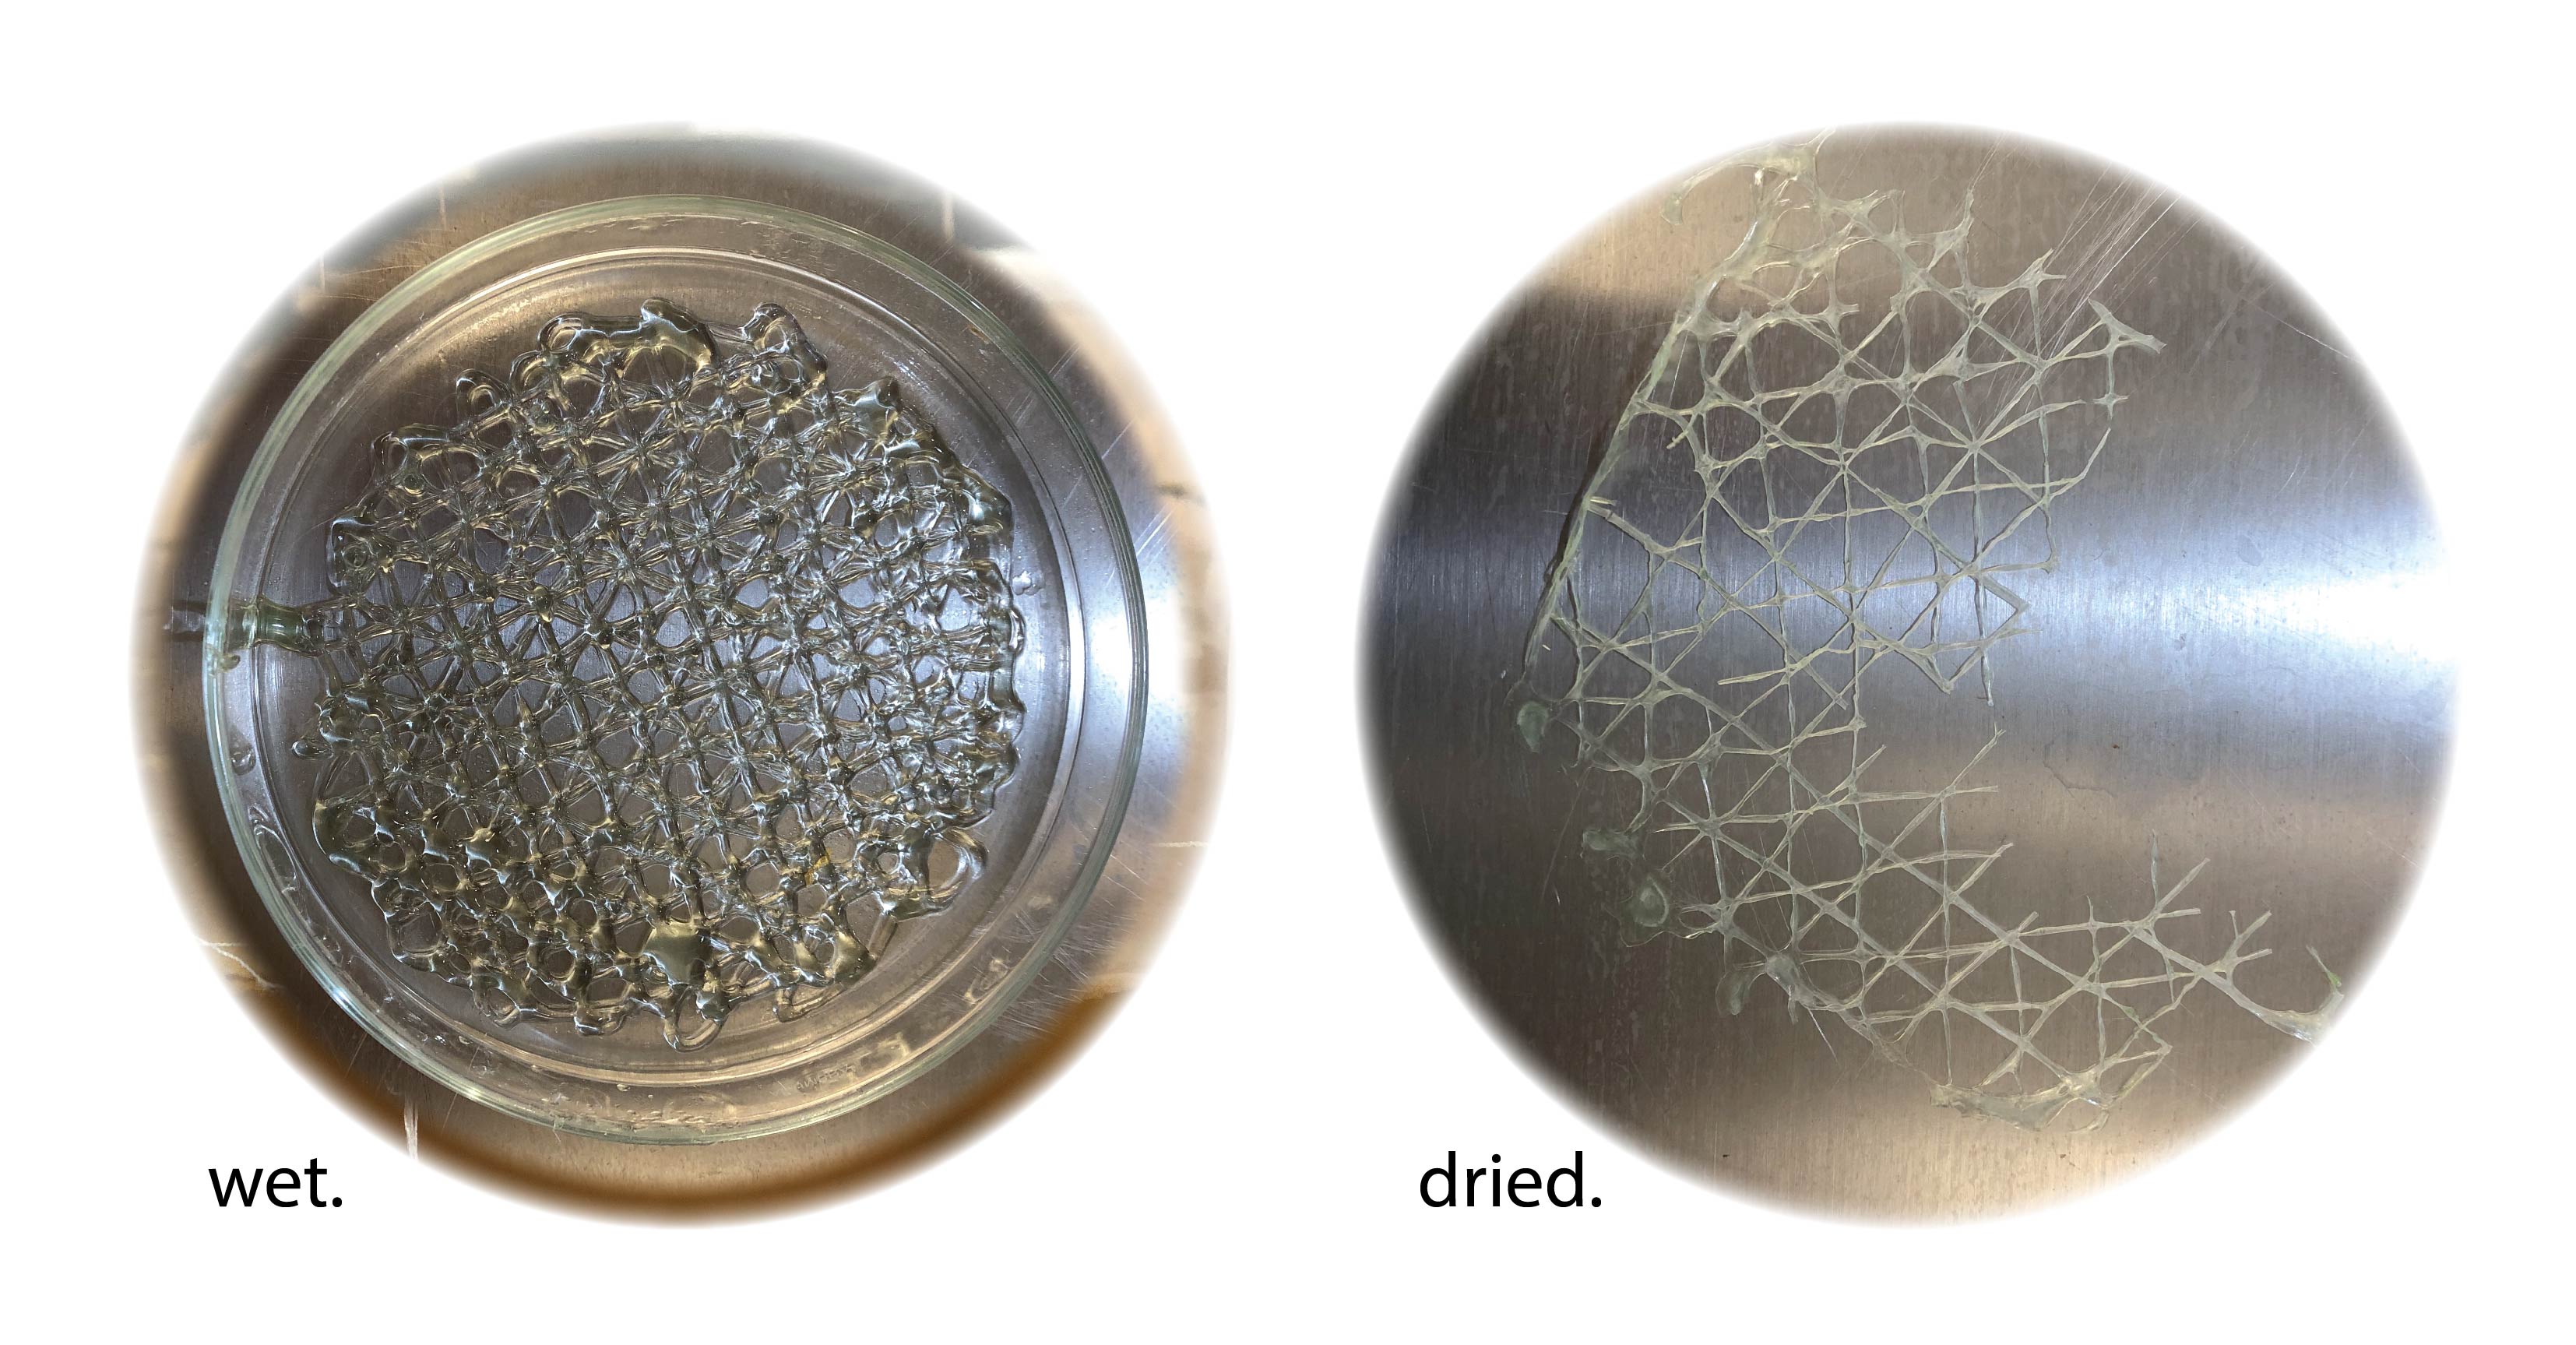
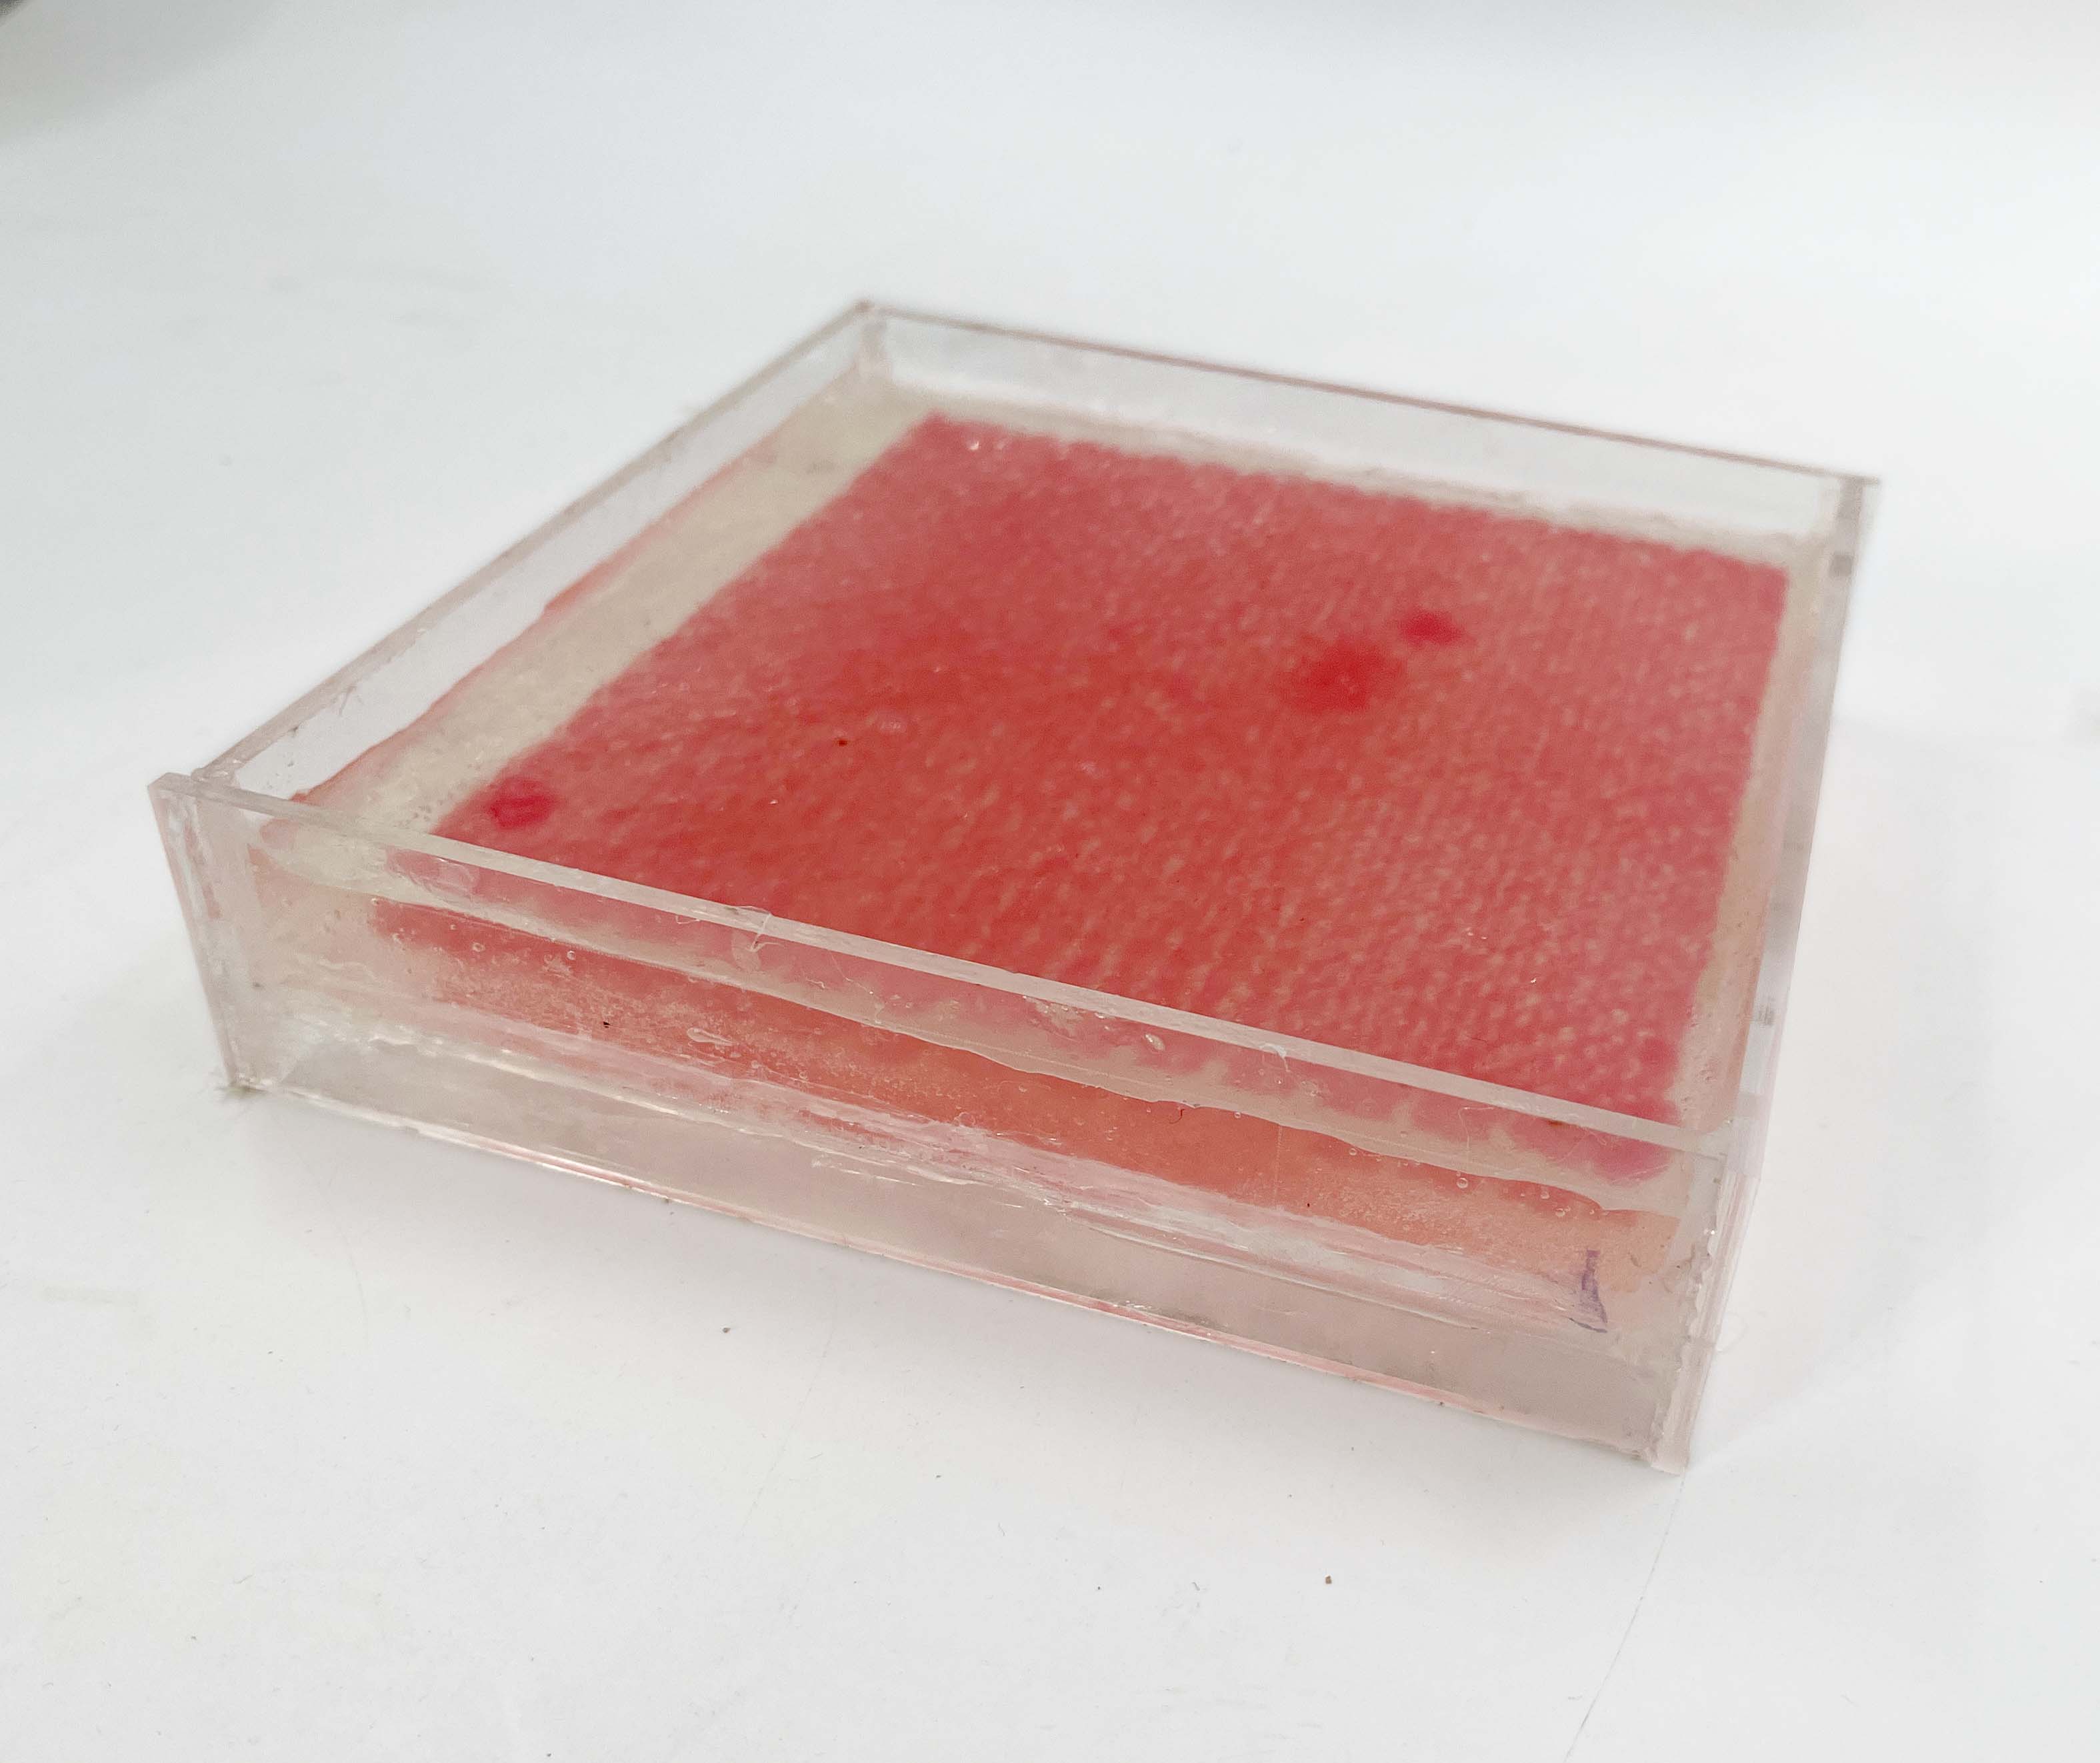
 first tryout after the print is cured (still wet)
 _second tryout left cured right: still in the support bath
Even though I followed same methodology when curing the print the first tryout was more successful. The comparison image of before and after curing of the second tryout clearly shows the details lost. Further prove the difficulties replicating the protocol in bigger scale and accuracy.
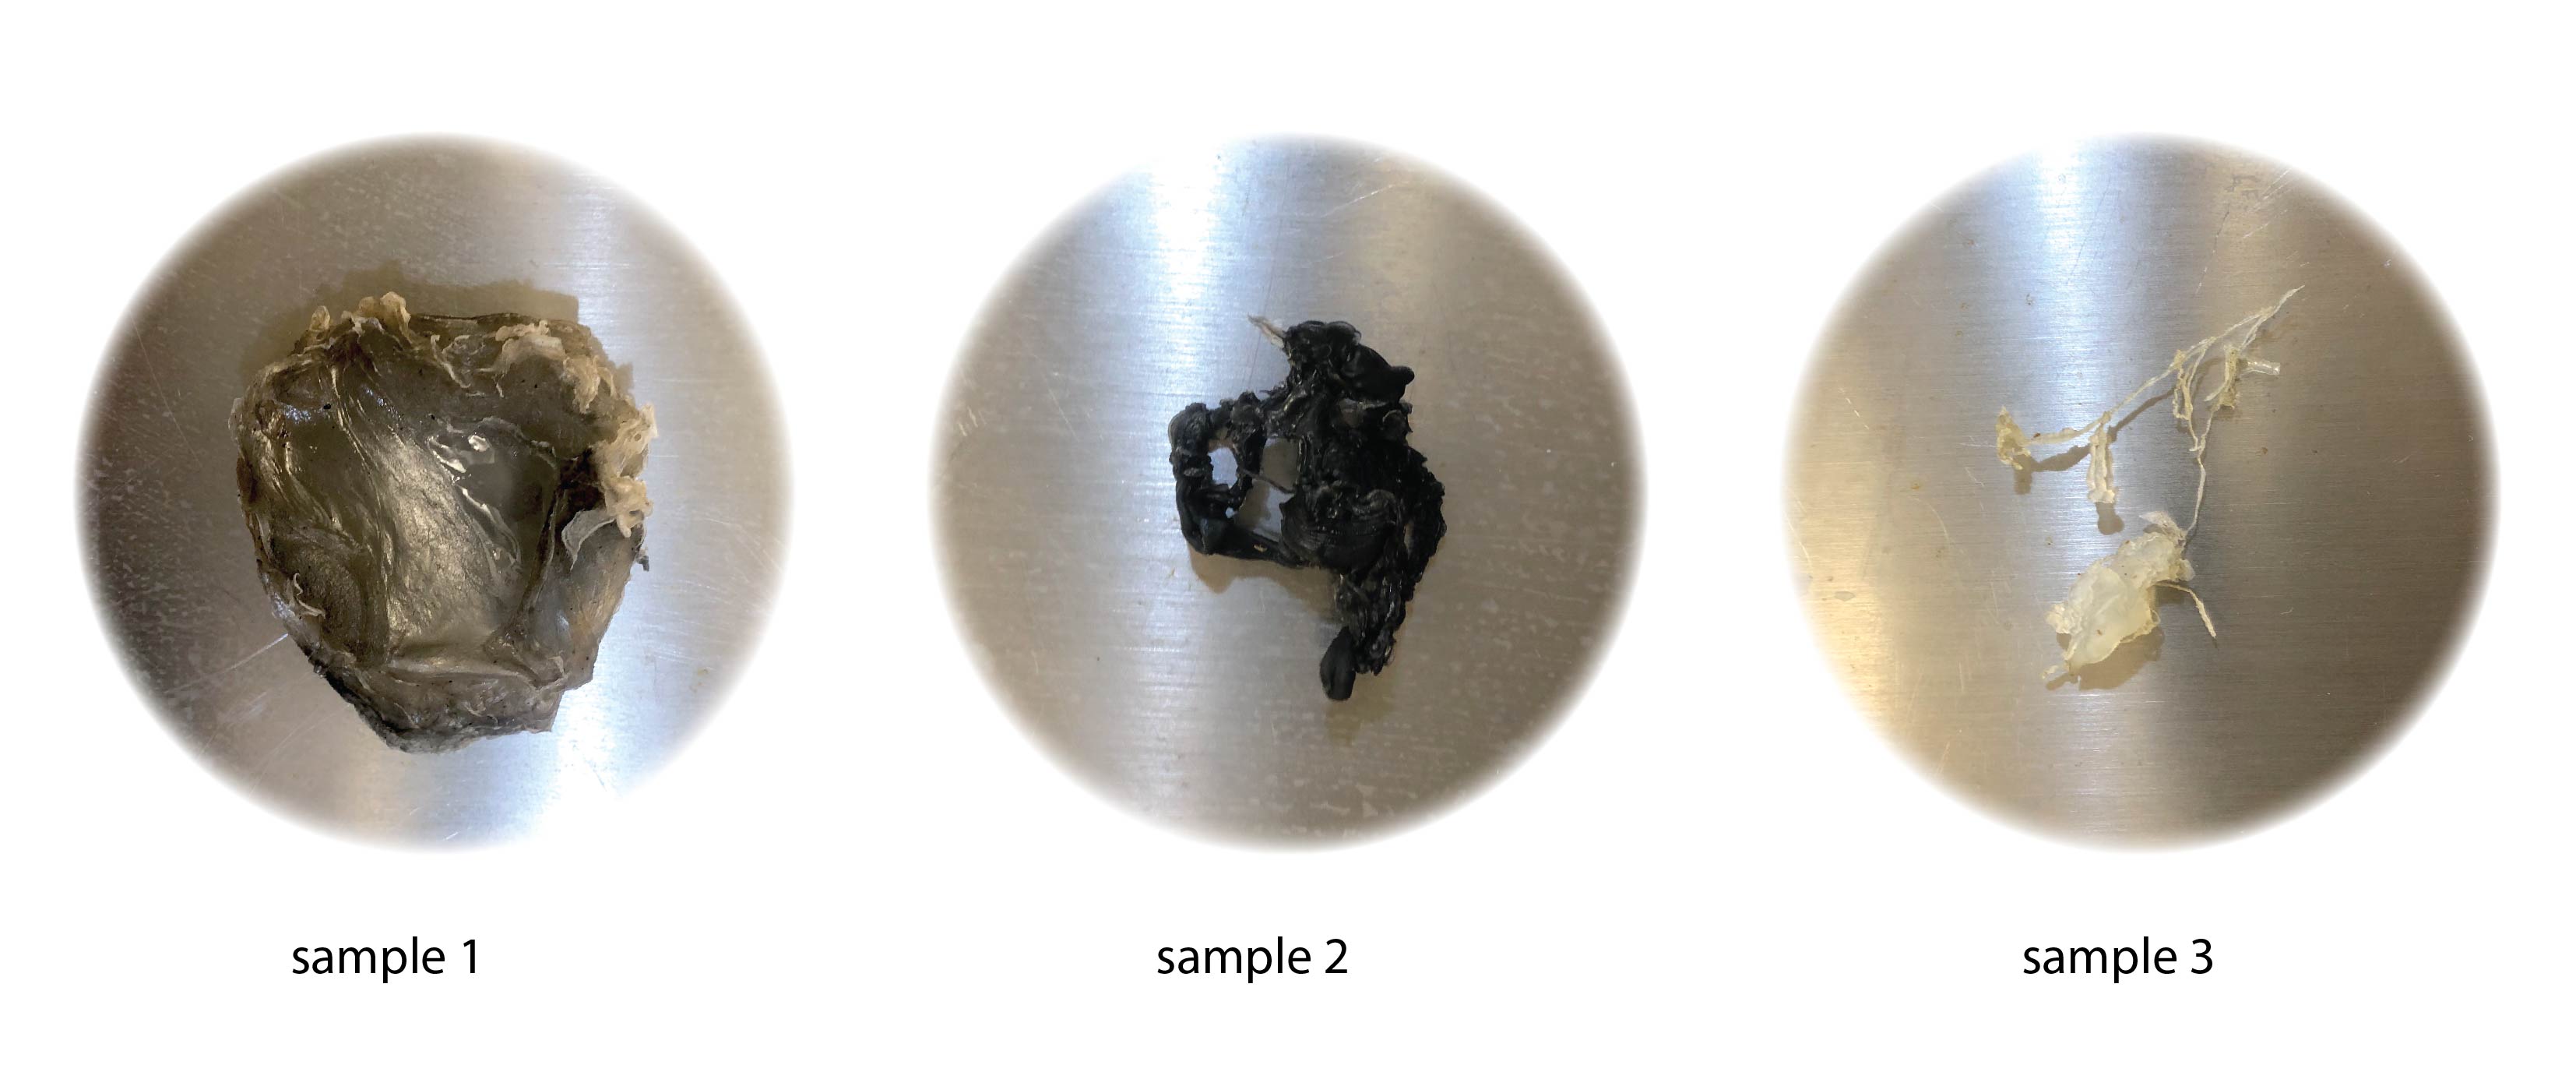
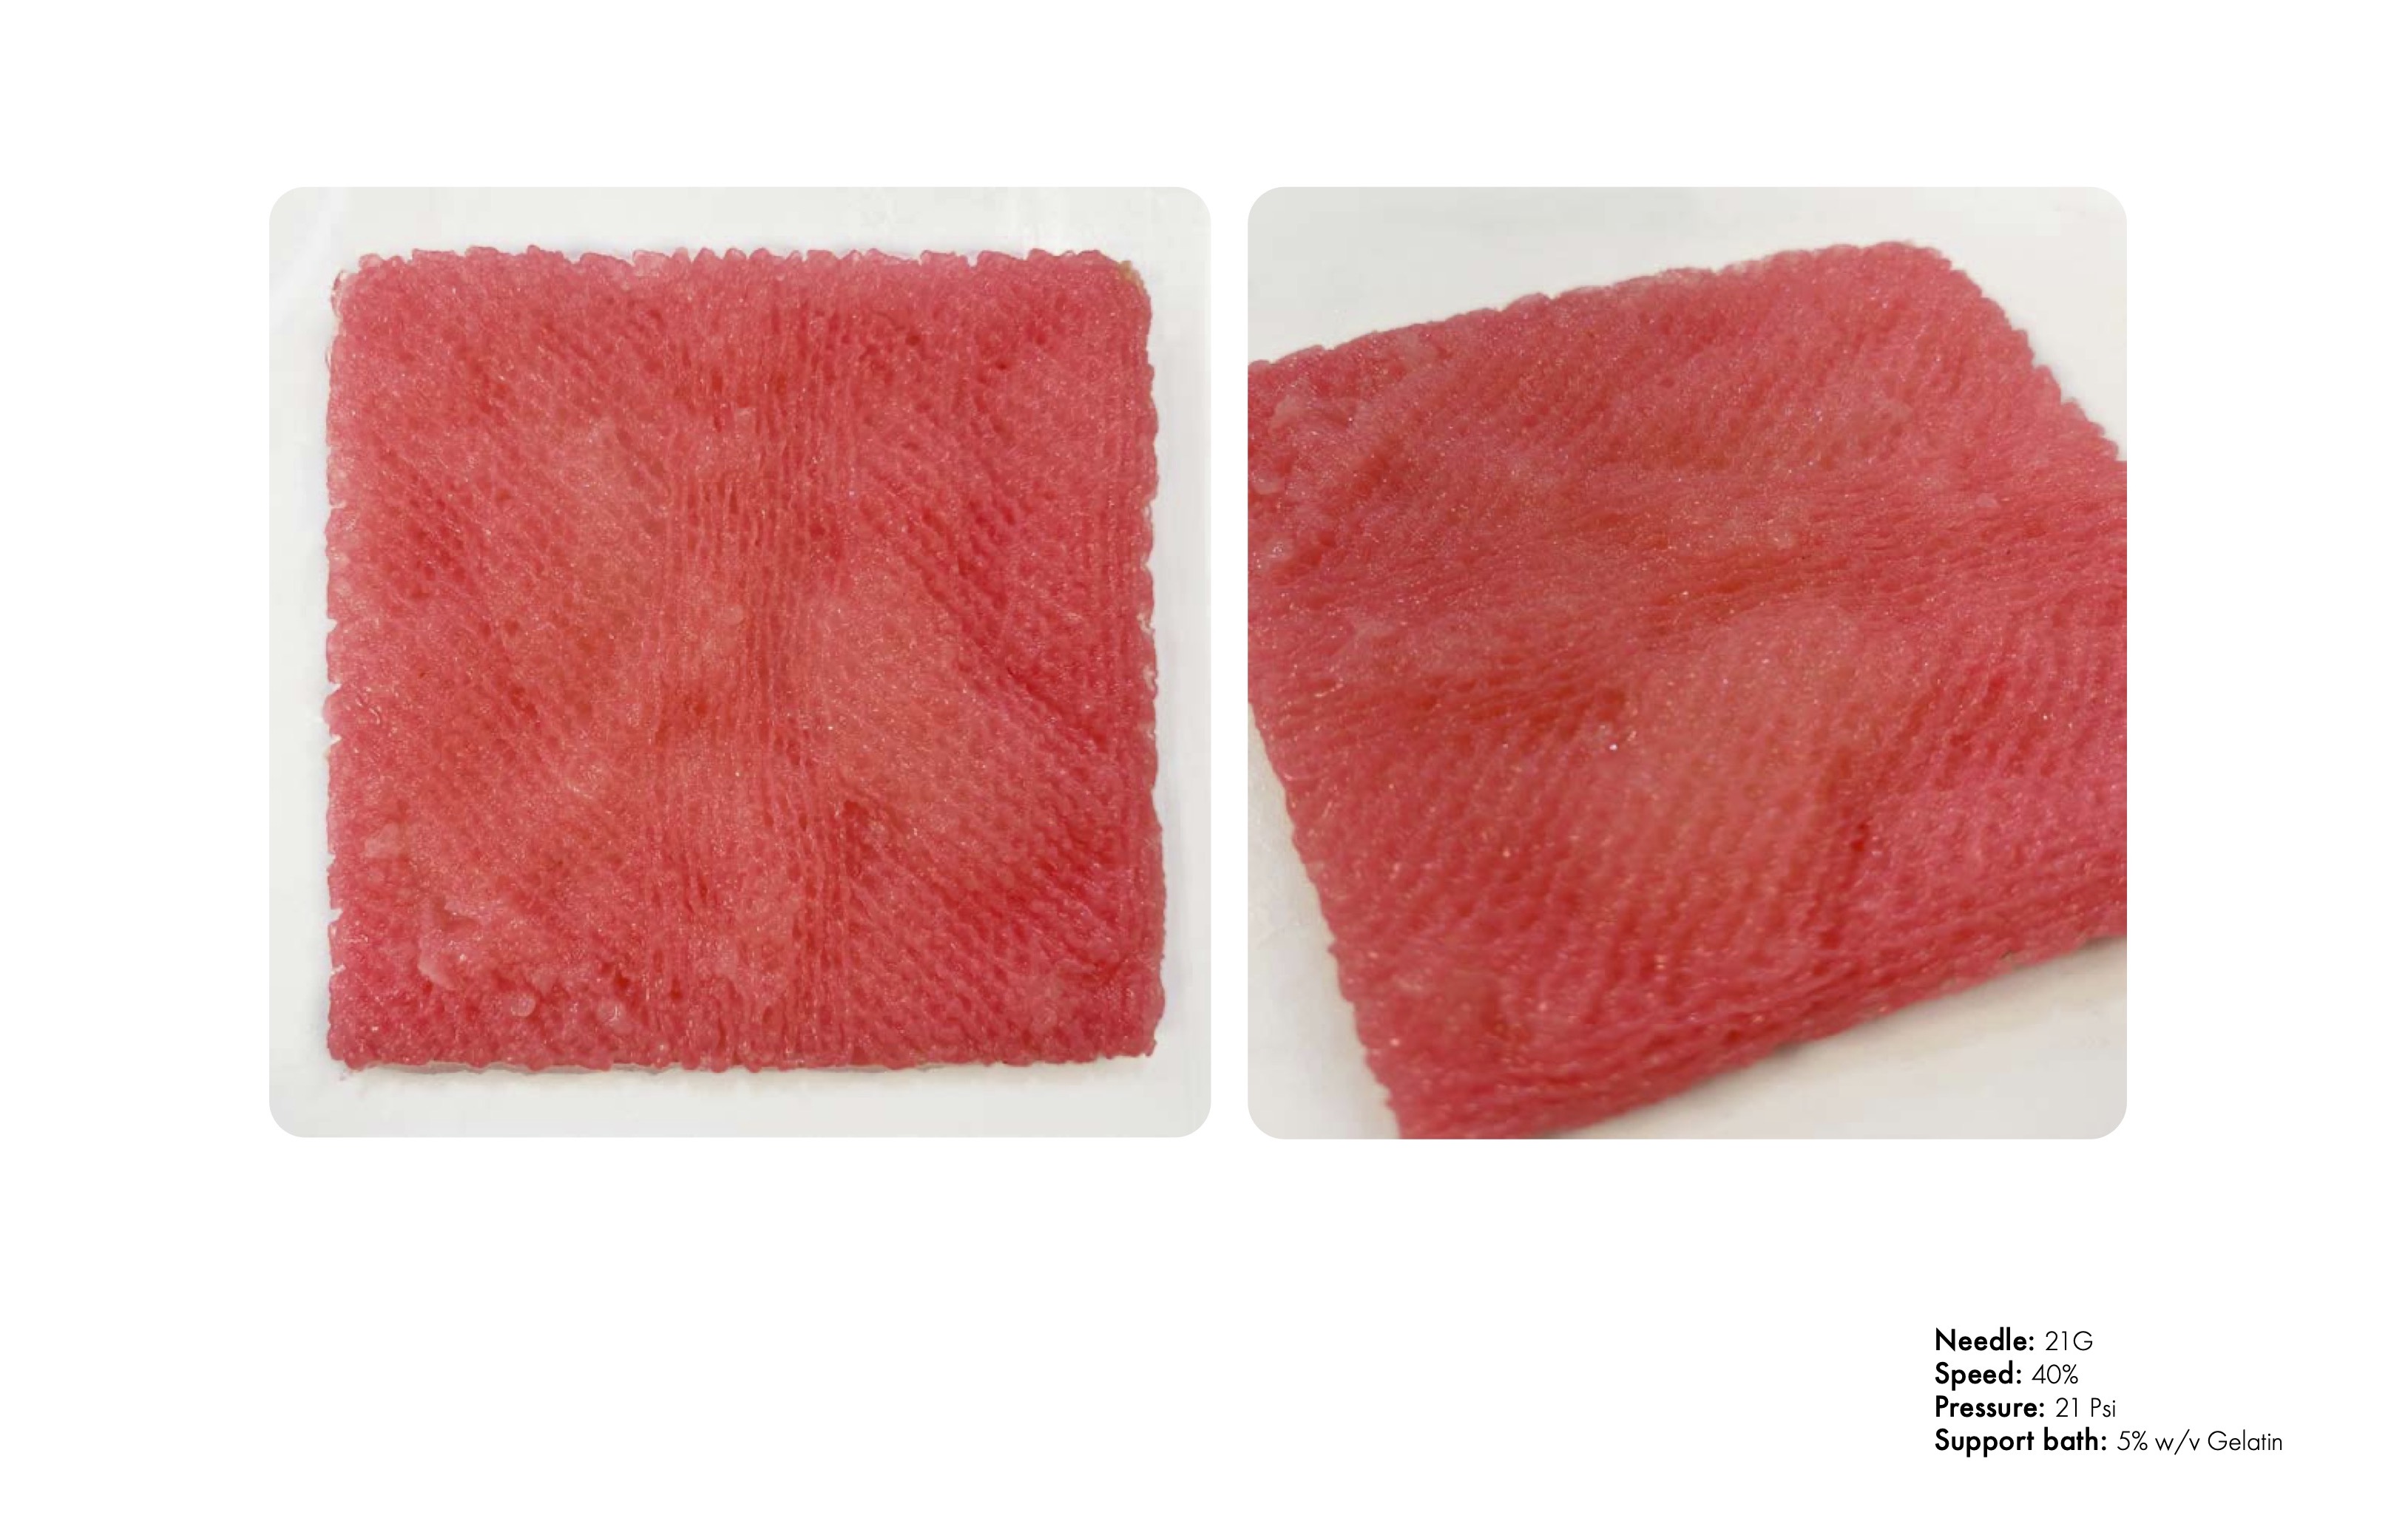
 first and second samples after drying
 Interestingly the two samples showed a significant difference in shrinkage. Both samples were dried at room temperature with the only difference being that the first sample was dipped in a 50/50 glycerin bath for 2 hours before drying which made it significantly softer with an almost oily surface, It is not clear if this also affected the shrinkage. An alternative explanation for the shrinkage difference could be that the first sample crosslinked better with the calcium chloride resulting in a stronger wet structure that inhibited drastic volume loss.
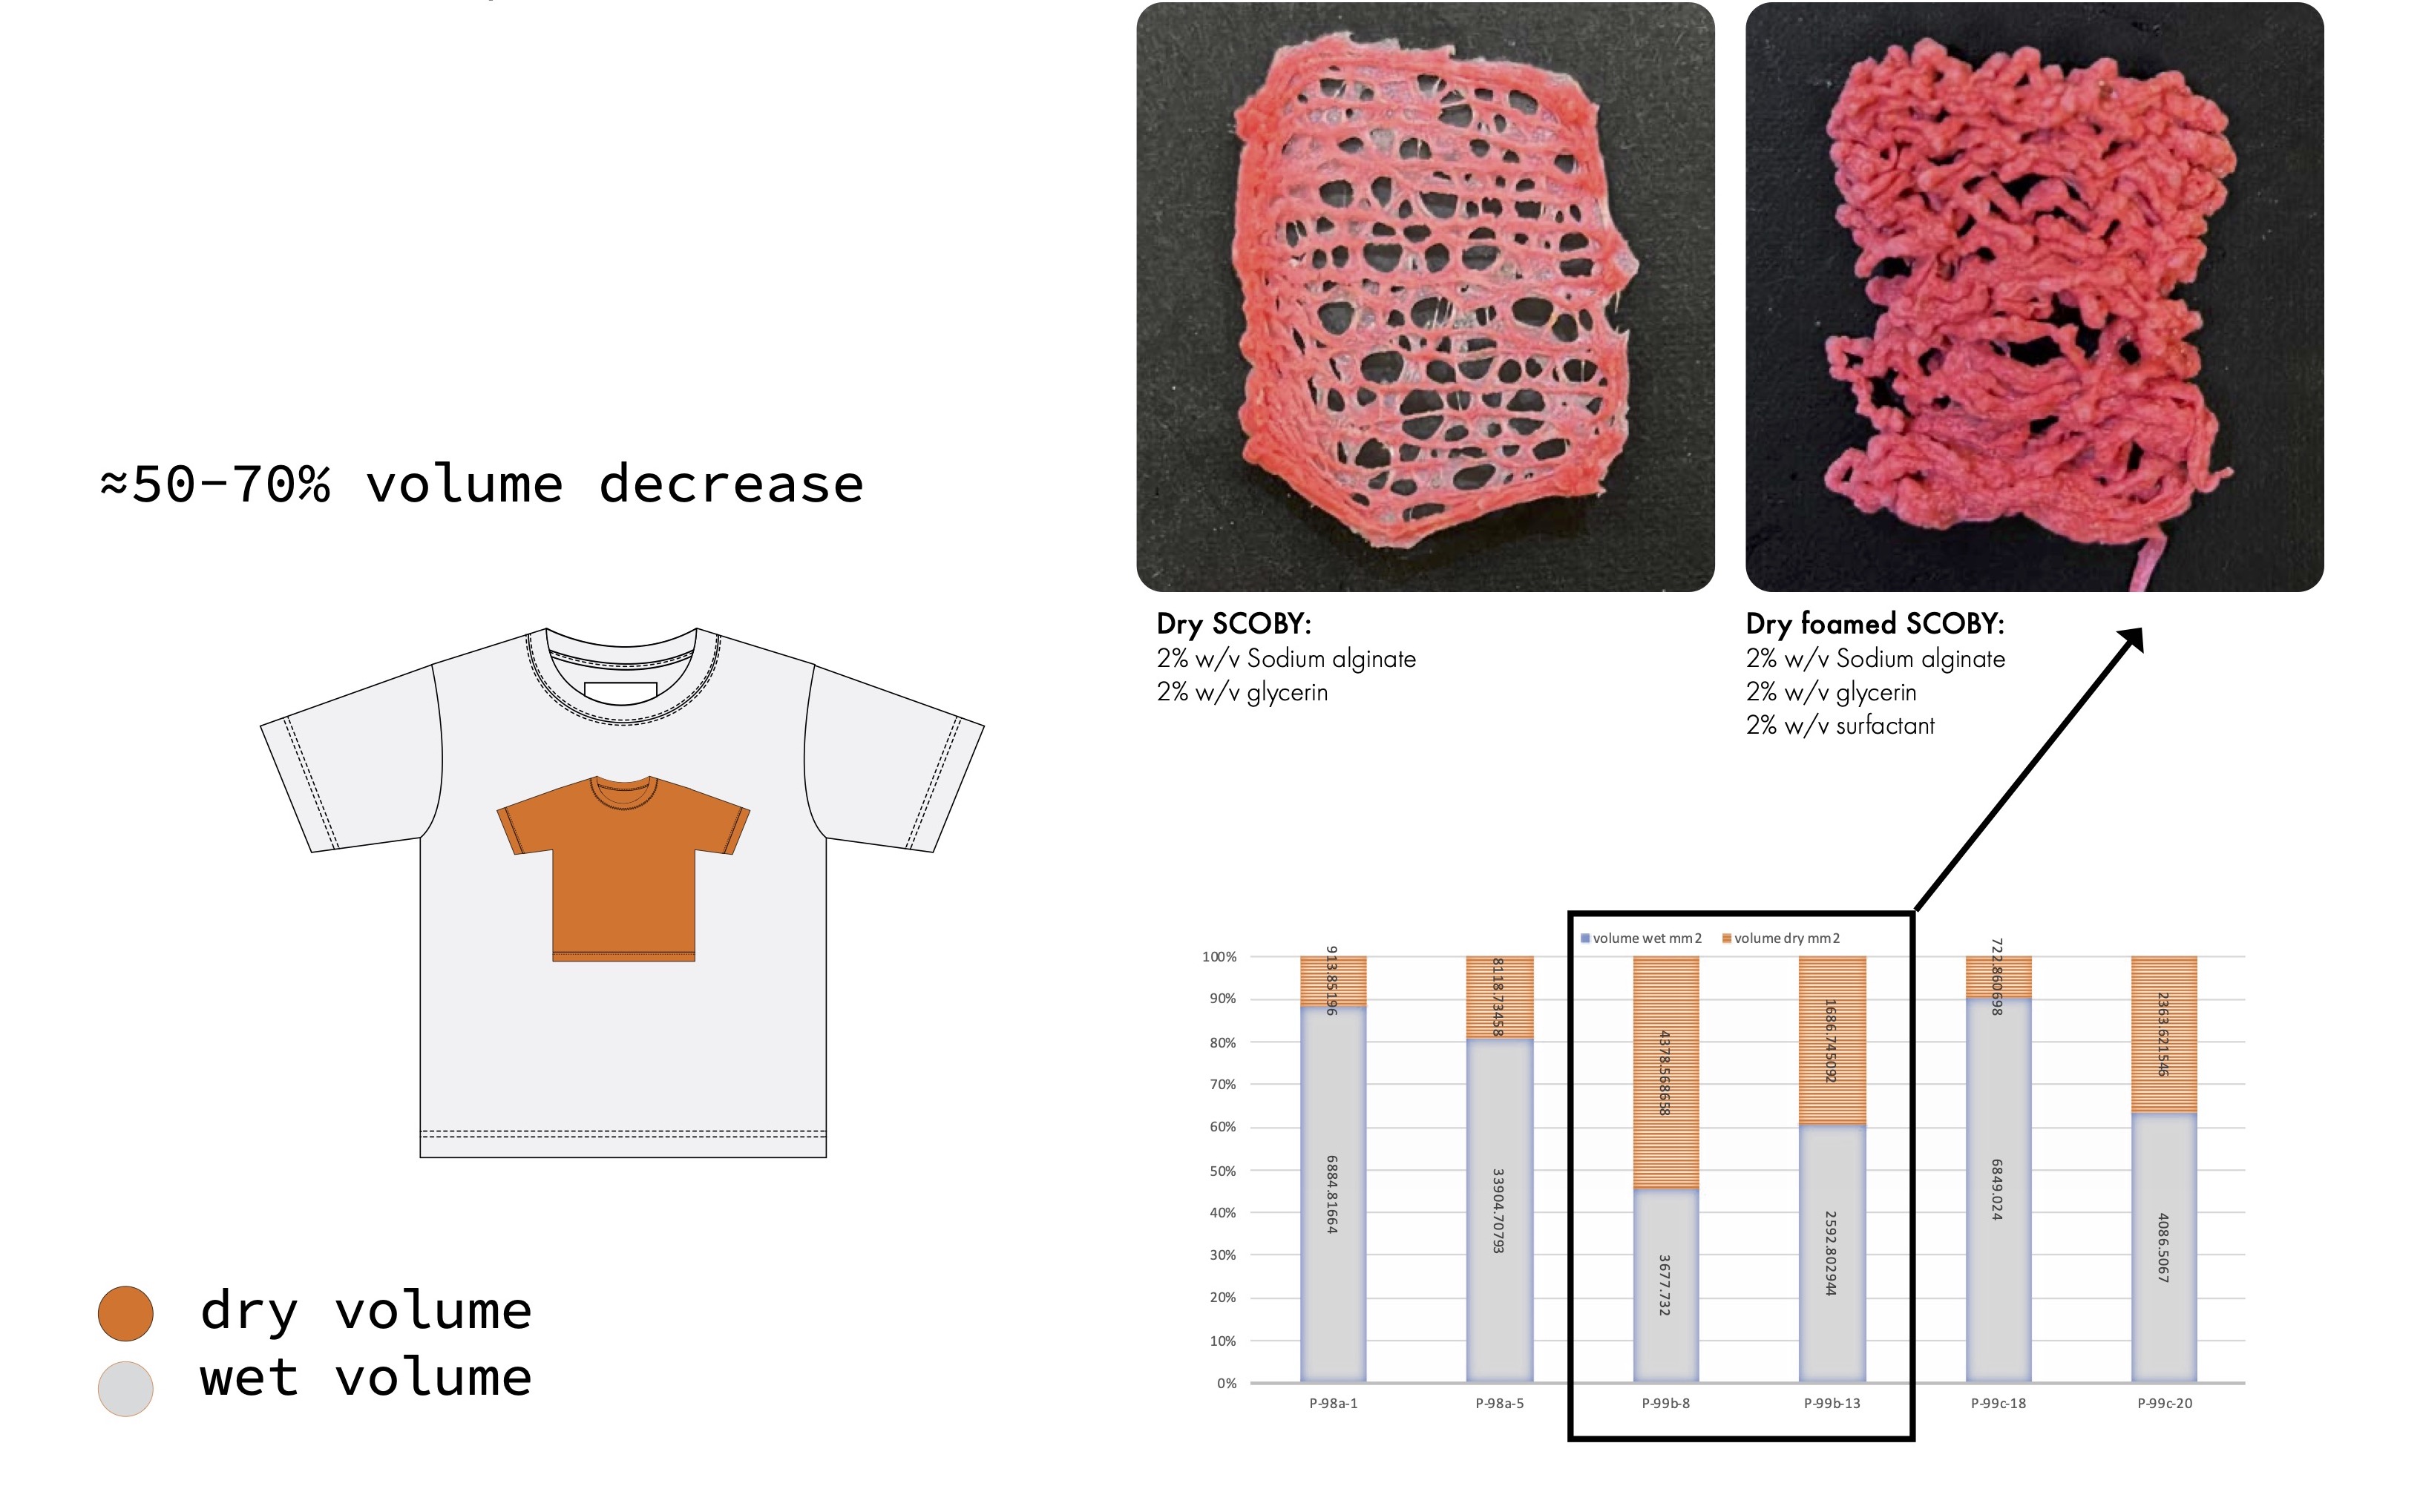 Even previous samples showed significant shrinkage sometimes up to 70% I have experimented by mitigating it by foaming the ink which decreased the volume loss (see P99b-13 and P99b-8) however the foaming also made the printing more difficult.
 absorption test with dried samples was also conducted. The test was performed with two samples one pure BC sample and another one with 2% v/w alginate and 2% v/w glycerin dipped into distilled water for 4 and 40 hours. For both samples, the experiment showed some volume increase after 2 hours but then the expansion plateaued. Moreover, the experiment indicated that the alginate and glycerin sample absorbed less water than the pure BC sample.
Reflection of the BC bioprinting protocol:
We have developed a process for bioprinting bacterial cellulose using the FRESH protocol. We have experimented using different artwork mainly focusing on modifications of two different geometries. We have seen how we could create open lace-like structures as well as more dense solid materials using two different suspension baths; gelatin and xanthan gum-based.
We have shown how the FRESH protocol can create complex 3D structures mimicking traditional fabrics, but we have also encountered problems, especially in the drying and post-processing phases. Here further research is necessary.
One suggested solution could be to freeze-dry the prints, it is a process that should dramatically reduce the shrinkage but of course, also be quite an energy-heavy process.
Another option could be to use the shrinkage as a feature, a method to create small-scaled detailed artworks that otherwise would not be physically possible with a 3D printer. Ofcourse this would require that we print oversized garments that then shrink down into the finished size. Printing the garments folded could be a solution to this problem see nervouse system Another problem with this idea is that a 3D garment would dry differently in different part dependent on graviditation direction possibly a rotational drying process could be a solution rotational casting
We have also seen how the material after drying loose most of its absorption quality which suggest that it would be washable and partly water repellent. That should be a good material propertly for garments.
Another problem we have encountered is curing the print in an even and replicable way without using 0.16% v/w Ca2I infusion. Further research into different curing process such as photocrosslinking would be interesting for further development of the project.