2. Digital bodies
Final result by Marieke van Eyndhoven
In our second week we will focus on new digital tools that complement hand tools in order to design, represent, make and modify the human figure that can then be used as a canvas for creation.
We should not think of the body as a white canvas, but instead understand how any perception of, or idea about bodies is already cultural and political. Therefore we have to step away from the simple copy of the human figure as support of our work and start our creative process from the very beginning: the design of the canvas itself.
Research & Ideation
Female body in the fashion industry: relation between the fashionable body, clothing and gender role stereotypes
It is clear that the fashion industry has long seen the female body as a malleable entity, something to be moulded according to the dictates of complex social codes. In that way the fashionable female body has always been a cultural construct. Awareness about this construct is rising.
Therefore it’s becoming increasingly the norm to see models on runways or in campaigns of a different race, size, age, gender, or sexuality. It's an attempt from the fashion industry to step away from stereotyping the female body.
However, is just altering those bodies on the runaway or in campaigns, a suitable way to liberate society from the broader issue of gender role stereotypes?
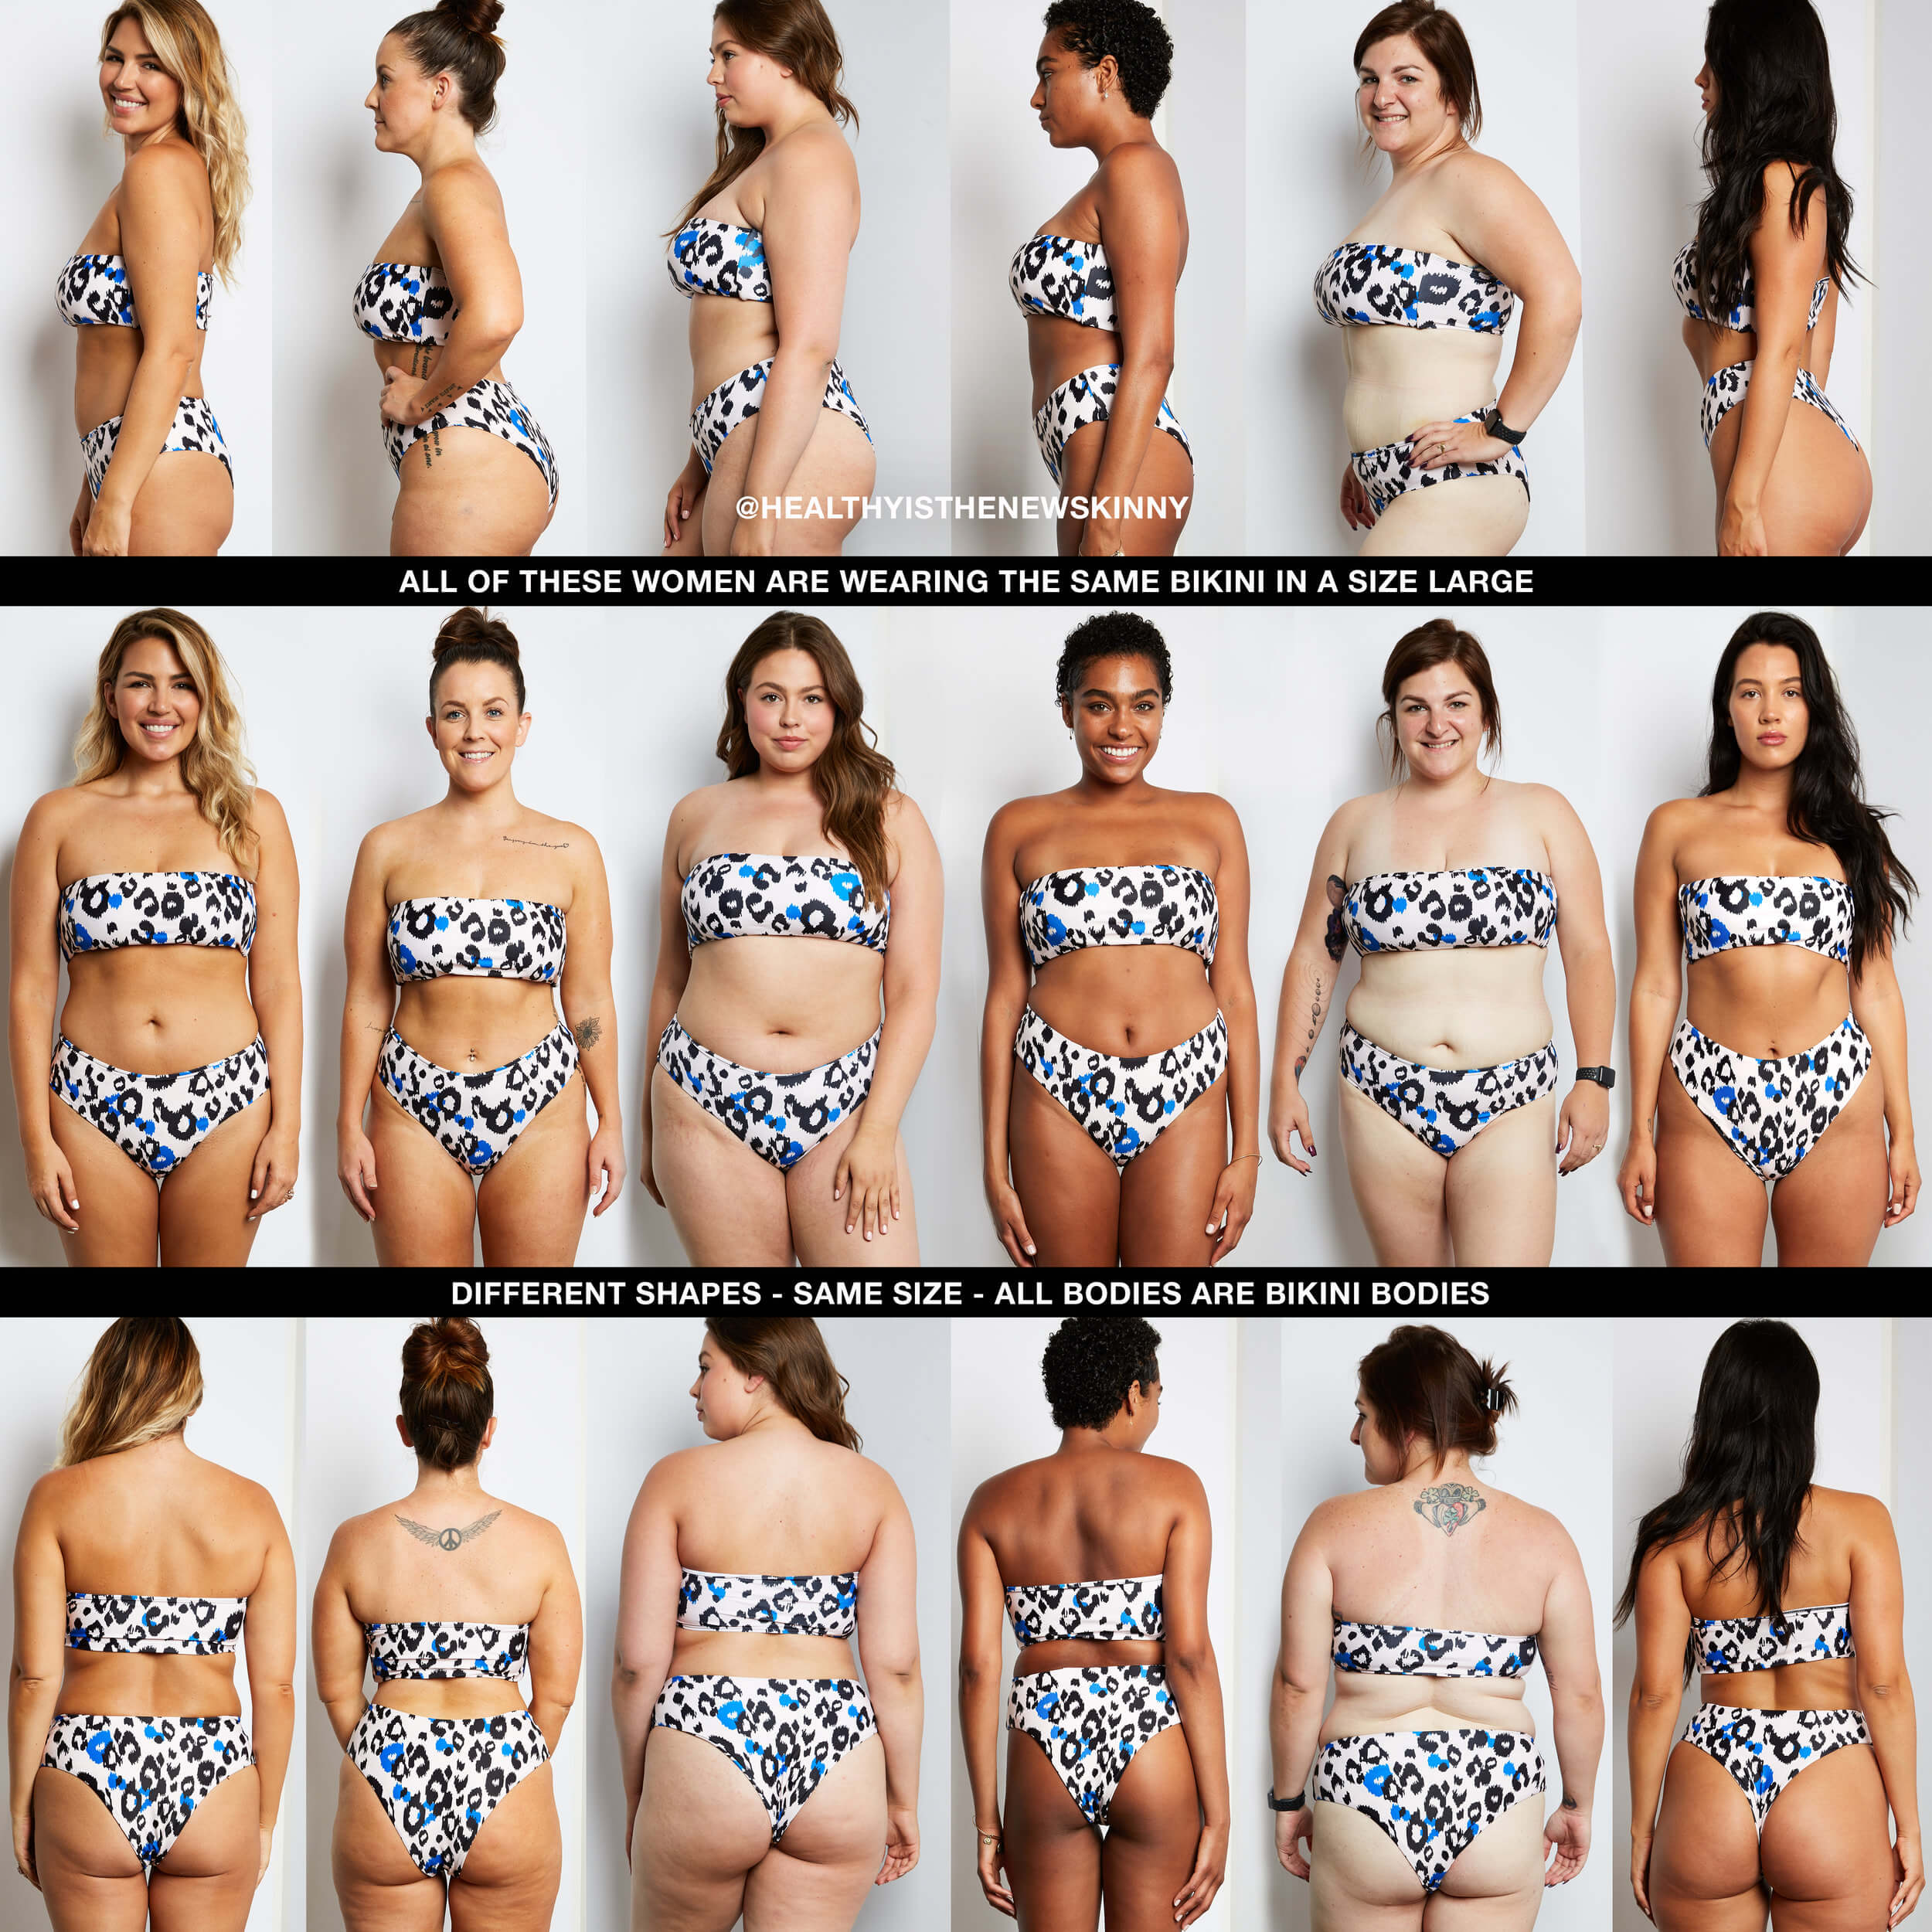
Photo from website Healthy is the new Skinny
For centuries both individuals and societies have used clothes and other body adornment as a form of nonverbal communication to indicate rank, gender, sexual availability, locality, class, wealth and group affiliation. Clothing is a form of free speech. What we wear and how and when we wear it, provides others with a shorthand to subtly read the surface of a social situation. From the history and development of clothing as a means of communication, we can deduce that fashion-in-itself was and still is a systematic encryption, a transmission, and an interpretation of social meaning and signs, functioning in a complex and interesting way to construct identities, specifically feminine identities. The clothing people choose is based on intrinsic social preferences subliminally imposed on through cultural norms.
For ages, in most societies, women were (officially) inferior to men. Power was primarily wielded by men, who occupied the most prominent roles in society and had the greatest social advantages. Women were assumed to take on subservant roles and the woman’s world was centred around the home. On the list of typical feminine character traits associated with the woman gender stereotype were words like emotional, dependent, passive, sensitive, graceful, innocent, weak, volatile and sexually submissive. The traits commonly associated with masculinity were independent, non-emotional, aggressive, competitive, experienced, strong, rebellious and active. For a long time, female clothing were restricted clothing, which marginalized women in society and emphasized their gender stereotypical “feminine” traits of weakness and volatility. The Victorian corset being a great example of this type of clothing.
In that way fashion dictated to women how their bodies should look. And in turn, society's obsession with bodily ideals reinforced gender roles culturally assigned to men and women by emphasizing individuals’ biological sex and encouraging them to behave according to specific character traits associated with their specific sex.
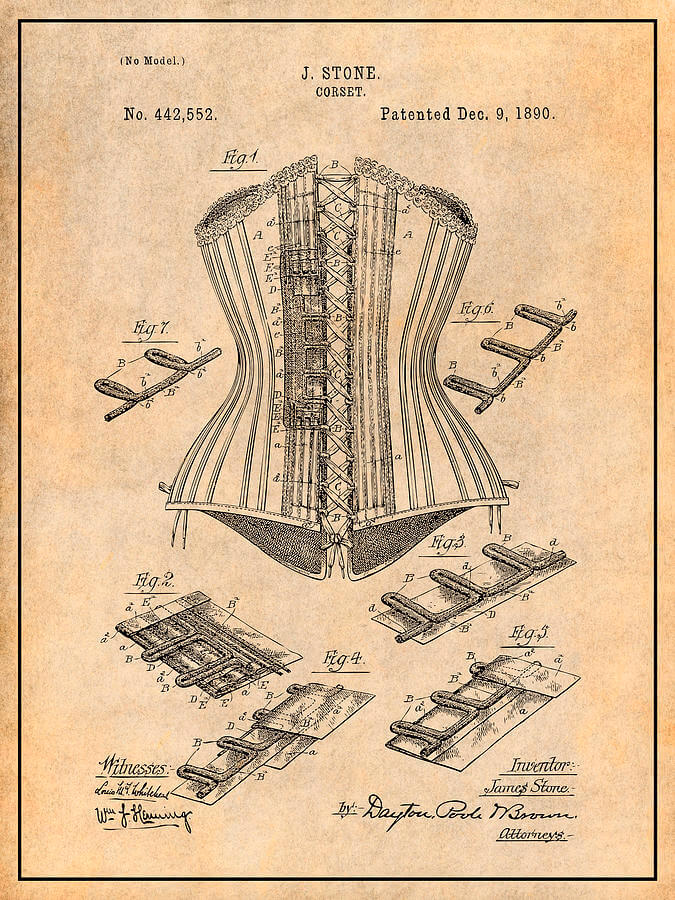
1890 Framed Victorian Corset Antique Paper Patent Print, drawing by Greg Edwards
In my view, the rigid gender stereotypes still present in society, dictate to this day fashion design, which in turn continue to lead to bodily ideals, and those bodily ideals successively reinforce the stereotypes. An unhealthy cycle of gender sterotyping fueled by 'clothing + body' AND by 'body + clothing'. For all of us the body is mostly a non-changeable given. But if clothing can be fortifying stereotype roles, then garments can also play a role in liberating individuals from gender constraints. We should all start recognizing fashion as a device that can be manipulated and molded as a means to break through gender boundaries, and begin acting accordingly.
Photo from website Marketwatch
The fashion industry, should not be designing only for the eye, but mostly making clothes for women’s bodies of all shape and size. And through a more conceptual approach to fashion, they should question and reflect on the industry trends. In their designs, they should aim to pay careful attention to women’s capacity for strength, resolve and versatility and as such redefine femininity through these traits. What is useful about the idea of redefining femininity is that it simultaneously redefines masculinity.

Lady Gaga: "Today I wear the pants", photo by Neilson Bard, illustration by Slate
And we the people on the other side of the equation as wearers and viewers of clothing? We have the ability to alter our clothing. And we have the responsibility to ignore or challenge the nonverbal communication assigned to them. In doing so, bodies will be bodies and fashion will no longer fuel stereotype gender roles. Or at least, clothing becomes an advantage in creating a more nuanced perspective towards gender roles.1 2 3
Is such a society, in which roles are not strictly defined along gender roles, an utopia? Maybe. Or maybe not. The aim for more fluid gender roles is often ascribed as an entirely modern phenomenon. But ancient societies and religions from around the world already recognised the fluidity of gender.
My inspiration: Freya
Take for example the Vikings (I love them!).
We often imagine their society to be incredibly masculine and feminine. And it’s true, with rare exception, the men fought, and women ran the home. But when you closely study their religious beliefs and their stories about the Norse gods in their mythology you must conclude that the Vikings acknowledged that gender was not limited to two fixed points.
For example in one story, Thor, the great god of thunder, without a doubt the most masculine of all the gods, dressed as a woman to reclaim his stolen hammer Mjölnir. Or take Loki. In all the myths this trickster god does have an uncanny ability to shapeshift, often into a woman. Speculation even abounds about Odin, who is numerous times said to use women’s magic. As a god of wisdom, death and magic, among other things, we might expect Odin to have mastery over all magics, but Norse mythology makes a distinction between ‘male’ and ‘female’ magic. While it could simply be Odin seeking to be more knowledge, the very fact that he was able to take on a ‘feminine trait', challenges and defies the very notion of gender as a concept.4
So for my inspiration I will go back to this ancient Viking society and Norse mythology and focus on the goddess Freya.
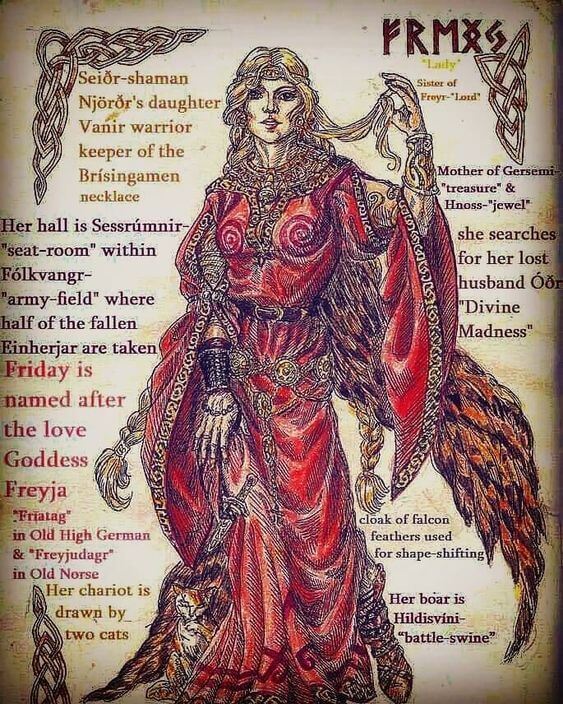
In Norse paganism, Freyja (old Norse for the Lady) is a goddess associated with love, beauty, fertility, female sexuality, the wild and untamed forces of nature, war, gold, and seiðr (magic for seeing and influencing the future). Freyja is the owner of the necklace Brísingamen, rides a chariot pulled by two cats, is accompanied by the boar Hildisvíni, and possesses a cloak of falcon feathers.
As the goddess of love and beauty, Freya was not only kind, friendly, caring, loving, sweet and gentle but she is also flirtatious as well. So at first sight she seems to be pictured as an outspoken female character. But she is way more than that.
Freja, painting by John Bauer
Freya is the archetype of the völva, a professional or semiprofessional practitioner of seiðr, the most organized form of Norse magic. It was she who first brought this art to the gods, and, by extension, to humans as well. Given her expertise in controlling and manipulating the desires, health, and prosperity of others, she’s a deity whose knowledge and power are almost without equal. But the one aspect of Freya's divine power, aside from her powers in the way of seiðr, in which her authority was unmatched, was determining the fates of fallen Viking warriors. She ruled over a realm of the Norse cosmos known as Folkvangr. And half of the Viking warriors who died in battle ended with Freya in Folkvangr. As the primary recruiter of elite Viking fighters, her powers were on par, or even superior to, male gods like Odin and Thor.5 6
She was a woman of power and beauty. In the Norse myths, Freya is a deity to which both female as well as male traits were assigned. Two gender roles in one and the same person. That's a lady!
Sometimes Freya is depicted along an apple tree. The apple tree being a symbol for youth and specifically fertility, which is clearly on the female side.
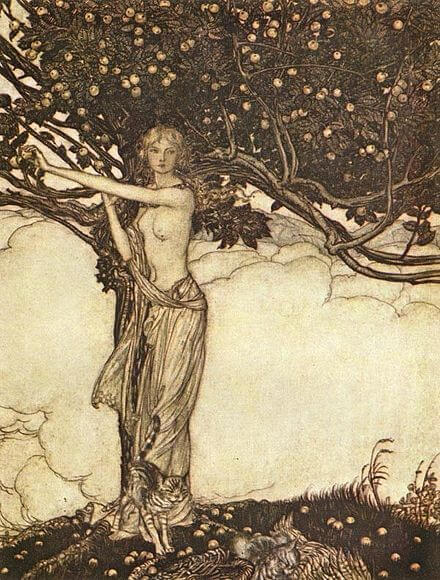
In my design of the human body, I want to depict the head of the deity Freya, being both powerful as well as sensual. Her expression must be radiating strenght, while I only suggest her sensuality by using apples as a 'crown' for her head. As such her head becomes the perfect mix of male and female characteristics. In that way she stands for a society without rigid gender stereotypes.
Workflow
Once my design was finalized, it was time to dive in the digital world to realize the body. We had been taught several technologies to help us along the way. The steps to take were as following:
- Capture an image of a human body by scanning or using software like MakeHuman.
- Adapt the image in Rhinoceros, 3D computer graphics and computer-aided design (CAD) application software.
- Use Slicer for Fusion 360 software to slice and convert the 3D model into 2D patterns.
- Cut out the patterns with a lasercutter.
- Assemble the pieces into a 3D model.
Capture a 3D image
In Amsterdam we have the Skanect scanning tool and the Sense plug and play scanner. We tried our hand on scanning our bodies with the Sense scanner.
These are the steps you need to follow to 3D scan with Sense:
- Open the Sense software on your computer.
- Specify what type of object you'll be scanning.
- Click "Start" on the computer screen.
- Slowly and steadily move the scanner around the subject while viewing the image on the screen.
- Once satisfied with the scan click "Finish" on the computer screen.
- The program has several edit tools to adjust and optimize the scan.
- Then you need to export the scan as an ".obj" file.
Our scans weren't great, so for my assignment I decided to continue with the MakeHuman software.
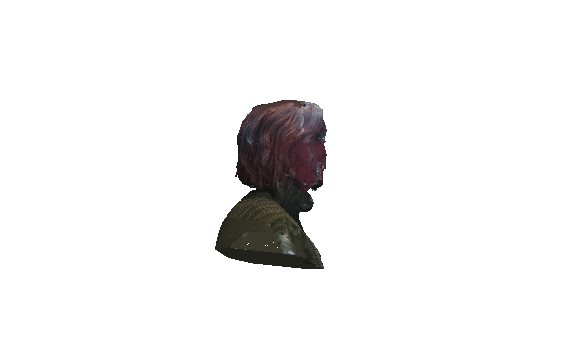
MakeHuman is a free and open source 3D computer graphics middleware designed for the prototyping of photorealistic humanoids. It is a pretty straightforward tool. With help of some simple menu's you can change and morph the body of your avatar. Since my plan was to focus on the head, I focused on defining the head features in the menu Geometries and the expression of the face in the menu Pose/Animate. I aimed for a female head radiating strenght and power. Once satisfied (although I found my avatar quite frightening) I exported the MakeHuman result as an ".obj" file.

Screenshot of MakeHuman avatar by Marieke van Eyndhoven
Adapt the image in Rhinoceros
My vision for my design was simple. I wanted to depict Freya's head sourrounded by apples and apple tree leafs.
The steps I followed in Rhino were as following:
- With the command "Box" I boxed in all the body parts I wanted to delete (everything apart from the head).
- The command "BooleanSplit" did split the different body parts, so that I could copy the head.
- With the command "Sphere" I created bigger and smaller spheres, which I morphed with the head by the command "BooleanUnion".
- The command "Cylinder" helped me to draw a cylinder, which I first lenghtened with the command "Scale2D", and then bent with the command "Bend" and also morphed with the head.
- I created a large plateau for the head to stand on with the command "Cylinder".
- Then I did draw with a free-form line half an apple form in 2D. With the command "Revolve" I was able to draw abstract 3D apple forms, which I placed on the plateau.
- Finally I selected my object and with the command "Export Selected" I created my Rhino ".obj" file.
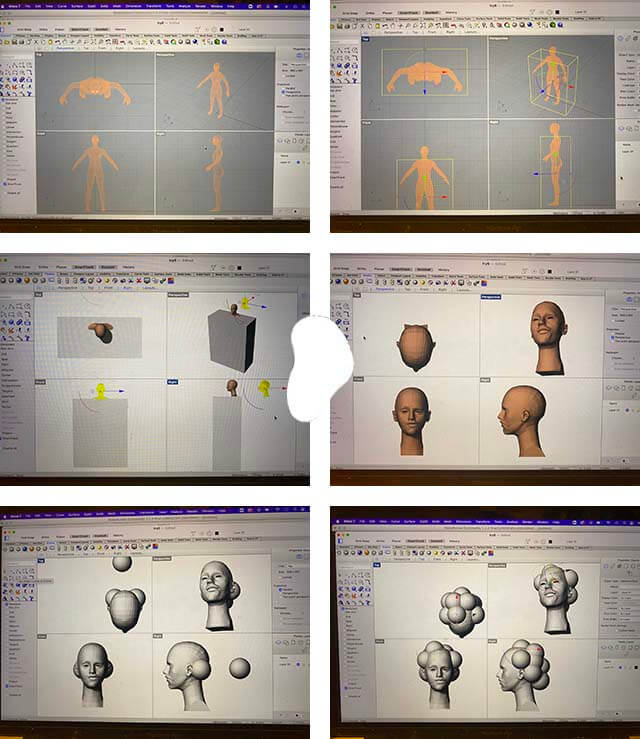
Screenshots of process in Rhino by Marieke van Eyndhoven
Screenshots of final result in Rhino by Marieke van Eyndhoven
Slice and convert to 2D patterns
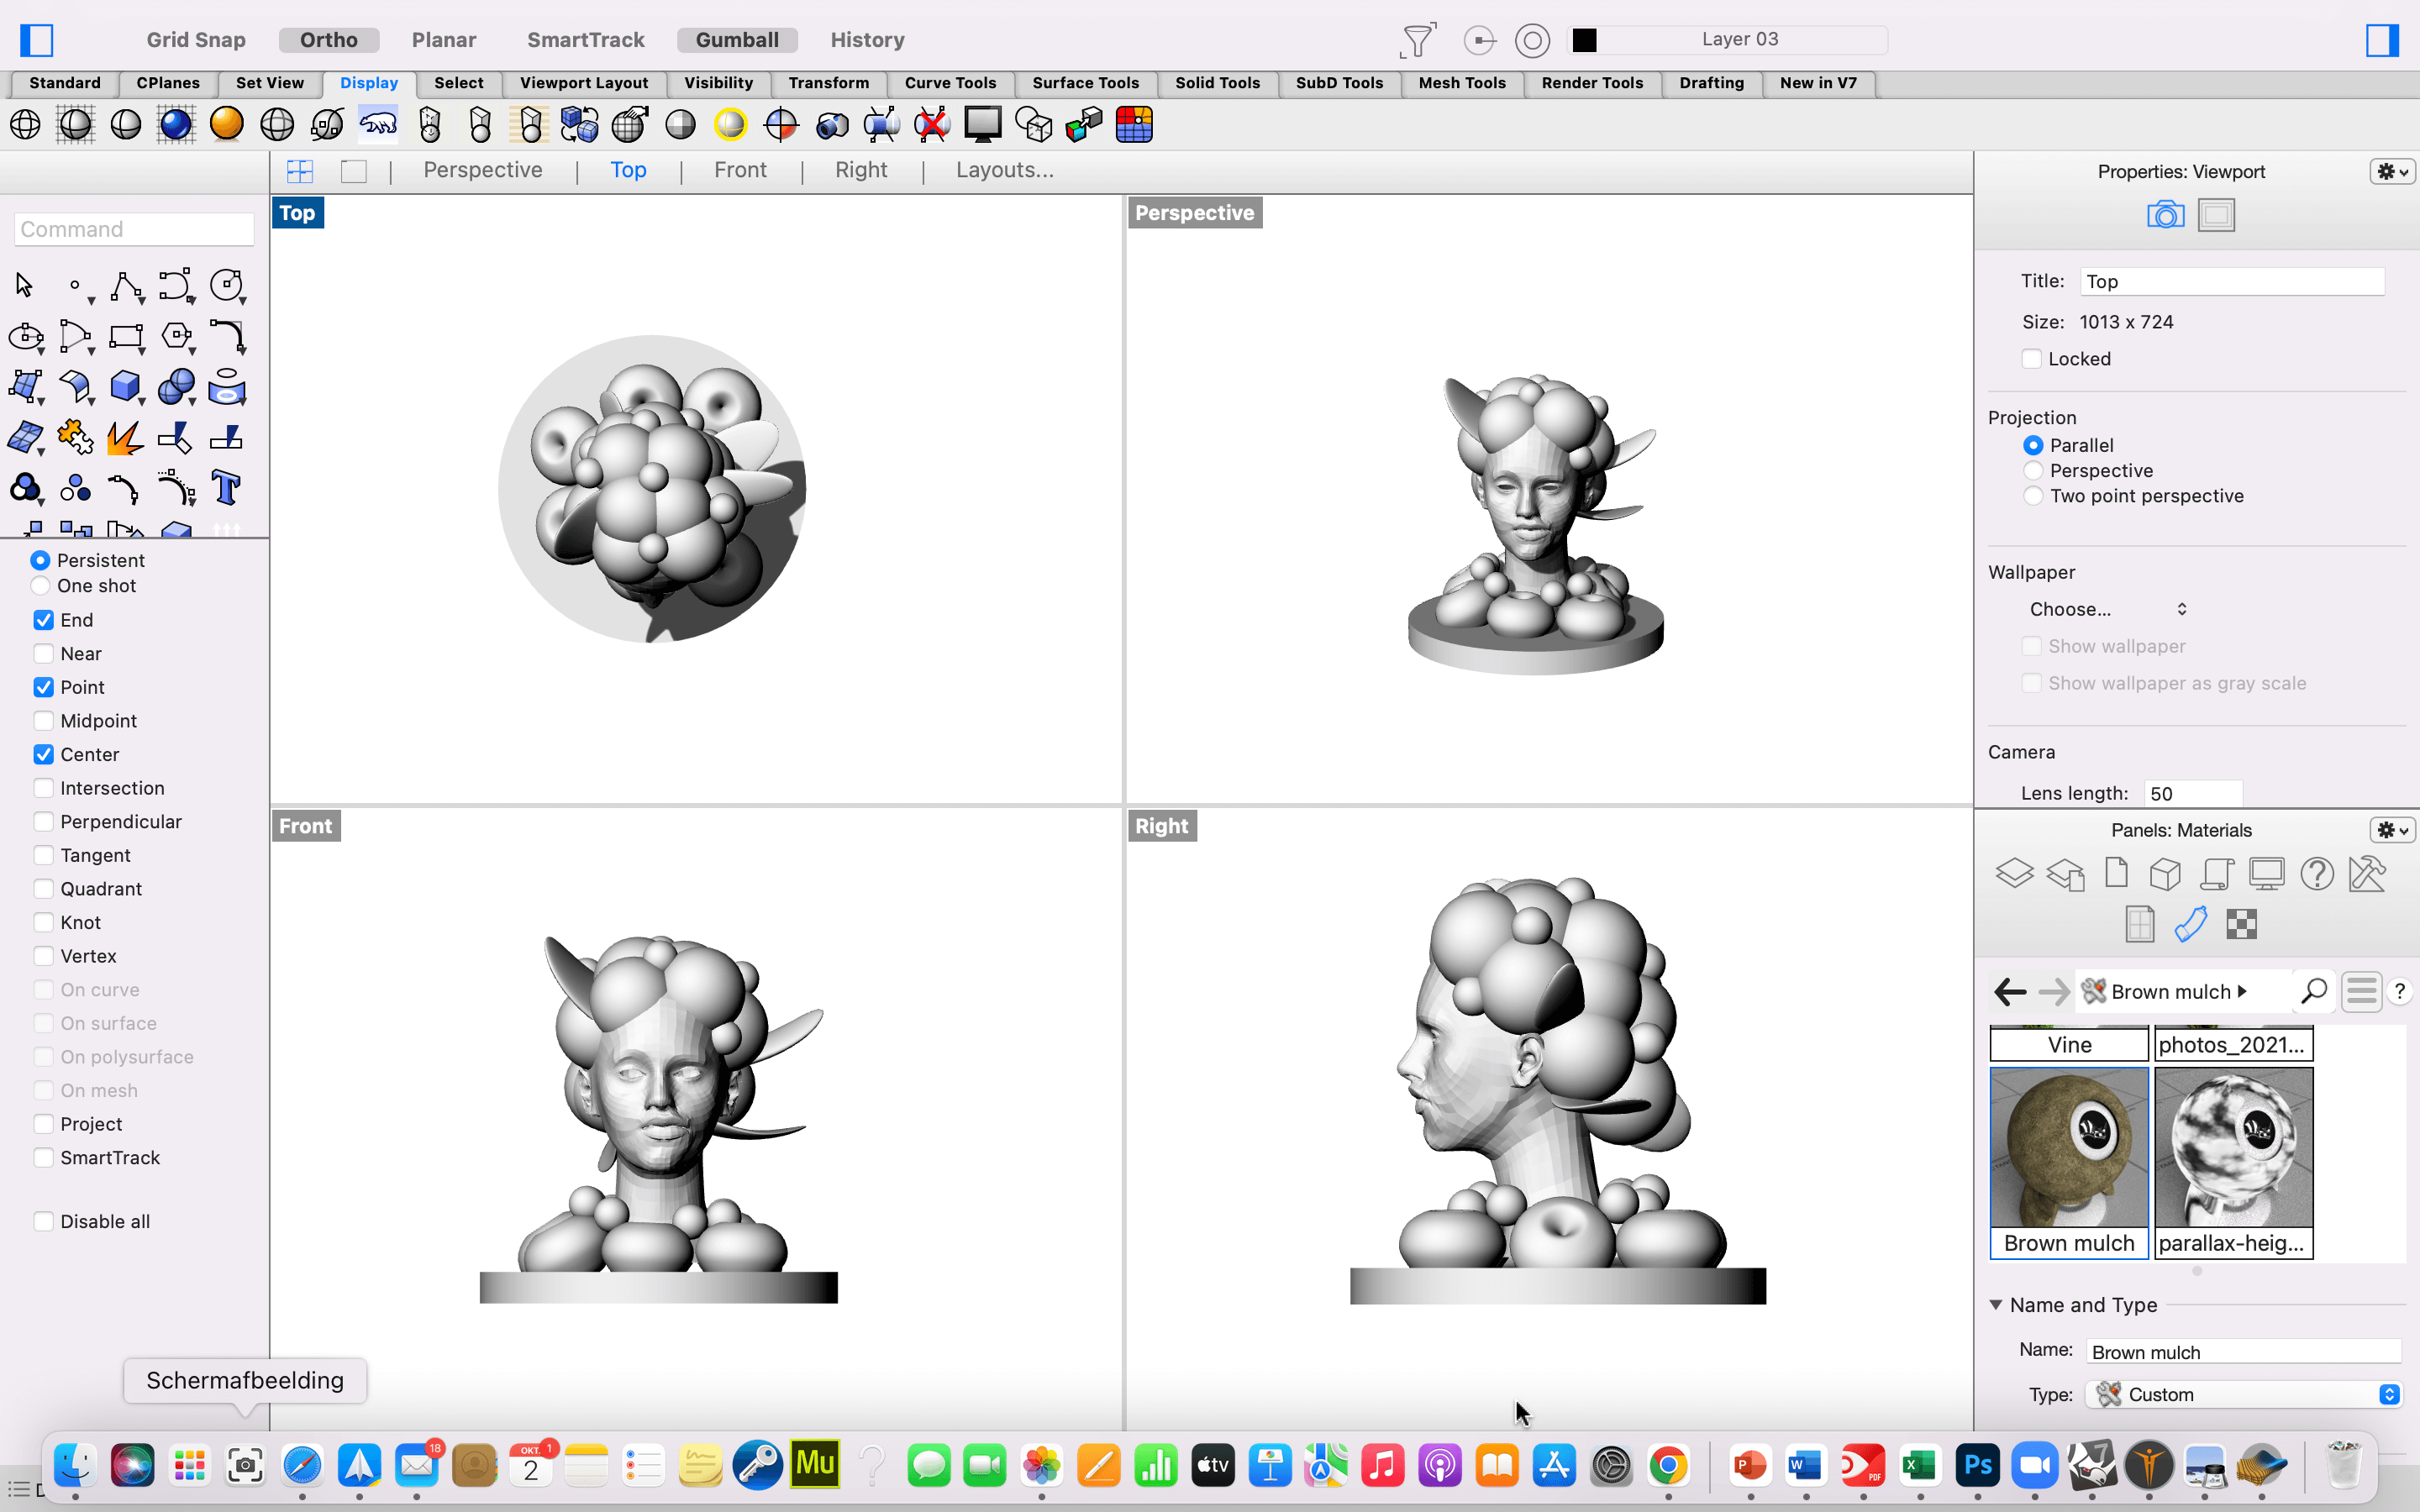
Slicer for Fusion 360 is an incredible piece of software that turns your 3D models into artefacts. It slices and converts 3D models into 2D patterns that you can laser cut out of any flat material. It is also very easy to use.
These are the steps I followed to slice my patterns:
- I imported my Rhino ".obj" file.
- By clicking on the pencil icon, I created a customised setting for the material I intended to use (cardboard with dimensions L=1160 x W=760 x H=3 mm).
- I set the units in the correct dimension (I selected mm) and defined my desired height of the 3d model.
- You can choose from several assembling techniques (as I desired a full form, I chose the "Stacked Slices" ).
- I checked there were no errors in my design, prohibiting the cutting and assembly.
- I click on "Get Plans" and selected the ".dxf" format and "mm" as units of measurement and then I clicked on "Save" to keep the Slicer file for later use.
Although Slicer is very easy to handle I ran into some issues. These had to do with my detailed design. In first instance I selected a desired height for my head of 400 mm and tilted the axis of my stacked slices form. Those choices resulted in 11 sheets in the plan. Way beyond the desired scope of this project of 2-3 sheets to be cut. I did it again, whereby I reduced the height to 300 mm and left the stacked slice axis just vertical. This helped as I now got 4 sheets of patterns in the plan. Since the cylindric plateau in the design was pretty heigh, I got 8 sizeable cylinder patterns which took a lot of space. I decided to delete 6 out of 8. The room I saved could be used to copy the smaller patterns of the fourth sheet. Voila, I had my 3 sheets in the plan!
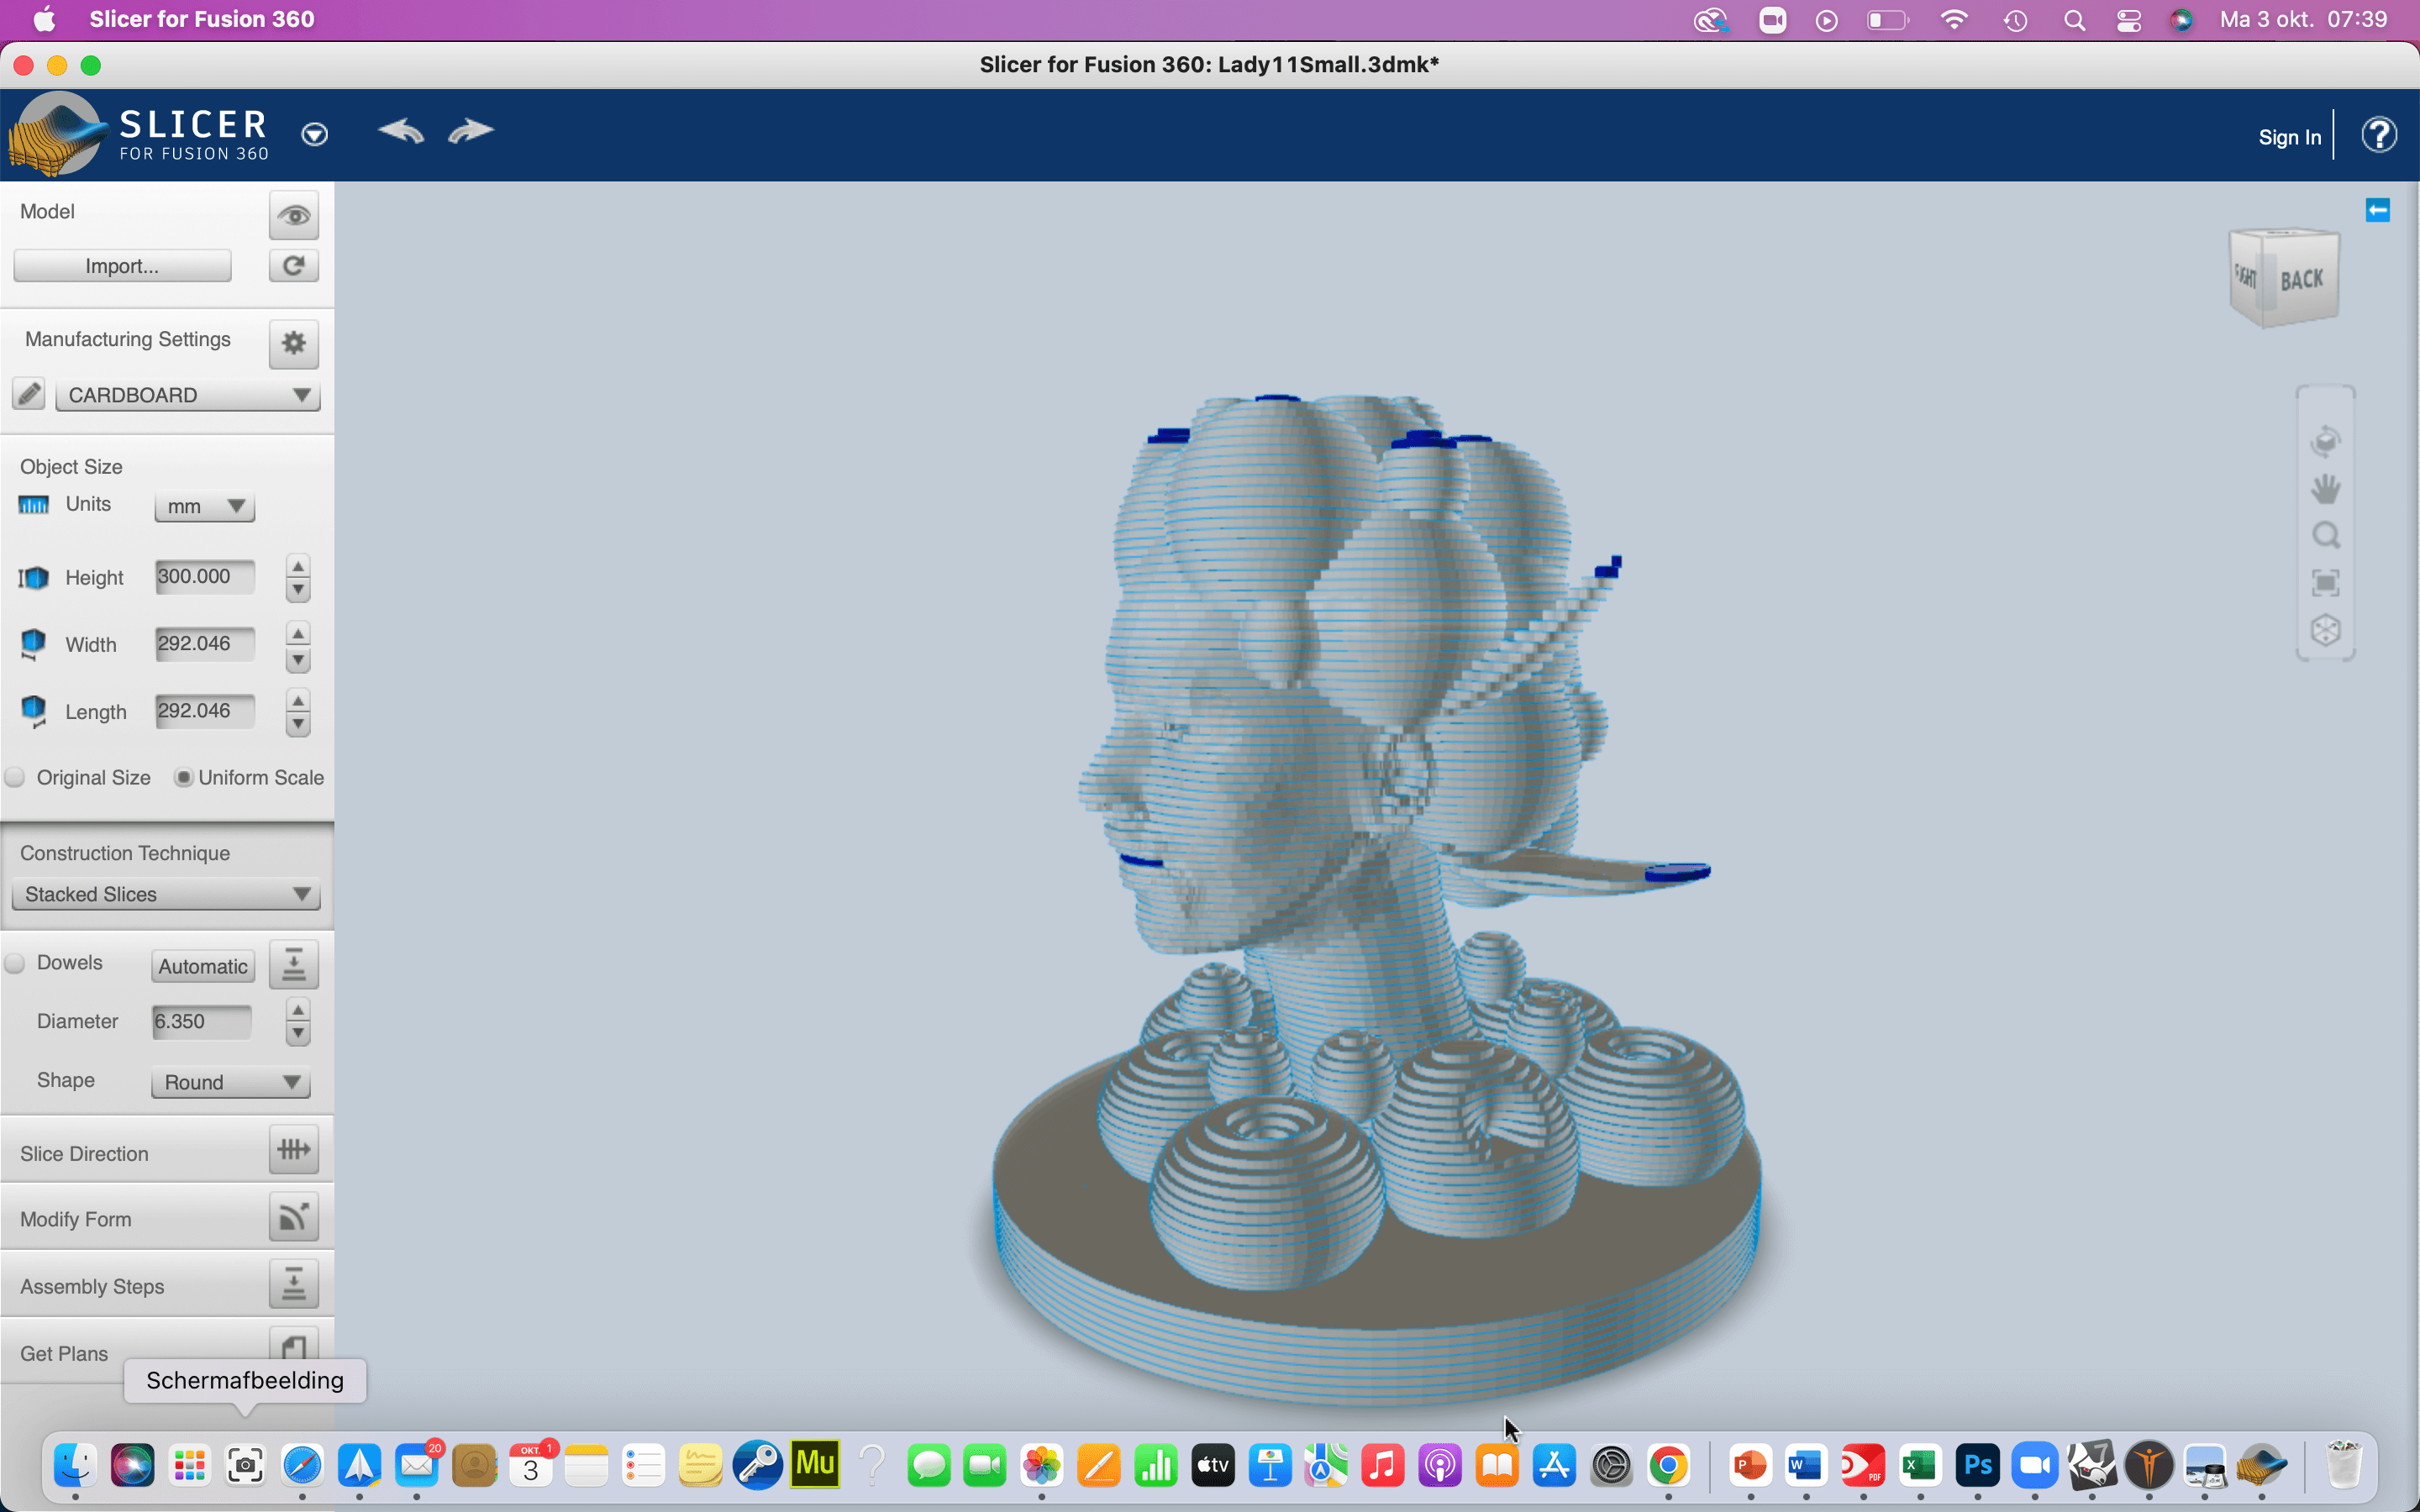
Screenshot of stacked model in Slicer by Marieke van Eyndhoven
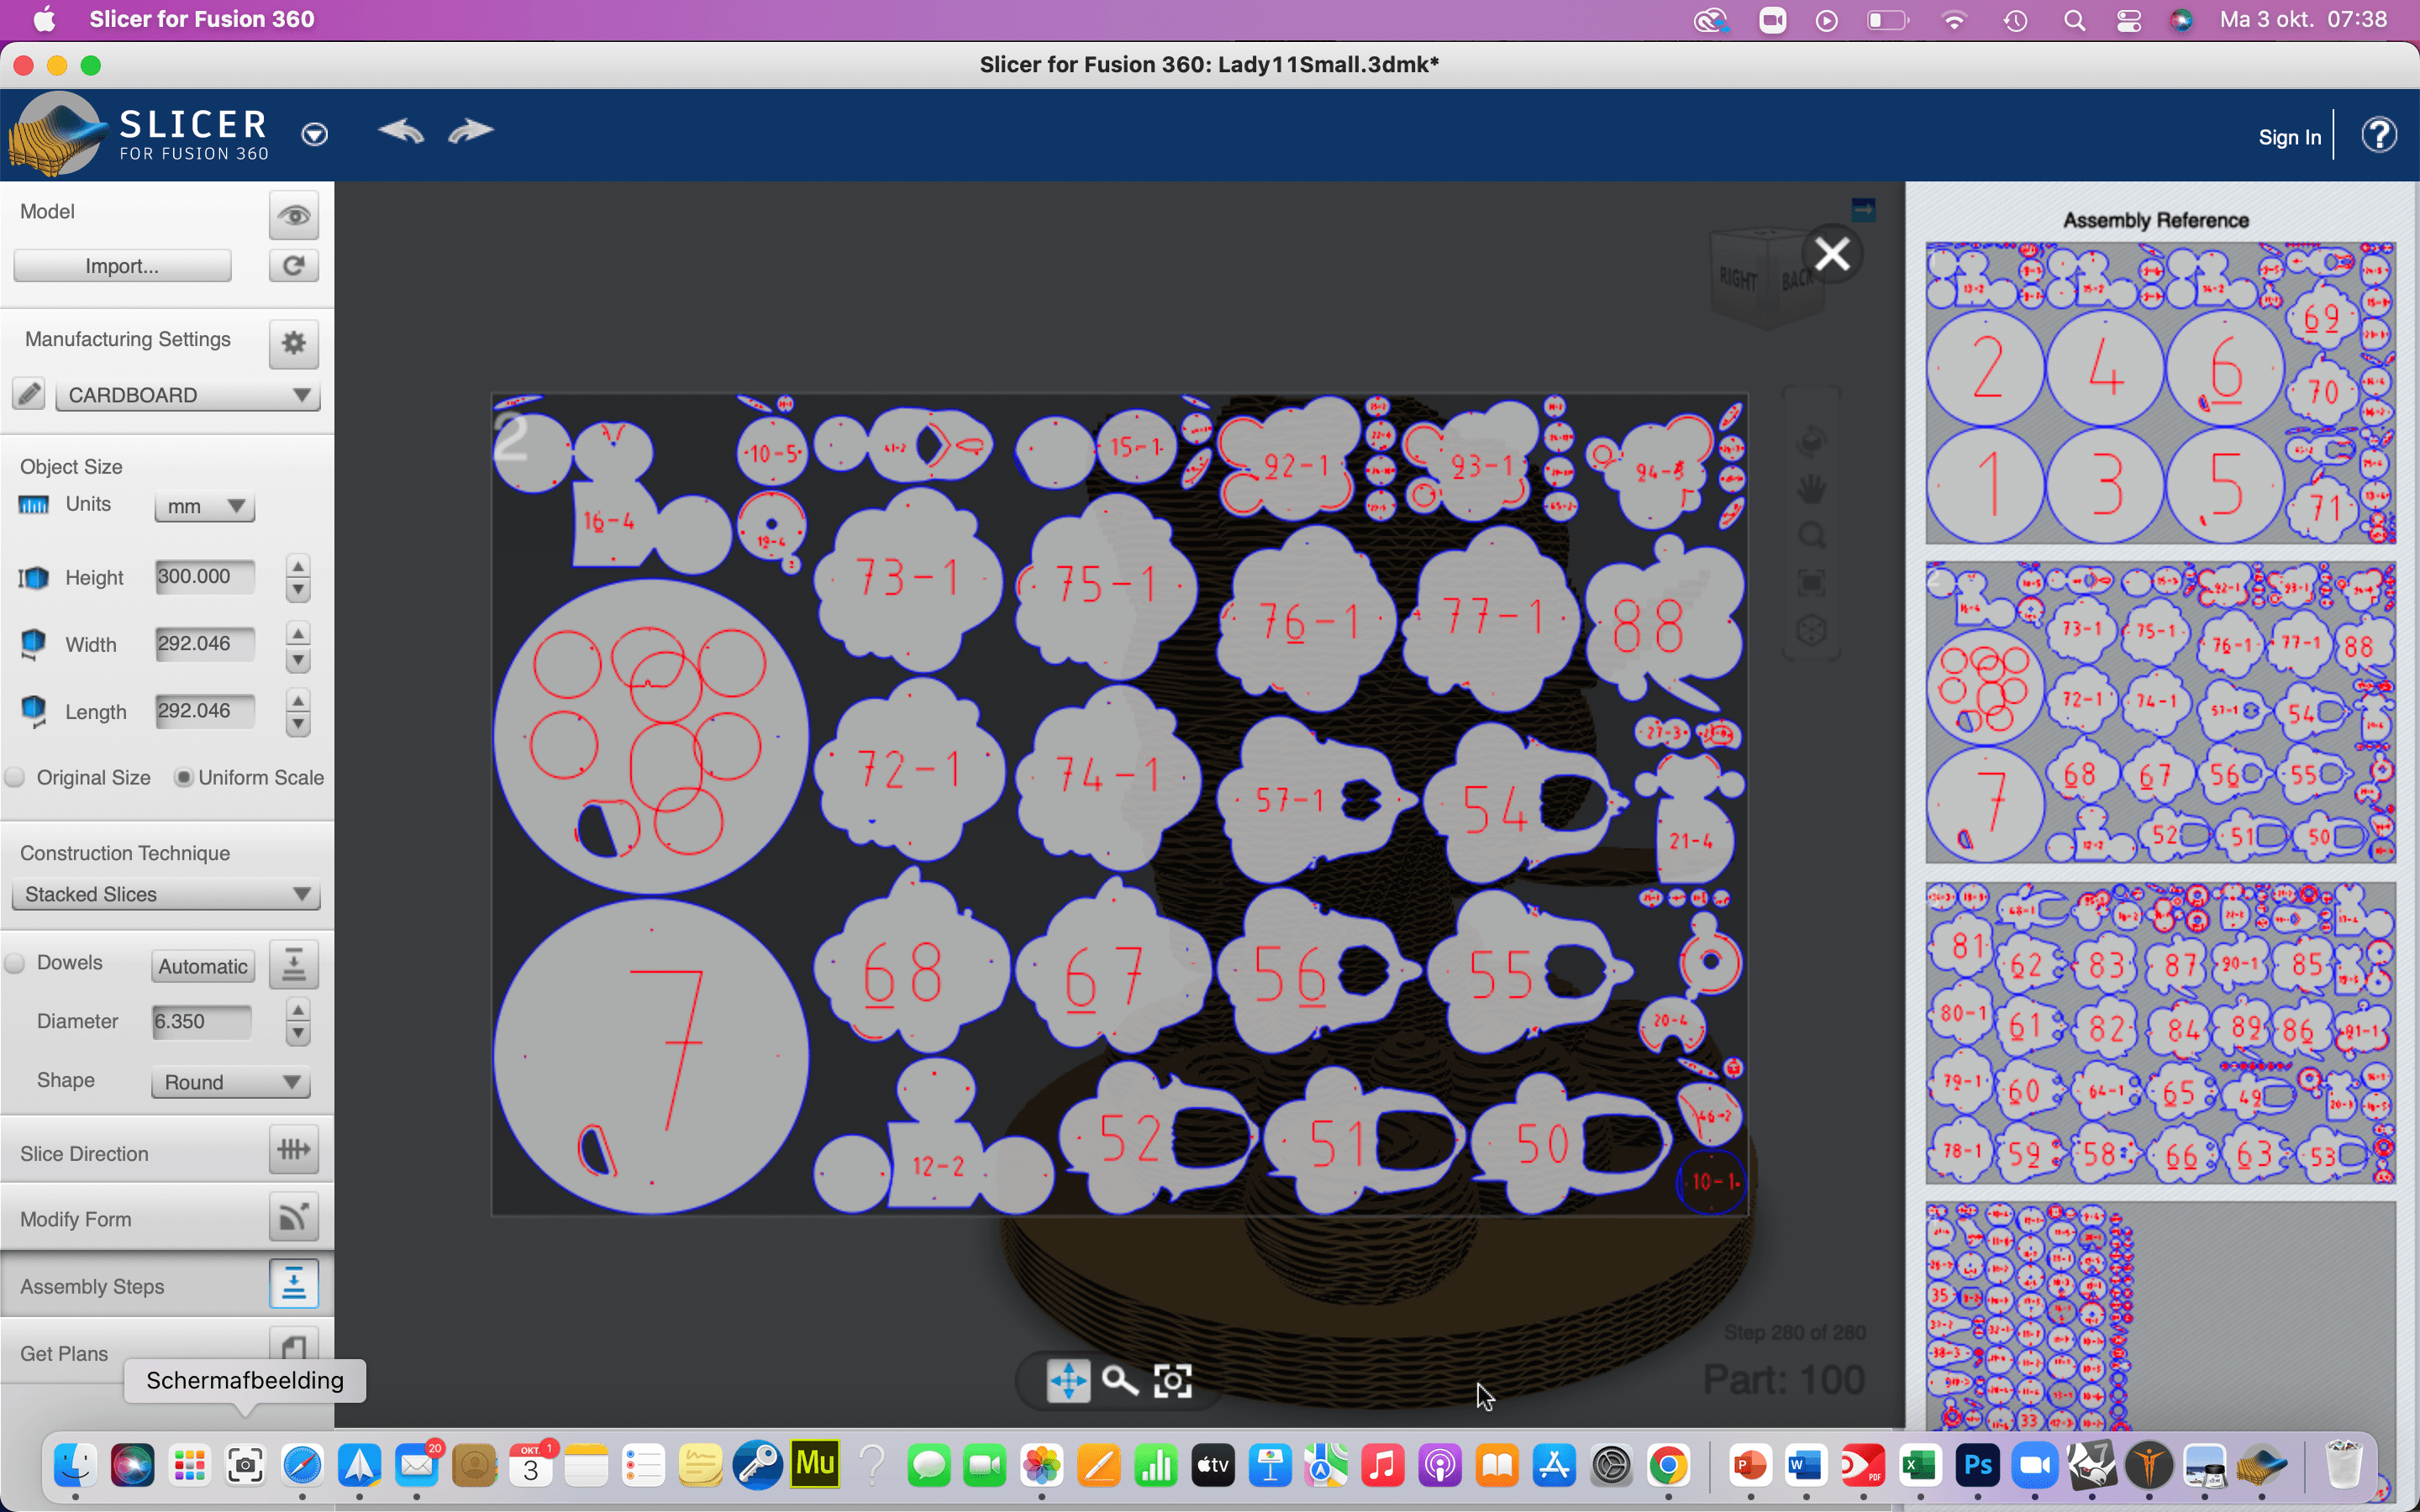
Screenshot of plan with pattern sheets in Slicer by Marieke van Eyndhoven
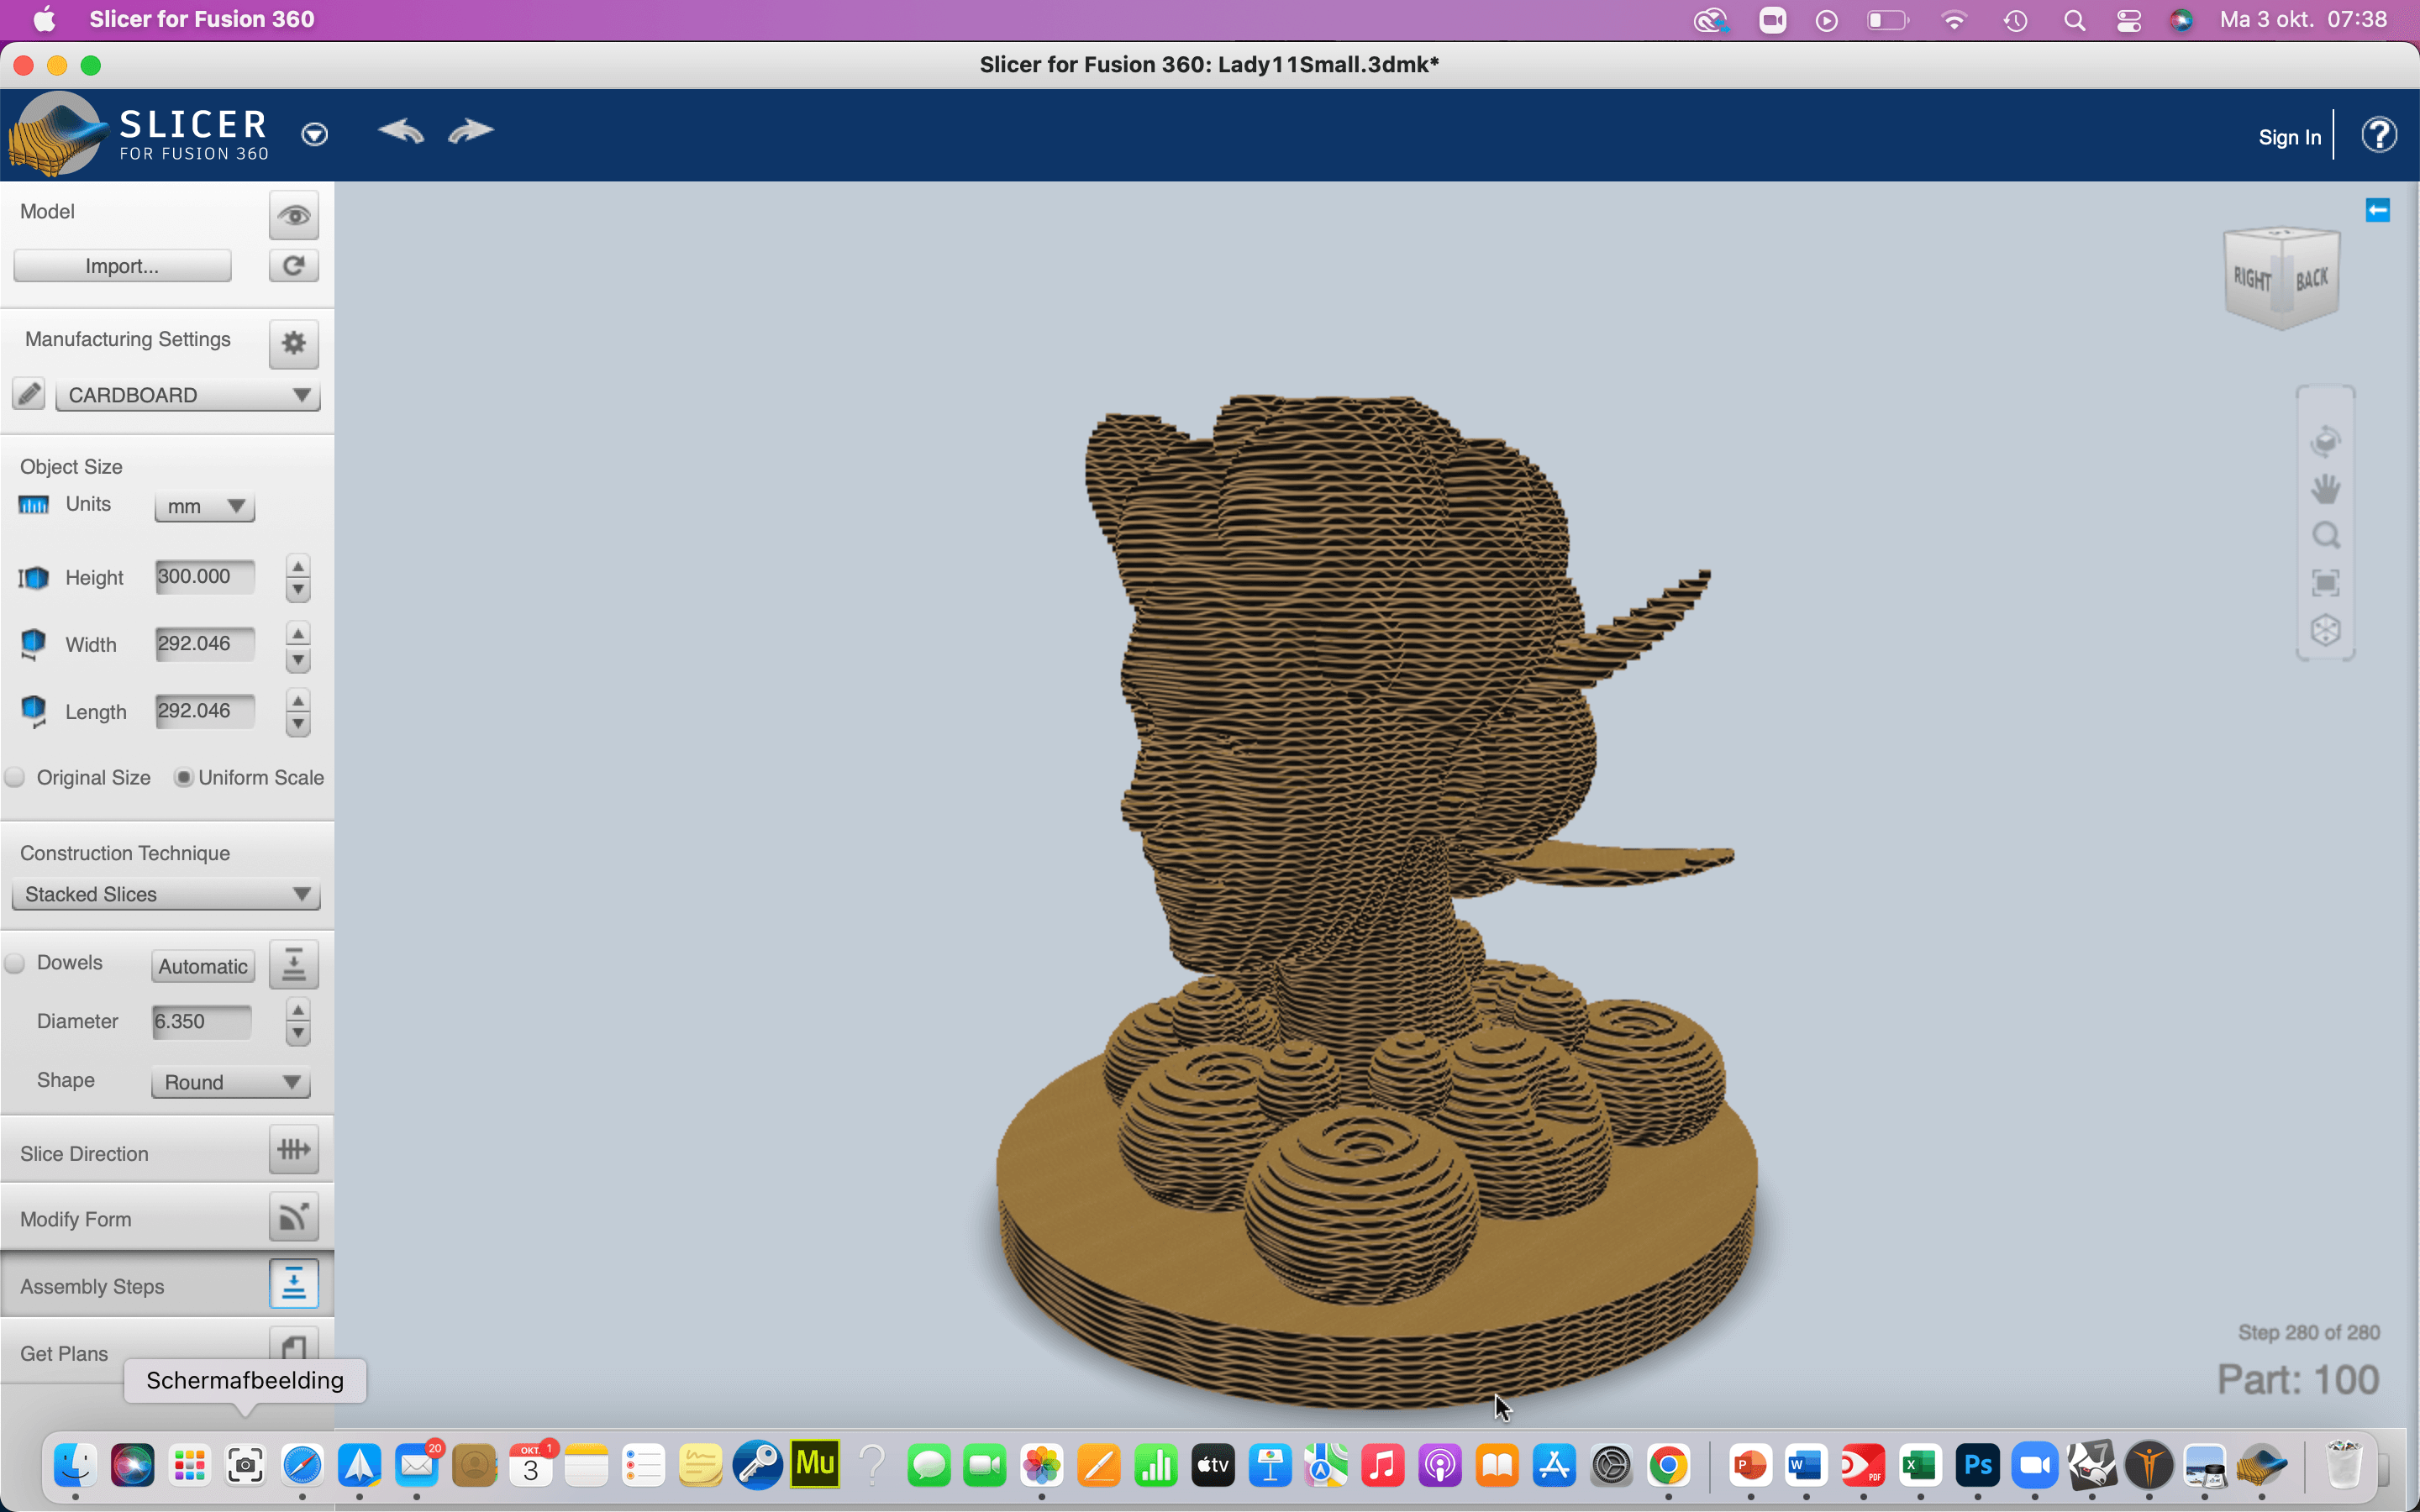
Screenshot of assembly video in Slicer by Marieke van Eyndhoven
Cut out the patterns with a laser cutter
Essentially, laser cutting is a fabrication process that uses a thin, focused, laser beam to cut and etch materials into custom designs, patterns, and shapes as specified by a designer. This non-contact, thermal-based fabrication process is ideal for several materials, including wood, glass, paper, metal, plastic, and gemstone. It’s also capable of producing intricate parts without needing a custom-designed tool. The main choices you have to make is selecting the speed and the power. The speed setting defines how fast the laser head will move. The slower the head moves, the deeper the cut will be. The power setting defines the intensity of the laser beam. The higher the power, the deeper the cut will be.
In Amsterdam we have a goldie oldie BRM laser cutter. And boy she works! For my model I selected cardboard of 3 mm height. Those cardboard sheets had a width of 760 mm and a lenght of 1160 mm.
Before we dived into cutting our sheet patterns, together with Bea we first run a test sheet to judge what power and speed settings would give the best results.
From the test I decided I wanted to adhere to the following settings:
- Text - Line (engraving) - speed 100 - power - 10
- Open spaces - Line (cutting) - speed 60 - power 65
These are the steps I followed to cut my patterns:
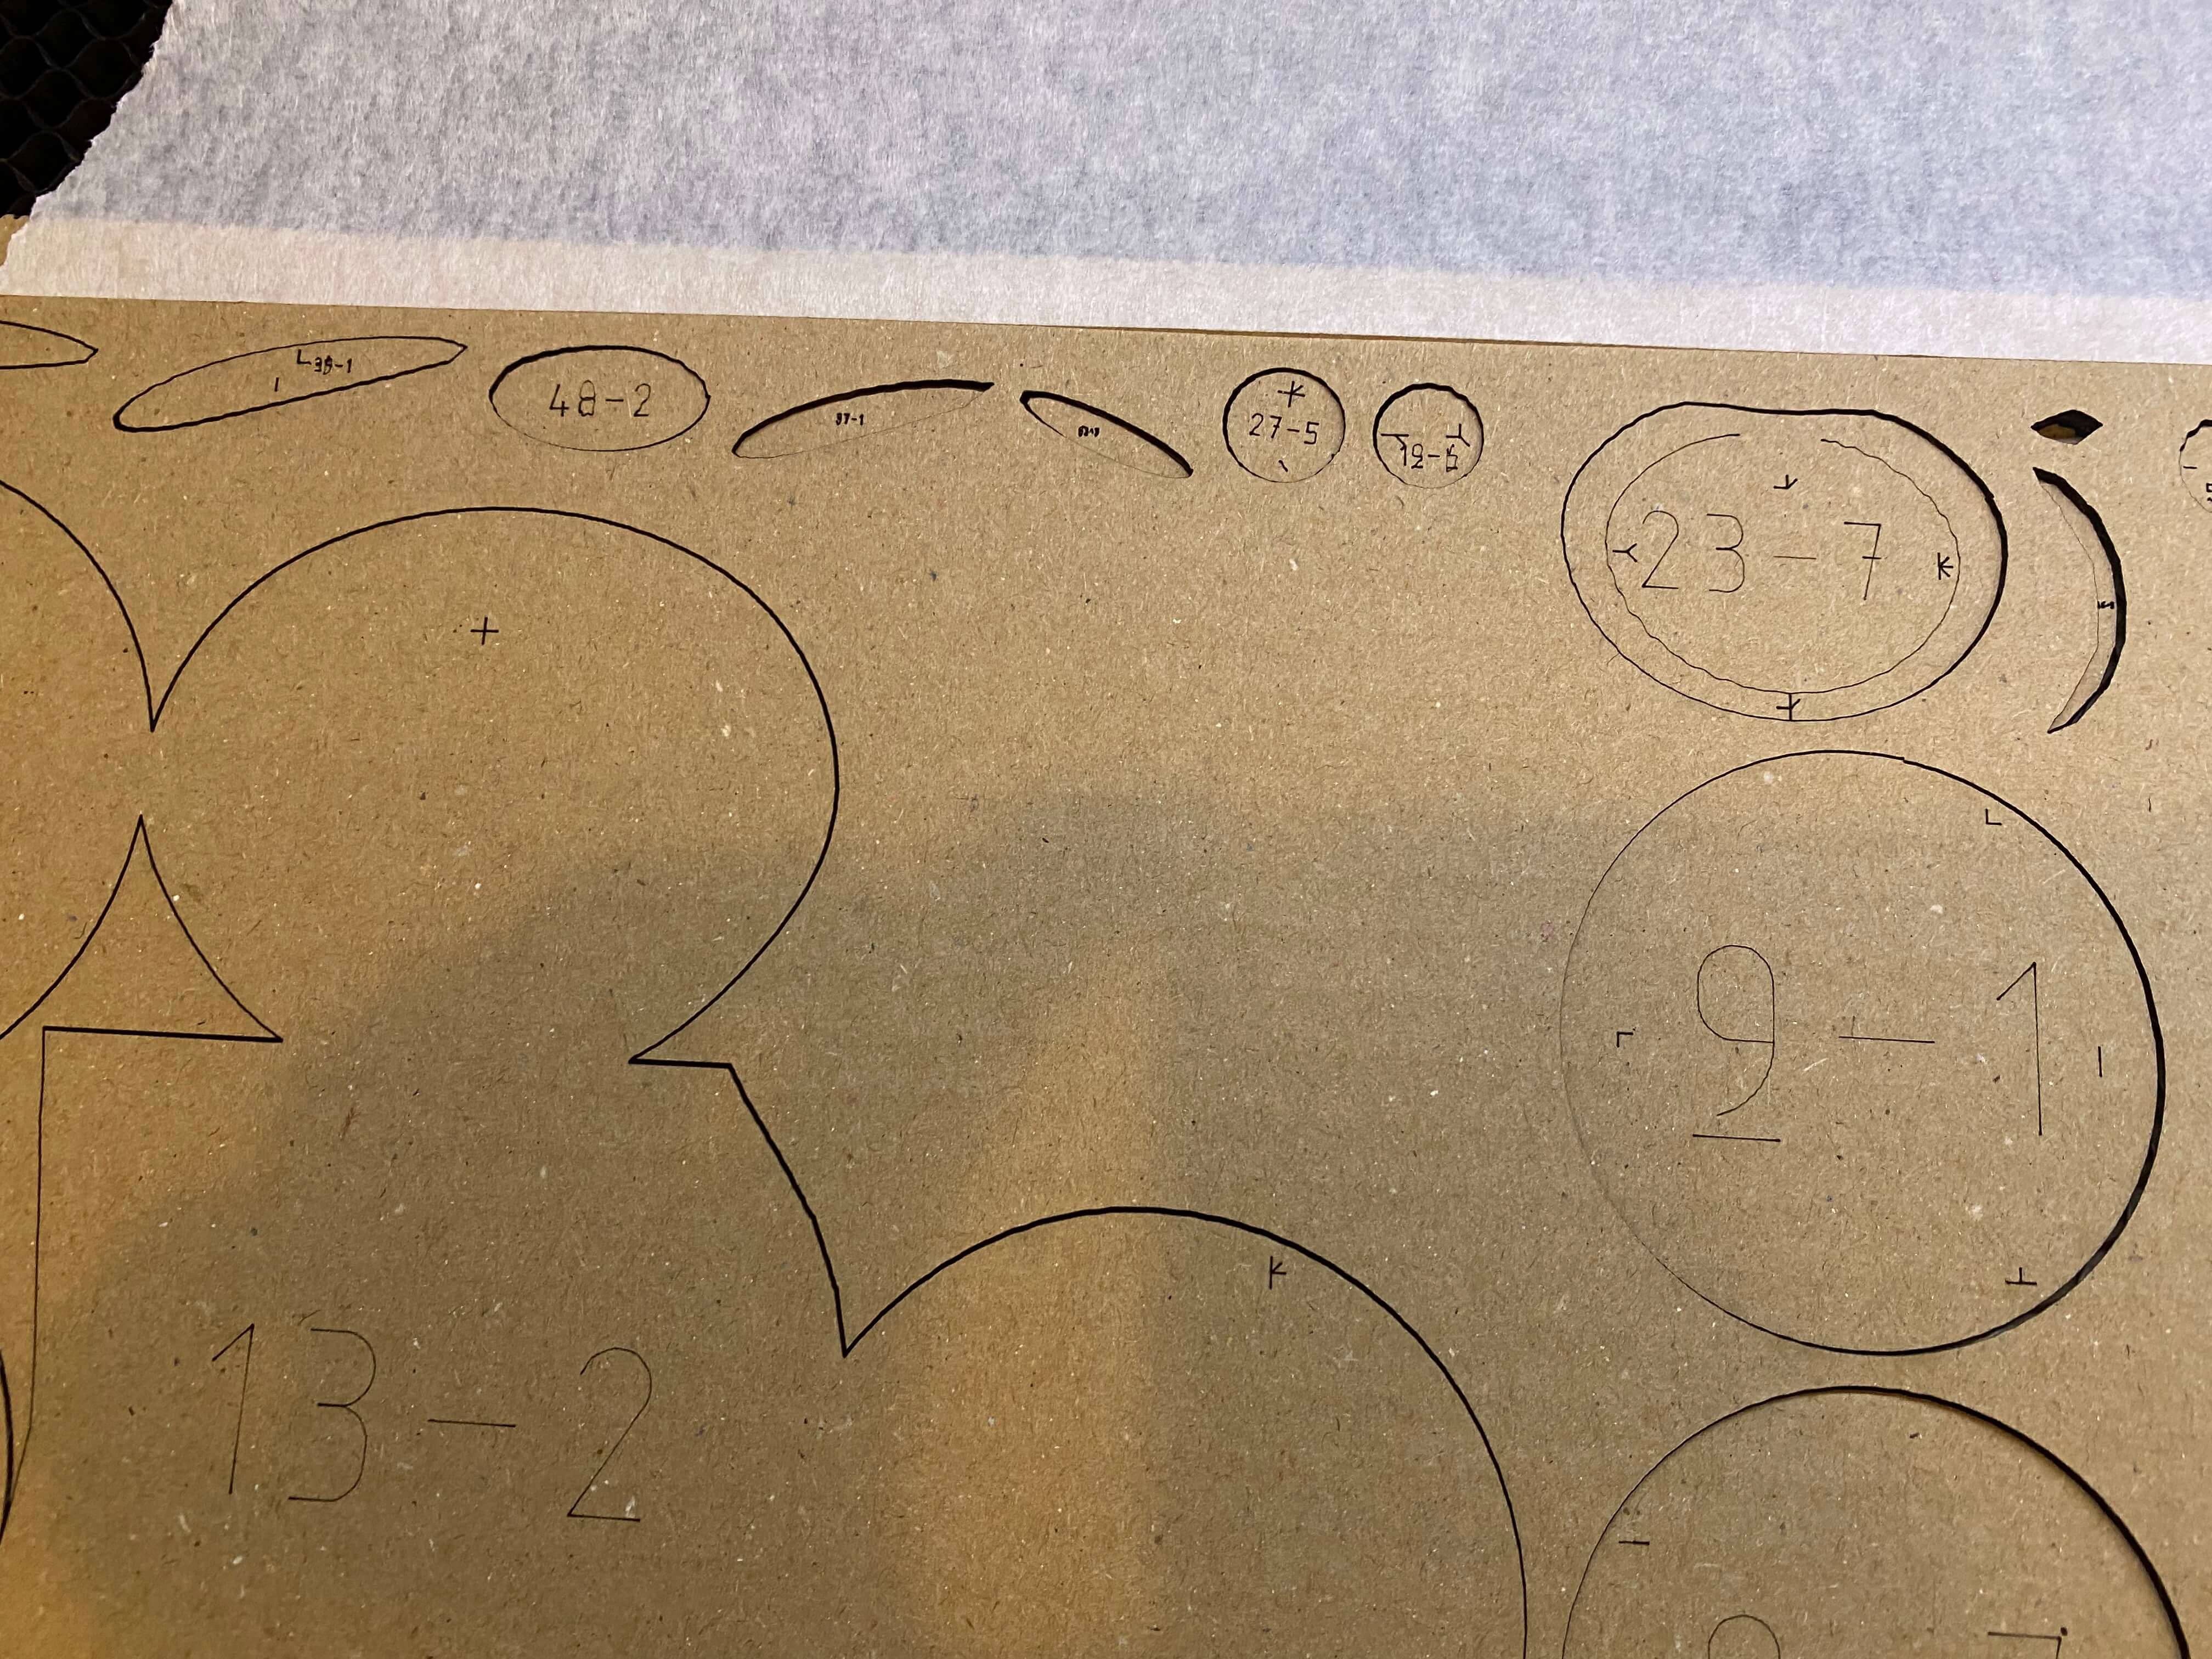
- I uploaded my Slicer ".dxf" sheets in the laser Lightburn software.
- Firstly I color coded the pattern numbers, the sheet frame and the open space lines in three different colors, in order to make sure I could set the power and speed for each of those elements to different values.
- While reviewing the sheets I noticed that Slicer had pictured a lot of dowels to help the later assembly. Since those dowels would take up a lot of cutting time, Michelle advised to remove those. Michelle run a little script in Adobe Illustrator whereby all figures of the same size were removed (thank you Michelle for all the great support!).7
- I again imported the optimized Adobe Illustrator sheets in Lightburn.
- On the computer screen I studied the placement of the open space patterns, when they were to close to the frame, I moved them slightly inwards.
- When all open space patterns were correctly placed, I set the power and speed for the text engraving and open space line cutting.
So far so good with Lightburn, time for the laser cutter:
- After the files were correctly set up I switched on the laser power.
- I placed the first cardboard sheet in the middle of the laser cutter.
- In Lightburn I placed the origin of the Laser head in the bottom left corner and adjusted the cardboard sheet accordingly.
- With a special measurement tool I measured the distance between the laser head and the top of the cardboard at different places on the cardboard sheet. This distance needs to be exact 12,10 mm.
- I clicked on "Frame" in Lightburn. This command lets the laser head run a full round. In doing so you can check if the laser head will stay within all four edges of the cardboard.
- After the framing was complete I taped the cardboard to the metal layer of the laser cutter.
- In Lightburn I removed the layer in which the frame image was present (we didn't want that to be cut).
- I switched on the air blower.
- And after switching on the laser power, I started the laser cutter in the Lightburn software for some magic!
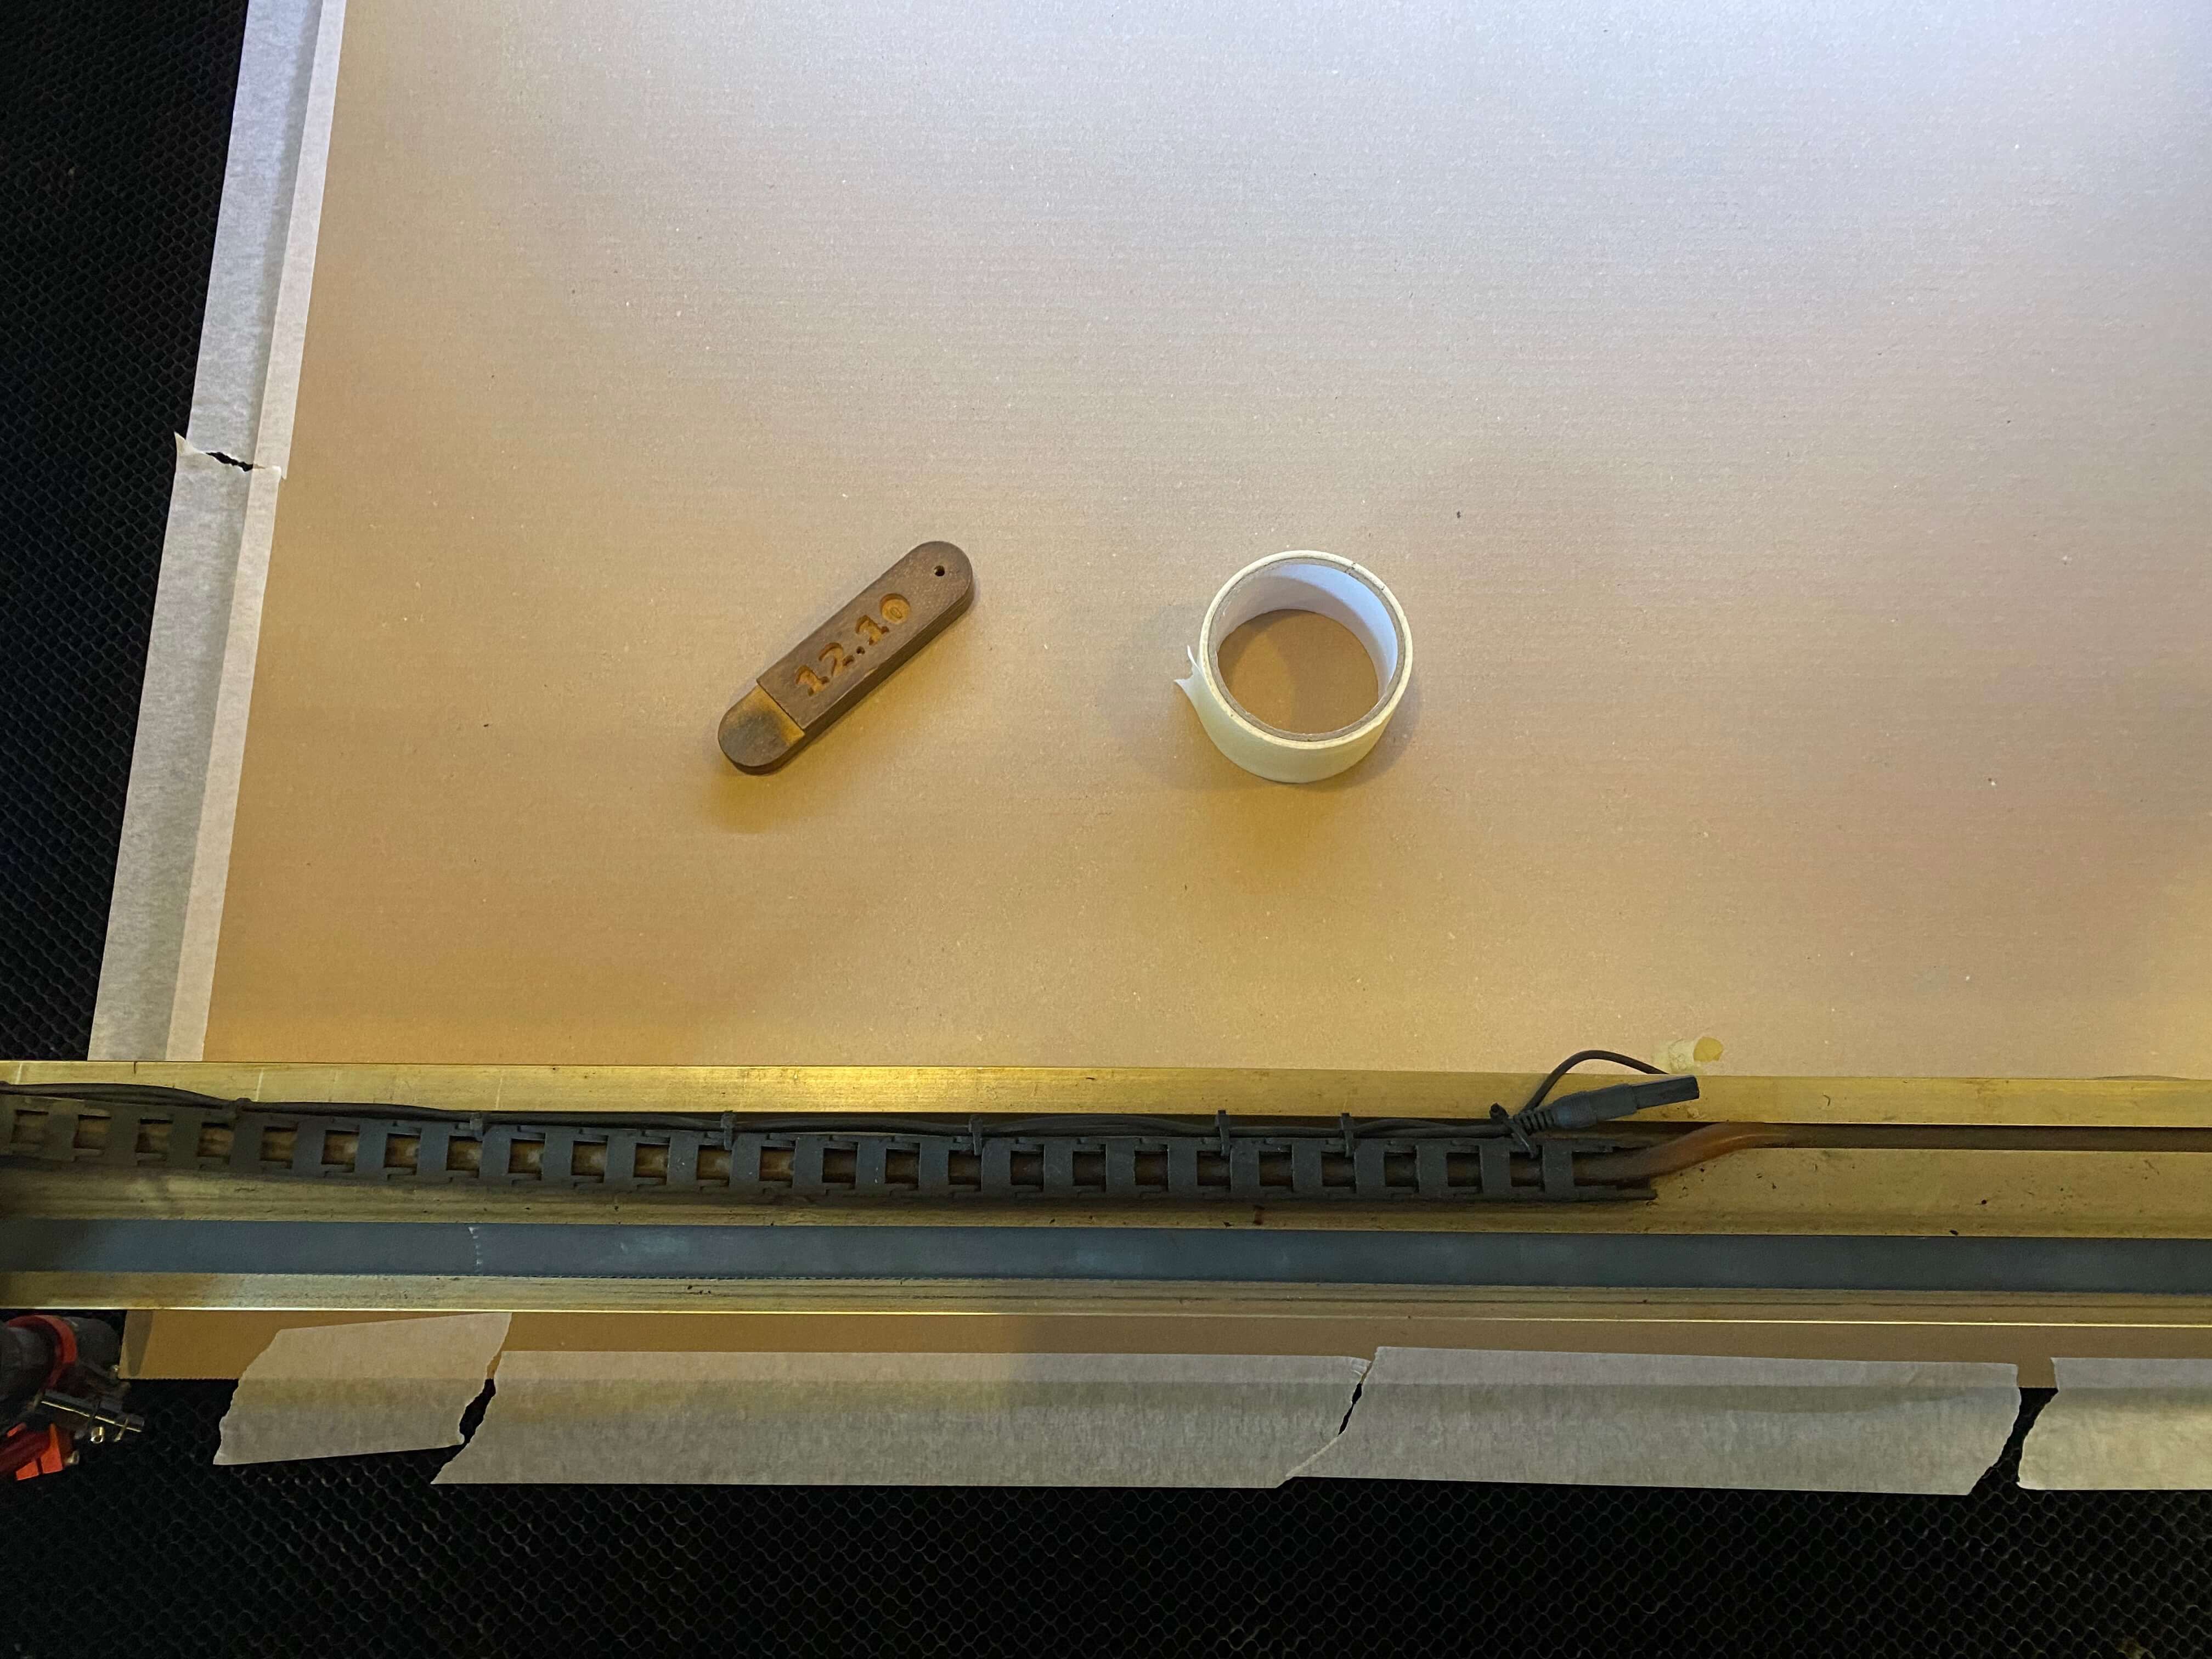
Photo of measuring block by Marieke van Eyndhoven
Well done laser!, photo by Marieke van Eyndhoven
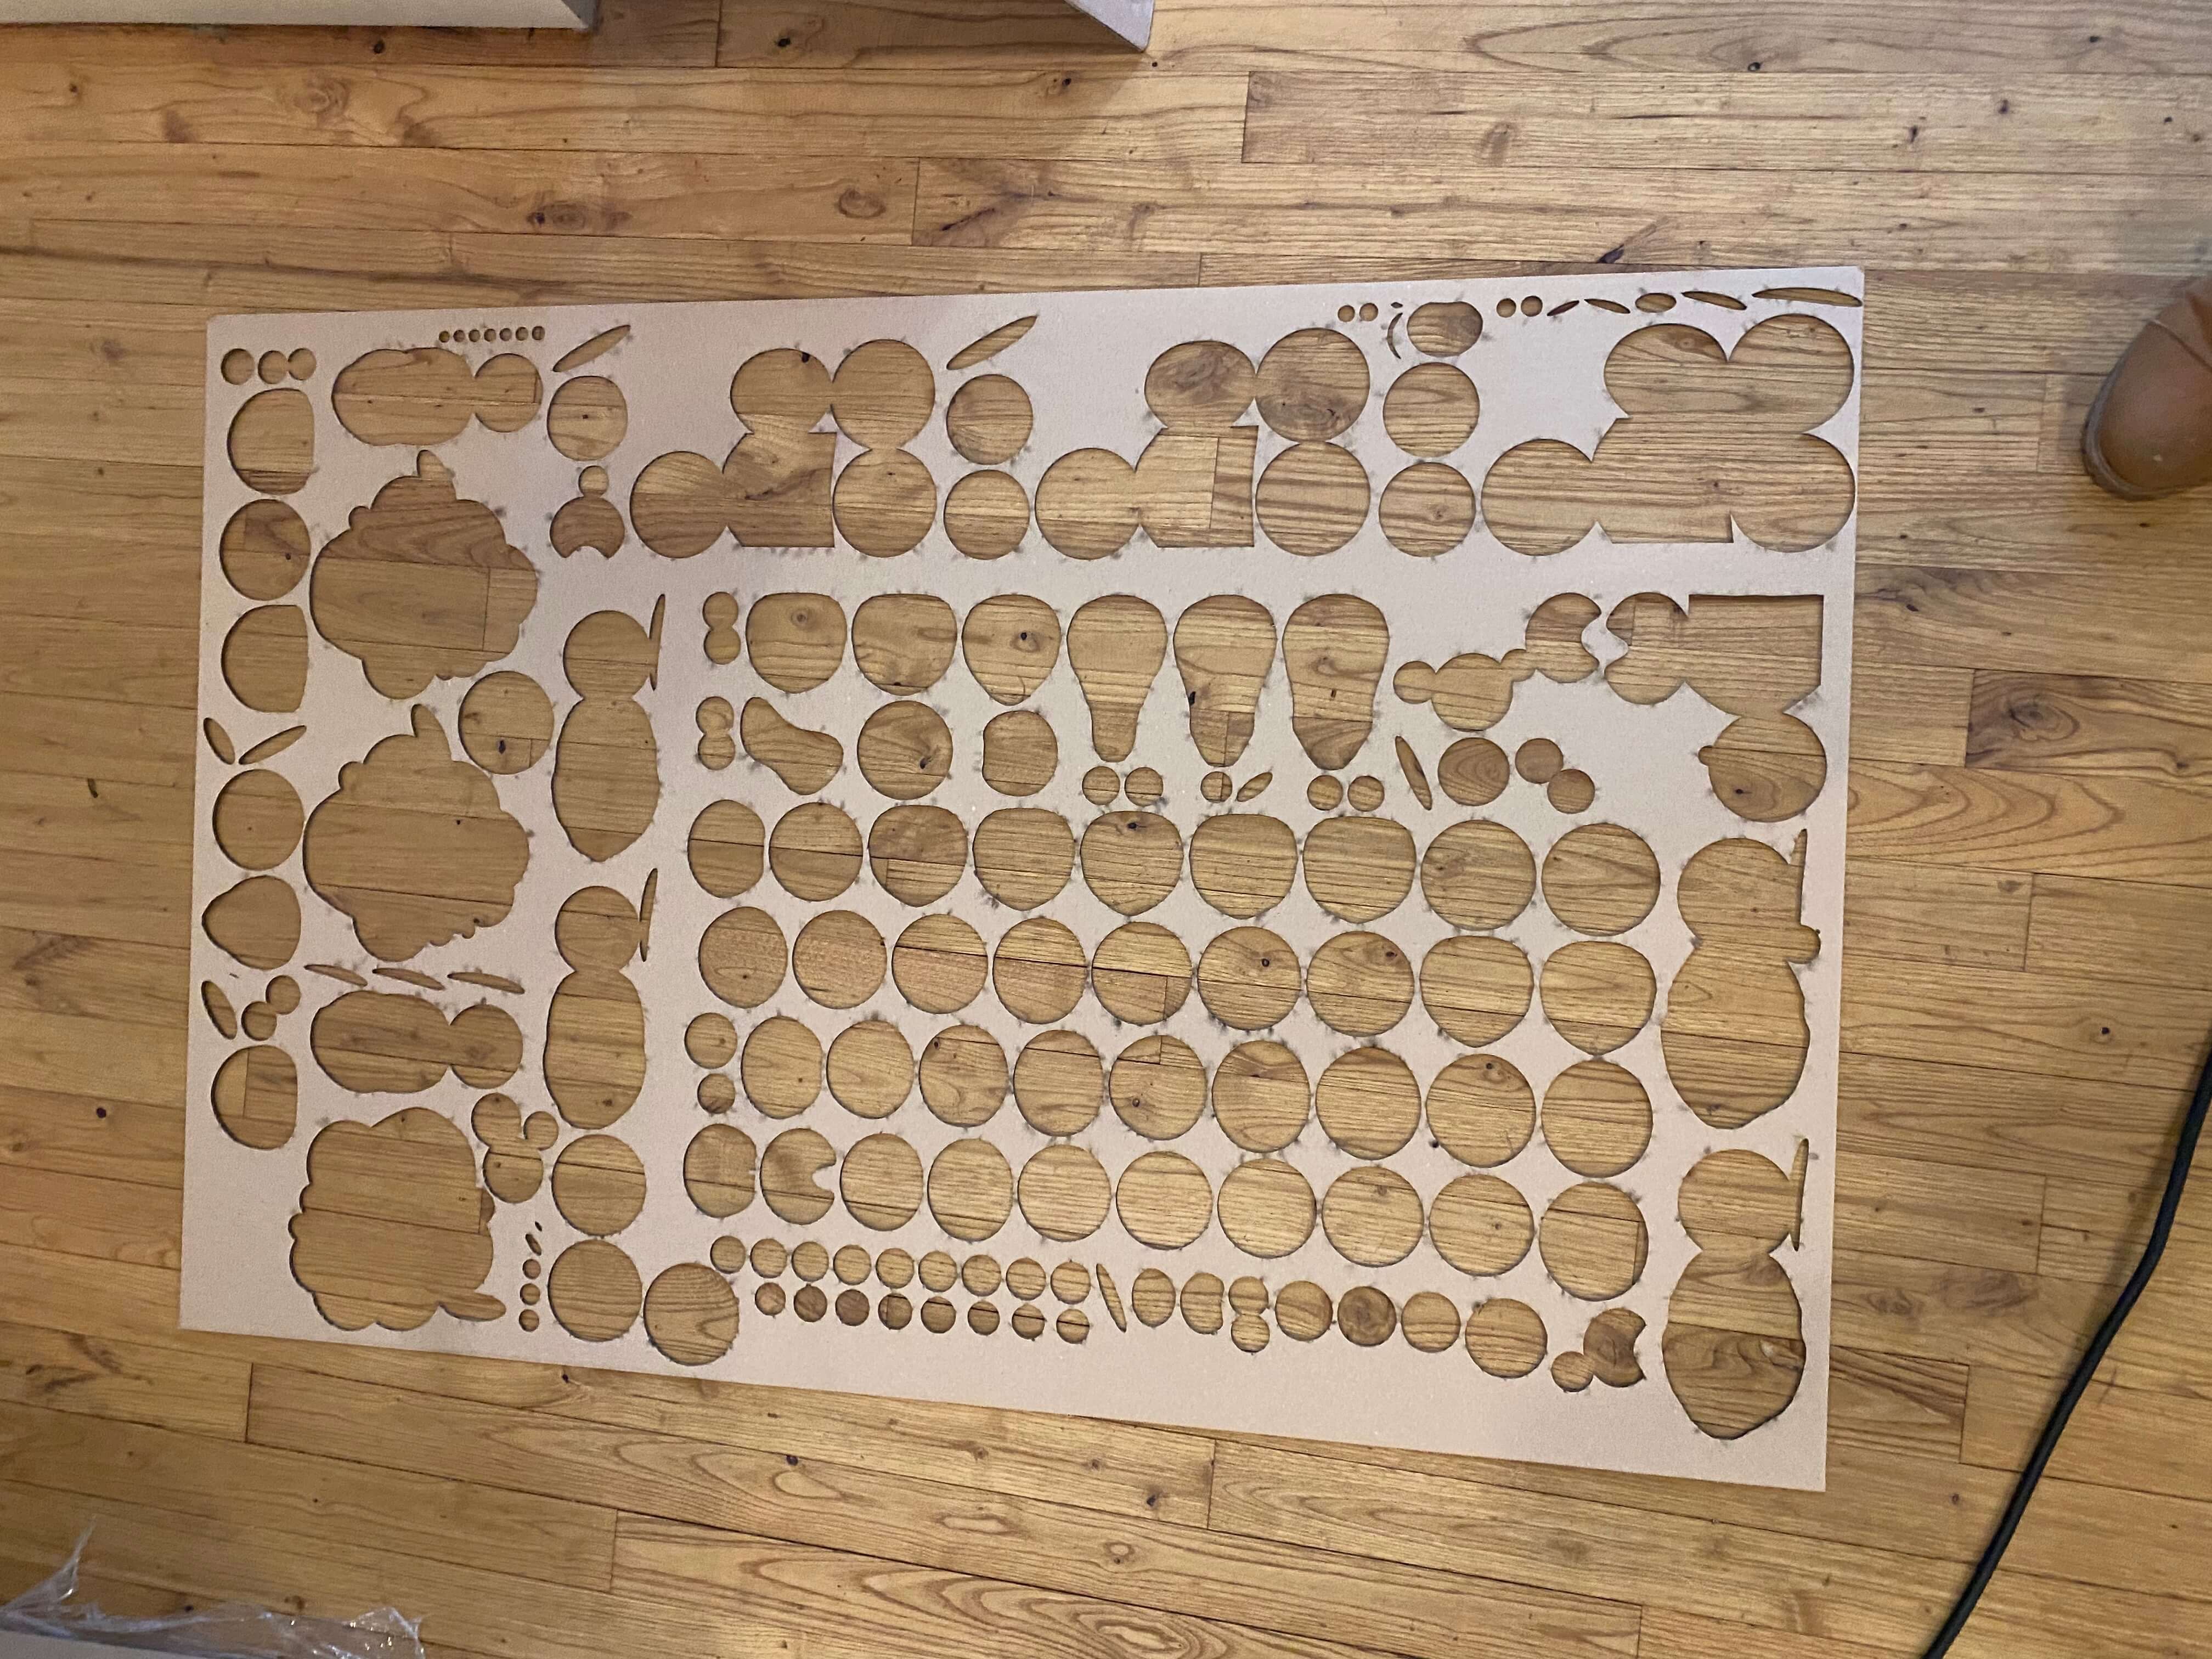
The sheet after cutting, photo by Marieke van Eyndhoven
Laser cutting from Marieke van Eyndhoven on Vimeo.
Assemble the pieces into a 3D model
Once the laser cutter had done its work, it was time to build the 3d model. At that moment I realized why Michelle had urged me to not go for the stacked slices technique, but for a more simple slicing choice. Sitting in front of a pile of 280 individual pieces is a bit disheartening. But with a tube of glue, a glass of wine and the assembly step video in Slicer I got to the end!
Starting the assembly from Marieke van Eyndhoven on Vimeo.
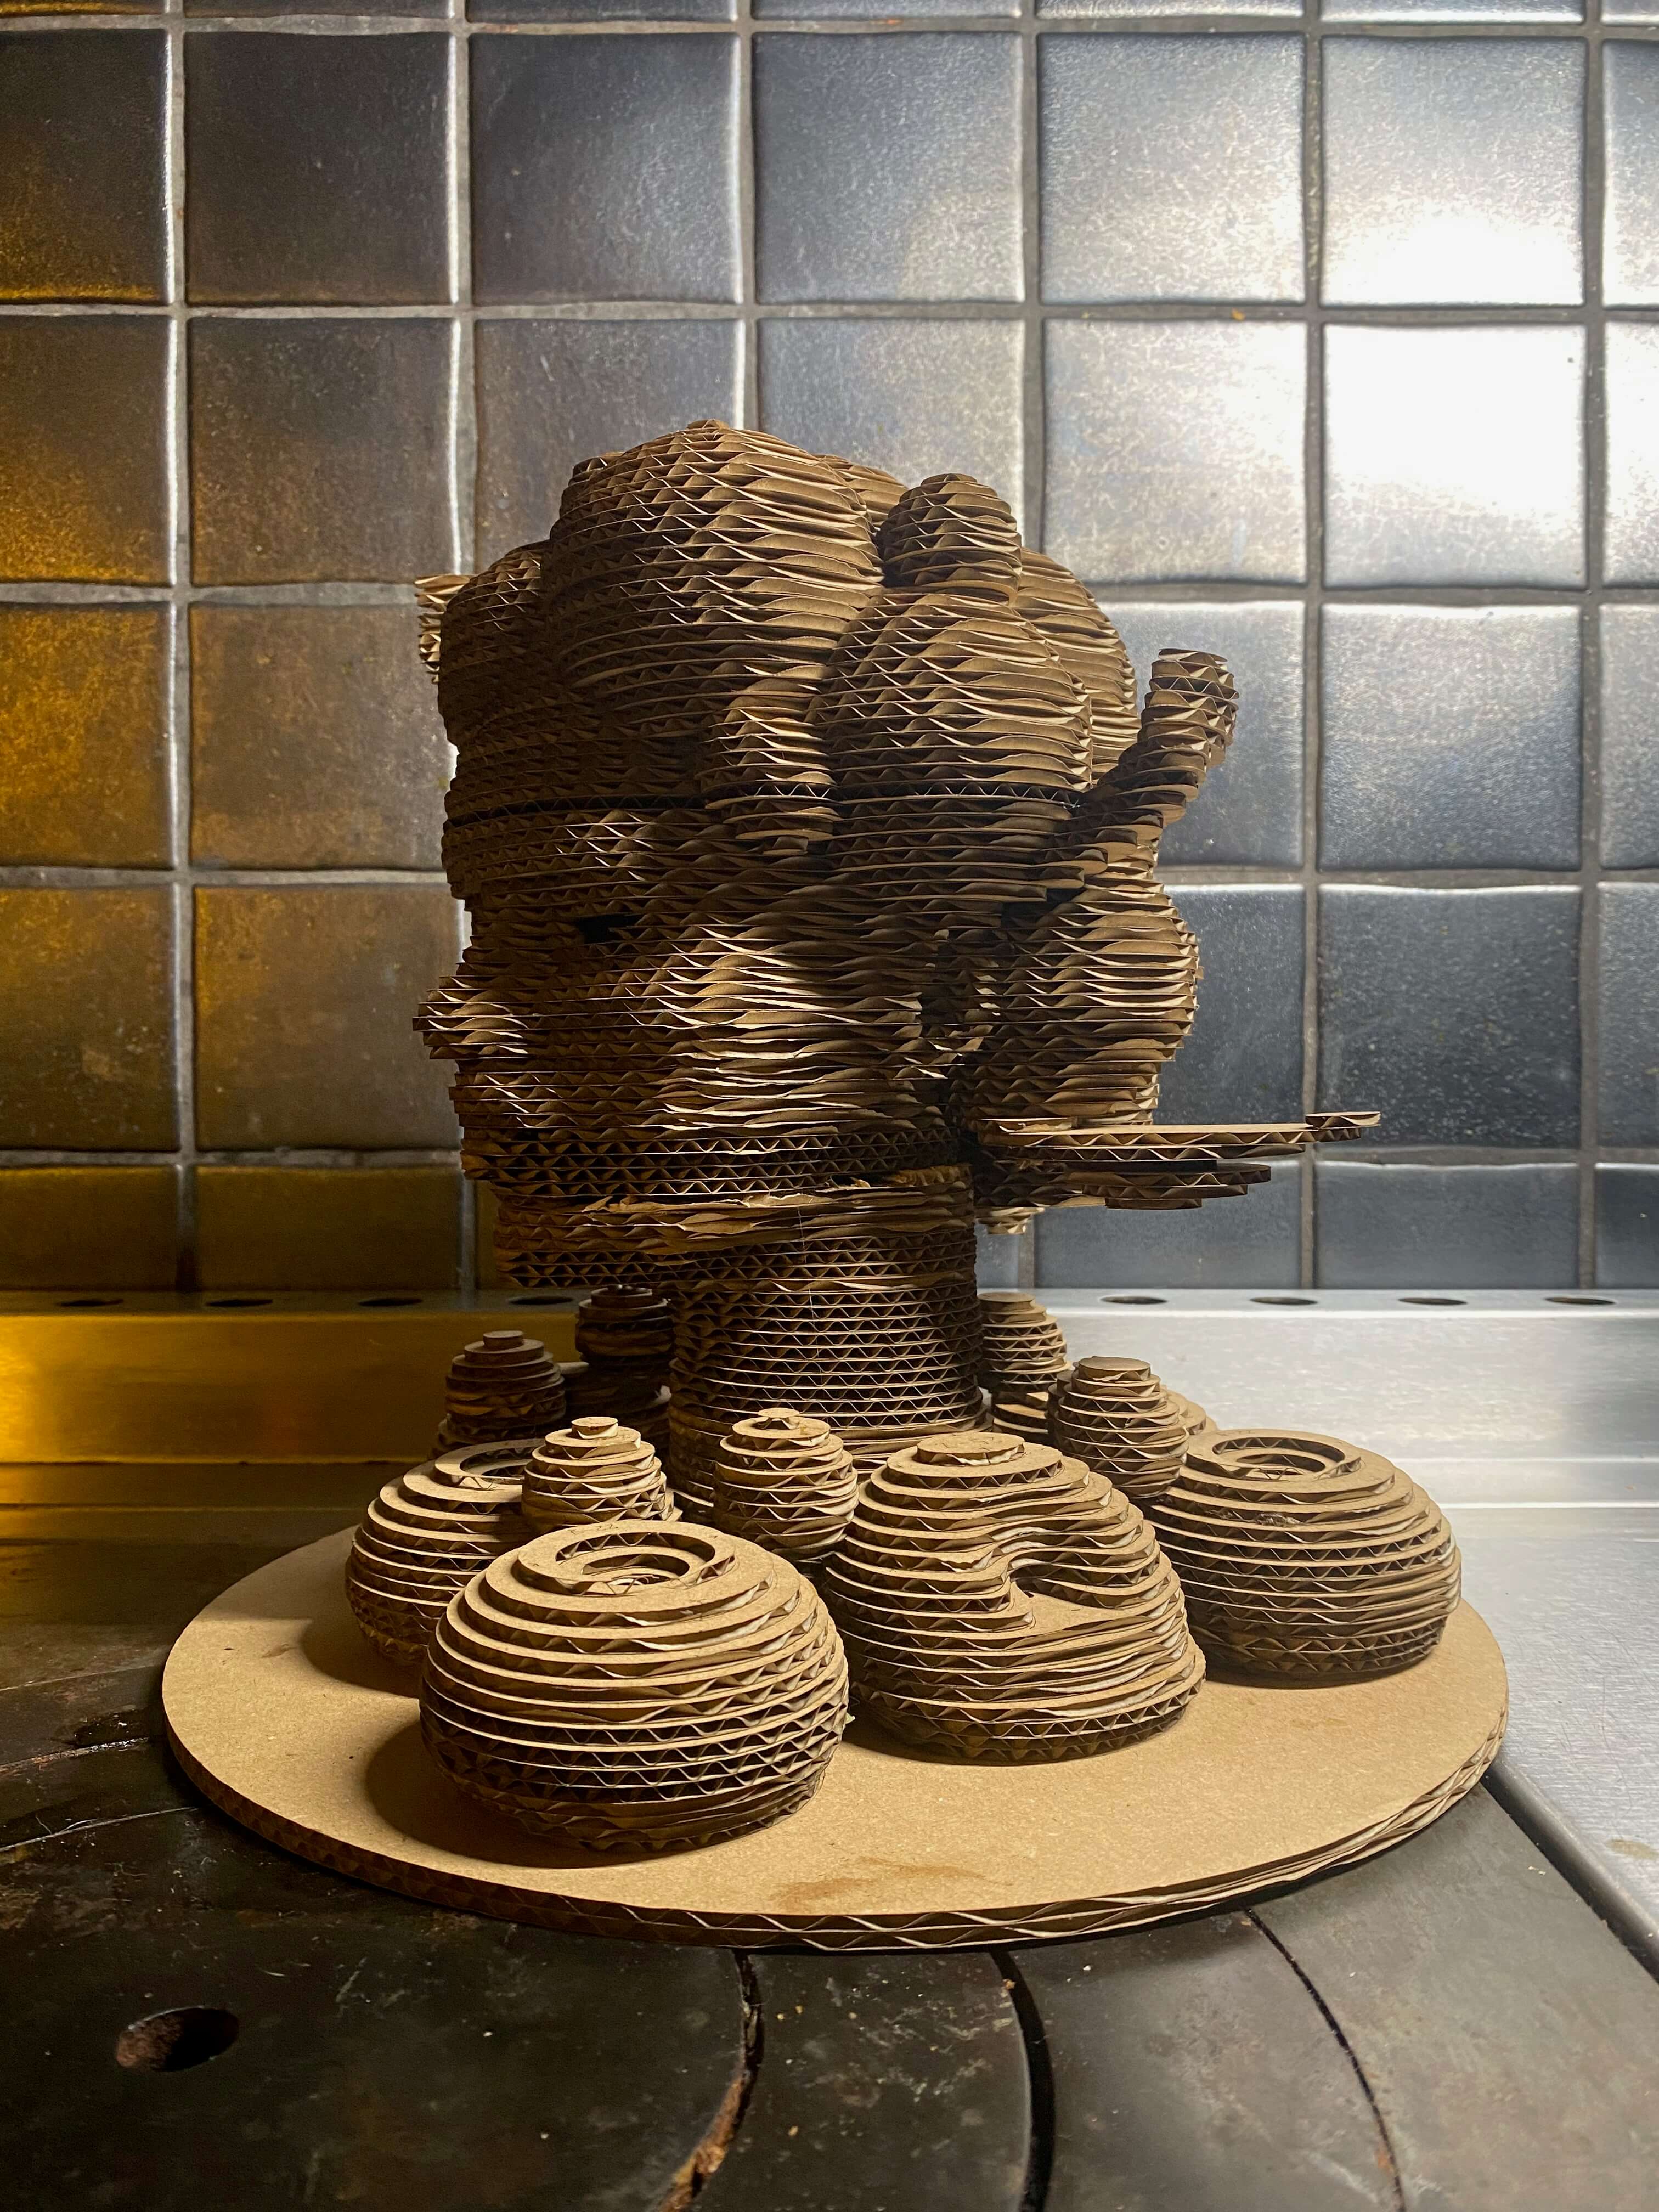
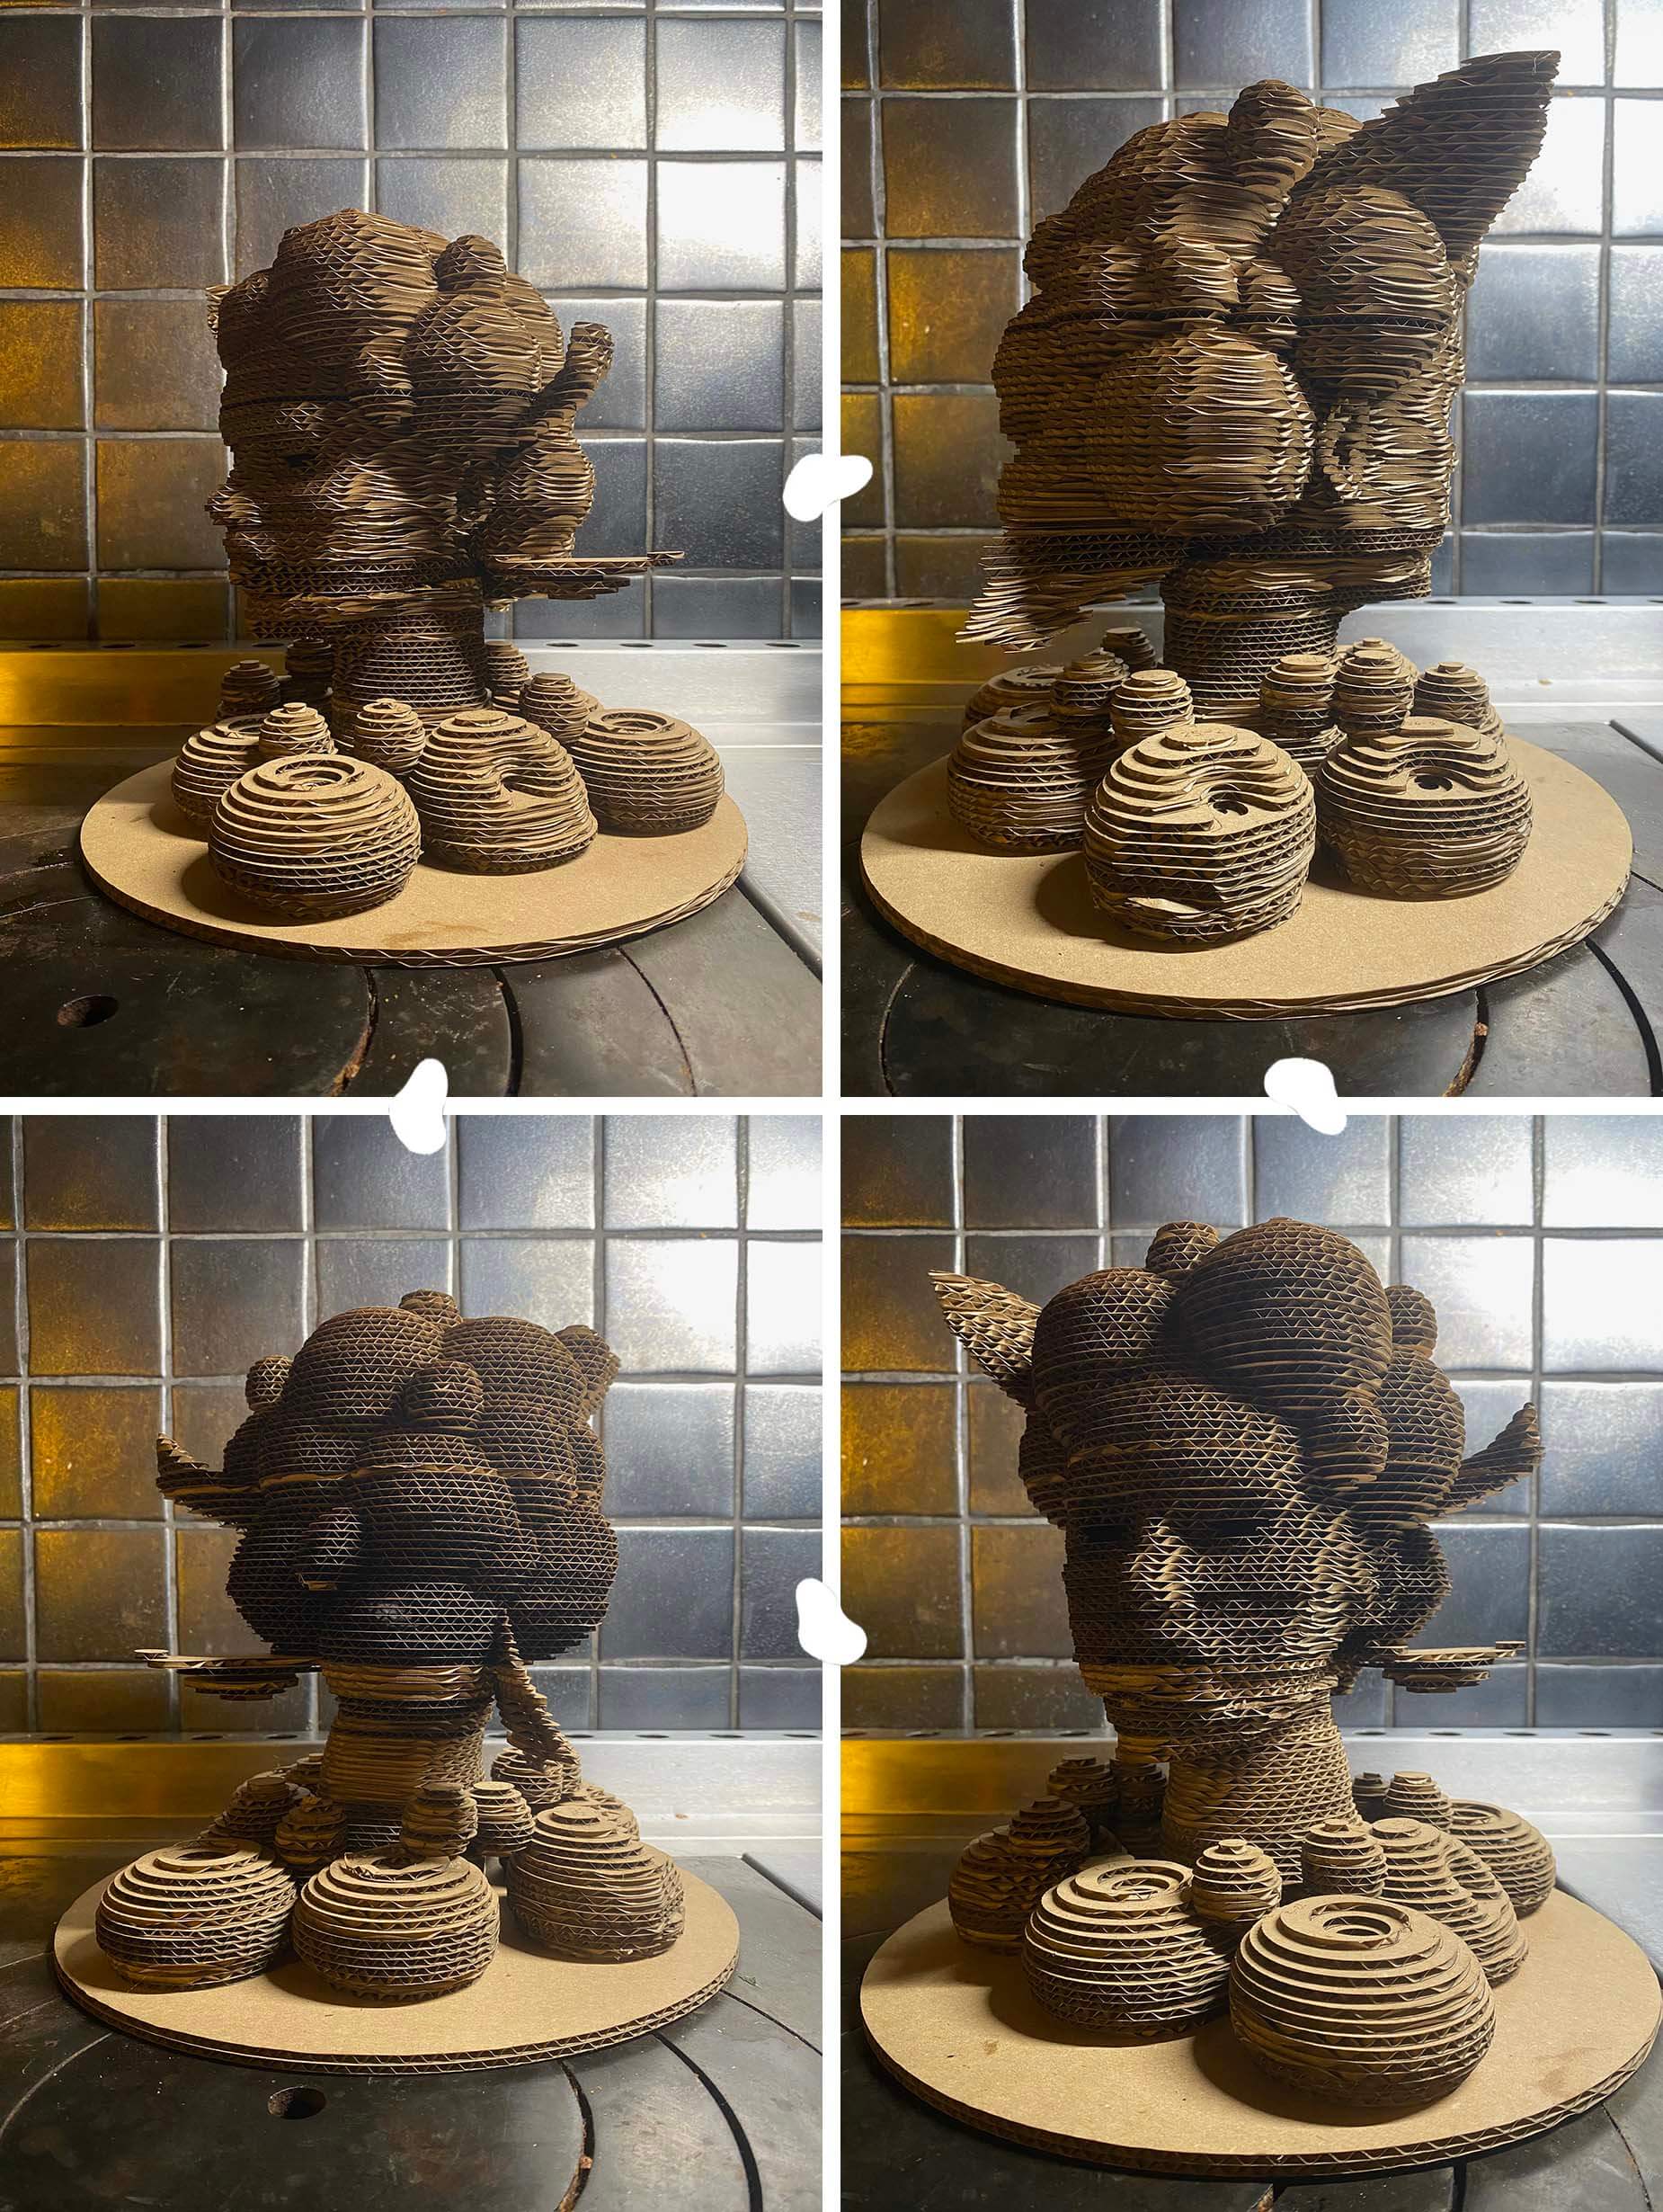
Hello Freya!, photo by Marieke van Eyndhoven
Files
All the files for modelling, cutting and assembling can be downloaded here.