7. Computational Couture
Inspiration
This week was about a deep dive in 3D modelling, parametric design, and 3D printing. So what is it? Andrew Sears (IST) stated in 2007 that parametric design is:
“A process based on algorithmic thinking that enables the expression of parametrics and rules that together, define, enlist and clarify the relationship between design intent and design responses”
The idea is that all design elements are interdependent, adaptable, and sometimes even the contrast to its surrounding. And here is my honest confession. I am a total beta-nerd, but ... but ... I don't know if I really like the concept of parametric design in fashion.
I do like the parametric design application in architecture and urban design. As the outcome of this approach leads to shapes and forms that have a curving nature, I feel that man-made buildings and landscapes developed with this approach, take on a softer look and get closer to nature. But in fashion? When looking at parametric wearables I get the feeling of looking at something that is artificial and harsh.
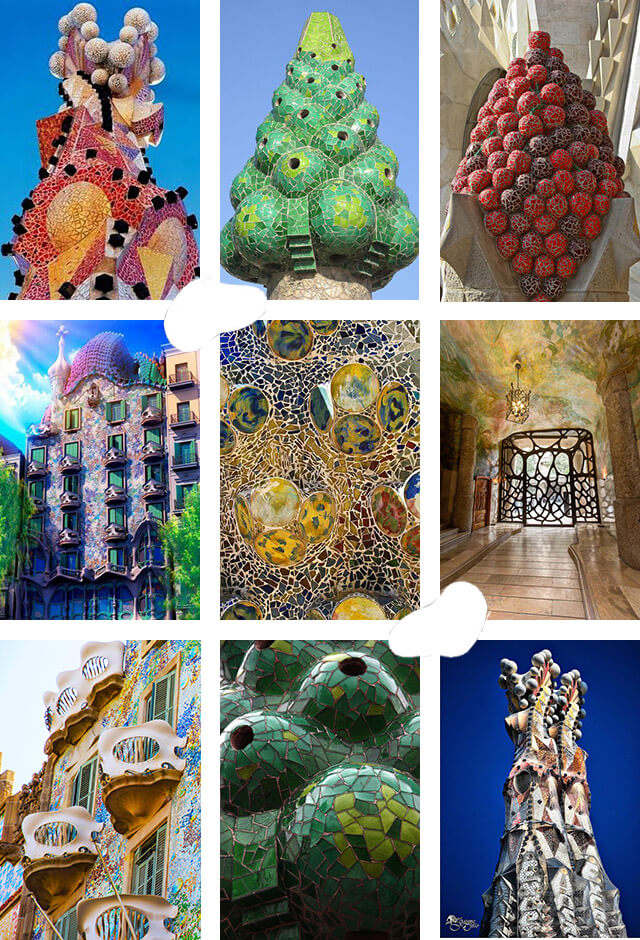
Therefore I will get my main inspiration for this week from the work of Antonio Gaudi. When visiting his buildings, I get a feeling of being enveloped in a round and colorful world which really touches me and lifts me up.
3D Printing
3D printers work with solid filaments that are melted, extruded and then dry. A typical 3D printer is very much like an inkjet printer operated from a computer. It builds up a 3D model one layer at a time, from the bottom upward, by repeatedly printing over the same area. Working entirely automatically, the printer creates a model over a period of minutes to hours by turning a 3D CAD drawing into lots of two-dimensional, cross-sectional, separate 2D prints that sit one on top of another, but without the paper in between. Instead of using ink, which would never build up to much volume, the printer deposits layers of molten material and fuses them together.
3D printing materials
It's hardly surprising that 3D printers use most often thermoplastics (plastics that melt when you heat them and turn solid when you cool them back down). Typical plastics being used in a 3D printer are ABS (acrylonitrile butadiene styrene), PLA (polylactic acid), or PETG (polyethylene gerephthalate glycol).
Perhaps most familiar as the material from which LEGO bricks are made, ABS is also widely used in car interiors, for making the insides of refrigerators, and in plastic computer parts. It's really a composite of a hard, tough plastic (acrylonitrile) with a synthetic rubber (butadiene styrene). It's perfect for 3D printing because it's a solid at room temperatures and melts at a little over 100°C (220°F), which is cool enough to melt inside the printer without too much heat and hot enough that models printed from it won't melt if they're left in the Sun. ABS is not biodegradable, but is recyclable.
PLA is easier to use than ABS, though it's softer and less durable. But in addition to being recyclable, PLA 3D printer filaments are also biodegradable. Since PLA is made from plant-based materials derived from crops like corn, it is eventually broken down by microorganisms into carbon emissions.
PETG is a halfway house, closer to the strength of ABS, easy to shape, and relatively easy to recycle, but it isn't biodegradable.
But you don't necessarily need to print in 3D with plastic: in theory, you can print objects using any molten material that hardens and sets reasonably quickly.
In Amsterdam we only had PLA filament available, so all my print work was done with that material.
3D printers and software
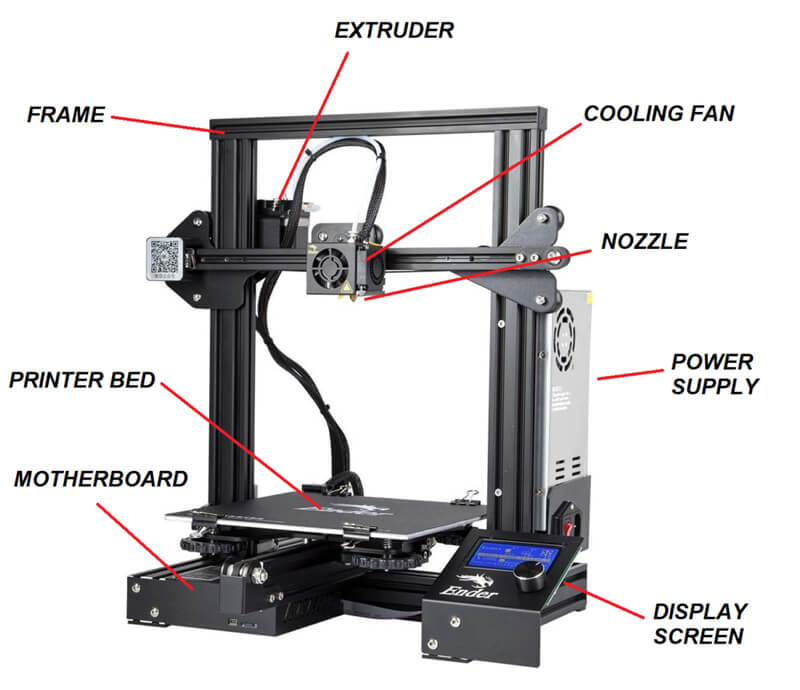
In Amsterdam we have three 3D printers:
- The Ender
- The Prusa
- The Ultimaker 2+
To create the 3D printer files in Gcode, there is different software to be used:
- For the Ender and the Prusa printers the PrusaSlicer software needs to be used
- For the Ultimaker 2+ printer the Ultimaker-Cura software should be used
Although the printers differ a bit in loading the filament (and the width of filament they accept), calibrating the nozzle versus the printer bed, and managing the settings through the display screen, on the whole they function pretty much the same, and create more or less the same end-results. Also both software programs are straightforward and require in essence the same input settings.
To familiarize ourselves with both slicing software programs and all three printers, I downloaded a small 3D model of a floor tile, from the website Thingiverse 1, created the two Gcode files, and printed the model on each printer.
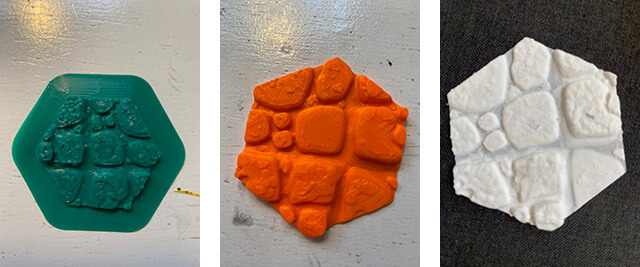
While printing the three models, I discovered that the end-result (and the time to print) is mostly a function of the settings you select in the software and of the filament you use. I printed the white model on the Ender and I selected a substantially lower layer thickness for this print than for the other two. As a result, the model took ages to print, but came out more detailed as well.
Over the last couple of days I mainly worked with the Ultimaker 2+ printer. So let me take you through the process.
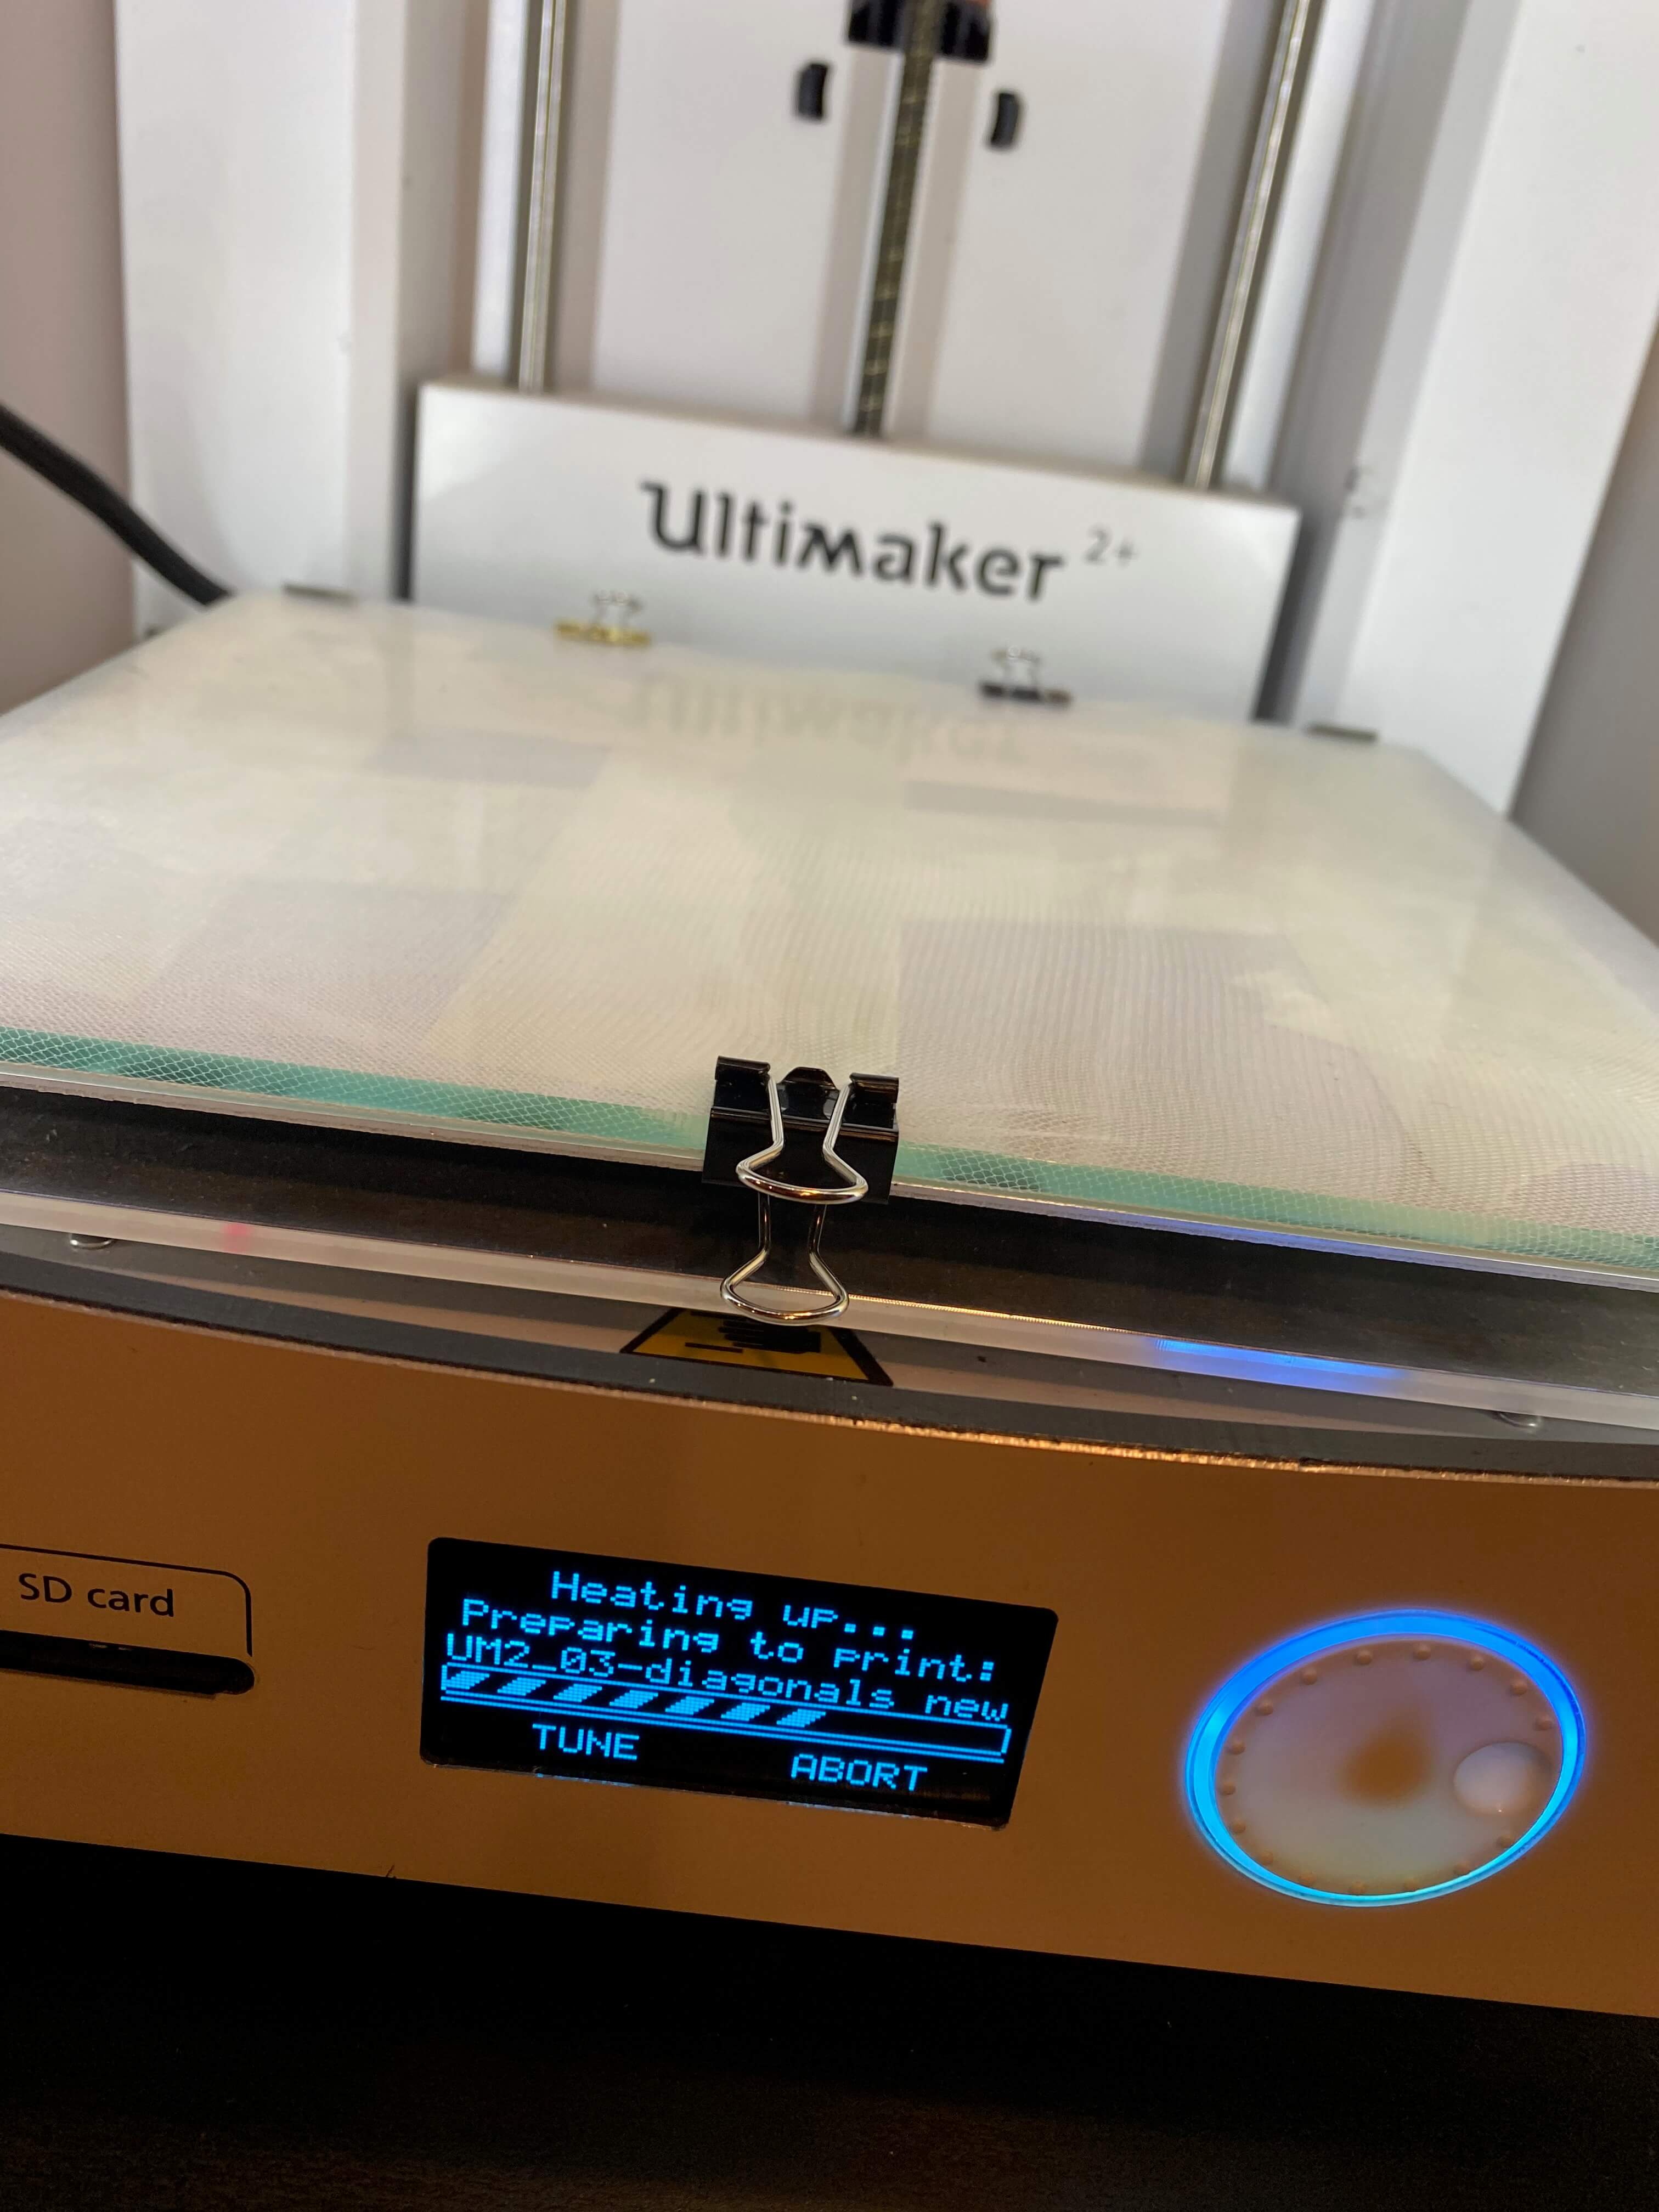
3D printing process for Ultimaker 2+
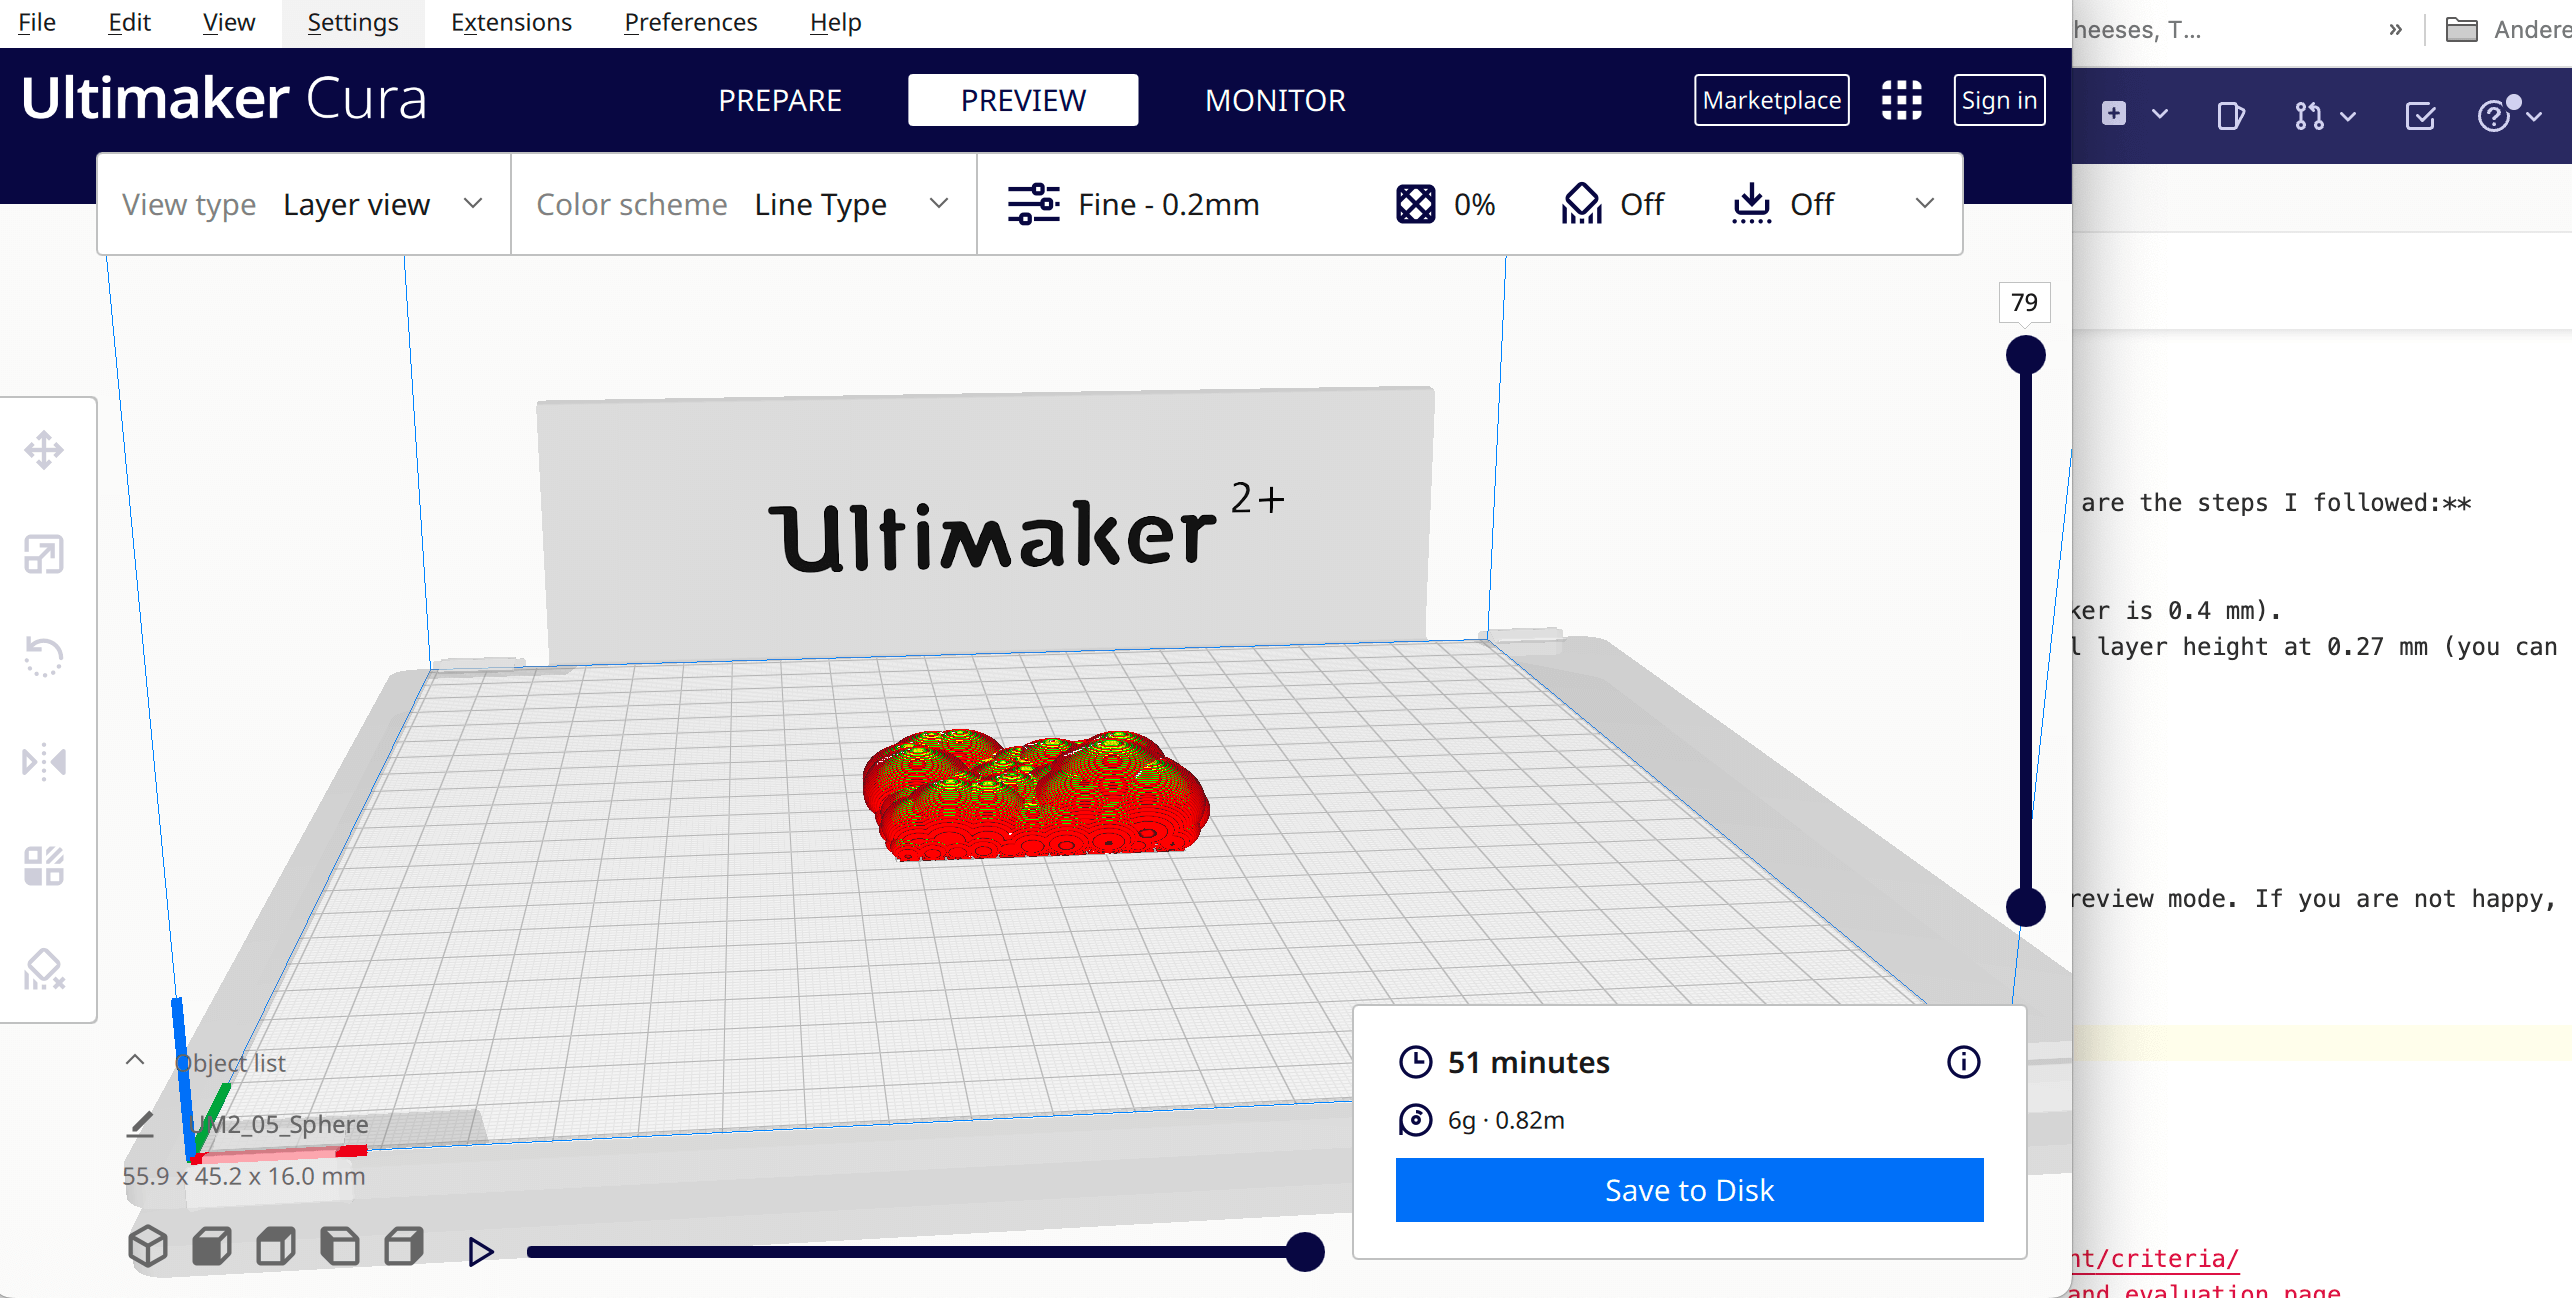
Preparing the Gcode file
As a first step towards printing a Gcode file must be prepared in the Ultimaker-Cura software. These are the steps I followed:
- I imported my .stl file into the Ultimaker-Cura software (more file types, like for example .obj, .amf, .3mf, .ply, and .ctm can be imported).
- First I changed the settings of the material to Generic PLA 0.4 (the nozzle of the Ultimaker is 0.4 mm).
- I selected as profile Fine 0.1, this defines the layer thickness at 0.1 mm and the initial layer height at 0.27 mm (you can adapt these values under the menu dropdown "Quality" ).
- Then I set the infill at 0% in the menu dropdown "Infill".
- Under the menu drowdown "Build Plate Adhesion", I choose the "type" as "none".
- Lastly I pushed the button "Slice".
- After reviewing the outcome, I exported the Gcode file.
The software tells how much time the printing will take. And in the preview mode a preview of the print can be reviewed. If the results are not acceptable, the settings can be adapted, but after each change, the model must be sliced again. In this way, optimization between printing time and quality can be obtained.
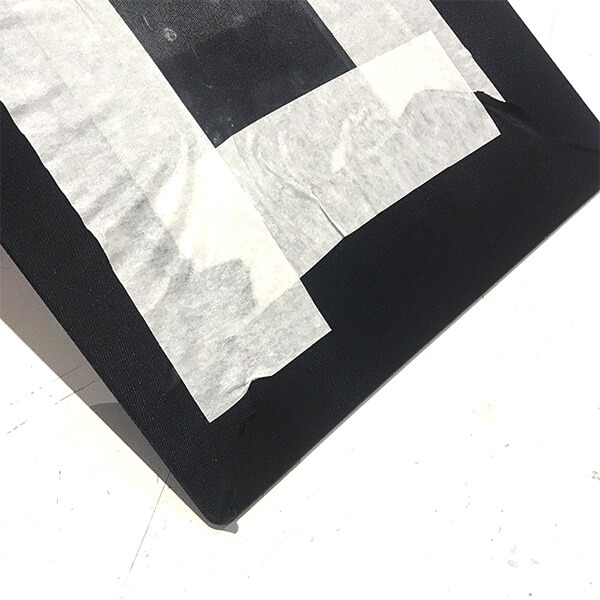
Preparing the print bed
Whatever the aim, as a first step, the print bed should be cleaned with a little bit of alcohol and a tissue paper. When printing on fabric, the fabric needs to be attached to the print bed. The fabric can be more or less stretched. But in any case, the fabric should be forming a very flat layer on the print bed. This is accomplished by taping the fabric on the back of the print bed with paper tape. Once taped, it should be tested if the fabric is moving or not. If it still moves, it is to lose and the nozzle will burn the textile or just damage the printing.
3D printing
With a Gcode file and a prepared printer bed, I was ready to print. These are the steps I followed:
- I switched on the Ultimaker 2+ on the back.
- Then I chose the filament with which to work (for the Ultimaker the diameter of the filament should be 2.85 mm).
- I first pushed the coil with filament in position and then inserted the filament into the marked opening.
- On the digital screen I selected "Load filament".
- I waited till melted material of the right color came out of the nozzle, and then confirmed on the digital screen that the loading was "Ready" (since there is always some previously used material left in the nozzle, you should wait till the color turns right).
- Then I selected "Material" on the digital screen, and input my choice (I worked mostly with PLA, the printer will adapt the temperature of the nozzle and the print bed based on the material you select).
- I went back to "Maintenance" and selected "Build Plate", in order to calibrate the nozzle versus the printbed (the printer will lead you through this calibrating process).
- Finally I uploaded my Gcode file with help of the SD card.
When printing PLA on fabric, it is wise to adapt two settings, namely the speed from 100% to 75% (from 60 mm/sec to 45 mm/sec), and the bed temperature from the predefined setting of 60 degrees celcius to 100 degrees celcius. The nozzle temperatue I kept on the predefined setting of 215 degrees celcius. These adaptations help the print quality and make sure that the plastic adheres better to the fabric. So these were the settings I adhered to for all my print work on the Ultimaker.
Ready to print!
Printing with the Ultimaker
Some early 3D print results
While catching up with Rhino and Grasshopper, I already wanted to test the waters with printing. So I used several sources to create some print files.
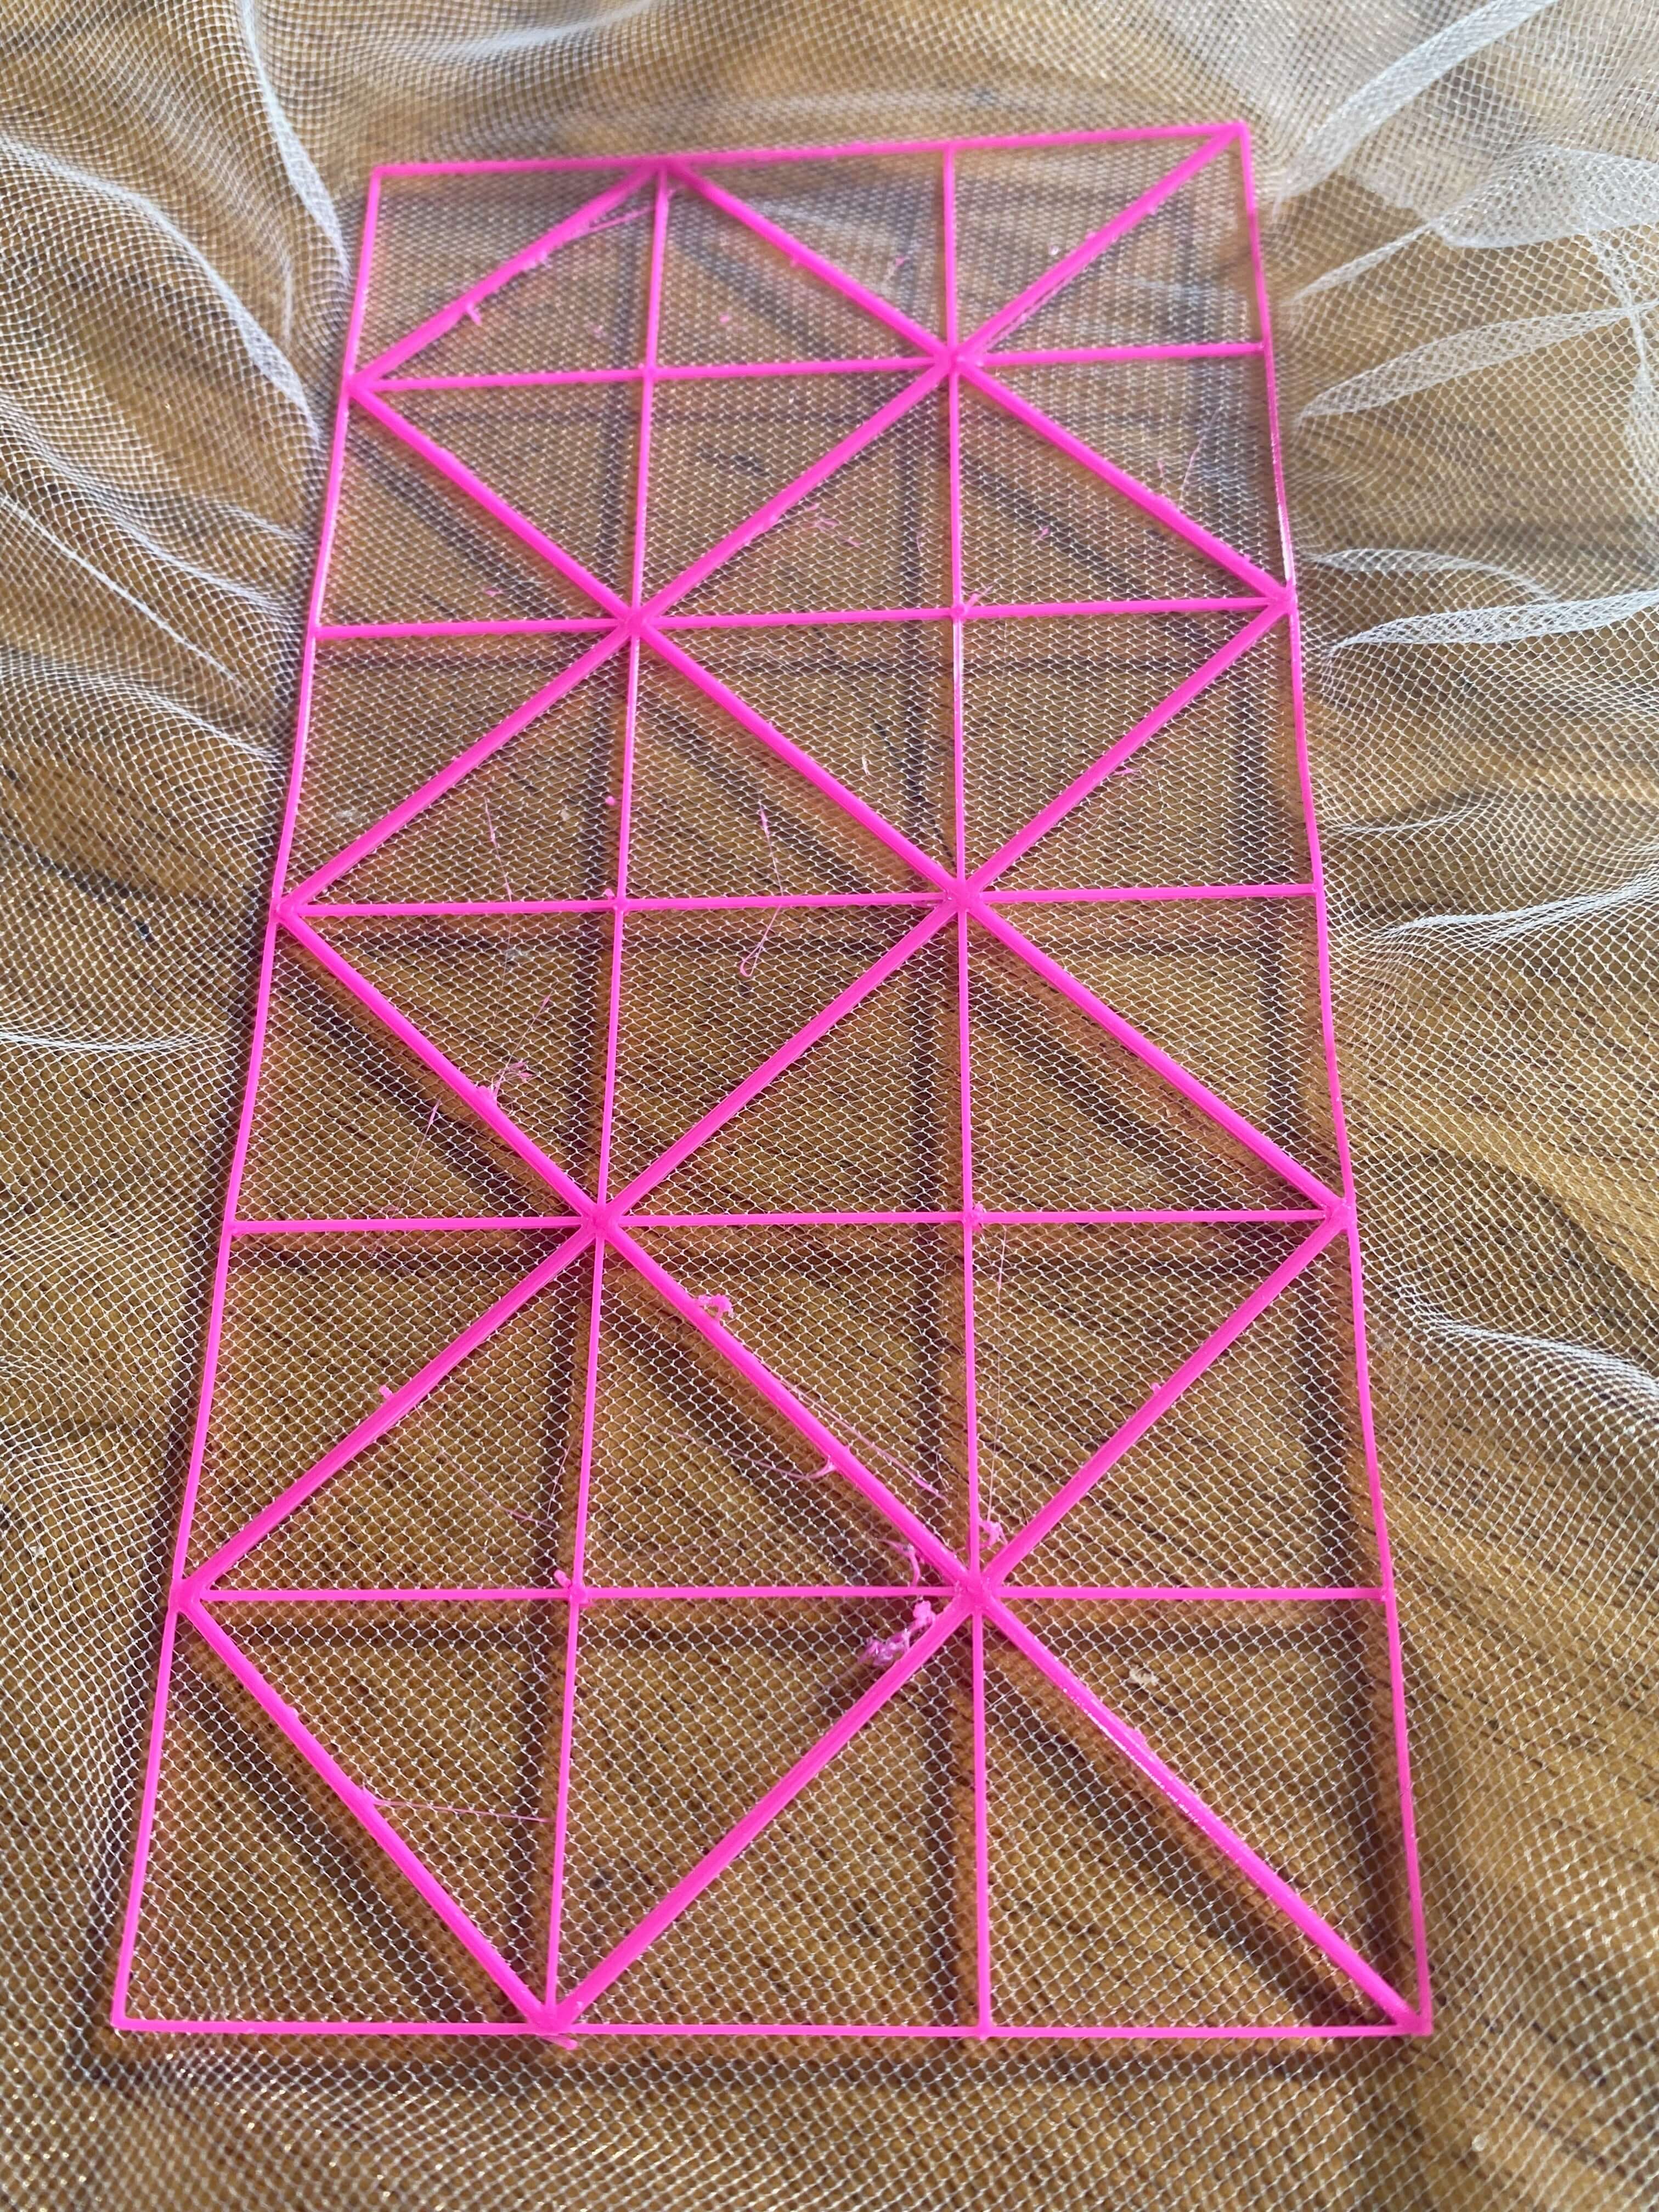
Pink raster
Bea shared some 3D design models in .stl format with us to test printing on fabric. I could directly import those files in the Ultimaker-Cura software for slicing. By forcefully stretching the fabric on the printer bed, the finished print was supposed to curl the fabric, once the stretch was released. For the print I used pink PLA filament on white tule. However the combination of tule and a rather large rectangle design was not good to get the curling effect.
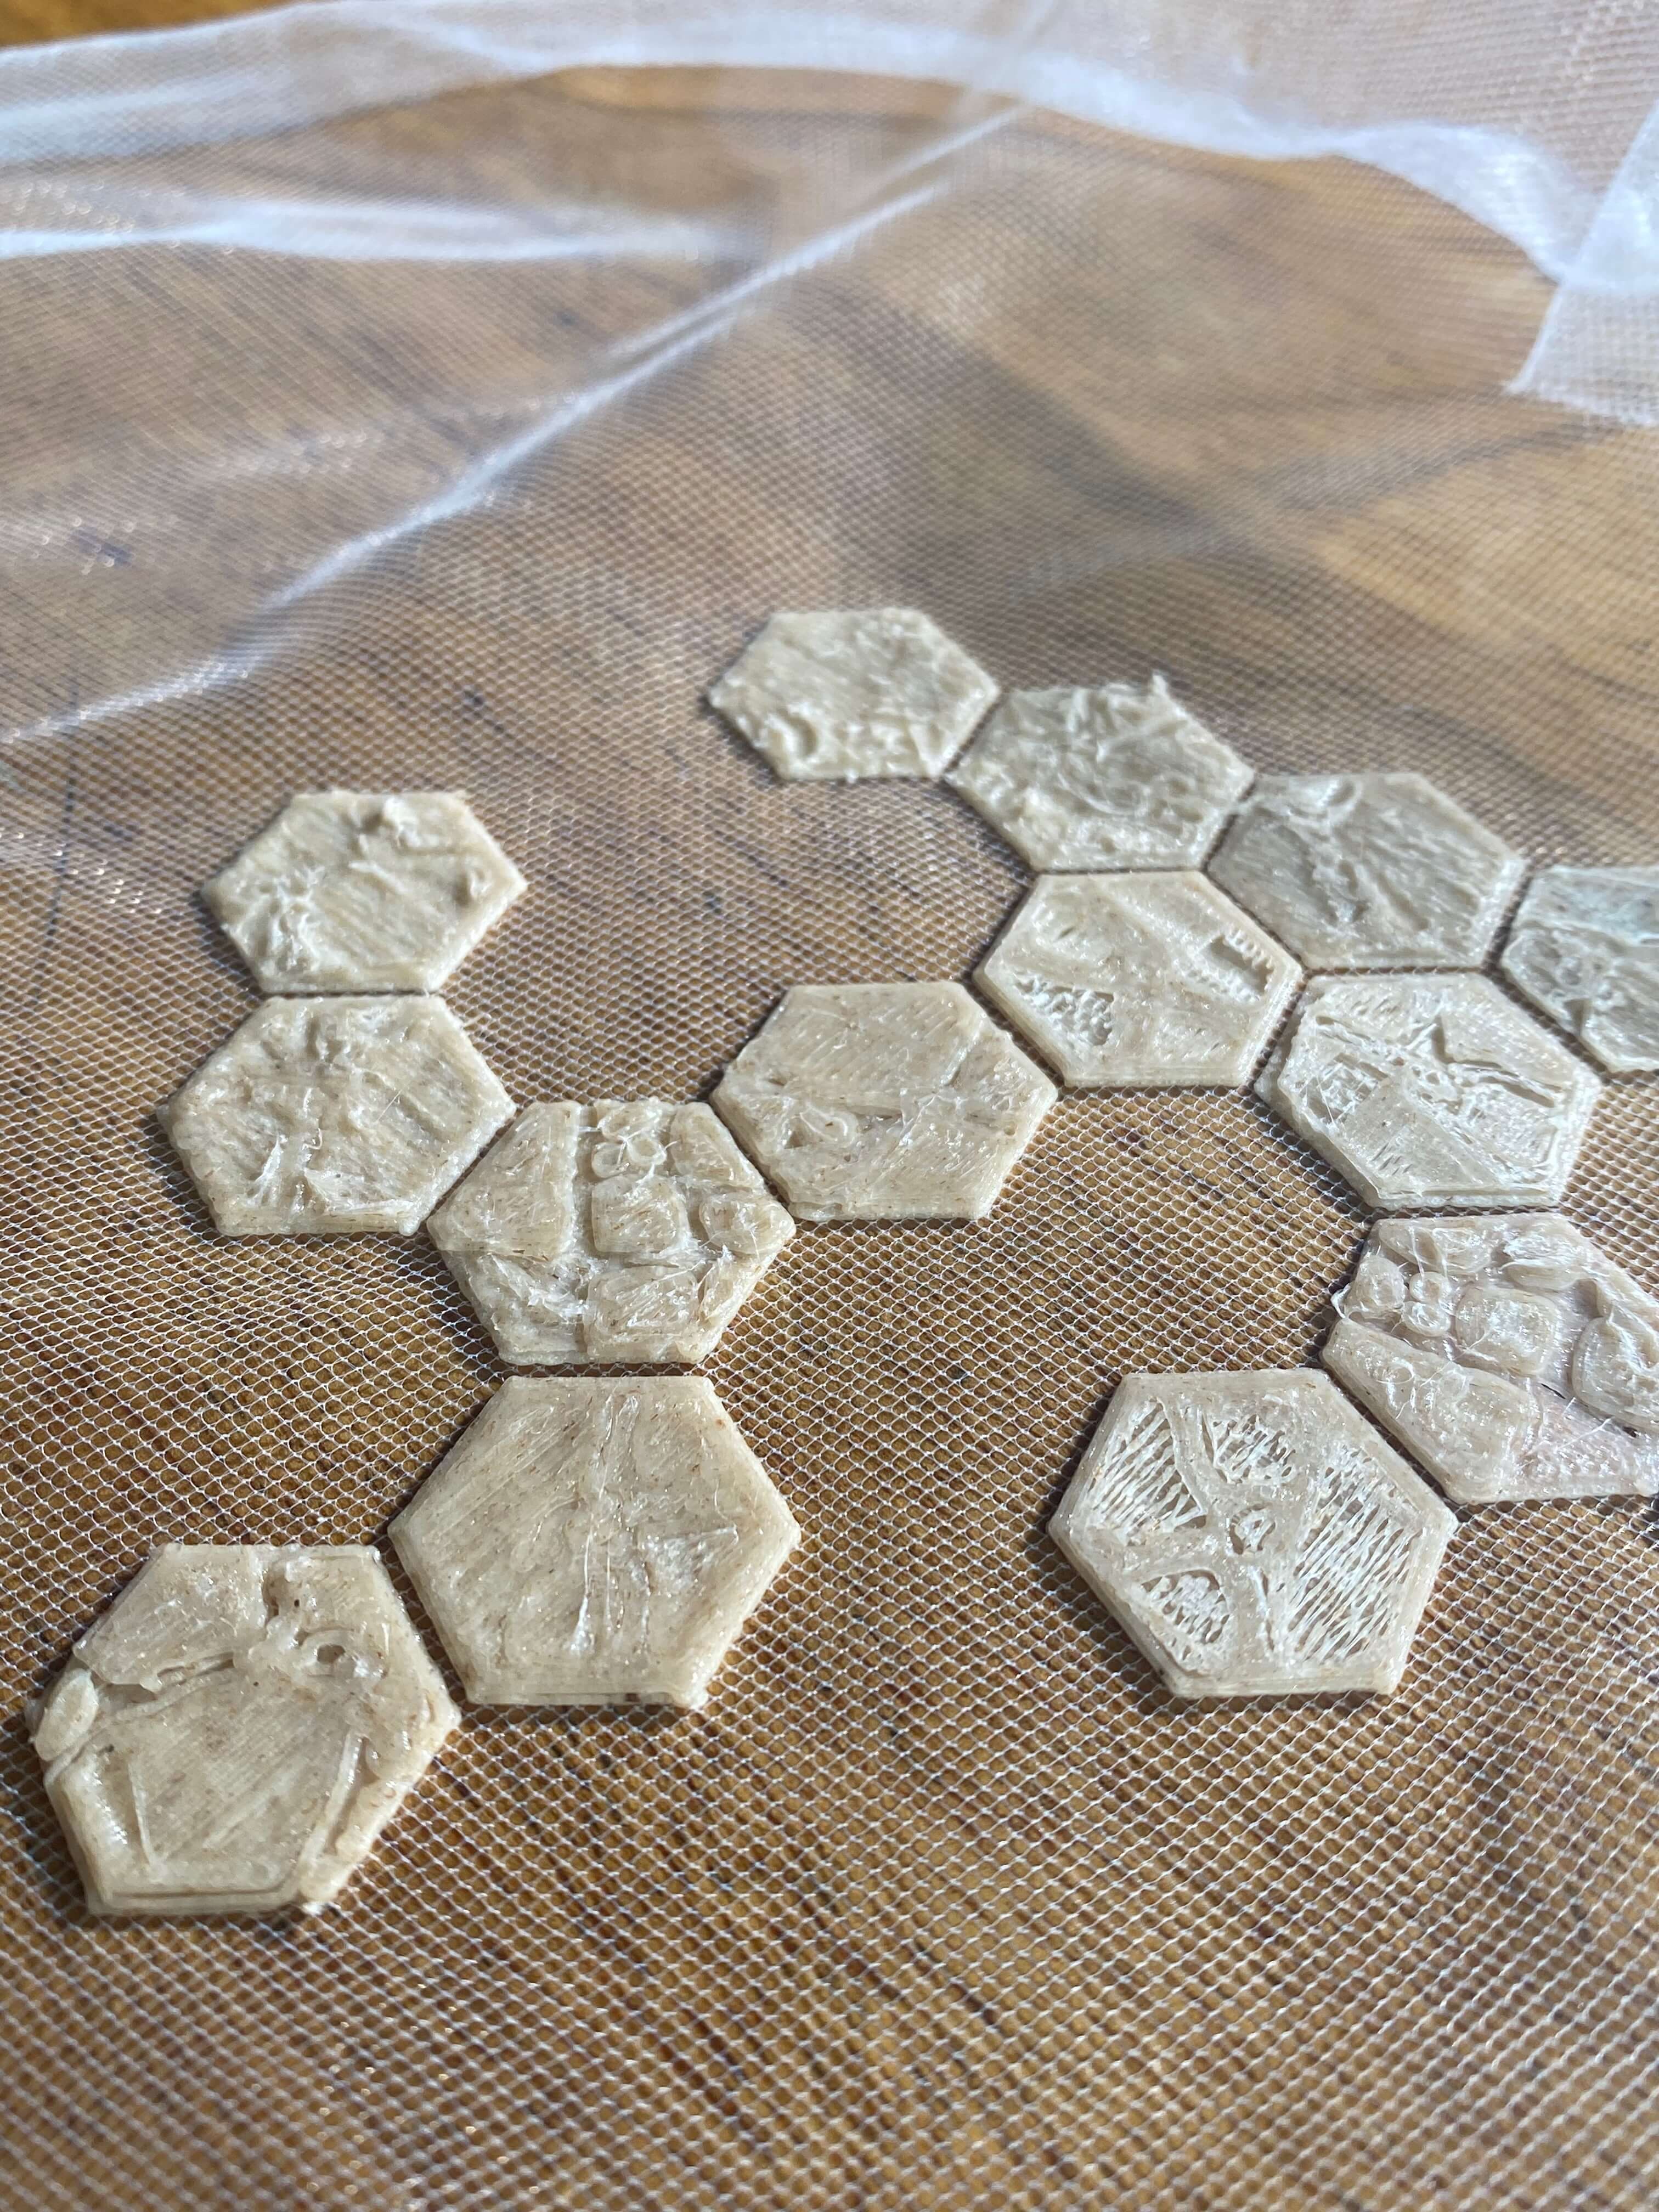
Hemp hexagon
Earlier I had downloaded a 3D model of a floor tile in .stl format from the website Thingiverse. I imported this model multiple times in the slicing software, and then played around with the sizing and positioning. For the 3D print I used beige PLA filled with hemp on white tule. I liked the color, but because of downsizing the original model, the details of the tile were mostly faded, and the hemp effect would have been more pronounced in a larger print.
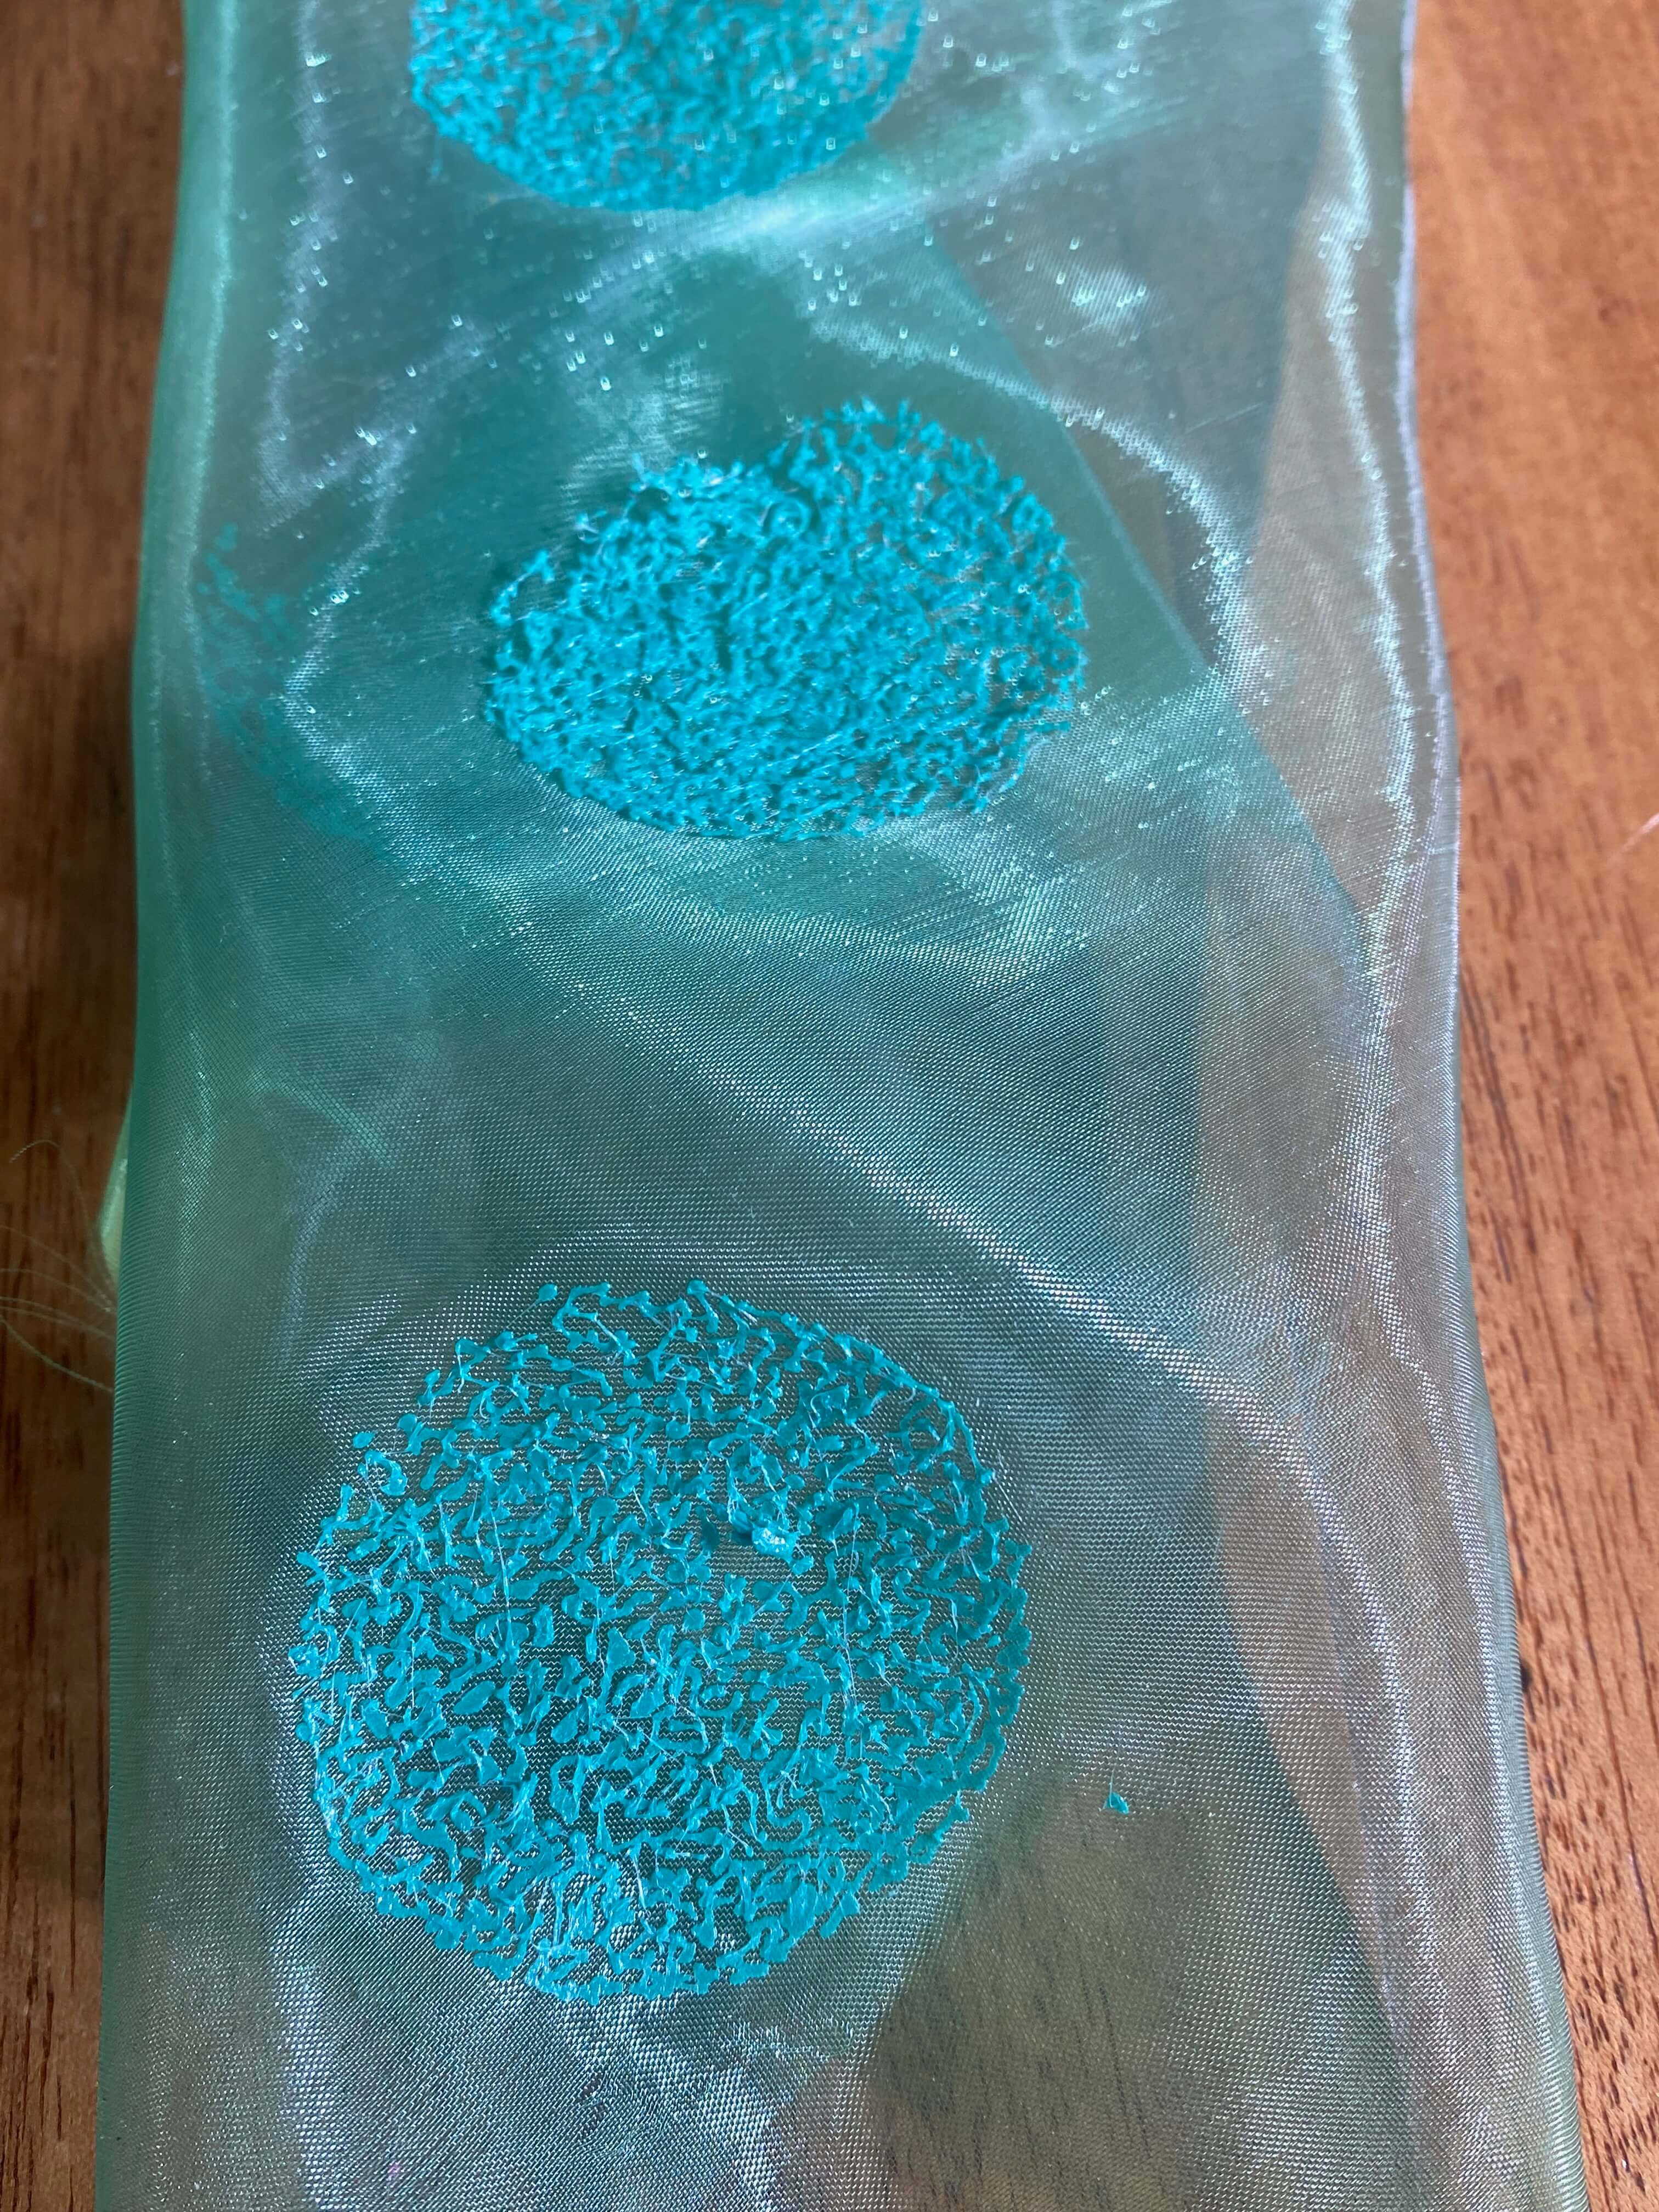
Blueish green Voronoi
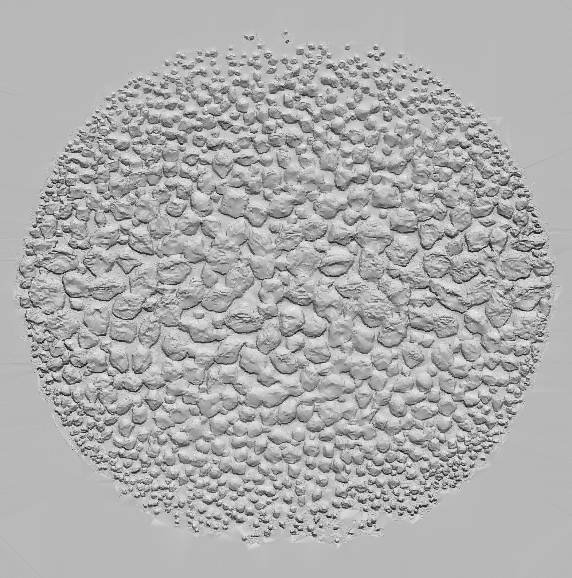
In the free 3D digital design app Tinkercad 2 I played around with a Voronoi tesselation. In a Voronoi pattern, every point within a given region is closer to the “seed” inside that region than it is to any other point outside that region. Each point along a region's edge is equidistant from the two nearest seeds. In nature the Voronoi tesselation is seen in places ranging from cracked mud to giraffe skin to foamy bubbles. So this pattern is to my liking! I printed the tesselation with a blueish green, translucent PLA filament on green, shiny organza. The PLA didn't behave great, and what I got was not a fabulous 3D print, but a lot of 2D lines of plastic sitting crudely on top of one another—like badly piped cake icing! I was really dissappointed about this result as I had really liked the Voronoi tesselation when developing it.
Green balls
Another test in Tinkercad got me balls with a pattern. I swapped the blueish green, trasnlucent PLA for a solid green PLA, and kept the green organza as fabric. This print came out better as the print adhered well to the fabric and the details obtained by omission came out well.
Time for Grasshopper
Grasshopper program
Grasshopper is a visual programming language and environment that runs within the Rhinoceros 3D computer-aided design (CAD) application. Programs are created by dragging components onto a canvas. The outputs to these components are then connected to the inputs of subsequent components.
So Grasshopper is about building up a logical flow, whereby each component gives the other one information to follow and this flow of information will result in a specific shape in Rhino.
Every component has an input and output, if the component is yellow, it means there is no data inside. When green, it means there is referenced geometry, and when red, there is some error.
I watched the recorded tutorials from Eugenio, and then did some more via the website Parametric house 3.
Maybe because I am running Rhino and Grasshopper on my Mac, but I noticed that I had to wait a long time for Grasshopper and Rhino to digest the things I did, and sometimes it took really minutes before the program responded after a change.
My code
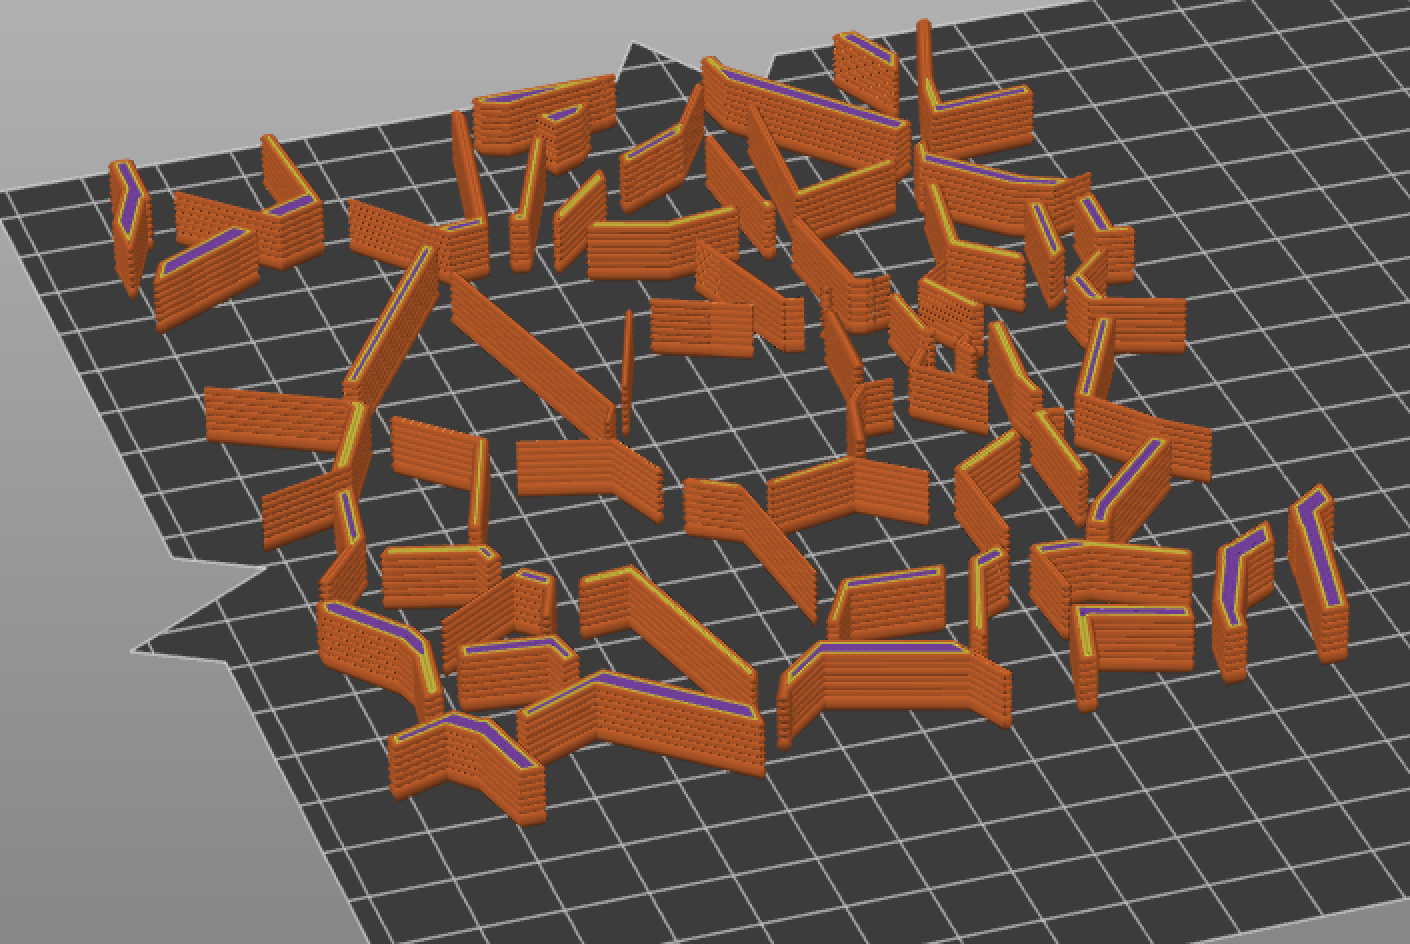
I am inspired by Gaudi, and from my early 3D print efforts, I liked working with the the Voronoi pattern and my balls. So I decided to try to create spheres in a Voronoi tesselation. I studied many, many tutorials. And understood in the end a bit the logic in Grasshopper and came up with a code that worked (pfff).
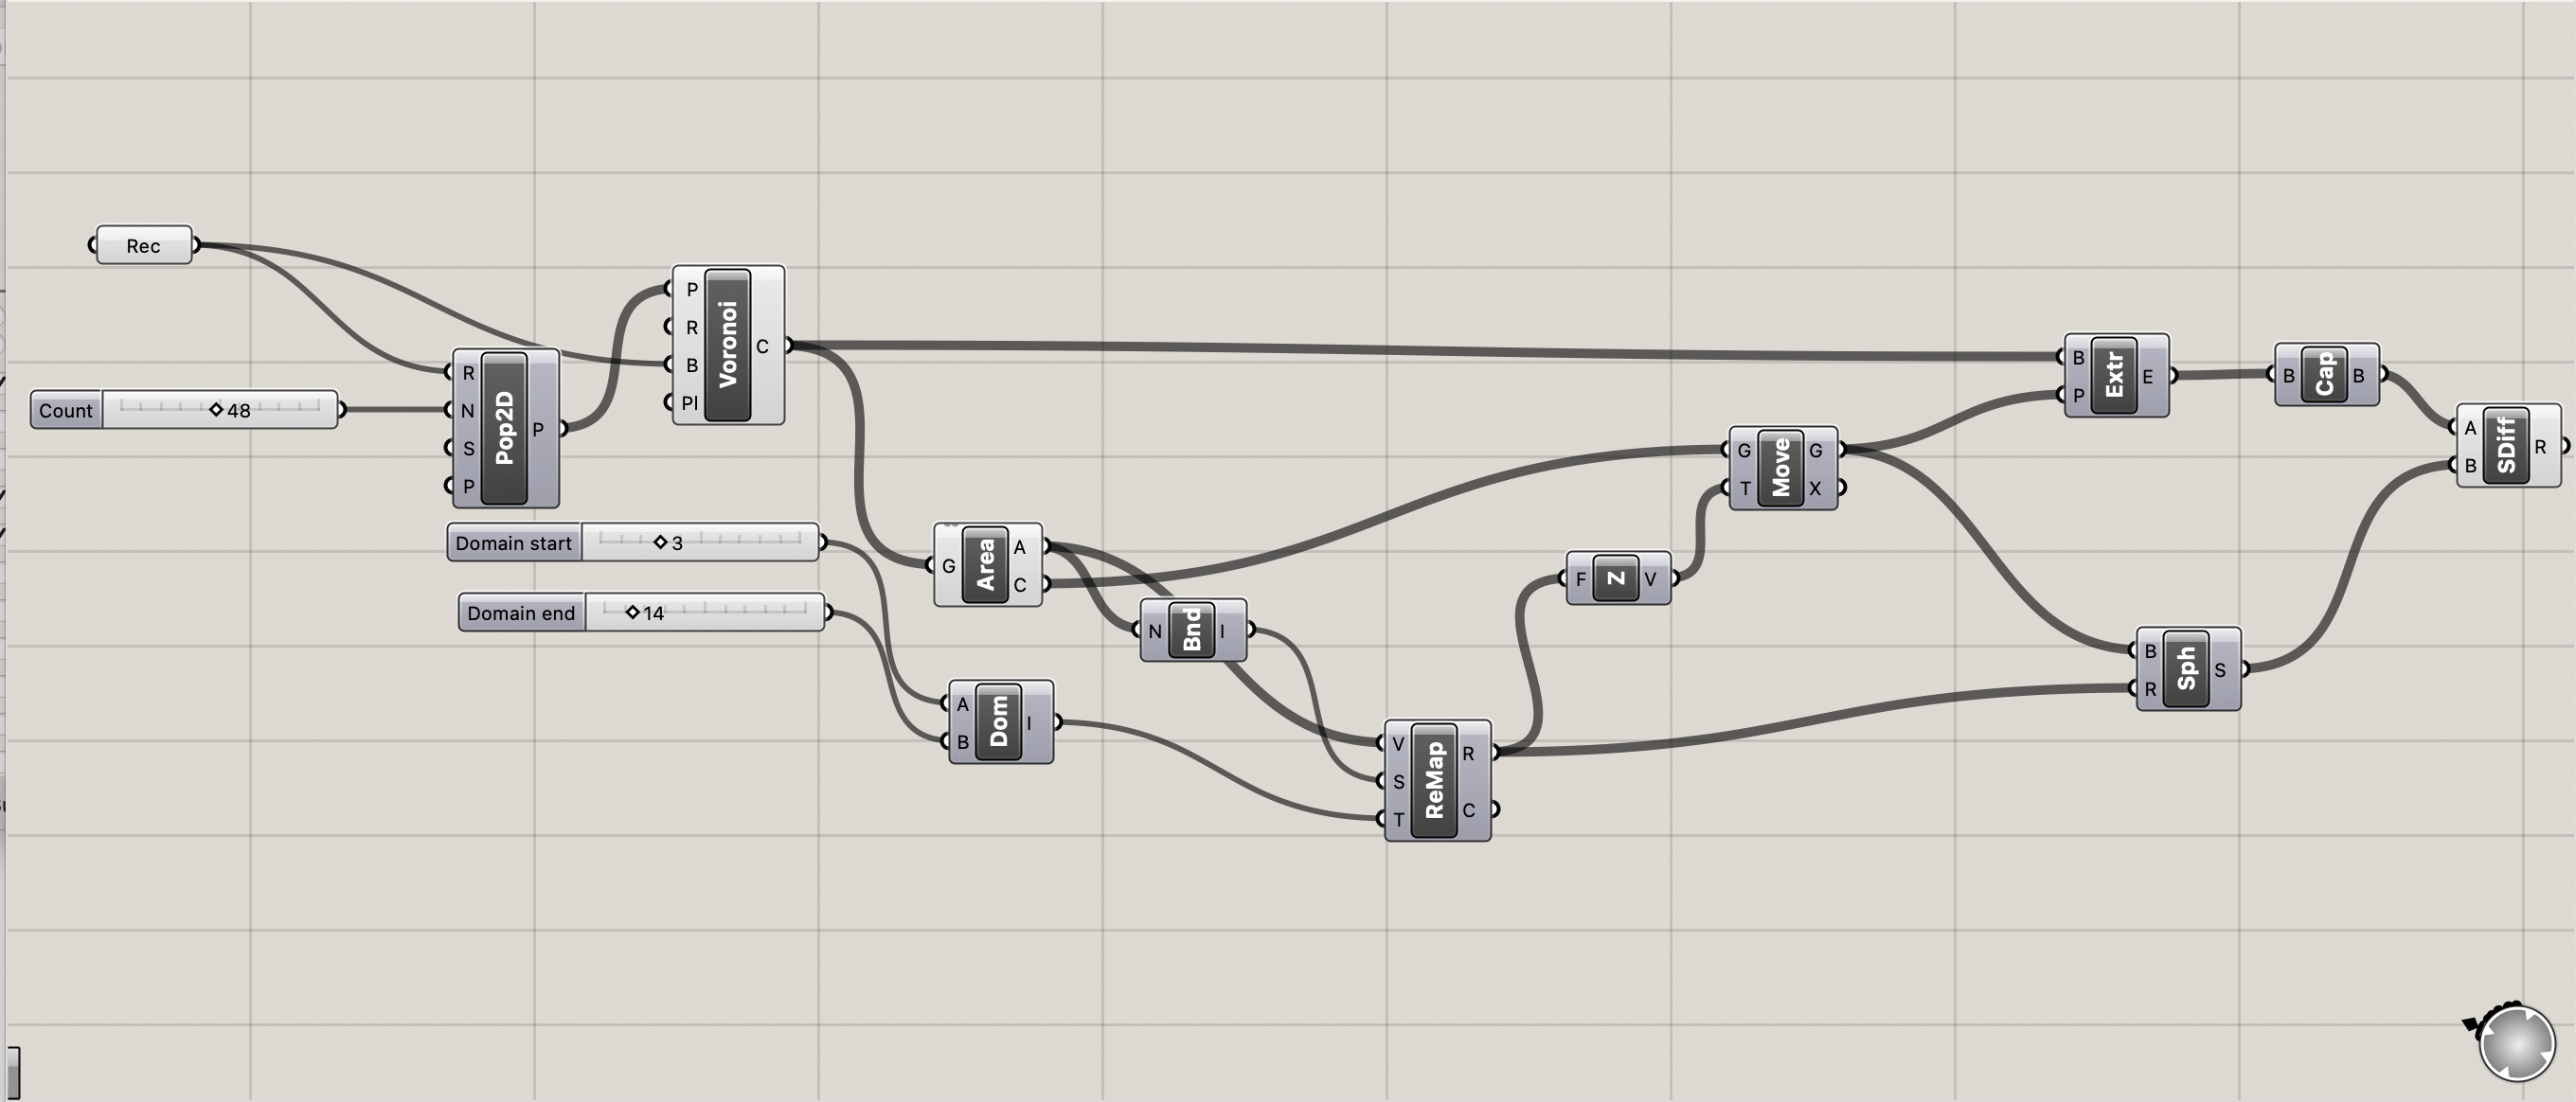
This is how my code works in preview mode.
Grasshopper code working in preview
Being afraid the Grasshopper program would crash, once I had a code that worked, I immediately saved it from Rhino in .stl format!
Final results
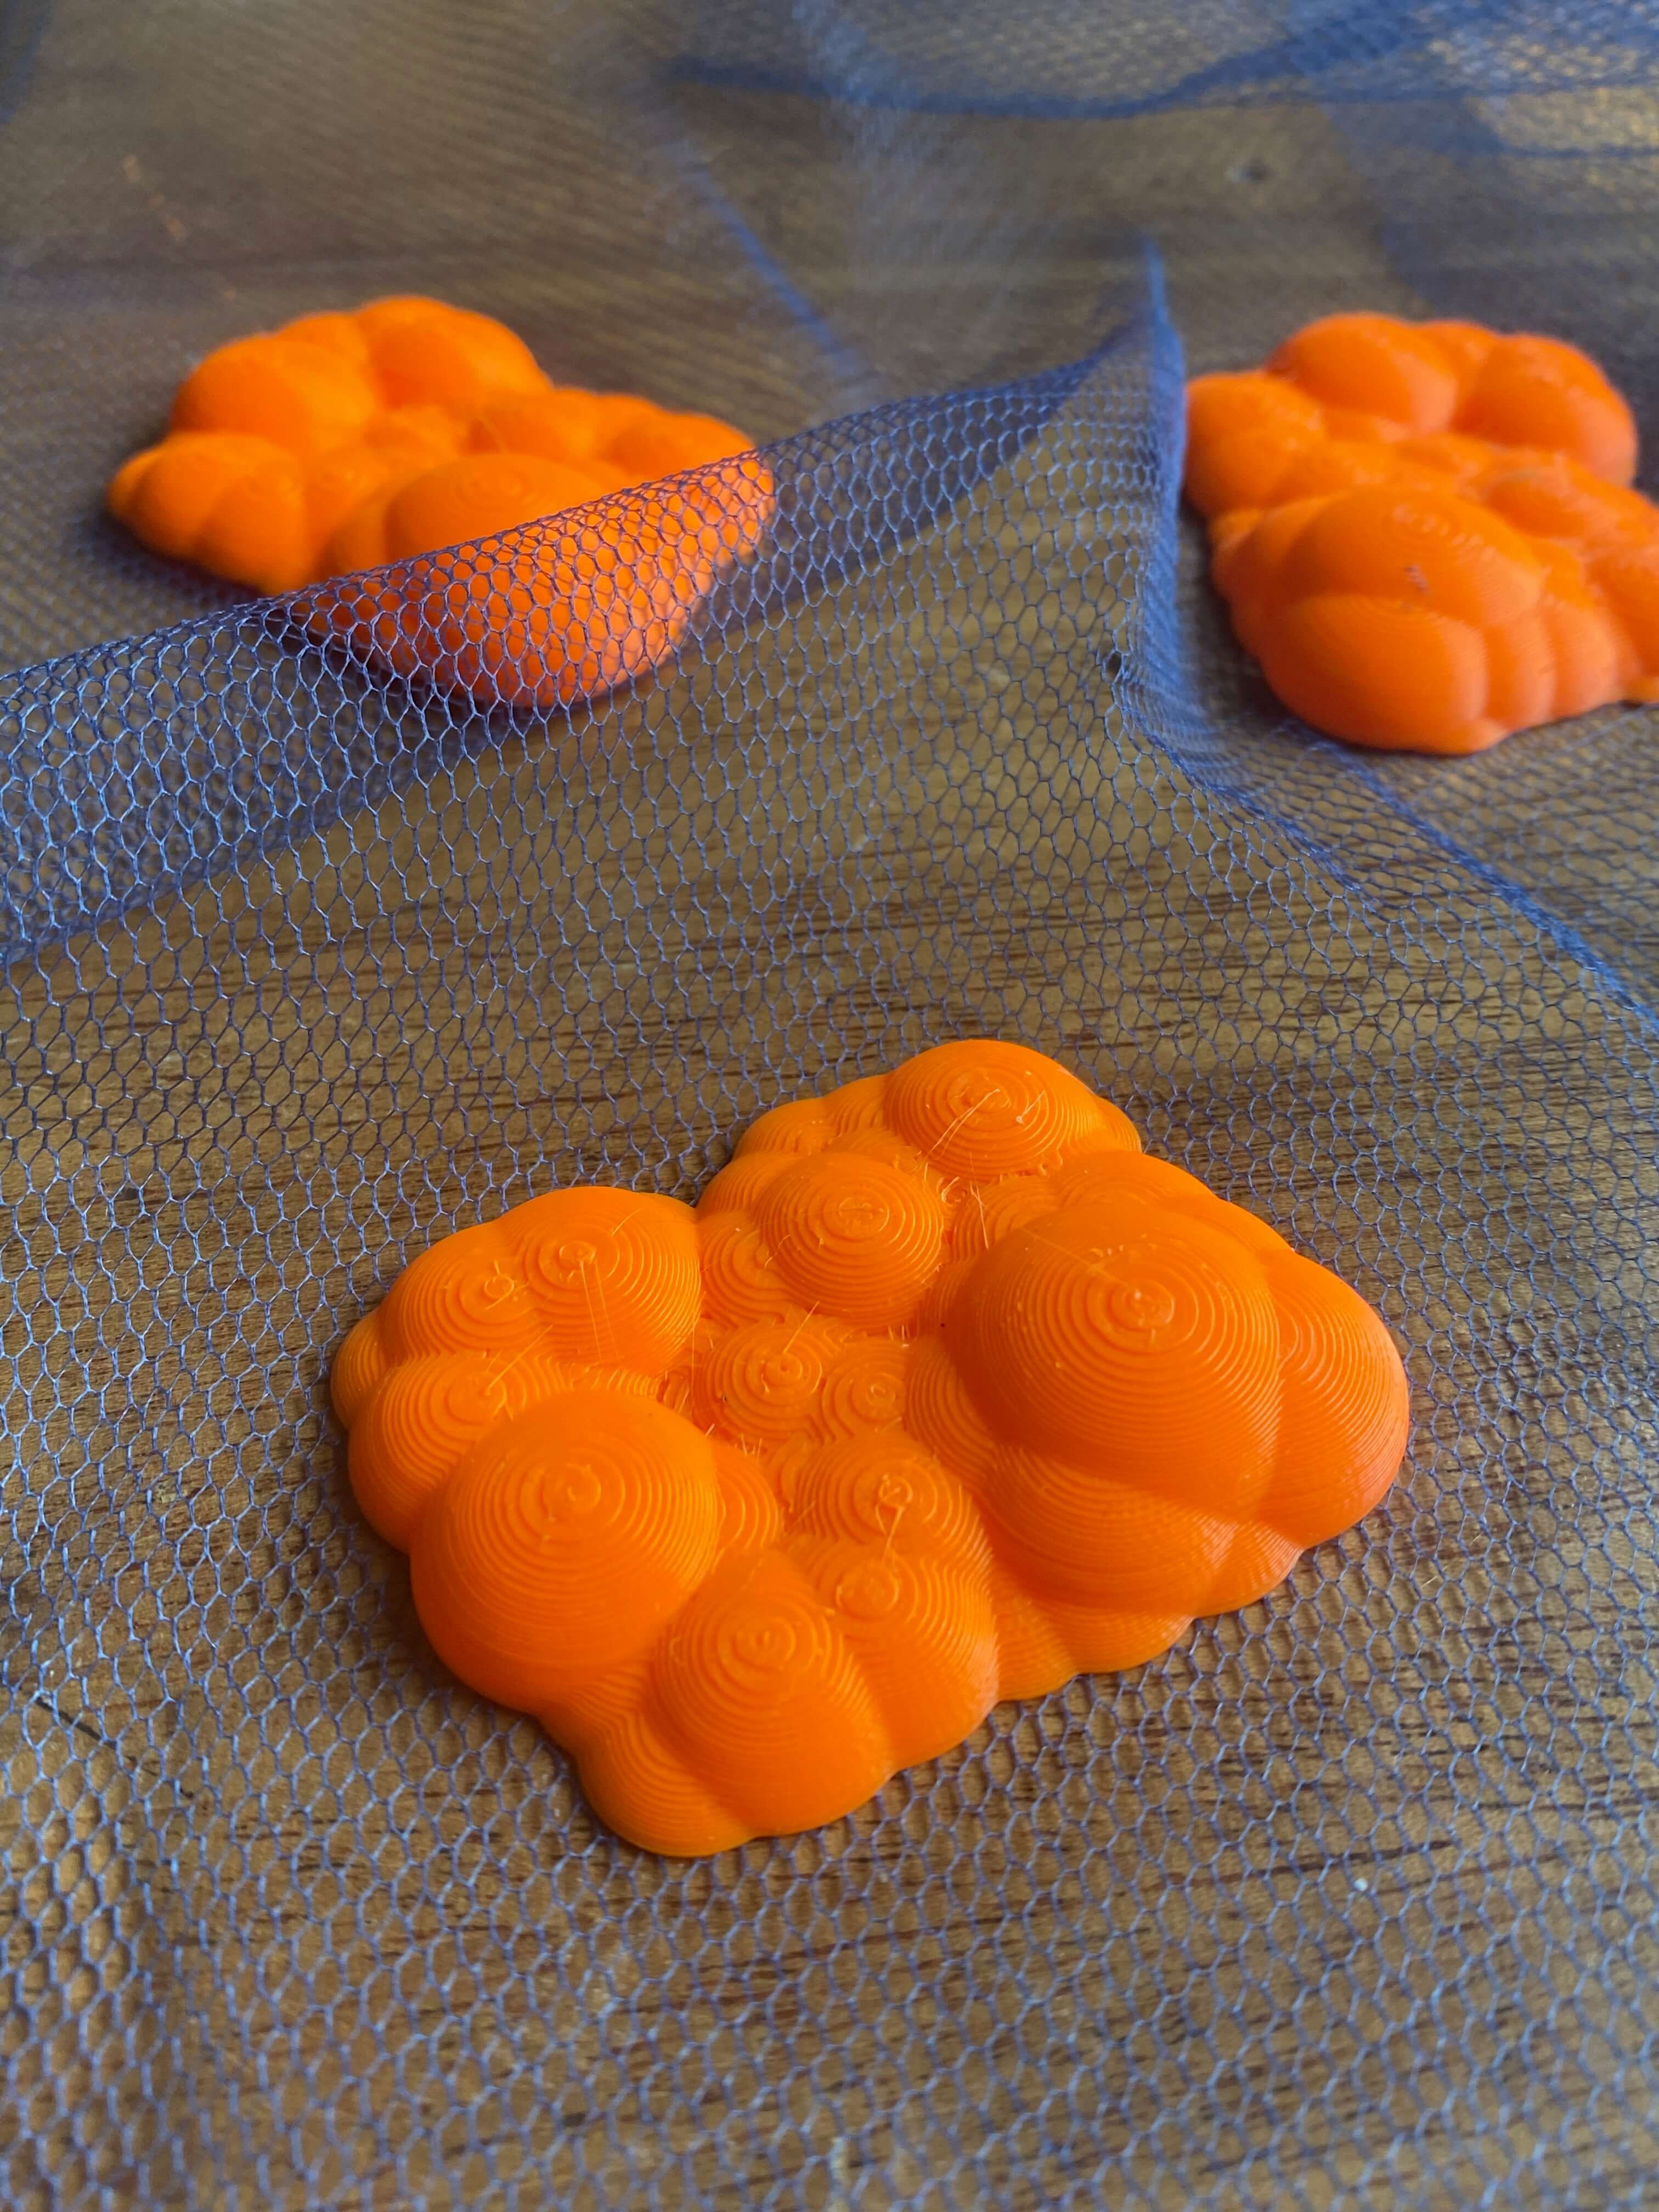
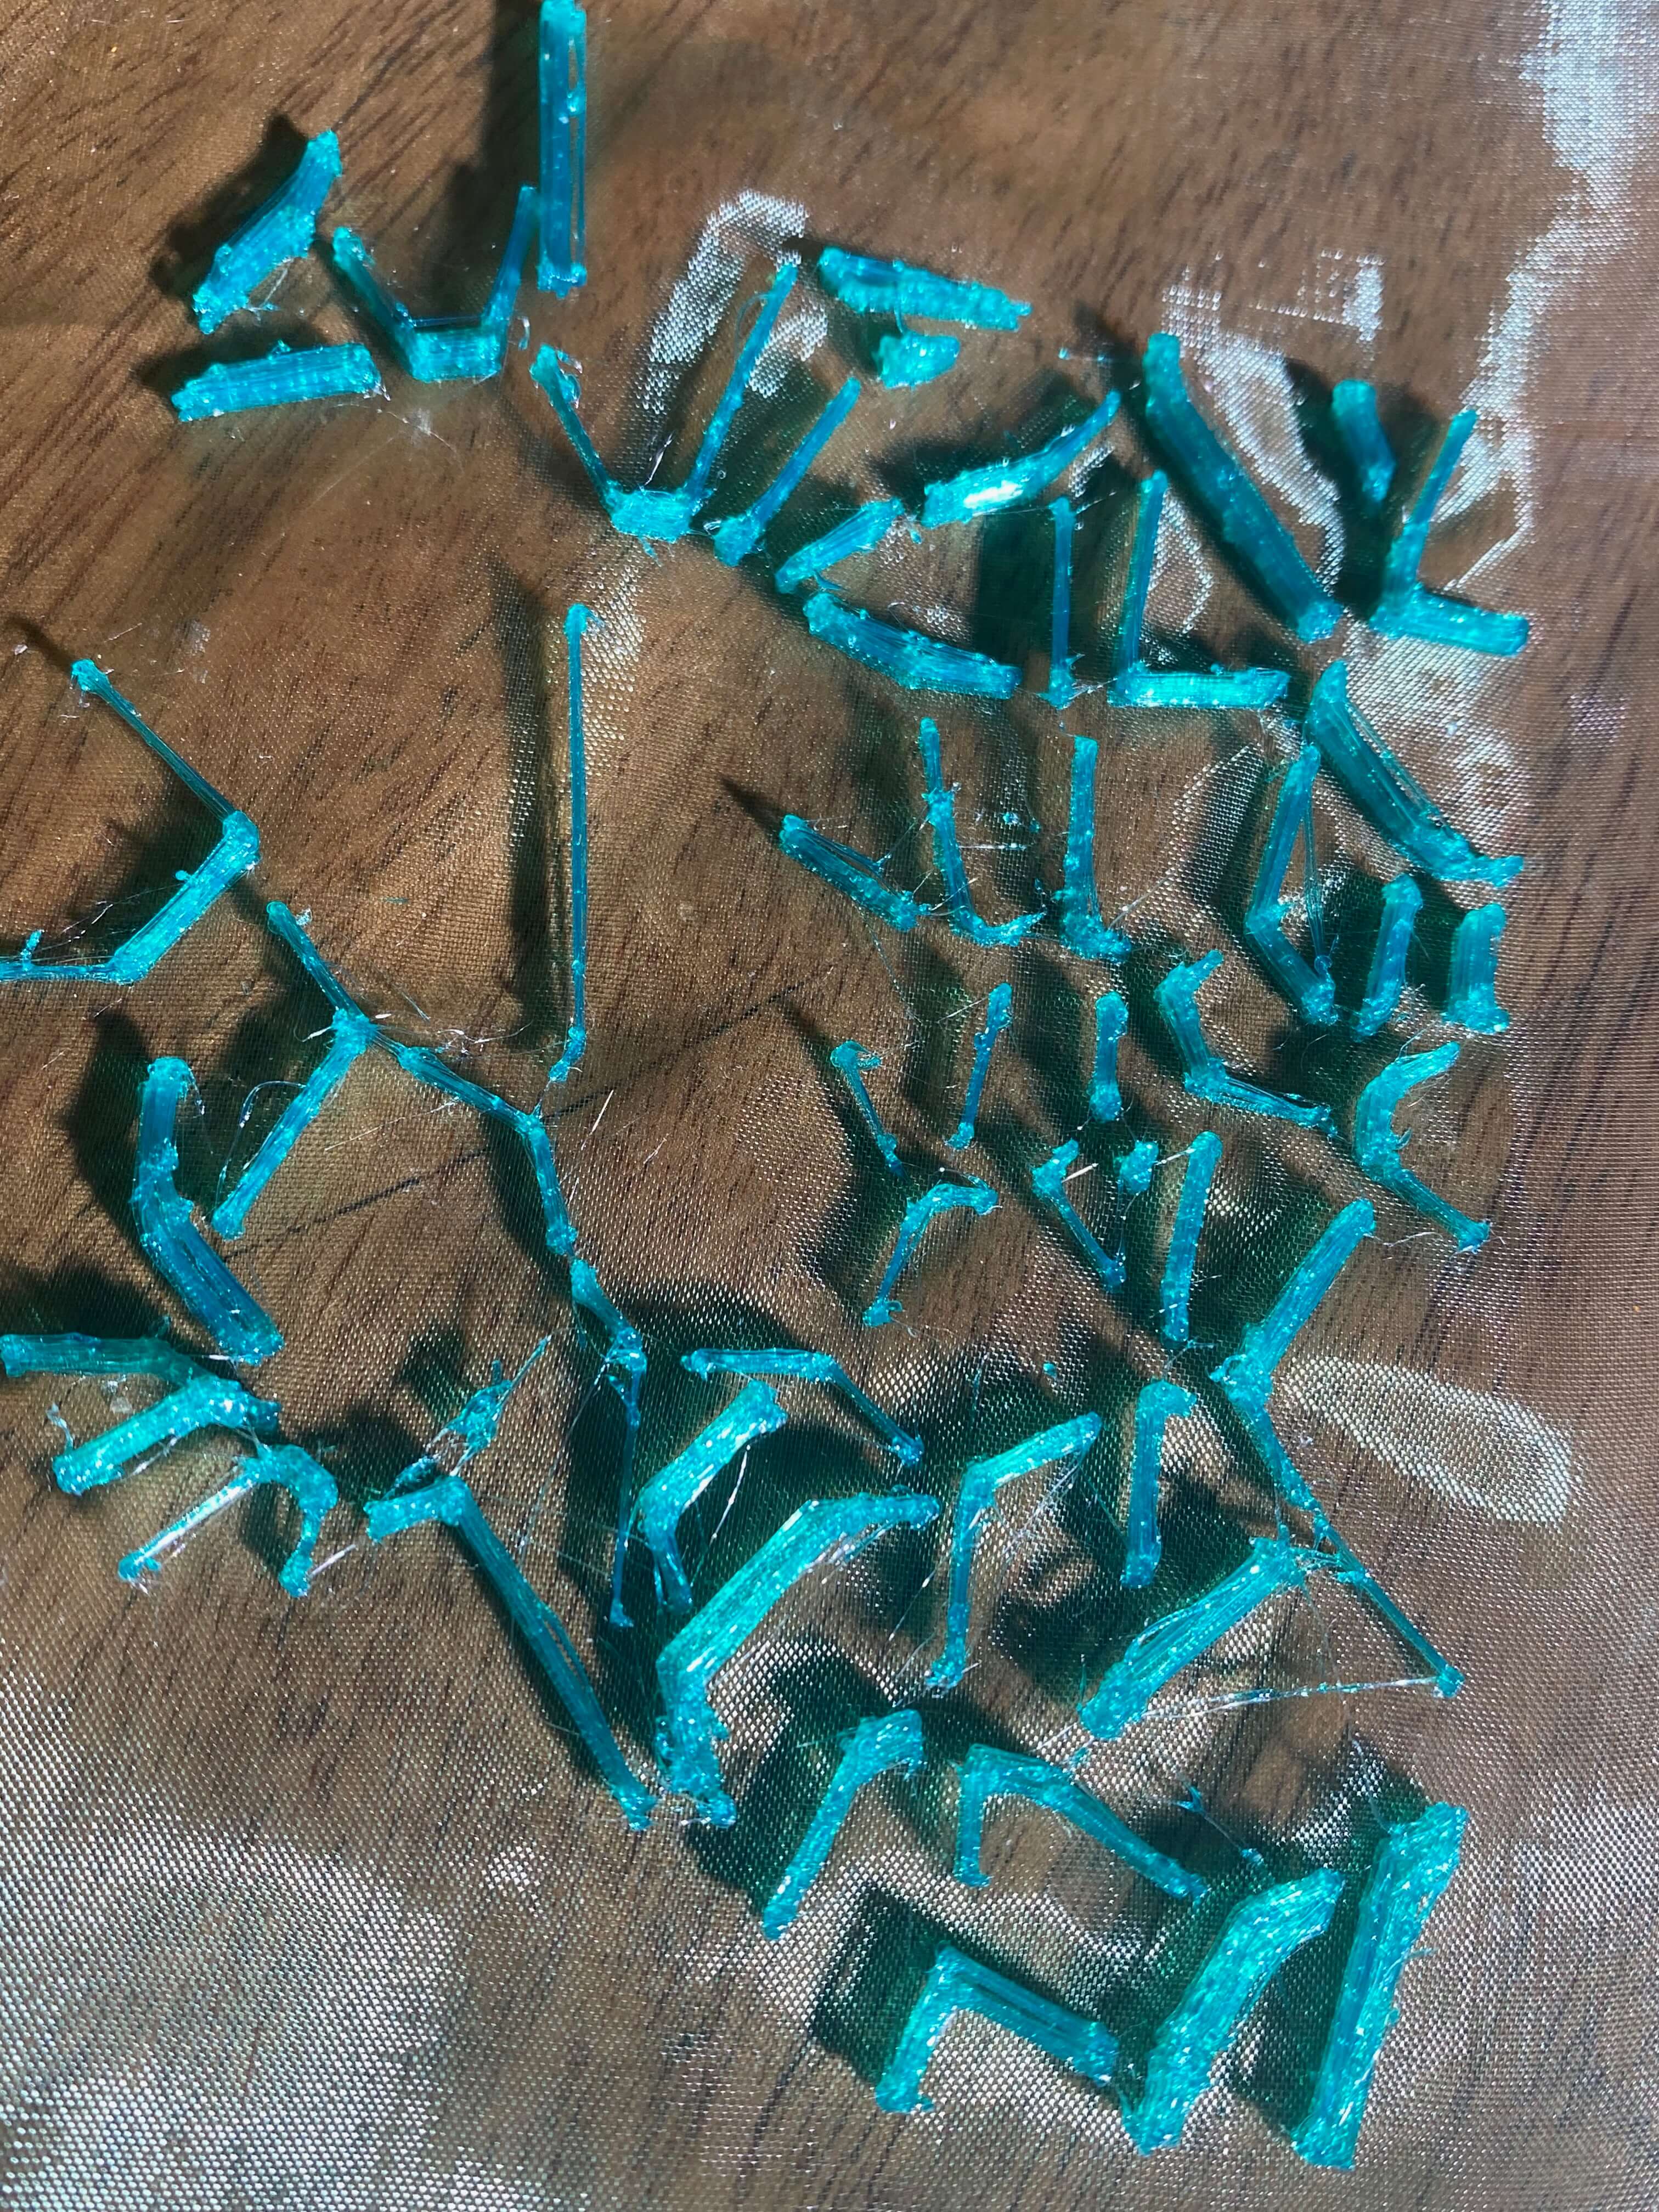
I printed my spheres first a bit bigger with orange PLA filament on blue netting. I liked the detail and the organic flow of the design. But when sizing the spheres for printing, I didn't take into consideration the contours of the human body. Also, because I used PLA, the spheres were stiff and hard, and did not bend around body curves. In that sense I wondered how to incorporate my orange blobs in any garment.
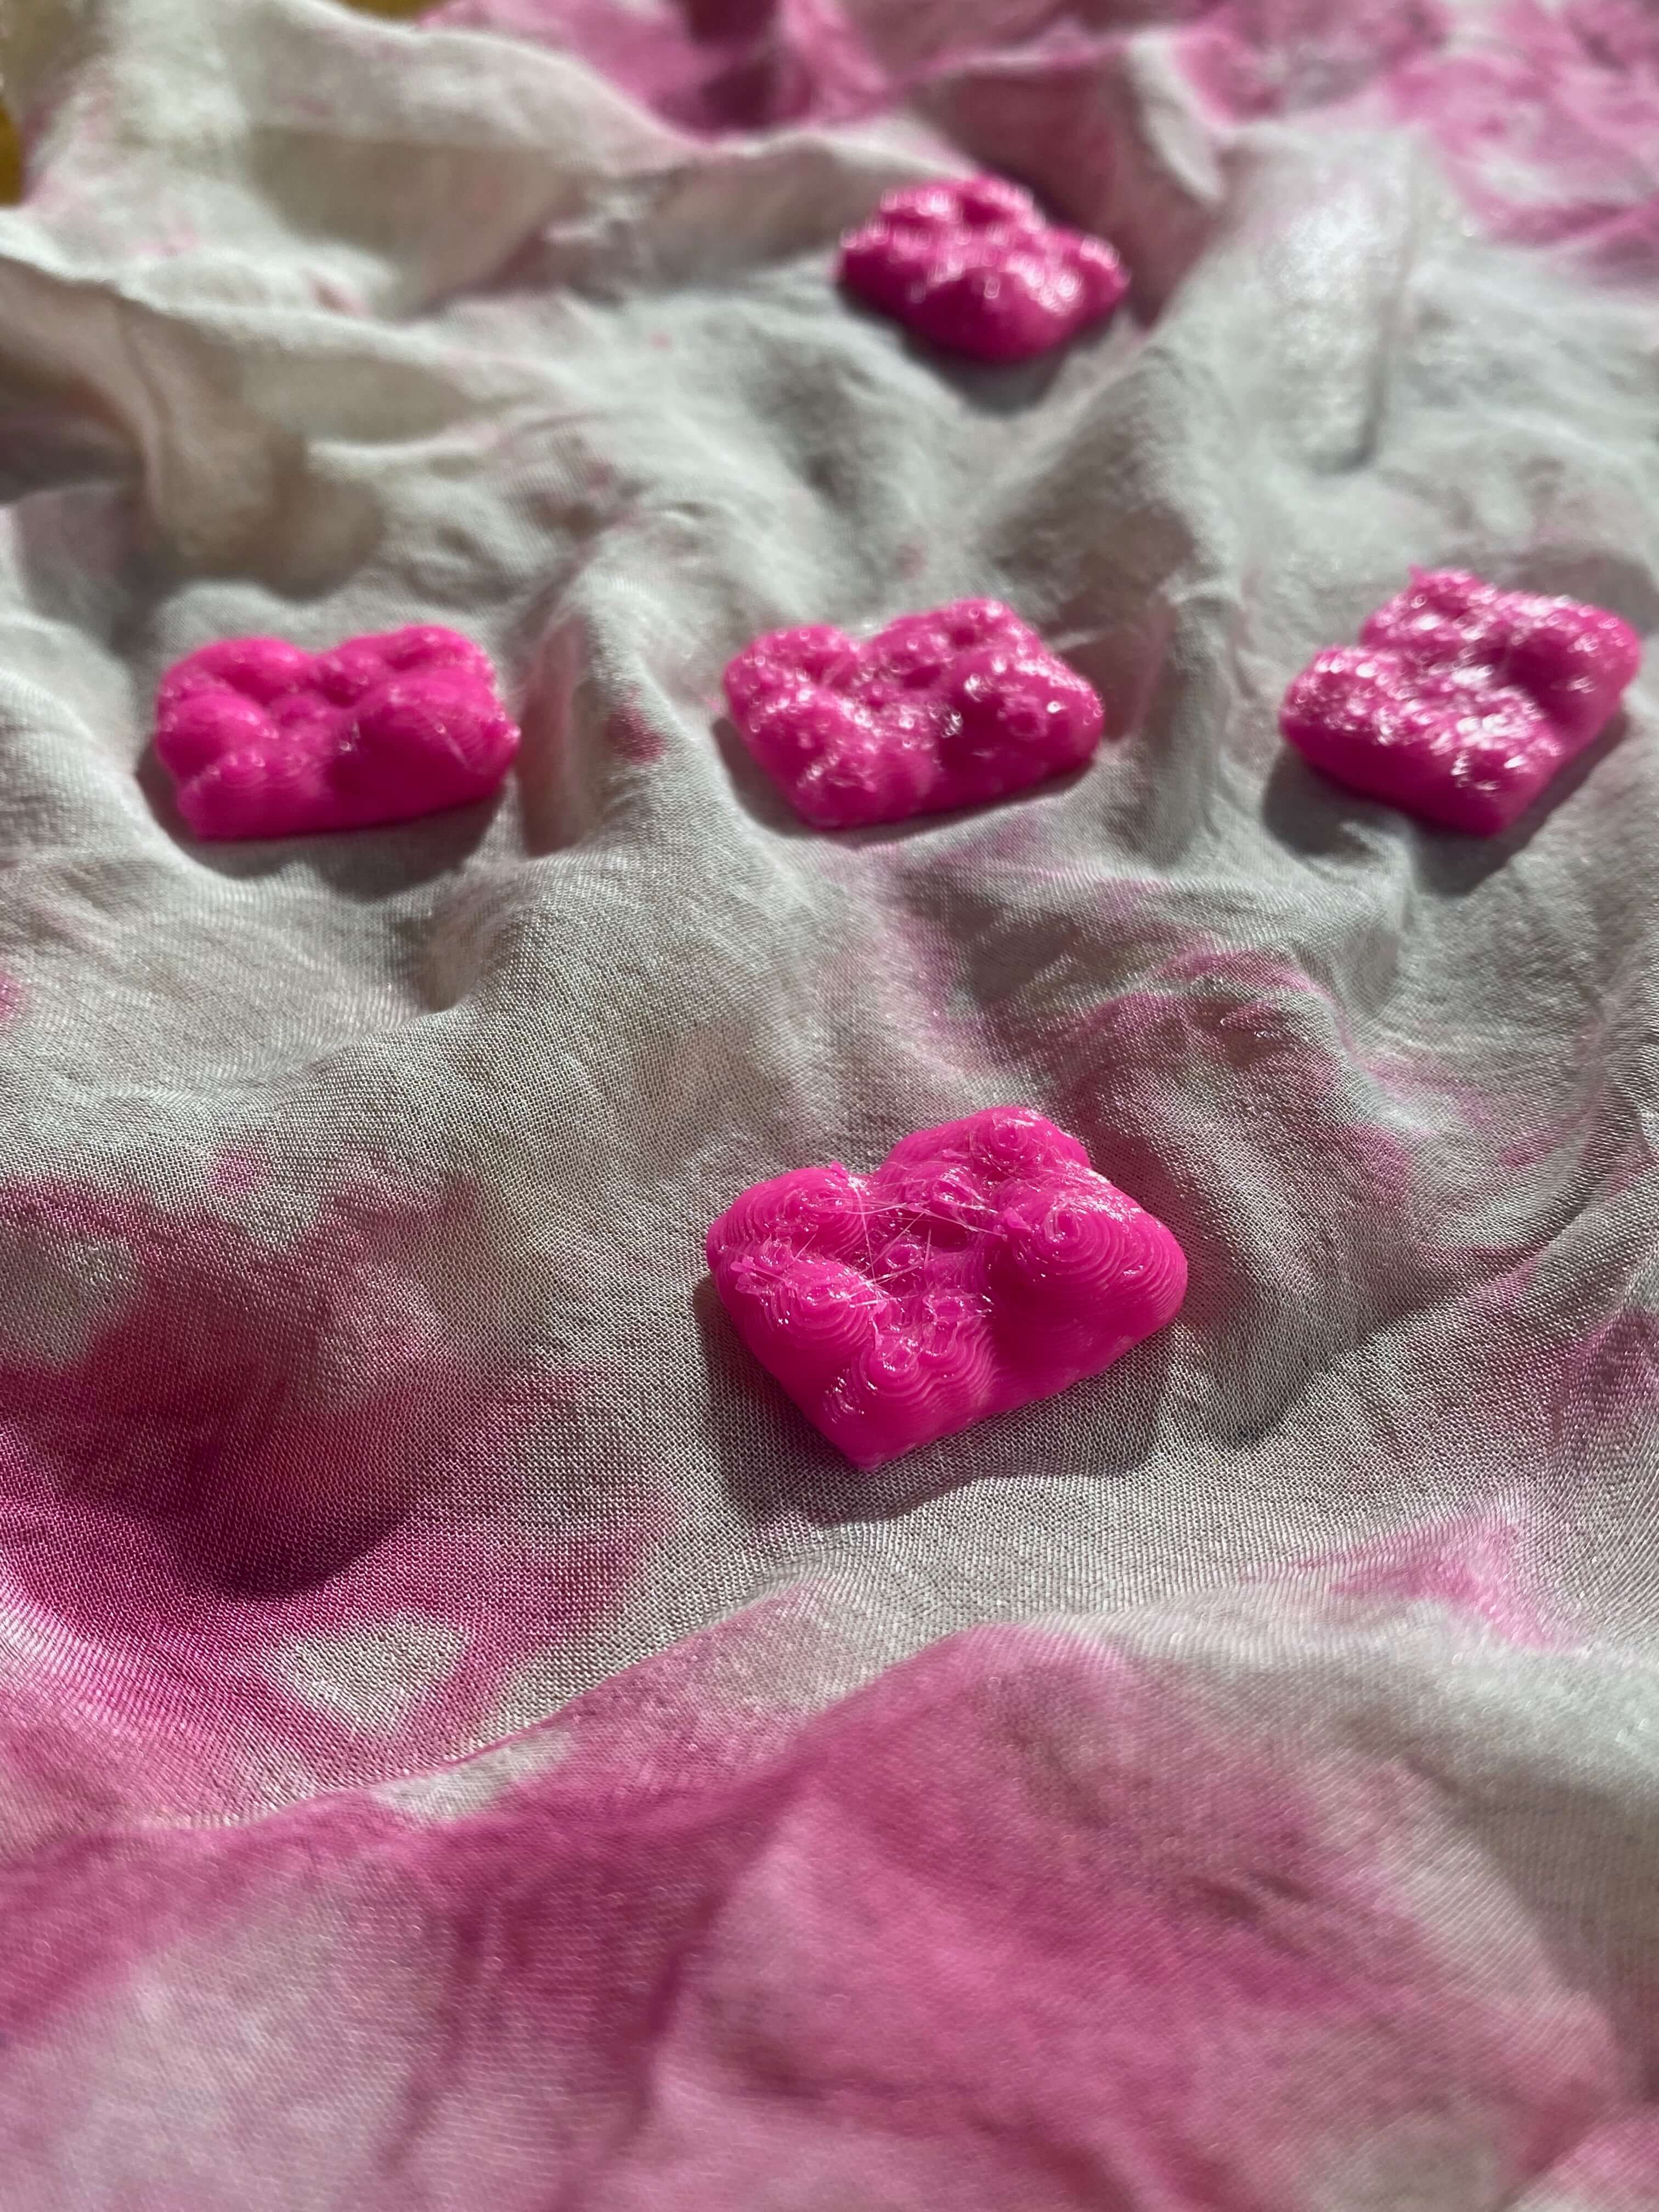
I resized the spheres and printed those for a second time with pink PLA on silk that we had painted with bacteria some weeks earlier. Because of the resizing they lost most of their detail and their attractive organic form. Again, because of the stiffness of the PLA, the spheres seemed to be seperate entities, and did not blend with the fabric.
So the next stage in designing would be taking the human body into consideration and reflect from there how to incorporate those spheres into garments.
Files
The .stl file, all the files for Rhino and Grasshopper modelling, and slicing in Ultimaker-Cura can be downloaded here.