Week 8: Open Source Hardware
This week’s focus laid on different types of open source hardware in the textile field with a grand focus on different types of looms and hardware designed to aid textiles in multiple ways. This week was an exploration of all kinds of machines to tools. It was also our very first time working as a Team. Boy was this going to be a challenge!
Pre-existing techniques, tools and machines were closely observed to gain inspiration for our own creation. The idea behind it is to hack open source hardware. This giving us endless possibilities to design and come up with technology or obsolete machines that would serve to create new possibilities.
In our group was discussed not only the functionality of our creation but also the political and social ideas behind it. Question was how functional and successful can you make such a. Piece in just four days’ time!
Here is our final piece!
How it all started:
In beginning of this week it took us all a long time to figure out what it was that we were making as a team. Having quite a few team memebrs also resulted in many different opinions but all in all we agreed on one thing: "We wanted to make an extruder". Then the ideas started evolving from extruding bicycles to sewing machines that could extrude with a pedle and a conveyor belt that would drag the extraction into lines. The main point was going to be to extrude something in 3D: A 3D extruder.
Here are some photos of our initial sketches:
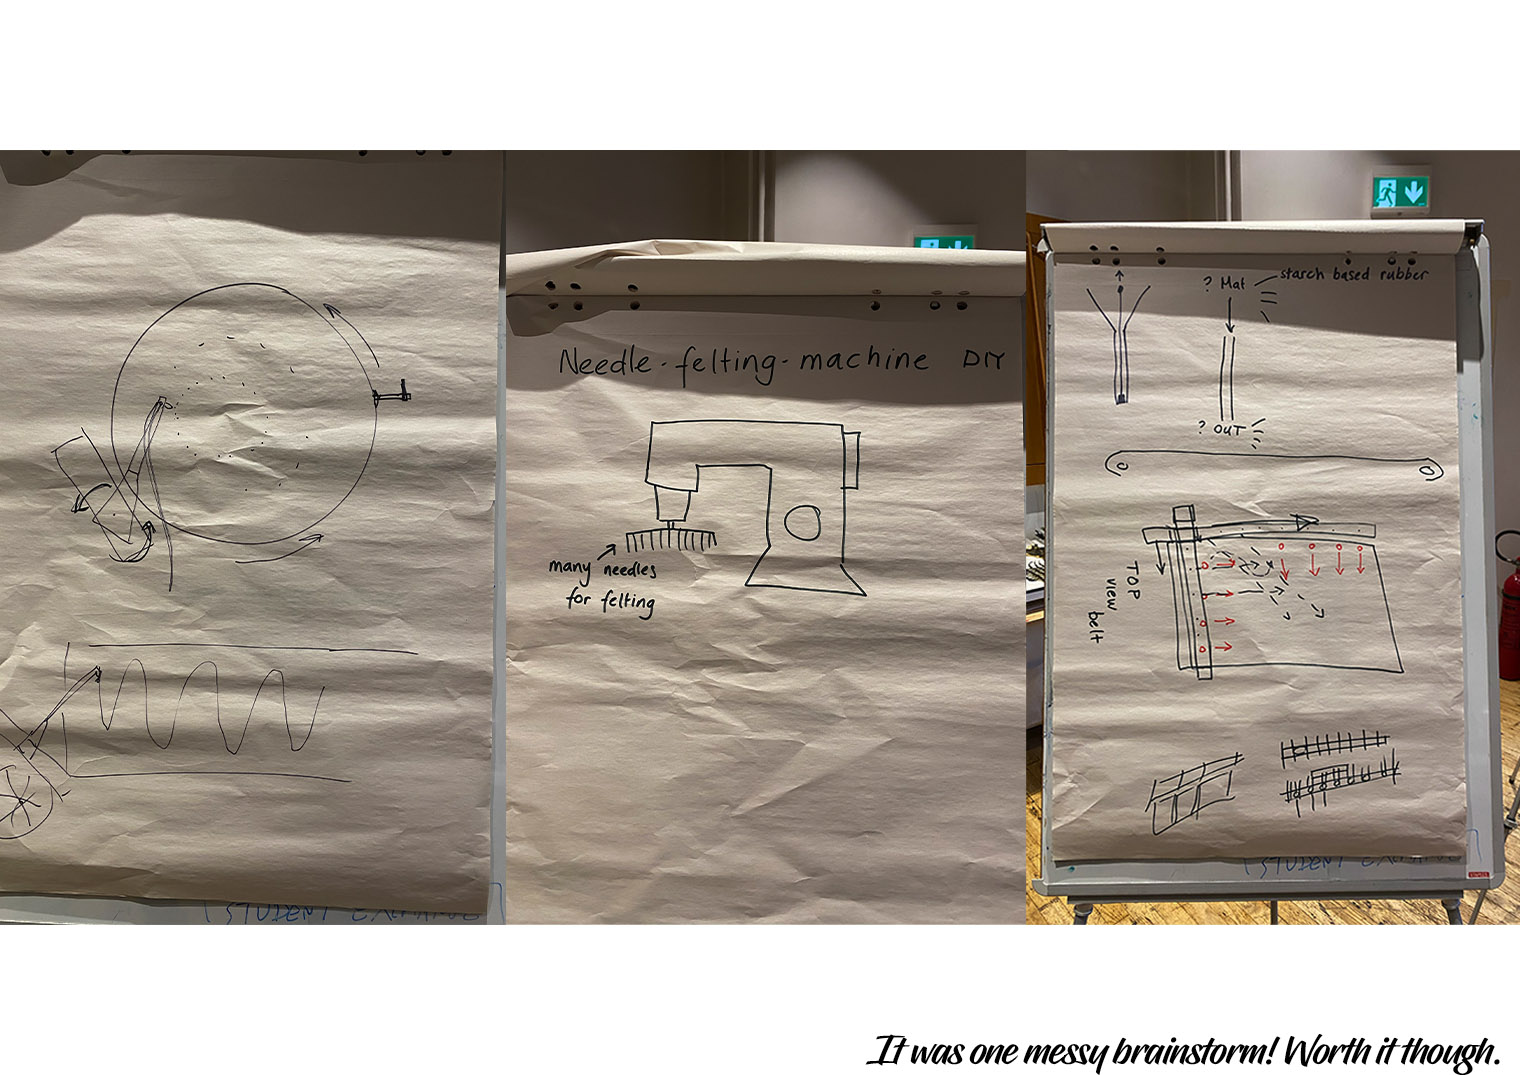
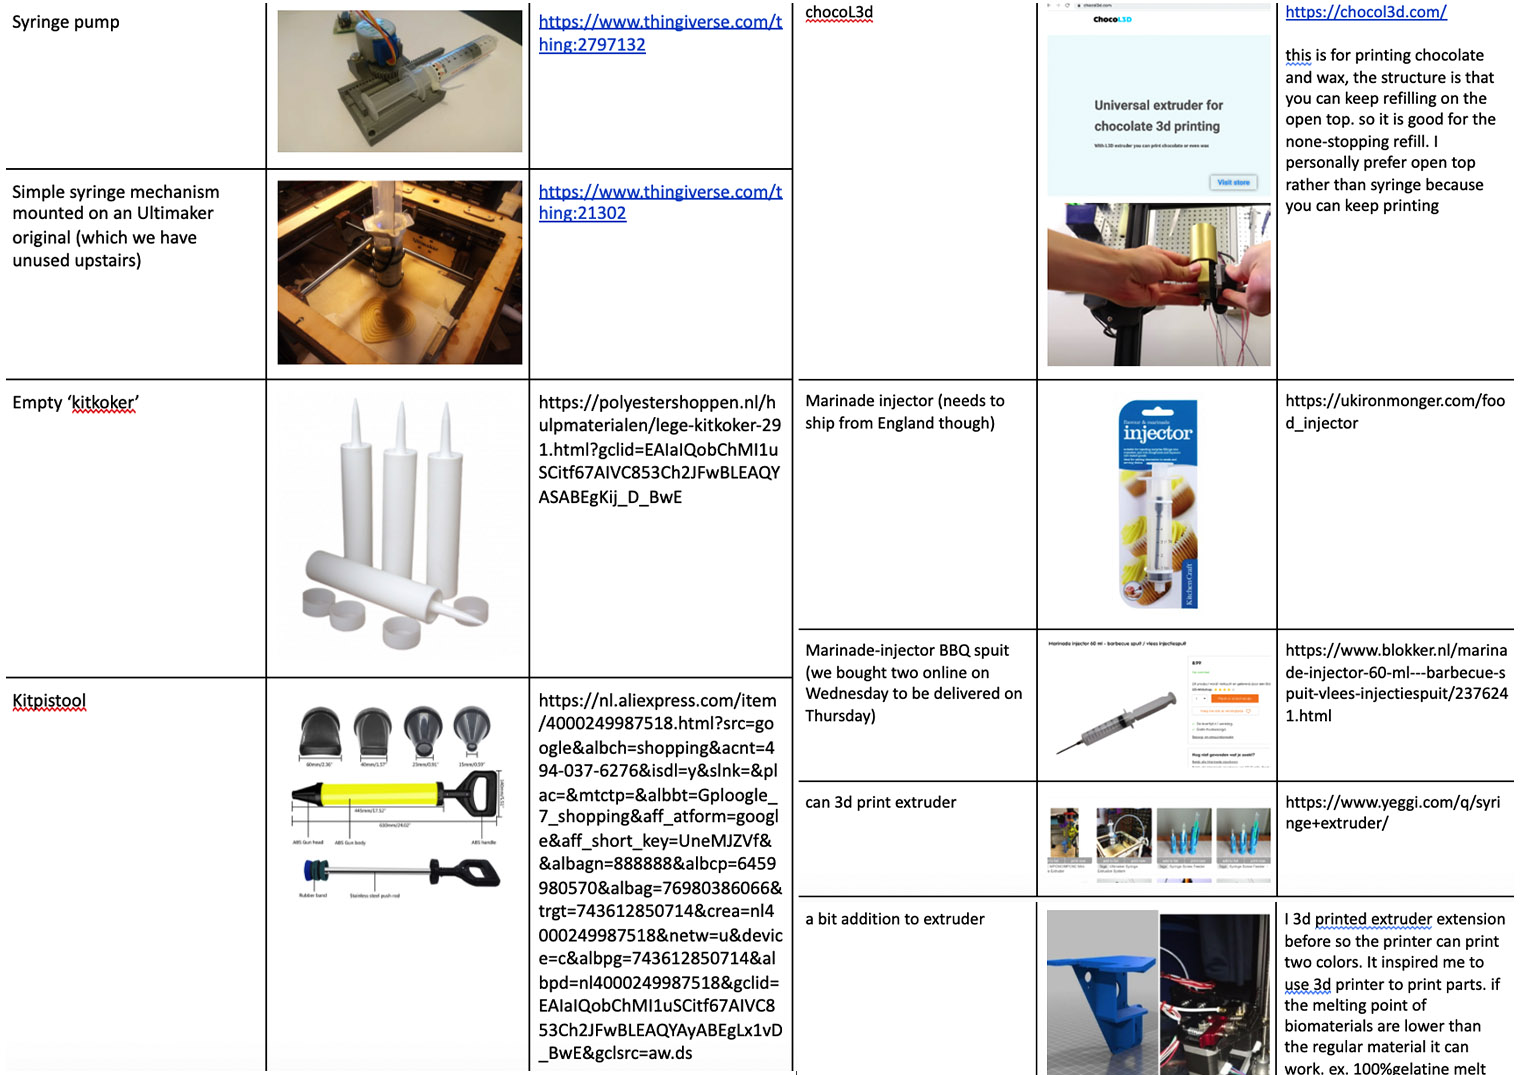
We started with this task with a googling session to see what kind of simple extruders where out there:
Next was the division of labor in our team, so that everyone could be assigned to a task during this week:
-
Documentation Rebecca B.
-
Coding motor control + adapting 3D file: Sara
-
Sketches of the thing: Jen
-
Put together the thing:
3D printing: Patty + Becca (me) -
Material recipes + testing: Carolina + Rebecca
Construction process:
Mini diary:
Wednesday: The start of it all.
So, we set for the handheld 3D hand extruder. On the same day of the brainstorm Rebecca went to the Blokker nearby in the Jodenbreestraat, but no large syringes there, so we ordered them online. What we did with the two 5V motors was order them just so that we could be sure to could continue the next day.
We only had 5 days to fix this before our show and tell! Time was crucial.
Thursday: How to work the first prototype and Prusa (3D machine).
Today we were expecting our syringes ordered from Blokker.nl but then we realise they wouldnt arrive on top. So we adapted our extruder file to fit one of the syringes that we could fin din De Waag. Sarah managed to adapt the file from home and realised that we had to fiddle around with the extruder a little and that we may need some support in the file.
The support was on 45 overhang angle, but we could only see it when turning on the ‘preview’, rather than the ‘prepare’ button. We played around a little and discovered that 0 ‘overhang angle’ provides maximum support and 90 no support at all. Henk clarified everything by telling us that we needed no support.
Henk helped and advised to change the temperature of the nozzle to 245 degrees Celsius and that of the board to 85 degrees Celsius. He also advised to keep the doors closed as much as possible, seeing the heat can easily be disrupted when wind or a breath blows in.
Insert gif of 3D printer PRUSA:
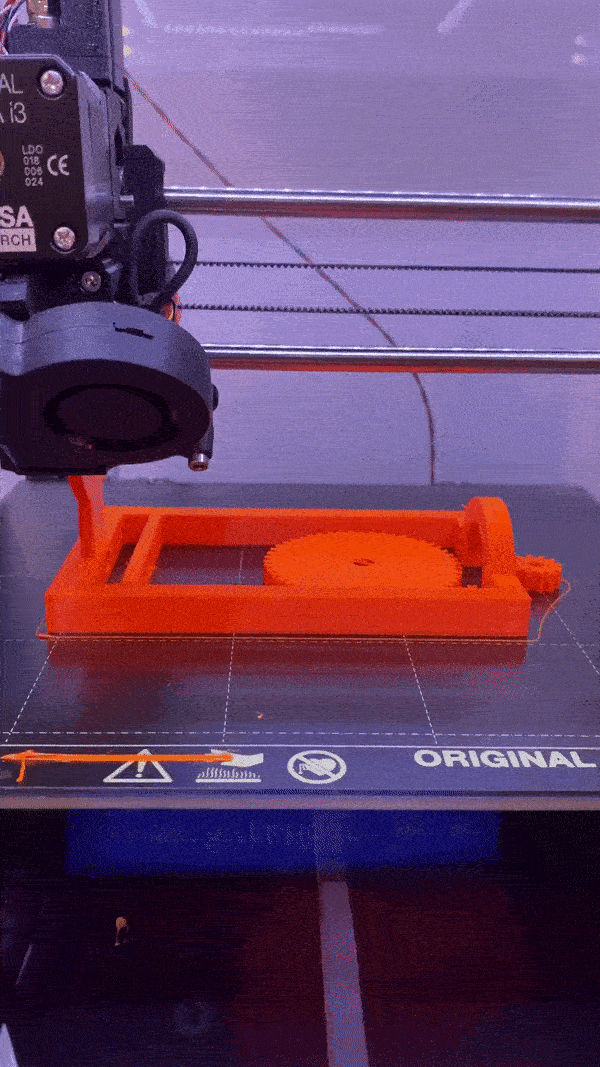
We put the file on the scandisk. Wrote down its name: PI3MK3M_UM2_syringe_extruder_30 and made our way to the Prusa printer to start the assembly of our ‘baby’, which would take about 3,5 hours. Not too bad.
Documentation PRUSA instructions:
- Turn on at the back of the machine.
- Clean the board on top of the (magnetic) bed. This is important because you’re printing directly on the board and not on fabric.
- Push the filament in from the top.
- Enter main menu: ‘Load filament’ and press the knob.
- Under temperature: select ‘material’ and PET (it will use the temperature selected during the slice).
- Press the knob to start extruding.
- The machine will ask you whether the colour filament that is extruded is the right one. We don’t know because perhaps the same colour yet a different filament was used previously. So we press ‘no’ several times until we see a long clear orange thread coming out.
- After pressing ‘yes’ (see previous action) we go to ‘settings’. There’s no real need to change these.
- Put the SD card in the slot and select the appropriate file (ours was titled PI3MK3M_UM2_syringe_extruder_30).
- The printer will start heating and running.
- Henk reminds us to close the doors because the heat of the nozzle is 245 degrees and the board is 85, just some wind would. make the temperature drop, which is not what we want.
- Wait a few hours and let the model cool down before taking it out, meanwhile: Take out filament by pulling hard while you make sure the head is still hot.
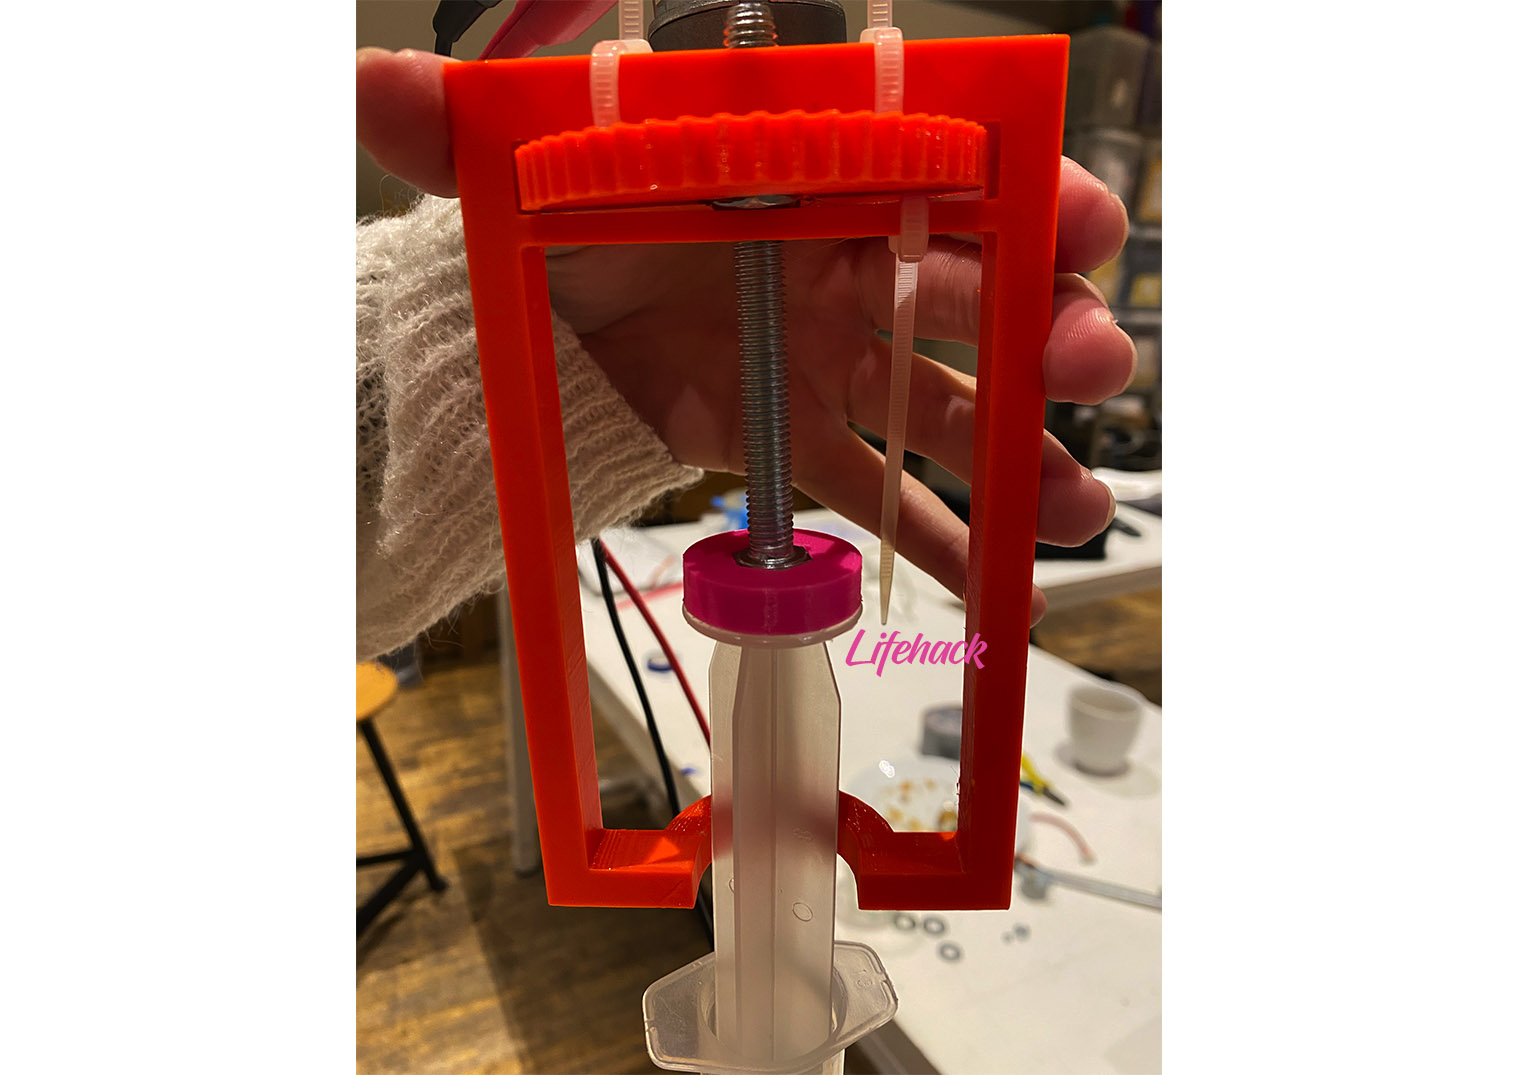
- Turn off Machine (at the back) As Patty and I continued to further develop this pushing down motion of the syringe, we decided to put a bolt of 8cm in the hole of the device. Like this the wheel of the extruder would turn the bolt down or up depending on the side of rotation. As the wheel would force itself inside the bracket it would move the bolt down or up.
[Afternoon, after printing]
Apparently, something had gone wrong with the printing of the centre of the main sprocket. Once the 8mm bolt was though, I became clear that the wheel wouldn’t set anything in motion. The hole proved too large to push the bolt forward. After contemplating printing a new sprocket, Cecilia helped out. Her suggestion was to make the whole a little bigger so that a nut could be pushed into place for support. Once the nut was soldered into the plastic the result wasn't pretty (oops).
Some of the first trials with our extruder:
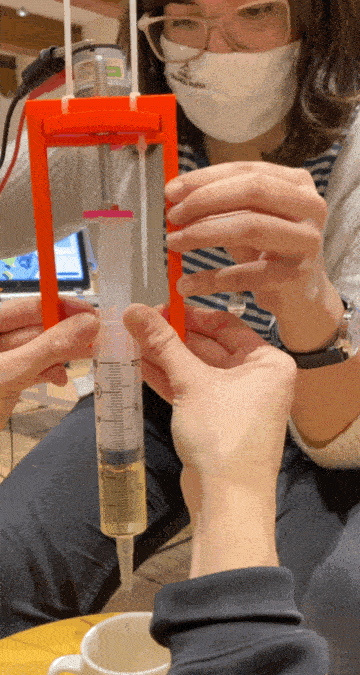
Bolt photo and motor issues. Assembling try out.
Another one of the problems that we faced was the fact that structure wasnt supporting the motor movement and therefore the shaft didnt function either. The structure may have been printed in a weaker way so we started hacking the machine with several tie wraps to see whther the support would be strengthened. The first test was with water to see whether the mechanism was extruding anything at all.
The last problem was that the syringe and the bold would slip on top of one another due to rotation, this is where we 3D printed and extra piece so that it could fit over the head of the bolt for it to become a wider surface area and get more grip while being pushed down. Very okay for our first trial if you ask me.
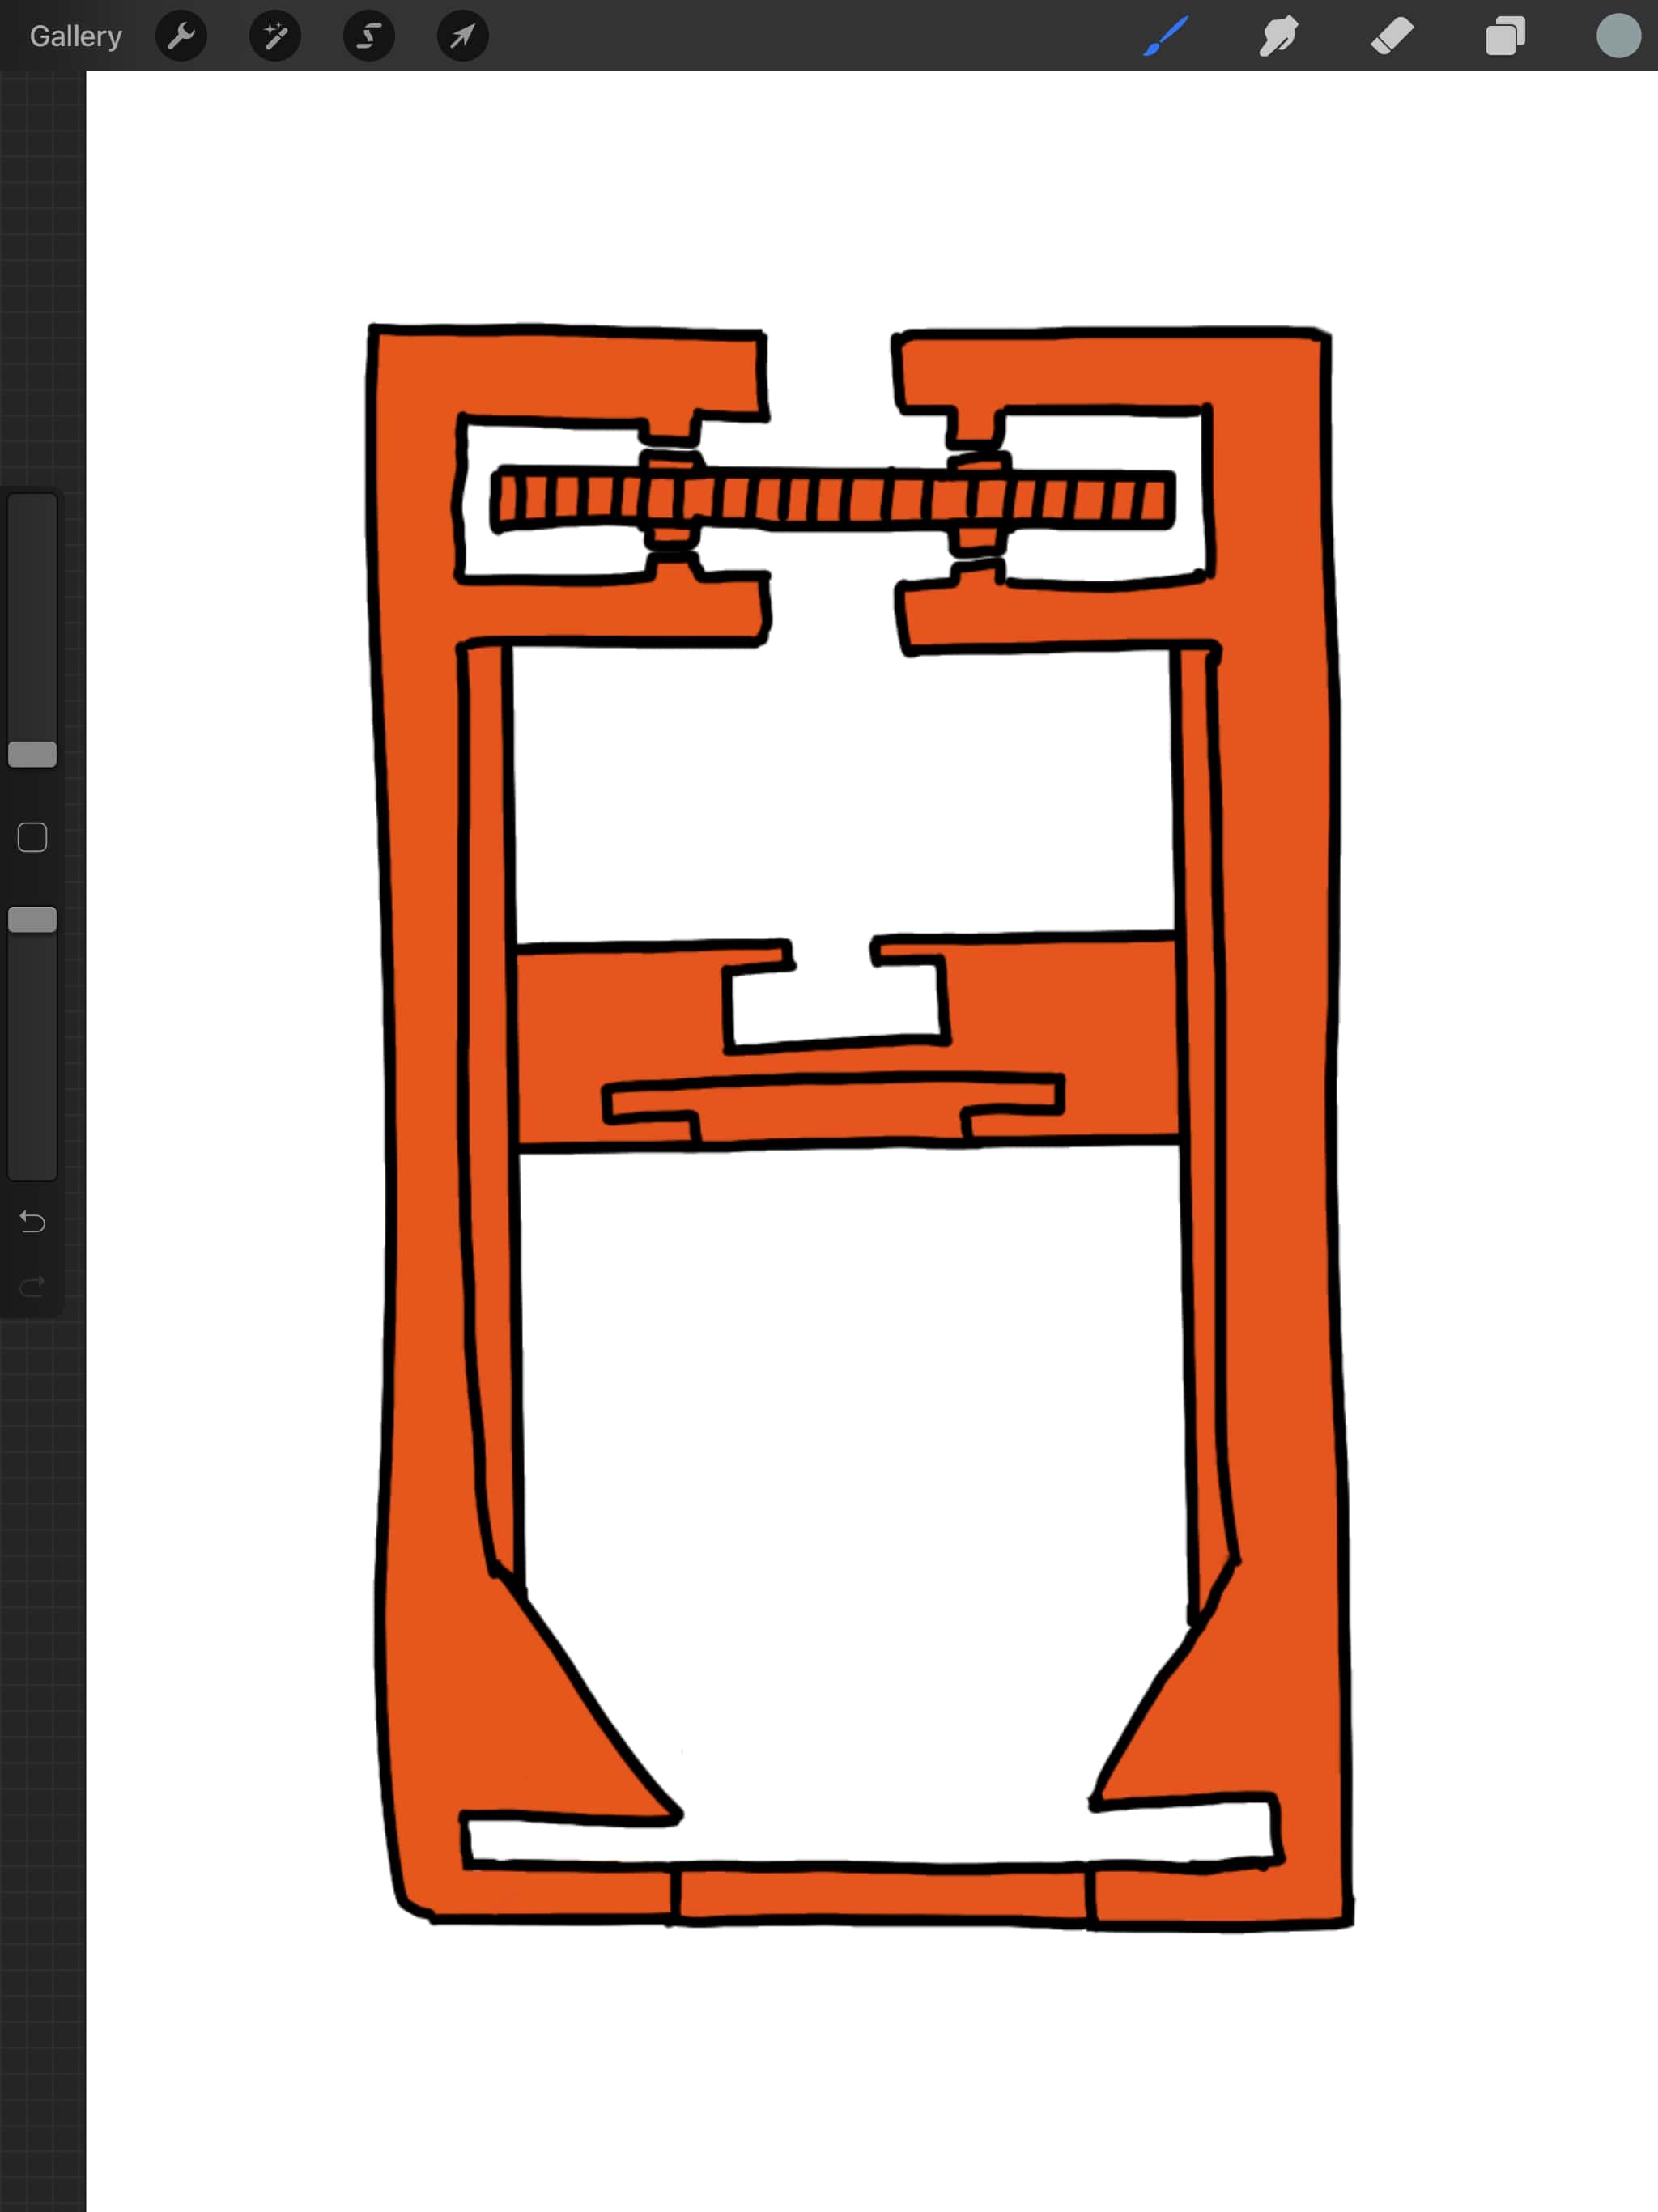
The idea would be this:
Before we had Sara: (Hack)
So this little pink piece aided us to push the syringe:
Once we had a sort of functional prototype we had decided to call it a day seeing as it was 17:00 and dark already, The next step was the programming, where our dear Sarah would be a star and help hes with her genius.
A lovely illustration to show the support of our bio extruder. this is the piece that will hold the syringe that is placed inside.
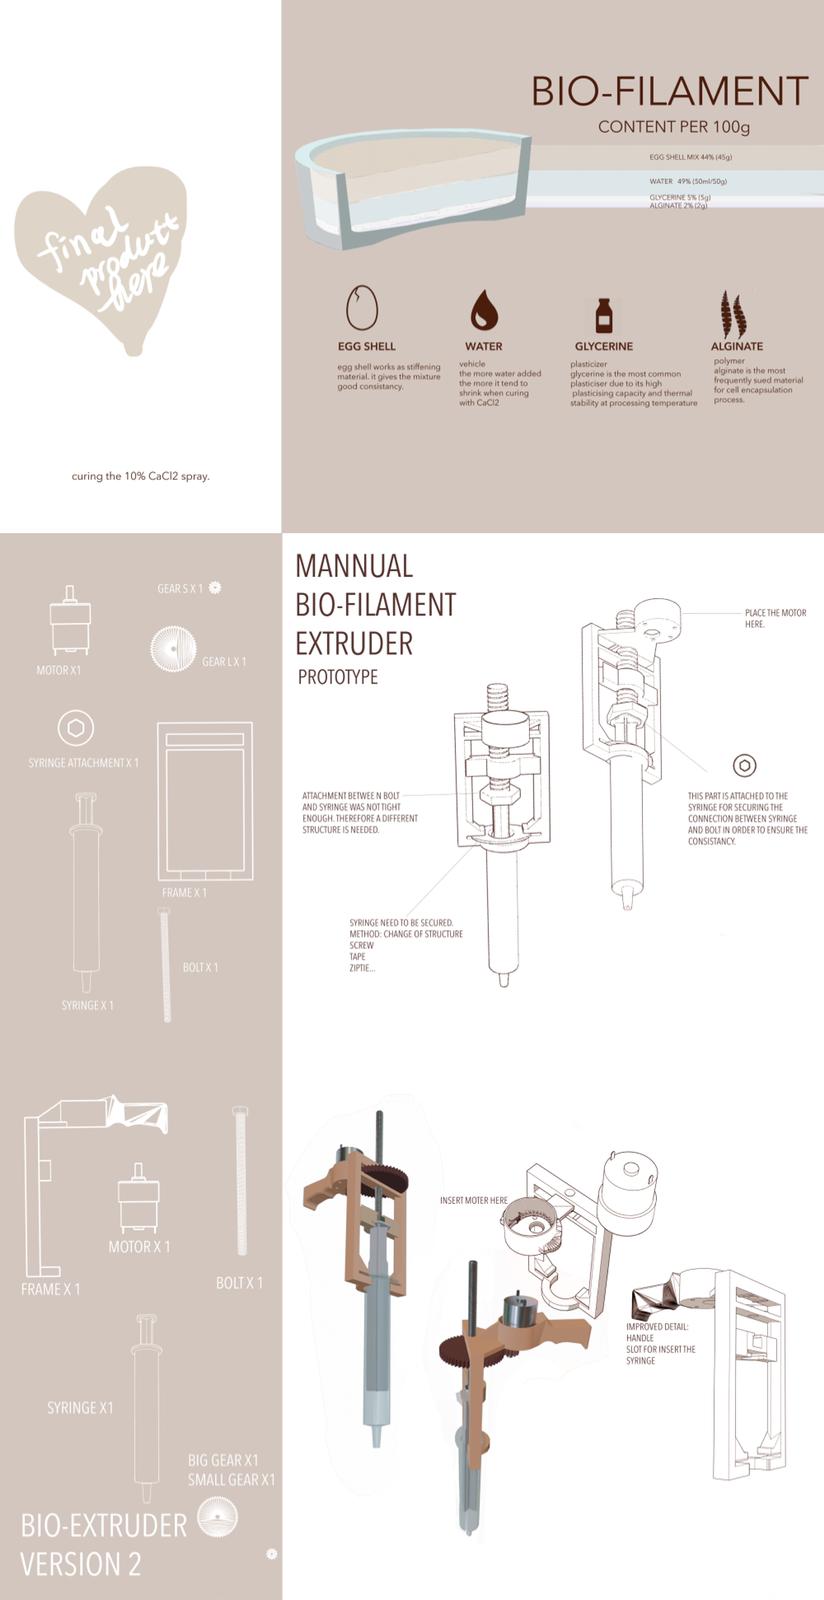
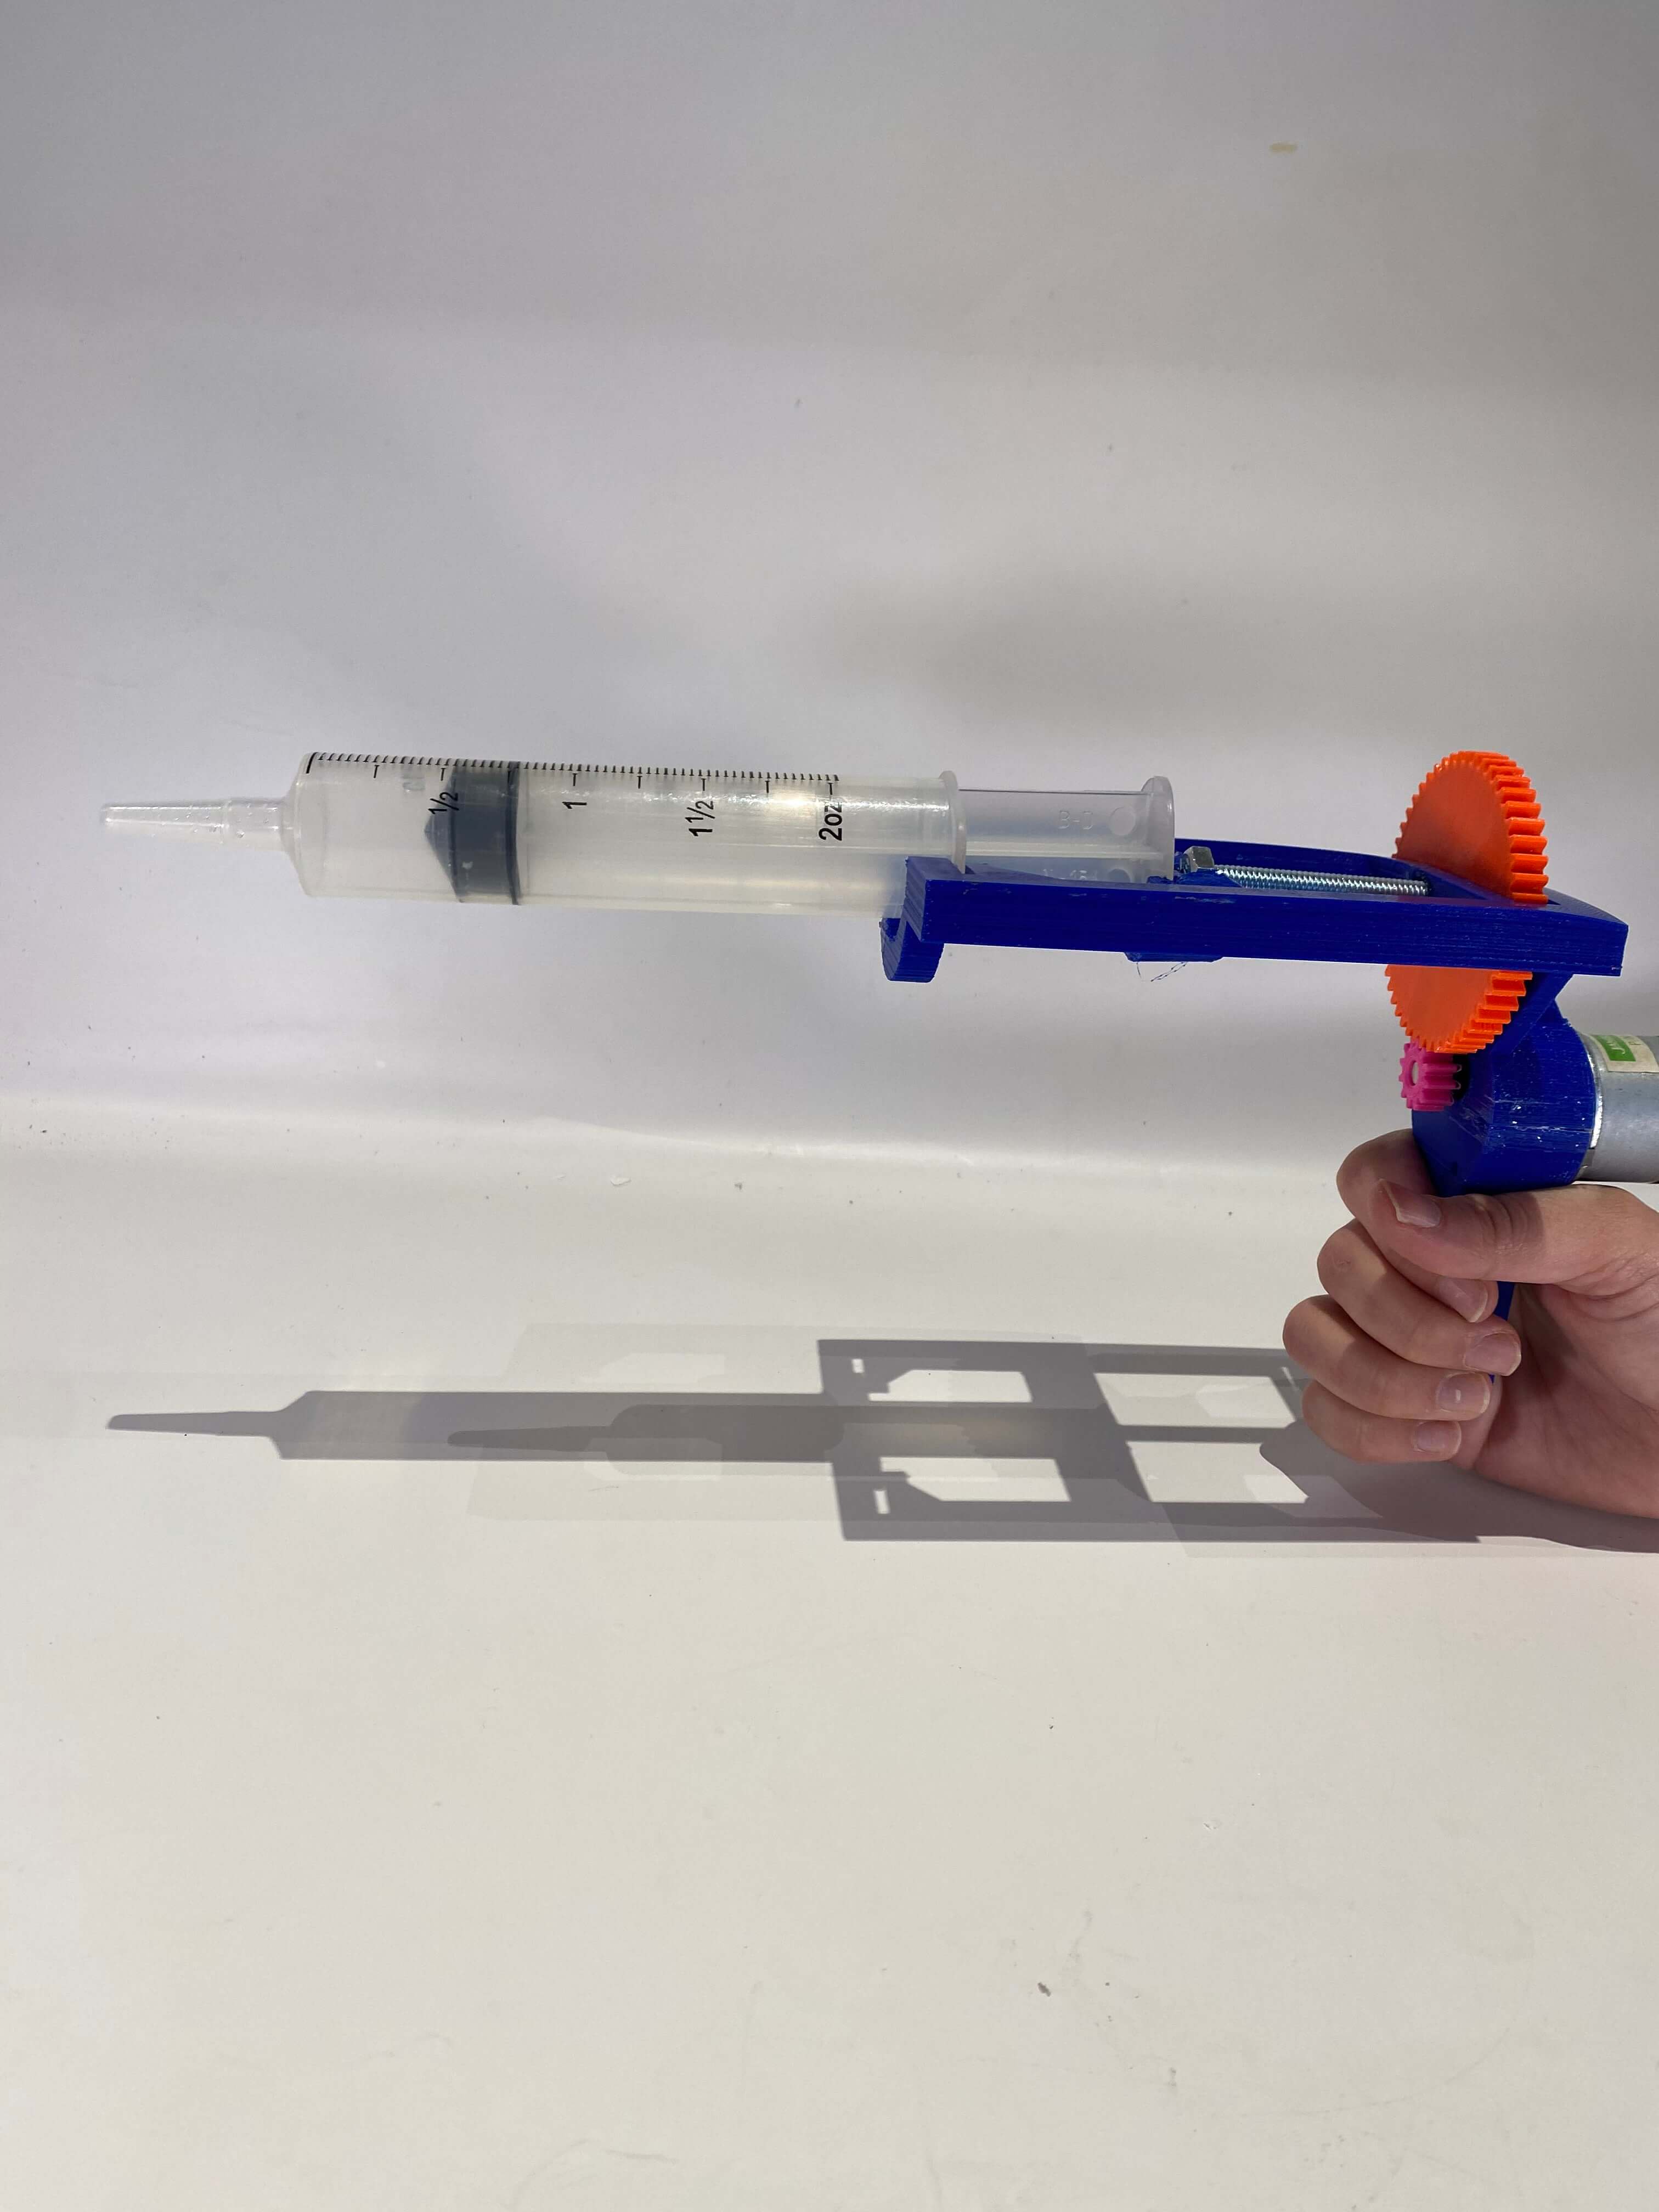
Friday and Monday: (Version 2)
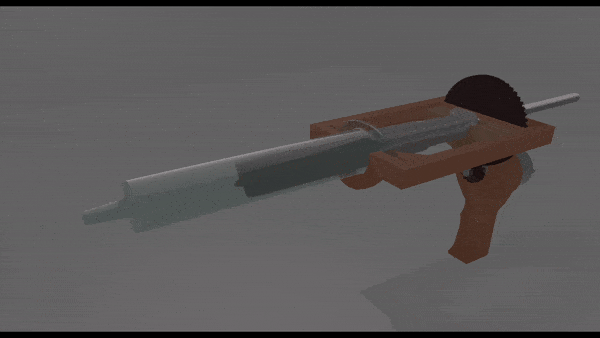
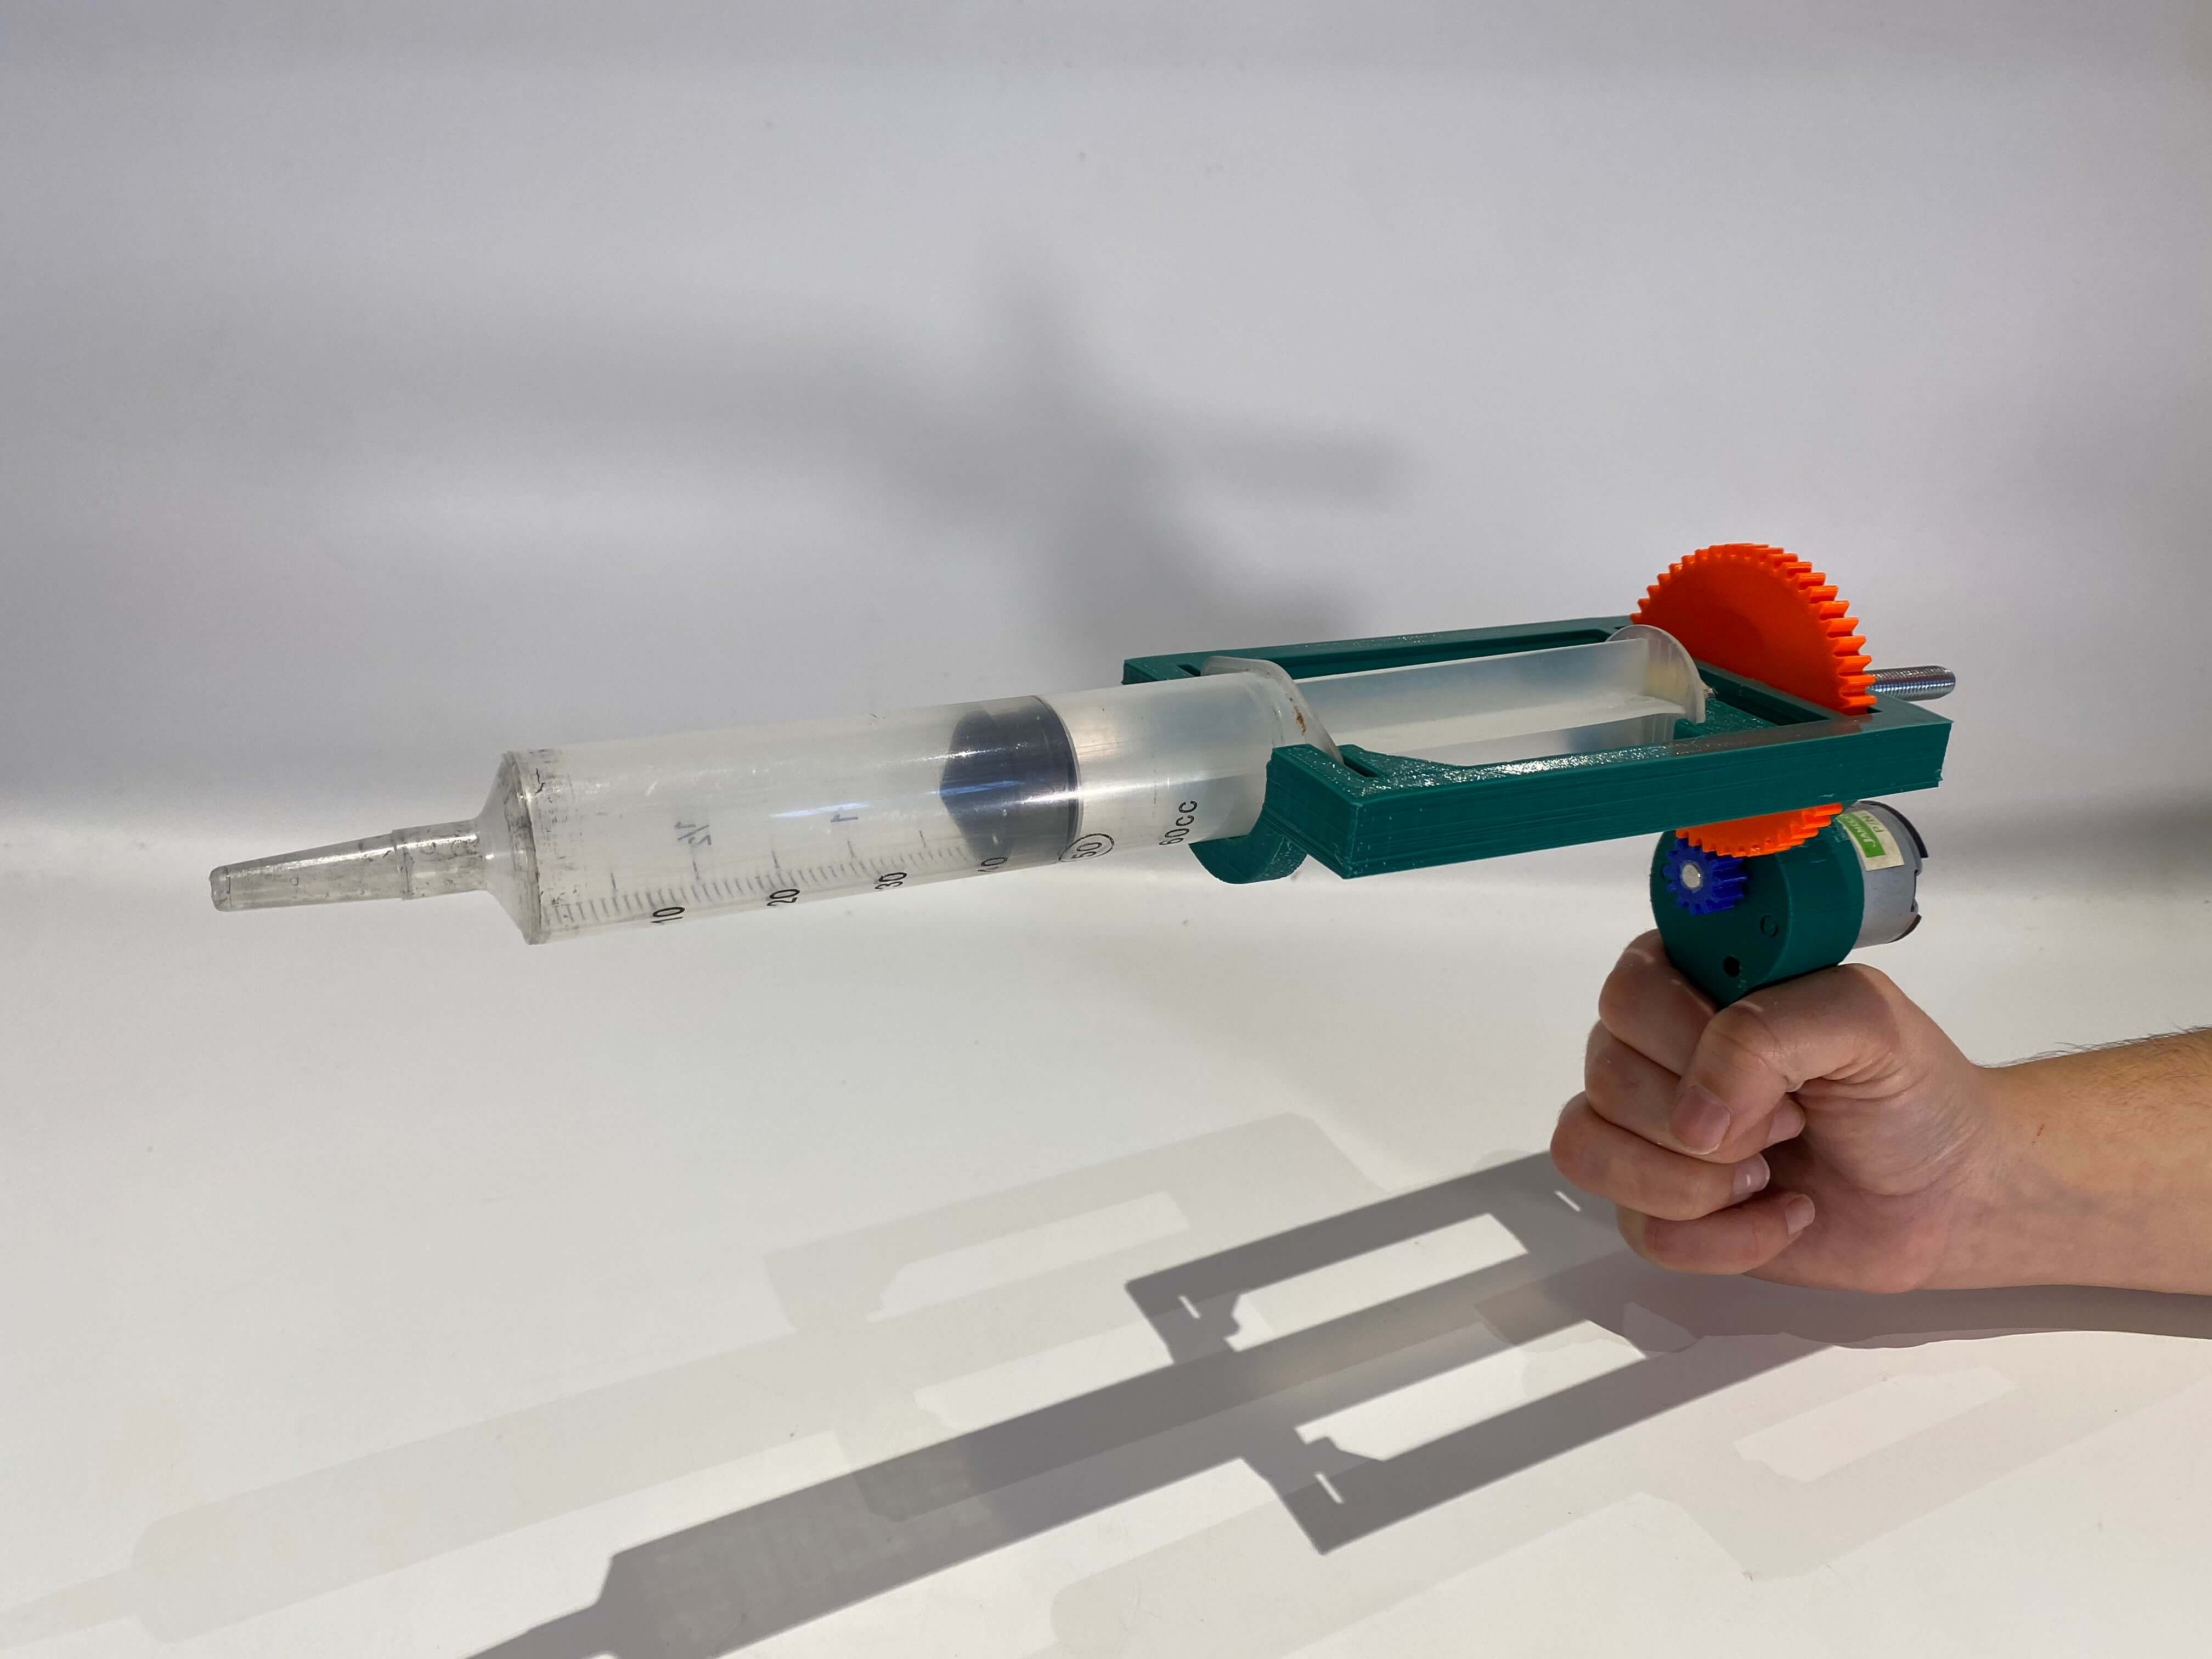
This time round Sarah had come back with some kick ass energy and printed a 3D model at home. This extruder was also still for the 5V motor. This was our second verison of the extruder and it had a handle just like you see in guns. Some crazy design skills here. It looked impressive with a special space for the larger motor, a handle and even a whole new way of pushing the syringe to extrude.
The material was, however, quite brittle and – just like Extruder 1.0 needed extensive filing to enlarge the holes that hold the bolt in place (this really is a mistake in the original file).
After having experimented all day we realised that the more we forced the extruder to extrude the more it was going to break because of the brittle material. Having looked at the principle problems we tweaked the 3D model in Utlimaker and Sarah printed the new model at home for a version 2.0
Monday: (Version 3)
Sarah's so kind to have shared the changes that she had made to boost up the design to a next level:
- Adding ribs to the structure containing the big wheel to add some friction to the system (replacing this way the tie wraps).
- Creating a connector between the plunge and the bolt heads.
- Adding rails in which the plunge-bolt connector would move.
- Adding a smaller opening for the syringe barrel holder so it would click in place and didn't need tape to be secured.
- Adding a slit for the syringe barrel top to be secured in place.
The third version of the gun extruder was in a green colour this time. There weren't any huge changes in the design seeing as that was solved mostly in version 2. In version 2 PLA was used as a filament for the piece and therefore quite brittle to touch but in the version 3 a PLA spool was used to print the gun. er a few tests with the extruder. Therefore, we printed the gun again with a newer PLA spool and assembled it. In this extruder the handle contained space for an even larger motor and a sturdier handle. As well as a tighter fit fo the gap between the head of the bolt and the slode of the gun. The struture was far stronger already.
After having remoddeled the design in Rhino, the gun was printed again and we used some of the functional parts from the previous design to make the gun comical and playful to look at in the aesthtical aspect.
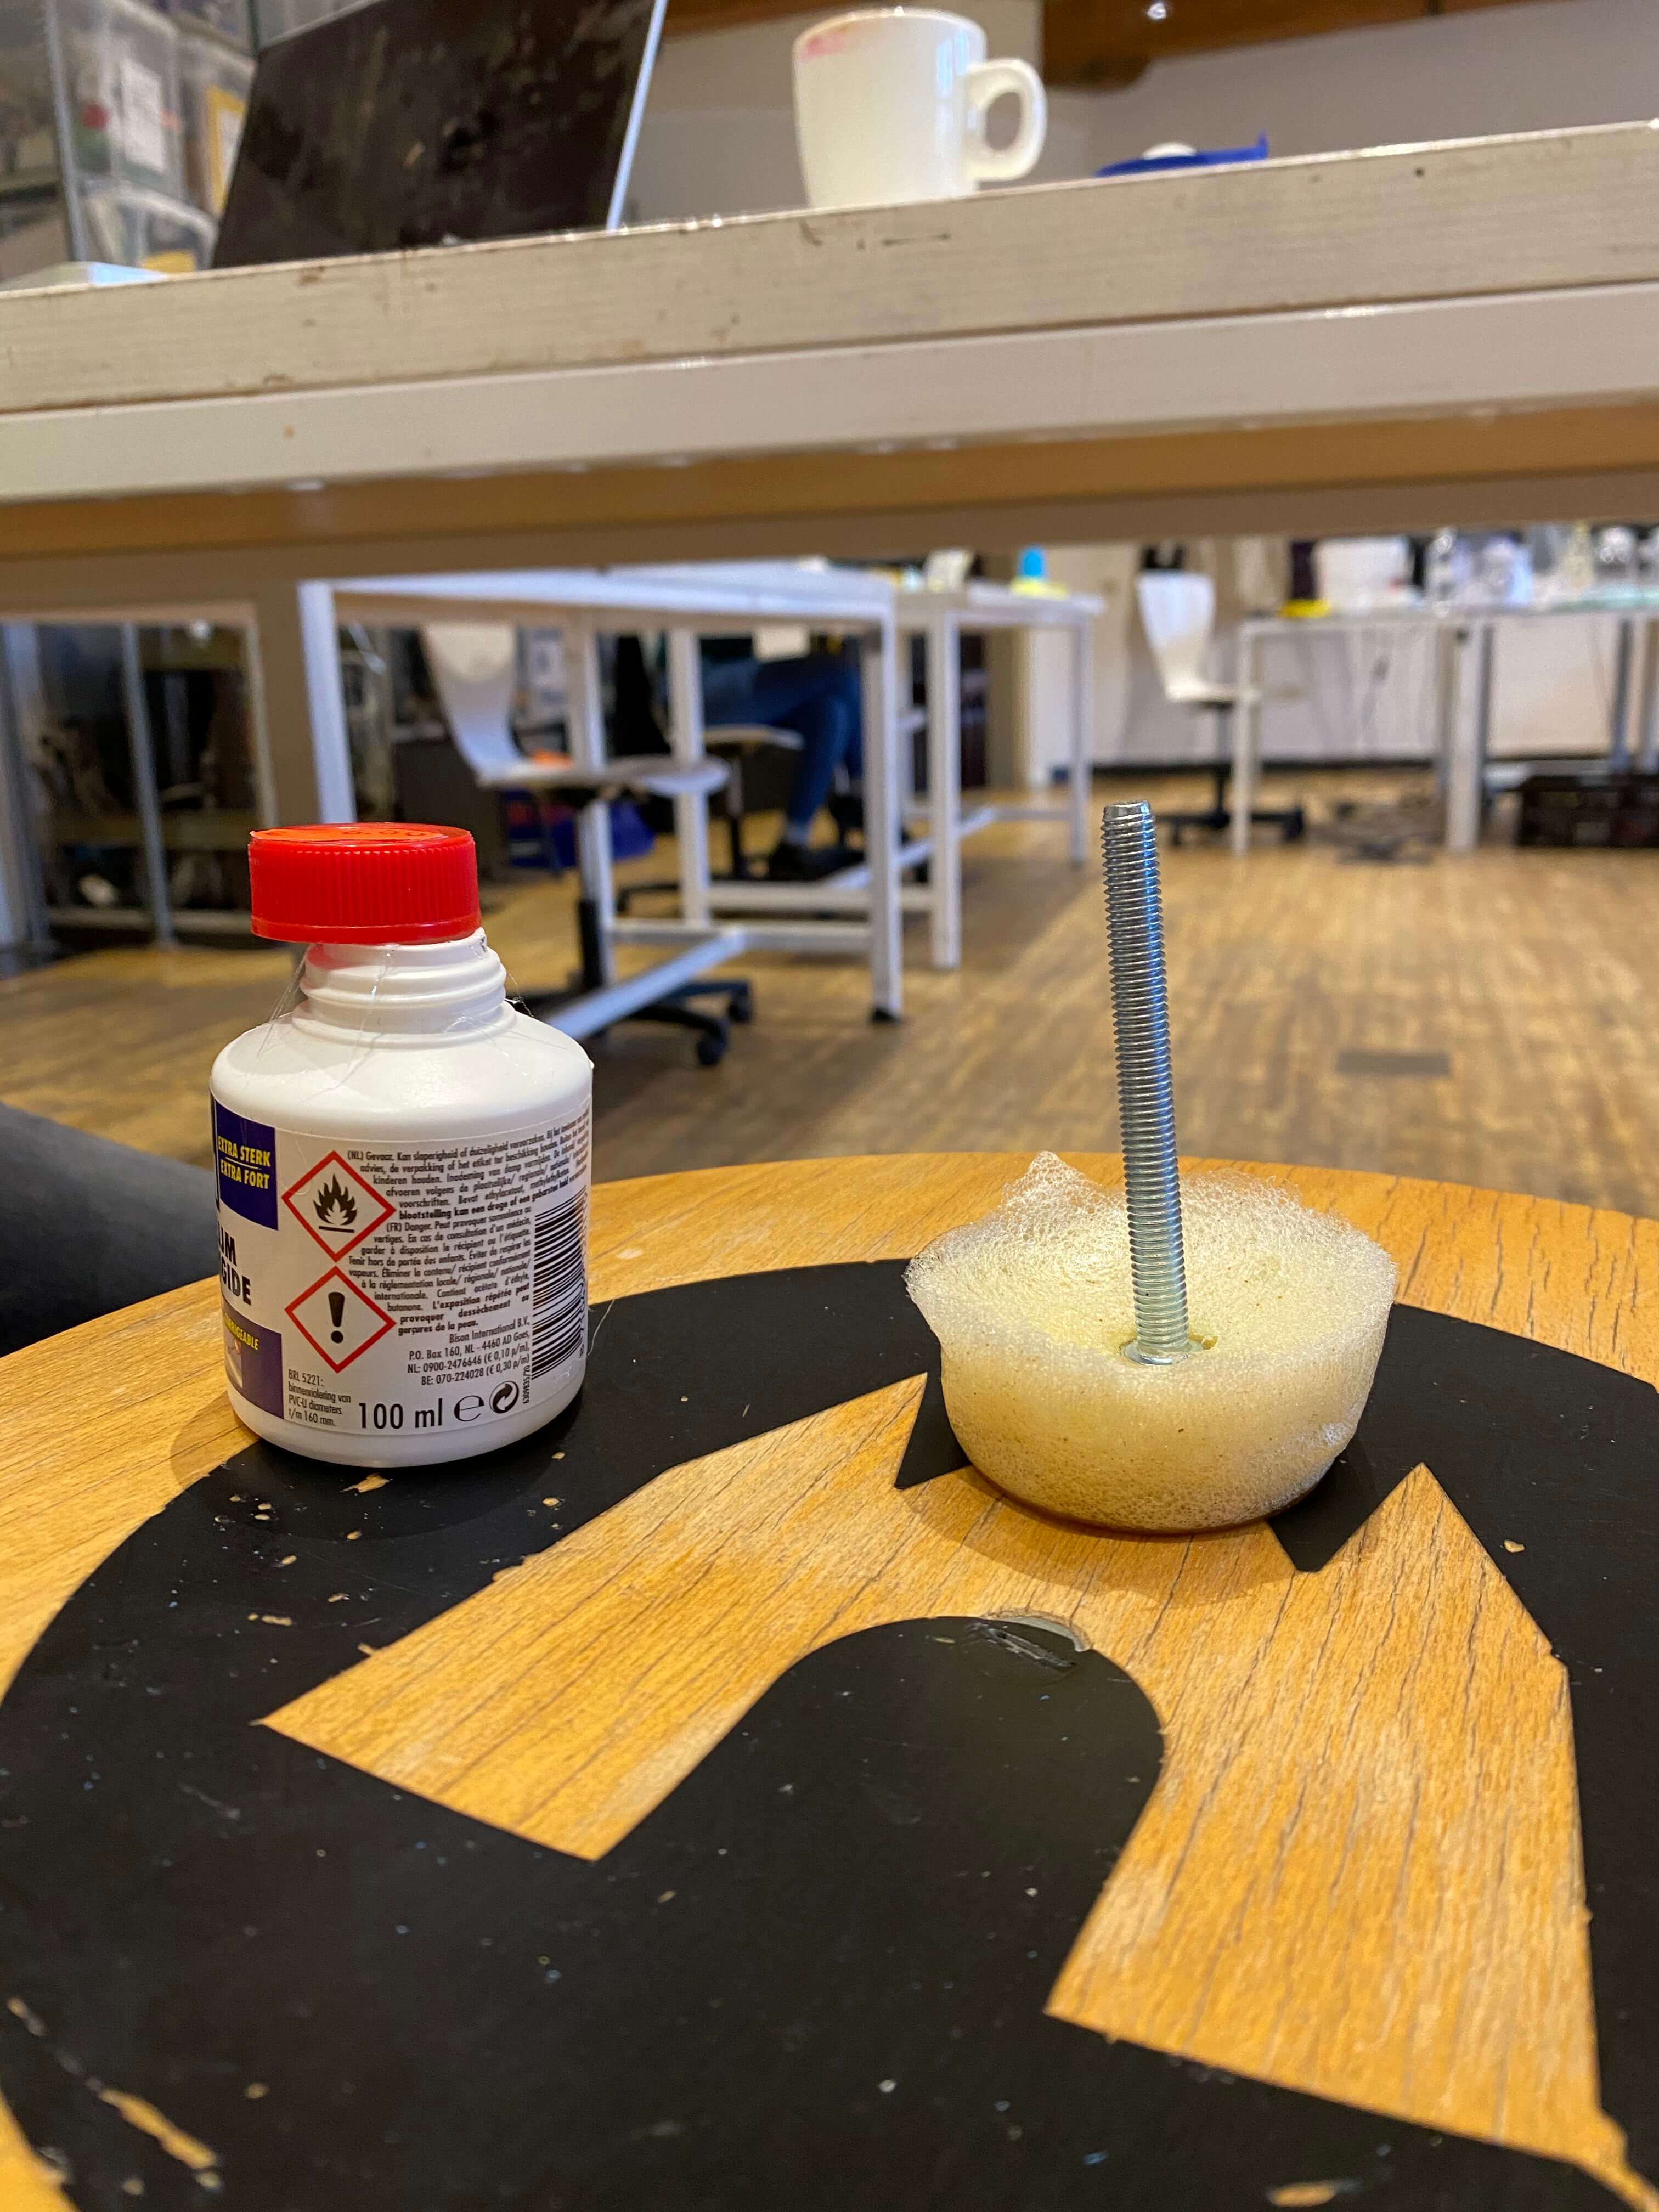
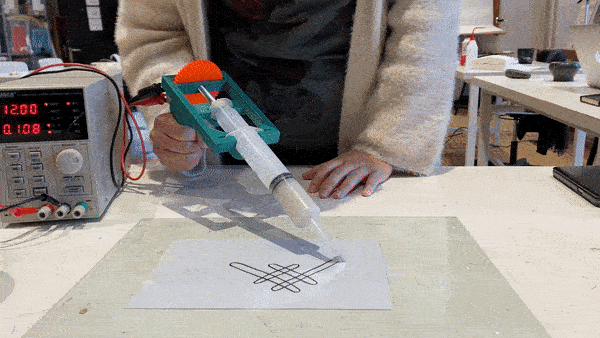
Rebecca and Carolina were also on experimenting all day to make a biocomposite that could be extruded by the gun extruder. Some testing was done, and although we still needed to hold the device, it extruded the final eggshell paste quite nicely.

We were finally going somewhere with this!
The evolution of our 3D handgun extruder:
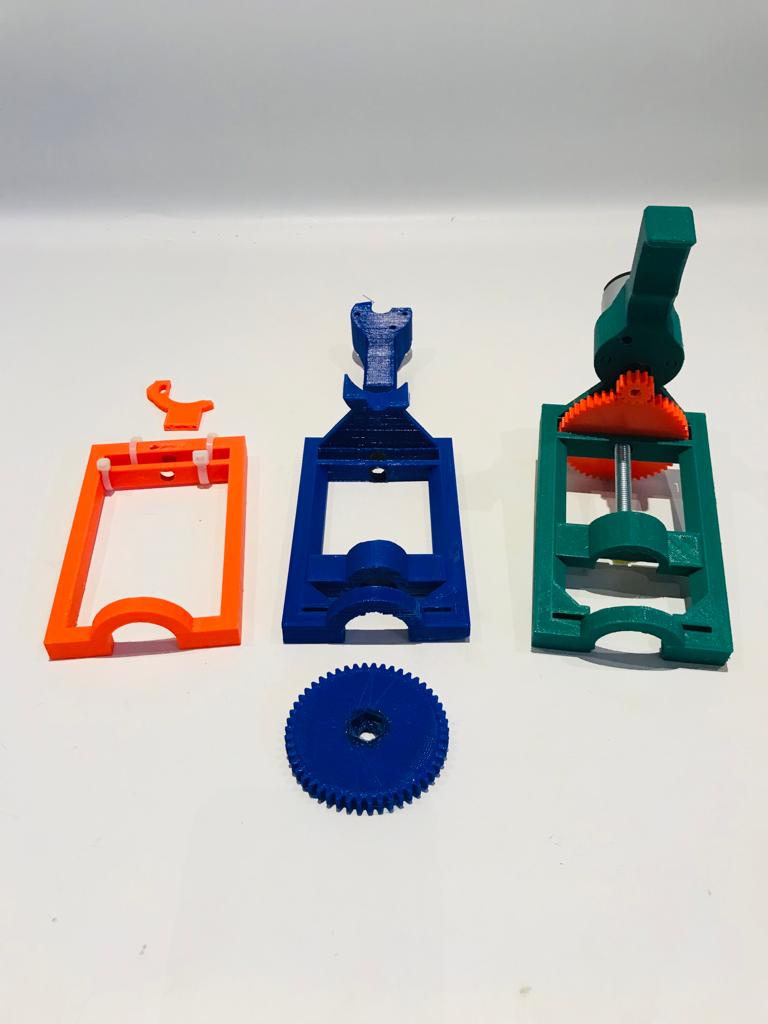
Our final product, somewhat space vibes:
The demonstration:
Code:
https://www.makerguides.com/28byj-48-stepper-motor-arduino-tutorial/
Biocomposites: Rebecca & Carolina:
Having worked onthe machine of the project was important but the biocomposite was just as important!
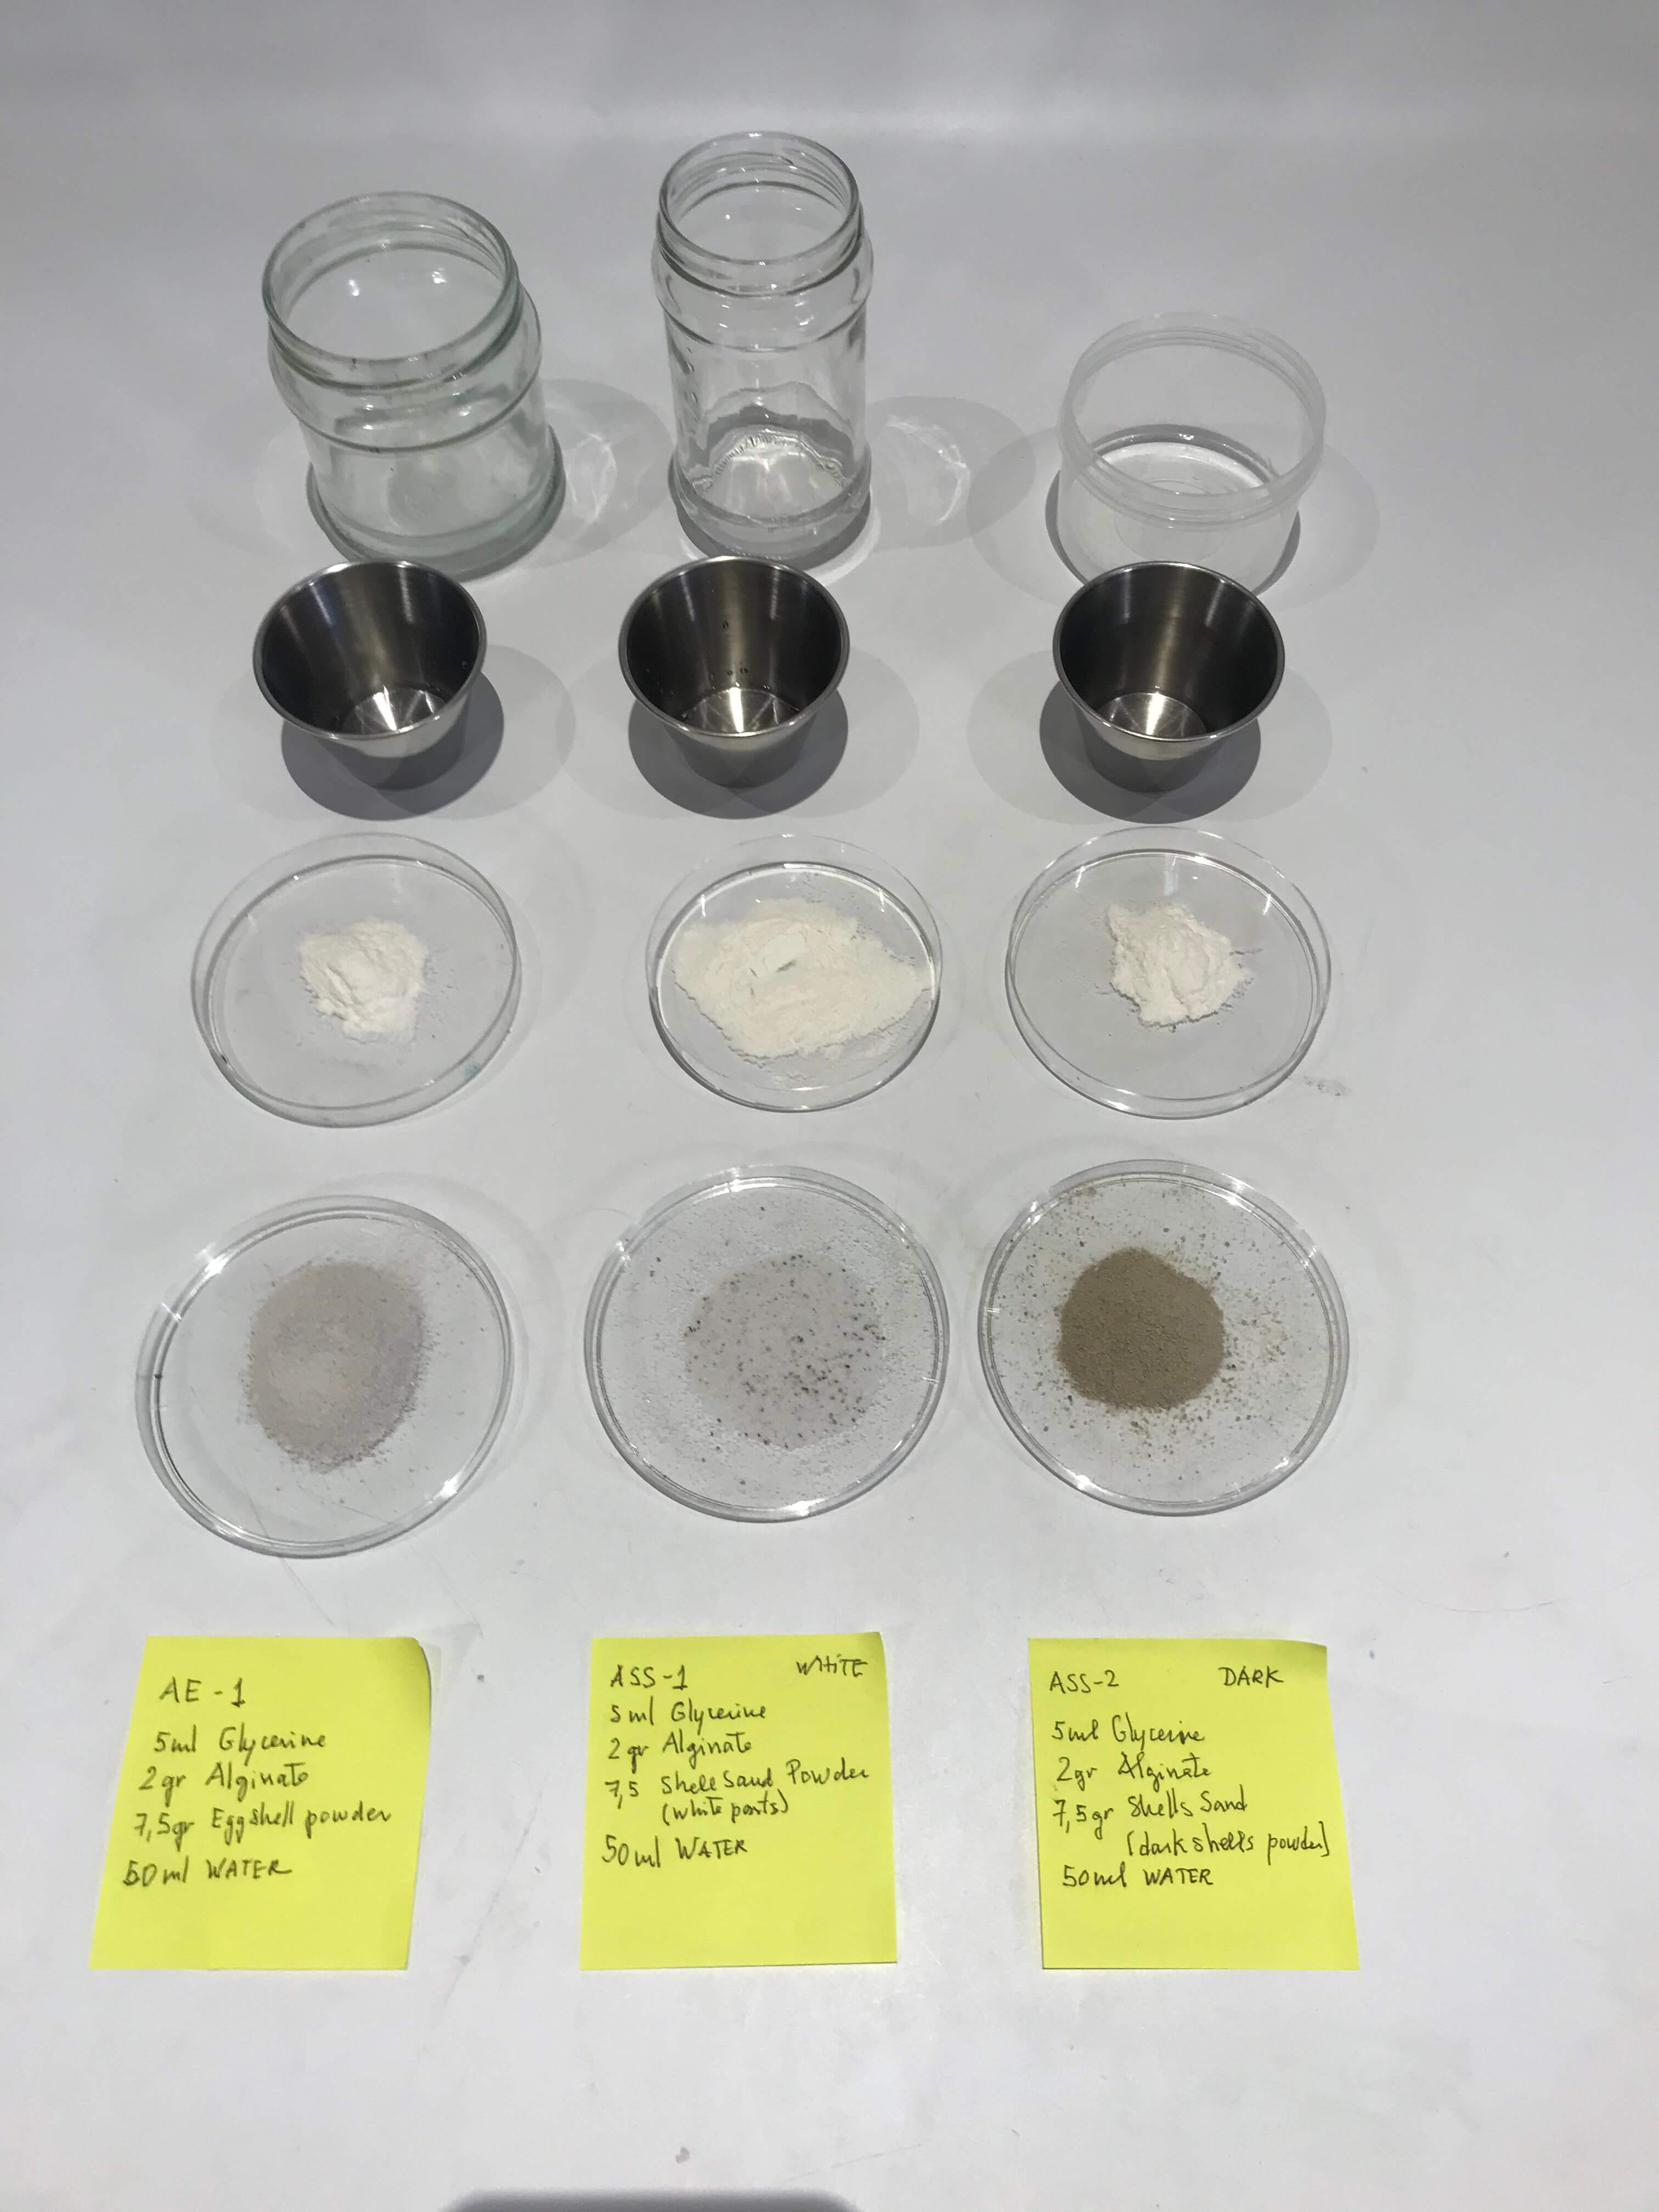
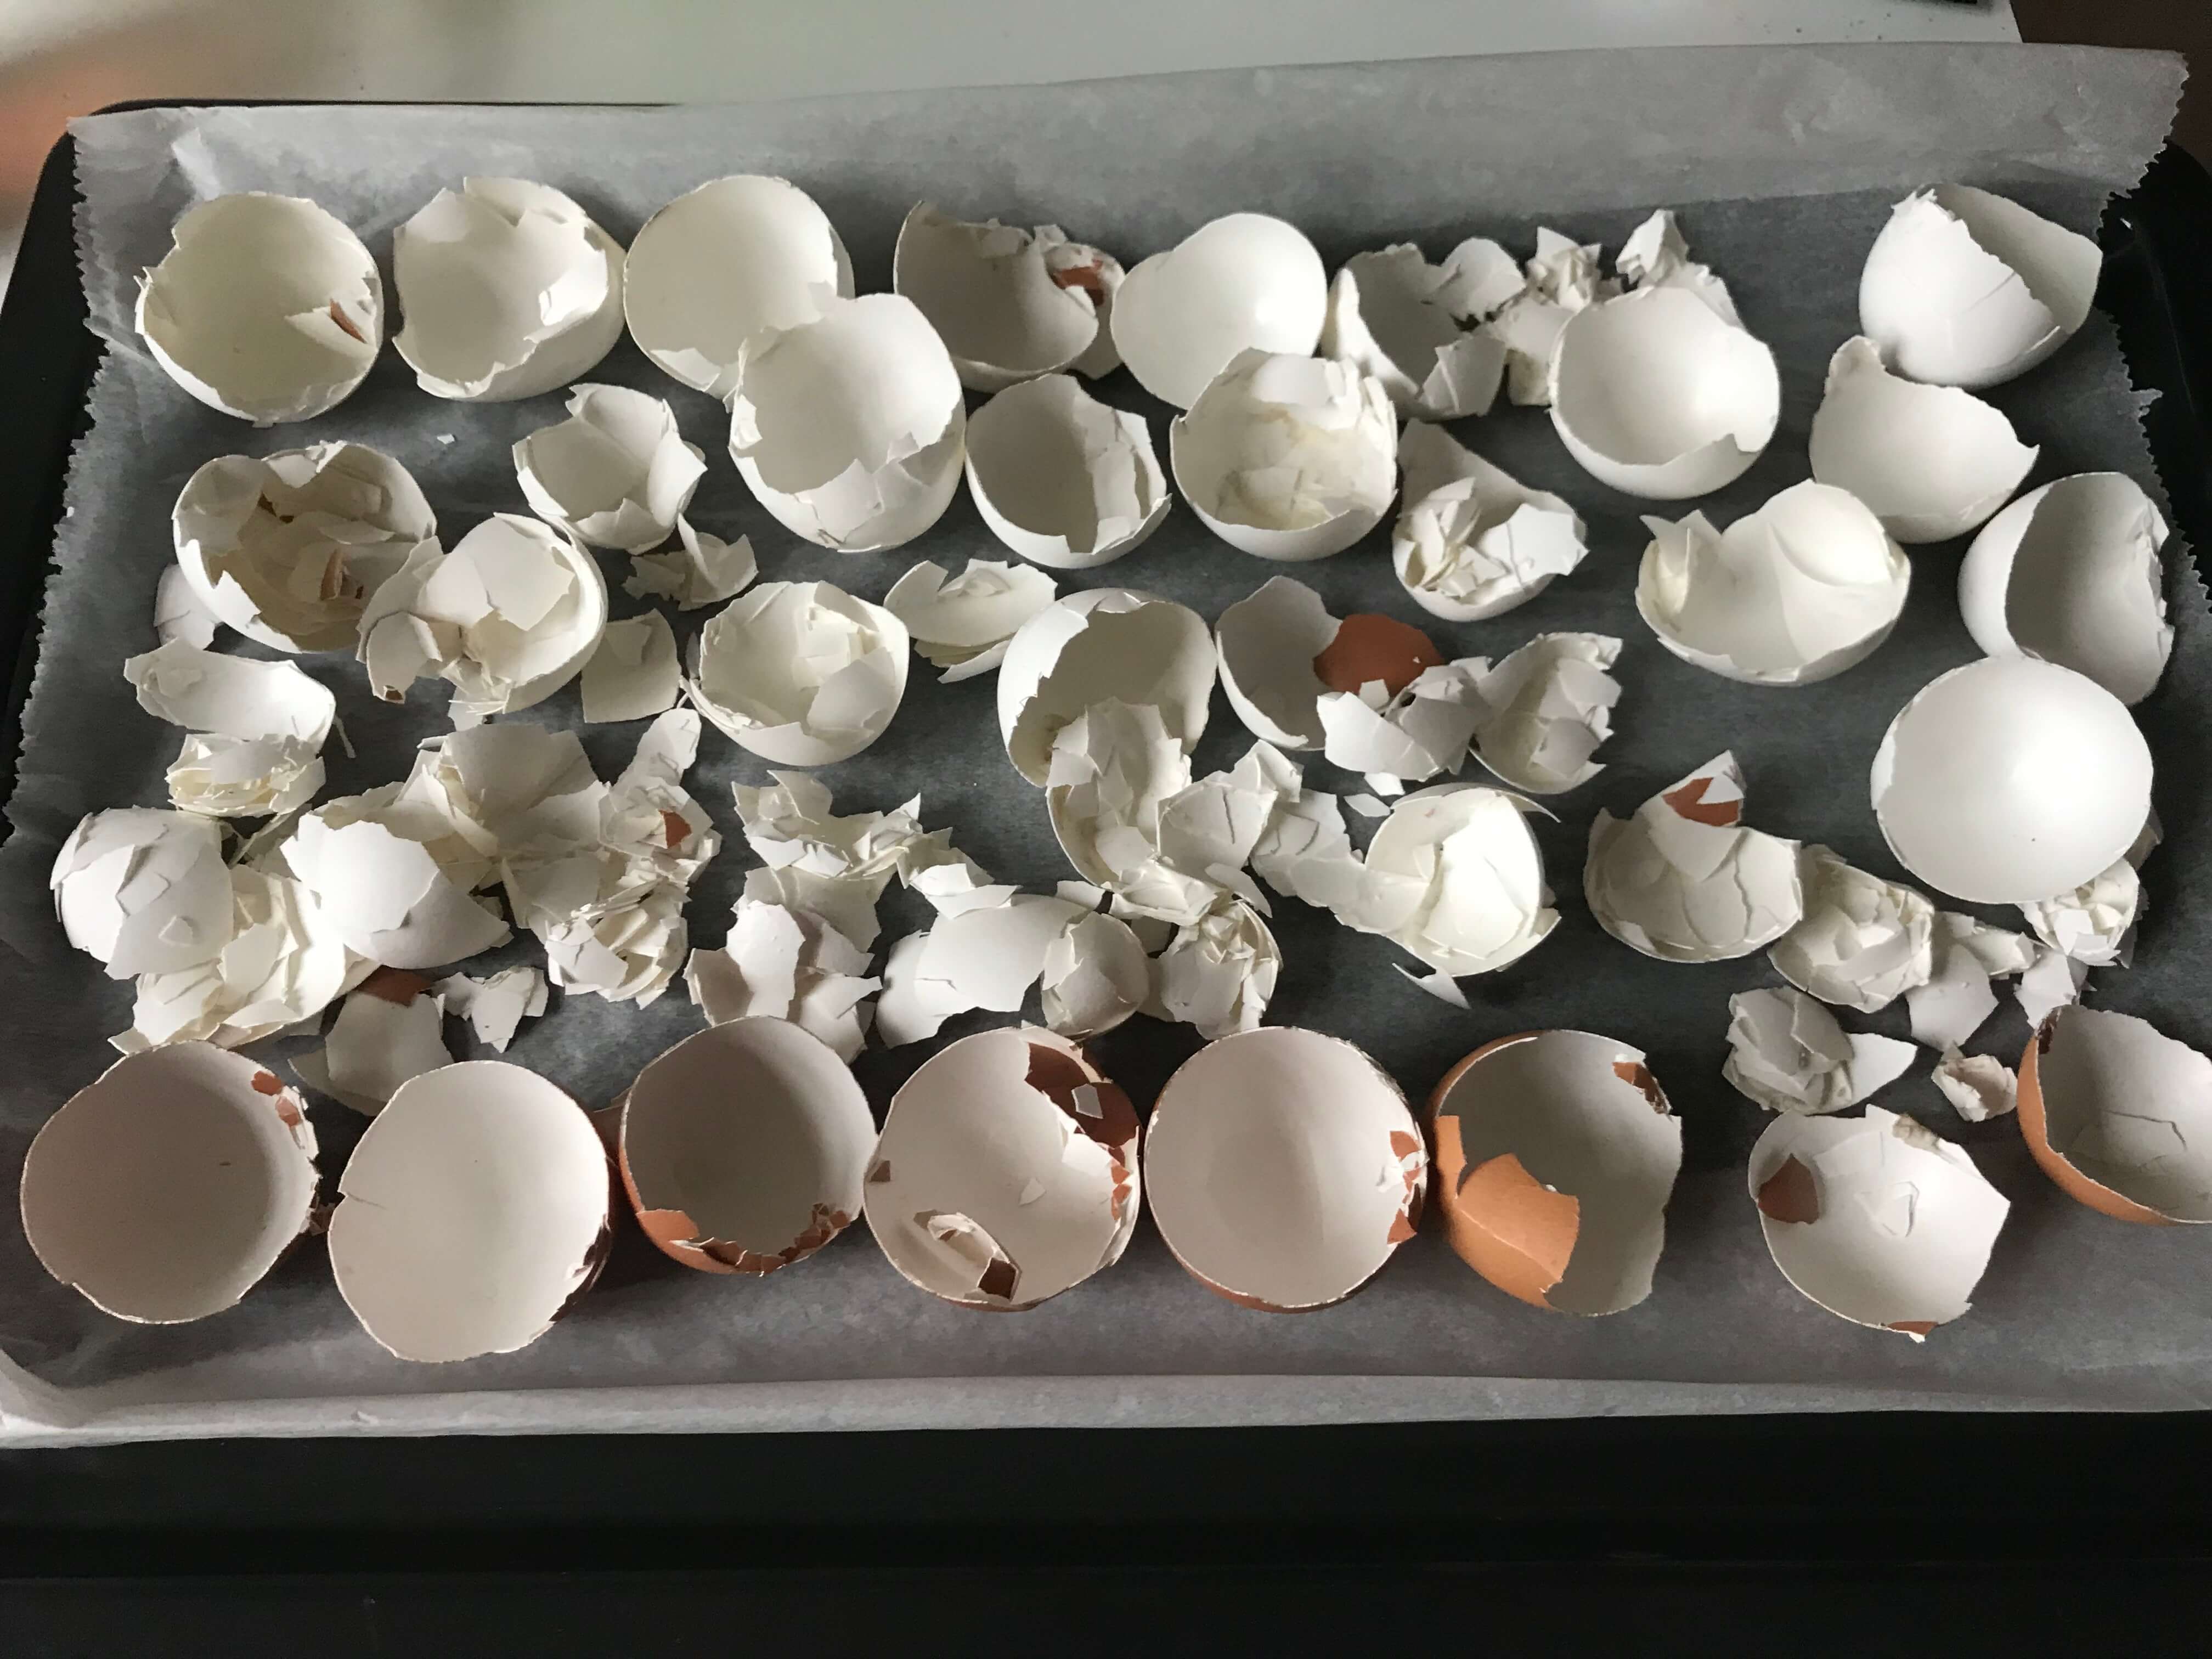
Carolina and Rebecca worked on researching the alginate recipes for the extruder. The main idea was to mimic something that looks like cermaic. Carolina was so nice as to share her previous knowledge on recipes with alginates, eggshells and glycerine. Sand shells came into the mix later on because Rebecca had remembered that they contain a lot of calcium as well.
Then later they had decided to use a basic recipe and try some variations with finely grounded eggshells as well as the shell-sand. Sieving the latter to divide the oyster snippets from the fine, white sand and thus started with three initial recipes, each consisting of the same amount of base ingredients, yet with different fillers
Eggshells:
EggShells recipe preparation:
Recipe from © Midushi Kochhar, at https://materiom.org/recipe/122
Preparation of eggshells: Collect as many eggshells as you need from your home, neighbours, cafes, etc.
- Wash the eggshells thoroughly and boil them for about 15 mins to kill all bacteria.
- To dry the eggshell, you can use one of these two methods:
- Place the eggshells in the oven at 100 degrees for 15 minutes.
- Place the eggshells in the microwave for 1 minute at high temperature, then 3 minutes at med-high. Both methods work, but the eggshells need to be dried out; brittle but not burnt. Subtle crackling sound means that the eggshells are ready.
Preparing the ShellSand:
- Filter the Shell Sand to remove the darker and bigger parts (mostly oyster).
- White Powder - Use the filtered sand 2. Dark Powder - Use a morte to powder the remains
Basic Alginate Recipe
2 gr alginate
5 ml glycerine
50 ml water
Our 3 versions:
15 gr eggshells
15 gr shell sand (sieved)
15 gr grounded oyster snippets (from sieved shell sand)
We though the result of recipe two was most aesthetically pleasing and decided to continue with the white (sieved) shell sand. We decided we would try four different ones, of which the first one was a repetition of the former batch, just to be sure. We, furthermore, decided to double the alginate for recipe 5 and 6 and the glycerine for 6 as well. For the last one we decided to add vinegar.
Ingredients:

The Recipes that stuck:
Recipe 1: Alginate eggshell.
- 5 ml glycerine
- 2 gr alginate
- 15 gr white shell sand
- 50 ml water
This one still sagged a little however and they wanted something sturdier!
During the weekend, Rebecca boild the eggshells for 15 minutes and then she put them in a 100 degree oven for 20 minutes. On Monday, we tried to grind them with the blender, but this wasn’t much of a success. Simply crushing them in a plastic bag as finely as possible and then grinding them into powder with a pestle and mortar proved best. We had lots of eggshells so, inspired by the ceramic-like structure of the last shell sand experiments, we decided to try some with a lot of eggs and little water.
Final recipe: The extruder material.
2 gr alginate
4 ml glycerine
40 gr eggshells
10-30 ml water
Results (some of):