10. Open Source Hardware
A LITTLE BIT OF HISTORY
We have been using the same knitting, weaving, crochet and braiding techniques for ages, these technologies never changed. Since the techniques have not changed much, the machines have not changed much either. But some technology can be incorporated to it by intruducing microcontrollers and macrocontrollers on it ! Knitting machines can be hacked to knit the desired patterns using arduino (Glitchknit, Ayab, etc). We can also build new knitting machines based on the previous knitting machines and embed new features in it, like for instance being able to knit more than one thread at once or that knit a pattern ! It is however difficult to make a machine that works as great as the old ones. I was particularly inspired by this project called the Open Knit Machine but unfortunately discovered it too late to make it on my own this week... Filt is also an open source machine set to make recycle fabric into felted fabric !
 Legos are also a really good tool for making hacked machines since they are modular and you can make almost any shape you want with it. For instance, this video shows how to hack a sewing machine into an emboidery machine using legos !
Since we could not make our machine to make fibers, together with Annah we decided to make a laminar flow hood to be able to work in a much cleaner and sterile environment when cultivating bacteria, mycelium or doing our bio projects. We took our inspiration from EZMushroom.com who made this very simple yet functional laminar flow hood and described the process very well.
LAMINAR FLOW HOOD
What do we need? Materials :)
- Plastic box, without lid, hopefully large and transparent to be able to work comfortably
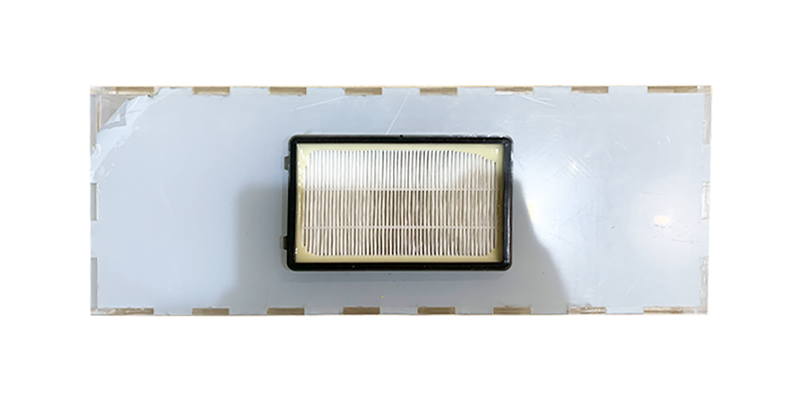
- HEPA filter, we use a HIGH FILTRATION AIR EXIT FILTER.
- Hot silicone
- Fans
- Power supply
- 12 screws
- Acrylic, we use 5mm
- Wood, we use 9mm
Let's Do It!!
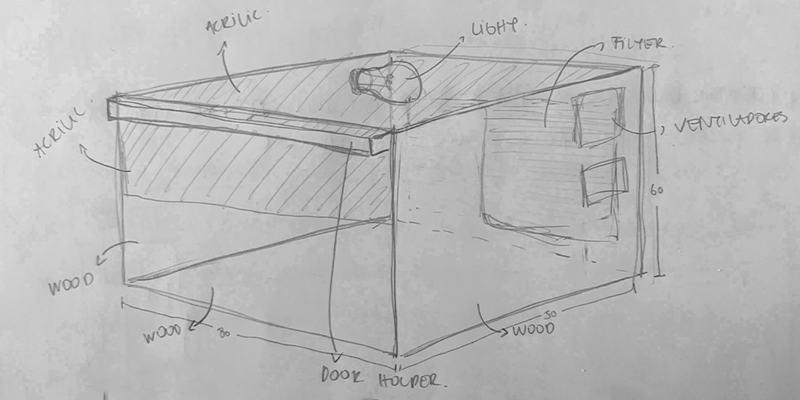
First of all, we made a kind of sketch of what we wanted to do
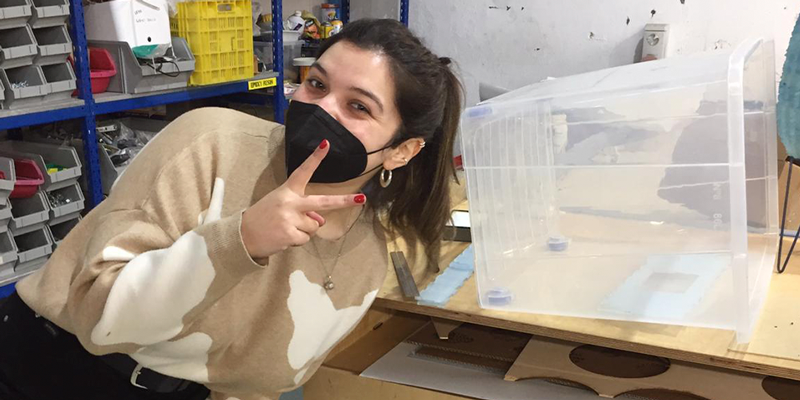
STEP 01: First of all, we have to clean the box, once it is well cleaned we can start working.
STEP 02: We designed our plate that will help us to support all our fan and power source equipment.
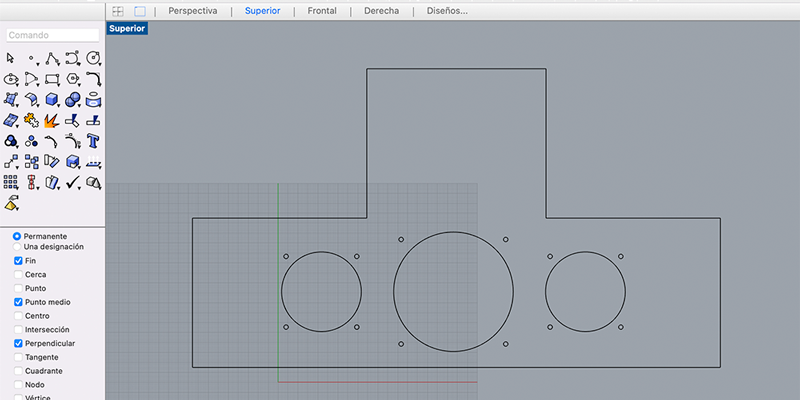
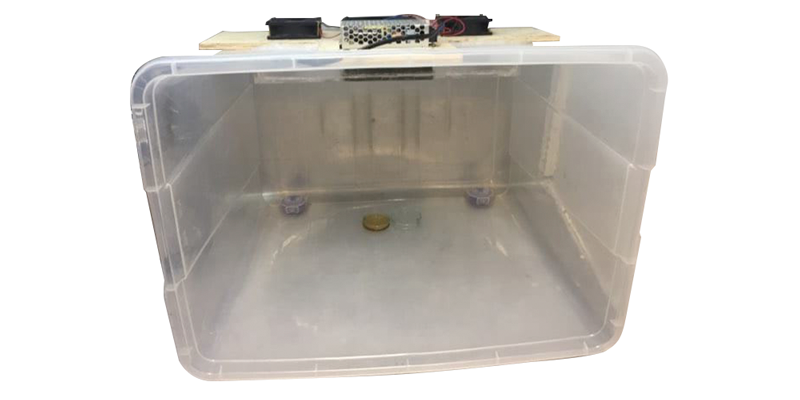
In this case, our plate is 40x15 cm join to a 12x12 cm extension with 3 holes to give space to the fans that will help with the circulation of the air in our sterilization chamber. The extension is for the current transformator taking as an input the wall current (230 V, 16 Amp and AC current) and changig it to a 12V DC current with a maximum capacity of 8.6 Amperes.
STEP 03: We cut our plate in a 9mm wooden board so that it is strong enough and does not bend due to the weight of our equipment.
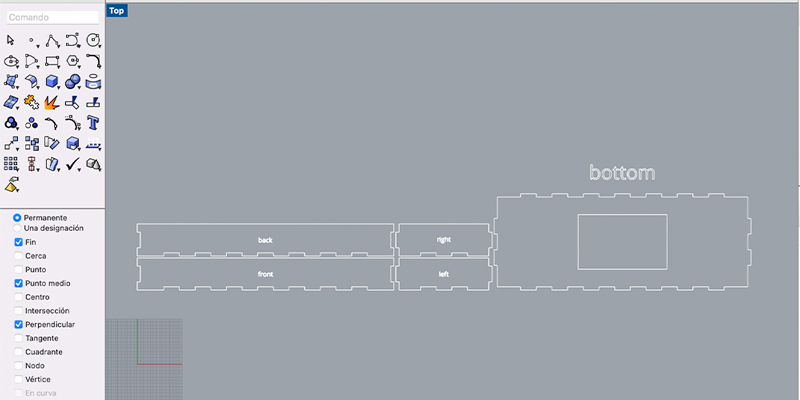
STEP 04: We have to make it go through a specific filter called HEPA filter. The cut diameter of these types of equipements are of 0.3µm, filtering yeasts, modls, spores and most of the existing bacteria. Since we only had one small yet thick filter, we decided to concentrate the power of the fans mediating an airtight box.We cut a box that allows us to place the filter and fans in an integrated way. For this we decided to make a 40x15 cm box with a 14x9 cm hole in 5 mm Acrylic, taking into that acrylic is a good material to work in a sterile environment, since it is easy to clean and does not leave residue.
Final result. Without glue
STEP 05: With the help of a DREMEL we cut a 40x15 cm hole in the plastic box, hopefully centered on the lower part of the upper face of the box, which is where we will put our filter and fans.
Once cut, we sand the plastic so that the edges are easy to manipulate.
STEP 06: While our acrylic box with the filter is drying, we screw the fans to the wooden plate.
STEP 07: We glue the box with the filter and the wooden plate, first with super glue and then we put it in the hole of the plastic box and seal with hot silicone so that there are no air leaks.
STEP 08: Power Supply Installation. After everything was installed, we connected the wires of the fans to the current transformator. We had to make some wires longer so we did a bit of soldering and with a little bit of screwing, we connected the current transformator to a plug that could be plugged on the wall. And the fans worked!
Sounds Like Trouble to Me
Problems. What we did not think through was that the fact that we had a box 5cm away from the fans and that not all the fans were directly in front of the filter acted as a wall against the air. Once the fans were turnt on, very few air passed through the filter (which is quite resistive to the air flow) and the air was actually repelled trough the fan and the air flow was very low.
Finding solutions. We decided to try to construct the laminar flow hood anyways and tested if it was working by turning it on for 5 minutes, putting a petri dish open inside the hood for 10 minutes and then incubating that dish for some days to check if it was contaminated or not.
Final Results
Final Laminar Flow Hood
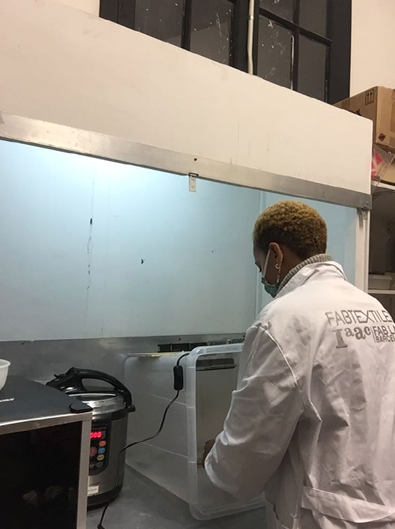
Final Testing
HILO MACHINE
You can find all the details to assemble your own HILO MACHINE here
Thanks for reading!! See you next week :)