Week 08 | Wearables
Sensory Thermochromic Textile | Ugly Christmas Sweater Swatch
Inspiration
My inspiration for this week came from three awesome designers inaddition to combing through Pintrest:
Pola Demianiuk
Pola Demianiuk is an interdisciplinary fashion designer currently working on her MA at Swedish School of Textiles. She focuses on make soft robotic garments that warp/move to be attached to one's body. Her website shares a lot of her past work and on her Instragram she shares some of her process and development.
Philip Beesley X Iris van Herpen
I have been following Philip Beesley's work for a while now and was so excited to see him have a collaboration with Iris van Herpen in her Hypnosis collection. His Instragram and website show cases the range of his experimental intillation work and architectural background.
Stone Island 'Ice Knit'
I came across this thermochromic knit sweater a while ago on a fashion account on instagram. This article on Hypebeast summaries the collection and explains a bit about the double knit construciton and thermochromic yarns that are used.
Sensory Thermochromic Tapestry
For this week's assignment I really wanted to play around with thermochromic pigments. We got some pigments for skin electronics week for me to be able to test out my idea. My idea for this tapestry involves a motion sensor as the switch to turn on the circuit to have the conductive thread heat the coated thermochromic fibers to create a prewoven image in the tapestry. An additonal layer to the epicness of this project would be figuring out how to either weave, code or make the yarn have different temperature reactions to have the circuit create a range of different images in one tapestry.
Finding projects that had used a pigment powder to "dye" yarn was tricky, but Dena Molnar and Nicole Tariverdian's Thermochromic yarn expirement's with a paste gave me some insights into ingredients and tips to keep in miind when working with thermochromic pigments.
Making the swatches
Yarn
Materials
- 1g of wool yarn
- 1g of cotton yarn
- 3g Thermochromic pigment
- 15ml vinegar
- 200ml room temperature water
- Beaker
- Spoon
- Scale
- Heat source
Process
- Add vinegar to room temperature water to beaker and mix
- Add thermochromic pigment to beaker
- Run the yarn swatches under warm tap water to saturate
- Add yarn watches into the beaker and mix
- Let the yarn soak in solution for about an hour
- Remove from solution and squeeze out excess liquid
- Hang to dry
- Test thermochromic properties by using a hair dryer or pressing against a heated radiator
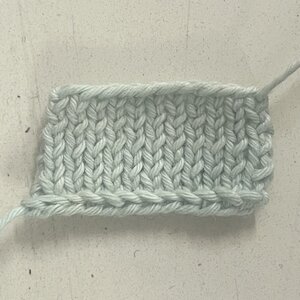
Results
It surprisingly worked! At first the pigment wasn't mixing into the solution for some reason. I don't know if it has hydrophobic properties or something, but eventually after a lot of mixing it got into the solution. When doing the ential tests it would turn orange when heated, but over time it would be more the natural color of the fiber. This may be because it's not actually dying the fibers, but more coating or staining it and so there's not a very "thick" or constrated amount of the pigment on the fibers. The knit structures worked best on the heated surfaces of the radiator then when incorperated into a circuit, but more tests will need to be done with conductive wire, copper tape, and fabric to see if it triggers the thermochromic properites better.
Wool
left unheated and right heated
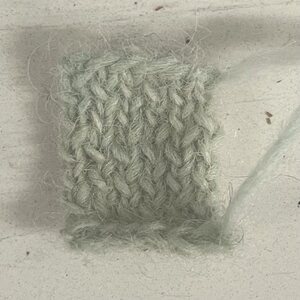
sped up x5 "cooling down"
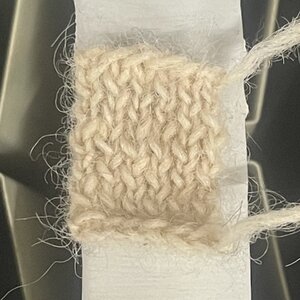
Cotton
left unheated and right heated
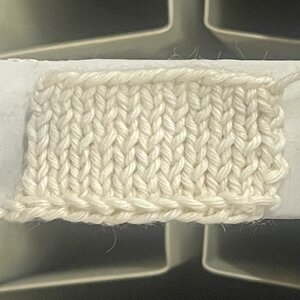
sped up x5 "cooling down"
Code
The code below is from Denish Kumar's thermochromic documentation and what would be used with my tapestry to set up a circuit to turn on and off. I would need to do further research as to how a motion sensor works to incorperate that as the switch for the circuit.
    include <analogWrite.h>

    int led_pin = 13;

    void setup() {
    // put your setup code here, to run once:
    pinMode(13, OUTPUT);
    Serial.begin(9600);

    }
    void loop() {
    // put your main code here, to run repeatedly:
    analogWrite(led_pin,150);
    Serial.println("ON");
    //delay to keep heat on longer
    delay(2000);

    //To turn off
    analogWrite(led_pin, 0);
    Serial.println("OFF");

    delay(5000);
    }
Ugly Christmas Sweater Swatch
Getting in the holiday spirit I wanted to figure out how to make the most epic ugly Christmas sweater possible by having it light up in sync to a Christmas song. I started by coming across this Simple Light-Up Ugly Christmas Sweater, but didn't want it to just be a simple on and off parallel circuit. I then started looking into how people sync their outdoor Christmas light decorations to music and came across the somewhat confusing instructable How to Make LEDs Flash to Music With an Arduino and youtube video below that gave me the tools to make my ugly Christmas sweater swatch.
Making the swatch
The How to Make LEDs Flash to Music With an Arduino was faily stright forward to follow, except that there were some broken links and no clear skematics of the circuits they made. So below is my revised sets on how to make the swatch:
Materials
- 6 LEDs
- 6 220 Ohm resistors
- 7 Crocidile Clamps
- 7 Pin wires
- Aurdino Uno
- Conductive thread
- Non Conductive thread
- Felt
- Glue Stick
- Plyers
- Scissors
- Sewing Needle
- Computer
Testing the LEDs
As the youtube video reminds one to do it to check to make sure your lights work to start with. So below is a simple sketmatic and code to test that the LEDs work.

    void setup() {
pinMode(12, OUTPUT);
pinMode(8, OUTPUT);
pinMode(2, OUTPUT);
pinMode(13, OUTPUT);
pinMode(7, OUTPUT);
pinMode(4, OUTPUT);
}

    void loop() {
digitalWrite(12, HIGH);
delay(1000);
digitalWrite(12, LOW);
delay(1000);
digitalWrite(8, HIGH);
delay(1000);
digitalWrite(8, LOW);
delay(1000);
digitalWrite(2, HIGH);
delay(1000);
digitalWrite(2, LOW);
delay(1000);
digitalWrite(13, HIGH);
delay(1000);
digitalWrite(13, LOW);
delay(1000);
digitalWrite(7, HIGH);
delay(1000);
digitalWrite(7, LOW);
delay(1000);
digitalWrite(4, HIGH);
delay(1000);
digitalWrite(4, LOW);
delay(1000);
}
Downloading and Installing the Programs and Libraries
Next you will want to download the following programs:
- Arduino IDE
- Processing
- Minim
- Beatwrite.zip
- Carol Of The Bells ! Tone.mp3
Downloading libraries in Arduino IDE:
1. In Arduino go to File -> Examples -> Firmata -> StandardFirmata
2. Plug in your Arduino Uno and press the Upload button on the Arduino SE
3. On the Arduino Uno you will see light blink, wait til the blinking is done and the Firmata firmware is done downloading
Downloading libraries in Processing:
1. In Processing go to Sketch -> Import Libraries... -> Manage Libraries...
2. After the Manage Libraries window opens search Arduino (Firmata) in the Library tab search bar
3. Install Arduino (Firmata)
4. Now search for Minim in the Library tab search bar
5. Install Minim
Setting up the Beatwrite Code:
1. In your downloads folder open the Beatwrite.zip.
2. Open Beatwrite.pde
3. With the code file open in Procesing add these lines of code after line 27:
int ledPin4 =  13;   // LED connected to digital pin 12
int ledPin5 =  7;    // LED connected to digital pin 1
int ledPin6 =  4;    // LED connected to digital pin 0
- Add these lines of code after line 61:
arduino.pinMode(ledPin4, Arduino.OUTPUT);
arduino.pinMode(ledPin5, Arduino.OUTPUT);
arduino.pinMode(ledPin6, Arduino.OUTPUT);
- Add these lines of code after line 81:
if(beat.isKick()) {
    arduino.digitalWrite(ledPin4, Arduino.HIGH);   // set the LED on
    kickSize = 32;
}
if(beat.isSnare()) {
    arduino.digitalWrite(ledPin5, Arduino.HIGH);   // set the LED on
    snareSize = 32;
}
if(beat.isHat()) {
    arduino.digitalWrite(ledPin6, Arduino.HIGH);   // set the LED on
    hatSize = 32;
}
- Add these lines of code after line 96:
arduino.digitalWrite(ledPin4, Arduino.LOW);    // set the LED off
arduino.digitalWrite(ledPin5, Arduino.LOW);    // set the LED off
arduino.digitalWrite(ledPin6, Arduino.LOW);    // set the LED off
- In your downloads folder move the Carol Of The Bells ! Tone.mp3 file into the data folder in the unzipped Beatwrite folder
- On line 40 in the open Beatwrtie.pde code change "freebird.mp3" to "Carol Of The Bells ! Tone.mp3"
The Skematic
Now that everything is set up digitaly its time we will be using the same sketmatic set up we did to test the LEDs before:
Testing the Circuit
Once the circuit is all set up plug in the Arduino Uno to your comupter and click the play button on the top left of the open Processing window. It takes a moment for Java to open. If everything is correct you will see a panel open that says KICK SNARE HAT and the Carol of the Bells mp3 file will being to play and the lights will start to flash in sync to the music.
Embeding the Circuit
Now is time to embed the circuit into the ugly christmas sweater swatch
1. Cut out your christmas tree shape of choice and 2 background rectangle
2. With your christmas tree, glue it down to one of the background rectangles and stich into place adding whatever "decorations" you want with non conductive thread
3. Figure out your arragement of your lights, making sure to give enough space between them
4. Curl the long leg or postive leg of the LED and stitch it down to the christmas tree panel with non conductive thread
5. Curl the short leg or negative leg of the LED and stitch it down to the christrmas tree panel with a diffrent color non conductive thread
6. Do this with all the lights
7. Place the christmas tree panel with the lights over the second backgorund panel and using a sewing needle poke through the top christmas tree panel where the positive leg of a LED is and make a + sign on the back of the second panel. Do the same thing with the negative leg of the LED
8. Repeat with all the legs
9. The second panel should now be marked with all the places where the positive and negative legs of the LEDs are
10. On the left side of the now marked second panel we will stitch down some conductive thread using the Couching stitch with non conductive thread to secure it
11. Draw reference lines for where the negative leg marking will reach the now secured conductive thread on the back of the second panel. Make sure there are no cross overs or that any of the lines are too close
12. With the couching stitch technique again use non conductive thread to secure the conductive thread from the negative leg markings to the line of conductive thread stitched before
13. Cut out a narrow strip of felt and stitch over the line of conductive thread leaving a bit exposed at the bottom
14. Take your 220 Ohm resistors and curl both ends up on all the resistors
15. Stitch them down with non conductive thread on top of the narrow strip of felt
16. Repeat steps 11 and 12 but with the postive markings and finishing the stitching by attaching it to a resistor
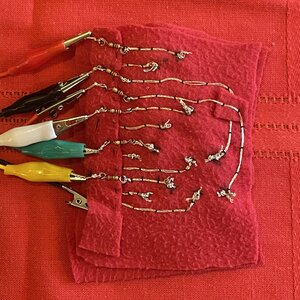
17. Now use conductive thread to stitch through both panels and secure the positve couching end with the long leg of the LEDs and the negative couching ends with the short leg of the LEDs on the christmas tree panel
18. Use crocodile clamps to connect the resitor ends to the corisponding pin on the Arduino Uno board
19. Use a crocodile clamp to connect the GND pin to the conductive thread we secured under the felt
20. Make sure no metal clamps or threads are touch or crossing over each other
21. Plug in the Ardunio Uno to your computer and press the play button in the top left corner of the Beatwrite code in Processing
22. Your christmas tree should light up in sync to the Carol of the Bells mp3 file
Final Swatch
Moving forward further research will need to be done on how to not have this circuit be attached to a computer in order to have it run. But for now below is the Ugly Christmas sweater swatch in action: