Week 12 | Soft Robotics
Inspiration
Inflatable Metal Seat
I first came across the manufacturing process of inflating metal for furniture design while reading Making It: Manufacturing Techniques for Product Design by Chris Lefteri. In the book there was an example of architect Oskar Zieta and materials scientist Phillipp Dohmen furniture that uses free inner pressure deformation (FiDU). A technique requires laser cut sheets of steel, welding them together and then inflataing them to give them a strong 3D form.
And recently Israeli desginer Moran Bramaper designed Puff! a collection of home items that can be inflated with just a bicycle pump.
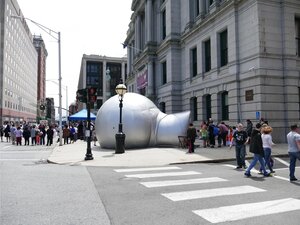
Pneuhaus
Pneuhaus is an art and design studio based in Providence, Rhode Isand that specialized in inflatable installations. They are inspired by physics, biology, and craft to create environments that incoerporates the lessons of nature in form and function. They created a range of beauitful and fun installations, bellow are my personal favorites:
Pnit
A giant inflatable knit structure with a programmed LED facade.
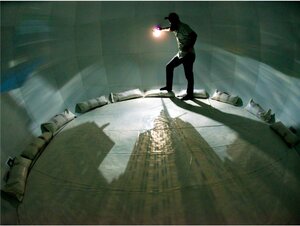
Another favorite of mine that Pneuhaus collabroated with photographers Peter Goldberg and Erik Gould is their installation Camera Obscura. I have played around with making camera obsuras before and had never imagined it being a such a large scale that could be an interactive space.
Christopher Raxxy
Christopher Raxxy is a Chinese luxury down jacket brand that crosses mathmatical practices and fashion design. Though this designer doesn't use inflatables in their work, the concept of making stuffed garments utilizes a similar mindset in its construction. A beautiful use of color, texture, and form to make elegant and playful outfits.
Digital Inflatable Simulating
examples from rhino tutorial with grasshopper and kangaroo
Vinyl Inflatables
After readig through Saskia Helinska's final project on soft robtics, I took inspiration to expolre inflatable forms with vinyl. It was very interesting to see how the positioning and size of whatever shape was inside the form changed the motion/contortion of inflation. I started by exploring hinges and then progressed into 3D hinge possibilities and textures. The baking paper sandwiched in between the vinyl pieces was another factor that contributed to how the form inflated.
Materials
- Baking Paper
- Vinyl sheets
- Laser Cutter
- Heat Press
- Scissors
- Syringe or Hand Pump
Process
- Laser cut shapes on baking paper
- Using laser cut baking paper shapes trace with an allowance of 5mm on the vinyl
- Make 2 copies of traced shape
- Hand cut out the vinyl following your traced lines
- Peel vinyl off baking
- Sandwich vinyl with shiny side up, baking paper, skiny side down.
- Turn on heat press and set to 150C
- Place large sheets of baking paper down on the head press board
- Lay your vinyl sandwiches down
- Place another large sheet of baking paper ontop of vinyl sandwiches
- Press down the heat press for 10 seconds
- After the heat press pops open let it rest for 10-20 seconds
- Remove baking paper and vinyl sandwiches from heat press
- Carefully peel vinyl sandwiches off of the baking paper
- Cut off sealed nozzel insert
- Fill syringe with air or assemble hand pump
- Insert syringe or hand pump tube into nozzel insert
- Pump air into form
- Syringe or hand pump may need to be refilled to fully inflate
    Laser Cut Settings:
    Speed - 85
    Power - 17
    Frequency - 10
Tests
Square diamond test:
Medium diamond test:
2 Medium diamonds test:
3 Medium diamonds test:
Medium vertical diamond test:
Small diamond test:
Box w/ small square diamond hinge w/ wrong vinyl test:
Box w/ large square diamond hinge w/ wrong vinyl test:
Box w/ square diamond hinge w/ correct vinyl test:
Box w/ medium diamond hinge test:
2 triangles test:
3 triangles test:
4 triangles test:
Seat w/ no hinge test:
Seat w/ square diamond hinge test:
Tick mark test:
Waves test:
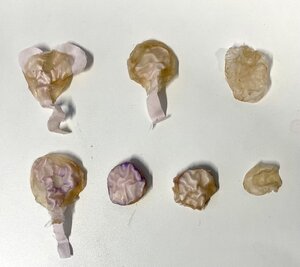
Alginate Inflatables
Back in bio materials week I had played around with making pockets with alginate after discovering the control one can have with curring certain parts of the alginate to make layers and to drain it as well. Below are the materials and steps I had follow this week from what I did during week 6. Additionally, I added a youtube video of my trials this week as making mini inflatable forms. Over all it was very tricky to brainstorm how to layer the alginate to make different air chambers and have it cure. The curing process was what took the most time because if it was too "soft" or "liquid" air would fill in the uncurred alginate and make a new chamber. And I was never paitent enought to wait for it to be fully cured as that would've have a few hours. Also the thickness of the fabric and how much curing solution it can absorob would be interesting to expeirement more with.
Recipe
Materials
- Foil
- 12g Alginate
- 30g Glycerine
- 400ml Warm H20
- (optional: 1ml Spirulina or 2ml Lupin powder)
- Curring Solution
- 10ml Sodium Chloride Hydrate
- 100ml H20
- Spray Bottle
- Other
- Beakers
- Electric hand mixer
- Metal spoon
- Scale
- 70% Alcohol in spray bottle
- Essential Oil
Prep
- Add Glycerine to Warm H20 and stir
- Add Alginate
- Add 2 drops of Essential oil to help with molding
- Use Electric Mixer to mix
- Spray with Ethanol to help w/ Ethanol to help with bubbles
- Cover container with foil
- Put in fridge to rest overnight
- Add Sodium Chloride Hydrate and H20 to spray bottle to make Curing Solution
Making the pockets
Materials
- Alginate foil or sheet solution
- Embroidery hoop with stretched cotton or petri dish
- Spray bottle filled with curing solution
- Beaker of curing solution
- Bowl filled with water
- Strips of paper or fabric
- Scapula or scissors
- Syringe
Pocket1
- Saturate cotton stretched on emboidery hoop with curing solution
- Pour a 1/4 cup of alginate solution on to the cotton
- Use gravity to spread the alginate around
- Spray the top with the curing solution
- Dunk the embroidery hoop with the alginate into the bowl of water
- Remove the alginate "disk" from the water
- Lay on a flat surface
- Press and squeeze liquid alginate inside the alginate disk away from you
- Poke a hole on the edge of the alginate dish where the collected liquid alginate is
- Drain the liquid alginate
- Fill the syringe with water
- Put the syringe nozel inside the hole used for draining the liquid alginate
- Fill the disk with water, be care to not use too much force or you will make another hole
- Drain the water out
- Fill the syringe with the curing solution
- Put the syringe inside the hole
- Fill the disk with the curing solution
- Drain the curing solution out
- Leave it flat to dry over the next few days on a pouris surface
Pocket2
- Saturate cotton stretched on emboidery hoop with curing solution
- Pour a 1/4 cup of alginate solution on to the cotton
- Use gravity to spread the alginate around
- Dip strips of fabric or paper in the curring solution
- Place saturated fabric or paper where you want the alginate to cure, leaving "seams" of exposed alginate
- Pour a 1/4 cup of alginate solution onto the last layer
- Use gravity to spread the solution around
- Repeat 4-7 until desiered amount of layers are made
- Spray the final layer with curing solution
- Lay large piece of fabric or paper to cover the whole alginate surface
- Spray with curing solution
- Let it rest 15 minutes
- Spray more curing solution, you really want it to be fully cured before rinsing
- Let it rest for another 15 minutes or so
- Place in water
- Remove from embroidery hope
- Pull out fabric paper from the layers in the water
- Let dry with ventilation passing through all the laters for a quicker dry time
Making 2 pockets with paper:
Process
- Pour a layer of alginate foil on cure coated surface
- Lay paper down that was saturated in solution
- Pour another layer alginate foil
- Lay paper down that was saturated in solution
- Pour another layer of alginate foil
- Spray with curing solution to end build up
Making the drain pouch video:
Making the layering pouch video:
Inflation Tests:
Inflation tests 2 weeks later all dried up: