Week 06 | BioFabricating Materials
Mycelium | Kombucha | Alginate | Egg Shells
Inspiration
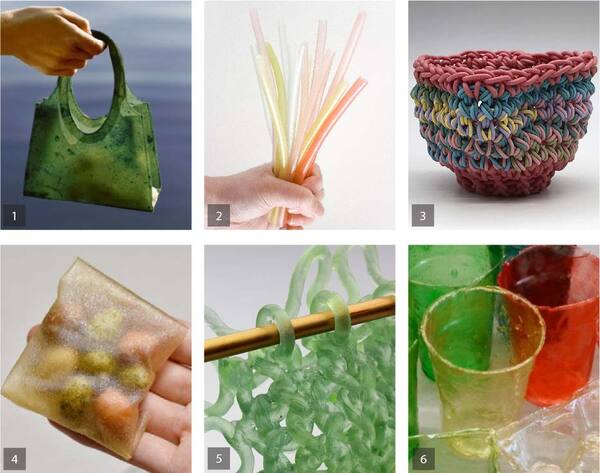
1|Lobke Beckfeld and Johanna Hehemeyer-Cürten 2|Margarita Talep 3|Jermey Brooks 4|Wenwen Fan 5|Carol Milne 6|Wyss Institute
Awesome Recipe Books:
Recipes for Material Activism
Chemarts
Bioplastic Cookbook
Catherine Euale
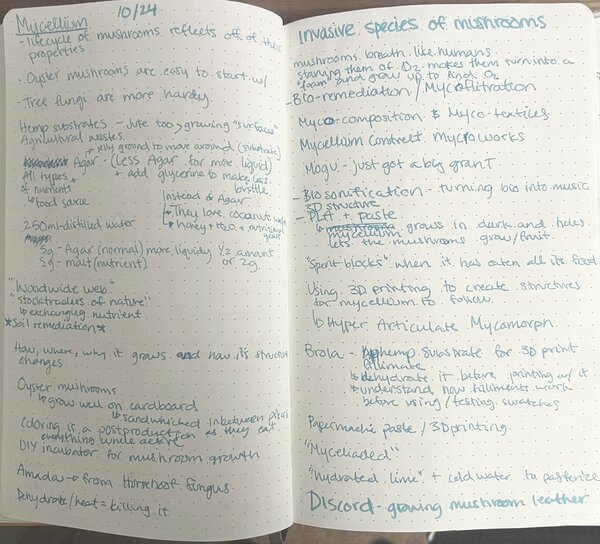
We had the amazing Catherine Euale visiting us for most of Bio Materials week and give a presentation of her background in Bio Materials and provided us with a fascinating background on Mycology and the potentials of Bio Materials. Below is my brain dump of notes from her talk:
Mycelium
With Catherine Euale we set up our dishes to grow our mycelium samples in the same process we did for our bacteria dishes. A new technique we learned for transfering the "parent" mycelium was cutting and transfering.
Materials
- Mycelium parent tray
- Prepared Nutrient Agar dishes
- Gas stove burner
- Lighter
- Scapula
- Parafilm Tape
- 70% Alcohol in spray bottle
- Facemask
Transfering
- Put on facemask
- Set up camping stove, lighter, dishes, nutrient agar dishes, and parent mycelium
- Sterilize area with alchohol
- Turn on burner
- Heat scapula end over flame to sterilize
- Use an extra nutrient agar dish to cool the scapula in
- Open parent mycelium dish towards the flame
- Cut out either a small square or triangle of the parent mycelium
- Close parent mycelium dish
- Quickly transfer to prepared nutrient agar dish and place parent mycelium with mycelium down on the fresh agar
- Close transfer dish
- Repeat 5-11 with a new prepared nutrient agar dish
- Turn off burner
- Close up dishes with Parafilm Tape
- Store in incubator or in warm area for mycelium to grow
- Check on it every few days for growth and contamination
Karen Kombucha
During our first week of Fabricademy we had gotten Karen going. I had a basic understanding of what Kombucha was, but had never experienced the process of setting up a "grow bath". The possibilites of Komhucha are mind blowing and fascinating. We had to have her set up next to a radiator to keep her warm. We did get a bit of molding, but we're calling those her birthmarks. Overall she was very thin after a month of growth, but very strong and slimmy. We put her next to a radiator to dry over some textures surfaces and caused her to dry to quickly. So shes very crispy and delicate now.
Materials
- Kombucha Scooby
- 7L Boiling H20
- 7 Bags of English Breakfast Tea
- 700g Sugar
- 70% Alcohol in Spray bottle
- PH Strips
- Large Wide Tub
- Metal Whisk
- Scale
- Beaker
- Dish soap
Process
- Boil water, measure out tea, and sugar
- Clean out tub with Alcohol
- Add boiled water into tub
- Add sugar and mix
- Add tea bags and mix
- Add vinegar until PH is 3
- Let water cool to room temperature
- Add Kombucha Scooby
- Cover tub and place in warm environment
- Check on it every week to see if it needs more water or to be "fed"
- Once grown over several weeks and a good layer has formed one can remove it from the tub
- Rinse 2-3 times in soapy water to help remove any residue
- Lay flat or on a textured surface to dry slowly
Karen wet and then crispy dry after drying too quicly overnight
Divide and Conqure
As a team we divided and conqured different materials and recipes to have a large library of samples to reference. Below is our "Recipe Booklet" where we compiled the recipies everyone tried out:
Alginate
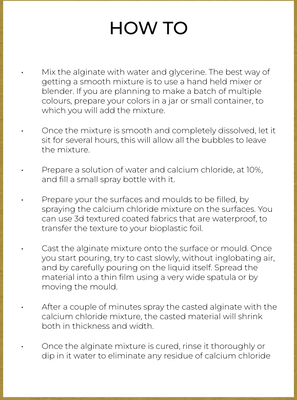
My base material of choice was Alginate and experimenting with layering techniques and making noodles. The base recipies I used were from Cecilia's presentation Lecture Slides part 2 - BIOPLASTIC RESEARCH & RECIPES on slide 12 & 13:
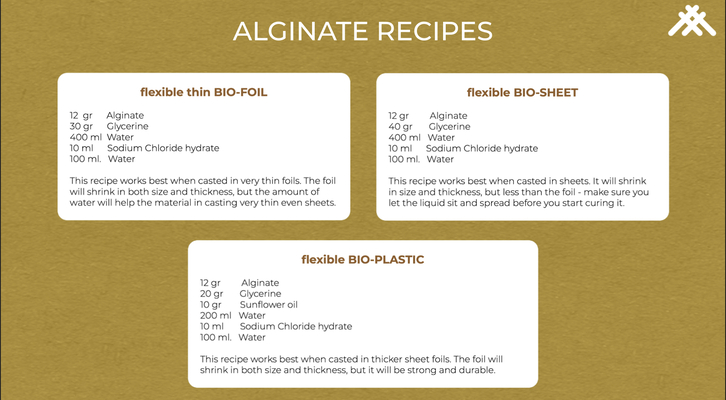
Foil
Making anything alginate based was super easy as it didn't involved any heat. The foil was my first pour and I was not ready for how quickly it would start to cure. So I learned very quickly to have gravity be my friend in spreading the alginate rather then try to spread it. It was also a great consistency to getting different thicknesses of noodles to knit and crochet with. Adding color was most sucessful when adding a pigment powder verses using dye bath water. Catherine's insight on why using dye bath water wouldn't work is because Alginate is very PH senstive. We used Spirulina powder and Lupin pigment powder for our colorants.
Materials
- Foil
- 12g Alginate
- 30g Glycerine
- 400ml Warm H20
- (optional: 1ml Spirulina or 2ml Lupin powder)
- Curring Solution
- 10ml Sodium Chloride Hydrate
- 100ml H20
- Spray Bottle
- Other
- Beakers
- Electric hand mixer
- Metal spoon
- Scale
- 70% Alcohol in spray bottle
- Essential Oil
Prep
- Add Glycerine to Warm H20 and stir
- Add Alginate
- Add 2 drops of Essential oil to help with molding
- Use Electric Mixer to mix
- Spray with Ethanol to help w/ Ethanol to help with bubbles
- Cover container with foil
- Put in fridge to rest overnight
- Add Sodium Chloride Hydrate and H20 to spray bottle to make Curing Solution
Pouring
- Spray surface with Curing Solution
- Pour Alginate foil on surface and use gravity to spread
- Let rest a few minutes
- Spray with Curing Solution
- Rinse w/ water to remove curing solution
- Let dry
Properties
- Pliable
- Transparent
- Skin-like
- Curling at the edges
Sheet
The sheet alginate was a bit thicker then the foil, but had very similar properties when pouring and was great for making layers or draining to make pockets.
Materials
- Sheet
- 12g Alginate
- 40g Glycerine
- 400ml Warm H20
- (optional: 1ml Spirulina or 2ml Lupin powder)
- Curring Solution
- 10ml Sodium Chloride Hydrate
- 100ml H20
- Other
- Beakers
- Electric hand mixer
- Metal spoon
- Scale
- 70% Alcohol in spray bottle
- Essential Oil
Prep
- Add Glycerine to Warm H20 and stir
- Add Alginate
- Add 2 drops of Essential oil to help with molding
- Use Electric Mixer to mix
- Spray with Ethanol to help w/ Ethanol to help with bubbles
- Cover container with foil
- Put in fridge to rest overnight
- Add Sodium Chloride Hydrate and H20 to spray bottle to make Curing Solution
Pouring
- Spray surface with Curing Solution
- Pour Alginate foil on surface and use gravity to spread
- Let rest a few minutes
- Spray with Curing Solution
- Rinse w/ water to remove curing solution
- Let dry
Properties
- Non stretchy
- Flexible
- Smooth
- Skin-like
Plastic
The plastic alginate was definetly the hardest to work with because of how thick it was. You couldnt reall pour it that easily. And extruding it with a syringe to make noodles was a workout to say the least. But they made beautiful thick noodles to knit with.
Materials
- Plastic
- 12g Alginate
- 20g Glycerine
- 10g Vegtable Oil
- 200ml Warm H20
- (optional: 1ml Spirulina or 2ml Lupin powder)
- Curring Solution
- 10ml Sodium Chloride Hydrate
- 100ml H20
- Other
- Beakers
- Electric hand mixer
- Metal spoon
- Scale
- 70% Alcohol in spray bottle
- Essential Oil
Prep
- Add Glycerine to Warm H20 and stir
- Add Alginate
- Add 2 drops of Essential oil to help with molding
- Use Electric Mixer to mix
- Spray with Ethanol to help w/ Ethanol to help with bubbles
- Cover container with foil
- Put in fridge to rest overnight
- Add Sodium Chloride Hydrate and H20 to spray bottle to make Curing Solution
Pouring
- Spray surface with Curing Solution
- Pour Alginate foil on surface and use gravity to spread
- Let rest a few minutes
- Spray with Curing Solution
- Rinse w/ water to remove curing solution
- Let dry
Properties
- High shrinkage rate
- Shrinking 30%
- Bendy
- Strong
- Colour change to translucent
- Skin-like
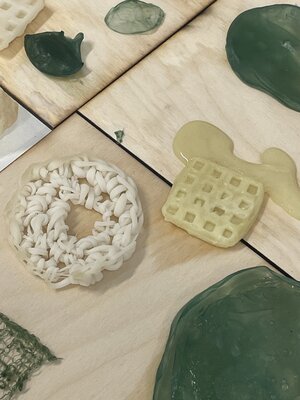
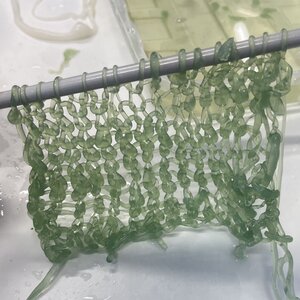
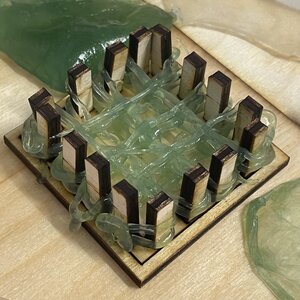
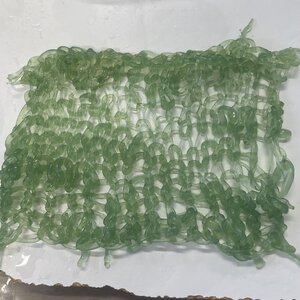
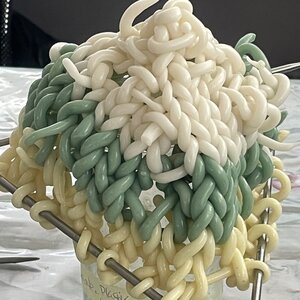
Noodle Making
With the alginate foil and plastic I had a lot of fun manually making noodles to knit and crochet with.
Materials
- Alginate foil or plastic solution
- Syringe
- Bowl or Beaker filled with Curing Soluion
- Bowl or Beaker of H2O
Process
- Fill syringe by sucking up the alginate solution to avoid air bubbles
- Empty the syringe over the container with the curing solution in a steady stream
- Let the noodles sit in the curing solution. Thinner noodles only need to be in there for 15 minutes to be fully cured, where thicker ones can be in there for about an hour
- Remove from curing solution and place in water to rinse
- Either hang to dry or use for project when more plyable when wet
- Let dry over a few days
Foil Noodles:
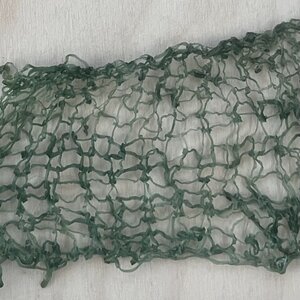
Plastic Noodles:
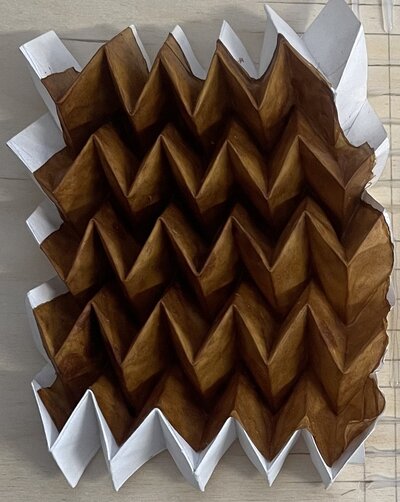
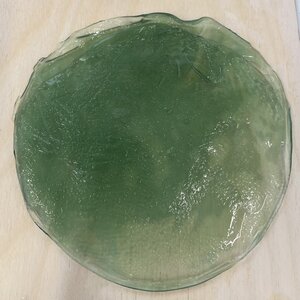
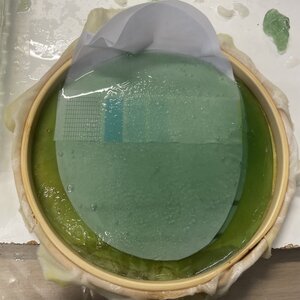
Pockets and Layering
What really cool with alginate is how you can control what parts cure and which parts stay "sticky". This allows for fun stuff like draining out uncured alginate to make a "bubble" or making layers of alginate with cured paper or fabric inbetween to create pockets. Using fabric was easier then paper and also reusable.
Materials
- Alginate foil or sheet solution
- Embroidery hoop with stretched cotton
- Spray bottle filled with curing solution
- Beaker of curing solution
- Bowl filled with water
- Strips of paper or fabric
- Scapula
- Syringe
Pocket1
- Saturate cotton stretched on emboidery hoop with curing solution
- Pour a 1/4 cup of alginate solution on to the cotton
- Use gravity to spread the alginate around
- Spray the top with the curing solution
- Dunk the embroidery hoop with the alginate into the bowl of water
- Remove the alginate "disk" from the water
- Lay on a flat surface
- Press and squeeze liquid alginate inside the alginate disk away from you
- Poke a hole on the edge of the alginate dish where the collected liquid alginate is
- Drain the liquid alginate
- Fill the syringe with water
- Put the syringe nozel inside the hole used for draining the liquid alginate
- Fill the disk with water, be care to not use too much force or you will make another hole
- Drain the water out
- Fill the syringe with the curing solution
- Put the syringe inside the hole
- Fill the disk with the curing solution
- Drain the curing solution out
- Leave it flat to dry over the next few days on a pouris surface
Pocket2
- Saturate cotton stretched on emboidery hoop with curing solution
- Pour a 1/4 cup of alginate solution on to the cotton
- Use gravity to spread the alginate around
- Dip strips of fabric or paper in the curring solution
- Place saturated fabric or paper where you want the alginate to cure, leaving "seams" of exposed alginate
- Pour a 1/4 cup of alginate solution onto the last layer
- Use gravity to spread the solution around
- Repeat 4-7 until desiered amount of layers are made
- Spray the final layer with curing solution
- Lay large piece of fabric or paper to cover the whole alginate surface
- Spray with curing solution
- Let it rest 15 minutes
- Spray more curing solution, you really want it to be fully cured before rinsing
- Let it rest for another 15 minutes or so
- Place in water
- Remove from embroidery hope
- Pull out fabric paper from the layers in the water
- Let dry with ventilation passing through all the laters for a quicker dry time
Making 2 pockets with paper:
Process
- Pour a layer of alginate foil on cure coated surface
- Lay paper down that was saturated in solution
- Pour another layer alginate foil
- Lay paper down that was saturated in solution
- Pour another layer of alginate foil
- Spray with curing solution to end build up
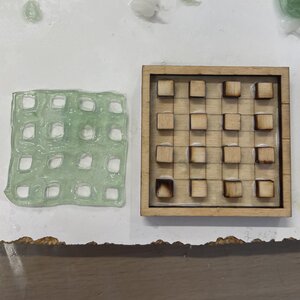
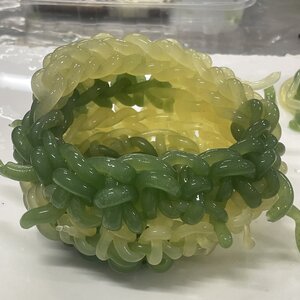
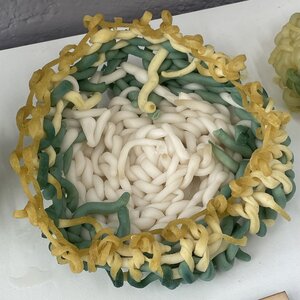
Making flower "pocket/layers" with fabric:
Process
- Cut out pizza slices of fabric
- Pour a layer of alginate foil on cure coated surface
- Lay fabric down with spaces in between each slice
- Pour another layer of alginate foil
- Lay fabric down with spaces in between each slice covering the no fabric spaces from the layer before
- Repeat 4-5 for desired layers
- Spray with curing solution to end constuction of layers
Making vertical "pocket/layers" with fabric:

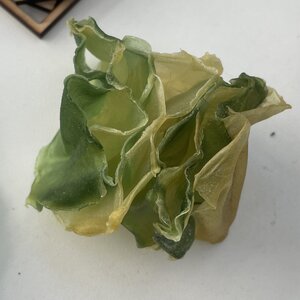
Wet vs dried
Material Review
After a few weeks the alignate knitted pieces and pockets shrunk a lot and became quite brittle, especially the super thin noodles. The thicker noodles are more durable and the pockets held their shape really well when dried.
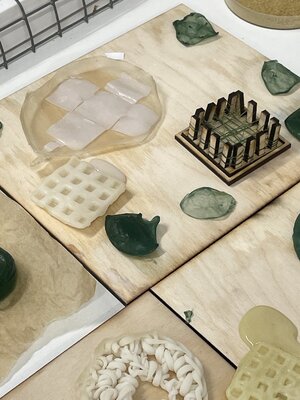
Egg Filler
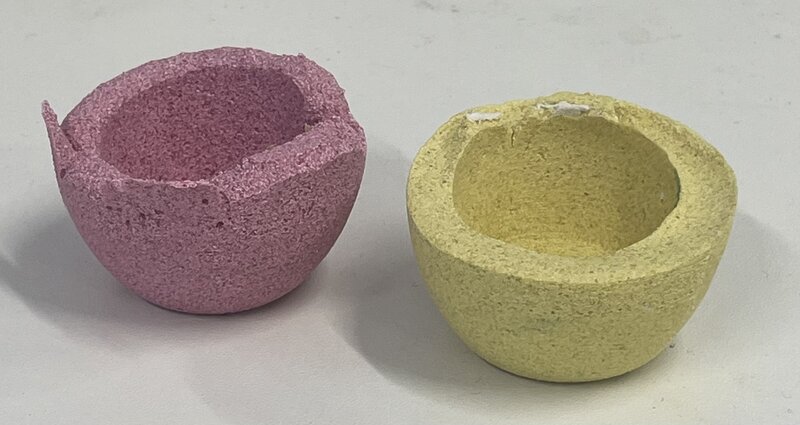
My filler of choice was white egg shell. I played around with different recipies to be able to "3D print", make little cups, and pour sheets of the material. Some worked out great and some were epic disasters.
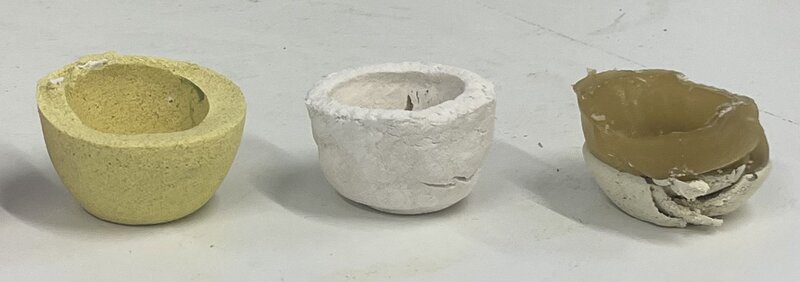
For the little cups I found a 2 part mold file on Thingivers and with the help of Louise we resized it and made a smaller cup to 3D print a mold
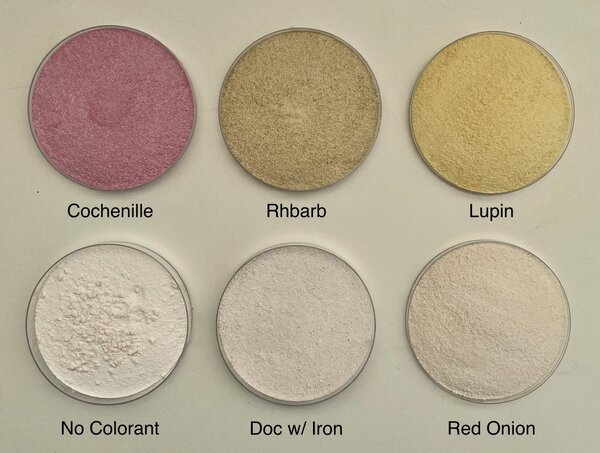
Egg Shell Prep
In order to make biomaterials with egg shells there is a process that the eggs shells have to go through inorder to be able to use them
Materials
- Clean Egg Shells
- Pot
- H20 or Dye Bath
- Spoon
- Dehydrator
- Coffee Grinder
- Face Mask
Process
- Clean egg shells
- Boil in water or dye bath for 15 min. Keep a close eye while boiling as it will foam up
- Remove from dye bath a dry in dehydrator for 12 hours at 70 C
- Put on face mask
- Grind into fine powder and store in jar
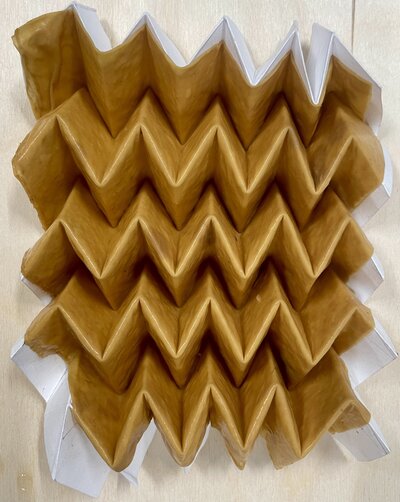
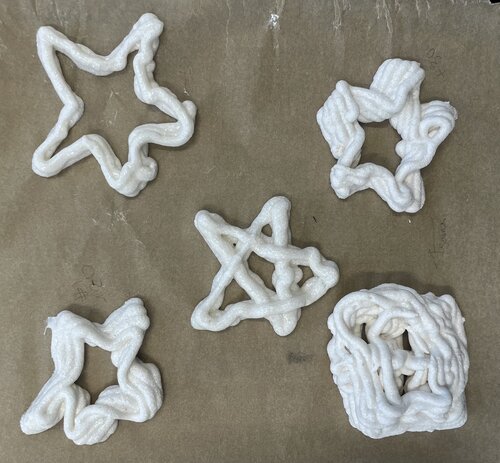
Xanthan Powder
For "3D printing" I played around with an Eggshell paste found on Materiom
Materials
- 100g (to start) Egg Shell Powder
- 100ml Warm H20
- 4g Xanthan Powder
- Syringe
- Baking sheet
- Flat surface
- Spoon
- Beaker
- Scale
Process
- Add Xanthan Powder to Warm H20 and mix until it starts to thicken and all lumps are dissolved
- Add egg shell powder a stir into a smooth paste
- Add to syringe and begin “3D printing”
Properties
- Brittle
- Dense
- Hard
- Light
Tips
- The more egg shells added the “sturdier” the paste was and the quicker it dried
- Binder Ratio water to xanthan= 1:0.04
- Paste Ratio powder to binder= 1:0.4
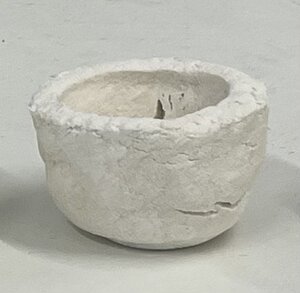
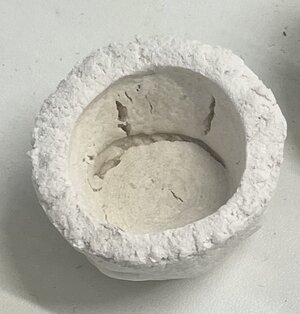
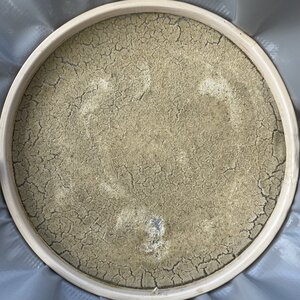
Alginate
The Alginate "ceramic" recipe had a lot of potential, the rushed drying caused cracking and disformation of the over all shape. But a nice texture overall. The recipe was also found on Materiom
Materials
- 20g Egg Shell Powder
- 22ml Warm H20
- 5g Calcium Alginate
- Scale
- Beaker
- Pot
- Stove Top
- Dehydrator
- Mold
Process
- Add calcium alginate to water and mix thoroughly so that there are no lumps
- Add egg shells and mix thoroughly quicky before the alginate starts to set
- Place in mold to let harden
- Remove from mold when dry
Properties
- Dense
- Hard
- Light
- Cracking up
Tips
- It was quite sticky when doing this in a 2 part mold so either put a baking sheet or spray with the curing solution from alginate recipes to help with removal from the mold
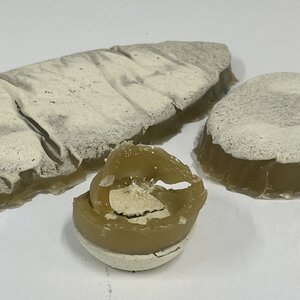
Agar Agar
This agar recipe was a hot mess to say the least. The mixture continued to seperate no matter how much I mixed it after adding the egg shell. What I think happened was that I didn't let the agar "cook" enough before adding the egg shell.
Materials
- 10g Egg Shell Powder
- 40ml H20
- 3g Glycerol
- 2g Agar Agar
- Scale
- Beaker
- Pot
- Stove Top
- Dehydrator
- Mold
- Freezer
Process
- Add glycerol and agar into pot with water on the stove and mix
- Don’t couldn’t tell you for how long you are supposed to mix for as the recipe didn’t say, but I went until the agar had dissolved and for a few minutes after
- Let the mixture cool down before adding the egg shells
- Add egg shells and mix thoroughly
- My mixture kept separating
- Pour into mold and put in the freezer
- Remove from freezer and remove from mold to let harden overnight
Properties
- Seperated
- Very hard
Tips
- This was an utter disaster. Couldn’t tell you where I went wrong. Possibly didn’t let it “cook” for long enough
Gelatine
This biocomposite recipe worked like a charm. Also found on Materiom
Materials
- 24g Egg Shell Powder
- 12ml Warm H20
- 5g Gelatin
- Scale
- Beaker
- Pot
- Stove Top
- Dehydrator
- Mold
- Freezer
Process
- Add gelatin into water over medium heat
- Stir until gelatin is fully dissolved
- Remove from heat and add in egg shell powder mixing thoroughly
- Pour into mold
- Put in freezer for 10 minutes
- Take out of freezer and remove from mold
- Let harden over the next day or so
Properties
- Dense
- Hard
- Light
- Smooth
Tips
- Freezing is the way to go for setting the gelatine and having the biomaterial come out of the mold easily