Week 10 | Open Source Hardware - From Fibers to Fabric
Insipration
This week's focus got my industrial design jucies flowing. I have always looked for way to mechanise processes and challenge the idea of who the "maker" is; the designer or machine? I also look to mechanise processes for efficency of time and use of materials. A big part in my fascination of how things are made comes from the processes and machines involved. And so a lot of the time I will get caught up in tyring to understand how a machine works in a certain process of making something and how it can be used for another function or tweaked to have other outcomes.
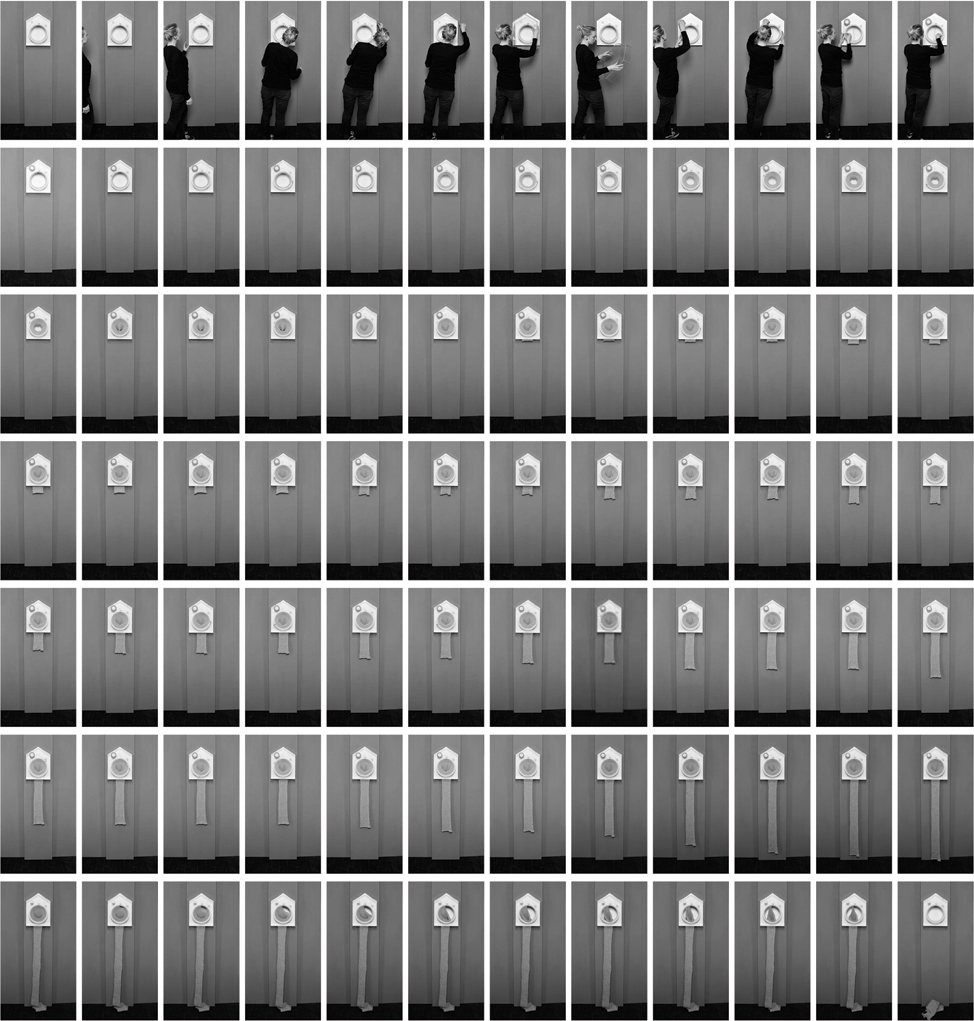
Siren Elise Wilhelmsen
Siren Elise Wilhelmsen is a deisgner that seeks ways to stimulate ideas and discussions around our everyday objects, rituals and culture. My favorite work of her's is 365 KNITTING CLOCK wall-hanging clock that gives a physical representation to time passing more then just numbers on a clock face, but with the past having been knit and the future still wound in a spool. This article has additional information and visual documentation to her project.
Will Cruickshank
Will Cruickshank is a multidisciplinary creative whose practice includes sculpture, film, photography, and printmaking. His recent work has focused on making objects through the development of experimental machinery, materials, and production methods. He has been repurposing equipment such as cement mixers, bikes, or potters wheels to develop complex makeshift weaving machines, improvised lathes, printing presses, and water carving techniques and tools. Below is a video compliation he made of his machinery development stages in Methods 2016-2020:
Jen Keane
Jen Keane is a designer, material inovator, inventor of the microbial weaving prcoess and founder of Modern Synthesis. Jen's most notable project is This is Grown that merges modern, mass-production textile practices with a philosophy of future biotech and enhances a new form of ‘microbial weaving’, the growing process of k. rhaeticus bacteria is optimized to weave a hybrid material that is not only strong but also lightweight. This articel on designboom.com has a great insight into Jen's mission and process of her This is Grown project. Additionally on her Instagram she shares beautiful visual documentaion of her projects.
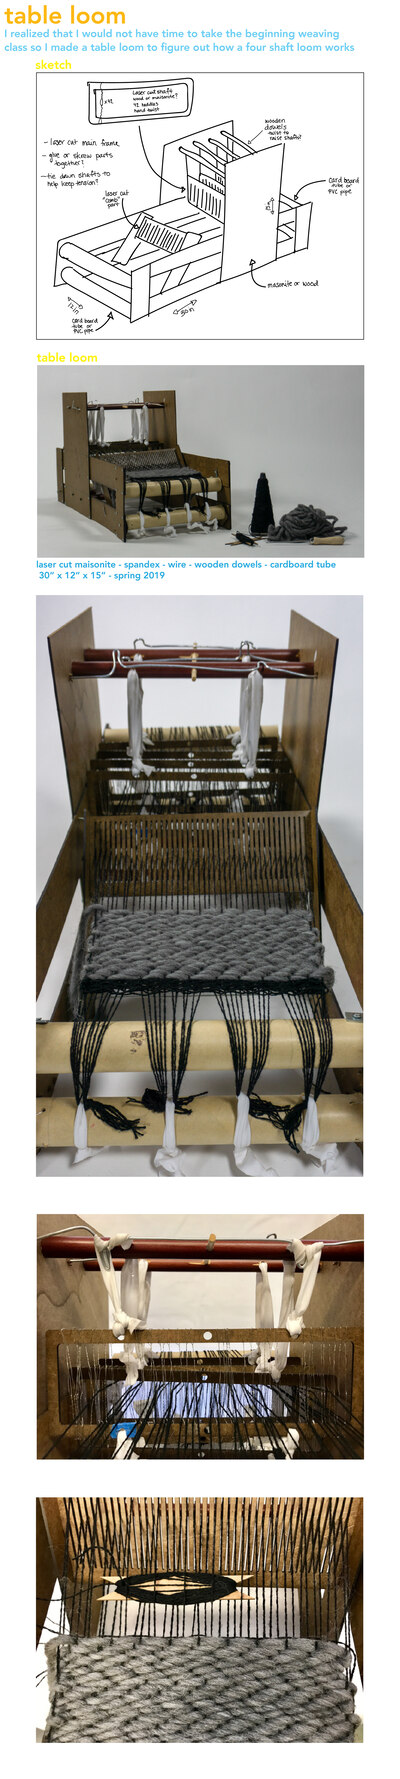
Past Work
Back in the spring of 2019 I missed my chance at taking a weaving class at Mass Art and instead took it apon myself to make my own table loom to self teach the principles of weaving:
Rigid Heddle Loom Fix
At the textile center here in Blönduós I came across a rigid heddle loom with a broken heddle that needed to be replaced. The rigid heddle had been made out of plastic and had broken eyelets that would a nightmare to weave with.
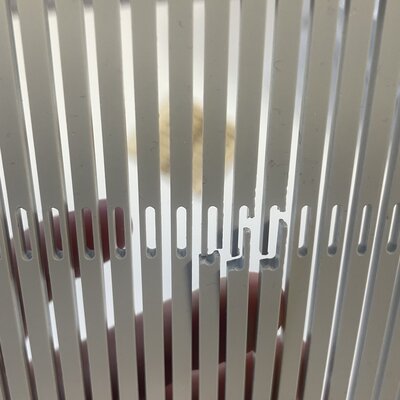
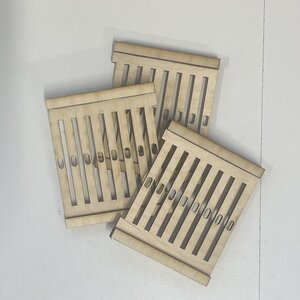
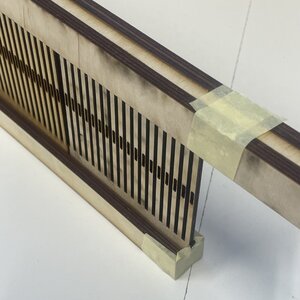
And so I took inspiration from Ashford's Veri Dent Reeds to design a new rigid heddle for the table loom.
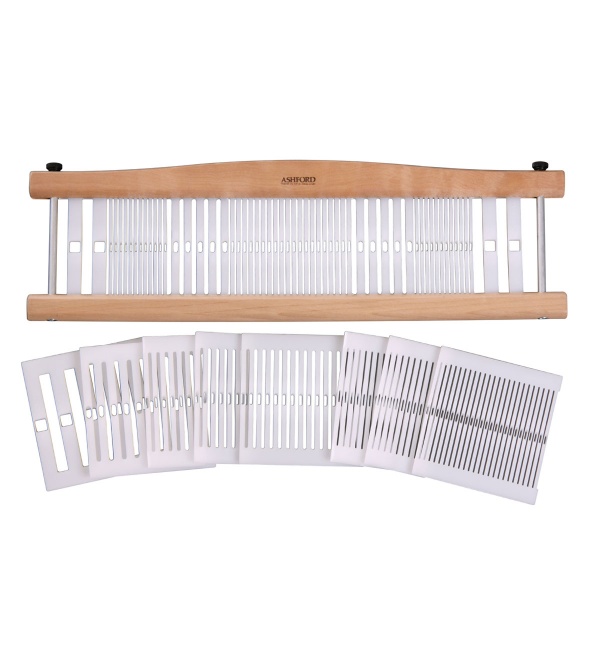
I first designed 2 different dent sizes and then how the parts would be assembled. I had in mind that one could slide in the different parts on to the rigid heddle and make it modular. However, after assembling it all together I realized that a better design would be to use wing nuts to sandwich the top and bottom bars around the dent pieces. Rather then relazer cutting everything, I will drill holes into the pieces and find wing nuts to secure it all in place. Below are the files and images of the first attempt at making the modular rigid heddle.
Materials
- 4mm Plywood
- Laser Cutter
- Wood Glue
- 4 Bolts and Wing Nuts
Files:
- Small Dent File
- Large Dent File
- Top Bar File
- Bottom Bar File
NOTE: Different colors are assigned in the files so they cut in a ceratin order. Configure laser cut machine to process colors in files from blue to black to red in order to have the detailed parts cut out properly.
    Laser Cut Settings:
    Speed: 15
    Power: 100
    Frequency: 10
Incubator
For our group project we collaborated on making an Incubator for the studio. We divided the team into 3ish steps. I took on laser cutting out the exterior box, sliding door, and shelves. Birdy and Margrét took on building the insullation layer and with the help of Louise programed the Arduino.
Below is the documentaion of our process and notes:
Incubator rator by Margrét Katrín Guttormsdóttir
Reference Tutorials
- GOOGLE DOC HANDBOOK: INCUBATOR
- LECTURE 2022
- INSTRUCTABLES
- LIST OF MATERIALS AND LINKS
- WENDY'S DOCUMENTATION
- PREVIOIS YEAR DRIVE
- PREVIOUS FABRICADEMY
- PREVIOUS RESEARCH PAPERS
- HACKADAY
Tools and Programs
- ARDUINO UNO
- ARDUINO IDE
- 2D/3D MODELLING RHINO
- 2D MODELLING IILLUSTRATOR
- REGULATING TEMP
- SPARKFUN SENSOR CODE
- SPARKFUN LIBRARY
- CODE FOR CONTROLLING FAN
- LIQUID CRYSTAL
- RELAY MODULES
Materials
| Qty | Description | Price | Link | Notes |
|---|---|---|---|---|
| 1 | Arduino UNO | 24 € | https://store.arduino.cc/products/arduino-uno-rev3 | Arduino kit also includes lcd screen and cable |
| 1 | Humidity and temperature sensor | 10.95 $ | https://www.sparkfun.com/products/16467 | find alternative |
| 1 | Relay Module 5V | 22.00 $ | http://amazon.com/test | |
| 1 | USB A to B cable for the Arduino | 6.50 € | https://store.arduino.cc/products/usb-2-0-cable-type-a-b?queryID=undefined | |
| 1 | 75W incandescent light bulb | 2.83 $ | https://www.amazon.com/GE-41032-Incandescent-Globe-White/dp/B00FZYLF50/ref=sr_1_2?keywords=incandescent+light+bulbs+75+watt&qid=1669653476&sr=8-2 | Heating element can also be used |
| 1 | 12V computer fan | 16.99 $ | https://www.amazon.com/6000RPM-Antminer-Cooling-Dissipation-Machines/dp/B09L62QDH4/ref=sr_1_22_sspa?crid=5M8QIMX6D705&keywords=12v+fan&qid=1669653747&sprefix=12v+fa%2Caps%2C277&sr=8-22-spons&psc=1&spLa=ZW5jcnlwdGVkUXVhbGlmaWVyPUEzUkhHOTVSQ09IWUtNJmVuY3J5cHRlZElkPUEwOTA2Mzc3Mk5PTTBUMlQ3QTFYUyZlbmNyeXB0ZWRBZElkPUEwNTMzMTQ2MzQzUVJGTkhJNFZLSiZ3aWRnZXROYW1lPXNwX2J0ZiZhY3Rpb249Y2xpY2tSZWRpcmVjdCZkb05vdExvZ0NsaWNrPXRydWU= | we got our for free from an old computer |
| 2 | 12V power supply | 9.99 $ | https://www.amazon.com/ALITOVE-100-240V-Converter-Security-Surveillance/dp/B07VQHYGRD | order online |
| 1 | Piezo buzzer | 0.95 $ | https://www.sparkfun.com/products/21235 | this or alternative |
| 3 | 10k potentiometer | 3.15 $ | https://www.sparkfun.com/products/9939 | this or alternative |
| 1 | Small LCD screen | 9.99 $ | https://www.amazon.com/SunFounder-Serial-Module-Display-Arduino/dp/B019K5X53O/ref=sr_1_2_sspa?crid=2N6X4JEC2554E&keywords=arduino%2Blcd%2Bscreen&qid=1669654286&sprefix=arduino%2Blcd%2Bscreen%2Caps%2C188&sr=8-2-spons&spLa=ZW5jcnlwdGVkUXVhbGlmaWVyPUExSEhZOFZVUUJVWVVBJmVuY3J5cHRlZElkPUEwOTE5MzU4MUxFOUhQT0NPOUQ2ViZlbmNyeXB0ZWRBZElkPUEwNjg1NDY1M0hTTDVSTVhZQlNUQyZ3aWRnZXROYW1lPXNwX2F0ZiZhY3Rpb249Y2xpY2tSZWRpcmVjdCZkb05vdExvZ0NsaWNrPXRydWU&th=1 | also comes with the arduino kit |
Code
Download the libraries:
- SparkFun_Si7021_Breakout_Library.h
- Go to slide 20 in above deck for clear instruction on how to activate the libraries:
Humidity and Temperature Sensor
    ******************************************************************************
SparkFun Si7021 Breakout Example
Joel Bartlett @ SparkFun Electronics
Original Creation Date: May 18, 2015
Updated May 4, 2016
This sketch prints the temperature and humidity the Serial port.

The library used in this example can be found here:
https://github.com/sparkfun/Si7021_Breakout/tree/master/Libraries

Hardware Connections:
  HTU21D ------------- Photon
  (-) ------------------- GND
  (+) ------------------- 3.3V (VCC)
   CL ------------------- D1/SCL
   DA ------------------- D0/SDA

Development environment specifics:
IDE: Particle Dev
Hardware Platform: SparkFun RedBoard
                   Arduino IDE 1.6.5

This code is beerware; if you see me (or any other SparkFun
employee) at the local, and you've found our code helpful,
please buy us a round!
Distributed as-is; no warranty is given.
*******************************************************************************/
#include "SparkFun_Si7021_Breakout_Library.h"
#include <Wire.h>

float humidity = 0;
float tempf = 0;


int power = A3;
int GND = A2;

//Create Instance of HTU21D or SI7021 temp and humidity sensor and MPL3115A2 barrometric sensor
Weather sensor;

//---------------------------------------------------------------
void setup()
{
Serial.begin(9600);   // open serial over USB at 9600 baud

pinMode(power, OUTPUT);
pinMode(GND, OUTPUT);

digitalWrite(power, HIGH);
digitalWrite(GND, LOW);

//Initialize the I2C sensors and ping them
sensor.begin();


}
//---------------------------------------------------------------
void loop()
{
//Get readings from all sensors
getWeather();
printInfo();
delay(1000);

}
//---------------------------------------------------------------
void getWeather()
{
// Measure Relative Humidity from the HTU21D or Si7021
humidity = sensor.getRH();

// Measure Temperature from the HTU21D or Si7021
tempf = sensor.getTempF();
// Temperature is measured every time RH is requested.
// It is faster, therefore, to read it from previous RH
// measurement with getTemp() instead with readTemp()
}
//---------------------------------------------------------------
void printInfo()
{
//This function prints the weather data out to the default Serial Port

Serial.print("Temp:");
Serial.print(tempf);
Serial.print("F, ");

Serial.print("Humidity:");
Serial.print(humidity);
Serial.println("%");
}
LCD Screen
/******************************************************************************
SparkFun Si7021 Breakout Example
Joel Bartlett @ SparkFun Electronics
Original Creation Date: May 18, 2015
Updated May 4, 2016
This sketch prints the temperature and humidity the Serial port.

The library used in this example can be found here:
https://github.com/sparkfun/Si7021_Breakout/tree/master/Libraries

Hardware Connections:
  HTU21D ------------- Photon
  (-) ------------------- GND
  (+) ------------------- 3.3V (VCC)
   CL ------------------- D1/SCL
   DA ------------------- D0/SDA

Development environment specifics:
IDE: Particle Dev
Hardware Platform: SparkFun RedBoard
                   Arduino IDE 1.6.5

his code is beerware; if you see me (or any other SparkFun
employee) at the local, and you've found our code helpful,
please buy us a round!
Distributed as-is; no warranty is given.
*******************************************************************************/
#include "SparkFun_Si7021_Breakout_Library.h"
#include <Wire.h>
#include <LiquidCrystal.h>

float humidity = 0;
float tempf = 0;


int power = A3;
int GND = A2;
const int rs = 12, en = 11, d4 = 5, d5 = 4, d6 = 3, d7 = 2;
LiquidCrystal lcd(rs, en, d4, d5, d6, d7);
const int RELAY_PIN = A0;  // the Arduino pin, which connects to the IN pin of relay

//Create Instance of HTU21D or SI7021 temp and humidity sensor and MPL3115A2 barrometric sensor
Weather sensor;

//---------------------------------------------------------------
void setup()
{
// set up the LCD's number of columns and rows:
lcd.begin(16, 2);
// Print a message to the LCD.
lcd.print("hello, world!");


}
Serial.begin(9600);   // open serial over USB at 9600 baud

pinMode(power, OUTPUT);
pinMode(GND, OUTPUT);

digitalWrite(power, HIGH);
digitalWrite(GND, LOW);

//Initialize the I2C sensors and ping them
sensor.begin();
pinMode(RELAY_PIN, OUTPUT);

}
//---------------------------------------------------------------
void loop()
{
//Get readings from all sensors
getWeather();
printInfo();
if(tempf <= 74){ //=18°C
digitalWrite(RELAY_PIN, LOW);
}
else if(tempf > 74){ //23°C
digitalWrite(RELAY_PIN, HIGH);
delay(5000); //5 seconds ON
digitalWrite(RELAY_PIN, LOW);
delay(5000); //5 seconds OFF
}
printInfo();
delay(1000);
}

//---------------------------------------------------------------
void getWeather()
{
// Measure Relative Humidity from the HTU21D or Si7021
humidity = sensor.getRH();

// Measure Temperature from the HTU21D or Si7021
tempf = sensor.getTempF();
// Temperature is measured every time RH is requested.
// It is faster, therefore, to read it from previous RH
// measurement with getTemp() instead with readTemp()
}
//---------------------------------------------------------------
void printInfo()
{
//This function prints the weather data out to the default Serial Port

Serial.print("Temp:");
Serial.print((tempf - 32) * 5 / 9); //Temperature in Celsius
Serial.print("C, ");

Serial.print("Humidity:");
Serial.print(humidity);
Serial.println("%");

// set the cursor to column 0, line 0
// (note: line 0 is the first row, since counting begins with 0):
lcd.setCursor(0, 0);
// print the number of temperature since reset:
lcd.print("Temp:");
lcd.print((tempf - 32) * 5 / 9);
lcd.print("C  "); //space to remove the d! "from hello world!"

// set the cursor to column 0, line 1
// (note: line 1 is the second row, since counting begins with 0):
lcd.setCursor(0, 1);
// print the number of humidity since reset:
lcd.print("Humid:");
lcd.print(humidity);
lcd.println("%");

// constants won't change for fan
// const int RELAY_PIN = A0; // the Arduino pin, which connects to the IN pin of relay
Converting Fahrenheit to Celsius
void printInfo()
{
//This function prints the weather data out to the default Serial Port

Serial.print("Temp:");
Serial.print((tempf - 32) * 5 / 9); //Temperature in Celsius
Serial.print("C, ");

Serial.print("Humidity:");
Serial.print(humidity);
Serial.println("%");

// set the cursor to column 0, line 0
// (note: line 0 is the first row, since counting begins with 0):
lcd.setCursor(0, 0);
// print the number of temperature since reset:
lcd.print("Temp:");
lcd.print((tempf - 32) * 5 / 9);
lcd.print("C  "); //space to remove the d! "from hello world!"

// set the cursor to column 0, line 1
// (note: line 1 is the second row, since counting begins with 0):
lcd.setCursor(0, 1);
// print the number of humidity since reset:
lcd.print("Humid:");
lcd.print(humidity);
lcd.println("%");
Fan
/*
* Created by ArduinoGetStarted.com
*
* This example code is in the public domain
*
* Tutorial page: https://arduinogetstarted.com/tutorials/arduino-controls-fan
*/

// constants won't change
const int RELAY_PIN = A0;  // the Arduino pin, which connects to the IN pin of relay

// the setup function runs once when you press reset or power the board
void setup() {
// initialize digital pin A0 as an output.
pinMode(RELAY_PIN, OUTPUT);
}

// the loop function runs over and over again forever
void loop() {
digitalWrite(RELAY_PIN, HIGH); // turn on fan 5 seconds
delay(5000);
digitalWrite(RELAY_PIN, LOW);  // turn off fan 5 seconds
delay(5000);
}