10 Open Source Hardware
Research
This week is all about making your own tools. I have been following a few projects over the years in this field after I saw the Open Source Loom Project. I love this version of the project from @retrotechjournal on Youtube.
All Yarns Are Beautiful (AYAB)
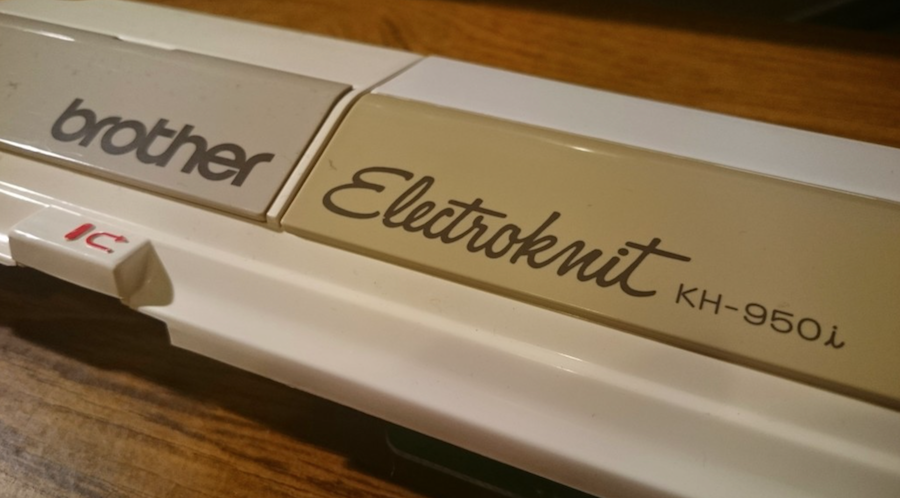
I was very excited to learn that we had a Brother 950i Knitting maching to hack. This was made possible from the project All Yarns are Beautiful which is something I´ve wanted to do for a very long time.
The project was simple right. We have a AYAB Sheild kit and an old electric knitting machine and our task was to integrate this circuit board into the machine using the Arduino Uno R3 as an controlling interface. As I´m well aquainted with the arduino after wearables week I was looking forward to using it in a non soft way.
Hardware Part 1
So we have a kit that was purchased and here you can see the contents.
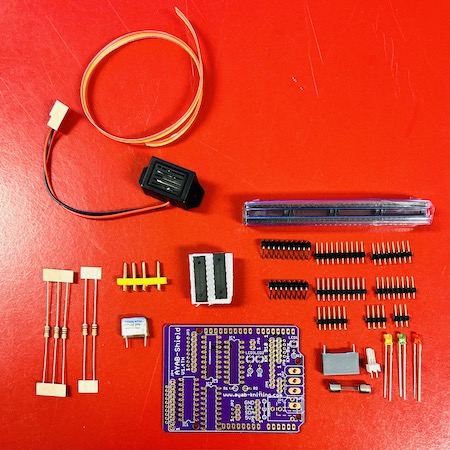
The circuit needs to be constructed so this is our first challenge, actually soldering stuff. As I have soldered something twice in my life this was gonna be a job. As it turned out very much so. First thing was to find the instructions. You can find the soldering instructions herewhere it says AYAB shield solder instructions. I also reccomend reading the super cut comic on how to solder linked below it.
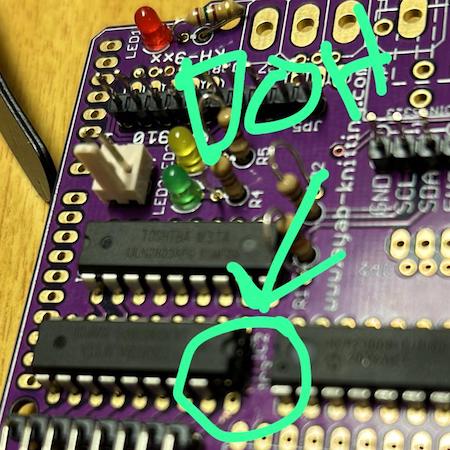
Well practice make perfect and by the time I had soldered alot of the connectors in I was getting pretty good at it. Then I got cocky and thats when disaster struck. As I was flying through the chips I somehow managed to solder it on without realising one of the legs of one of the 18bit chip was left out. I had already soldered the rest on so I thought I could just bend it into place. Then it snapped off much to my horror. In an attempt not to panic I thought I could maybe just solder it back on as i tried to squeeze it in with tweezers the leg somehow went flying and is now in the Icelandic wind somewhere. Whoops.
As we live in a tiny town with literally no amenities there isn´t a single replacement chip anywhere in this town so luckily Margret is going to Reykjavik this weekend so hopefully she can find a replacement for us.
- Here is the image I sent to Louise explaining this whoopsy.
Desoldering
Pretty much the whole of the next day was spent removing all the hard work I had done the day before. I had done such i good job of soldering that desoldering the chip was a nightmare. I removed most of it using heat but it wasn´t budging for love or money. Eventually we discovered we had a solder sucker or a desoldering pump. This did help a bit.
- Here is a video where they make it look super easy. Its not.
I ended up cutting the chip off with small scissors and trying to pop through the legs. Not sure if I´ve completely messed up the board but we will find out in Hardware part 2 when I get the replacement chip.
Brother 950i Knitting Machine
Laying the soldering part to the side it was time to open up the knitting machine. Firstly these old machines are already pretty epic. If you have time in your day I highly recommend watching these old instruction videos as it takes me right back to my childhood.
Its always good to know how these machines work in their originally intended way before you start messing with them. I used to have a couple of non electric brother machines in Scotland so I know my way around it. I checked that we had all the parts needed before proceding. Before we opened it up it is important to note that we needed to make this hack completely reversable so it could go back to its original form too.
- Here you can see the instruction video we followed to open up the necessary parts of the unit.
In the video you can see that the machine can´t be closed properly with the hace added so Louise suggested that it might be a good idea to create a open source 3D printed cover that could be used to replace the old cover. This would make it easy to change between the old and new version and also make it easier to remove the arduino when not in use.
A New Cover
Where do you start? with a curve. We literally drew around the end of the cover of the machine where it connects with the middle part. We realised that this was the only part that had to be really kinda precise so we figured that drawing round it and popping it into illustrator we would perhaps get fairly close to it.
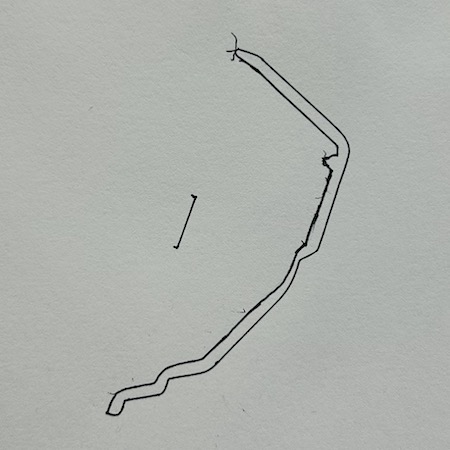
We thought that if we drew a little 1cm "scale next to it for reference then it would be easier to scale in Illustrator. We put this image into the program after changing the levels to be stronger in black and white before turning it into a vector image. We cleaned up the image, manipulating it into what we thought was the correct scale.
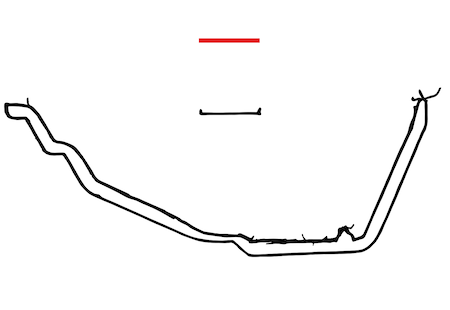
Then using the curvature tool I was able to draw round the curve to get the rough outline of the shape I needed refering back to the physical item during the process. I removed the little square notch on the shape as it had no relevance to the final objective.
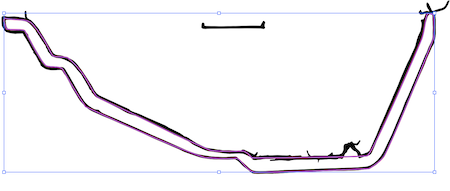
I then used Export Selected (i´ve learned from last week) to take this shape into Rhino. We then had to scale it again as it didn´t transfer as we had hoped. Then after converting the curve to a boundary surface we just extruded the surface by 1cm as our prototype shape. We baked it and decided to 3D print this.
The 3D print went well altough the shape popped off the bed on the last layer. That was due to the fact that the window was open so it was a bit colder. Once it was printed out I tested it on the part of the machine it needed to fit and it looks pretty good. I am beyond surprised.
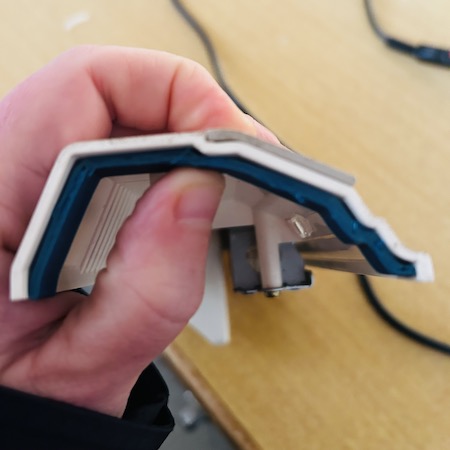
Basically knowing we had this important curve near as correct as it can be we just decided to make as much of the cover from this as needed. Basically the whole working process from here on it adding new curves and extruding them in the right way. So far I have attained a shape that is quite close to what we are looking for. It needs the finishing tabs and also the height needs to be finallised but I think its looking nearly there. I can´t finish the project untill I can find the replacement chip which I have just been told doesn´t exist in Iceland.
Many Many Many Weeks Later.
After getting the replacement chip I realised that in my terrible attempt at desoldering I had completely burned the connection pad of the circuit out. I asked an expert and he told me that it was very unlikely that it would work properly as I had probably burned out the chips too. At this point it was a good time to look at my first GIF of Fabricademy again.
So I bought another brand new one. Estimated delivery time to Iceland being 4-6 weeks. I ordered from Etsy here
Meanwhile I´ve being trying to use the software but It will not open. I have even tried bypassing the malware as we did with some of the open source software we downloaded before but I still cant get it working. I have my feelers out to folk to try and figure it out but this is going to be a much later add on to the project.
3 Weeks Before Hand In.
The Sheild arrived to Reykjavik a couple of weeks ago but I was still in Blönduós. As I was soldering my final project and under the watchful eye of a much better solderer I completed the soldering on the sheild. This time it came with chip baskets and this made me so much more confident in not burning out the chips as I had done before.
As I´m staying in Reykjavik till after the final presentation I cannot actually embed the sheild into the knitting machine till then so theres not much more I can do to complete this week till then. I have decided to put up the 3D model that I have designed here that I will have to tweak when I get back to make sure the height of the model is correct and enough to close the knitting machine off.
I have included the original curve in the model as it still needs to be manipulated to get the final model. Watch this space.
Post Hand In.
Unfortunately I didn´t have the time to complete this project. The shield is there and maybe future students will be able to finish it. I tried to get into the software but its not apple approved and I couldný get it working on my MAC. Its sad to fail out but I feel a little more soldering experience than I had is perhaps needed to do a more complicated electronics project like this. So sorry guys its another example of learning through failing.
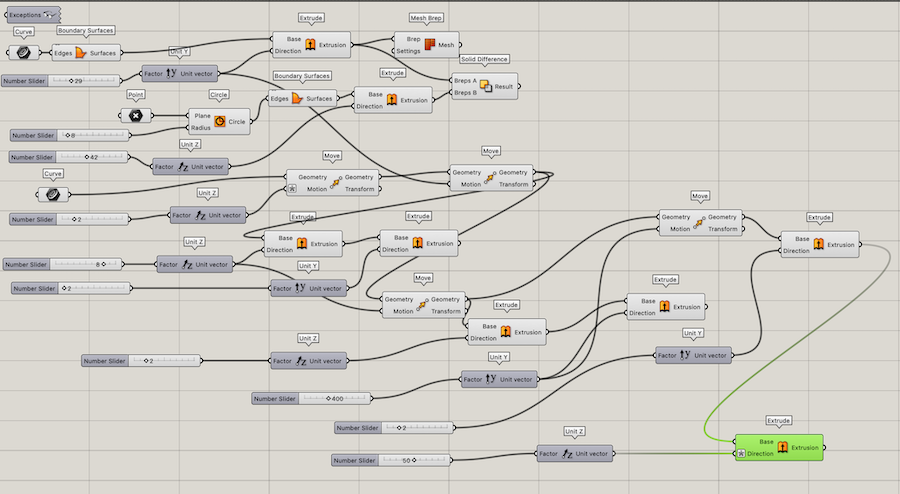
Fabrication Files
Rhino File for Model
Grasshopper File for Model