02 Digital Bodies
Research & Ideation
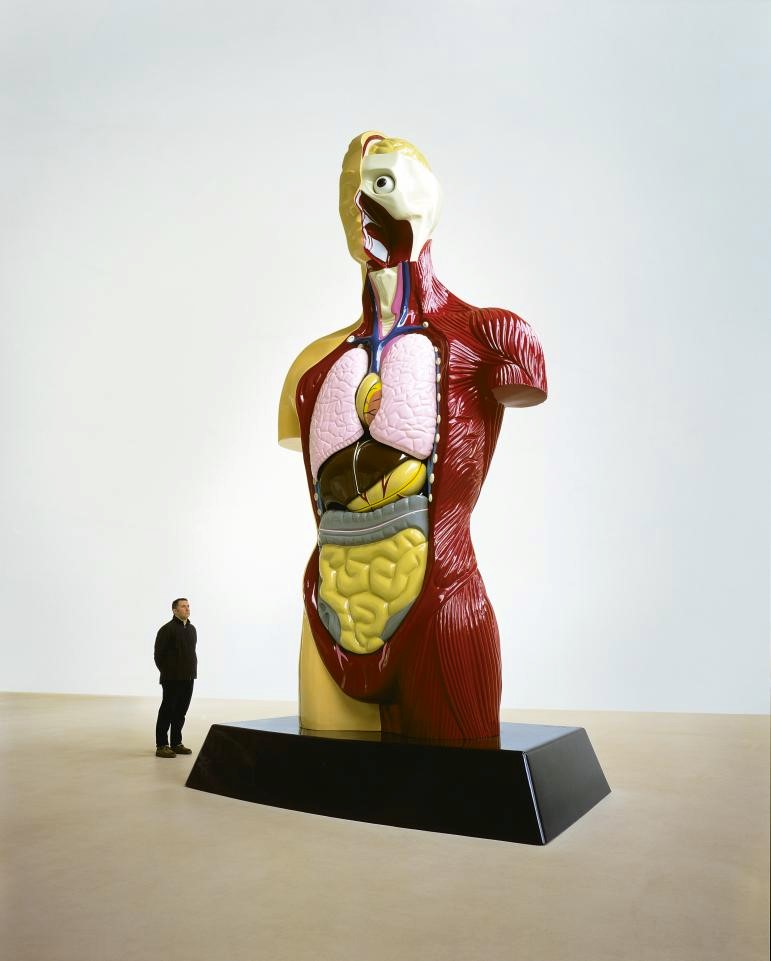
Hymn by Damian Hirst, 1999 Bronze, Gold and Silver.
"After our amazing lecture today on the human form for Digital Bodies I thought I would start my research here With the sculpture Hymn from Damian Hirst. This piece is where it began for me many years ago as a young anatomy student in the late 90s. My boyfriend at the time had bought me a simple anatomy toy that came with a body facts book.
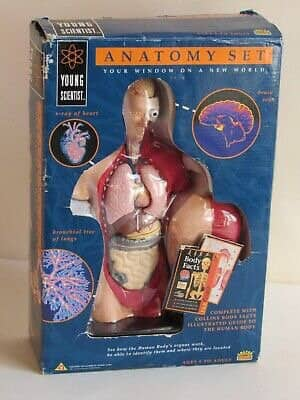
Humbrol Limited’s Young Scientist Anatomy Set by Norman Emms, Bluebird Toys, 1996.
A couple of years later Damian Hirst, created a giant version called Hymn, pictured above. There was a fair amount of controversy around the piece as he had stole the work directly from the toy designer and later paid damages This piece sparked a new interest in science as an art form and through this I found the Young British Artists - YBAs and from them my passion for Contemporary Art was born.
The Human Form
Anna Uddenburg
Recently, I visited the Boros Collection in Berlin and found a few artists in the collection that relate directly to the current notions of the human form in art. One artist that really stood out to me wasAnna Uddenberg (b.Stockholm,1982). She works with a variety of new technologies to explore notions of body culture, consumerism, gender, taste and the class system. In the works I saw at the Boros, she has used these complex technologies to pose intricately dressed human forms in a "furnituresque" manner around the space. In viewing the pieces I felt I was exploring ideas of voyerism and of that of the girlfriend effect.
She, alongside mixed media artist Kristina Nagel was also responsible for the Balenciaga Crocs.
- Here is one of the pieces I saw that shows the extreme manipulation of the models body.
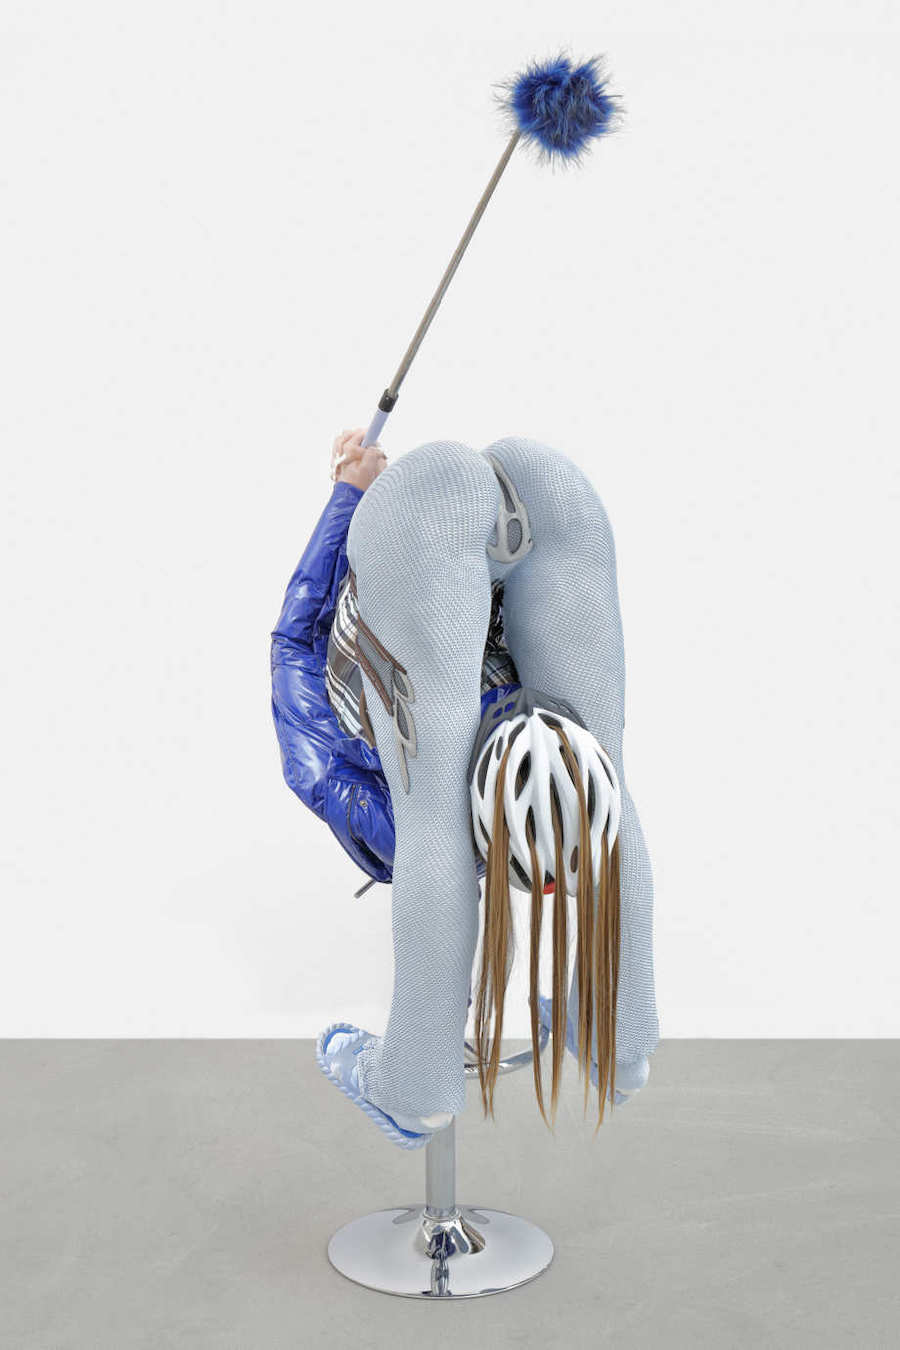 Anna Uddenburg - Focus 2 - Pussy Padding 2018.
Berenice Olmedo
Another artists work that I saw at the Boros collection this year was Berenice Olmedo (b.Oaxaca, Mexico, 1987) 1987 in Oaxaca. Her practice focuses on the use of discarded materials again highlighting Social disparities in her native Mexico. I thought of her work after the lecture as she has been using discarded leg braces from children who have lost limbs. her work with children’s prosthetics and orthotics, collectively titled “Anthroprosthetic” really made me think about the body and the structures that are ever evolving to improve the human form.
- In the video below Olga (2018) she uses this found prosthetic combined with a motor to show the form trying to stand and falling back down.
Berenice Olmedo, "Olga," 2018 from Jan Kaps *on* Vimeo.
Zhang Huan
Chinese Conceptual artist Zhang Huan (b.Shanghai, 1965) works in a variety of forms that reference the significant political, intellectual, and religious figures of China. For his three-dimensional sculptural works, Zhang frequently uses both common objects and unusual organic materials, including feathers, cowhides, and for his 2005 sculpture Donkey, a taxidermied donkey. These forms again refer to anatomy for me and I enjoy the large scale of these sculptures.
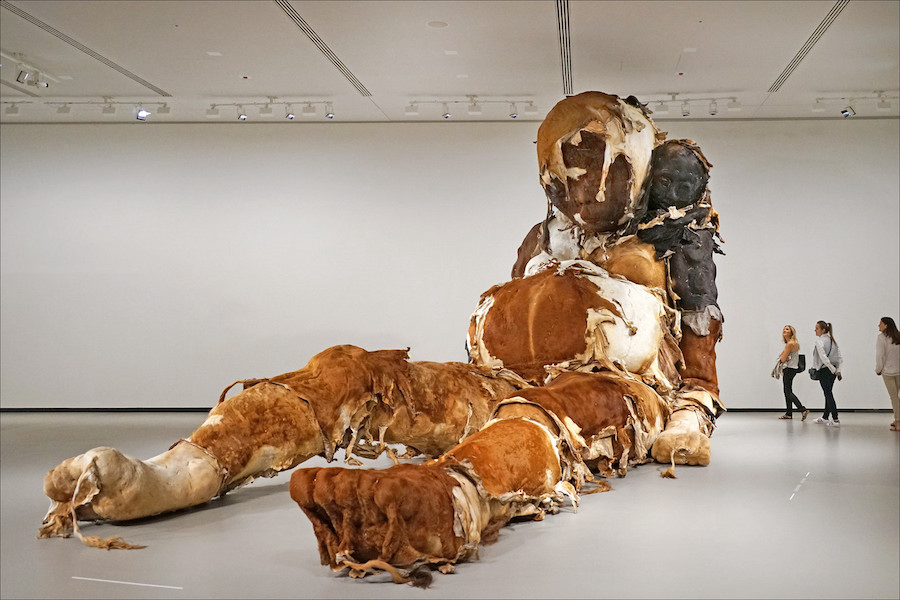
Zhang Huan, La Géante N°3, 2008 Fondation Louis Vuitton; Paris | © Jean-Pierre Dalbéra/Flickr
Gunther von Hagens
Uddenburgs work also reminded me of a pre Covid visit I had made to the Body Worlds exhibition in Amsterdam. I have always been fascinated by the process of Plastination developed by the controversal figure Gunther von Hagens in 1977. I am from Edinburgh, a city with a dark history relating to the early days of the study of anatomy and the birth of modern surgery. Many of my family have donated their body to medical science and some are in Surgeons Hall so I was seriously considering donating my body to Von Hagens but after seeing some of the highly unusual poses in the museum I decided against it. It has a voyeristic quality in my opinion, much like the work of Uddenburg but with the use of real bodies.
- Below is a video showing the process of Plastination by Body Worlds. Warning! - There is footage of real dead bodies in both the videos below.
Body Works Video on the Process of Plastination.
Here is also an interesting documentary Following the life, death, and groundbreaking 3D resurrection of Susan Potter whose body became a high resolution digital cadaver. I think its important to look at the ethical implications of the work as you are look at real human forms and how to visualise them digitally.
How a Womans Donated Body Became a Digital Cadaver, National Geographic.
Alumni Resources
- Haneen Jaafrey for use of open forms.
- Petra Garaiová for manipulation.
- David Arias for manipulation of 3D scan.
- Marisa Satsia for her research.
Weekly Assignment
3D Scanning
Our group took the journey from Blönduós to the Fab Lab in Sauðárkrókur 2 towns away. We were helped by Hrannur who explained the working process with their brand new 3D scanner to us and gave us a great tour of the Technical School there.
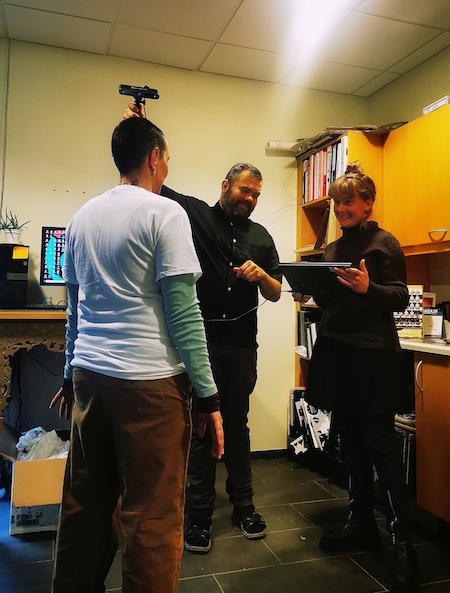
Hrannur Showing Alberte how to use the Scanner with Ariane
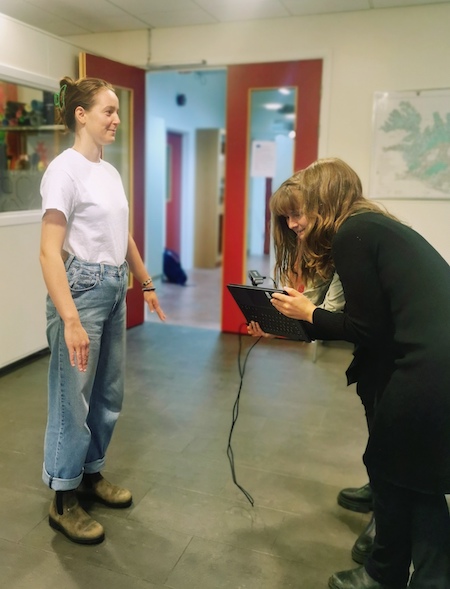
Alberte and Margrét Katrín scanning Alice
The scanner we used was the Revopoint Pop 2.
To use the scanner the settings we used were.. - High Accuracy Scan - Body - No Colour
It would of been good to know that the scanner doesnt really read black. We were all wearing black pretty much so we loaned a white tshirt in order to get good contrast for the scanner to read us.
We all took turns in scanning each other with various results. After trial and error and some really weird looking snake humans that looked like the worlds largest ever inflatable made by Studio Dennis Vanderbroek for Diesel at Milan Fashion Week last week.
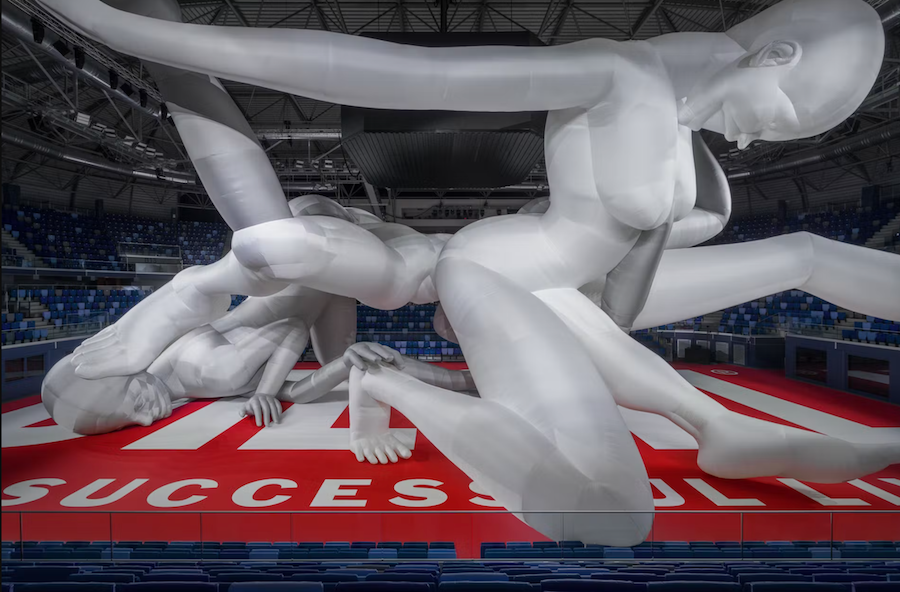 Studio Dennis Vanderbroeck for Diesel at Milan Fashion Week 2022.
we got some pretty good results by going very slow and making sure to keep the screen on "excellent"
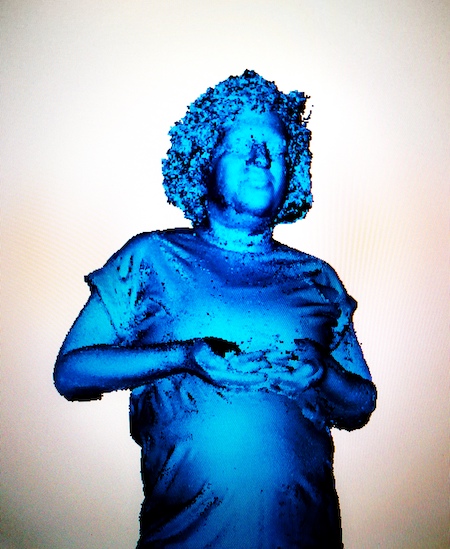
When it came to my scan I decided to have a slighty disjointed pose and also to hold my hands near my chest. The plan was to be able to hollow out the rib area of myself and put a 3D heart inside in Rhino (well more about this plan later).
It was really quite difficult to stay in the position I picked as we scanned super slowly so I got a little shaky in the knees towards the end.
Also the scanner really does not like hair, especially my curls.
So, the intial scan of my looked super weird. Half the back of my hair ended up on my shoulder somehow so I really wasnt confident in the outcome.
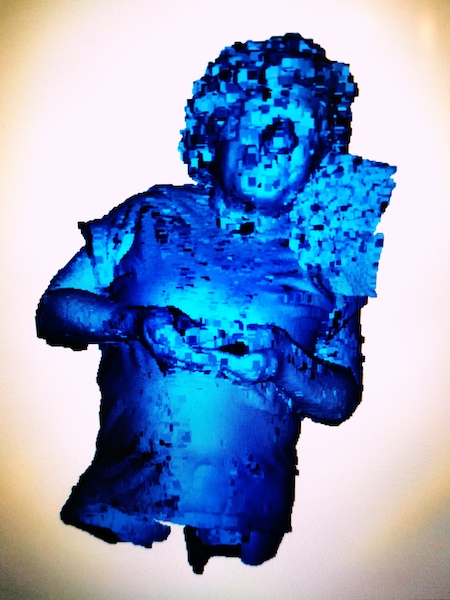
Screenshot of Raw Scan Before the Software Smoothed Out my Extra Head
Screenshot of How the Final Scan Looked
Unfortunately the file we uploaded of my scan didn´t load up properly for some reason. I thin that the file was just too large to open properly as we had spent so long getting data. I will add in the file when I have time to go back over to the Fab Lab. It meant a change of plans for this week but I am glad I was able to take some screenshots of it. I want to 3D print it at a later date.
Make Human
We were also given a lecture in the Open Source program Make Human. I played around with it a bit but I found it quite frustrating to use. when the scan failed I thought I would basically recreate myself in this instead. I was highly frustated as it kept crashing when I tried to download anything so I ended up kinda giving up on it for a bit. I decided to give it another go as I was doing the documentation and I actually was quite happy with the results this time. I´m the right height and weight anyway and it was fun refering to the 3D scan of myself to alter the parameters of the figure.
- Here is a model I made working on documentation.
3D Anatomy
During the lecture Anastasia mentioned that there were other sources for Anatomically correct 3D models online that could be manipulated. I decided to have a look for a model of the cardiovascular system. I knew this would be incredibly difficult to navigate as a complete newbie in Rhino7 so of course I went for it.
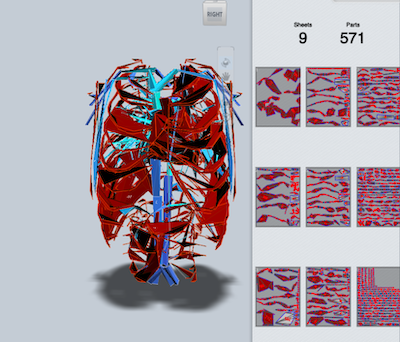
It took alot of searching as most anatomy models are incredibly expensive. Mostly used for education purposes so incredible detailed. I looked at pond5 and Turbosquid and there was so many incredible models available but out of my range. It was then I started playing with Z-Anatomy, An incredible Open Source Anatomy atlas of the human body.
- How to use the software
How to Use Z-Anatomy
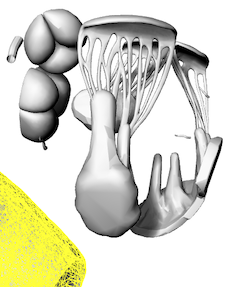
It was here that I ran into problems. I love this program and I am certainly going to use it as a reference tool in future projects but any customisable model I made myself in the program would be usable only in Blender. As an absolute beginner in all things computer design I didn´t feel like trying to get my head around yet another program so I went back to searching. I eventually found a highly detailed 3D Angiology Model for free on Sketchfab
So, there were many problems in my logic here.
My plan was to make a simpified female body in Make Human, and make a reverse cast somehow of the heart and arteries to put inside after I chopped off the arms, legs and head. What I discovered is that this is all WAY beyond my capabilities as a first time Rhino user. Had some fun trying though.
- Here I was working out some of the basics when I accidentally extruded the new figure. I actually really like the shape. I was tempted to continue to work on this piece, making flat slices along the y axis. It might be an interesting future project.
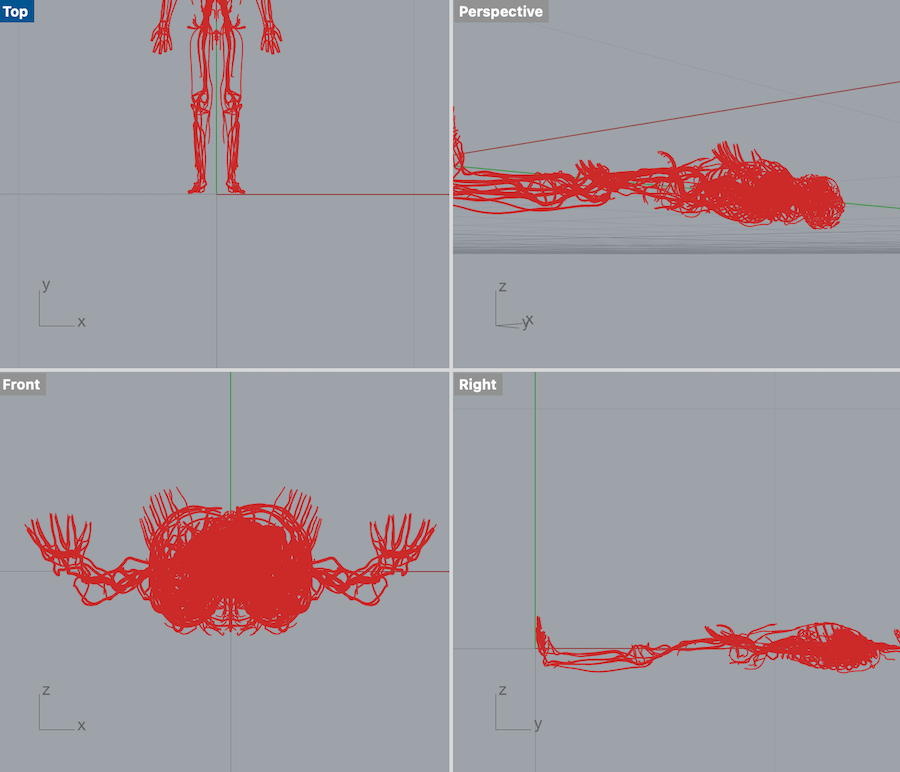
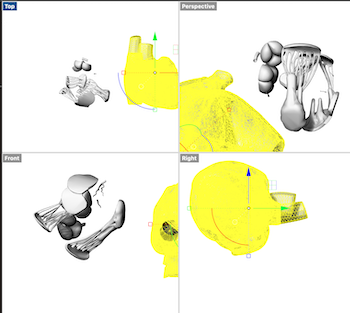
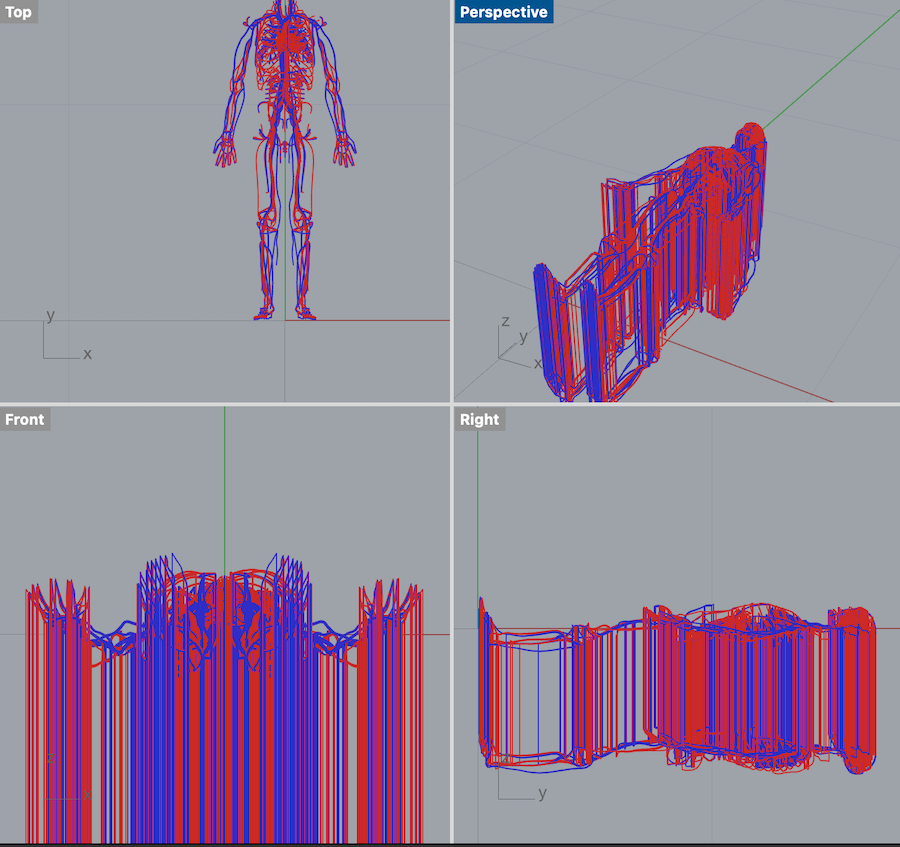 3D Angiology in Rhino.
- Here I decided that I needed to join everything together using the MeshJoin command. I thought this would make my life easier to manipulate the figure to where I could meshtrim off the extremities.
 3D Angiology as a Single Mesh
- Here you can see I am learning through watching the tutorial from last year about resizing my figure using a bounding box to find out the size of the figure before using the scale command.
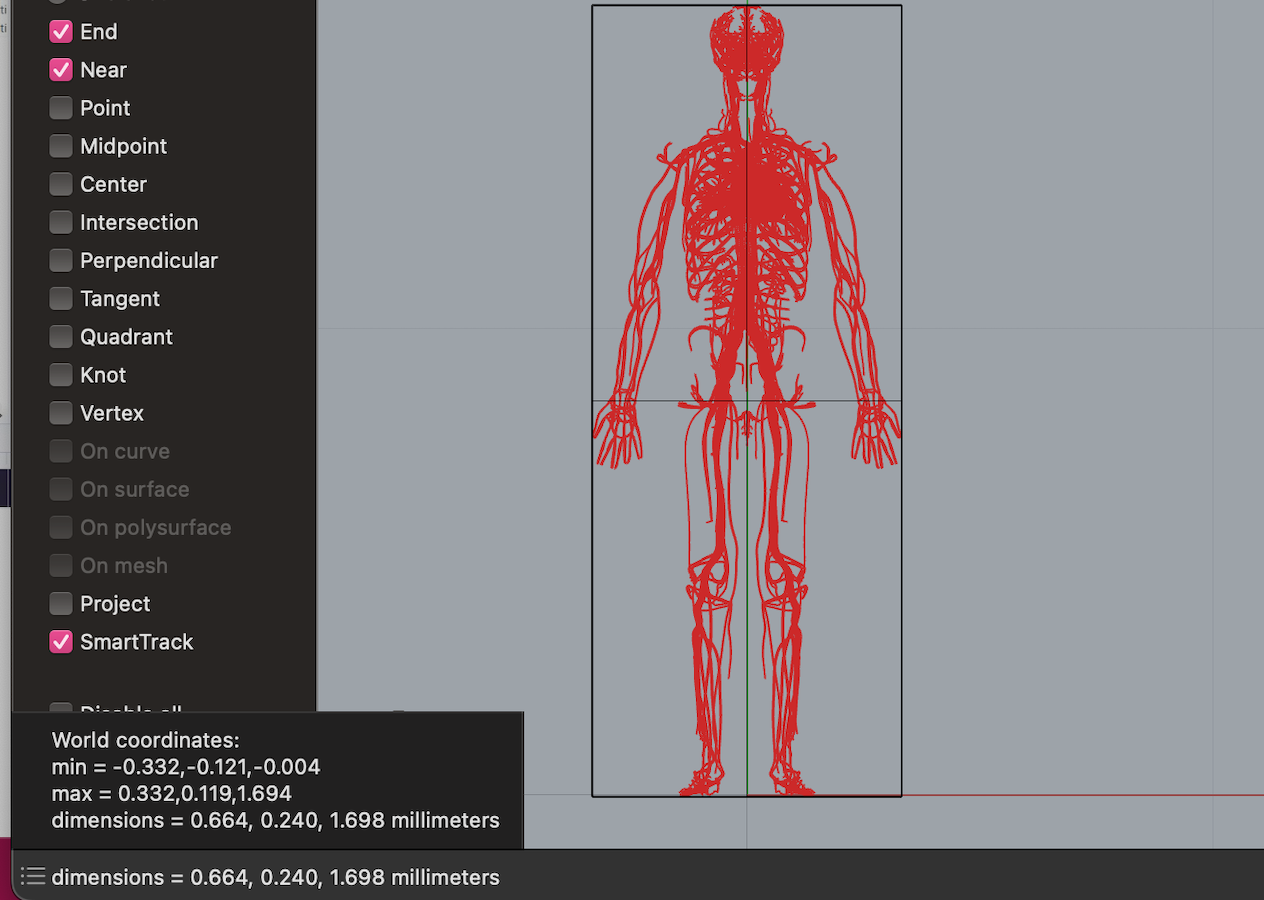 Screengrab of the model in bounding box before altering the scale.
Note To Self...The bounding Box if its not removed
One thing I kept doing by mistake was exporting my files into the slicer without removing the bounding box so this box is what you get rendered in Slicer for Fusion 360 still did it like 3 times.
Deconstruction
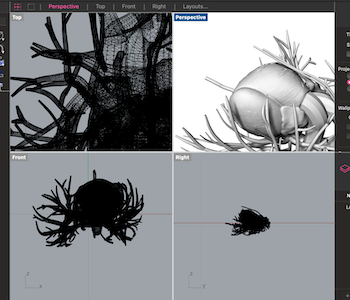
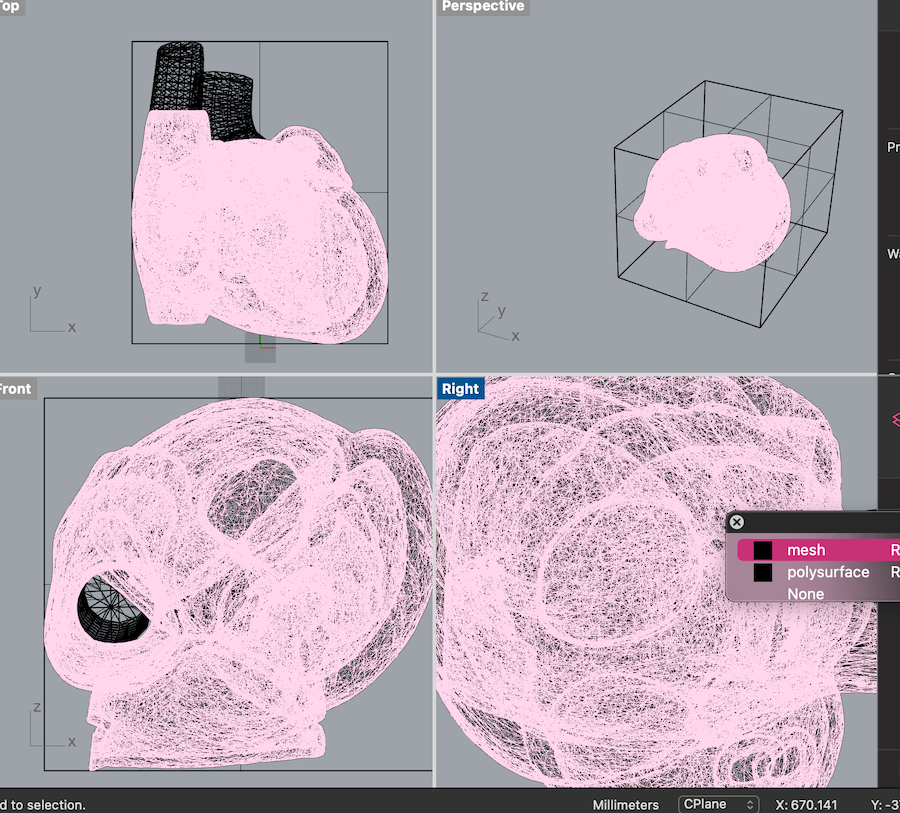
This is where my lack of experience in 3D started to really show. The model was so complex and with so many meshes it was actually very hard to get it to load into the Slicer program. I tried to hack off the legs, arms and head using a variety of techniques like all the Mesh Boolean commands and mesh trim using an extruded line. These all proved more difficult because of the complex geometries of the model. After many many attemps I decided to scrap the joined version of the model and go back to the drawing board.
- Once I uploaded the model again I began to highlight the individual mesh parts and delete them by hand (there was alot of veins and arteries).
 *A Screenshot Showing the Removal of the Legs, Arms and Half the Head
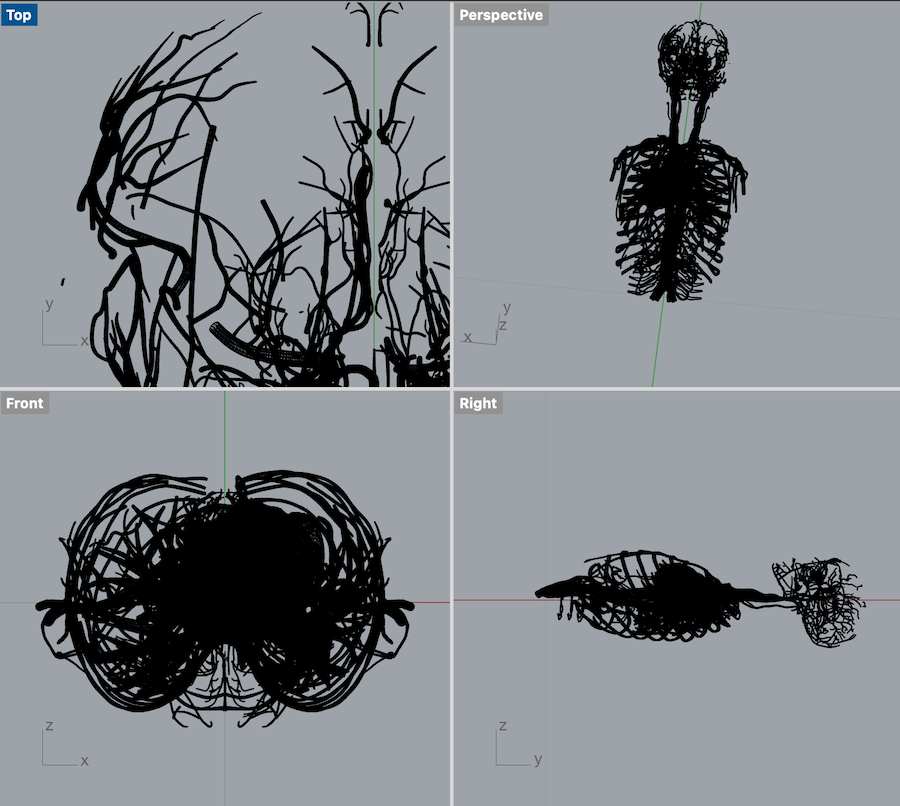
Because I had simplified the model so far I was finally able to upload the model into slicer to see what i was dealing with. Its here that the true complexity of what I was trying to do really became clear.
- Below I used 2 different slice construction techniques, both unsucessful as there are either too Many Parts or they are Impossible to Construct.
Screenshots Showing Structures for the Torso.
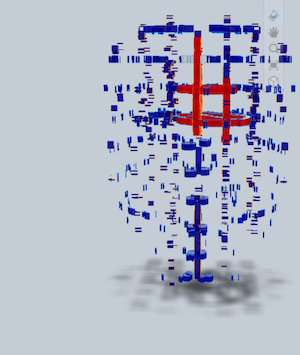
At this point I was actually enjoying removing every vein and artery in the human body by hand so I just kept going. The plan was still to simplify veins around the heart and then combine it with a human form of some description but at this point the tech started to fail me.
- Here you can see as I got closer to the heart it bacame way clearer to use the rendered view so I could remove the tiny veins and vessels.
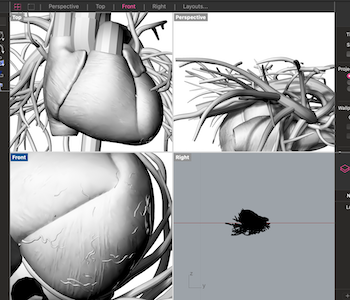
Screenshots Showing the Difference in View after Using the Rendered Version to Edit.
- This was still way too busy to use in the slicer as you can see from these screenshots.
Screenshots Showing Slice Possibilities with Vessels.
so at this point I decided to just use the basic heart itself. I could of just very easily downloded a heart at the very begining and saved myself the effort of removing every vessel in the cardio vasucular system but there you are. I actually found it quite cathartic in the end. As I got down to the bare heart itself I started looking to cap the mesh to close it but I kept saying it has more open structures. Its then I looked inside the heart and realised the model was so detailed that the internal structures were still inside.
*here you see the internal structures of the heart theat I removed.
Screenshots Showing the Internal Structures of the Heart in Rendered View.
Then I capped the mesh to close the structures for final import into the slicer.
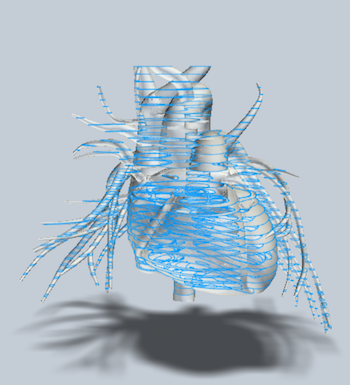
 The Final Closed Mesh Structure for my final design.
The final model files can be found here [^1]
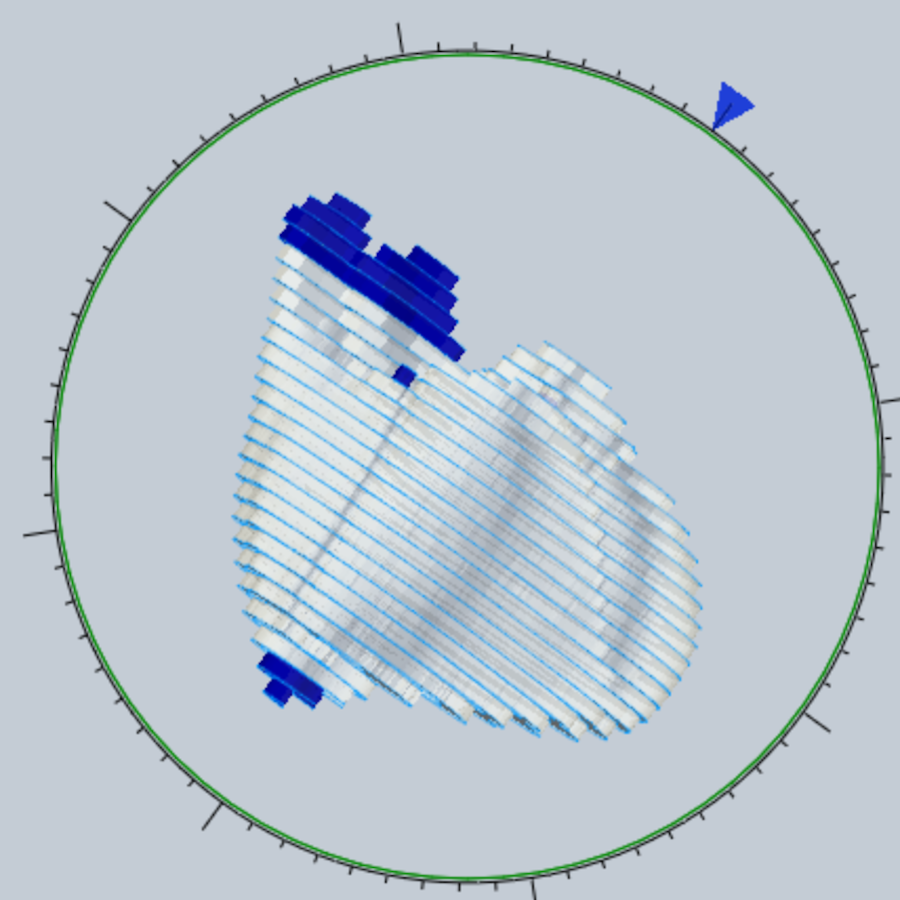
Slices
First thing is to set the material size. I had a few issues with the program itself being unable to read millimeters properly. It seems to pefer inches but I eventually swapped into centimeters for all of it. You must remember to be very conscious of pressing enter on the custom file size.
Incorrect Material Size in Slicer
- To be honest it did lead to some pretty interesting but unmakable models like this one in curve. I had to triple check everything to make sure the model and the material was set up correctly.
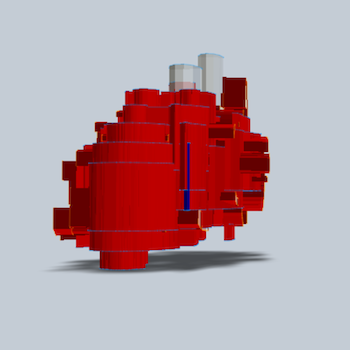
Once I got my model into the slicer I happily realised that the structure was hollow but showed the anatomically correct chambers of the heart. This means that I could of had the choice to import it back into Rhino to make it solid then I would of been able to us some more of the Slicer types. Most apart from stacked slices wouldnt work without solidifing the form as the contruction slots would not be able to fit on the thin walls. I decided that the sctructure was so nice that it would be a shame to fill it in. Although I do feel that with alot more time and using the Skrinkwrap function to make the walls slightly thicker I could of made it work but all I could see was red.

Screenshots Showing Some of the Possible Constuction Problems
Directionality
- Here you can see some of the interesting contours you can get from the human heart.
Straight Cut Slices and Diagonal Cut Slices
I deciced after playing around with the form that I liked the diagonal slices formed more than straight slices. I also knew that it would be better for the way the model would stand.
 The Directianality of the Final Model
Here [^2] is the files for the slicer model
Materials
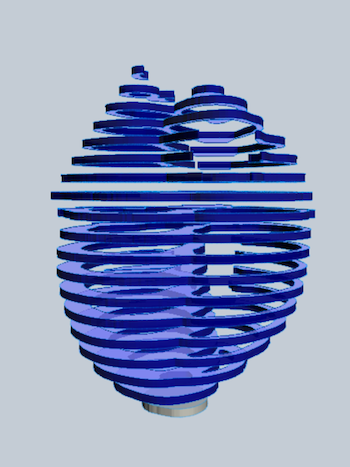
This is where I had to think about the use of my project. Sadly I am not making a human form as I had planed buy rather now its literally a deconstructed human. I initially decided to use the cardboard provided for the piece. I thought it would be nice to put a light inside the model. It has a hole in the bottom that would be ideal for a lead into it and you would be able to make out the shapes inside. I wanted to play with the scale to make it as large as possible so it would be a giant human bady sized heart.
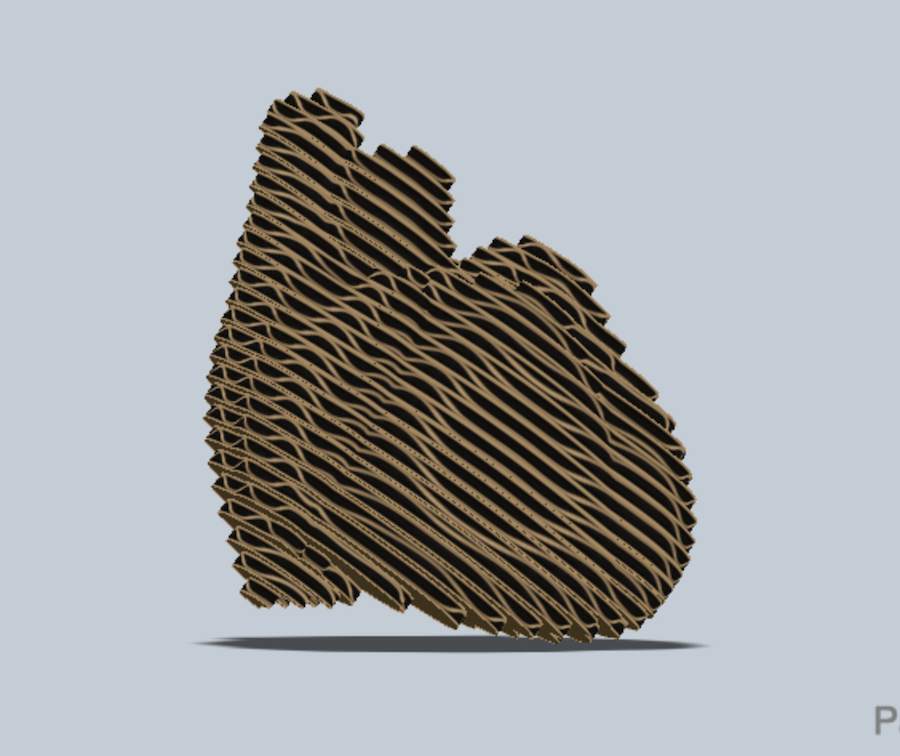 The Model Rendered in Carboard
One of my fellow participants suggesting using perspex for it as it is going to light up. I am a complete novice to lazer cutting so I wasnt even sure it would be possible but Louise also said it would work. Obviously the enviromental factor bothered me somewhat but it is only gonna be for this time then I will be able to make my own plastics instead.
- Here is the assembly steps in perspex.
I designed the slices to fit on the perspex sheets
- Width - 750mm
- Length - 500mm
- Thickness - 3mm
I found out later that this was more than the laser cutter when I first uploaded it to print. I had to resize everything from scratch (rookie mistake.) so new dimensons are
- Width - 750mm
- Lenght - 460mm
- Thickness - 3mm
I also had to vastly reduce the size of the model down to a height of 230mm (i had planned to be as large as 700m) for enviromental and for cost reasons. My my heart was gonna be alot smaller. It ended on 6 sheets on Slicer which I reduced to 5 on Illustrator. This was my first time really using this program too so that was also a baptism on fire. My trackpad and mouse were calibrated incorectly so it was nearly impossible for me to move items leading to massive delays in getting to the cutter. Sometimes its hard when your computer skills are not up to scratch with you design brain. Thankfully the ever patient Louise was able to walk me through this like a baby and now I feel way more confident using Illustrator now I have my computer recalibrated too.
Here are the files that I sent to the laser cutter [^3].
Manufacturing Processes
Lazer Cutting
At the Icelandic Textile Center we have an Epilogue Fusion Pro Laser Cutter so it actually has a camera inside. As you can see from the video above.
The cutting went well after I learned how to use the machine properly. Not bad for my first try.
The Setting I used were
- Auto Focus for Camera - Thickness
Engrave - Process Type - Vector - Speed - 80% - Power - 20% - Frequency - 100% - Thickness - 3mm
Vector - Process Type - Vector - Speed - 15% - Power - 100% - Frequency - 100% - Thickness - 3mm
The place stank so I am not sure if plastic will ever be my medium but I am glad I did this and I feel confident in using the Laser cutter going forward.
Assembly
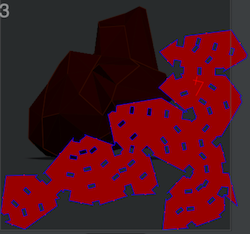
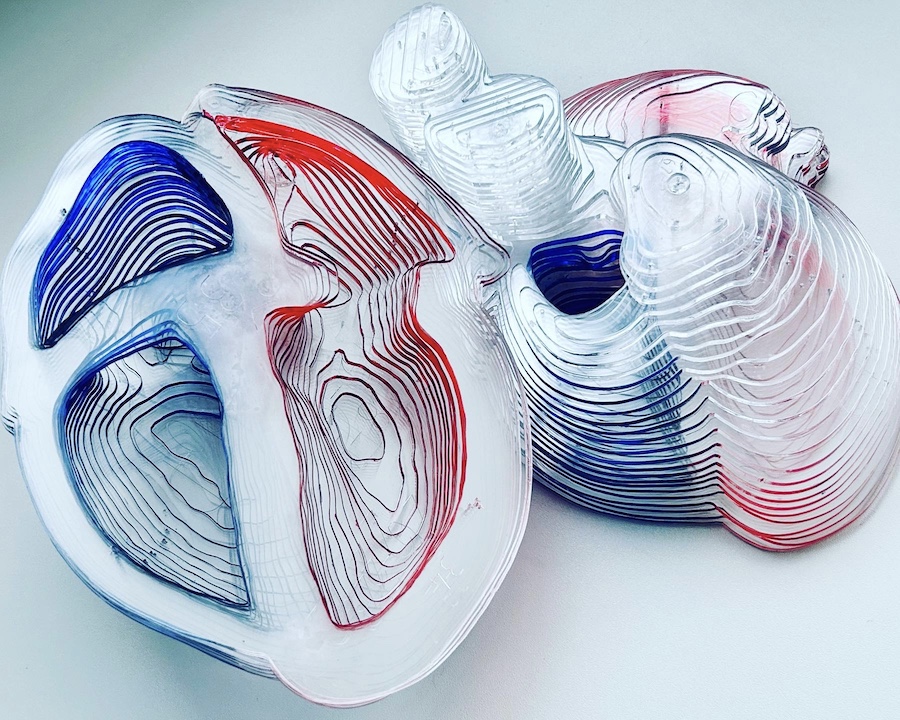
Now this is where things of course got complicated again. I had removed the dowels in my model as I thought they didnt really add anything to the look of the project and of course I was running really low on time at that point. So against my better judgement I decided to glue them together instead. Because glue looks gross on perspex I decided to add in colour to the chambers on both sides. It makes it more like an actual anatomy model.
Being in Blönduós, North Iceland has it challenges so you cant just run to the art store and pick up supplies. I experimented with what I had with me so acrylic paint and acrylic markers. The light was really blocked as the paints were not transparent. I then went to the local tiny town supermarket and found red and blue permanent markers in 2 different tip sizes. I tested this on the corner off cut of the plastic and was very happy with the results. Only the 2 straight edges were coloured and the blends on the curved edge were very pleasing. I decided to paint the inside of the ventricles with this technique highlighting the deoxygenated blood flow in blue and oxygenated blood flow in red.
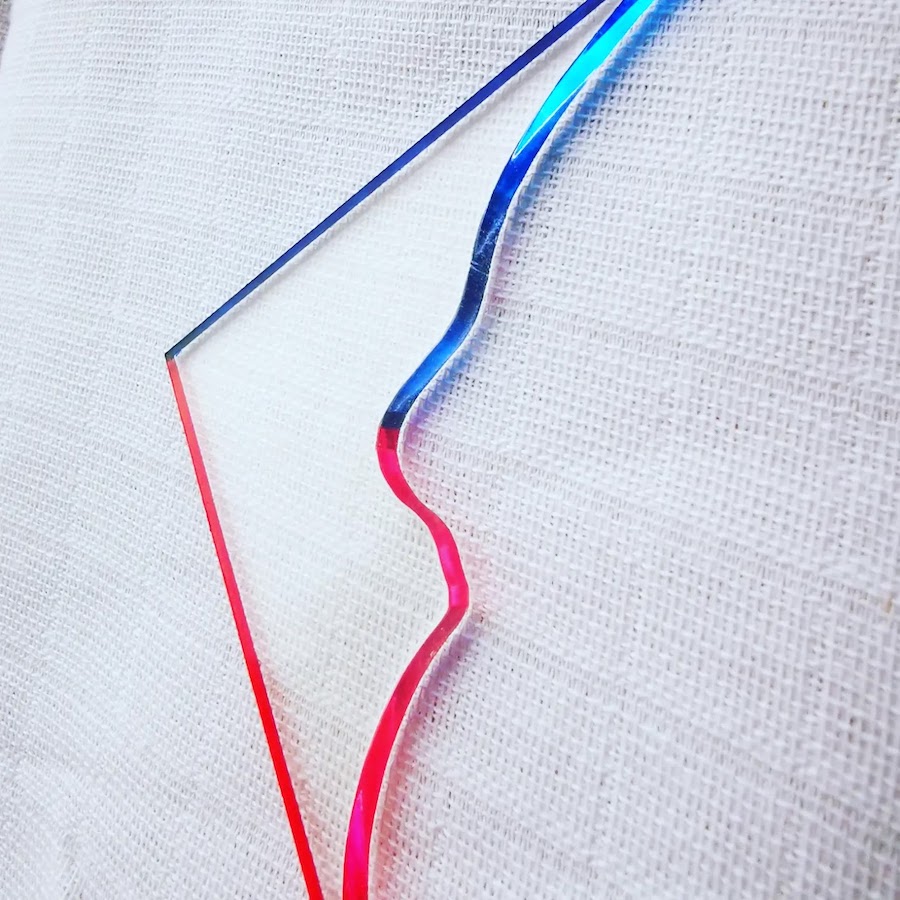 Test on Corner Off Cut Using Permanent Markers

Working In the LightBox
The assembly process has been ok so far. I was attemping to do a assembly process video by taking a picture of each slice in a lightbox (thank you grey skies of Iceland) but it just looked horrible. I still got some amazing images of the shapes as I went.
On a side note and for another day I have labeled and organised the ventricle negative spaces so I can construct them as well. I actullay ran out of Superglue and you know.... Small town Iceland...
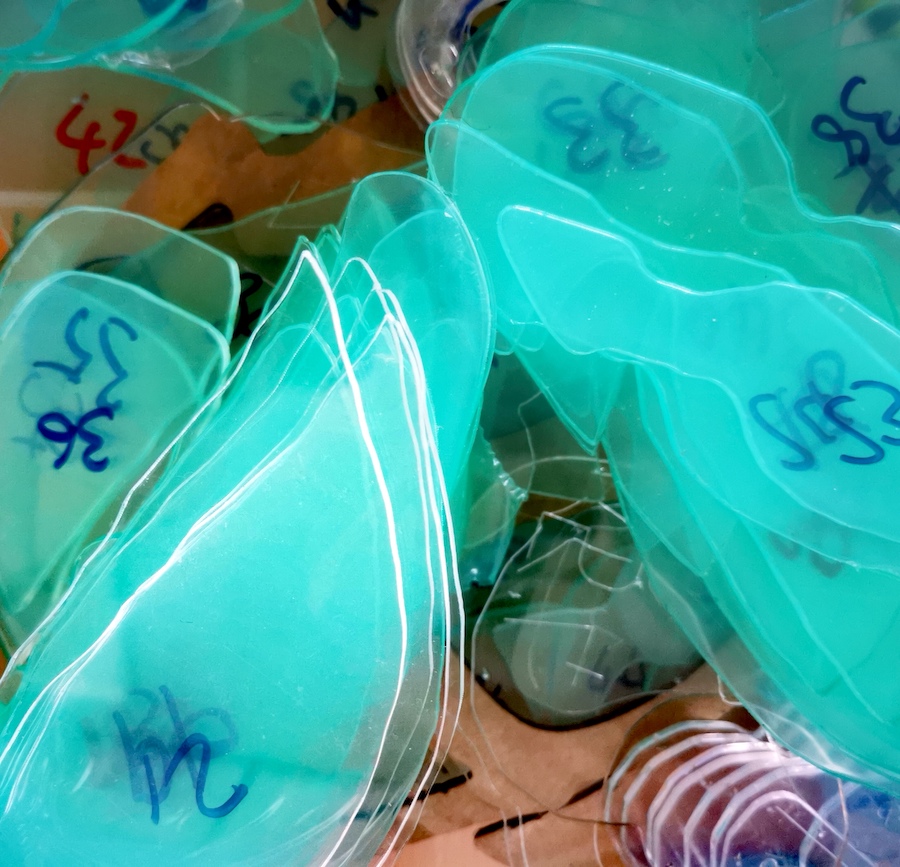 Off Cut Negative Space Waiting to be constructed
 Under Construction
 Under Construction
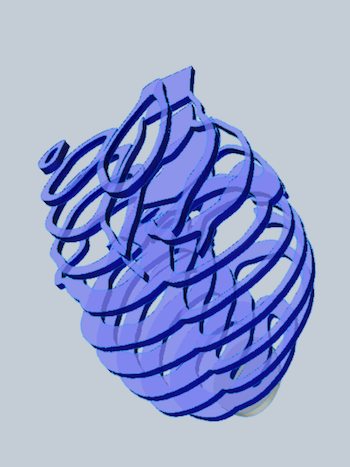
Final Project
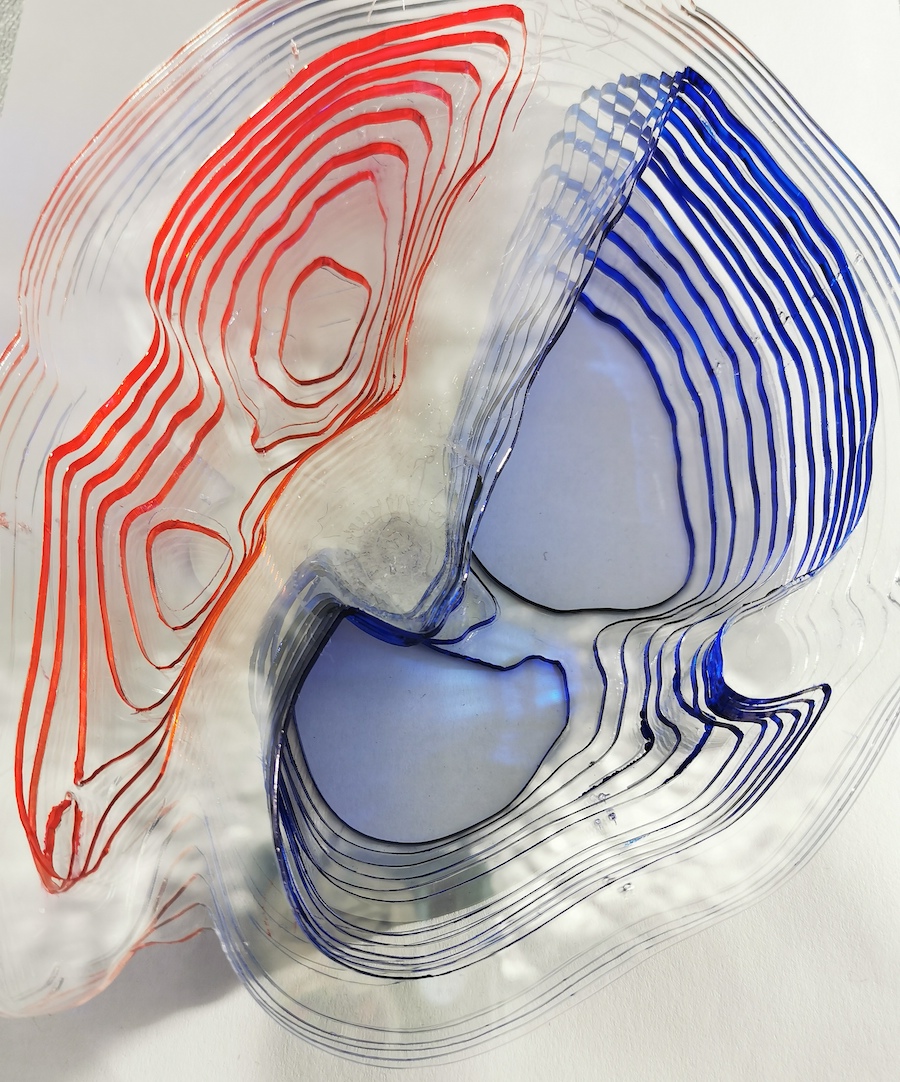
As I constructed the piece in two halves and then I put them together I actually decided I like the final piece way more as separate entities so you can see all of the internal structures better. I dont think adding lights as I had intended would add anything to the piece. This can always change of course but overall I am very happy with the outcome.
 The Final Works
Tools
Fabrication files
Lazer Cutter Files
Slicer Model
3D Model of the Heart
You can also find them here on a google drive.