07 Computational Couture
Research & Ideation
This week is all about parametric design with Grasshopper to make designs to be 3D Printed. Grasshopper is an extension that runs in the 3D modelling software Rhino which allows you explore components that create 3D geometries and generative algorithms for art and design purposes.
Lynne MacLachlan
One of the first time I had seen design like this was the work of Scottish Jewelery Designer Lynne MacLachlan. I have been a huge fan of her colourful and playful 3D printed accessories for years and this year I even bought one of her nylon spiral necklaces and earings that are beautifully hand dyed. * Below you can see an interview with her about her work and process for Victoria and Albert Museum Dundee.
3D Printed Heart
Doing some research on 3D printing I saw that the advances in the technology are happening all the time. A team of researchers at the Tel Aviv University in Israel revealed the first three-dimensional vascularized engineered heart in 2019. Although medical researchers have printed simple tissues without blood vessels, the TAU researchers were able to engineer a heart, complete with cells, blood vessels, and other functional elements.
There was a development the next year in the technology when a full sized 3D printed heart was made by Adam Feinberg at Carnegie Melon University. Interestingly they are using alginates and collagen.
Arterial Stents
at the beginning of the week I tried to work towards a couple of goals, attempting something that it would be possible to integrate into a piece that is perhaps usuable for wearables week and also relating work to some heart related things I have found through my research. I tried to make something inspired by stent architecture. I have 2 of these in my Coronary artery and as I was reserching them I found that they reminded me very much of parametric design shapes and of kerf patterns and auxetic Patterns.
 Bioresorbable Scaffold Stent Designs. (Iqbal J, Onuma Y, Ormiston J, Bioresorbable scaffolds: rationale, current status, challenges, and future. Euro Heart Journal.
- Below you can see laser cut kerf patterns in wood from Gaurav Wadhwa.
I found one project where these flexible kerf structures are made by diffectly 3D printing by Ben Kromhout and Lukas Lambrichts
 3D Printed Kerf Patterns.
 Image Showing Flexible Auxetic 3D Printed Structures.
Design Development
Well I am just gonna put it here but this week was a lesson in what not to do for me. I couldn´t really follow the tutorials so I just went deep diving into youtube tutorials instead. Big up to Parametric House as I followed loads of their content. Theres so much out there that its hard to focus on one thing. I kept failing at finishing any kind of file and my documentation has really suffered from doing too many small failed experiments. Note to self too..... I ruined a bunch of grasshopper files by not saving the geometries assigned with them so now most of them are just angry red boxes and its so hard to keep track of what you are doing. Even if I know I´ve used a command before I always just seem to not be able to get it working.
Auxetic Cube
There is alot of auxetic patterns that are 3D printed flexible structures out there. so I found there was a plug in for Grasshopper called Linketix that give you the ability to play with some of these structures. I tried to follow a youtube tutorial on it but I ended up making a large square piece that wasnt really suitable for this particular project. You can find the Parametric House tutorial I followed here
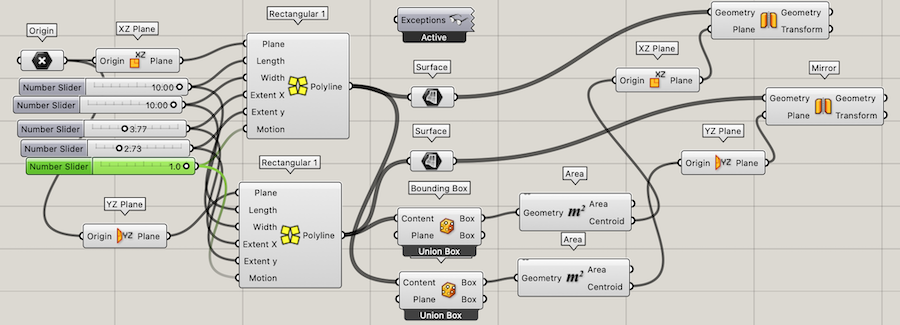 The Components.
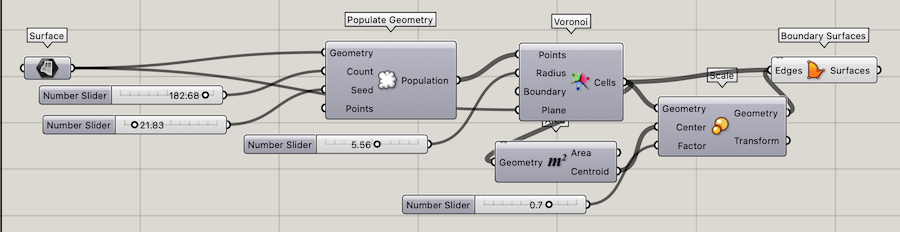
Voronoi
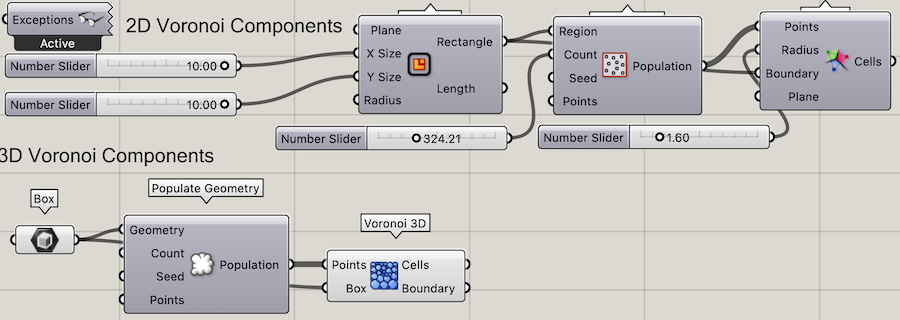
With time against me (thank you Iceland Airwaves) I decided to look at Voronoi cells as I had researched them during week 3 as I was looking at heart cells and hexaganal shapes. Lucky there is many very simple you tube explainers on how to use these functions. I used this one on 2D and 3D Voronoi again from Parametric House, to create these basic components and finally a box containing the cells in 3D
 The Components.
After trying to do this I decided it would be great if I could assign the points that creates the voronoi points to a surface I had created myself. I decided to use one of the heart slices I had made during week 2 as my surface. I initally followed this video from Parametric House again to try to figure this out but then I realised that the surface I had was 2D so thats alot more simple to acheive than what I was doing.
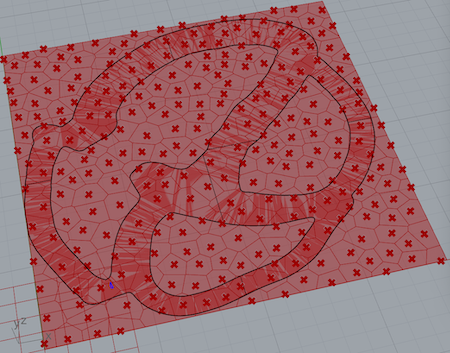
I remade the code just assigning the vonoroi to the surface of the heart directly without the bounding box and I started to get some interesting shapes as I moved the sliders. I found it impossible to make the shape itself the boundary to contain the cells but playing with the radius of the individual cells gave me a nice border around the shape.

*Here you can see my final components to create my first design for 3D printing.
 The Components.
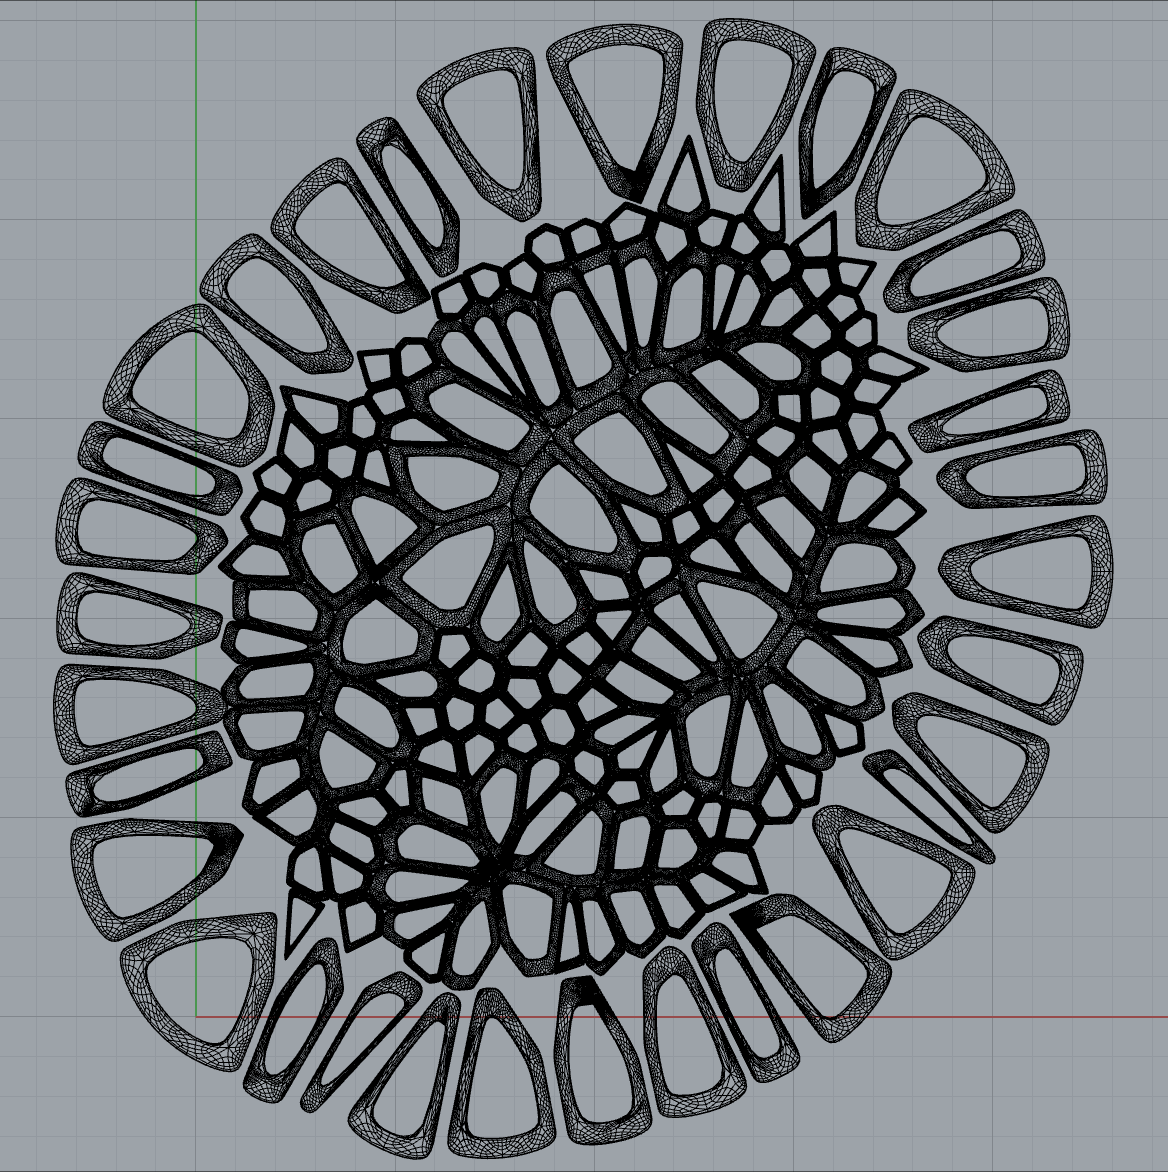
Once I had it looking alright I had to go ahead and bake it. When you are working in Grasshopper your geometries are only previewed in the working space in Rhino. Once its baked it exists in reality. Here you can see my baked heart geometry next to the original heart surface.
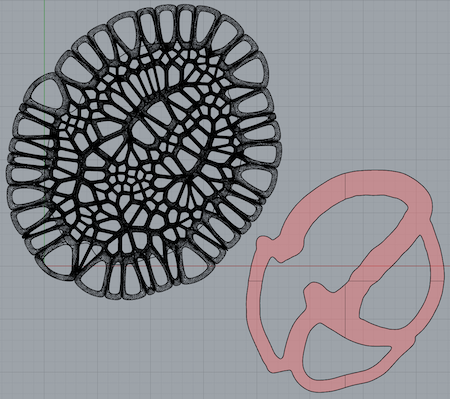
After Baking I decided to pull some of the outer meshes away from the main heart shape and deleted some just to increase the drape of any potential fabric. This is the time to check mesh. I had closed all of them using the Cap command in Rhino. Note to self... Remember to check that the geometries are still on the same plane. When we loaded into the Cura software one piece was floating. We set it to C Plane and made sure it was level then it was back to the Cura.
- You can find the STL file at Sketchlab below.
3D Printing
Set Up
Now I had the STL file in downloaded this into Cura, a Ultimaker 3D printing software. I found this very easy to use after a week of Grasshopper. The printer we have is the Prusa I3 which is a cool looking thing.
Here is a list of the settings I used in the software.
Settings
Fillament Type - Generic PLA
Size - Normal 0.3mm
Top/Bottom Thickness - 0.8
Top/Bottom Layers - 6
Infill - 10%
Infill Pattern - Grid
Printing Temperature - 200%
Build Plate Temperature - 50°
Print Speed 60mm/s
Build Plate Adesion - Skirt
We also programed a pause at layer 3 to enable time to add fabric.
Then you preview the slicing to make sure its doing what it should before saving the file as a Gcode.
The Print
-
First step was to clean the printing bed with sprit removing any previous print residue. I also needed to change the filament to PLA. Louise was with me and showed me the steps to get set up.
-
Turn on machine.
- Set to unload filament on the menu.
- Preheat using the preheat setting.
- Wait till heated and gently remove from nozzle.
- Change spool on holder with the direction facing down.
- Set to load filament on the menu.
- Push gently into the nossle past the step inside and very gently feed the wire into the machine until plastic flows through.
- Check that the colour is correct when prompted. If not say no and it will heat some more until it looks correct.
Then you are ready to print. I had prepared some stretchy black net to use that would be placed on the bed during the pause in layer 3. Then I took my Gcode file and placed that on an SD card and loaded it in. When the printer was warm enough it self calibrated and released a little more filamentwhich I removed with tweezers then after printing the test line it proceeded to print the skirt around the pattern. I watched the process to make sure the print was going well and at layer 3 the pause happened. I placed the fabric over it carefully then attched clips on the sides to hold the fabric in place. The print continued with no problems.
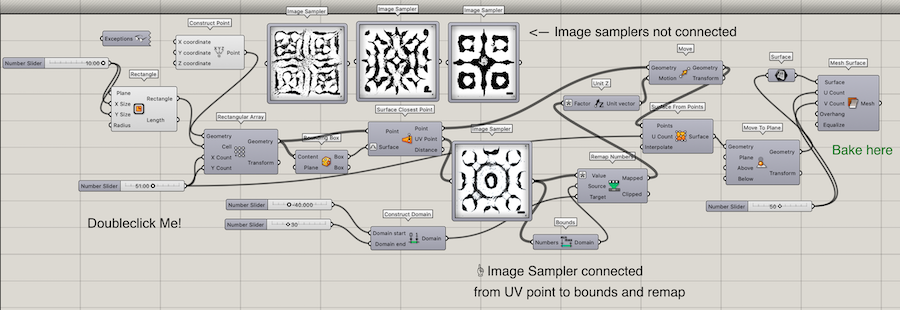
Image Sampler
I just didn´t have enough time this week and I was just about to start giving up on doing anything else when I saw a youtube tutorial on Image Sampler again from Parametric House. I was so inspired by this I decided to try it using the research I did in the very first week again as I thought these structures reminded me very much of the gradient patterns he used in the tutorials.
Acoustic Signals Steer Heart Cells through a Gel to Form a Series of Precise Patterns. Video courtesy of Sean Wu and Utkan Demirci.
Utkan Demirci PhD, an Acoustic Bioengineer and Professor of Radiology and Cardiologist Sean Wu MD, PhD use acoustics to manipulate heart cells into intricate patterns. A simple change in frequency and amplitude puts the cells in motion, guides them to a new position and holds them in place.
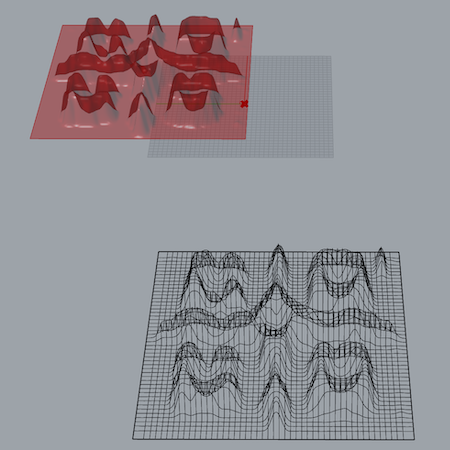
I selected 4 Images to work with from the pictures of them. I then adjusted the colour to give them more contrast and to make them black and white.
Image Taken from the Study Black and White with Increased Contrast.
Then I followed the tutorial and started to build my component path. I found it actually quite easy to do at first. Some playing with number sliders got me to a place where I had basically imprinted the dark and light areas of the image on a series of points created by the surface closest point component in a bounday box created from a rectangular array where the area was defined. This creating almost an extruded impression of the heart cell images without extrusion. I had a couple of problems in that my geometry was upside down so I added a reverse to Remap to turn it the right side up. but when I had it at nice levels I baked it into Rhino. I then proceeded to do 3 more shapes just disconnecting and reconnecting the image sampler. baking each one in Rhino till I had a grid of them.
- Below you can see the pathways I used to create the geometry.
 The Components.
- Here you can see my first baked geometry with the red preview as you see it visualised in grasshopper.
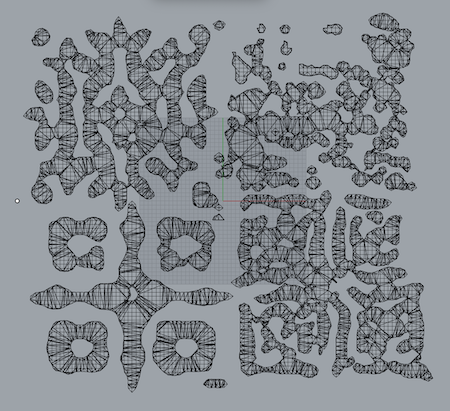
It was here that I realised I wanted to trim the square part of it off so only peaks would print. Honestly I don´t know who writes this software but its almost impossible to simply trim anything. I went through what seemed like hundreds of components and wires tring to do this in Grasshopper but nothing worked. Then I did the same in Rhino. for 4 hours I sat and tried to slice it off untill i tried mesh edit in Rhino.
- Make reactangle around the shape.
- Extrude Curve to desired height.
- Cap.
- Mesh Trim.
- Spend ages removing mesh by hand from the side (Its Digital Bodies all over again.) Change to perspective view.
- Remove shapes from the top that are too small or shaped weirdly.
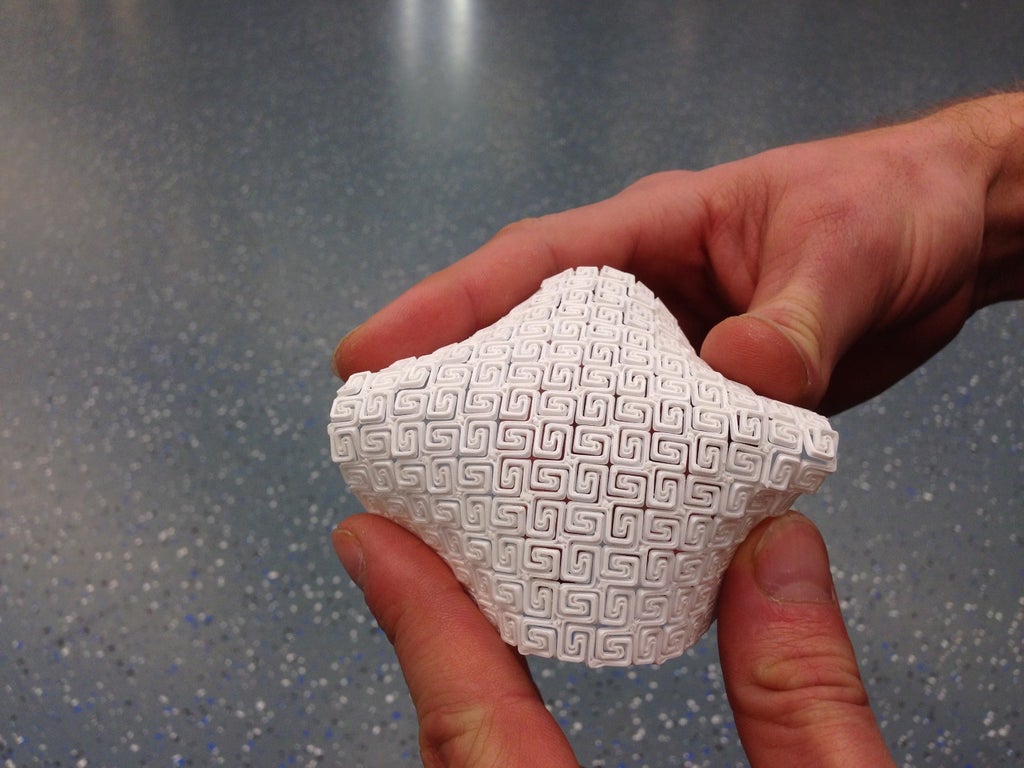
After trimming when I was happy with it I put it into Cura but the software was not happy with some of the shapes in the lower geometries so after 4 hours of mesh trimming I decided to pick one of the sucessful ones and put that into a repeat just to get something out there. I picked the first one I did as shown above.
- Here you can view and download my final model.
The Print
I wanted to try the flex TPU bendable plastic for this design so the settings ar a little different. I also changed the filament before starting using the same process as before.
Here is a list of the settings I used in the software.
Settings
Fillament Type - TPU
Size - Normal 0.3mm
Top/Bottom Thickness - 0.8
Top/Bottom Layers - 6
Infill - 10%
Infill Pattern - Grid
Printing Temperature - 250%
Build Plate Temperature - 50°
Print Speed 60mm/s
Build Plate Adesion - Skirt
We also programed a pause at layer 3 to enable time to add fabric.
The TPU fillament is a little more messy so after Birdie had made one that was super stringy I decided to up the temperature in the settings. Its also very cold in the Icelandic Textile Lab so that had to be taken into account. Its also orange so this piece looks a little halloweeny.
Conclusion
The fabric was very difficult to remove from the bed due to its flexability and there was alot of stringly threads over the shape that I cut off by hand. I dont think the stretch really made the piece gather but you can stretch it out quite far. I did like the PLA more than the flex but I´m sure with a little more play I would also find a good use for it.
Overall I think this is a great thing to learn but it is alot to do in 1 week. You really have to focus in on whats actually acheivable as I wastched alot of tutorials that didn´t prove helpful for what I wanted to acheive. I´m not sure if I could do this all myself without some tutorial to learn the steps initally as everytime I felt like I knew what I was doing without the help I was rudely awakened to my not knowing what I thought I knew.
- Below you can see me playing with the fabric to demostrate its properties.
Alumni Resources
- Loes Bogers
- Batoul Rashdan
- Haneem Jaafreh Techworks Amman 2021-22_
- Louise Massacrier Lyon TextileLab 2021-22
- Kate Reed
Tools
Fabrication files
Grasshopper Files for Heart
Rhino Files for Heart
Grasshoper files for Cells
Rhino Files for Cells
The files can be found on a doogle drive below.
^1: File: Rhino and Grasshopper Files for Image Sampler Named heart
^2: File: Rhino and Grasshopper Files for Image Sampler Named cells