04 BioChromes
Research
Week 4 is all about..
C O L O U R IN
N A T U R E !!! !!!
It was great to learn about the evolution of colour during this weeks introduction lecture. My core inspiration colour theory has always been in the work of Anni and Joseph Albers as in many aspects of design theory in general.
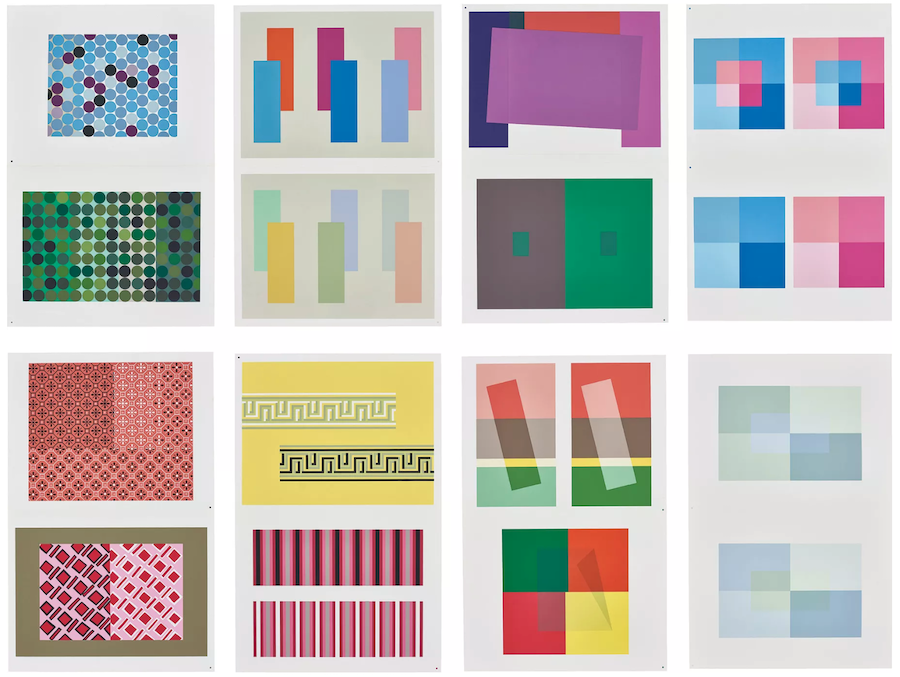 Josef Albers, Interaction of Color, 1973
Matthidur Halldórsdottir
For this project when we are looking at natural dyes and pigments, again another new thing for me, it was very important to me to concentrate on Icelandic plants and colours in our exploration. My partners grandmother, Gerður Benediktsdóttir, was somewhat of an expert in the Icelandic natural dyes of the area around Mývatn, 3 hours drive from Blöndóus. She learned from her Step Mother, Matthildur Halldórsdóttir, who published the first real guide natural dyes in Iceland in 1944. This book has been unavailable for decades but the oral knowledge has passed down now to me via Arnfríður Jónsdóttir her step granddaughter who gifted me these samples below. Although it is hard to know exactly the plants she thinks this is what they are.
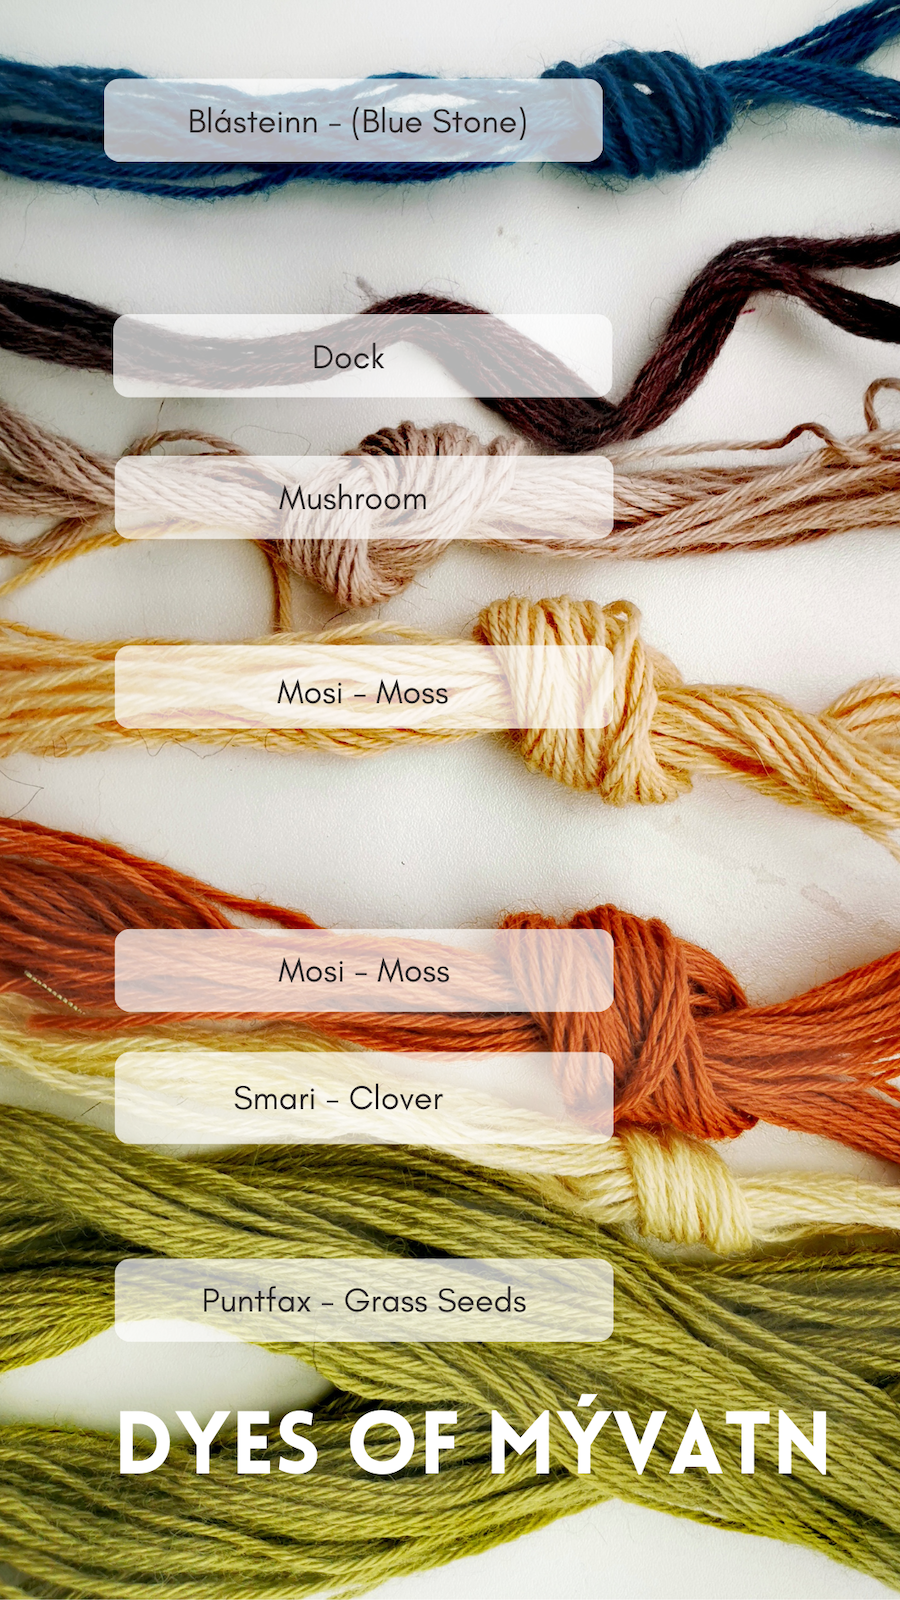
Matthildur Halldórsdóttir was born on Kálfaströnd in Mývatn County on December 23, 1886 (d. February 11, 1974). She studied at the Kvennaskolin in Reykjavík as she was interested in vegetable dyeing early on. She learned from her mother to dye from birch bark, moss and black heather, but throughout her life she worked on experiments and development of dyeing. She longed to bring the colorful glory of Icelandic nature into the color-poor existence of everyday life. Matthildur supplied the country's housekeeping schools and many handicraft shops with plant-colored ribbon. At first, it was only a homemade ribbon, but after they started producing ribbon at Gefjun's wool factory in Akureyri, Matthildi í Garði as she was known is counted among the most significant pioneers in natural dyeing in Iceland.
Sigmundur Páll Freysteinsson
I have also been told of an exhibition on the subject of natural dyes and a book that was complied by Sigmundur Páll Freysteinsson. bringing some of this knowledge into the modern era. I am currently looking for a copy of it. He is know researching dyes in Kyoto, Japan.
 Útgáfuboð og Uppskeruhátið, Publication of Harvest, Hönnunarsjóði, 2021.
Natural Dyes
Collecting
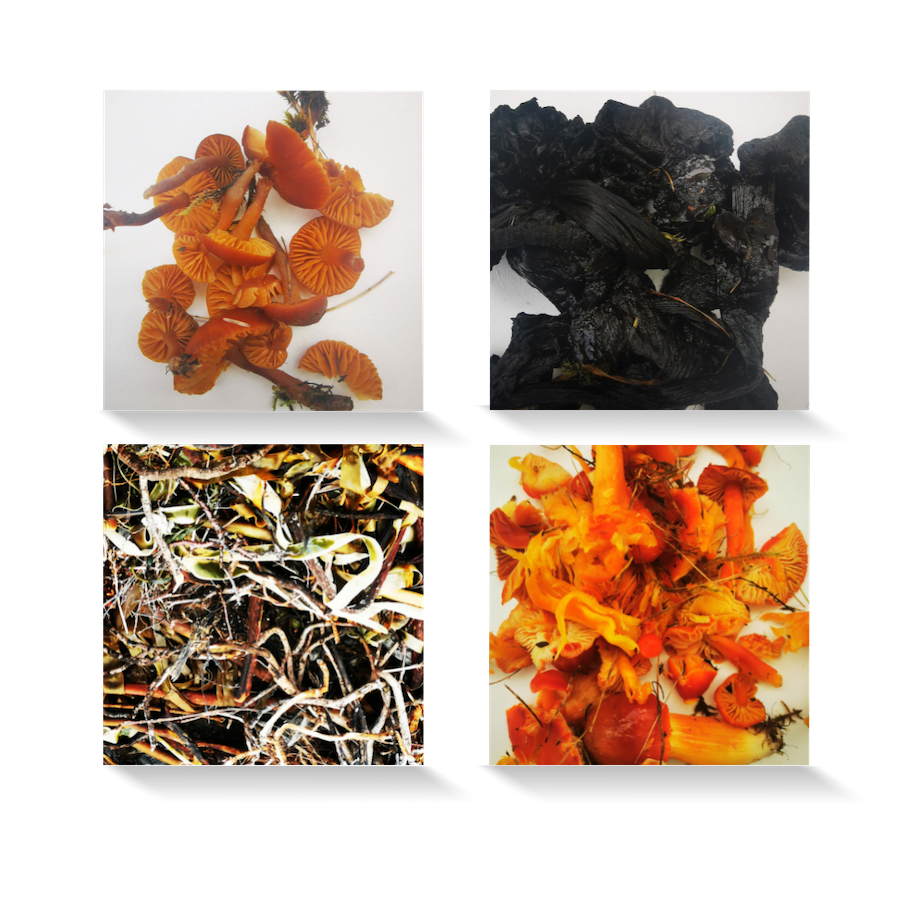
As I live in Blönduós with 2 other participants we have been collecting some food waste since we arrived for both Biochromes and Biomaterials. Obviously the availability of many products that may be slightly more exotic is quite rare so they have also been collecting flowers, weed, seaweed, mushrooms and moss aswell. Its very much winter here now but Magaret had collected alot of lupines and rhuburb before they all died so we had a good range of things to start work with. The Lab also provided us with some of the more unusual natural dyestufffs and the chemicals we needed to achieve results.
Fabrics
Firstly, Its good to know what kind of fibers you are using. Celulose fibers include all plant based fibers for example cotton, linen and bamboo. Protein or animal fibers include wool, silk, alpaca and cashmere. We wanted to use a mix we all decided to have a small sample of cotton, linen and silk for each dyebath as well as our local fiber, pure raw Icelandic fleece. We decided to use more in quantity of the wool than the others as we are all quite wooly people to be honest and in my opinion we should be as locally sourced and sustainable as possible. We weighed it all together and decided to split it after dyeing. Note that synthetic and man made fibers do not dye well with natural dyes.
Scouring
The process of scouring is what is used to clean the fibers. This does not mean in the washing machine. The fibers need to be properly cleaned of grease or and coatings in order for the mordant and dye to adhere to them properly sometimes using soap and as in this case soda ash or sodium carbonate. We scoured the wool seperately to the silk, cotton and linen. Initally we thought it would be enough just to use soda ash with the wool but it was quite filled with Lanolin so we went and bought a simple PH neutral wool soap to prewash it before using the soda carbonate.
Scouring Recipes
Our Formula is to use Soda Ash as 2% of the weight of fiber (WOF)
Wool.
Total Weight of Fiber = 810g
Soda Ash 2% WOF
= 16.2g
Cotton, Silk, Linen
Silk = < 6g
Cotton = 18g
Linen = 60g
Total Weight of Fiber = 84g
Soda Ash 2% WOF
= 1.68g
We made a solution of warm water and the soda ash then we gently heated the samples leaving them for over an hour in the solution.
Mordanting
Some would argue that Mordanting is the most important step in the process of Natural Dyes. Mordant helps to ensure the most durable and long lasting colour pathways possible. In our case we used Alum or alumninium potassium sulphate as a good alrounder that can mordant both animal and plant fibers.
Mordanting Recipes
Our Formula is to use alum as 12% of the weight of fiber (WOF)
Wool
Total Weight of Fiber = 810g
Alum 12% WOF
= 97.2g
Cotton, Silk, Linen
Total Weight of Fiber = 84g
Alum 12% WOF
= 10.08g
As before we made a solution of warm water and the soda ash then we gently heated the samples leaving them for over an hour in the solution. We left some of them overnight as it was the end of the day but that is totally ok
Dye Baths
After mordanting its time to start dyeing the fabrics we had prepared. As we had collected a bunch a stuff but due to the amount of pots available, we decided to concentrate on just 6 different dye baths. 2 of the more tradional non local dyestuffs, one food waste item and 3 harvested locally. All the baths were made with enough water to allow the fabrics to swim in the tincture to absorb the pigments better.
Modifiers
For all the samples we did below we also tried dipping them in Iron to shift the colour. Iron solution tends to make the colour stronger but sadder or more dull. I have placed the recipe for the Iron solution here.
Iron Solution Recipe
5% Vinegar = 200ml
Iron = 2g
Sodium Carbonate Na2SO3 = 1g
Iron first them add the Sodium Carbonate and then the Vinegar
Pigments
The leftover dye baths can be used to make pigments and inks so they can be preserved longer. Pigments are generated by a percipitation reaction with the colourants in the left over dye baths by creating a solution of alum, sodium carbonate and the dye baths. This solution is given time to become sediment by filtering and drying it in the drying cabinet to become a powdered compound that can be used as a pigment to create inks or in screen printing paste. We used our ols dye bathes and also some interesting plantstuffs we had found on our travels. Note these do spill over and are very very. Add ingredients and stir slowly and make sure the jars are contained
Pigment Recipe
Alum = 20g
Dye Bath = 200ml
Sodium Carbonate Na2SO3 = 5g
add iron first then add the Sodium Carbonate and then the Vinegar.
Mushroom Pigments
Dried Recipe
Dye stuff = 355g
Alum = 10% of Dye = 35.5g
Sodium Carbonate = 2.5% of Dye = 8.8g
Not Dried Recipe
Dye stuff = 345g
Alum = 10% of Dye = 34.5g
Sodium Carbonate = 2.5% of Dye = 8.6g
Mystery Mushroom Recipe
Dye stuff = 288g
Alum = 10% of Dye = 28g
Sodium Carbonate = 2.5% of Dye = 7.2g
Seaweed Pigments
Seaweed 1
Dye stuff = 328g
Alum = 28.8g
Sodium Carbonate = 8.2g
Seaweed 2
Dye stuff = 206g
Alum = 20g
Sodium Carbonate = 5.15g
Reused Dye Bath Pigments
All the same quantities - Red Onion, Madder, Lupin.
Dye stuff = 350g
Alum = 10% of Dye = 35g
Sodium Carbonate = 2.5% of Dye = 8.75g
Inks
The pigments created above can be used to make inks by adding water to the pigments, however the recidual byebaths can also be ruduced to greate inks. The reduction is created by heating the dyebath. I only had time to experiment slightly and I would like to test more of these at a later date.
Indigo
Another way of dyeing is with Indigo, Indigofera tinctoria. The indigo dyeing is made via a Oxidation-Reduction chemical reaction that removes and adds oxygen. This is visible in a colour change from yellow to blue, when the fabric is pulled out of the solution it is yellow, but rapidly turns blue as the indigo pigment is oxidised. A VAT dye means that the dye is insoluble in water and should therefore be reduced in an alkaline solution before adding the fabric. The pH should be between 10-14. We used the 1, 2, 3 method for this dye VAT.
Indigo Recipe
Water = 1 = 1.5l
Indigo = 10% of water = 15g
Calcium Hydroxide = 2 x Indigo = 30g
Fructose = 3 x Indigo = 45g
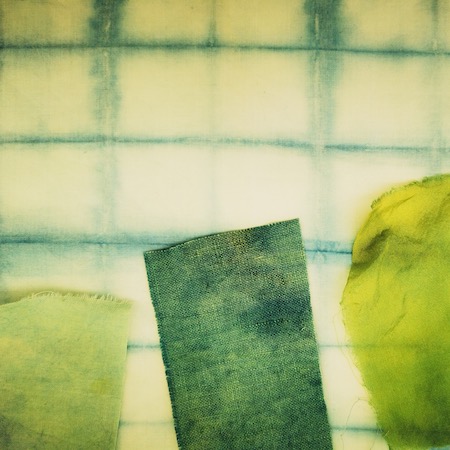
I carefully folded a cotton sample in a shibori style and triple dipped the fabric into the solution being careful not to agitate the mixture too much. After leaving it in the air for a while i dipped it in water to stop the process. Below you can see the final example alondside some other fibres that had been pre dyed in Lupine (yellow) to give a nice green blend.
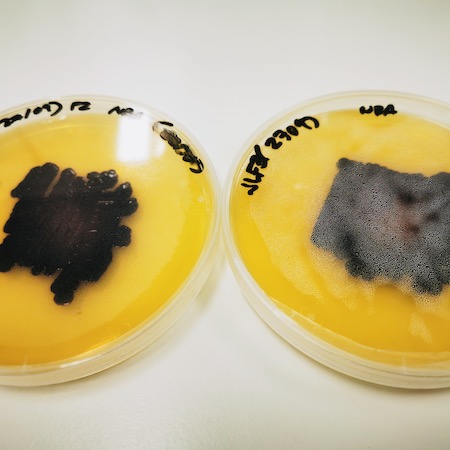
Bacterial Chromes
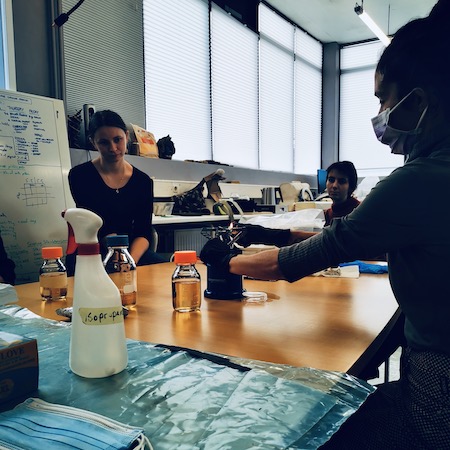
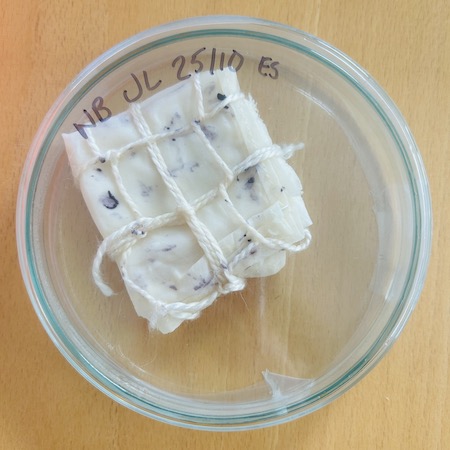
We got to work with the bacterial dyes a new way of approaching dying as more of a colaborative project with these living organisms that are all around us. The bacteria basically poops the colour onto the fabric as the bacteria multiply or grow. We went to Bio-Pol in Skagatrönd, to see the facilities and sterilize our equipment. Catherine Euale was visiting and showed us ways to collaborate with the bacteria to create the best environment for it and thus for the dye. The bacteria we used is called Janthinobacterium Lividum.
Agar and LB Broth
Water = 1 = 200ml
Agar = 2.5% of water = 5g
LB Broth = 2.5% of water = 5g
Instructions
- MAKE SURE EVERYTHING IS CLEAN AND STERILISED THROUGH THIS PROCESS.
- STERILISED HANDS AND MASKS REQUIRED.
- Make the agar and LB broth.
- Sterilize all the tools, the agar and LB broth in the pressure coocker for 30 min at 121 psi.
- Pour the agar into sterilised petri dishes onto an alcohol sterilised surface under a Bunsen Burner flame.
- Seal the petri dish.
- Let the agar cool down to a jelly.
- Innoculate the bacteria, under the Bunsen flame and on an alcohol sterilised surface.
- Use a sterilised inoculation loop to scoop up the bacteria from the petri dish.touch the hot loop to the agar on the side before touching the living bacterial.
- Quickly transfer the bacteria to the agar jell in a cross pattern.
- Close the lid of the petri dish quickly and seal with the parafilm tape.
- Let it grow.
- After you see some new healthy purple bacteria
- Manipulate a fabric sample. Here I folded it in a square pattern.
- PLace this fabric in petri dish.
- Pour the LB broth over the sample.
- Repeat the steps as above to innoculate the fabric
- Wait.
I am currently still waiting on my sample as we have repeated this process twice so far. I guess I was just unlucky as the bacteria has been very reluctant to grow well on my sample in particular. I am hoping that the little guys will grow better second time round so watch this space.
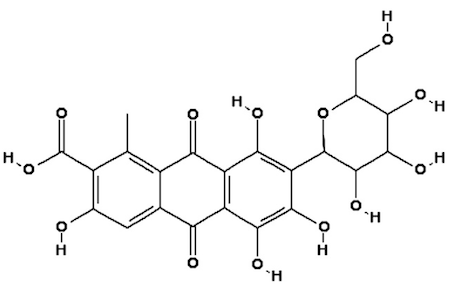
Madder
Madder, RUBIA TINCTORUM, from the perenianal Rubiaccae family is a tradional natural dye that has been used for many, many centuries. Madder species are distributed throughout the Mediterranean region, Asia, Africa, and the Americas. The plants have small yellowish flowers that grow in clusters. Madder also produce a number of phytochemicals, including quinone derivatives, that are of interest to pharmaceutical researchers but its the roots that are trationally used for the dyeing process.
Its history is fascinating. The first sample of Madder dye comes from India in the 3rd centrury. In Roman times is was refered to As Rubia Passiva and it has been excavated from Viking settlements at York. It was developed into Turkey Red which was a very colour fast red dye obtained by a labourius process developed in India, Turkey and Greece.
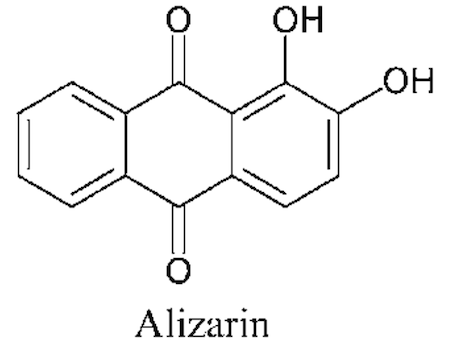
Chemical Formula for Alizarin
Alizarin Is also known as 1,2-dihydroxyanthraquinone is the active pigment in the root that is exracted in the dying process with Madder root.
We got some of the roots shipped to Iceland where we started to figure out the proportion of root to fiber. Its not and exact science unbelievable after all these years but we went with a ratio of 1:3
Madder Recipe
Madder Root 1:3
Total Weight of Fiber = 150g
Madder used
=50g
We actually left this bath alot longer as the colour seemed pretty weak initially. I have learned that with Natural dyes you kinda have to go with your gut alot of the time. Thats what makes it so experimental and fun.
Cochineal
Cochineal, Dactylopius Coccus is a scale insect of the sub order Sternorrhyncha native to the southern United States and tropical and sub tropical South America. Its main foodstuff is the prickly pear cactus. They are harvested and dried for the natural dye Carmine. They are still harvested mainly for use in Food colourants. although the process has fluctuated over the years due to health concerns with synthetic dyes.
- The time consuming process of collecting the bugs from the Prickly Pear cacti in the 1700s is represented in the drawing below.
/https://tf-cmsv2-smithsonianmag-media.s3.amazonaws.com/filer_public/21/d1/21d148a8-6d58-4912-9b32-a097499d5e42/indian_collecting_cochineal.jpeg)
Chemical Formula for Carmic Acid
Carmic acid is actually very difficult to replicate which is why this is becoming a problem. Loss of habitat and increased demand has raised the cost of Carmine greatly. You can read about some of the new possibilities of using our friends microbes to produce it in this Smithsonian Article
Cochineal Recipe
Cochineal 1:15
Total Weight of Fiber = 150g
Cochineal used
= 10g
It is a very powerful natural dye so we had no problems extracting the colours. We got a series of very bright pinks from it as you can see below.
Red Onion
This dyebath was the first one we did on day 1. We were very short on time so we decided heat the onion skins in the pot and then just to leave the fabrics in it in a cold bath overnight. All the skins here were from my kitchen and I was amazed by the intensity of the green we got here.
Red Onion Skins Recipe
Red Onion 1:2
Total Weight of Fiber = 150g
skins used
= 75g
Samples of Red Onion Skin Results.
Rhubarb
Rhubarb, Rheum or Rabarbari in Icelandic is everywhere in Iceland and its one of the most invasive and hardy species here. I once had a hot sauce project at my old work where people could bring in Rhubarb sticks for hot sauce and we had to limit them to 3 per person but people would be bringing in hundreds of sticks. In this case we used the leaves in our dye bath, while collecting the root which is surprisingly tree like, No wonder they survive super well here with these huge root systems.
Rhubarb Recipe
Rhubarb 1:1
Total Weight of Fiber = 150g
Leaves used
= 150g
Samples of Rhubarb Leaf Results.
Lupin
Lupin, Lupinus or Lúpína in Common Icelandic. Its actual official Icelandic title is Úlfabaunir or Wolf Beans. This is another invasive species in Iceland after being introduced in the 40s to try and bind together the soils in this sub arctic desert as the story goes, by just one Icelander. The sub type of the plant that grows here is specifically in Iceland is the Alaskan Lupine, Lupinus Nootkatensis. The flowers are bright purple and visable everywhere in the summer here.
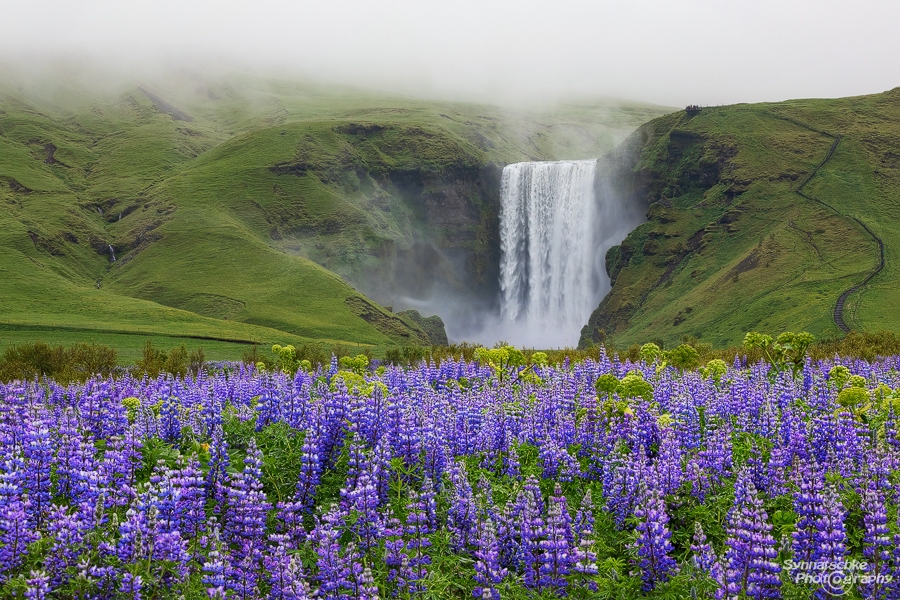 Purple Lupines Fields at Skógafoss by Synnatschke Photography
In this case we again used the leaves of the plant in our dye bath which provided us with an intense range of bright yellows. We also added some extra into the dye bath to use with the indigo for some extra colour blends
Lupine Recipe
Lupine 2:1
Total Weight of Fiber = 160g
leaves used
= 320g
Samples of Lupine Leaf Results.
Sample Book
All of these examples have been complied into a small flip book of samples that I will use and a reference and guide in future dying projects.