8. Wearables
This week and assignment was hard for me. I'm not very good at these themes but i'm trying to give my best. I can say that i was kind of scared, but together with my colleagues from ZipHouse, and with the help of our locul instructor from microlab, we started to work on the assignment.
Research
 First we had a great lecture on Wearables by Liza Stark. This helped us in understanding what we will be doing this week.
The first thing i do, by tradition is to browse the Fabricademy participants. The ones that guided me through this week assignment are: Diane Wakim, Vicky Luan, Loes Bogers, Sara Alvarez, Kate Reed
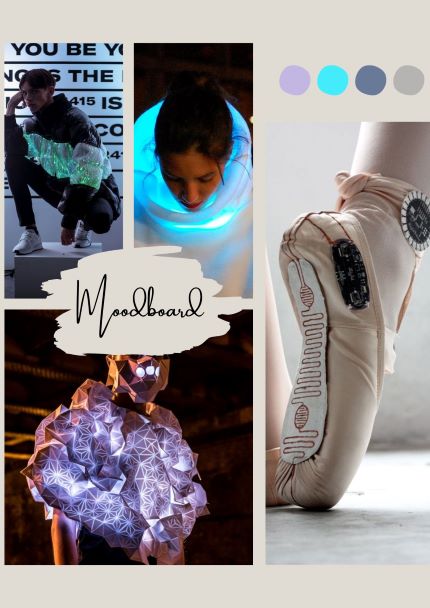
Because i was kind of scared by this week theme i did search a lot and here are some ideas that inspire me.
First we had a great lecture on Wearables by Liza Stark. This helped us in understanding what we will be doing this week.
The first thing i do, by tradition is to browse the Fabricademy participants. The ones that guided me through this week assignment are: Diane Wakim, Vicky Luan, Loes Bogers, Sara Alvarez, Kate Reed
Because i was kind of scared by this week theme i did search a lot and here are some ideas that inspire me.
Process and workflow
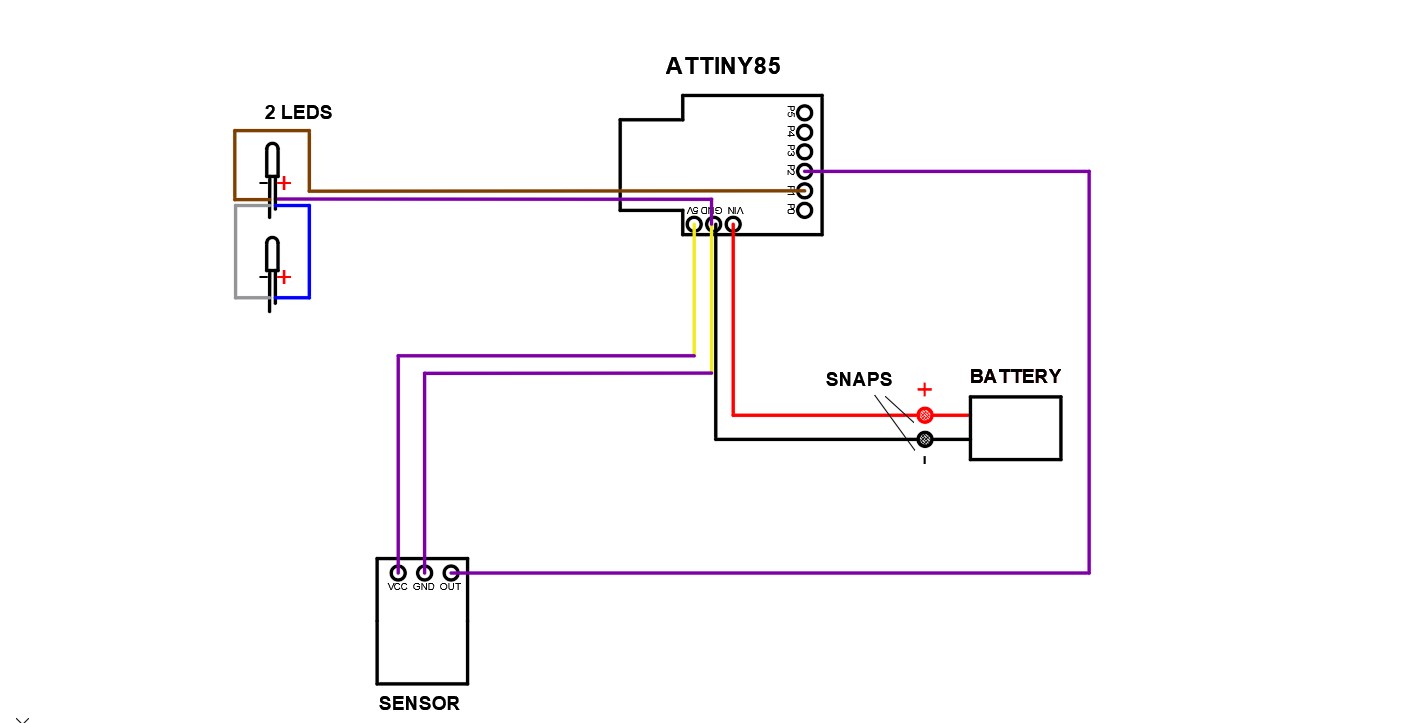
Circuit with light sensor
Tools:
- attiny85 development board;
- light intensity sensor module;
- leds (2);
- wires;
- snaps;
- battery;
- connector to the battery.
Based on the circuit done by my colleague Elena Florea i tried to use a similar circuit and integrate it into a garment.
Light sensor code
int Sensor = 2;
int Led = 1;
void setup() {
  pinMode(Led, OUTPUT);
  pinMode(Sensor, INPUT);
}

void loop() {

   if (digitalRead(Sensor) == HIGH) {
      digitalWrite (Led, HIGH);
  }
   if (digitalRead(Sensor) == LOW) {
      digitalWrite (Led, LOW);
  }
}
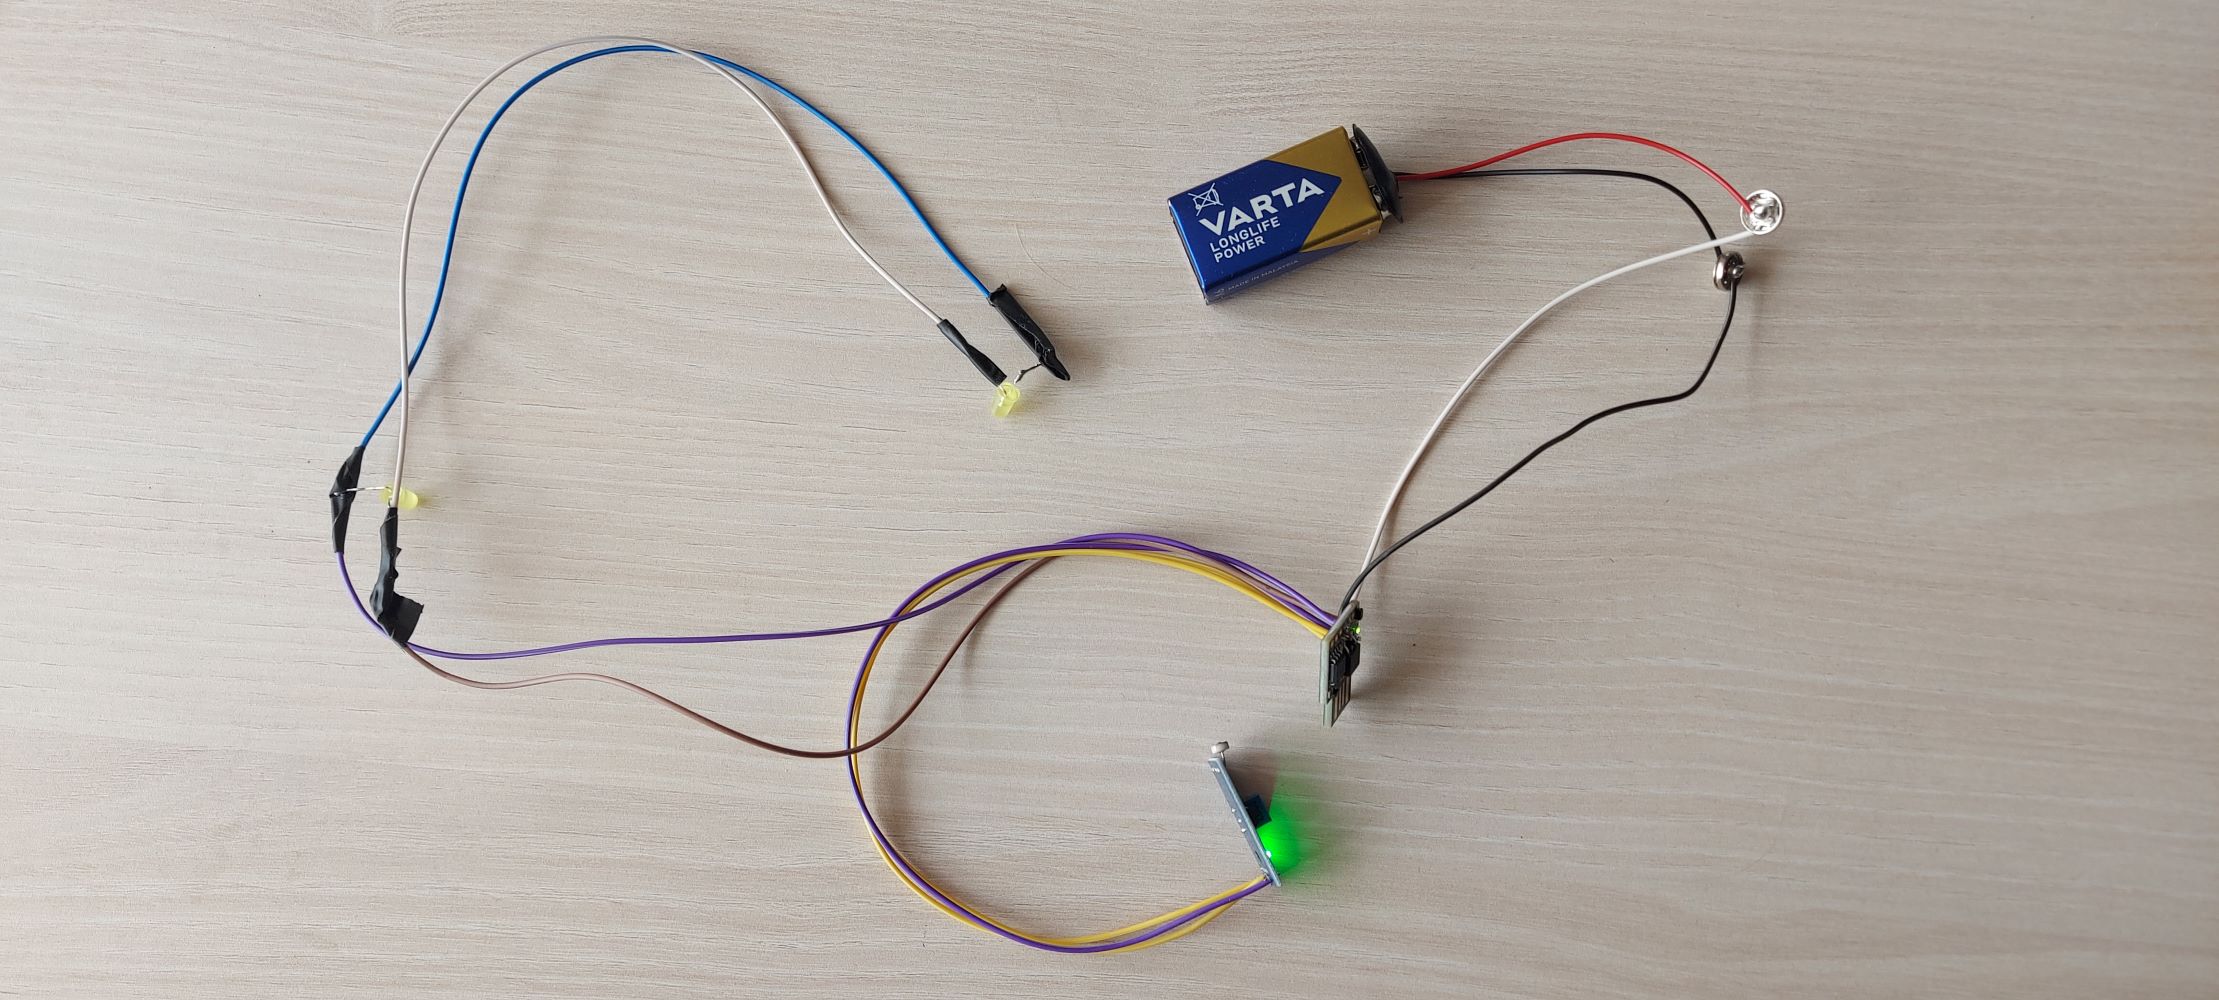
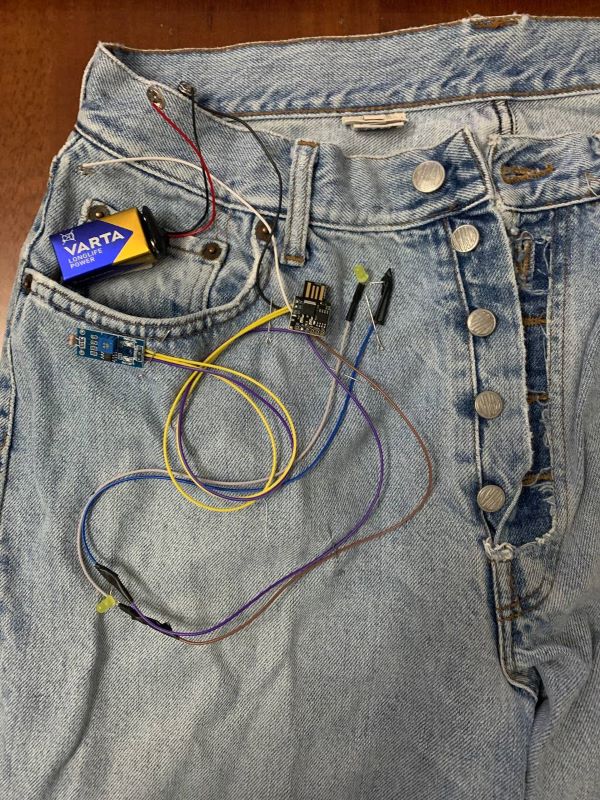
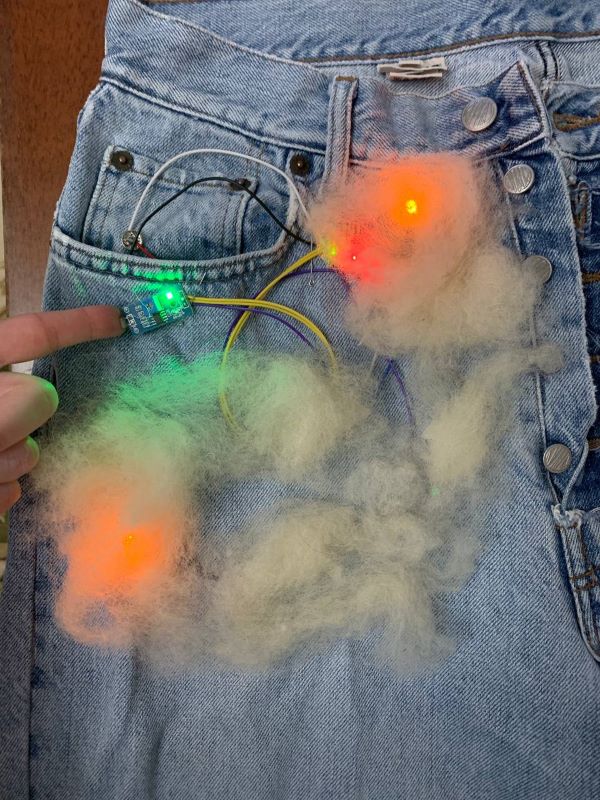
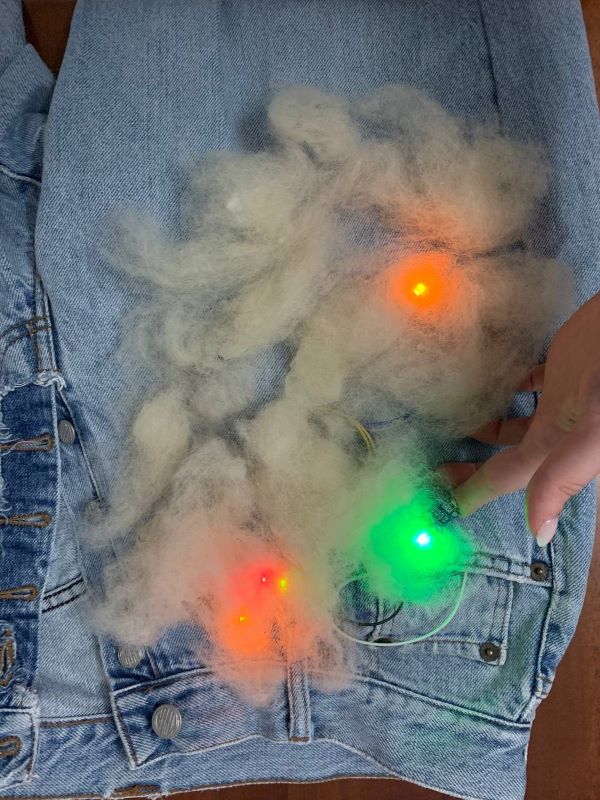
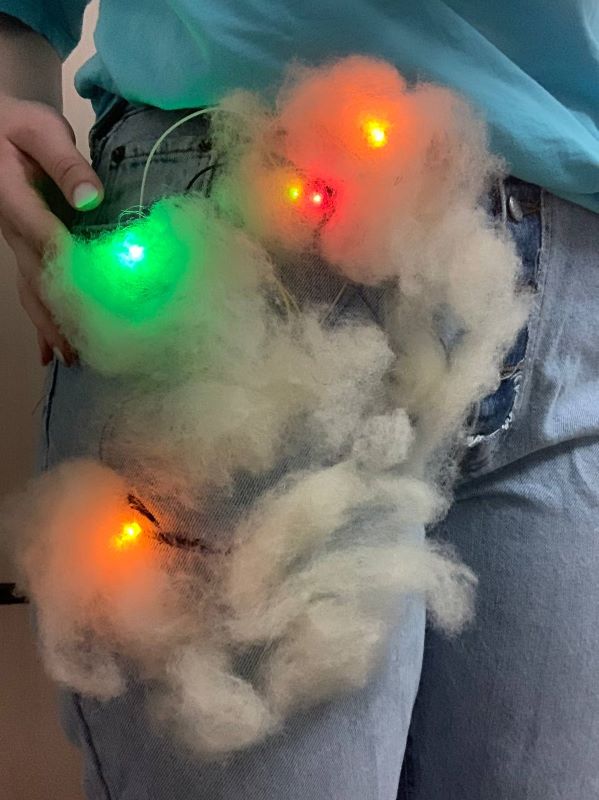
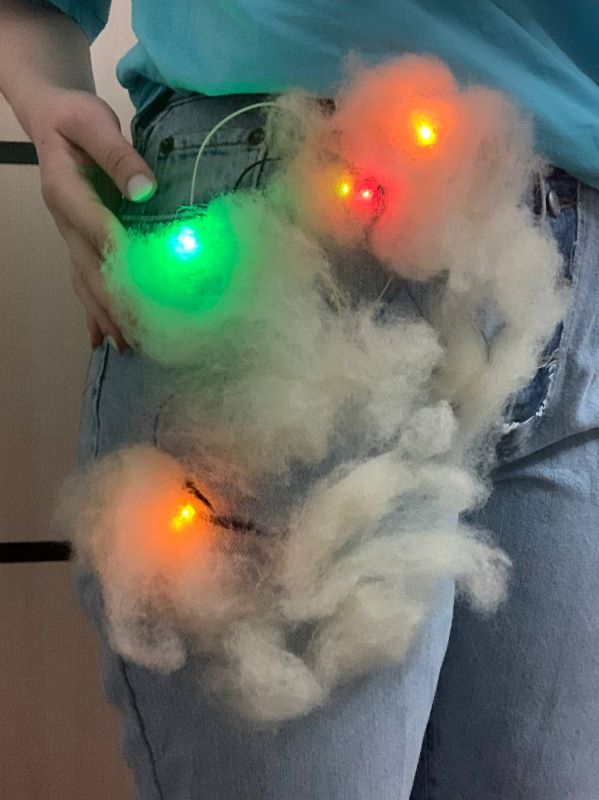
Then i started to think of a way to integrate the circuit to create a wearable. I decided to use a pair of jeans and create a visual effect of clouds with lights.

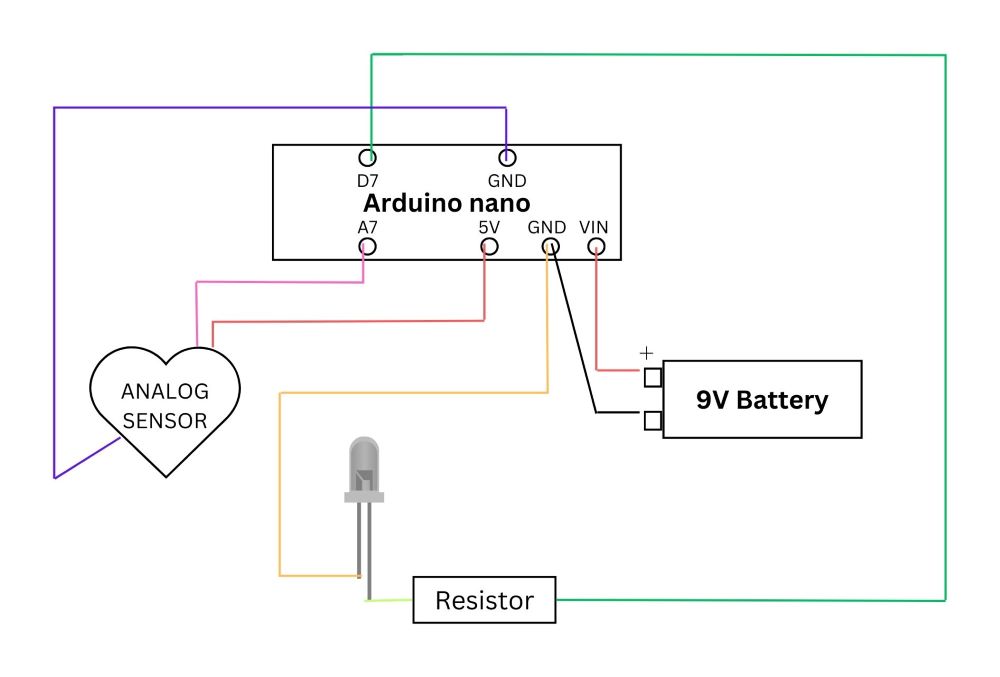
The handmade analog sensor (heart shaped)
Tools:
- Arduini nano;
- handmade analog sensor;
- led;
- wires;
- battery;
- connector to the battery.
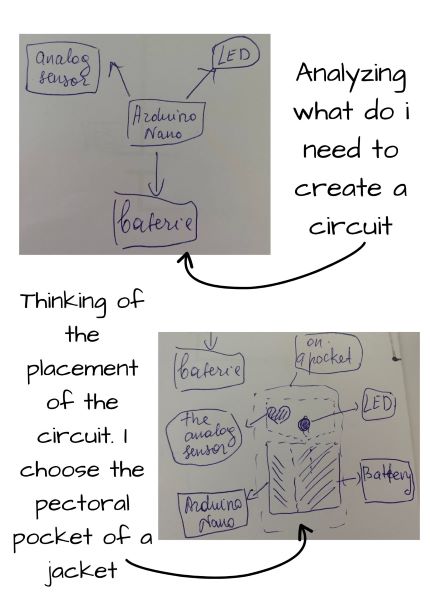
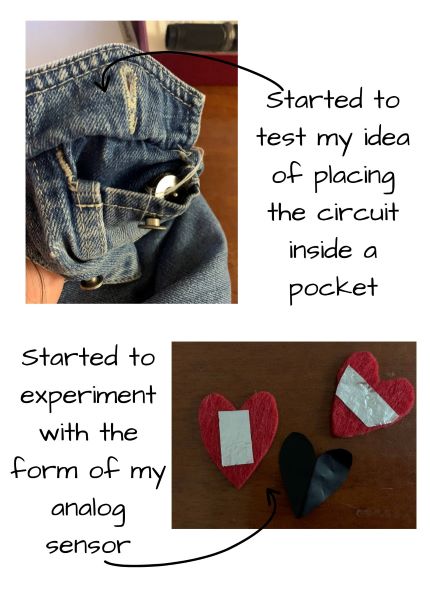
After all the prototyping we did as a group, i started the second product. My main idea came from using a led to have light to use when it's dark outside. I stated the work by analyzing what do i need to have to obtain a circuit.
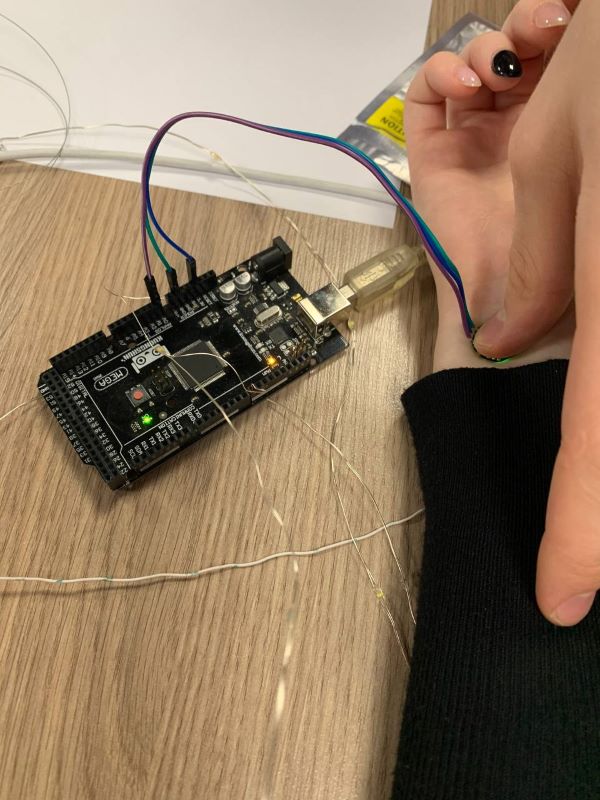
After all the experimenting and going back and forth i found my idea and what i wanted to do. so i started to create the circuit and started to connect everything. All was going well until i got to coding. Both me and our local instructor could not understand why the circuit didn't want to work. So i stated to change the analog sensor that i made, changed the arduino nano to a new one. But nothing worked. We tested everything. Separately everything worked but together it did not work.
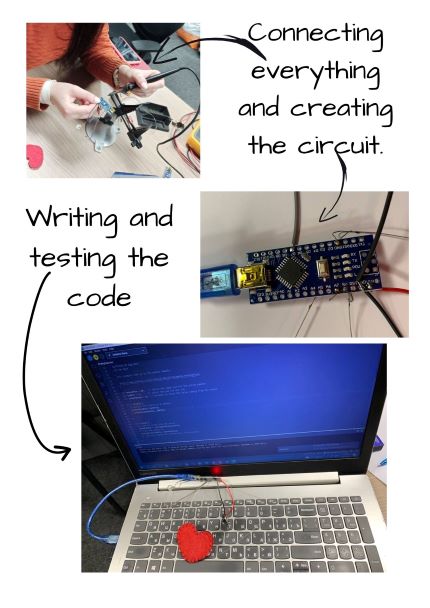
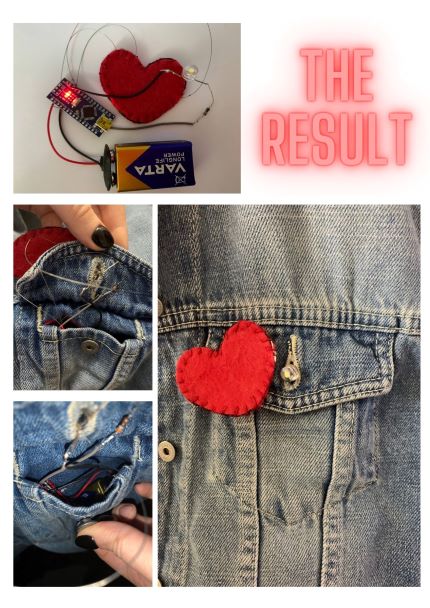
So in the end we found the problem. Arduino nano FTDI converter is not compatible with Arduino IDE, I’ve tried updating the drivers, changing the data cable, still doesnt work. For now i cannot do anything because we do not have other types of microcontrollers. I hope in the future this will change and i will be able to do the last step of lighting my led.
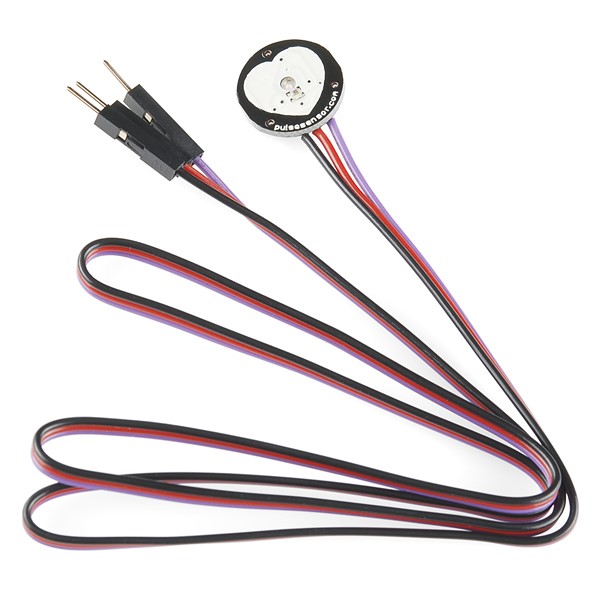
Pulse sensor
Tools:
- Arduini nano;
- pulse sensor;
- led;
- wires;
- battery;
- connector to the battery.
Because the second one failed, i made another circuit with a pulse sensor. The work started with creating the circuit based on the scheme below.
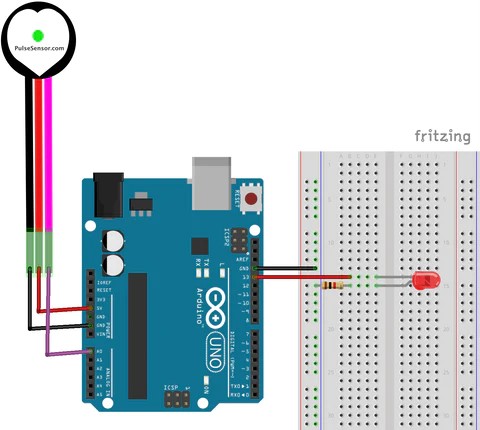
Based on this scheme here is the process and the obtained results.
Pulse sensor code
#define USE_ARDUINO_INTERRUPTS true // Set-up low-level interrupts for most acurate BPM math.
#include <PulseSensorPlayground.h> // Includes the PulseSensorPlayground Library.

// Variables
const int PulseWire = 0; // PulseSensor PURPLE WIRE connected to ANALOG PIN 0
const int LED_STRIP = 13; // The LED Strip that will light up when a heartbeat is connected
int Threshold = 550; // Determine which Signal to "count as a beat" and which to ignore.
// Use the "Gettting Started Project" to fine-tune Threshold Value beyond default setting.
// Otherwise leave the default "550" value.

PulseSensorPlayground pulseSensor; // Creates an instance of the PulseSensorPlayground object called "pulseSensor"
void setup() {

Serial.begin(9600); // For Serial Monitor

// Configure the PulseSensor object, by assigning our variables to it.
pulseSensor.analogInput(PulseWire);
pulseSensor.blinkOnPulse(LED_STRIP); //auto-magically blink Arduino's LED with heartbeat.
pulseSensor.setThreshold(Threshold);

// Double-check the "pulseSensor" object was created and "began" seeing a signal.
if (pulseSensor.begin()) {
Serial.println("We created a pulseSensor Object !"); //This prints one time at Arduino power-up, or on Arduino reset.


}
}

void loop() {

int myBPM = pulseSensor.getBeatsPerMinute(); // Calls function on our pulseSensor object that returns BPM as an "int".
// "myBPM" hold this BPM value now.
if (pulseSensor.sawStartOfBeat()) {
  digitalWrite(LED_STRIP,  HIGH);
}
delay(20); // considered best practice in a simple sketch.
}
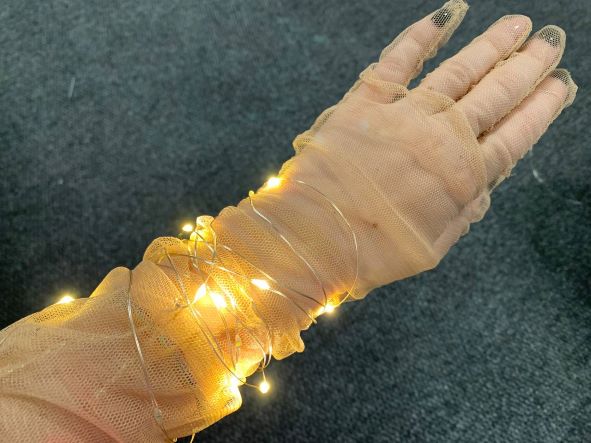
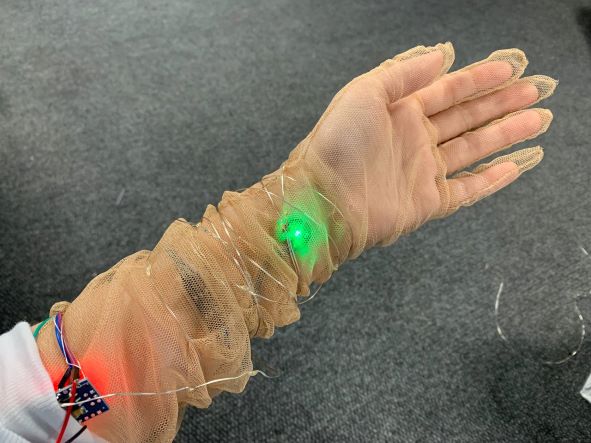
Then i started to think of a way to integrate the circuit to create a wearable. I decided to use a glove and create a visual effect with the light.
Prototyping
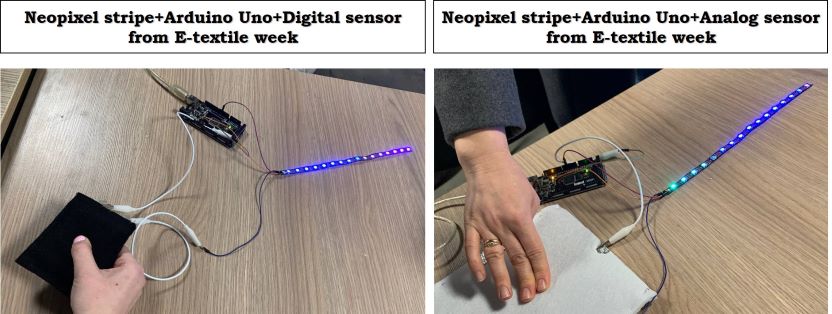
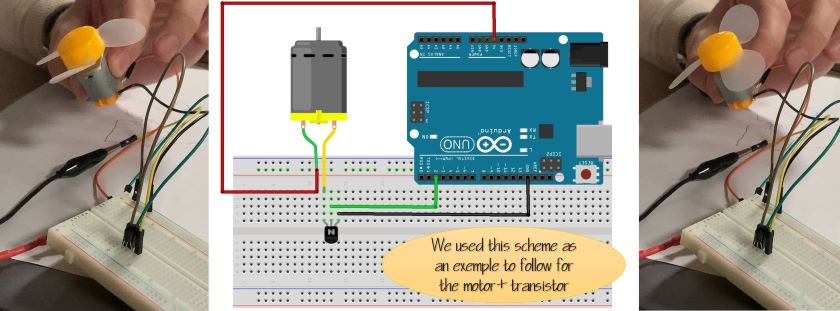
Because we were limited in the tools that we can use to create different swatches, we only were able to use the neopixel stripe and sound. Additionally we tried to do a swatch with a motor but the transistor was to weak and couldn't keep up with the power needed. So this was a one time experiment.
Prototyping Neopixel stripe
Neopixel code
#include <FastLED.h>

#define LED_PIN     5
#define NUM_LEDS    50
#define BRIGHTNESS  64
#define LED_TYPE    WS2811
#define COLOR_ORDER GRB
CRGB leds[NUM_LEDS];

#define UPDATES_PER_SECOND 100

// This example shows several ways to set up and use 'palettes' of colors
// with FastLED.
//
// These compact palettes provide an easy way to re-colorize your
// animation on the fly, quickly, easily, and with low overhead.
//
// USING palettes is MUCH simpler in practice than in theory, so first just
// run this sketch, and watch the pretty lights as you then read through
// the code.  Although this sketch has eight (or more) different color schemes,
// the entire sketch compiles down to about 6.5K on AVR.
//
// FastLED provides a few pre-configured color palettes, and makes it
// extremely easy to make up your own color schemes with palettes.
//
// Some notes on the more abstract 'theory and practice' of
// FastLED compact palettes are at the bottom of this file.


CRGBPalette16 currentPalette;
TBlendType    currentBlending;

extern CRGBPalette16 myRedWhiteBluePalette;
extern const TProgmemPalette16 myRedWhiteBluePalette_p PROGMEM;


void setup() {
    delay( 3000 ); // power-up safety delay
    FastLED.addLeds<LED_TYPE, LED_PIN, COLOR_ORDER>(leds, NUM_LEDS).setCorrection( TypicalLEDStrip );
    FastLED.setBrightness(  BRIGHTNESS );

    currentPalette = RainbowColors_p;
    currentBlending = LINEARBLEND;
}


void loop()
{
    ChangePalettePeriodically();

    static uint8_t startIndex = 0;
    startIndex = startIndex + 1; /* motion speed */

    FillLEDsFromPaletteColors( startIndex);

    FastLED.show();
    FastLED.delay(1000 / UPDATES_PER_SECOND);
}

void FillLEDsFromPaletteColors( uint8_t colorIndex)
{
    uint8_t brightness = 255;

    for( int i = 0; i < NUM_LEDS; ++i) {
        leds[i] = ColorFromPalette( currentPalette, colorIndex, brightness, currentBlending);
        colorIndex += 3;
    }
}


// There are several different palettes of colors demonstrated here.
//
// FastLED provides several 'preset' palettes: RainbowColors_p, RainbowStripeColors_p,
// OceanColors_p, CloudColors_p, LavaColors_p, ForestColors_p, and PartyColors_p.
//
// Additionally, you can manually define your own color palettes, or you can write
// code that creates color palettes on the fly.  All are shown here.

void ChangePalettePeriodically()
{
    uint8_t secondHand = (millis() / 1000) % 60;
    static uint8_t lastSecond = 99;

    if( lastSecond != secondHand) {
        lastSecond = secondHand;
        if( secondHand ==  0)  { currentPalette = RainbowColors_p;         currentBlending = LINEARBLEND; }
        if( secondHand == 10)  { currentPalette = RainbowStripeColors_p;   currentBlending = NOBLEND;  }
        if( secondHand == 15)  { currentPalette = RainbowStripeColors_p;   currentBlending = LINEARBLEND; }
        if( secondHand == 20)  { SetupPurpleAndGreenPalette();             currentBlending = LINEARBLEND; }
        if( secondHand == 25)  { SetupTotallyRandomPalette();              currentBlending = LINEARBLEND; }
        if( secondHand == 30)  { SetupBlackAndWhiteStripedPalette();       currentBlending = NOBLEND; }
        if( secondHand == 35)  { SetupBlackAndWhiteStripedPalette();       currentBlending = LINEARBLEND; }
        if( secondHand == 40)  { currentPalette = CloudColors_p;           currentBlending = LINEARBLEND; }
        if( secondHand == 45)  { currentPalette = PartyColors_p;           currentBlending = LINEARBLEND; }
        if( secondHand == 50)  { currentPalette = myRedWhiteBluePalette_p; currentBlending = NOBLEND;  }
        if( secondHand == 55)  { currentPalette = myRedWhiteBluePalette_p; currentBlending = LINEARBLEND; }
    }
}

// This function fills the palette with totally random colors.
void SetupTotallyRandomPalette()
{
    for( int i = 0; i < 16; ++i) {
        currentPalette[i] = CHSV( random8(), 255, random8());
    }
}

// This function sets up a palette of black and white stripes,
// using code.  Since the palette is effectively an array of
// sixteen CRGB colors, the various fill_* functions can be used
// to set them up.
void SetupBlackAndWhiteStripedPalette()
{
    // 'black out' all 16 palette entries...
    fill_solid( currentPalette, 16, CRGB::Black);
    // and set every fourth one to white.
    currentPalette[0] = CRGB::White;
    currentPalette[4] = CRGB::White;
    currentPalette[8] = CRGB::White;
    currentPalette[12] = CRGB::White;

}

// This function sets up a palette of purple and green stripes.
void SetupPurpleAndGreenPalette()
{
    CRGB purple = CHSV( HUE_PURPLE, 255, 255);
    CRGB green  = CHSV( HUE_GREEN, 255, 255);
    CRGB black  = CRGB::Black;

    currentPalette = CRGBPalette16(
                                   green,  green,  black,  black,
                                   purple, purple, black,  black,
                                   green,  green,  black,  black,
                                   purple, purple, black,  black );
}


// This example shows how to set up a static color palette
// which is stored in PROGMEM (flash), which is almost always more
// plentiful than RAM.  A static PROGMEM palette like this
// takes up 64 bytes of flash.
const TProgmemPalette16 myRedWhiteBluePalette_p PROGMEM =
{
    CRGB::Red,
    CRGB::Gray, // 'white' is too bright compared to red and blue
    CRGB::Blue,
    CRGB::Black,

    CRGB::Red,
    CRGB::Gray,
    CRGB::Blue,
    CRGB::Black,

    CRGB::Red,
    CRGB::Red,
    CRGB::Gray,
    CRGB::Gray,
    CRGB::Blue,
    CRGB::Blue,
    CRGB::Black,
    CRGB::Black
};


// Additional notes on FastLED compact palettes:
//
// Normally, in computer graphics, the palette (or "color lookup table")
// has 256 entries, each containing a specific 24-bit RGB color.  You can then
// index into the color palette using a simple 8-bit (one byte) value.
// A 256-entry color palette takes up 768 bytes of RAM, which on Arduino
// is quite possibly "too many" bytes.
//
// FastLED does offer traditional 256-element palettes, for setups that
// can afford the 768-byte cost in RAM.
//
// However, FastLED also offers a compact alternative.  FastLED offers
// palettes that store 16 distinct entries, but can be accessed AS IF
// they actually have 256 entries; this is accomplished by interpolating
// between the 16 explicit entries to create fifteen intermediate palette
// entries between each pair.
//
// So for example, if you set the first two explicit entries of a compact
// palette to Green (0,255,0) and Blue (0,0,255), and then retrieved
// the first sixteen entries from the virtual palette (of 256), you'd get
// Green, followed by a smooth gradient from green-to-blue, and then Blue.
Prototyping Motor
And the last trial was using a motor. But this is a one time experiment because at the moment we do not have the needed transistor to support the power that we need to make the motor work.
Motor code
nt motorSpeedPin = 7;

void setup()

{
  Serial.begin(9600);
}

/******************************************/

void loop()

{
  digitalWrite(motorSpeedPin, HIGH);
}
Prototyping Sound
For the sound example we used an arduino uno, a code and the digital sensor as the button that starts the music.
Sound code
/*  RickRollCode

    AUTHOR: Rowan Packard
    rowanpackard@gmail.com

    DISCLAIMER: The song "Never Gonna Give You Up" by Rick Astley
    is not the creative property of the author. This code simply
    plays a Piezo buzzer rendition of the song.
*/

#define  a3f    208     // 208 Hz
#define  b3f    233     // 233 Hz
#define  b3     247     // 247 Hz
#define  c4     261     // 261 Hz MIDDLE C
#define  c4s    277     // 277 Hz
#define  e4f    311     // 311 Hz
#define  f4     349     // 349 Hz
#define  a4f    415     // 415 Hz
#define  b4f    466     // 466 Hz
#define  b4     493     // 493 Hz
#define  c5     523     // 523 Hz
#define  c5s    554     // 554 Hz
#define  e5f    622     // 622 Hz
#define  f5     698     // 698 Hz
#define  f5s    740     // 740 Hz
#define  a5f    831     // 831 Hz

#define rest    -1

int piezo = 7; // Connect your piezo buzzer to this pin or change it to match your circuit!
int led = LED_BUILTIN;

volatile int beatlength = 100; // determines tempo
float beatseparationconstant = 0.3;

int threshold;

int a; // part index
int b; // song index
int c; // lyric index

boolean flag;

// Parts 1 and 2 (Intro)

int song1_intro_melody[] =
{c5s, e5f, e5f, f5, a5f, f5s, f5, e5f, c5s, e5f, rest, a4f, a4f};

int song1_intro_rhythmn[] =
{6, 10, 6, 6, 1, 1, 1, 1, 6, 10, 4, 2, 10};

// Parts 3 or 5 (Verse 1)

int song1_verse1_melody[] =
{ rest, c4s, c4s, c4s, c4s, e4f, rest, c4, b3f, a3f,
  rest, b3f, b3f, c4, c4s, a3f, a4f, a4f, e4f,
  rest, b3f, b3f, c4, c4s, b3f, c4s, e4f, rest, c4, b3f, b3f, a3f,
  rest, b3f, b3f, c4, c4s, a3f, a3f, e4f, e4f, e4f, f4, e4f,
  c4s, e4f, f4, c4s, e4f, e4f, e4f, f4, e4f, a3f,
  rest, b3f, c4, c4s, a3f, rest, e4f, f4, e4f
};

int song1_verse1_rhythmn[] =
{ 2, 1, 1, 1, 1, 2, 1, 1, 1, 5,
  1, 1, 1, 1, 3, 1, 2, 1, 5,
  1, 1, 1, 1, 1, 1, 1, 2, 1, 1, 1, 1, 3,
  1, 1, 1, 1, 2, 1, 1, 1, 1, 1, 1, 4,
  5, 1, 1, 1, 1, 1, 1, 1, 2, 2,
  2, 1, 1, 1, 3, 1, 1, 1, 3
};

const char* lyrics_verse1[] =
{ "We're ", "no ", "strangers ", "", "to ", "love ", "", "\r\n",
  "You ", "know ", "the ", "rules ", "and ", "so ", "do ", "I\r\n",
  "A ", "full ", "commitment's ", "", "", "what ", "I'm ", "thinking ", "", "of", "\r\n",
  "You ", "wouldn't ", "", "get ", "this ", "from ", "any ", "", "other ", "", "guy\r\n",
  "I ", "just ", "wanna ", "", "tell ", "you ", "how ", "I'm ", "feeling", "\r\n",
  "Gotta ", "", "make ", "you ", "understand", "", "\r\n"
};

// Parts 4 or 6 (Chorus)

int song1_chorus_melody[] =
{ b4f, b4f, a4f, a4f,
  f5, f5, e5f, b4f, b4f, a4f, a4f, e5f, e5f, c5s, c5, b4f,
  c5s, c5s, c5s, c5s,
  c5s, e5f, c5, b4f, a4f, a4f, a4f, e5f, c5s,
  b4f, b4f, a4f, a4f,
  f5, f5, e5f, b4f, b4f, a4f, a4f, a5f, c5, c5s, c5, b4f,
  c5s, c5s, c5s, c5s,
  c5s, e5f, c5, b4f, a4f, rest, a4f, e5f, c5s, rest
};

int song1_chorus_rhythmn[] =
{ 1, 1, 1, 1,
  3, 3, 6, 1, 1, 1, 1, 3, 3, 3, 1, 2,
  1, 1, 1, 1,
  3, 3, 3, 1, 2, 2, 2, 4, 8,
  1, 1, 1, 1,
  3, 3, 6, 1, 1, 1, 1, 3, 3, 3, 1, 2,
  1, 1, 1, 1,
  3, 3, 3, 1, 2, 2, 2, 4, 8, 4
};

const char* lyrics_chorus[] =
{ "Never ", "", "gonna ", "", "give ", "you ", "up\r\n",
  "Never ", "", "gonna ", "", "let ", "you ", "down", "", "\r\n",
  "Never ", "", "gonna ", "", "run ", "around ", "", "", "", "and ", "desert ", "", "you\r\n",
  "Never ", "", "gonna ", "", "make ", "you ", "cry\r\n",
  "Never ", "", "gonna ", "", "say ", "goodbye ", "", "", "\r\n",
  "Never ", "", "gonna ", "", "tell ", "a ", "lie ", "", "", "and ", "hurt ", "you\r\n"
};

void setup()
{
  pinMode(piezo, OUTPUT);
  pinMode(led, OUTPUT);

  digitalWrite(led, LOW);
  Serial.begin(9600);
  flag = true;
  a = 4;
  b = 0;
  c = 0;
}

void loop()
{


  // play next step in song
  if (flag == true) {
    play();
  }
}
void play() {
  int notelength;
  if (a == 1 || a == 2) {
    // intro
    notelength = beatlength * song1_intro_rhythmn[b];
    if (song1_intro_melody[b] > 0) {
      digitalWrite(led, HIGH);
      tone(piezo, song1_intro_melody[b], notelength);
    }
    b++;
    if (b >= sizeof(song1_intro_melody) / sizeof(int)) {
      a++;
      b = 0;
      c = 0;
    }
  }
  else if (a == 3 || a == 5) {
    // verse
    notelength = beatlength * 2 * song1_verse1_rhythmn[b];
    if (song1_verse1_melody[b] > 0) {
      digitalWrite(led, HIGH);
      Serial.print(lyrics_verse1[c]);
      tone(piezo, song1_verse1_melody[b], notelength);
      c++;
    }
    b++;
    if (b >= sizeof(song1_verse1_melody) / sizeof(int)) {
      a++;
      b = 0;
      c = 0;
    }
  }
  else if (a == 4 || a == 6) {
    // chorus
    notelength = beatlength * song1_chorus_rhythmn[b];
    if (song1_chorus_melody[b] > 0) {
      digitalWrite(led, HIGH);
      Serial.print(lyrics_chorus[c]);
      tone(piezo, song1_chorus_melody[b], notelength);
      c++;
    }
    b++;
    if (b >= sizeof(song1_chorus_melody) / sizeof(int)) {
      Serial.println("");
      a++;
      b = 0;
      c = 0;
    }
  }
  delay(notelength);
  noTone(piezo);
  digitalWrite(led, LOW);
  delay(notelength * beatseparationconstant);
  if (a == 7) { // loop back around to beginning of song
    a = 1;
  }
}