10. Open Source Hardware - From Fibers to Fabric
Getting closer and closer to the end of the assigments, this week we have learned how by working in group we have achieved improvements in our area of work, we have reconsidered what we needed to promote and that is what we have done, since we are lucky to have a large amount of resources and creating machines in our center.
PROCESS AND WORKFLOW
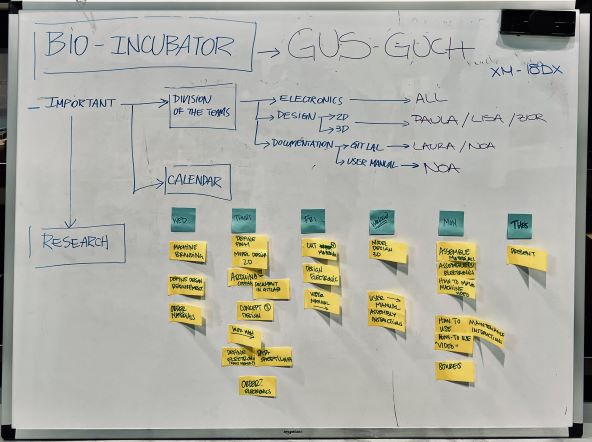
In order to carry out this week's assignment, we needed to distribute the tasks and organize ourselves very well, so the work could be fluid and five minds that think and work in different ways found a union and harmony. Of course we have received the support of our instructors in the BDC to be able to carry out the complex task.
REFERENCES
This week has been full of great benchmarks and references, but we have mainly relied on three to make the workflow easier and more concrete.
INVESTIGATION
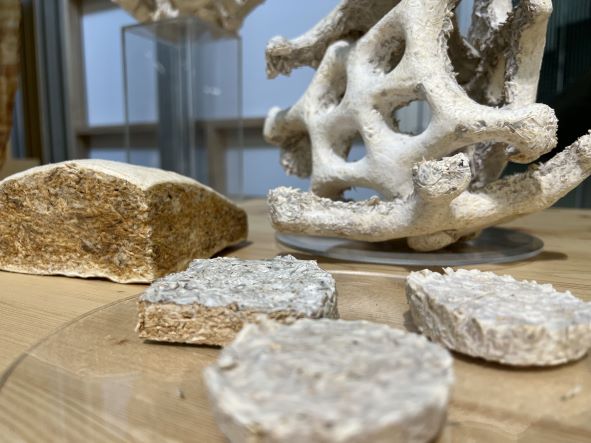
At the BDC, as you may have intuited, we have decided to build an incubator since we have realized the need for a space for the regulated creation of the last week mycelium. For this, it is explained below what an incubator is and what is needed to create it.
An incubator is a device whose common function is to create an environment with adequate humidity and temperature for the growth or reproduction of living beings. The main types of incubators are those used in neonatology, those used in microbiology (what is our case) and those intended for the reproduction of oviparous species.
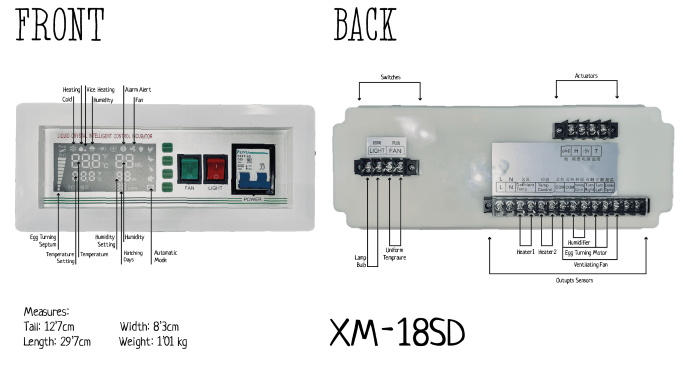
As an important point for the creation of our machine, we have used an humidity controller, the model is called XM-18SD, thanks to this we have been able to control the temperature and humidity that we want and need inside our incubator to be able to control and investigate the growth of mycelium.
The new generation intelligent humidity incubator controller is a control system of fully intelligent microcomputer designed and developed for the incubation industry and applies the latest microelectronic technology and new type components. Applied microcomputer chips to have strong anti-interference and high stable performance; The temperature sensor applies the high precision sensor for high temperature collection accuracy and wide range of temperature; applies high-performance, high-precision humidity sensor to ensure effectively stability and reliability. It has the user-firnedly four-screen design to display, including two screens showing the temperature aand humidity of the incubator and two other screens showing the egg turning times and incubation days by pressing the keys and displaying the preset temperature and humidity by pressing the keys.
ELECTRONICS
CREATING OUR OWN PROGRAMATION
We wanted to do our own programation to learn and know more about Arduino and how to control the sensor as we want.
-
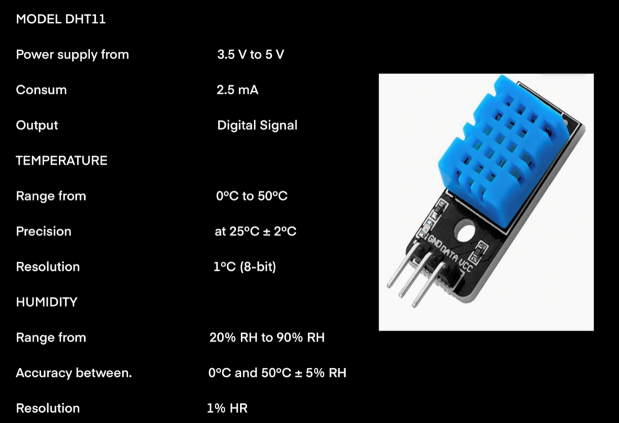
The first thing has been to find the name of our sensor to look at for in the library of Arduino.
-
Our sensor is DHT11
-
We will use the sensor and a pull-up resistor of 5 Kω.
-
The 3 pins of the PCB version of the DHT11 are:
• GND: grounding
• DATA: data transmission
• VCC: Power
-
Once we know the sensor and its functions we will take action with the code!
-
If we had to program the DHT11 temperature and humidity sensor from scratch, it would be frankly complicated. However, the bookstores around Arduino make our lives much easier)
-
In this case we will use the one provided by Adafruit.
-
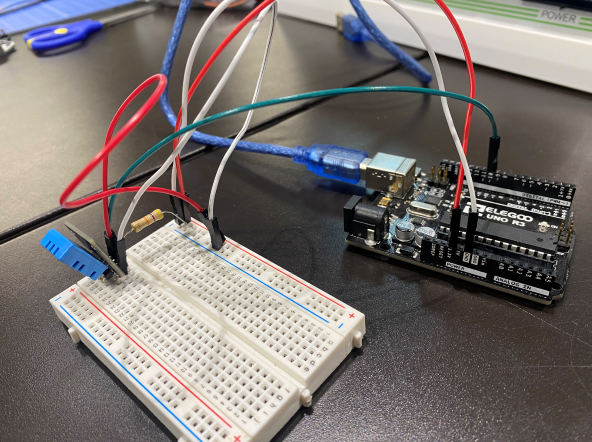
Once the search is done we need to connect the circuit on the protoboard.

-
We install the library
-
Copy the code and then edit it to our medium.
#include "DHT.h"
#define DHTPIN 10    // Digital pin connected to the DHT sensor
// Feather HUZZAH ESP8266 note: use pins 3, 4, 5, 12, 13 or 14 --
// Pin 15 can work but DHT must be disconnected during program upload.

// Uncomment whatever type you're using!
#define DHTTYPE DHT11   // DHT 11
//#define DHTTYPE DHT22   // DHT 22  (AM2302), AM2321
//#define DHTTYPE DHT21   // DHT 21 (AM2301)

DHT dht(DHTPIN, DHTTYPE);

int var= 0;


void setup() {
  Serial.begin(9600);
  Serial.println(F("DHTxx test!"));

  dht.begin();
}

void loop() {
  // Wait a few seconds between measurements.
  delay(2000);

  // Reading temperature or humidity takes about 250 milliseconds!
  // Sensor readings may also be up to 2 seconds 'old' (its a very slow sensor)
  float h = dht.readHumidity();
  // Read temperature as Celsius (the default)
  float t = dht.readTemperature();
  // Read temperature as Fahrenheit (isFahrenheit = true)
  float f = dht.readTemperature(false);

  // Check if any reads failed and exit early (to try again).
  if (isnan(h) || isnan(t) || isnan(f)) {
    Serial.println(F("Failed to read from DHT sensor!"));
    return;
  }

   if(h<=70) {
     var=1;
}

   if(h>=90){
     var = 2;
   }

  if(t>=24){
     var = 3;
   }

  if(t<=15){
     var = 4;
   }

switch (var) {
  case 1:
    //do something when var equals 1
    Serial.print(F("Humidity: "));
    Serial.print(h);
    Serial.print(F("%  Temperature: "));
    Serial.print(t);
    Serial.print(F("°C "));

    Serial.println( "Start humidifier");
    break;
  case 2:

    Serial.print(F("Humidity: "));
    Serial.print(h);
    Serial.print(F("%  Temperature: "));
    Serial.print(t);
    Serial.print(F("°C "));

    Serial.println( "Stop Humidifier");
    //do something when var equals 2
    break;
  case 3:
    Serial.print(F("Humidity: "));
    Serial.print(h);
    Serial.print(F("%  Temperature: "));
    Serial.print(t);
    Serial.print(F("°C "));

    Serial.println( "stop heating");
    //do something when var equals 2
    break;

 case 4:
    Serial.print(F("Humidity: "));
    Serial.print(h);
    Serial.print(F("%  Temperature: "));
    Serial.print(t);
    Serial.print(F("°C "));

    Serial.println( "start heating");
    //do something when var equals 2
    break;

  default:
    // if nothing else matches, do the default
    // default is optional
    break;
}
  // Compute heat index in Fahrenheit (the default)
  float hif = dht.computeHeatIndex(f, h);
  // Compute heat index in Celsius (isFahreheit = false)
  float hic = dht.computeHeatIndex(t, h, false);

/*
  Serial.print(F("%  Temperature: "));
  Serial.print(t);
  Serial.print(F("°C "));
  Serial.print(f);
  Serial.print(F("°F  Heat index: "));
  Serial.print(hic);
  Serial.print(F("°C "));
  Serial.print(hif);
  Serial.println(F("°F"));
  */
}
- Check how is the reaction
For our incubator we are going to opt for a controller already programmed so that facilitates our work, but in the same through a circuit with a temperature and humidity sensor with Arduino. For the mycelium to grow and develop optimally, it needs humidity between 70% and 90% and a temperature between 15Cº and 24Cº.
STEP BY STEP
INPUT:
-
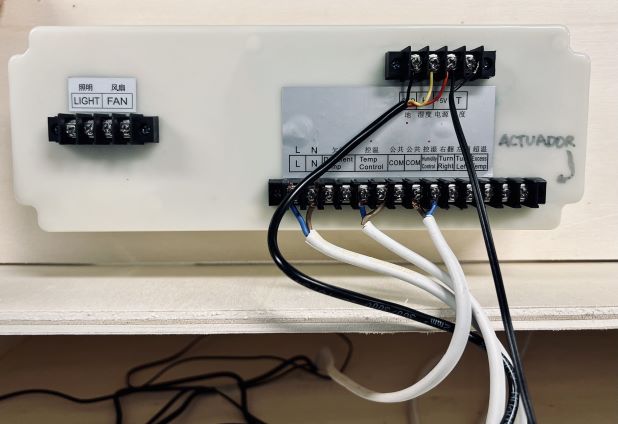
HUMIDITY Sensor: 1. We place the RED cable to + 5V (POWER) 2. We place the BLACK cable to the GROUND. 3. We place the YELLOW cable to the H.
-
TEMPERATURE Sensor: We place one of the cables to +5V (POWER) and the other to T.
OUTPUT:
-
ON/OFF Switch: We place 2 cables in L (Load) and N (Neutral, negative).
-
HEAT: We put two wires in TEMP CONTROL.
-
HUMIDITY: We put two wires. One to COM and the other to HUMIDITY CONTROL.
-
FAN: We put two wires. One to COM and the otherone to EXCESS TEMP.
Tools: This has been the best video I have found which has helped me understand how to assemble the electronic part
DESING PROCESS
Finally we saw the real posibility to build an incubator, where we have mainly used two different materials:
-
WOOD for the external part and the material that BDC proporcionate to us. It is an insulating material and prevents natural light from entering. The total measure is 250cmx125cm.
-
PVC for the internal part. We are gonna be able to control better the hygiene and maintenance of the space, which is the most important for the mycelium to grow.
-
XM-18SD sensor, necessary next to the control temperature and humidity cable.
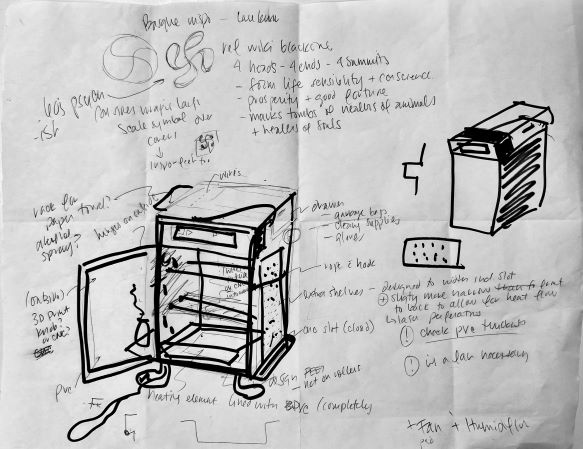
For the design of the incubator we have decided to divide the box into two parts, the upper part is for the XM-18SD sensor, which we will control the humidity and temperature of the lower level, for this reason some rails have been created to pass from one level to another, this is gonna protect the sensor and acting on the mycelium.

Inside the incubator, it has been thought to use a total of 3 shelves, which can be modified based on the user's needs; we added +10cm to the base of the incubator, for store the shelves that we dont need in that moment.
The ventilation system has been located on the lower left side and on the upper right side, so humidity travels avenly throughout the space and doesnt condence in a single area. On the other hand, inside the incubator we have housed a humidifier, which will make our ventilation work inside the incubator in an optimal and correct way.
In the back of the incubator we placed the heat plate, for this we have opened a hole to be able to connect to the electricity for the operation of the machine.

Here you can see the design in 3D.
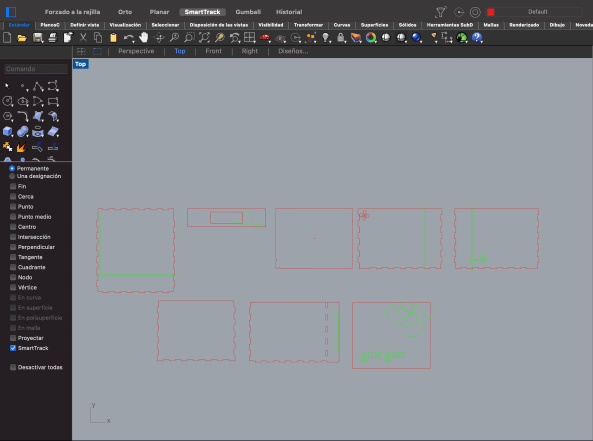
Before cutting the pieces of the incubator, we broke it down piece by piece in Rhino, so later we could use Aspire to send the pieces to cut with CNC machine.
RHINO
ASPIRE
Once we have assembled the walls it is important to clarify that we have had to make a series of changes in the design, so that the entire wiring system goes down the walls we have drilled the walls.
To lower the wiring from the upper floor to the lower one, on the one hand we have made some rails to connect the humidifier, the heating plate and the load of the XM-18SD, that is the plug. On the other hand, we have made a hole in the surface of the floor that divides our incubator to lower both the temperature and humidity sensors.
BILL OF MATERIALS
| MATERIAL | QTY | DESCRIPTION | PRICE | LINK |
|---|---|---|---|---|
| PLYWOOD | 7 | BOTTOM 750mm X 500mm. TOP 650mm X 500mm. BACK 700mm X 650mm. DOOR 650mm X 550mm. X2 LATERAL 700mm X 500mm | 24,58€ | LEROY MERLIN |
| PVC | 6 | We have recycled a pvc plate (plexiglass) with the following measures BOTTOM 630mm X 490mm. TOP 630mm X 490mm. BACK 534mm X 624mm X2LATERALS 534mm X 487mm | x | x |
| PVC TUBE | 4 | from a single 2m tube we have cut into 4 of 63cm | 5,90 | LEROY MERLIN |
| METHACRYLATE | 2 | From a single piece of methacrylate we have produced a two-piece design in rhino | 36,99€ | LEROY MERLIN |
| XM-18SD | 1 | programmer for a chicken incubator | 51,00€ | AMAZON |
| HUMIDIFIER | 1 | x | 60,00€ | AMAZON |
| FAN | 1 | we have made a small fan from an old computer | x | x |
| HEAT PLATE | 1 | a small heater that allows the incubator to stay humid and at the ideal temperature | x | x |