8. Wearables
Actuators
An actuator is a component of a circuit that moves or controls other part based in input
Visual
- LEDs
- Neopixels
- Fibre Optics
- Thermochromatic Ink
Sound
- Speakers
- Electromagnets
Motion
- Shape Memory Alloys
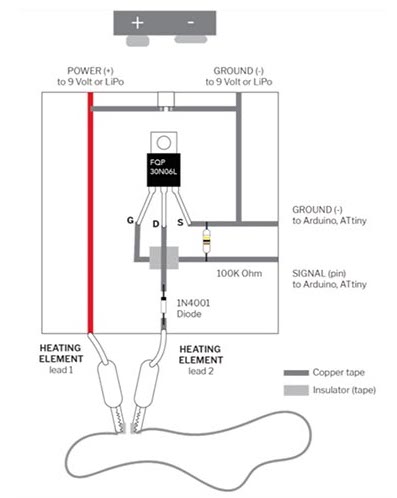
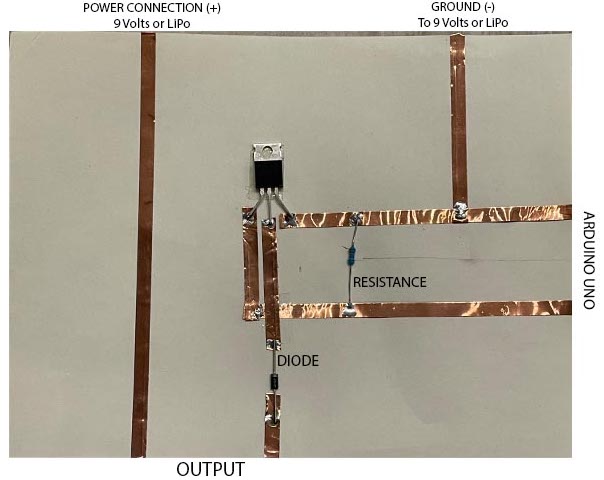
Mosfet Circuit
MOSFET, in short, is a metal oxide semiconductor field-effect transistor used to switch or amplify voltages in circuits. Being part of the field-effect transistor family, it is a current-controlled device that is constructed with 3 terminals; - Source - Gain - Drain
The purpose of a MOSFET transistor is essentially to control voltage/current flow between the source and the drain. The working principle differs based on the type of MOSFET.
Inspiration - Neopixels
I found Neopixels very interesting and fun to work with so I decided to use them for this assignment.
![]()
![]()
Neopixels
![]()
Circuit
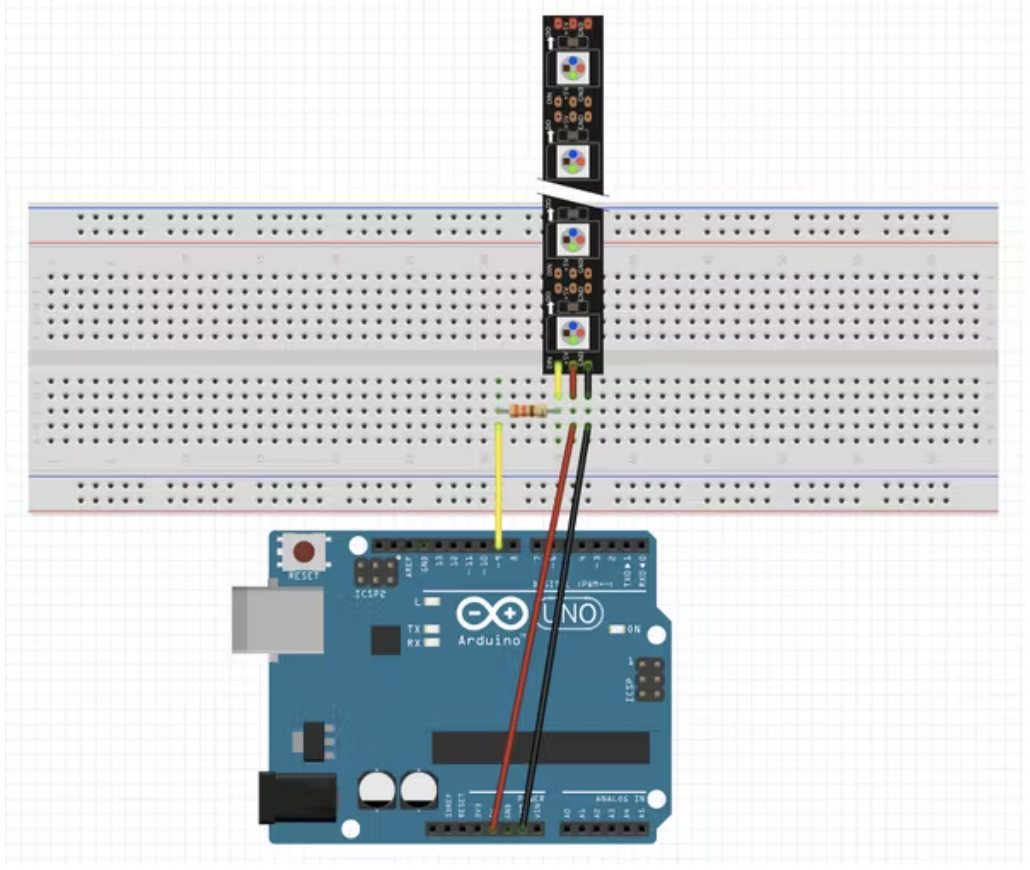
![]()
Code
(Credits: https://create.arduino.cc/projecthub/glowascii/neopixel-leds-arduino-basics-126d1a)
- Go download Adafruit's NeoPixel library to get started.
- You can just download the .zip file with the library.
- Unzip it on your computer, and drag the contents into your Arduino libraries folder. (The "libraries" folder is usually created in the same "Arduino" folder where you save your sketches. If you don't have one yet, go ahead and create it.)
- Also, restart the Arduino IDE if you already had it open. Once it's up again, you'll have some new example sketches.
- File > Examples > Adafruit NeoPixel > simple to check if the circuit is running properly.
I wanted to play with the Fade animation of the neopixel for which I was able to generate a code through this website. It is very convenient to use and you have the option to customise the animation as well as the colours. The code for my circuit was:
#include <Adafruit_NeoPixel.h>

class Strip
{
public:
  uint8_t   effect;
  uint8_t   effects;
  uint16_t  effStep;
  unsigned long effStart;
  Adafruit_NeoPixel strip;
  Strip(uint16_t leds, uint8_t pin, uint8_t toteffects, uint16_t striptype) : strip(leds, pin, striptype) {
    effect = -1;
    effects = toteffects;
    Reset();
  }
  void Reset(){
    effStep = 0;
    effect = (effect + 1) % effects;
    effStart = millis();
  }
};

struct Loop
{
  uint8_t currentChild;
  uint8_t childs;
  bool timeBased;
  uint16_t cycles;
  uint16_t currentTime;
  Loop(uint8_t totchilds, bool timebased, uint16_t tottime) {currentTime=0;currentChild=0;childs=totchilds;timeBased=timebased;cycles=tottime;}
};

Strip strip_0(12, 6, 12, NEO_GRB + NEO_KHZ800);
struct Loop strip0loop0(1, false, 1);

//[GLOBAL_VARIABLES]

void setup() {

  //Your setup here:

  strip_0.strip.begin();
}

void loop() {

  //Your code here:

  strips_loop();
}

void strips_loop() {
  if(strip0_loop0() & 0x01)
    strip_0.strip.show();
}

uint8_t strip0_loop0() {
  uint8_t ret = 0x00;
  switch(strip0loop0.currentChild) {
    case 0:
           ret = strip0_loop0_eff0();break;
  }
  if(ret & 0x02) {
    ret &= 0xfd;
    if(strip0loop0.currentChild + 1 >= strip0loop0.childs) {
      strip0loop0.currentChild = 0;
      if(++strip0loop0.currentTime >= strip0loop0.cycles) {strip0loop0.currentTime = 0; ret |= 0x02;}
    }
    else {
      strip0loop0.currentChild++;
    }
  };
  return ret;
}

uint8_t strip0_loop0_eff0() {
    // Strip ID: 0 - Effect: Fade - LEDS: 12
    // Steps: 983 - Delay: 1
    // Colors: 2 (50.0.0, 133.39.185)
    // Options: duration=983, every=1,
  if(millis() - strip_0.effStart < 1 * (strip_0.effStep)) return 0x00;
  uint8_t r,g,b;
  double e;
  e = (strip_0.effStep * 1) / (double)983;
  r = ( e ) * 133 + 50 * ( 1.0 - e );
  g = ( e ) * 39 + 0 * ( 1.0 - e );
  b = ( e ) * 185 + 0 * ( 1.0 - e );
  for(uint16_t j=0;j<12;j++) {
    if((j % 1) == 0)
      strip_0.strip.setPixelColor(j, r, g, b);
    else
      strip_0.strip.setPixelColor(j, 0, 0, 0);
  }
  if(strip_0.effStep >= 983) {strip_0.Reset(); return 0x03; }
  else strip_0.effStep++;
  return 0x01;
}
![]()
Please find this circuit integrated into a project on my Skin Electronics page.
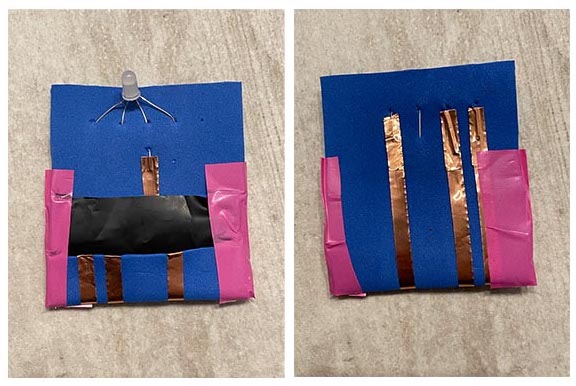
Shemakes Interactive Monster
Process
- Cut two pieces of Goma Eva cca 50x80 cm and 4 slices of the copper or conductive tape - cca 8 cm long.
- Each piece of the copper tape will belong to one of the legs of the LED light. And only one of them will be connected to the battery.
- Stick three of the slices to the cutted piece of Goma Eva and fold the ends of the tape on the otherside of the base. Fix it with a plastic tape.
- Pierce the rubber in the four places where you will put the light. Each hole is for one foot LED light.
- Stick the fourth piece of the copper tape to the longest leg of the LED light and to the place for the battery. Add one other piece of copper tape to make sure it will not move.
- Repeat it again for the each leg of the LED light.
- Cut another small piece of Goma Eva for a battery holder. You can picture it as a kangaroo belly.
- Place the battery on top of the cutted piece - (+) facing upwards. With the copper tape fix it to the previous piece of Eva with the LED light. Place it on the middle of the shape. On the top of the battery place a piece of Velostat - the same size as was the second Goma Eva. Fix it with plastic tape on the sides.
- Fold and roll the bottom part upwards.
- With the other textile you can create a shell for the part you just did.
- Whole tutorial with pictures can be found here - Tutorial by Nuria Robles, Fab Lab León