8∙ Wearables
8th November to 15th november 2022
Update
- November, 2022
- April, 2023
- June, 2023
Assignments
- Document your idea , sketches, references and research
- Create a swatch using an attiny with one input and one output of your choice, using hard-soft connection solutions and battery
- Create 2 actuator swatches and test them with the Arduino or ATtiny
- Learn how to program and ATTiny, add the libraries and links you used for your code
- Document the schematic and the programming code, libraries you had to add and calculations
- Upload a small video of your object working
- EXTRA POINT Integrate it to a project
Ressources of the week
Research & Ideation
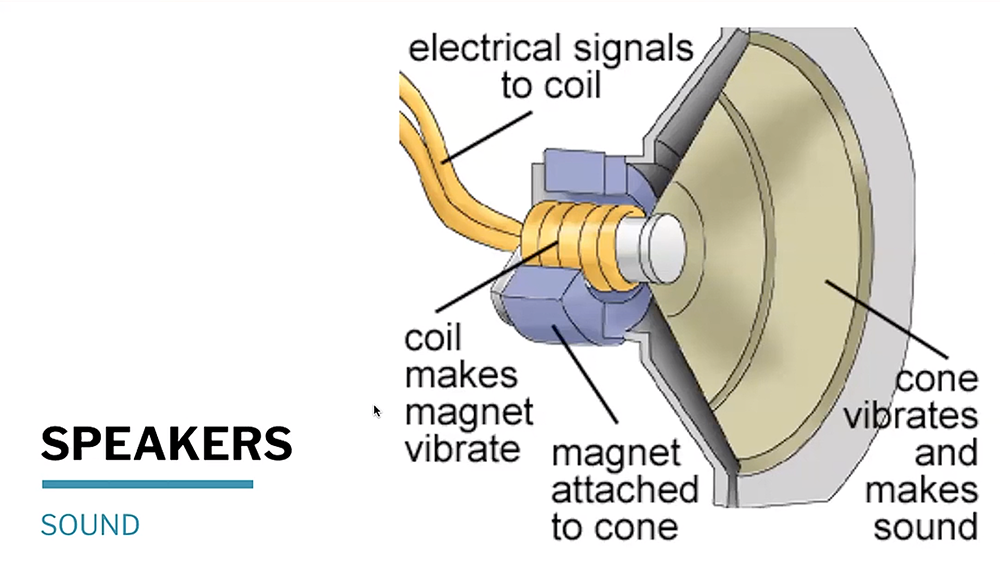
This week we follow the tutorial of Liza Stark and Emma Pareschi.
Diane Wakim and Camille Barot explain to us between the course for arriving to make it.
Diane show us the speaker she made previously. Feeling " Whaaaaa" how it's works?!
More info about her speaker here
When Liza Stark speak about speaker and transistors, I was really enthousiast about it for learn more. In same time I was tired and feel my brain is not cables for understanding all the informations.
References & Inspiration
- Knit Wrist Bend Sensor Summary
- Draping Sound by Ejtech
Draping Sound from EJTECH on Vimeo.
- Responsive knit
Tools & Materials
Arduino Ressources
| Material | Details |
|---|---|
| Machine | Laptop with USB port |
| Software | Arduino |
| Tools for Neopixels | Aligator clip cable, , stick neopixels 5leds RGB, , cooper tape, jumper wires |
| Tools for Soundknit | magnets, 9v battery, fabric, conductive thread, normal thread, a pot in glass |
| Others tools | Multimeter, |
Process and workflow
NEOPIXELS
For the Neopixels we follow the tutorial and the explications during the courses for making it. The maximum for the Arduino is 10 leds.For using it we download a special library.
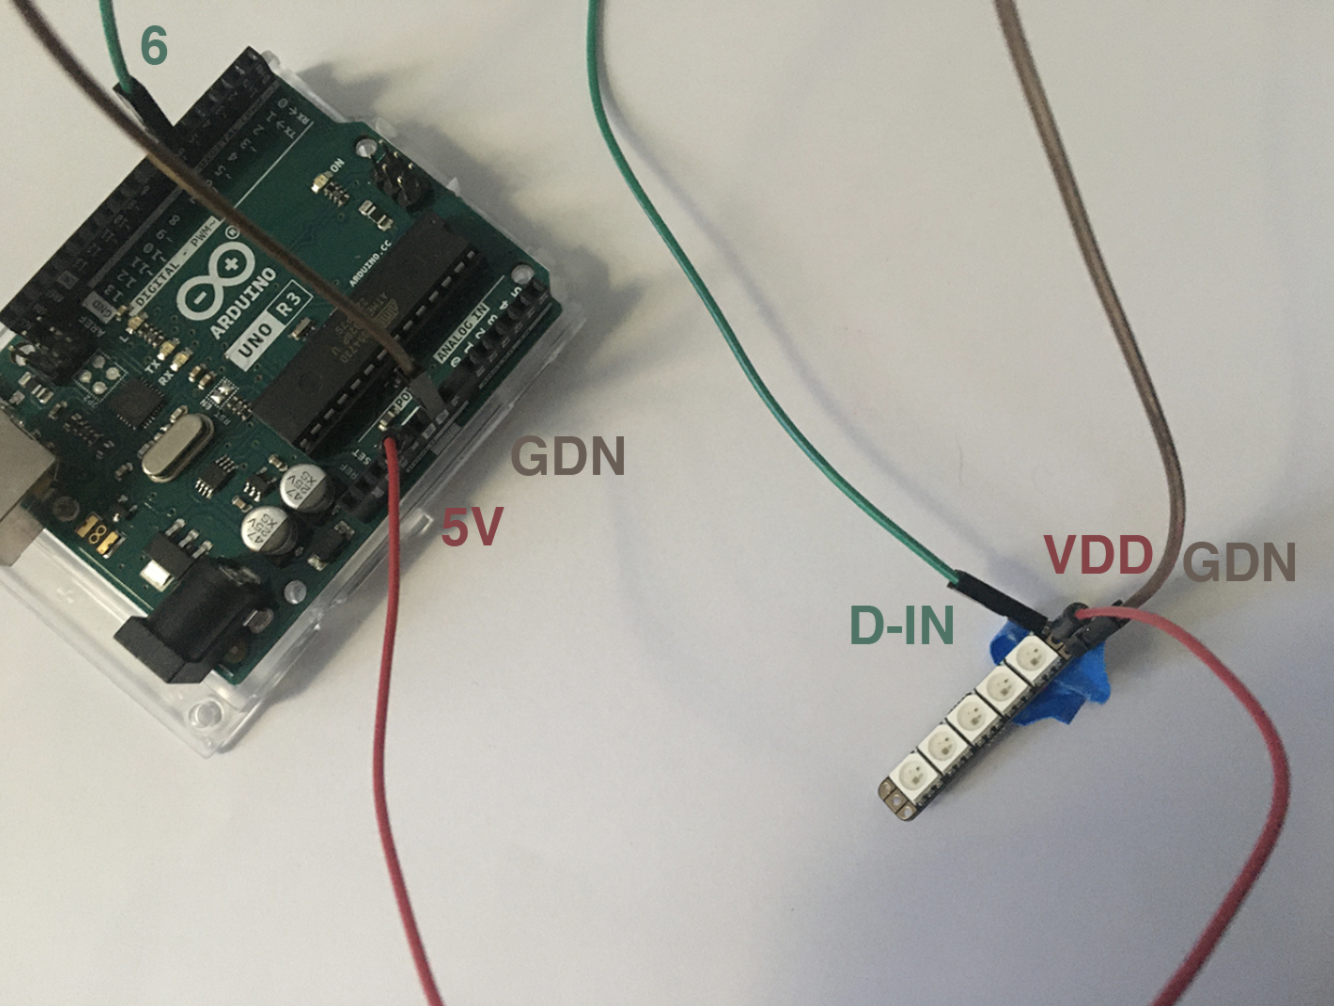
This schematic is connecting directly with the usb cable to the laptop.
Cable green :
// Which pin on the Arduino is connected to the NeoPixels?
#define PIN            6
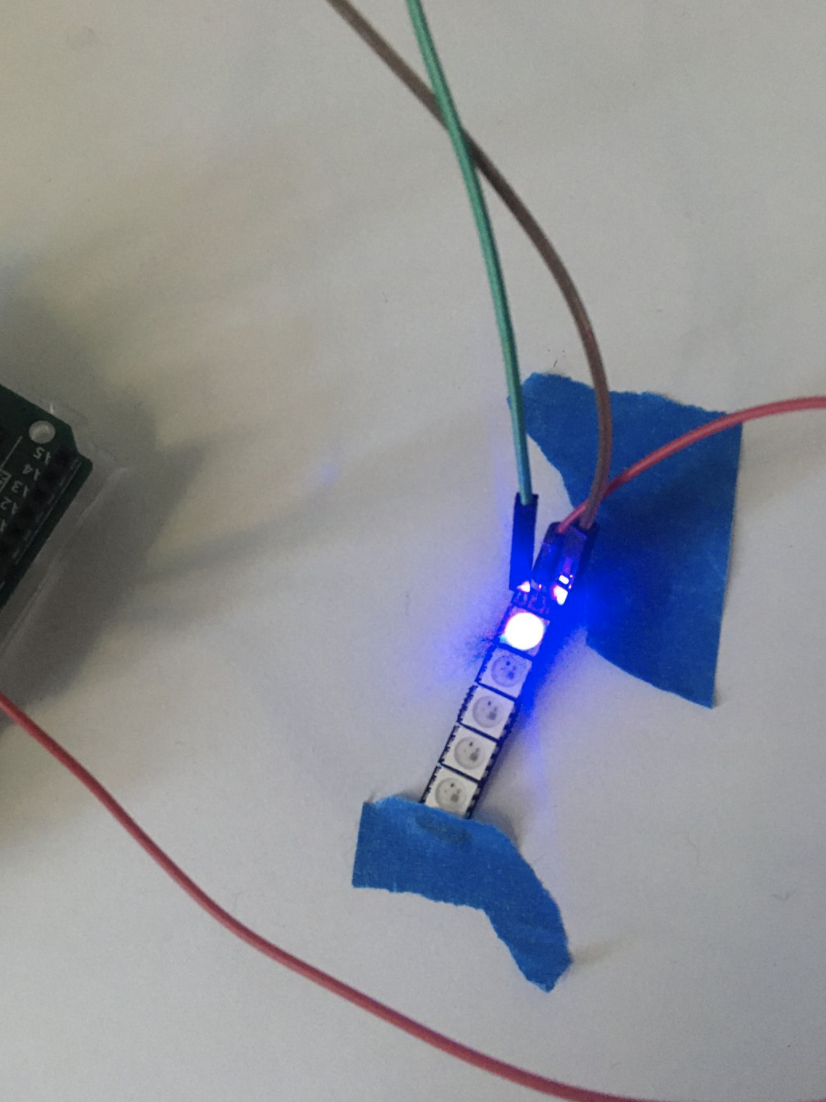
We have 5 in this example
// How many NeoPixels are attached to the Arduino?
#define NUMPIXELS      5
The first number is the number of the led
void loop() {

  pixels.setPixelColor(0, 255, 0, 0);
void loop() {
  for (int i=0; i> 8; i=i+1) {
    pixels.setPixelColor(i, magenta); //set the color red on the first pixel
    pixels.show();  //display the color
    delay(delayval);

    pixels.setPixelColor(i, blue); //set the color green on the first pixel
    pixels.show();  //display the color
    delay(delayval);

    pixels.setPixelColor(i, off); //set the color green
    pixels.show();  //display the color
    delay(delayval);

}
In this example this change the led each by each one.
void loop() {
  pixels.fill(purple,0,2); //
  pixels.show().
  delay(deayvall);

  pixels.fill(red,2,3); // We start to the led 3 ( because the number start at 0) for 3 led
  pixels.show().
  delay(deayvall);

// In this example we will have the 2 first led in purple still brighting and after the 3 last one brightness too.
Rainbow
void loop() {

  rainbow(10);             // Flowing rainbow cycle along the whole strip
  strip.fill(off, 0, 10);  // turn the strip off
  strip.show();  //display the color
  delay(1000);

}

// Rainbow cycle along whole strip. Pass delay time (in ms) between frames.

void rainbow(int wait) {
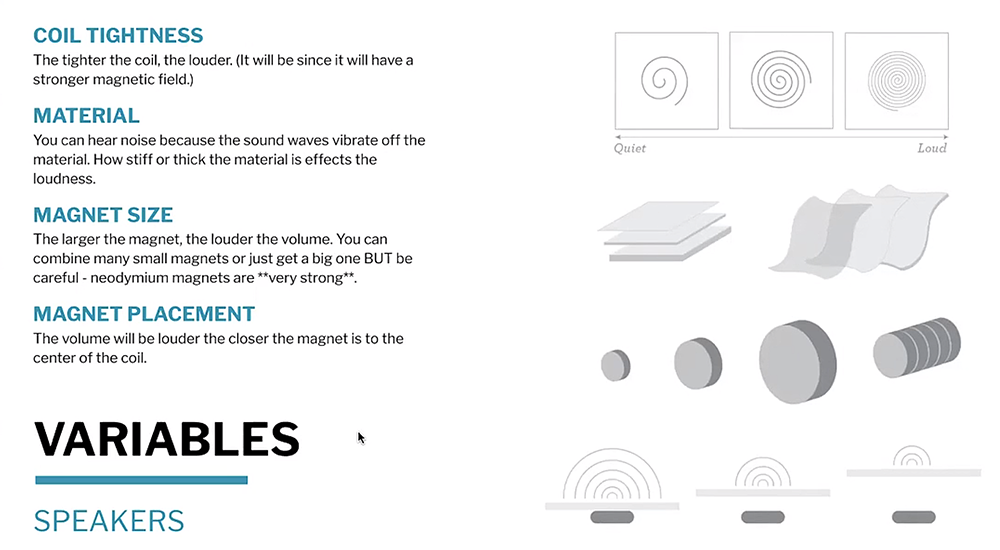
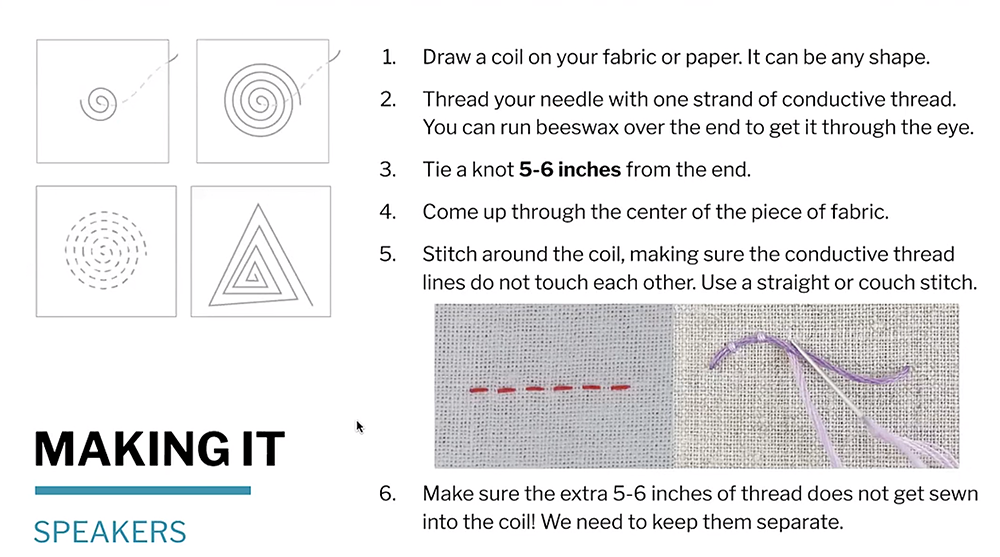
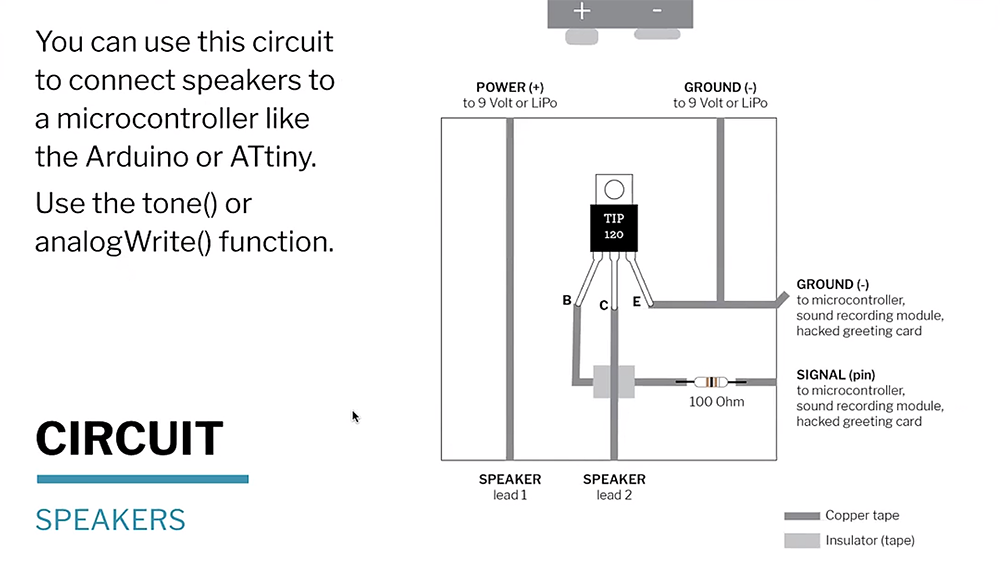
SOUND KNIT
Liza Stark explain to us how it's works. We follow here explaination for making it:
Following my interest for speaker and how is possible to add it on the kniting was still running in mine. Part of previous work here
We was stuck with Marion, Laora and Lauriane lot of time for arriving to understand why we need absolutely 8hms.
U=RI
U = voltage across the resistor, in volts (V). I = current through the resistor, in amperes (A). R = value of the resistance, in Ohm (Ω).
So 8 ohms is an impedance mostly used in loudspeakers of sound system and hi-fi. Depending on your winding you can reach other impedances but the manufacturers have chosen to make speakers with impedances of 4-8-16-32 ohms because it allows to standardize the powers that the amp specs give you. A spec amp often gives its power for a load of 4 or 8 ohms and since all speakers have an impedance multiple of 4 it is simple to calculate the power that the amp will provide in the case of a load at 8 or 16 ohms (2x less for the same voltage). For me I don't see why you would be "obliged" to make a speaker with an impedance of 8 ohms. For example at Devialet in our headset we have designed a 17 ohm speaker.
Thanks Bastien for this explanations.
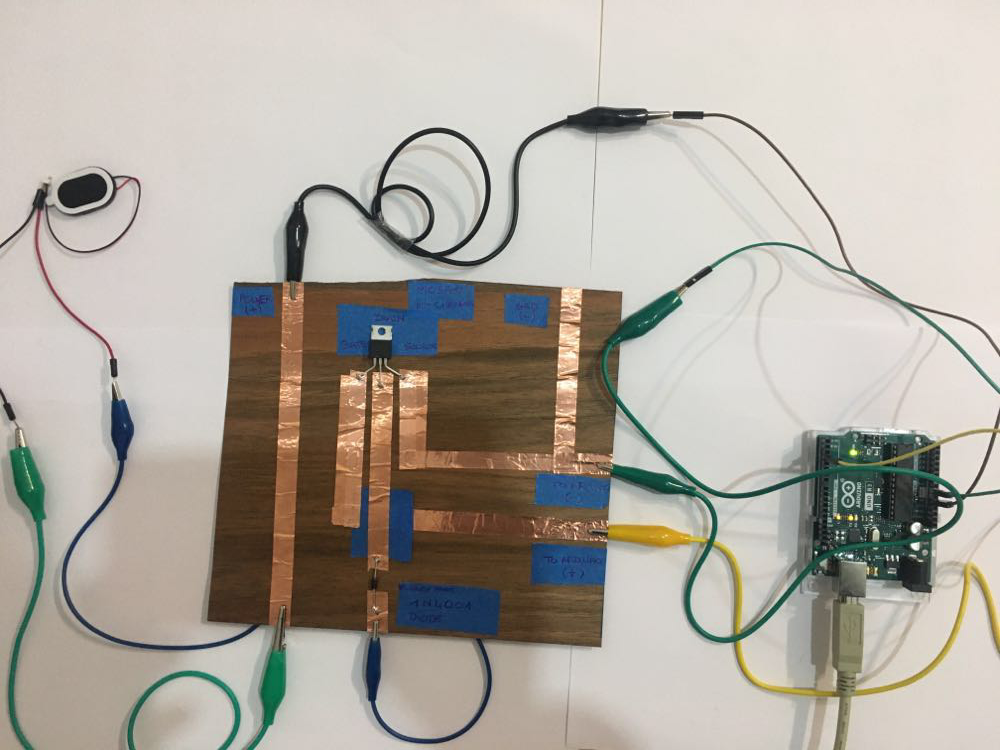
First we try to manage to arriving to make able the circuit with the normal speaker plug to Arduino.
/*
  Imperial March - Star Wars
  Connect a piezo buzzer or speaker to pin 3 or select a new pin.
  More songs available at https://github.com/robsoncouto/arduino-songs

                                              Robson Couto, 2019
*/

#define NOTE_B0  31
#define NOTE_C1  33
#define NOTE_CS1 35
#define NOTE_D1  37
#define NOTE_DS1 39
#define NOTE_E1  41
#define NOTE_F1  44
#define NOTE_FS1 46
#define NOTE_G1  49
#define NOTE_GS1 52
#define NOTE_A1  55
#define NOTE_AS1 58
#define NOTE_B1  62
#define NOTE_C2  65
#define NOTE_CS2 69
#define NOTE_D2  73
#define NOTE_DS2 78
#define NOTE_E2  82
#define NOTE_F2  87
#define NOTE_FS2 93
#define NOTE_G2  98
#define NOTE_GS2 104
#define NOTE_A2  110
#define NOTE_AS2 117
#define NOTE_B2  123
#define NOTE_C3  131
#define NOTE_CS3 139
#define NOTE_D3  147
#define NOTE_DS3 156
#define NOTE_E3  165
#define NOTE_F3  175
#define NOTE_FS3 185
#define NOTE_G3  196
#define NOTE_GS3 208
#define NOTE_A3  220
#define NOTE_AS3 233
#define NOTE_B3  247
#define NOTE_C4  262
#define NOTE_CS4 277
#define NOTE_D4  294
#define NOTE_DS4 311
#define NOTE_E4  330
#define NOTE_F4  349
#define NOTE_FS4 370
#define NOTE_G4  392
#define NOTE_GS4 415
#define NOTE_A4  440
#define NOTE_AS4 466
#define NOTE_B4  494
#define NOTE_C5  523
#define NOTE_CS5 554
#define NOTE_D5  587
#define NOTE_DS5 622
#define NOTE_E5  659
#define NOTE_F5  698
#define NOTE_FS5 740
#define NOTE_G5  784
#define NOTE_GS5 831
#define NOTE_A5  880
#define NOTE_AS5 932
#define NOTE_B5  988
#define NOTE_C6  1047
#define NOTE_CS6 1109
#define NOTE_D6  1175
#define NOTE_DS6 1245
#define NOTE_E6  1319
#define NOTE_F6  1397
#define NOTE_FS6 1480
#define NOTE_G6  1568
#define NOTE_GS6 1661
#define NOTE_A6  1760
#define NOTE_AS6 1865
#define NOTE_B6  1976
#define NOTE_C7  2093
#define NOTE_CS7 2217
#define NOTE_D7  2349
#define NOTE_DS7 2489
#define NOTE_E7  2637
#define NOTE_F7  2794
#define NOTE_FS7 2960
#define NOTE_G7  3136
#define NOTE_GS7 3322
#define NOTE_A7  3520
#define NOTE_AS7 3729
#define NOTE_B7  3951
#define NOTE_C8  4186
#define NOTE_CS8 4435
#define NOTE_D8  4699
#define NOTE_DS8 4978
#define REST      0


// change this to make the song slower or faster
int tempo = 120;

// change this to whichever pin you want to use
int buzzer = 3;

// notes of the moledy followed by the duration.
// a 4 means a quarter note, 8 an eighteenth , 16 sixteenth, so on
// !!negative numbers are used to represent dotted notes,
// so -4 means a dotted quarter note, that is, a quarter plus an eighteenth!!
int melody[] = {

  // Dart Vader theme (Imperial March) - Star wars
  // Score available at https://musescore.com/user/202909/scores/1141521
  // The tenor saxophone part was used

  NOTE_A4,-4, NOTE_A4,-4, NOTE_A4,16, NOTE_A4,16, NOTE_A4,16, NOTE_A4,16, NOTE_F4,8, REST,8,
  NOTE_A4,-4, NOTE_A4,-4, NOTE_A4,16, NOTE_A4,16, NOTE_A4,16, NOTE_A4,16, NOTE_F4,8, REST,8,
  NOTE_A4,4, NOTE_A4,4, NOTE_A4,4, NOTE_F4,-8, NOTE_C5,16,

  NOTE_A4,4, NOTE_F4,-8, NOTE_C5,16, NOTE_A4,2,//4
  NOTE_E5,4, NOTE_E5,4, NOTE_E5,4, NOTE_F5,-8, NOTE_C5,16,
  NOTE_A4,4, NOTE_F4,-8, NOTE_C5,16, NOTE_A4,2,

  NOTE_A5,4, NOTE_A4,-8, NOTE_A4,16, NOTE_A5,4, NOTE_GS5,-8, NOTE_G5,16, //7
  NOTE_DS5,16, NOTE_D5,16, NOTE_DS5,8, REST,8, NOTE_A4,8, NOTE_DS5,4, NOTE_D5,-8, NOTE_CS5,16,

  NOTE_C5,16, NOTE_B4,16, NOTE_C5,16, REST,8, NOTE_F4,8, NOTE_GS4,4, NOTE_F4,-8, NOTE_A4,-16,//9
  NOTE_C5,4, NOTE_A4,-8, NOTE_C5,16, NOTE_E5,2,

  NOTE_A5,4, NOTE_A4,-8, NOTE_A4,16, NOTE_A5,4, NOTE_GS5,-8, NOTE_G5,16, //7
  NOTE_DS5,16, NOTE_D5,16, NOTE_DS5,8, REST,8, NOTE_A4,8, NOTE_DS5,4, NOTE_D5,-8, NOTE_CS5,16,

  NOTE_C5,16, NOTE_B4,16, NOTE_C5,16, REST,8, NOTE_F4,8, NOTE_GS4,4, NOTE_F4,-8, NOTE_A4,-16,//9
  NOTE_A4,4, NOTE_F4,-8, NOTE_C5,16, NOTE_A4,2,

};

// sizeof gives the number of bytes, each int value is composed of two bytes (16 bits)
// there are two values per note (pitch and duration), so for each note there are four bytes
int notes = sizeof(melody) / sizeof(melody[0]) / 2;

// this calculates the duration of a whole note in ms
int wholenote = (60000 * 4) / tempo;

int divider = 0, noteDuration = 0;

void setup() {
  // iterate over the notes of the melody.
  // Remember, the array is twice the number of notes (notes + durations)
  for (int thisNote = 0; thisNote < notes * 2; thisNote = thisNote + 2) {

    // calculates the duration of each note
    divider = melody[thisNote + 1];
    if (divider > 0) {
      // regular note, just proceed
      noteDuration = (wholenote) / divider;
    } else if (divider < 0) {
      // dotted notes are represented with negative durations!!
      noteDuration = (wholenote) / abs(divider);
      noteDuration *= 1.5; // increases the duration in half for dotted notes
    }

    // we only play the note for 90% of the duration, leaving 10% as a pause
    tone(buzzer, melody[thisNote], noteDuration*0.9);

    // Wait for the specief duration before playing the next note.
    delay(noteDuration);

    // stop the waveform generation before the next note.
    noTone(buzzer);
  }
}

void loop() {
  // no need to repeat the melody.
}
In parallel we spoke a lot about 8 Ohms for speakers. After a day bloqued with this and trying to measure some part of conductive fabric and for desperately tring to find 8 ohms. We just decided with Lauriane Beaumont to try to have some knit square something randomly.
And it's working !
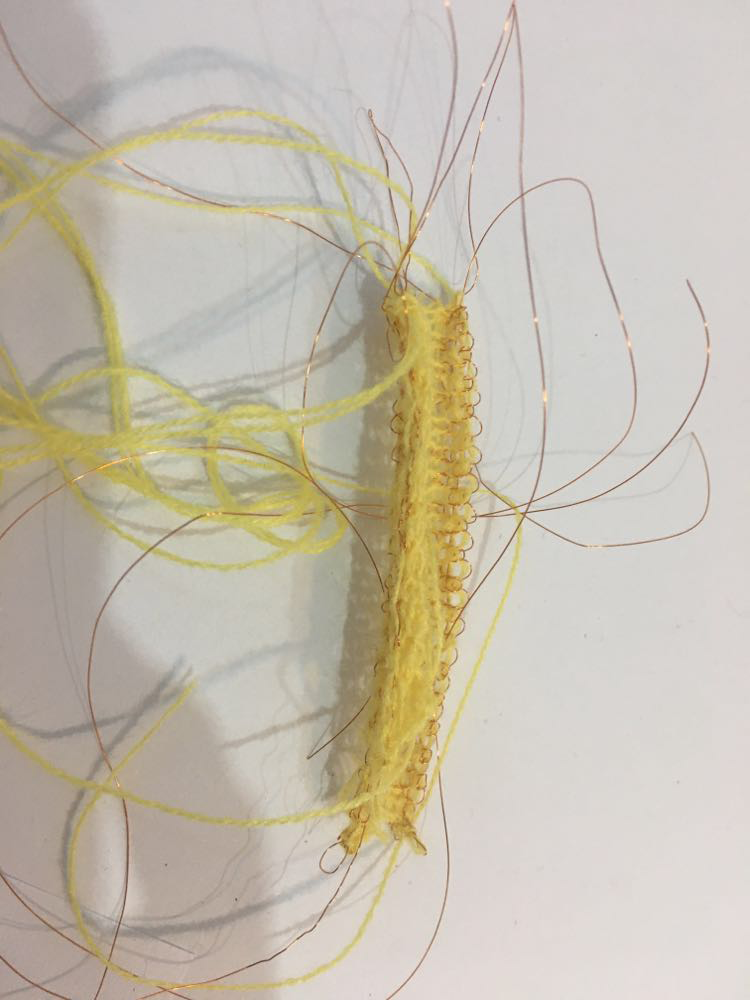
Lauriane Beaumont knit by hand. This test use conductive cable with a sheath.
We use the same circuit and just adding our part of knitting. For this example we have : - 0,5 Ohms = part of knitting - 9 V battery
Some test with conductive thread with knitting machine. Was not really succesfull.