WEEK 06 : BioFabricating Materials
About bioplastics
Quote from Cecilia Raspanti's course : "When synthetics seems to inevitably leak into the environment, we look at nature, we start to listen and learn a forgotten language.
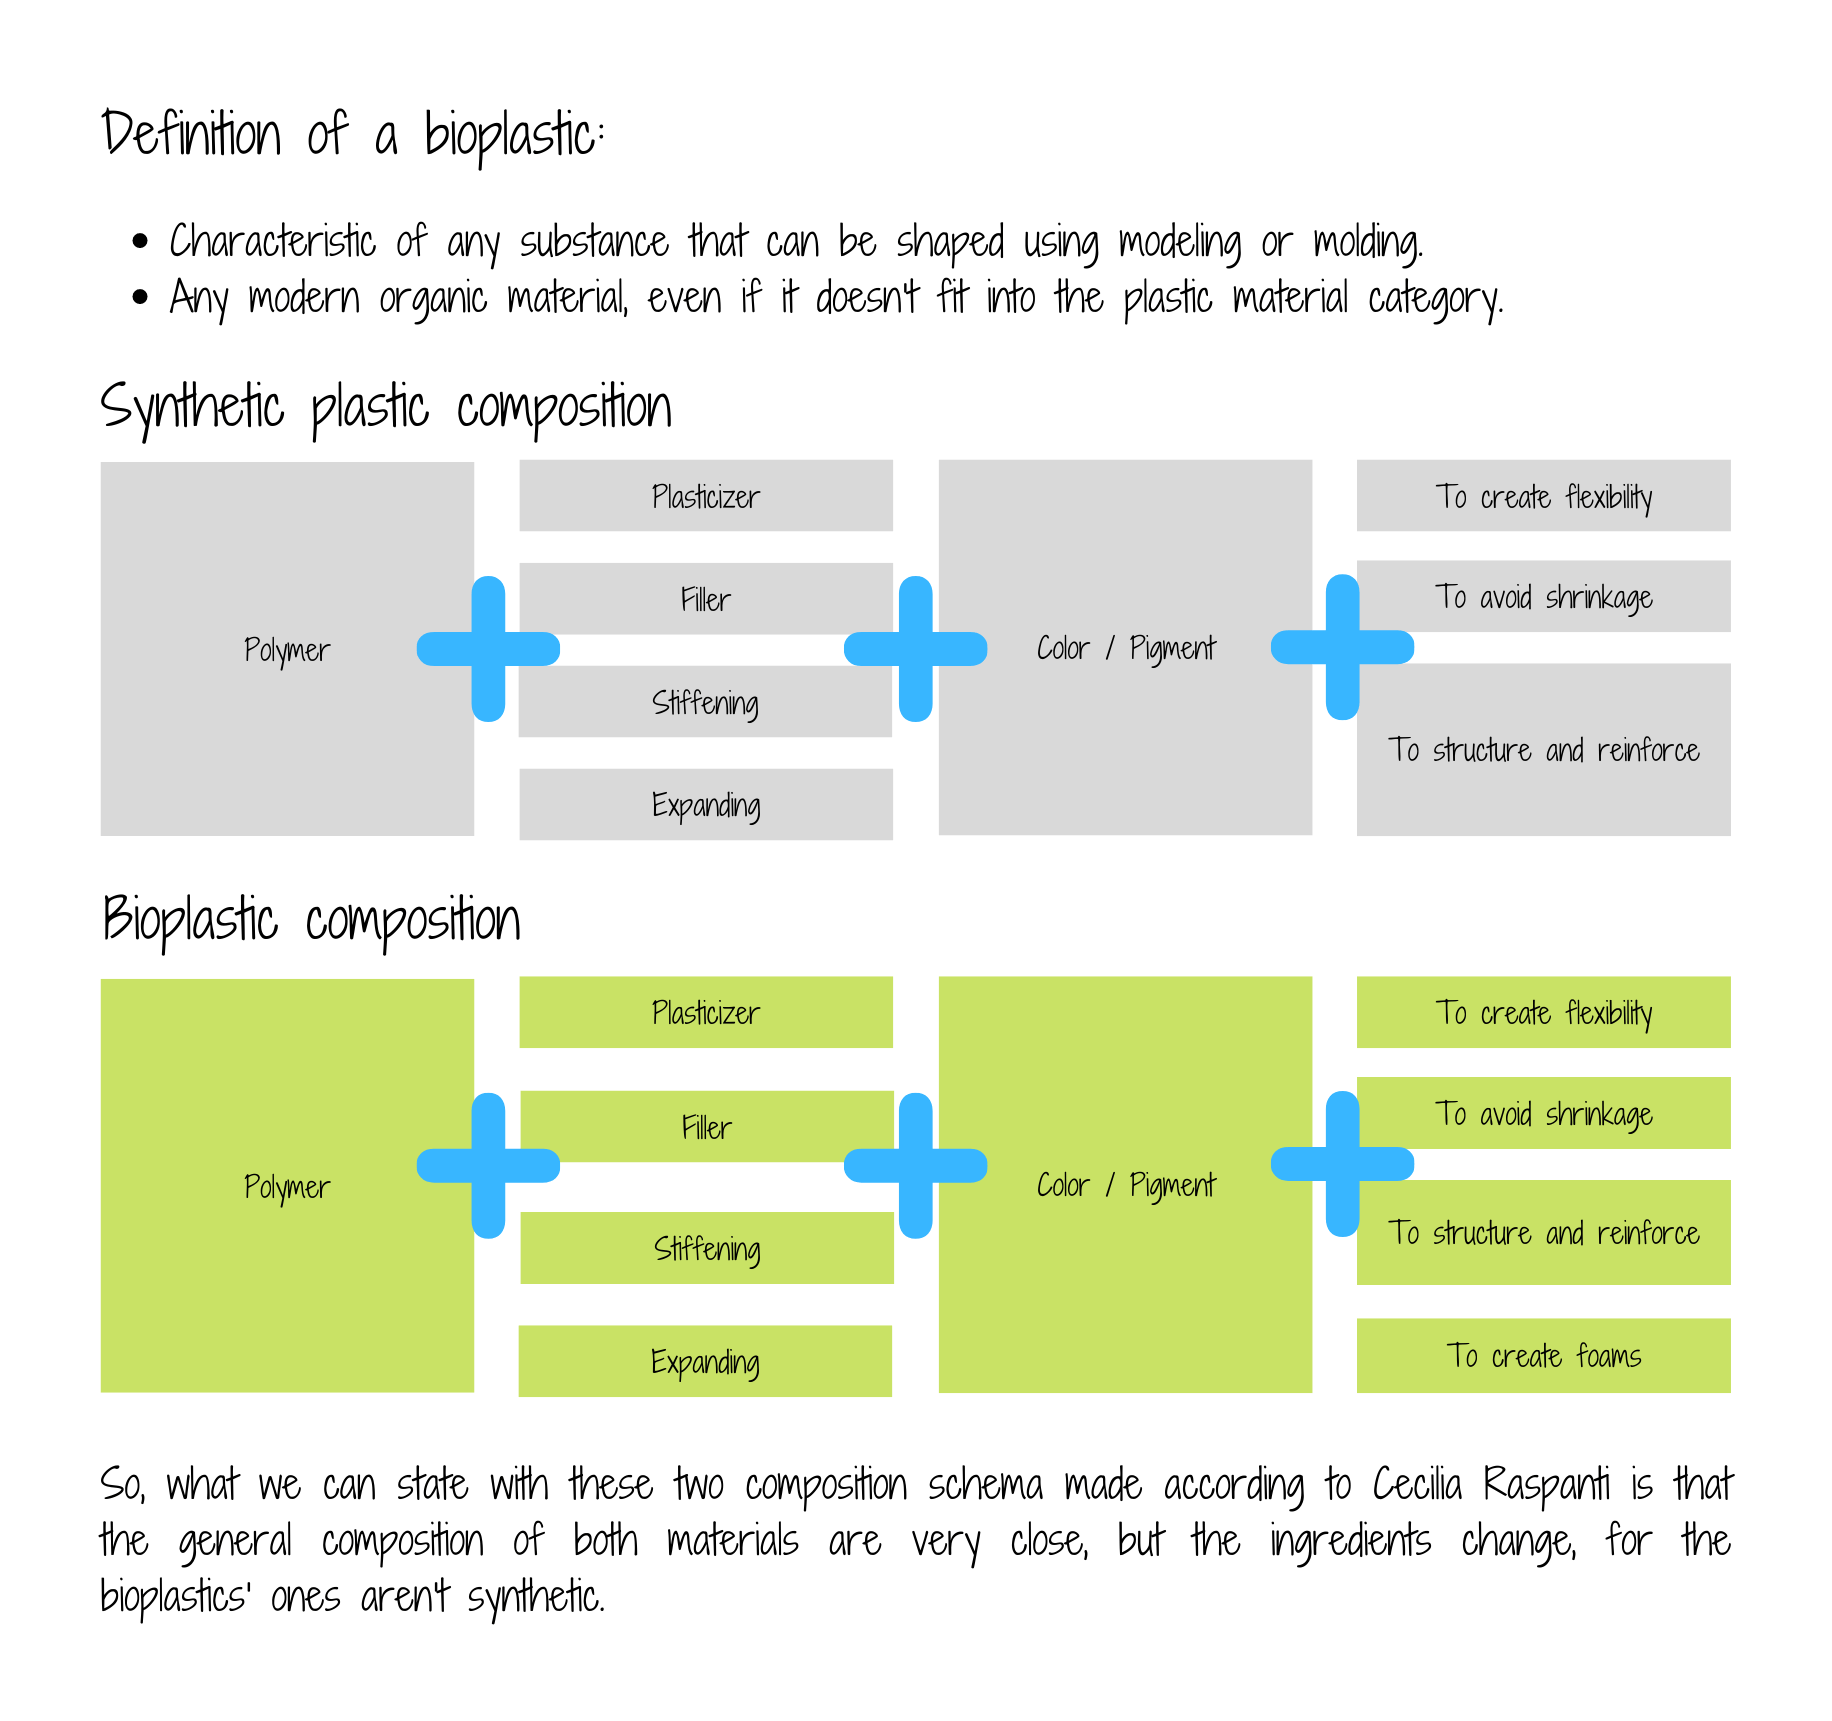
Different recipes and ingredients
Alginate
Alginate is extracted from a type of algae, mostly brown seaweed, or Laminaria. It is a biopolymer that can be used in medical matters, for instance when encapsulating medicine.
Agar agar
"Agar is a biopolymer made from agarose and agaropectin found in the cell walls of red algae from the phylum Rhodophyta. The agarose is released and the molecular bonds are able to be released and realigned to create the biomaterial through heating and boiling."
From the Bioplastic Cookbook for Ritual Healing from Petrochemical Landscapes, Tiare Ribeaux
Gelatin
"Gelatin is a biopolymer derived from pig collagen that is typically a waste product from the food industry. Gelatin biopolymers are made of polymer chains of amino acid monomers.
When Gelatin bioplastics are dry and especially when the are exposed to the sun, they often get quite brittle. Even when adding more glycerol to the recipe, it is still one of the stiffer bioplastics to work with. Use them for alternative packaging, create a folder or envelope, use them to replace stiff plastic materials your might use in your daily life. Heat them or wet them to shape them over forms or molds.
Optional: Combine Gelatin powder with Agar powder to make a more flexible/hybrid material."
From the Bioplastic Cookbook for Ritual Healing from Petrochemical Landscapes, Tiare Ribeaux
Inspirations
“There is no research project that does not produce results. It is always researchers who do not produce results.” ― Qizhi Chen, Biomaterials: A Basic Introduction
To me, this is the case for everything we try.
Miriam Ribul

Recipes for material activism
Word to remember
"Re-appropriation : reclaiming control over common and immediate items to fully explore their potential leads to re-apprOpriated of familiar processes for alternative uses."
Diana Scherer
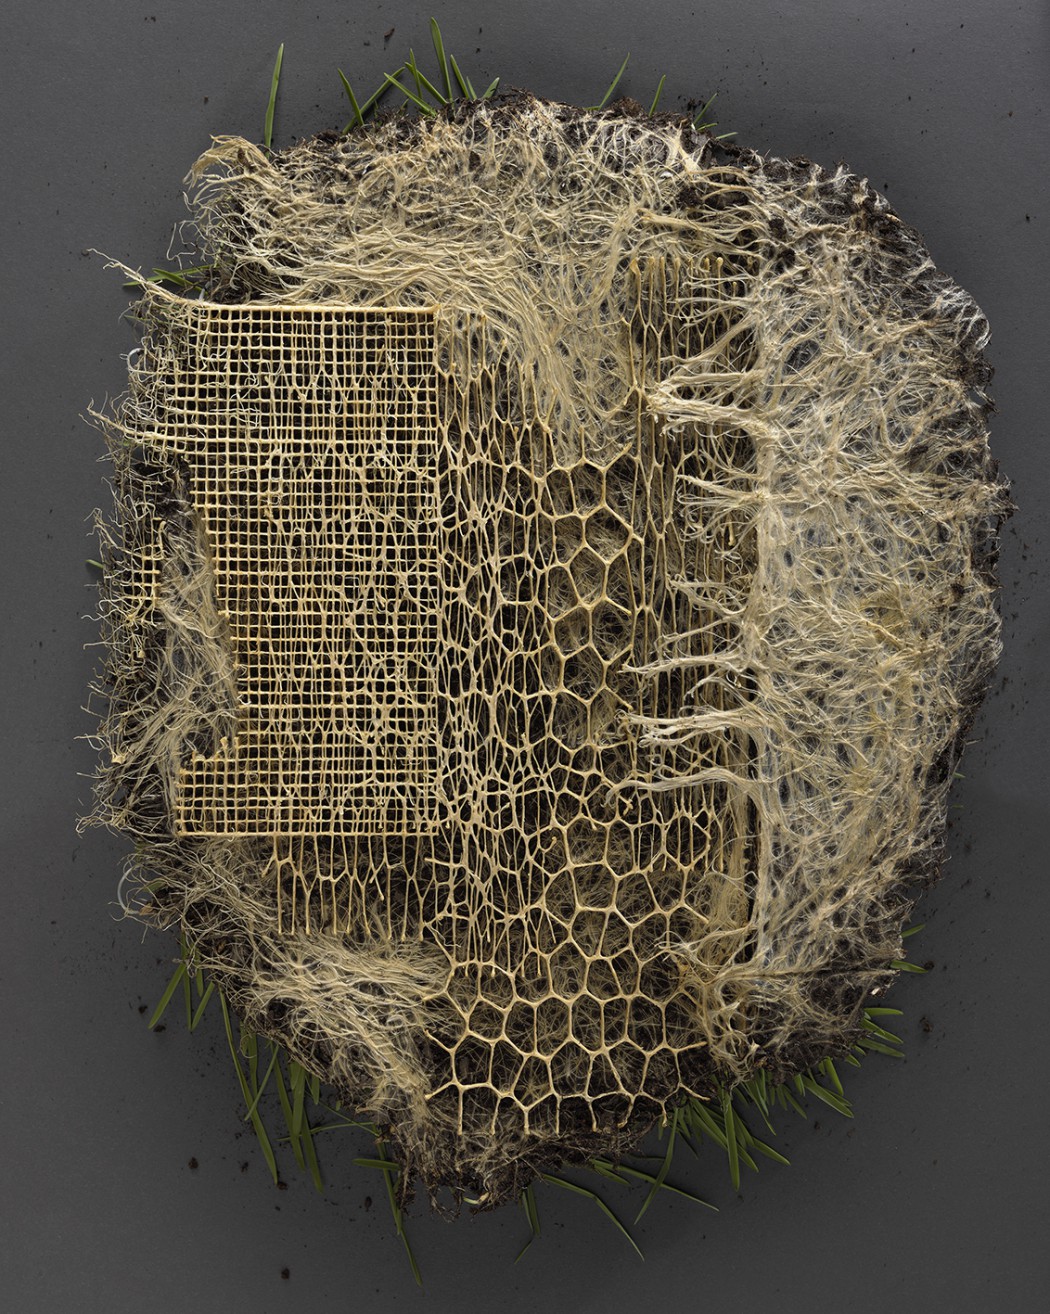
I already knew her work that I find particularly stunning.
This is an example of how to cope with nature to create piece of designed crafted art.
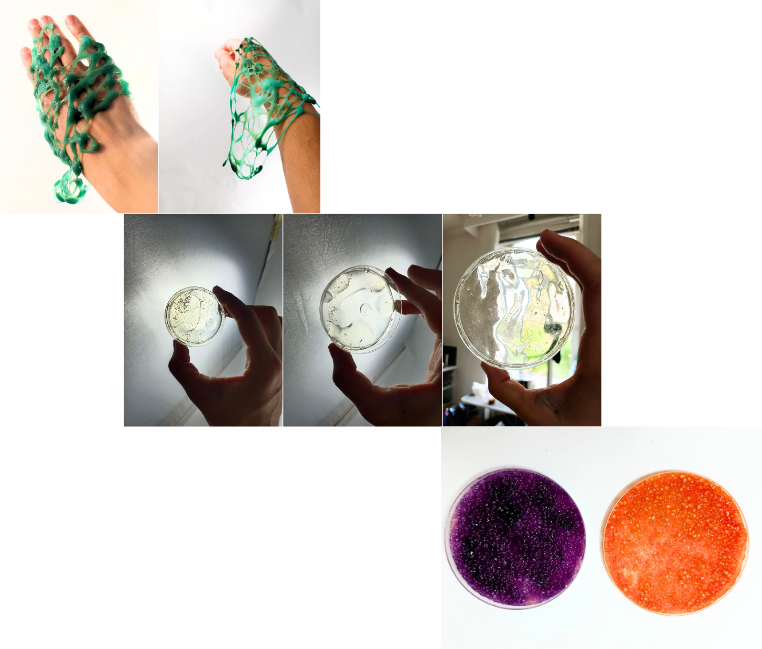
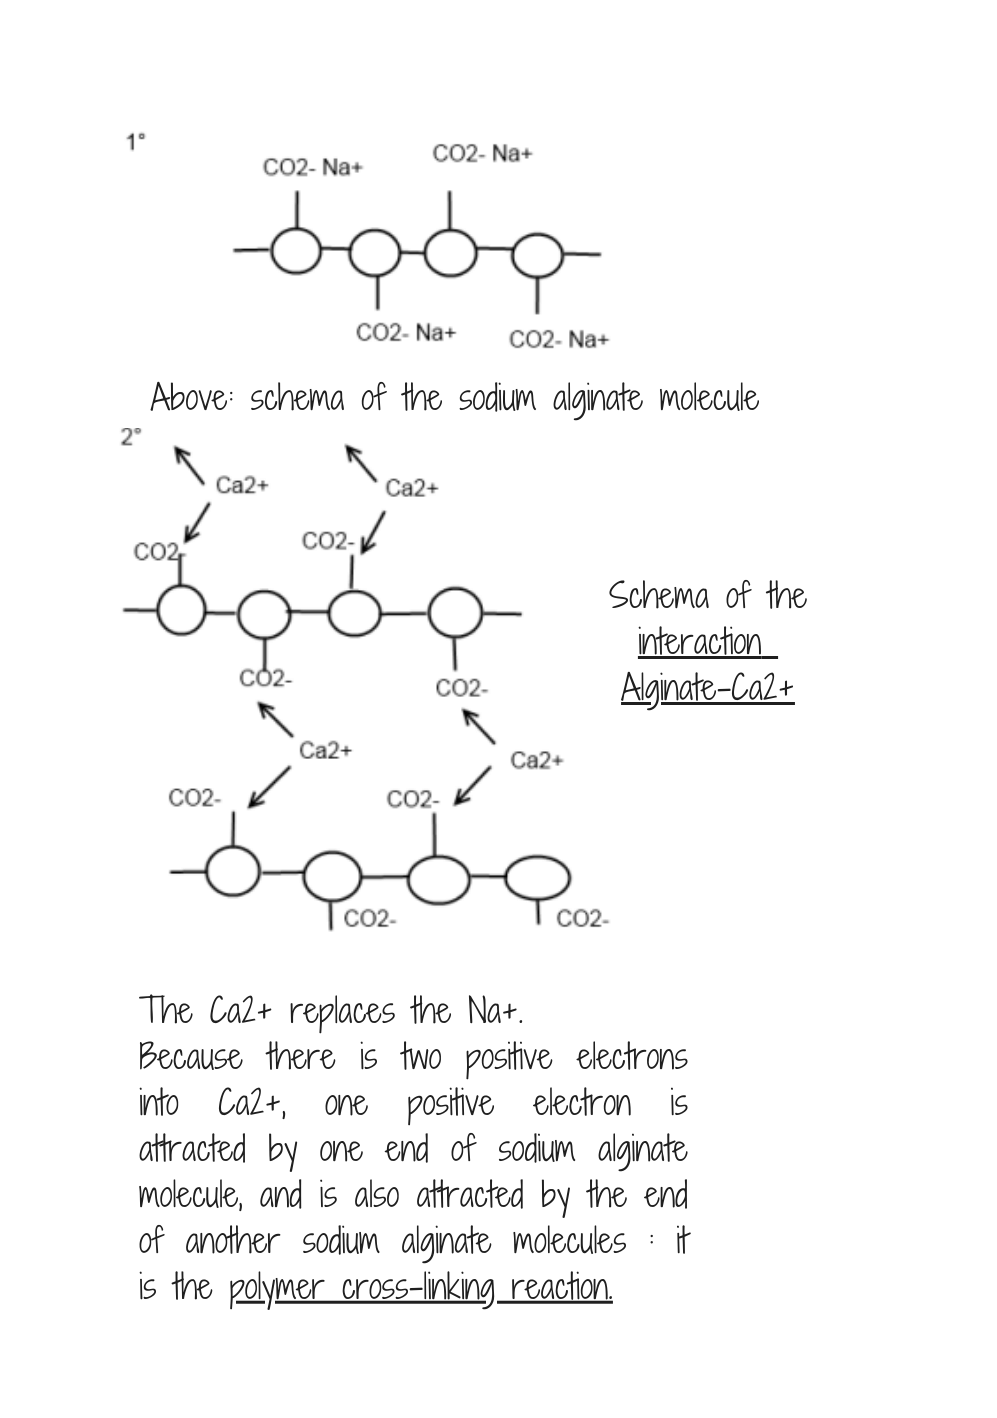
Alginate bioplastic process: so fascinating!
About Alginate bioplastic recipes
Once dipped in calcium chloricde, becomes waterproof.
Good heat resistance.
* Alginate | 12 grams
* Glycerol | 20mL
* Water | 400mL
* Oil | 10 grams
Process:
1. Put every ingredients into a high beaker (plastic or glass, both are okay.)
2. Use a hand blender to blend all the ingredients. Without it, you will have troubles not getting any clumps.
- Let the bubbles come to the surface (let it on the side during 3 or more hours.).
- Extrude the alginate mixture into calcium chloride (video)
How does it work?
Conductive bio-material
As we were just ending the E-textile week (and that we were still very excited about it), some of us decided to pursue our researches about conductivity by starting with a conductive Agar biomaterial recipe, and modifying it in order to add new materials to the list we had during the Week 05.
A running idea
This week, I would like to explore the conductivity of the biomaterials we are going to create, in order to be able to make a circuit completely out of biomaterials.
Conductive test 1: Conductive Agar Ag03
Created by Elisabeth Lorenzi
You can find this recipe here
About agar agar bioplastic recipes
Not very heat resistant
Not really stretchy
With gelatin, it can become thicker
* Agar Agar | 2 grams
* Glycerol | 1mL
* Water | 210mL
* Salt | 5 grams
* In a pot, mix the agar agar, glycerol and a little bit of water together.
* Add the rest of the water, and while stirring, heat it up to 95°C (make sure it doesn't boil).
* Add the salt and keep on stirring. Let it cool a little and pour it in a mold. Let it cool completely ; it will dry. (it takes between some days and a week.)
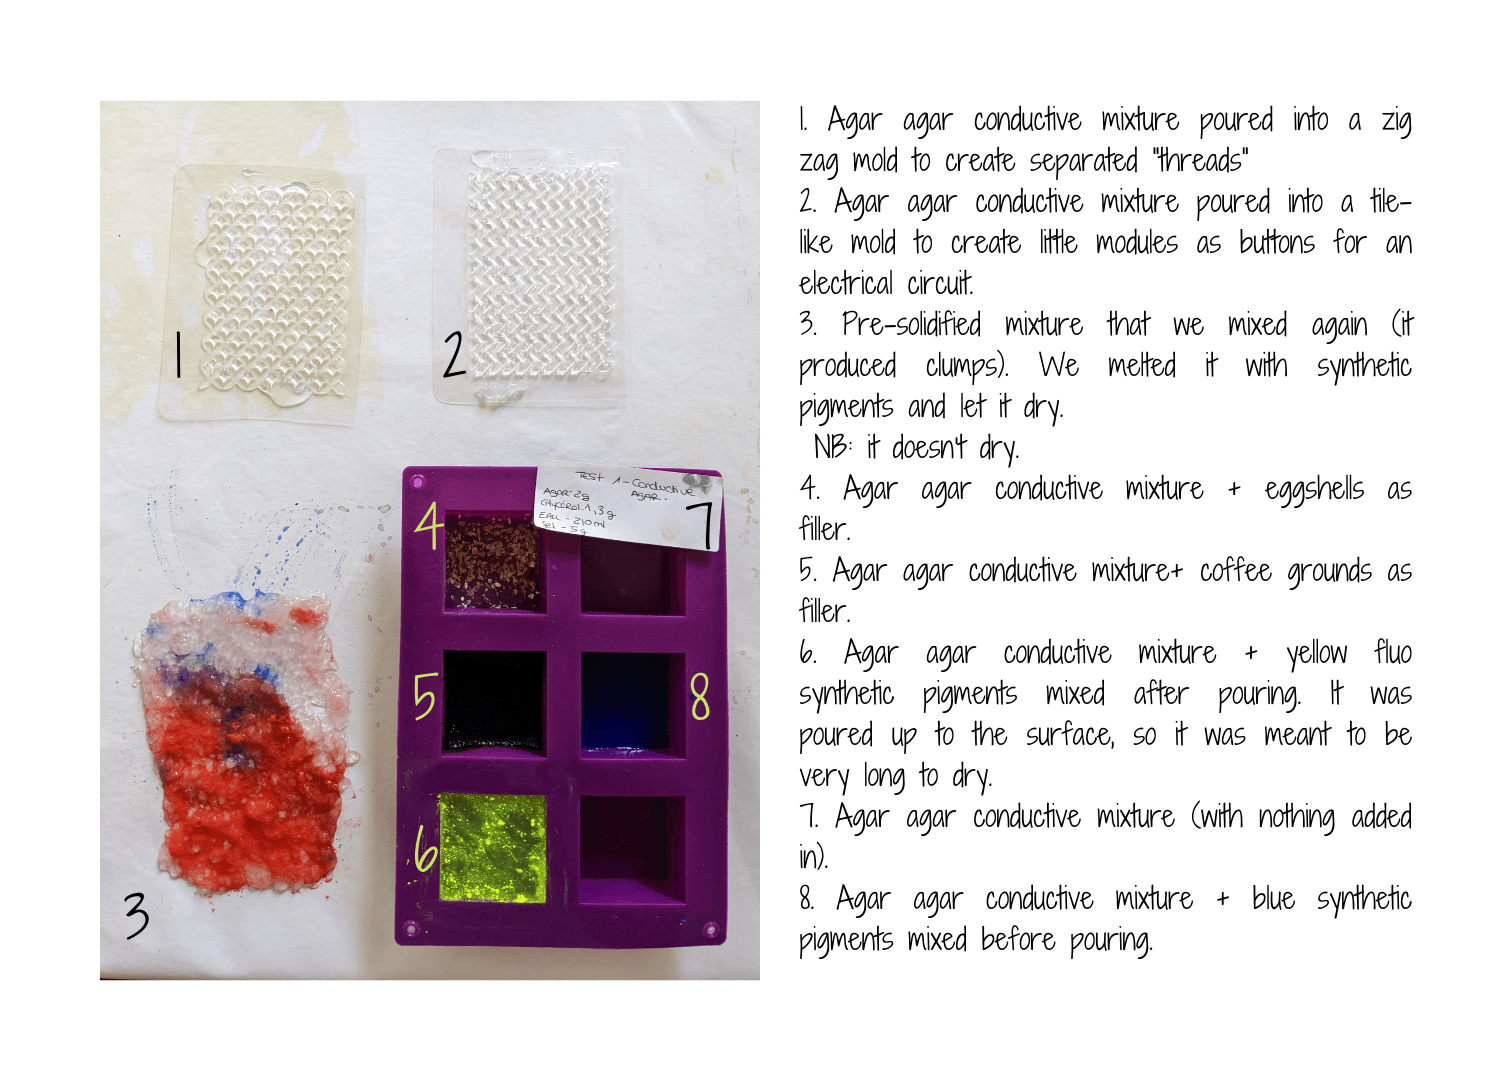
So, the main difference with an agar-based non conductive biomaterial is the salt.
If your biomaterial looses its conductive properties, rub it with water.
Well, a bit of physics:
So, related to the first test we did, I wanted to understand what was the role of salt in this.
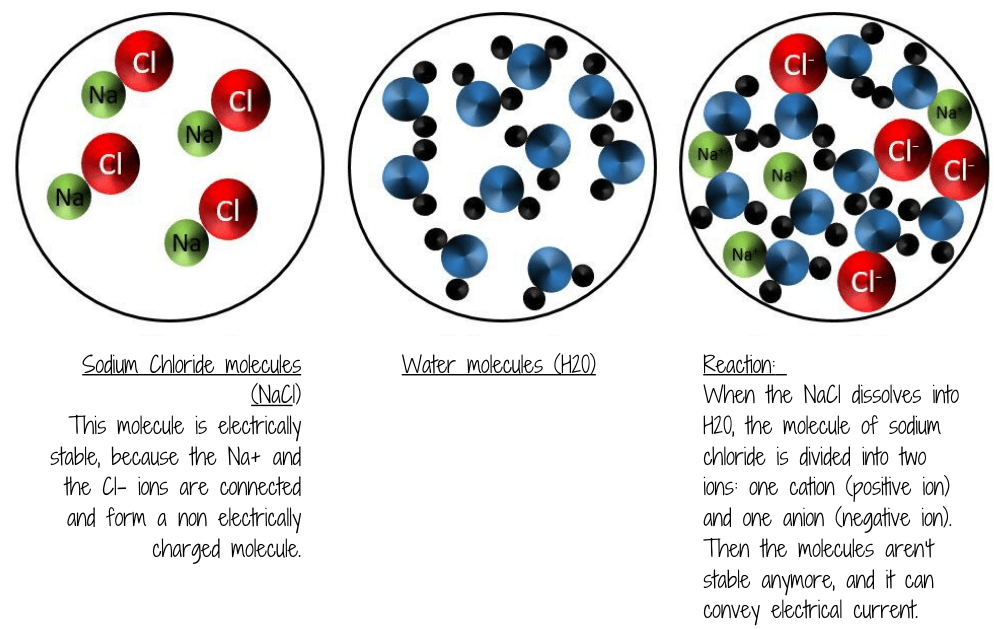
The main question was: Why does my cooking salt (sodium chloride) become conductive??
Why does salt have a high conductivity?
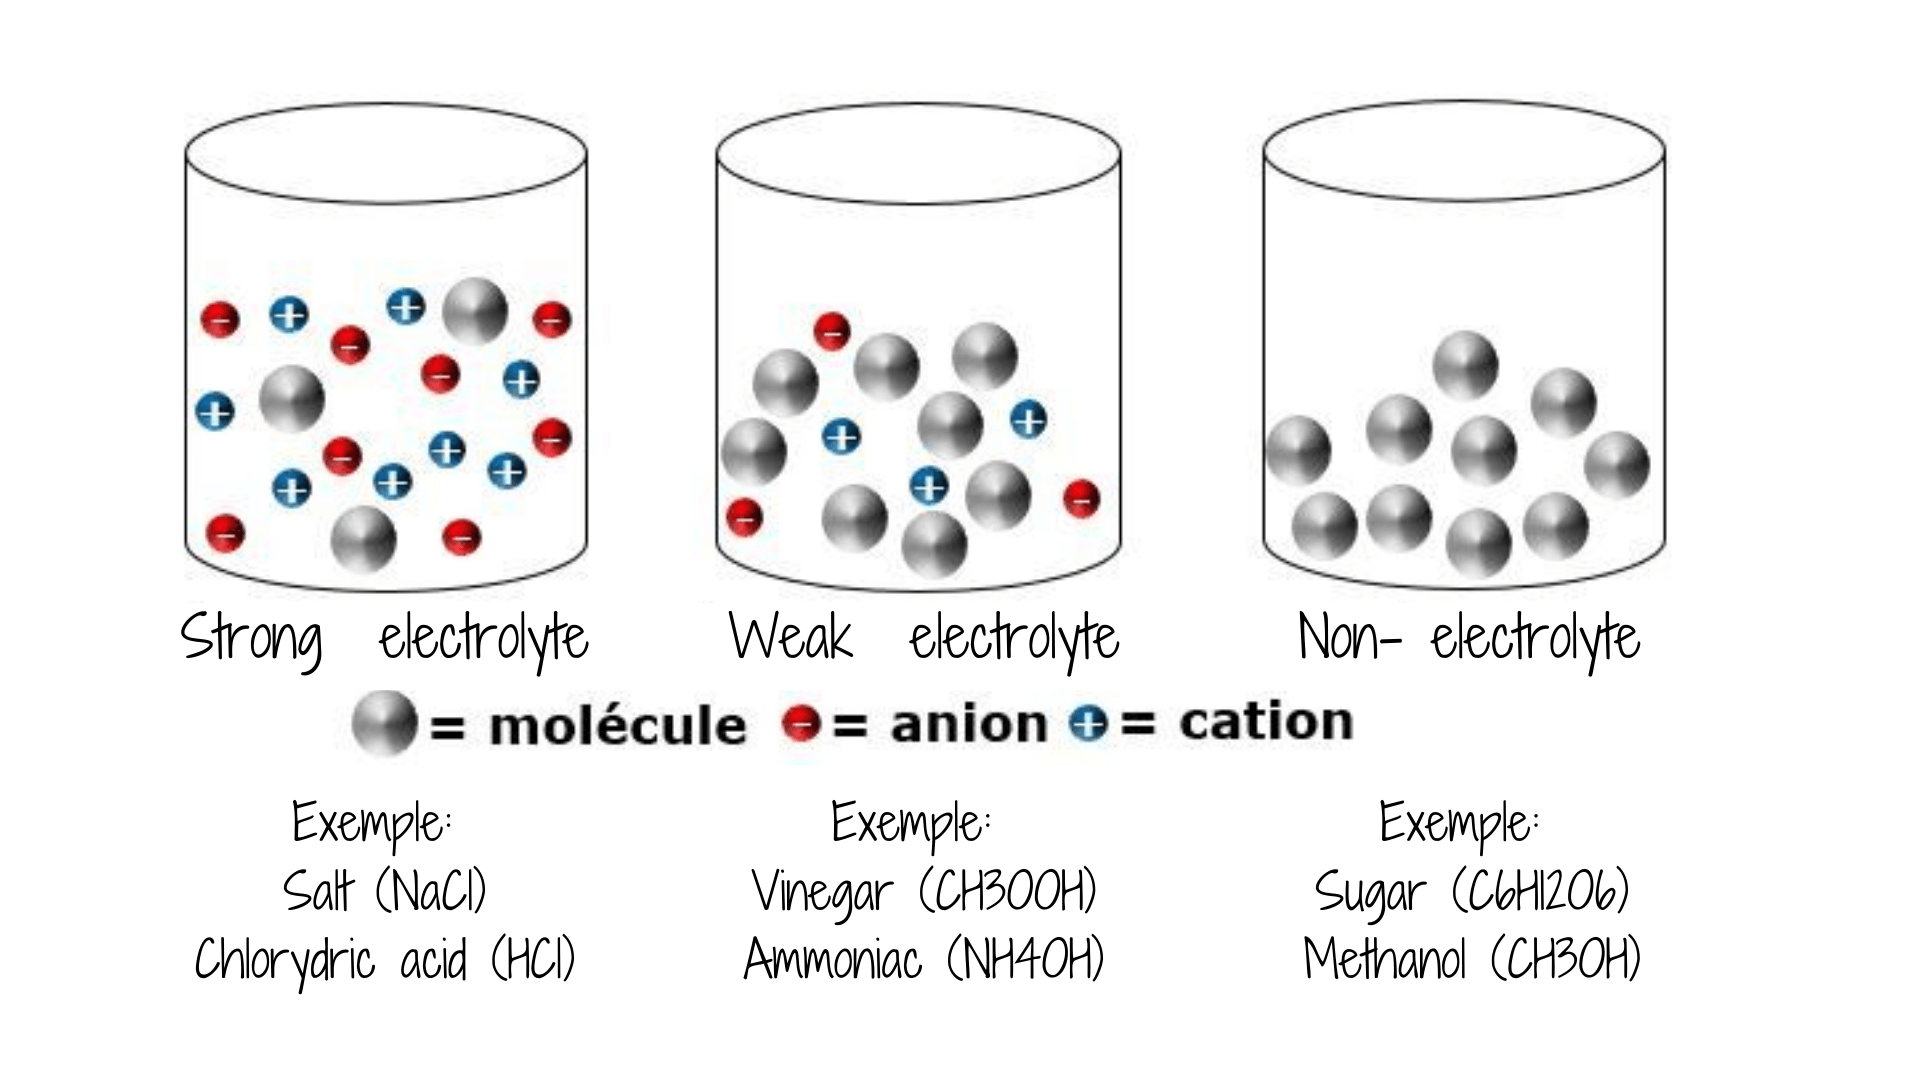
We commonly think about salt as consisting of sodium chloride (NaCl) which is common, or table, salt. But chemists define “salts” as any compound that, when dissolved in water, releases a positively charged cation and a negatively charged anion. These ions are what can conduct the electricity.
Sodium chloride is an ionic compound.
What could we use to create a conductive solution?
Next test was to create a conductive thread out of BUT alginate recipes are always done while all components are cold (you don't heat them), so dissolve the salt in water was more difficult.
Conductive test 2: Alginate + salt (conductive thread attempt 1)
* Alginate | 12 grams
* Glycerol | 20mL
* Water | 400mL
* Oil | 10 grams
* Salt | 5 grams
The reaction that happened between the salted water and the alginate made the general texture less fluid. It was a bit more complicated to create a thread, but we could create bigger shapes that were meant to be buttons.
Conductive test 3 : Alginate + graphite (conductive thread attempt)
During the previous week, we experimented in order to create a homemade conductive ink. We discovered that the ink made with graphite was conductive. That is why we decided to re-test it with biomaterials.
* Alginate | 12 grams
* Glycerol | 20mL
* Water | 400mL
* Oil | 10 grams
* Graphite | 5grams
From the alginate recipe above, take 60g.
Add 3g of graphite in the mixture.
With a syringe (diameter 2mm approximatly), we extruded the mixture.
Beware of the bubbles!
In order to create a continuous thread (that you'll be able to hand sew after, make sure that you don't have any bubble in your syringe.)

Extrusion
Testing the conductivity
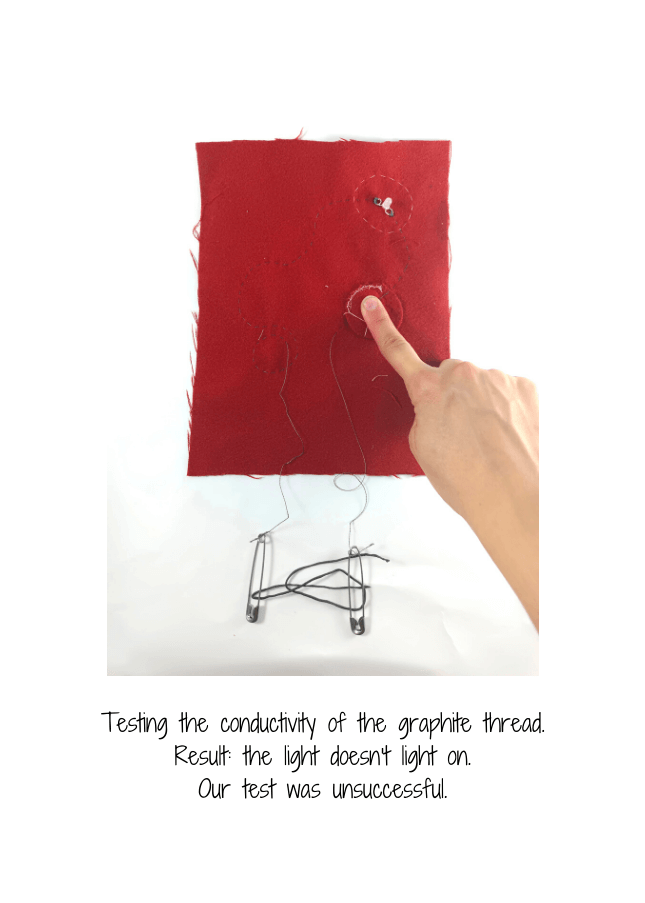
Breaking the molecules?
The reaction that happens with the salt is a reaction that produces conductivity. Maybe we should try and find some ways to degrade molecules in order to create this conductivity. Maybe the reaction between the graphite and the calcium chloride wasn't good for conductivity.
Well, this didn't work, but lets move on to something else!!!
Test 4 : Bioplastic Garden of Eden
Last year, Surzhana made a jacket with wool integrated into some biomaterial.
We loved this idea, and wanted to explore this path.
Our goal : Grow plants onto biomaterials
* Alginate | 12 grams
* Glycerol | 20mL
* Water | 400mL
* Oil | 10 grams
- Make the alginate recipe (non-conductive).
- Add some egg shells
- Add some coffee grounds
- Add some spiruline
These components are the "feeders" for the plants to be. (They bring some minerals into the bioplastic which is the base of our garden).
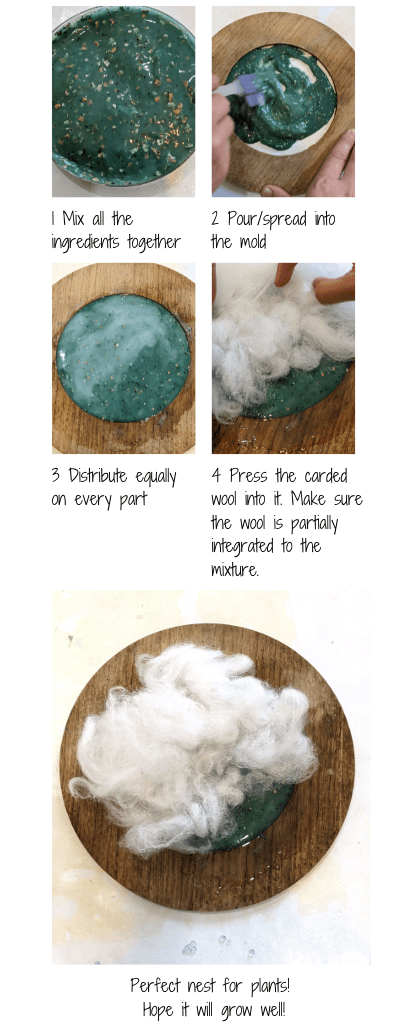
- Spray some calcium chloride (10%) onto the biomaterial (and wool).
- Wait for it to be dry.
In some Petri dish, sow some plants, in order to let them grow out of the garden at first.

When you tend to get young shoots, you can put them into your little garden.
The hypothesis
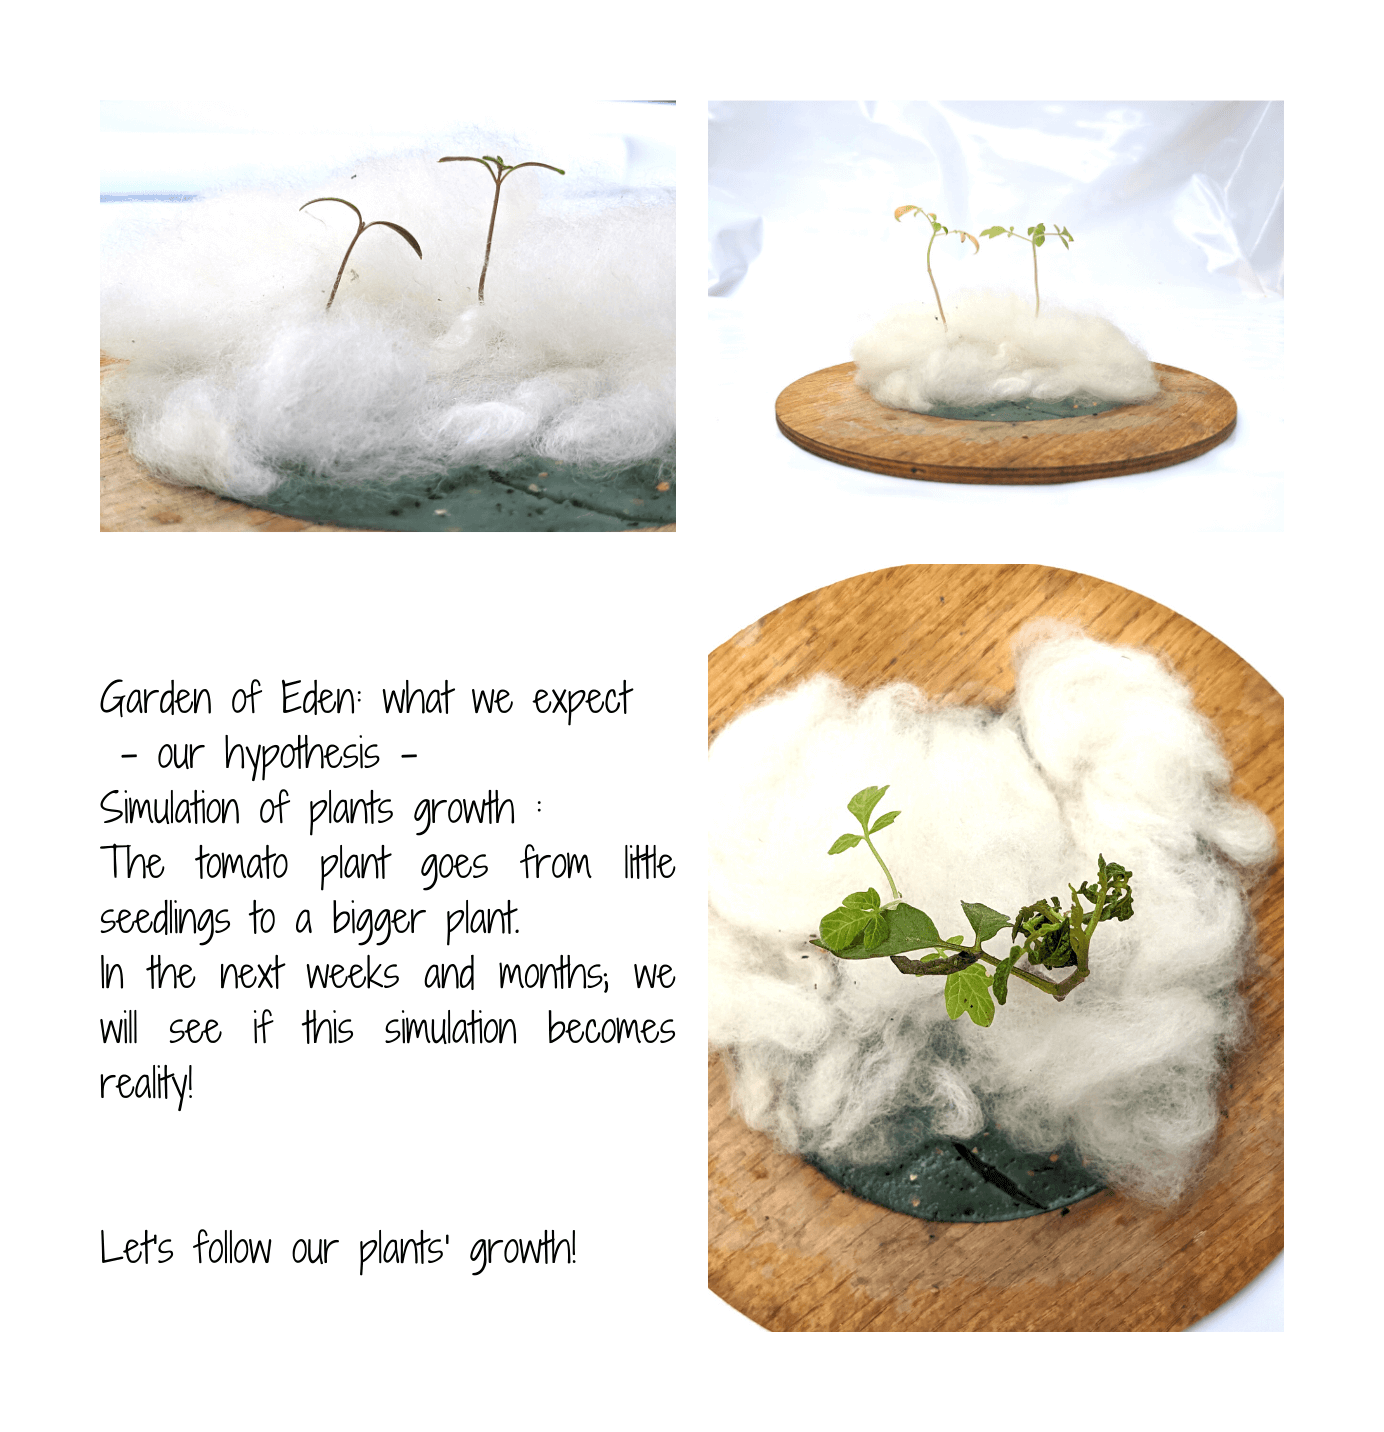
Unfornatunately, this attempt couldn't be made to the point of success, because it got moldy. We had to throw it into the bin.
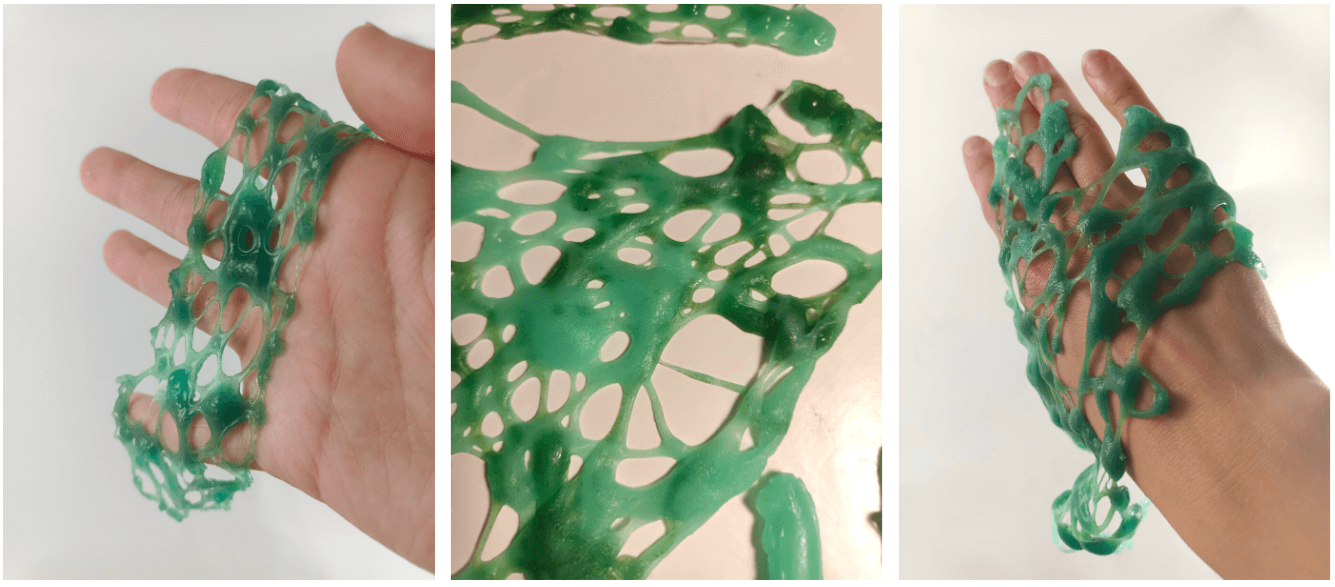
Test 5: Unwoven thready biomaterial
Bicolor alginate threads: create the recipe of the alginate with the following quantities of ingredients:
* Alginate | 12 grams
* Glycerol | 20mL
* Water | 400mL
* Oil | 10 grams
===
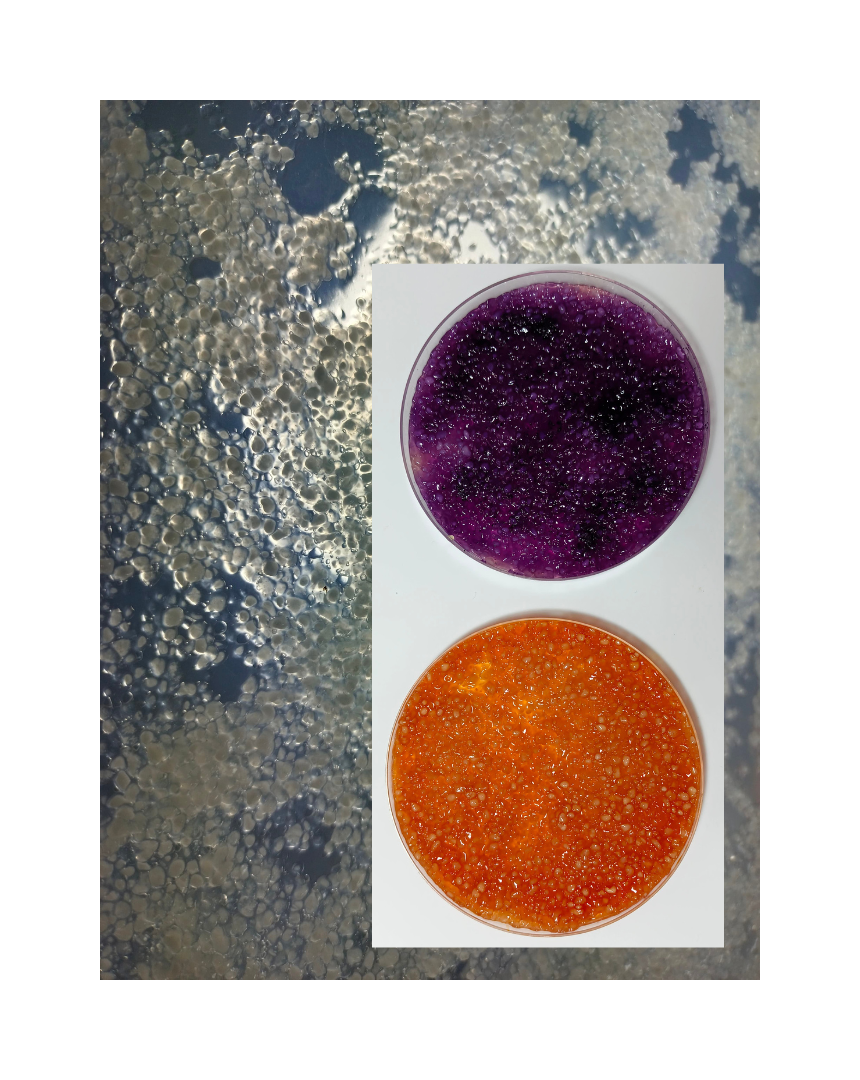
Then, separate your unpigmented mixture in two.
Add the amount of pigments you want in it. I added spiruline and turquoise bleu.
Mix it well.
Time for extrusion
What you will need:

I prepared my alginate the day before extruding it.
Let the bubbles come to the surface during some hours.
I left it on the side for the night.
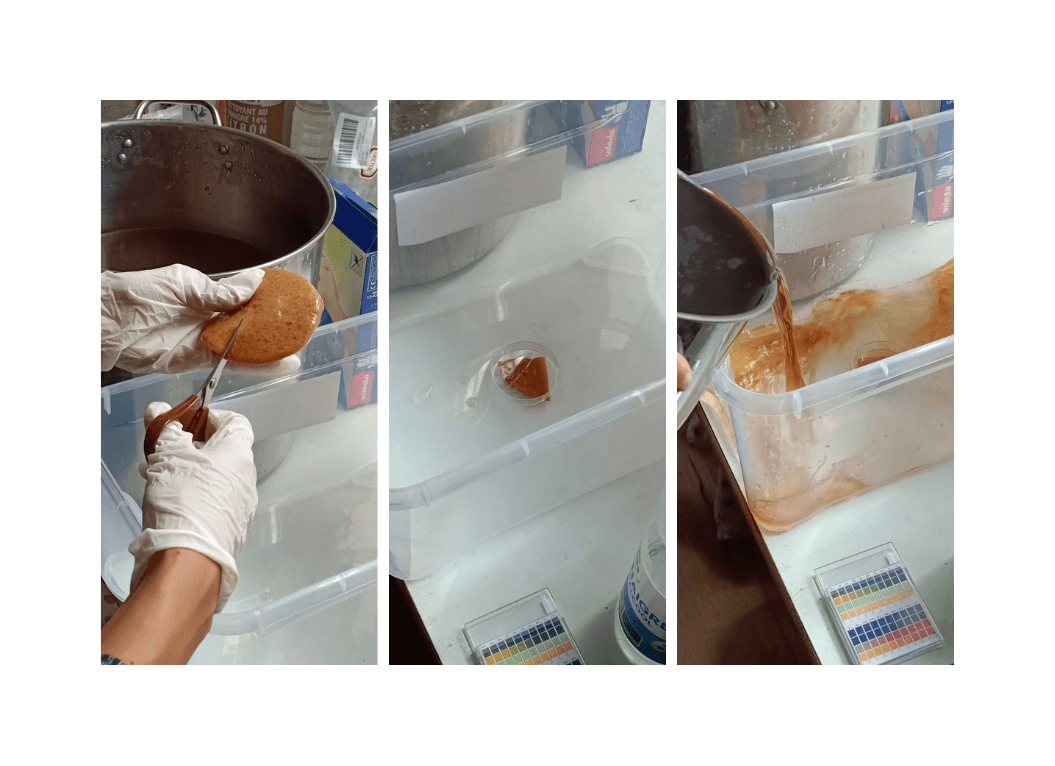
Test 6 : Tanning some fish skin
In LeTextileLab, we had some fish skins (salmon and trout) which were already washed and prepared for the tanning process. It was the opportunity for us to discover the process of tanning skin.
Thursday, during a crep time, we watched some videos about tanning fish skin.
Here is a video entitled "Tannage expérimental d’une peau de poisson" ("Experimental tanning of fish skin") by Technologies Autochtones. It is in french, you can turn the subtitles on!
So, the process we decided to go with:
* Engallage of the skin (with tannic solution : same recipe as for the natural dyeing process, see [here](https://class.textile-academy.org/2023/laora-guillerm/assignments/week04/#mordanting))
* Loosen the skin by massaging it for a long time with a preparation (recipe on the side)
* Loosen it by rubbing it on a piece of wood.
* Rinse it with clear water
* 1 egg yolk
* 5g of sunflower oil
* 5g of Marseille's soap
Contraction of the fish skin and shrinkening
When we put the fish skin into the tannic water , it shrinkened a lot, due to the huge difference of temperature between the room temperature and the tannic solution (up to 70°C). Moreover, it appeared that the fish skin was violently reacting to water: when rinsing, it was reshrinkening, and from flexibility gained with the massaging time, it became rigid.
Considering the issue mentionned above, Marion and Amandine decided to do another attempt.
The tanning part was made into room temperature water (25°C approximately), and was pinned onto a piece of composite wood (some material that won't rot because of moist.)
Test 7 : Gelatin as glass
Camille, when working with cornstarch bioplastic (and putting it into a dryer), she obtained some little waves on the surface of her sample. I was really intrigued by this, and I realized that I could work with the quick surfacial dry of some biomaterials to create texture on the surface of the samples.
I wanted to control the process, so I used a hairdryer to solidify it and control the solification of it. There is still a bit of randomness in this process, but it adds to the excitement when creating it.
* Gelatin | 24 grams
* Glycerol | 4grams
* Water | 120mL
* Weight every ingredients.
* Heat the water, then pour the ingredients in it and melt them.
* Beware to stay in a **temperature between 60°C and 80°C. Stir slowly to avoid bubbles.
* Keep an eye on the mixture until it reaches a sirup texture. It is the maximum evaporation you can reach. Don't let it too long on the plate, otherwise it will solidify into your pan!
* Pour in a mold or on a surface.
As I liked the result a lot, I made a rectangular bigger sample.
But, after drying, the round sample has molded!
Test 8 : Light and tapioca
Again, about light, I wanted to experiment a recipe with tapioca, because the expected result has a specific texture that I find interesting.
* Tapioca beads | 60 grams
* Vinegar | 10mL
* Water | 120mL
* Weight every ingredients.
* Pour all the ingredients in the pan before heating with medium head.
* Stir slowly until every ingredients melt. The tapioca must also melt and the mixture will get thicker.
* When the mixture reaches a thick and sticky texture, take it off the heat.
* Pour rapidly in a mold or on a surface.
* Let it dry.
Since we did'nt put any glycerine in it, the result is very hard and may break, it is fragile.
Test 9 : Clementine "lace"
This is the beginning of the clementine season !!
All the team of LeTextileLab helped me to create this visually appealing biomaterial.
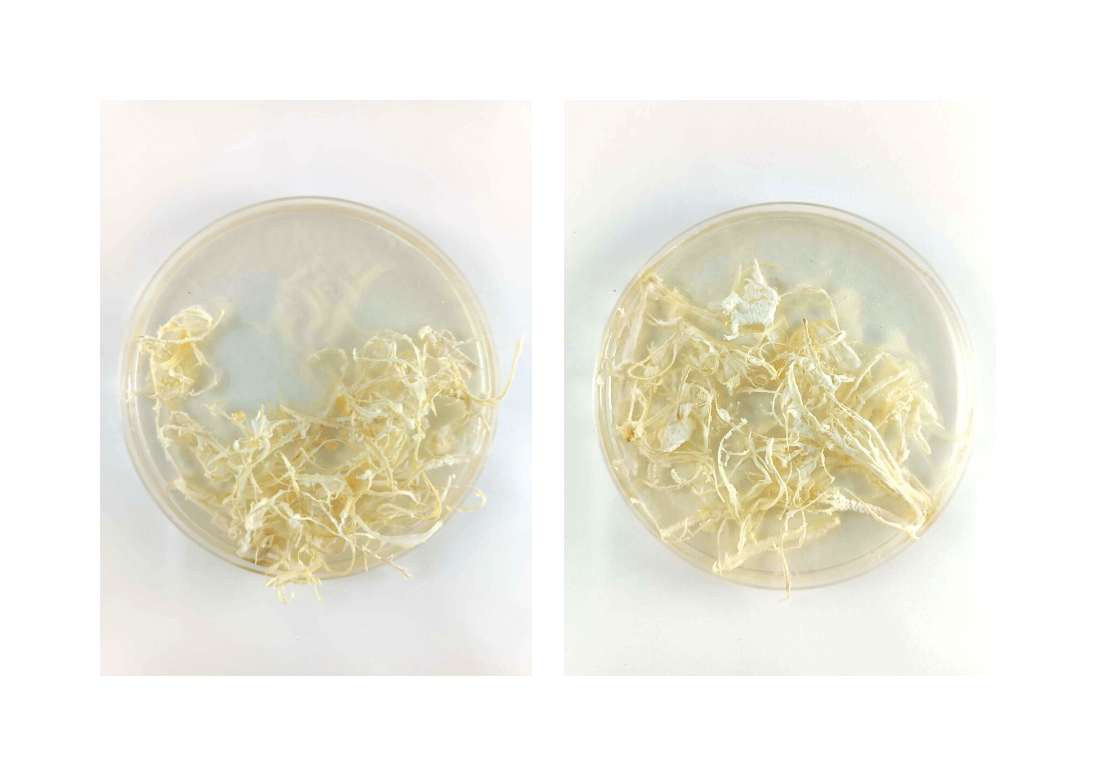
I needed the little filaments that you can find on the inner part of the clementine peels. So I brought clementines to the lab, and everyone, after peeling and eating one of them, was taking the filaments out of the peels, and was collecting it in a pot.
I could integrate them into unpigmented gelatin, because I wanted light to go through it and reveal the finesse of these filaments.
It was king of a child game brought to another level. I've always liked making some lace with clementine filaments, just for fun, and this attempt was a way to use it in another way!
I was also thinking about the work of a friend of mine, Loreline Simon, who used clementine into embroideries.
Very important step : let it dry a lot!
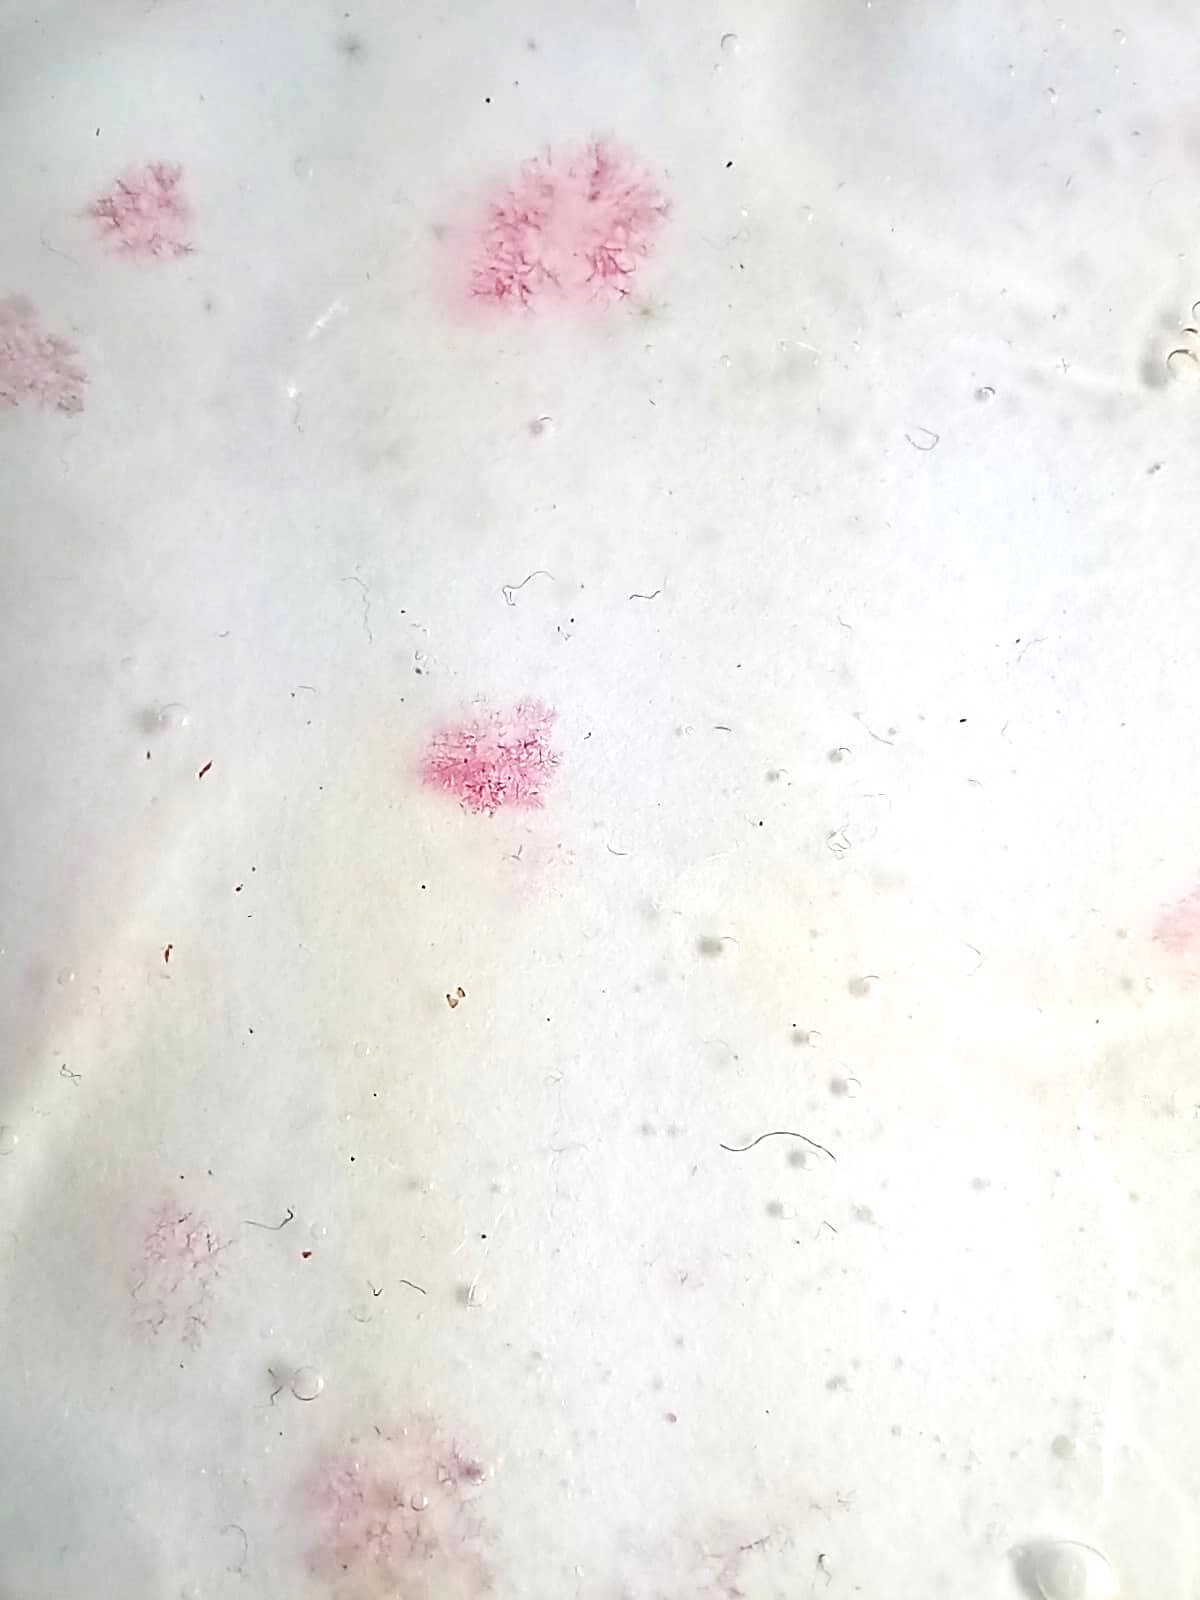
The problem when adding an organic material as a filler in a biomaterial is that it can easily contaminate and mold.
I put the clementine filaments in a dehydratiing machine for 6 hours. Basically, it was supposed to be extremely dry, but was it enough ?
But, after drying, it is mold!
It is not that odd, since organic waste was used in it.
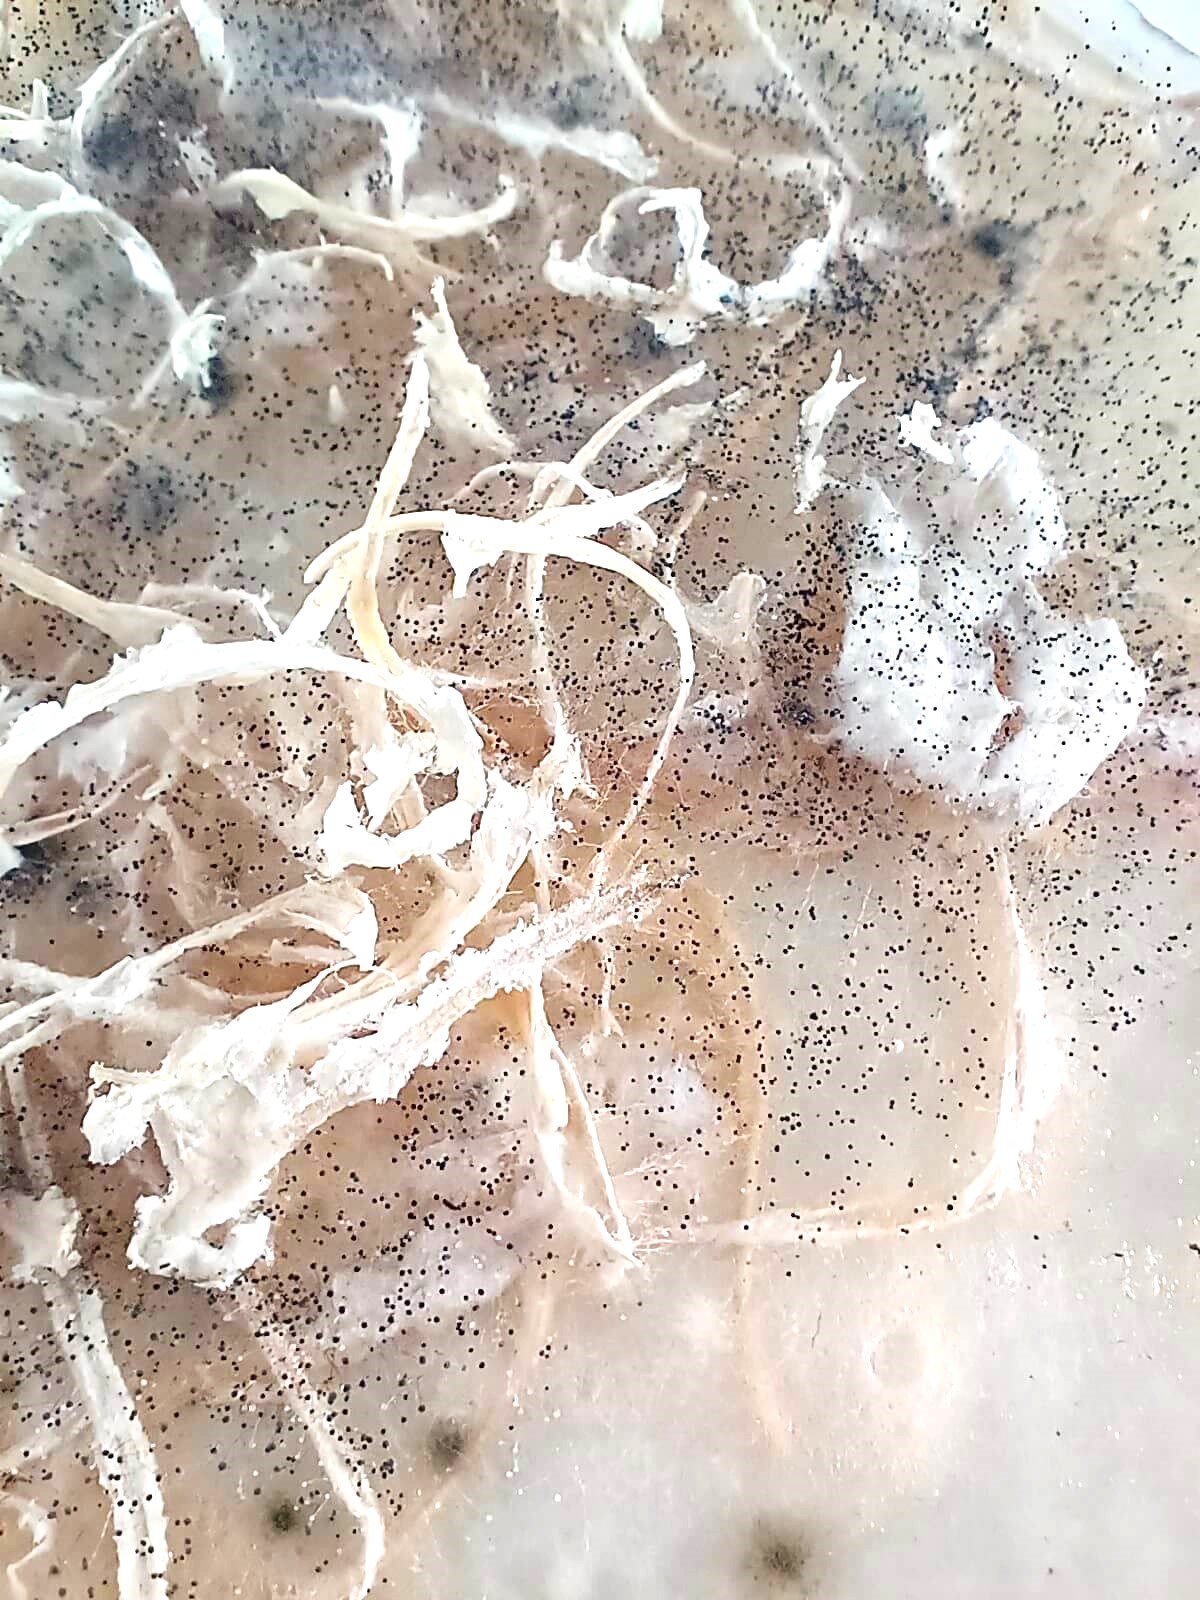
Also, all of our biomaterials being in the same room, we can imagine that one of the biomaterials, when molding, contaminated other experiments we made, so maybe the problem wasn't coming from this specific biomaterial. The drying part is the most crucial one. Also, using clean tools and casts is important too and is part of the success or failure of each attempt.
Test 10: "Kombuchaaaaaa!"
During the week 05, we also started the Kombucha growth.
* 1 receptable (pot, jar)
* 1 pair of scissors (if you cut your Kombucha)
* Use gloves if possible
* 1L water
* 10% of sugar (will be the Kombucha feed)
* You can add green tea, black tea, beer, wine... depending on the color you want your Kombucha to be.
* Alcohol vinegar (depending on the pH of the water).
- Sterilize every tools you will use.
- Prepare all the ingredients of the solution.
- Add the sugar to the water. Add enough sugar at this stage, because you cannot add more sugar when the Kombucha has already started to create its net, otherwise it will break the already created connections.
- Put the water to boil.
- Add the tea, wine, or other colouring ingredient you've chosen. (We added 8,4g of tea to make it dark).
- Let the water wool down.
- Pour it into your sterilized receptacle. Add the Kombucha.
- Measure the pH thanks to a pHmetre or pH strips.
This pH should be between 2.5 and 3.5. It is very important. - Add alcohol vinegar if the pH is too low.
Quantity of sugar
10% of sugar is a theorical measure, but you can take into account the season and temperatures to be in the following months.
For instance, in our case, we put 3L of water. 10% of 3L should be 300g of sugar, but we put 400g because we are in autumn and the temperatures will certainly be below the ideal temperature for Kombucha (25°C to 30°C).
This grown biomaterial was also a failure... We saw it grow week after week, but some mold appeared on the surface.
If mold grows on your kombucha:
Measure the pH: if needed, add some vinegar to restore a good pH for the growth. Unfortunately, mold stopped growing for a time, but then it covered the whole surface of the kombucha.
---
Annex thoughts: about rooted bio-material
We would like to try to create a net of roots that would create some pattern.
Two options
3D printing
20X20 for the 3D plate
5cm of thickness
Document in stl format? (rhino)
Closed mesh needed
Laser cutting
Acrylic sheet 5cm of thickness.