WEEK 07 : Computational Couture
This week was the introduction of parametric design : Grasshopper is the main new software we discovered.
All about logical thinking...
"Toujours bloqué dans la mauvaise zone
C'est ma faute j'ai mis les bons mots dans le mauvais ordre
J'ai encore tout emmêlé
[Fichtre] ça avait tellement l'air simple dans ma tête."
Mauvais ordre, Lomepal
Between [], corporate modification
"This process combined with the power of digital computers (which enables one to explore a huge range of permutations of a solution) allows designers to generate new options beyond what a sole man can create all by himself, in order to get to a more efficient and optimized design.
It mimics nature and its evolution with the conception through genetic diversity and selection."
Source: Wikipedia about generative design
Eugene VanVeldhoven
A creator that I've been following on Instagram for a while. (I love his short video of discovering the results of his flexible 3D printings!) is Eugene VanVeldhoven.
Go check his website, he works on so many different techniques!


What I find inspiring in his way of working on this technique to be (3D printing flexible materials) is that he uses biobased materials that can be endlessly recycled (and waste can be reused). It is a great continuity to the previous week, when we were making biomaterials.
Danit Peleg
Video about the advantages of 3D printing in the field of fashion
Why 3D printed fashion is more sustainable and can revolutionize the fashion industry?, by Danit Peleg
Danit Peleg, for her final year school project, created a whole collection of entirely 3D printed clothes. She made it when it was the beginning of this technique. In the video above, she explains how this technique can provide solution to current lack of substainability in the field of fashion.
Here are the advantages she sees in the use of 3D printing in fashion:
Grasshopper
"This software is avoiding the normal procedure of modelling, and then adjusting, and then coming back and deleting the design. It actually allows you to have the logical map, the logic network, and every moment you can enter it you can modify it or you can expand it or just steal apart of a code and bring it to another one and connect. It is more than the geometry, it is the logic behind the geometry you created."
Source: Eugenio Bettucchi, first tutorial about Grasshopper, 2022-2023
To remember
In a list, you have an index and items.
Paramétrer une courbe de 0 à 1 permet que, même si on modifie la courbe, les valeurs restent les bonnes.
When you set up the units in Rhino, Grasshopper will translate it into its own type of unit.
You can have several Grasshopper files for 1 Rhino file. (for example, one for the general shape, one for the ) Don't you forget saving your files in both Grasshopper AND Rhino!! If you don't, the link between the two softwares won't happen.
Understanding the importance of trees.
Actually, trees are the organization of data in Grasshopper. Each parameter corresponds to a list of points, and to a tree of this information.
I followed a tutorial by Kory Bieg, about data trees in Grasshopper.
You can find some more information about it on this site
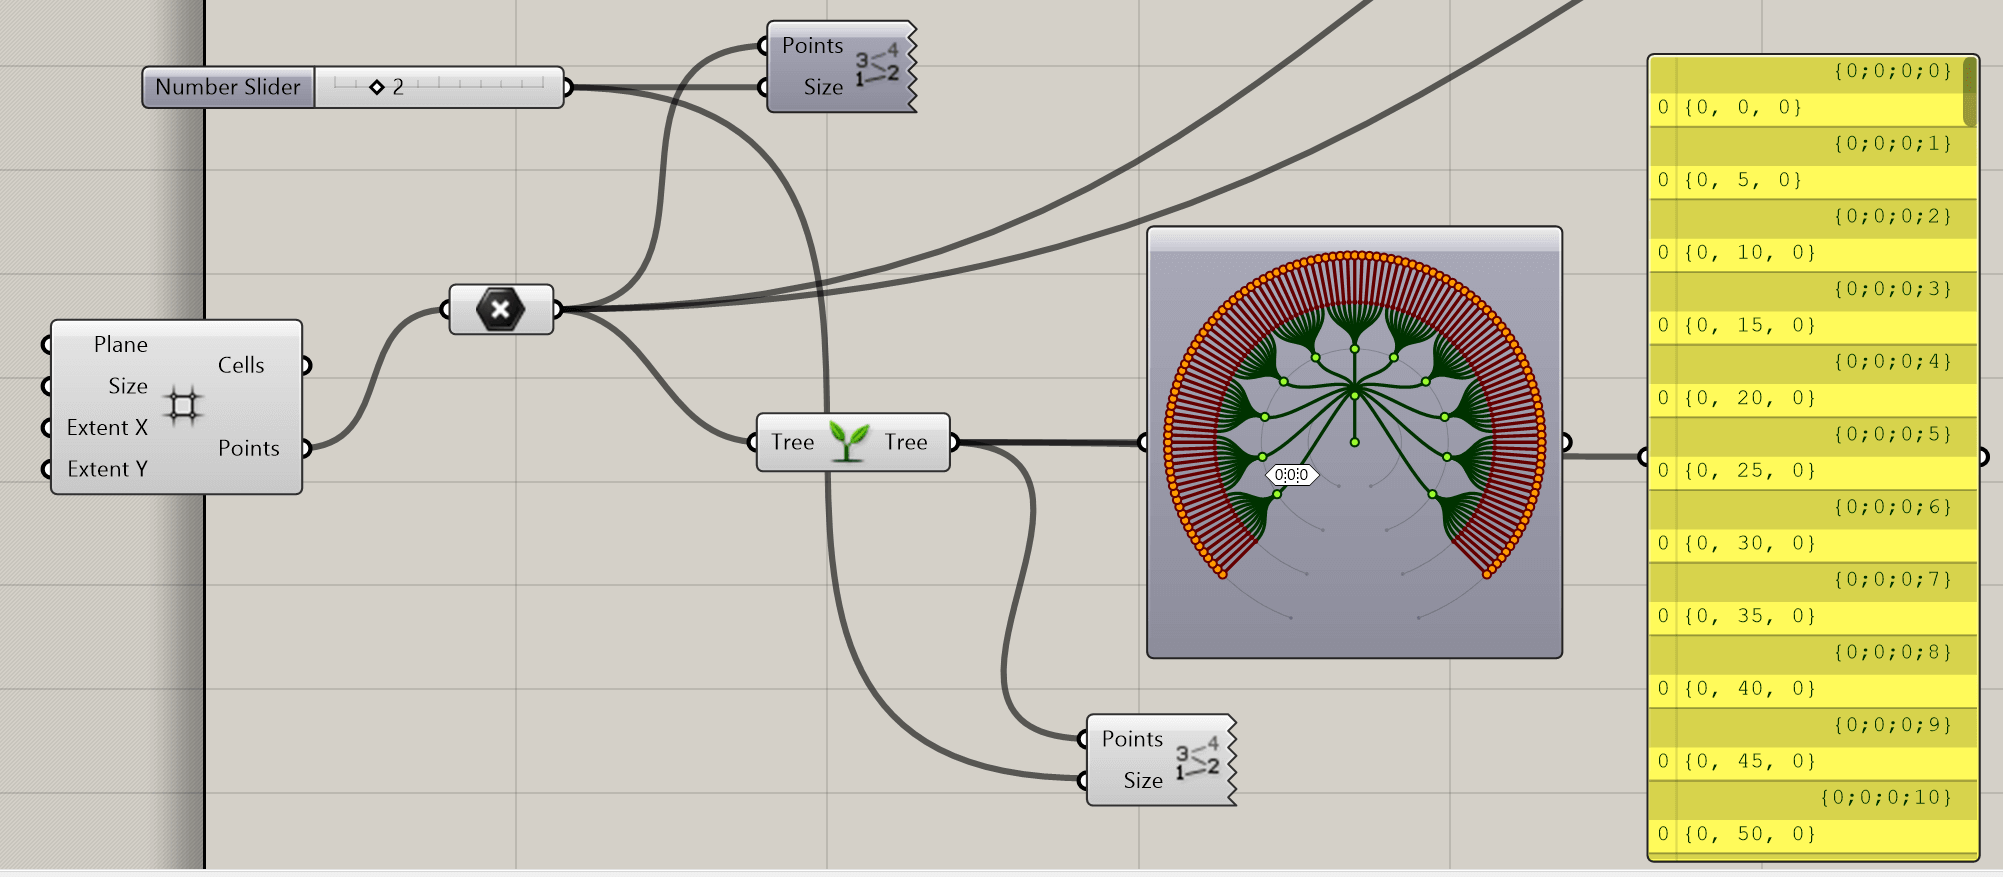
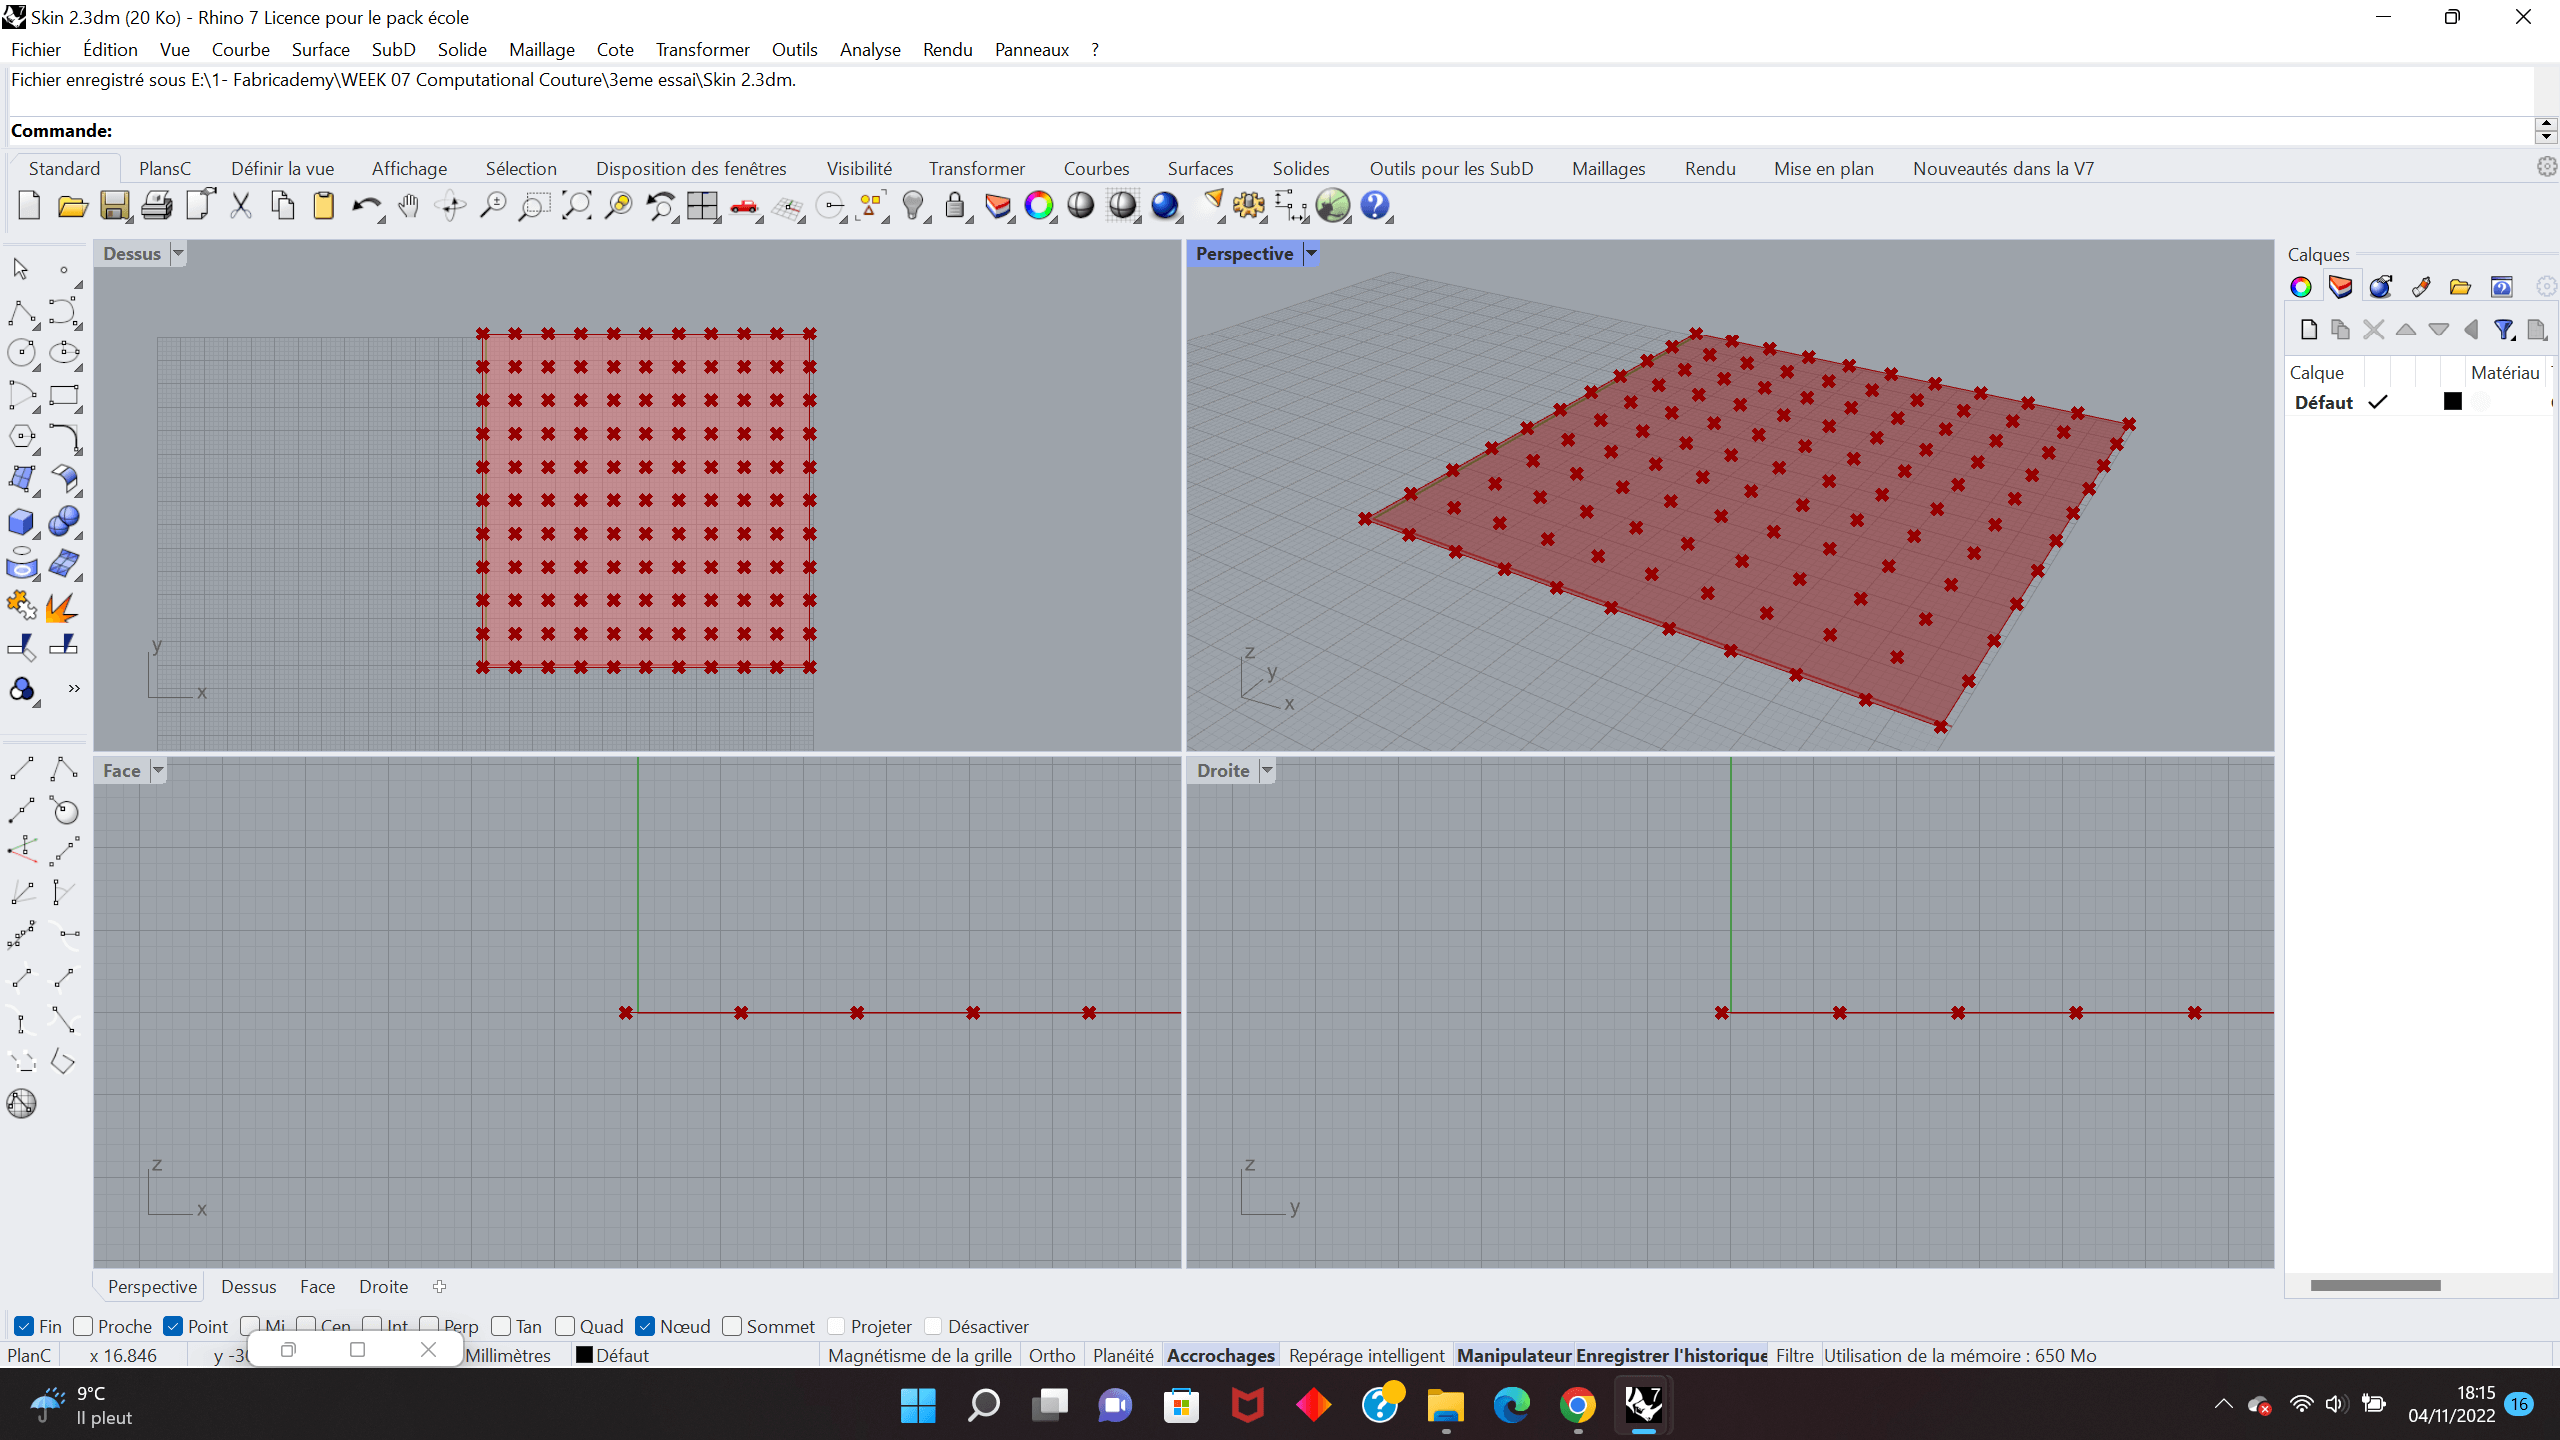
Basic situation (no graft tool, no flatten tool)
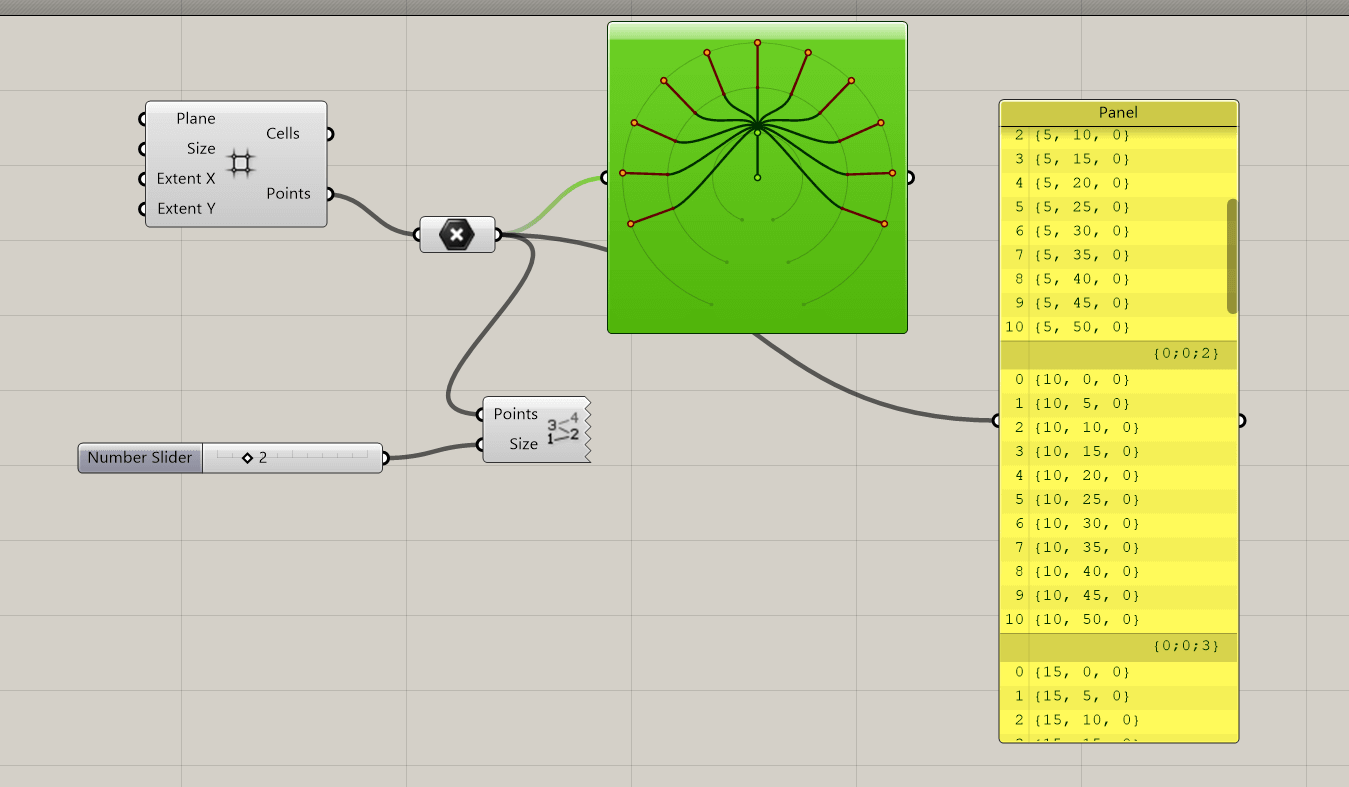
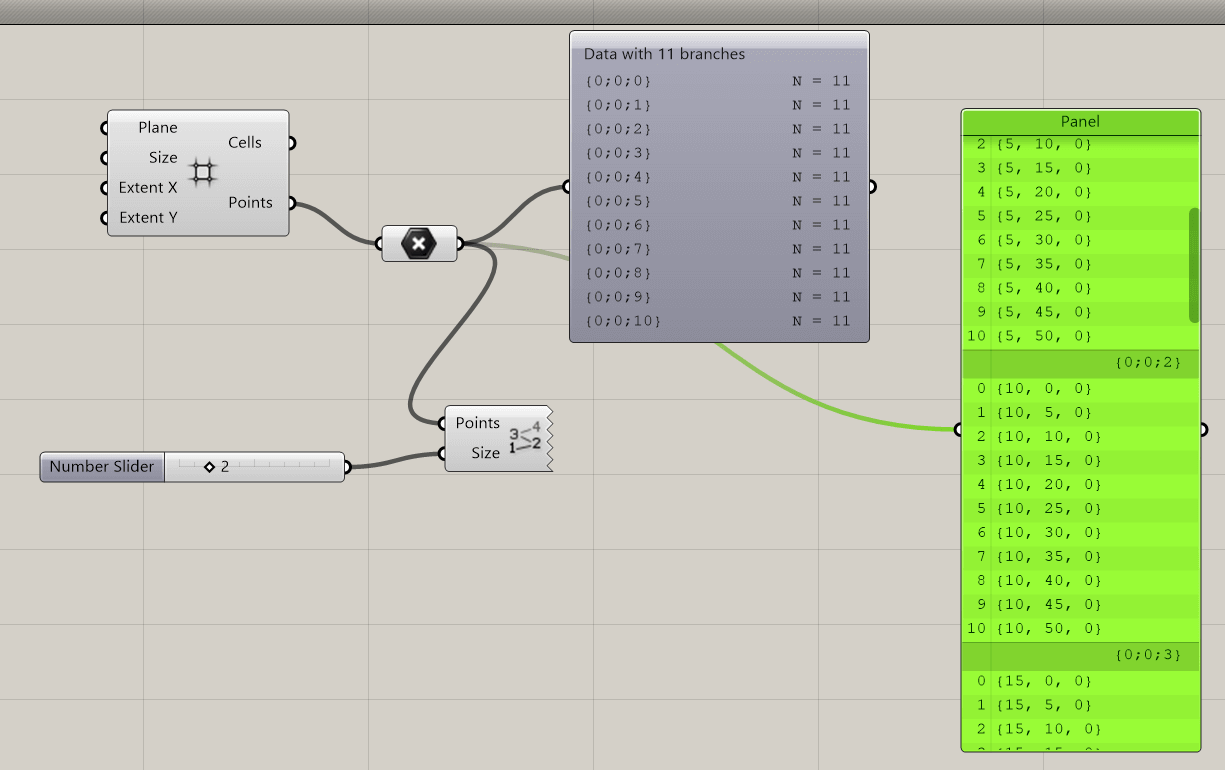
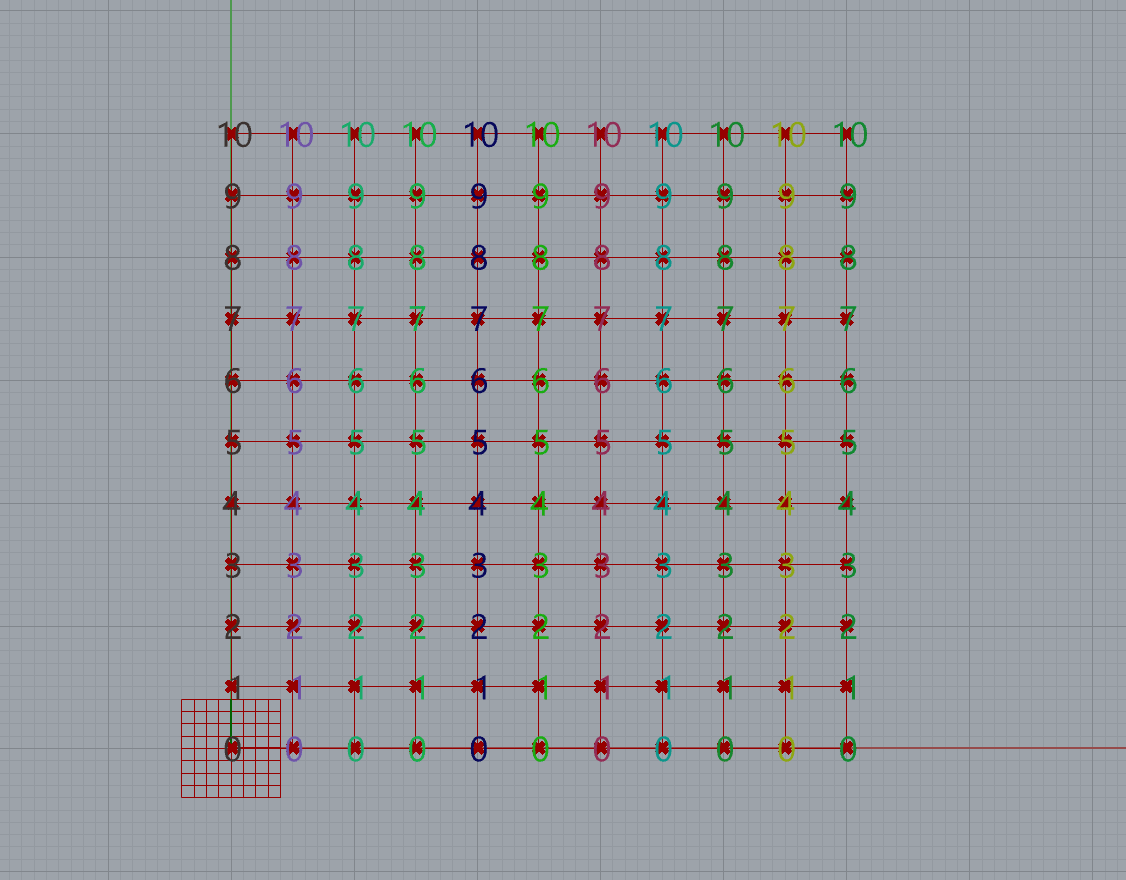
What we have here is a square grid make out of 10X10 points.
This list of points is referenced into the panel, where we can see that there are several (10) lists going from 0 (first number in Grasshopper) and 10.
The tree can be overviewed in two ways: a visual tree, or a list (double-click on it to see it appear.)
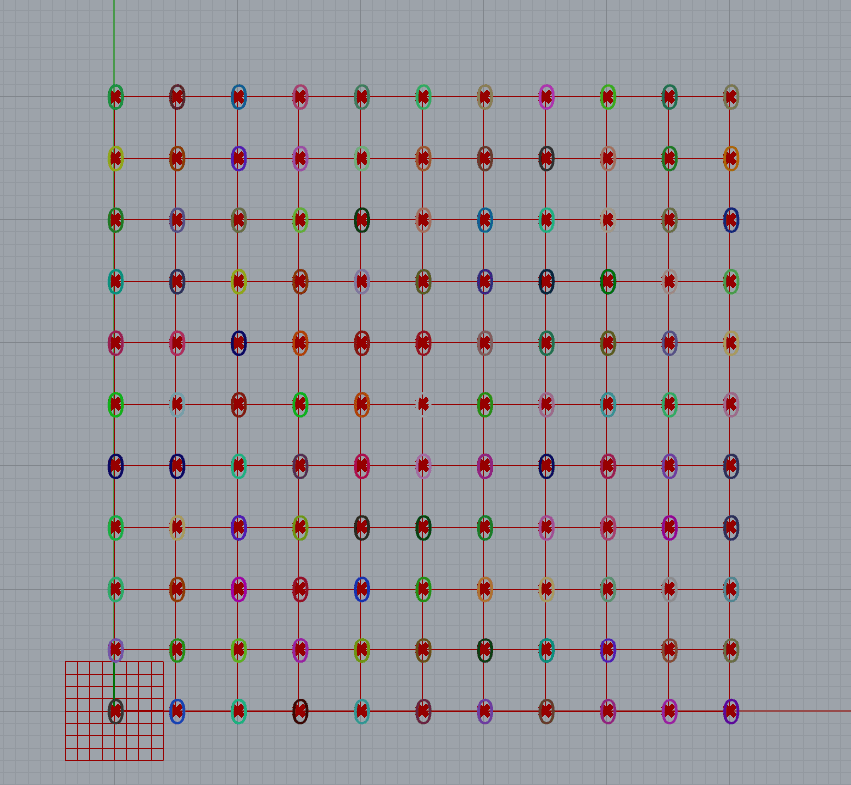
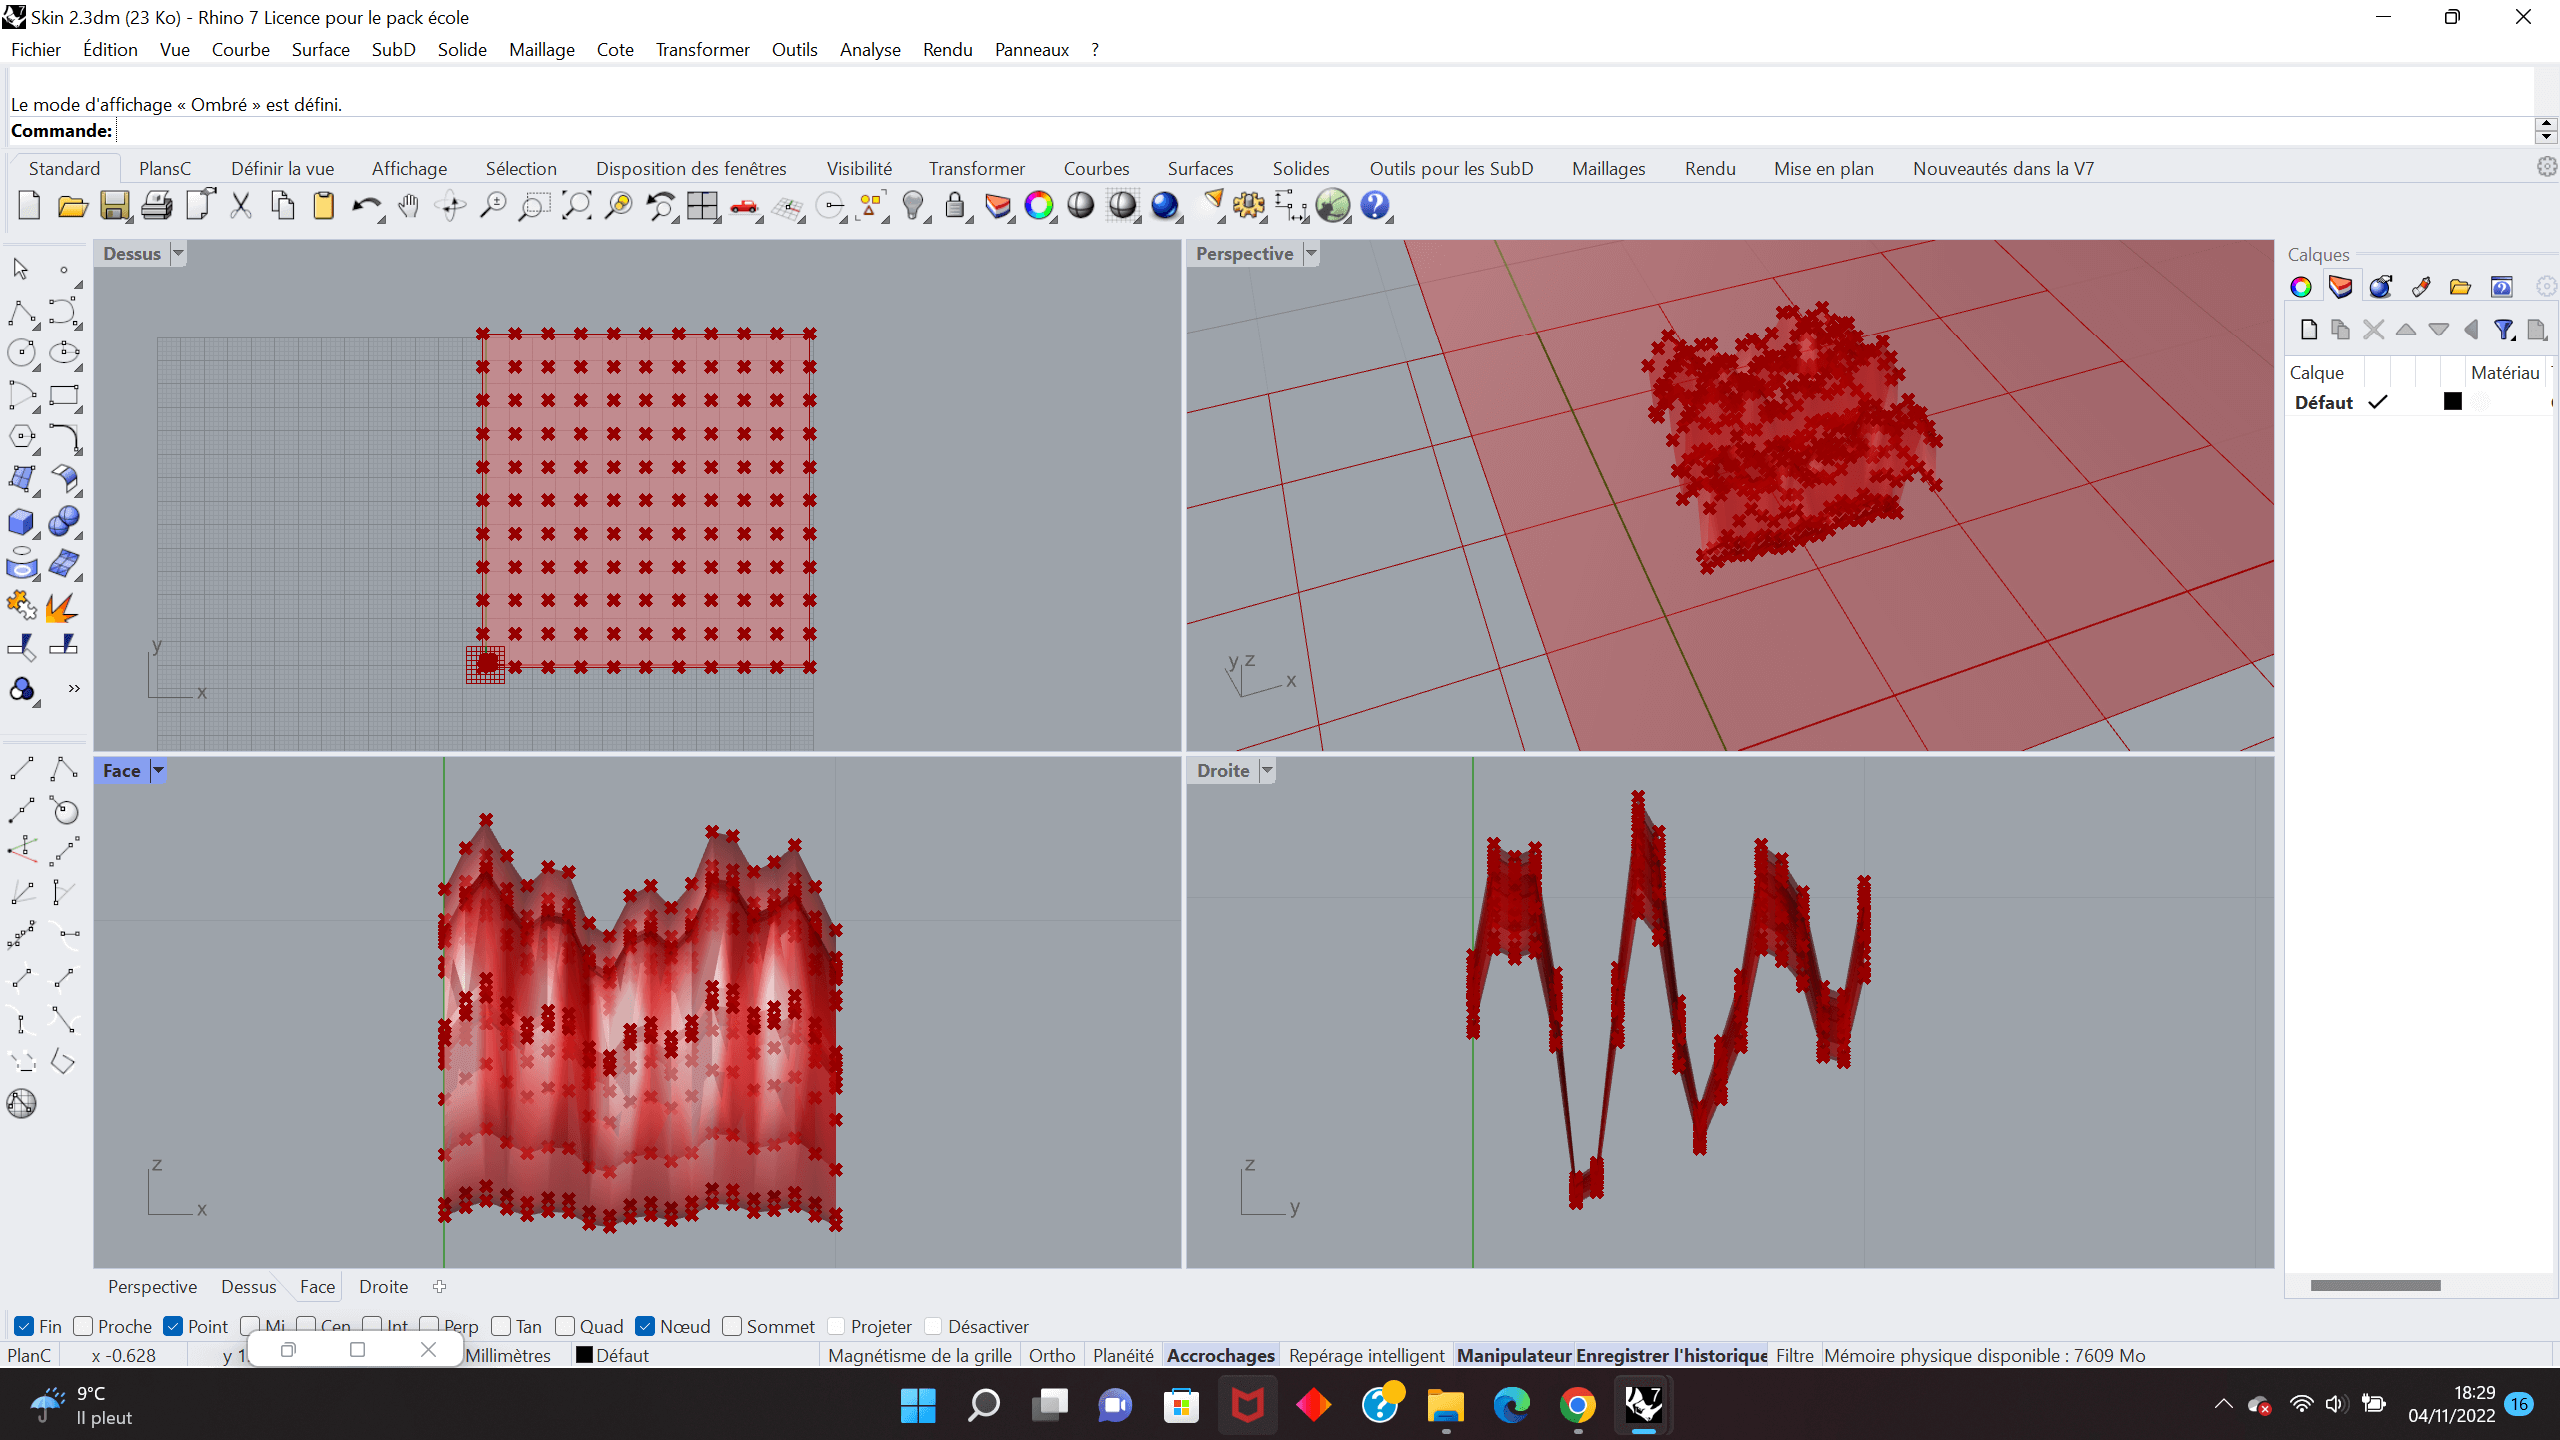
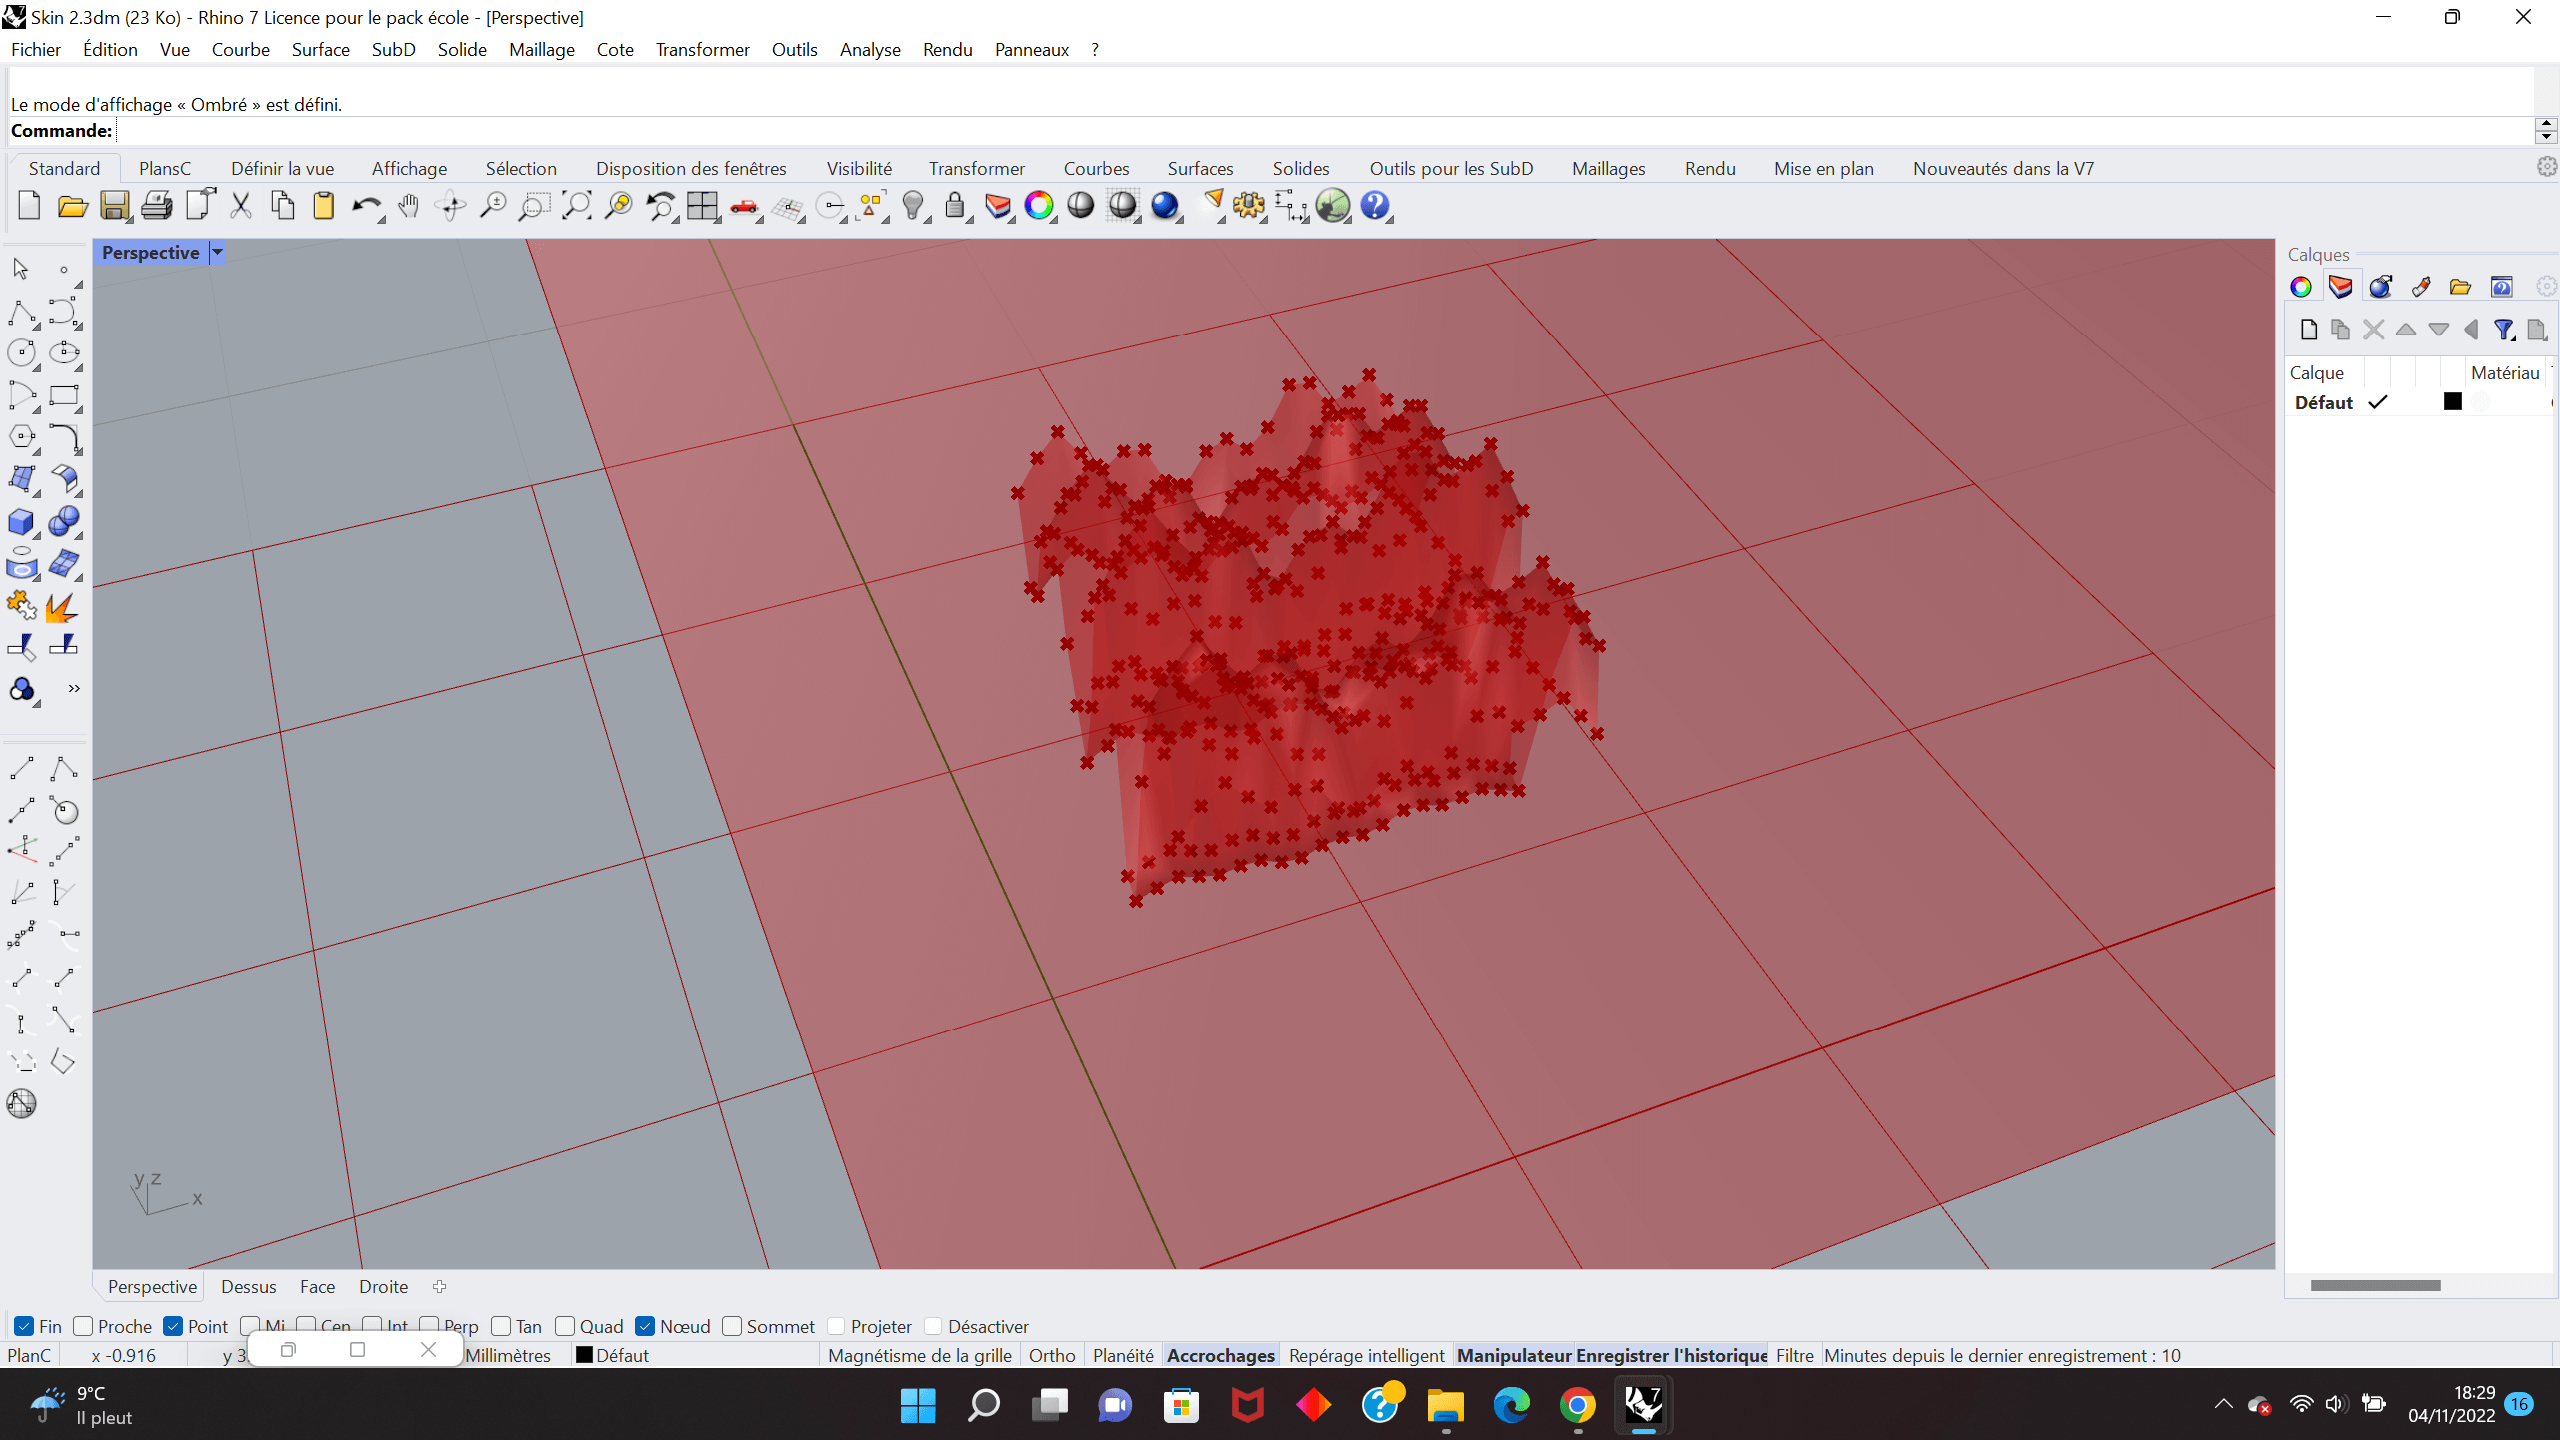
Graft tool
The idea with this tool is to individualize every point in its own list.
This is what you can see into the panel. There isn't 11 lists anymore, there is 120 lists containing each one point.
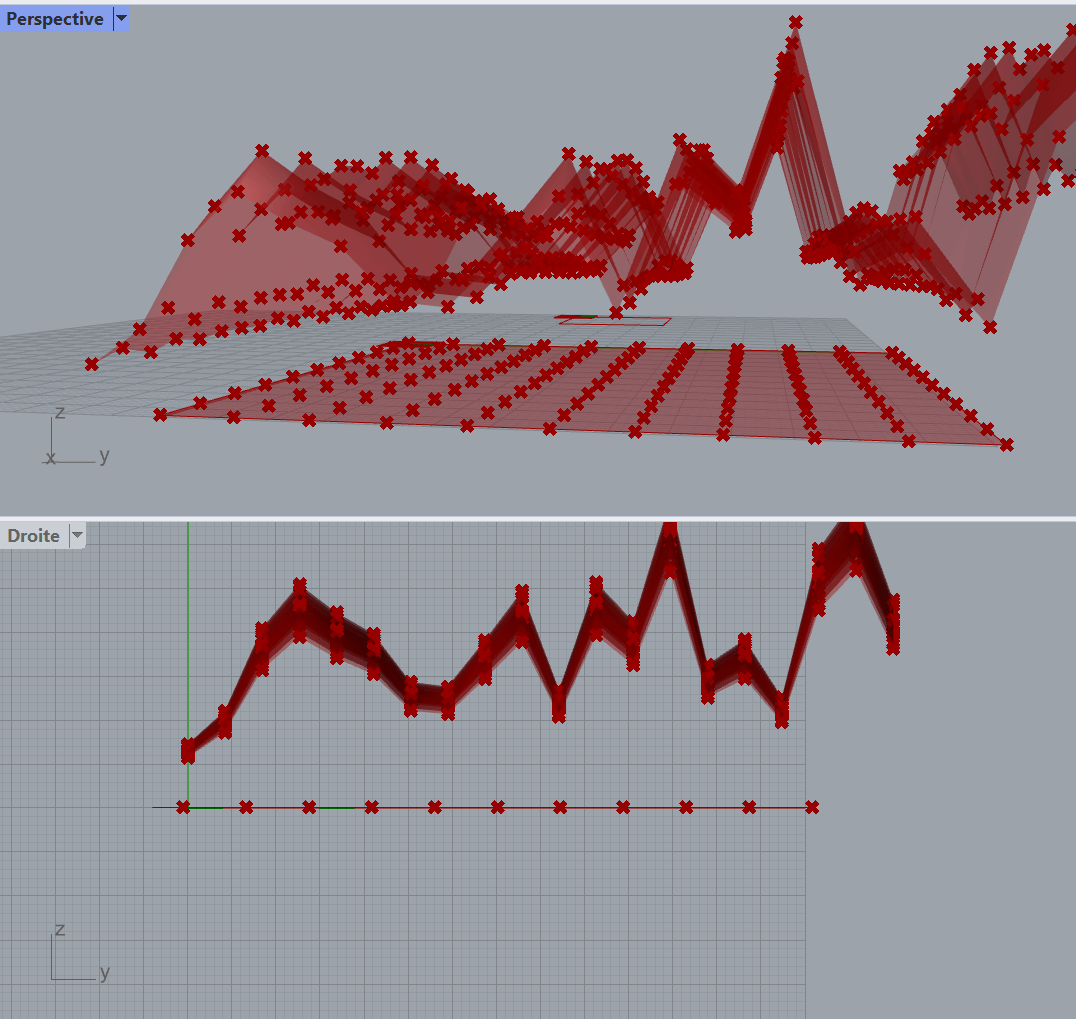
Flatten tool
With the flatten tool, it's the contrary to the graft tool, since it combines every points of the square grid into one and only list goign from 0 to 120.

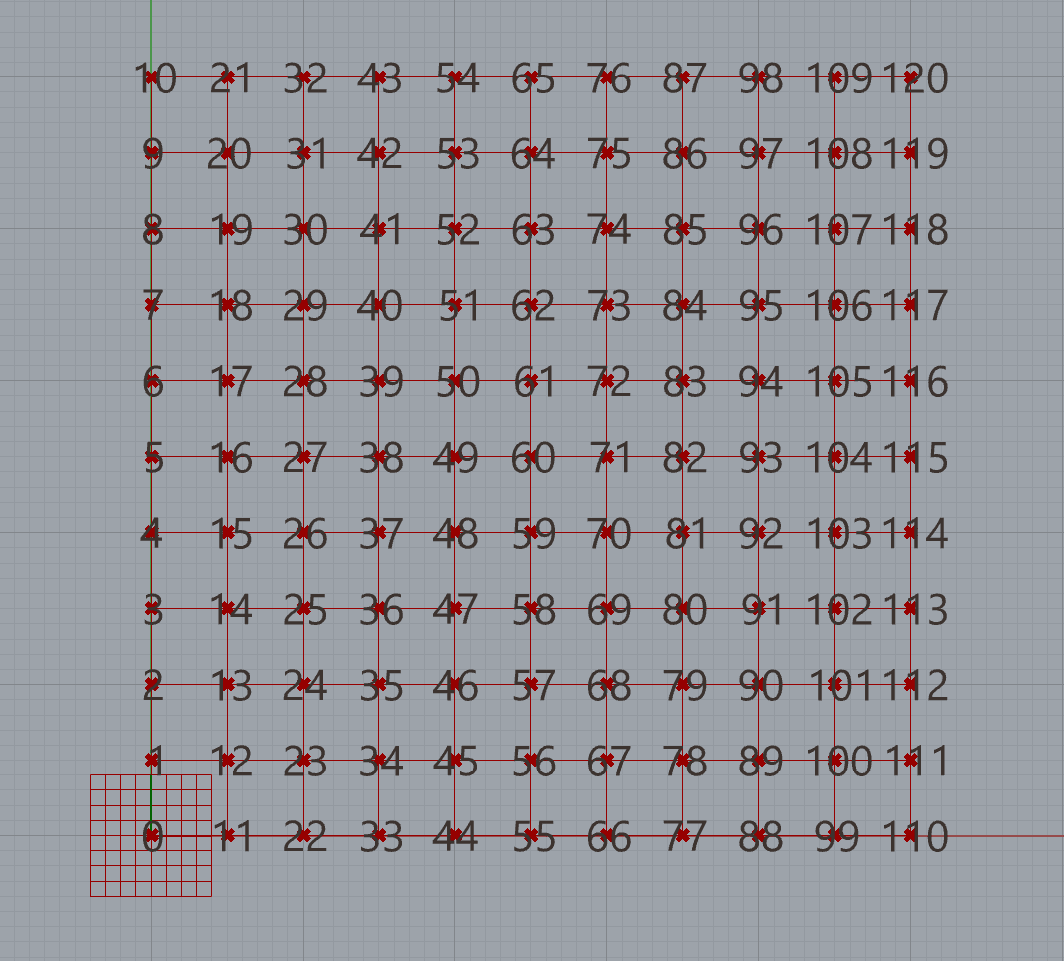
These operations are very common, so there is an easier way to use it: put your mouse onto a param setting, and right click. Then you have access to "graft", "flatten", "simplify", etc.
First approaches
About online tutorials
Make sure that the tutorial you choose fits with your version of Rhino and Grasshopper. Innovation in this field is very fast, and sometimes you'll miss some options because of your too new version of Grasshopper. I had the problem with a tutorial on drapé; I had to work with Kangaroo, but no way to fond this old version, and the Kangaroo 2 was too new!
Voronoi cells
I got fascinated by the precision of the Voronoi cells. This algorythm calculates the distance between two points out of a population of points, and it generates a segment right in the middle the distance between of the two points.
Considering that we worked here with the '2D populate' tool, I tried to add another attractor point from the example of the following tutorial
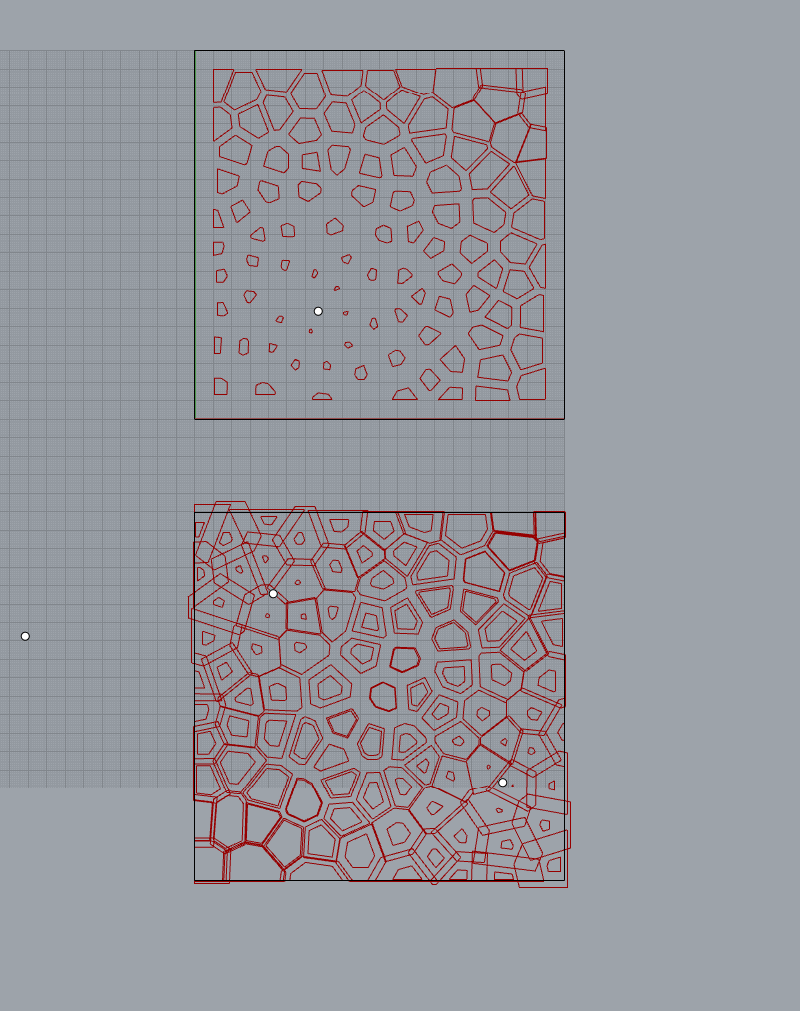
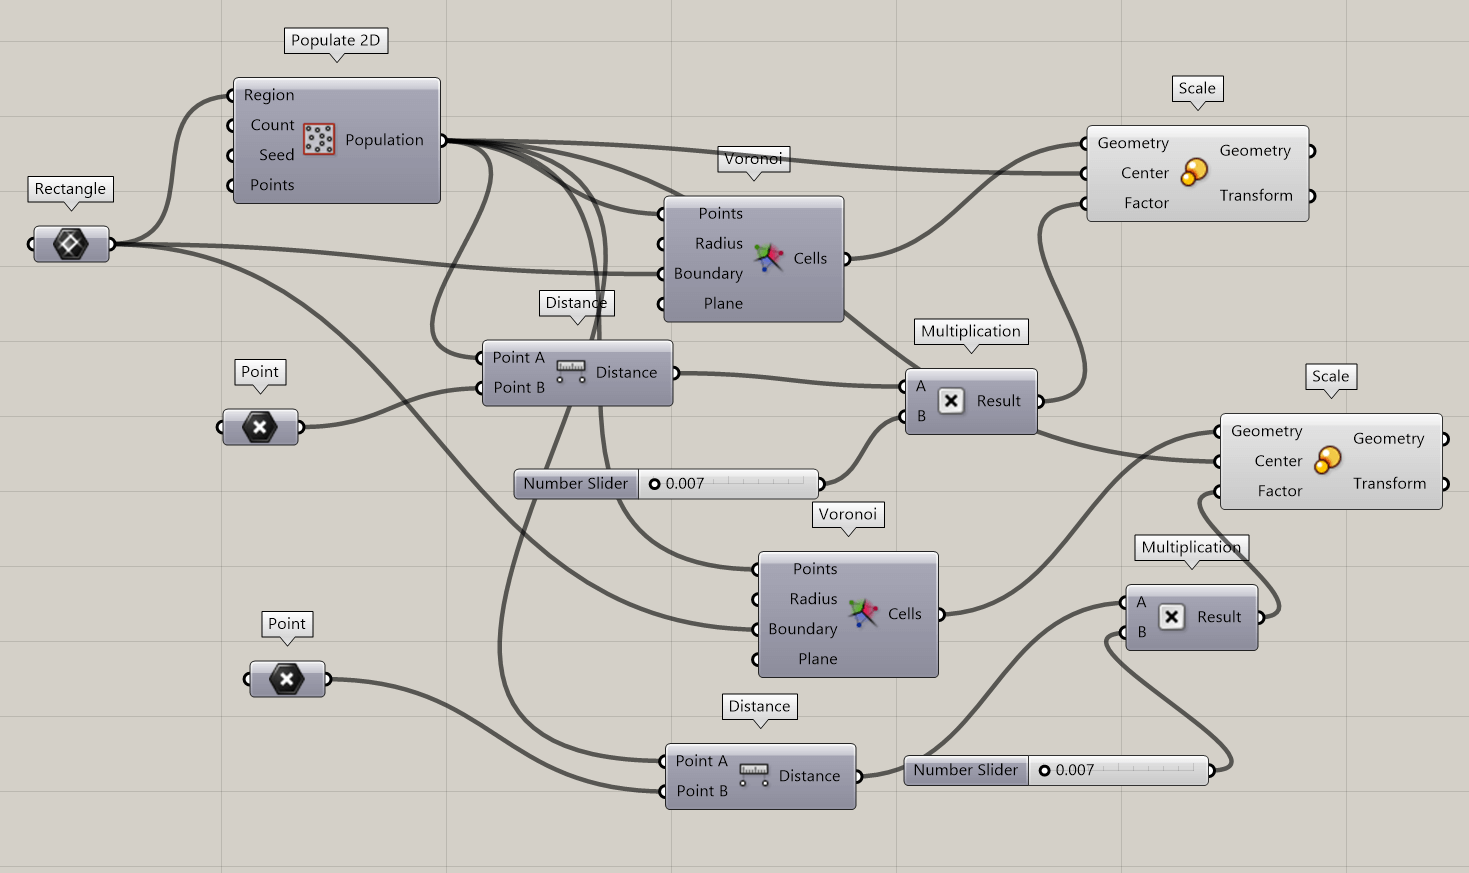
Actually, what I created here was a second frame with another attractor point, but it was superimposed to the first one. Nonetheless, the result is interesting!
Tween curve
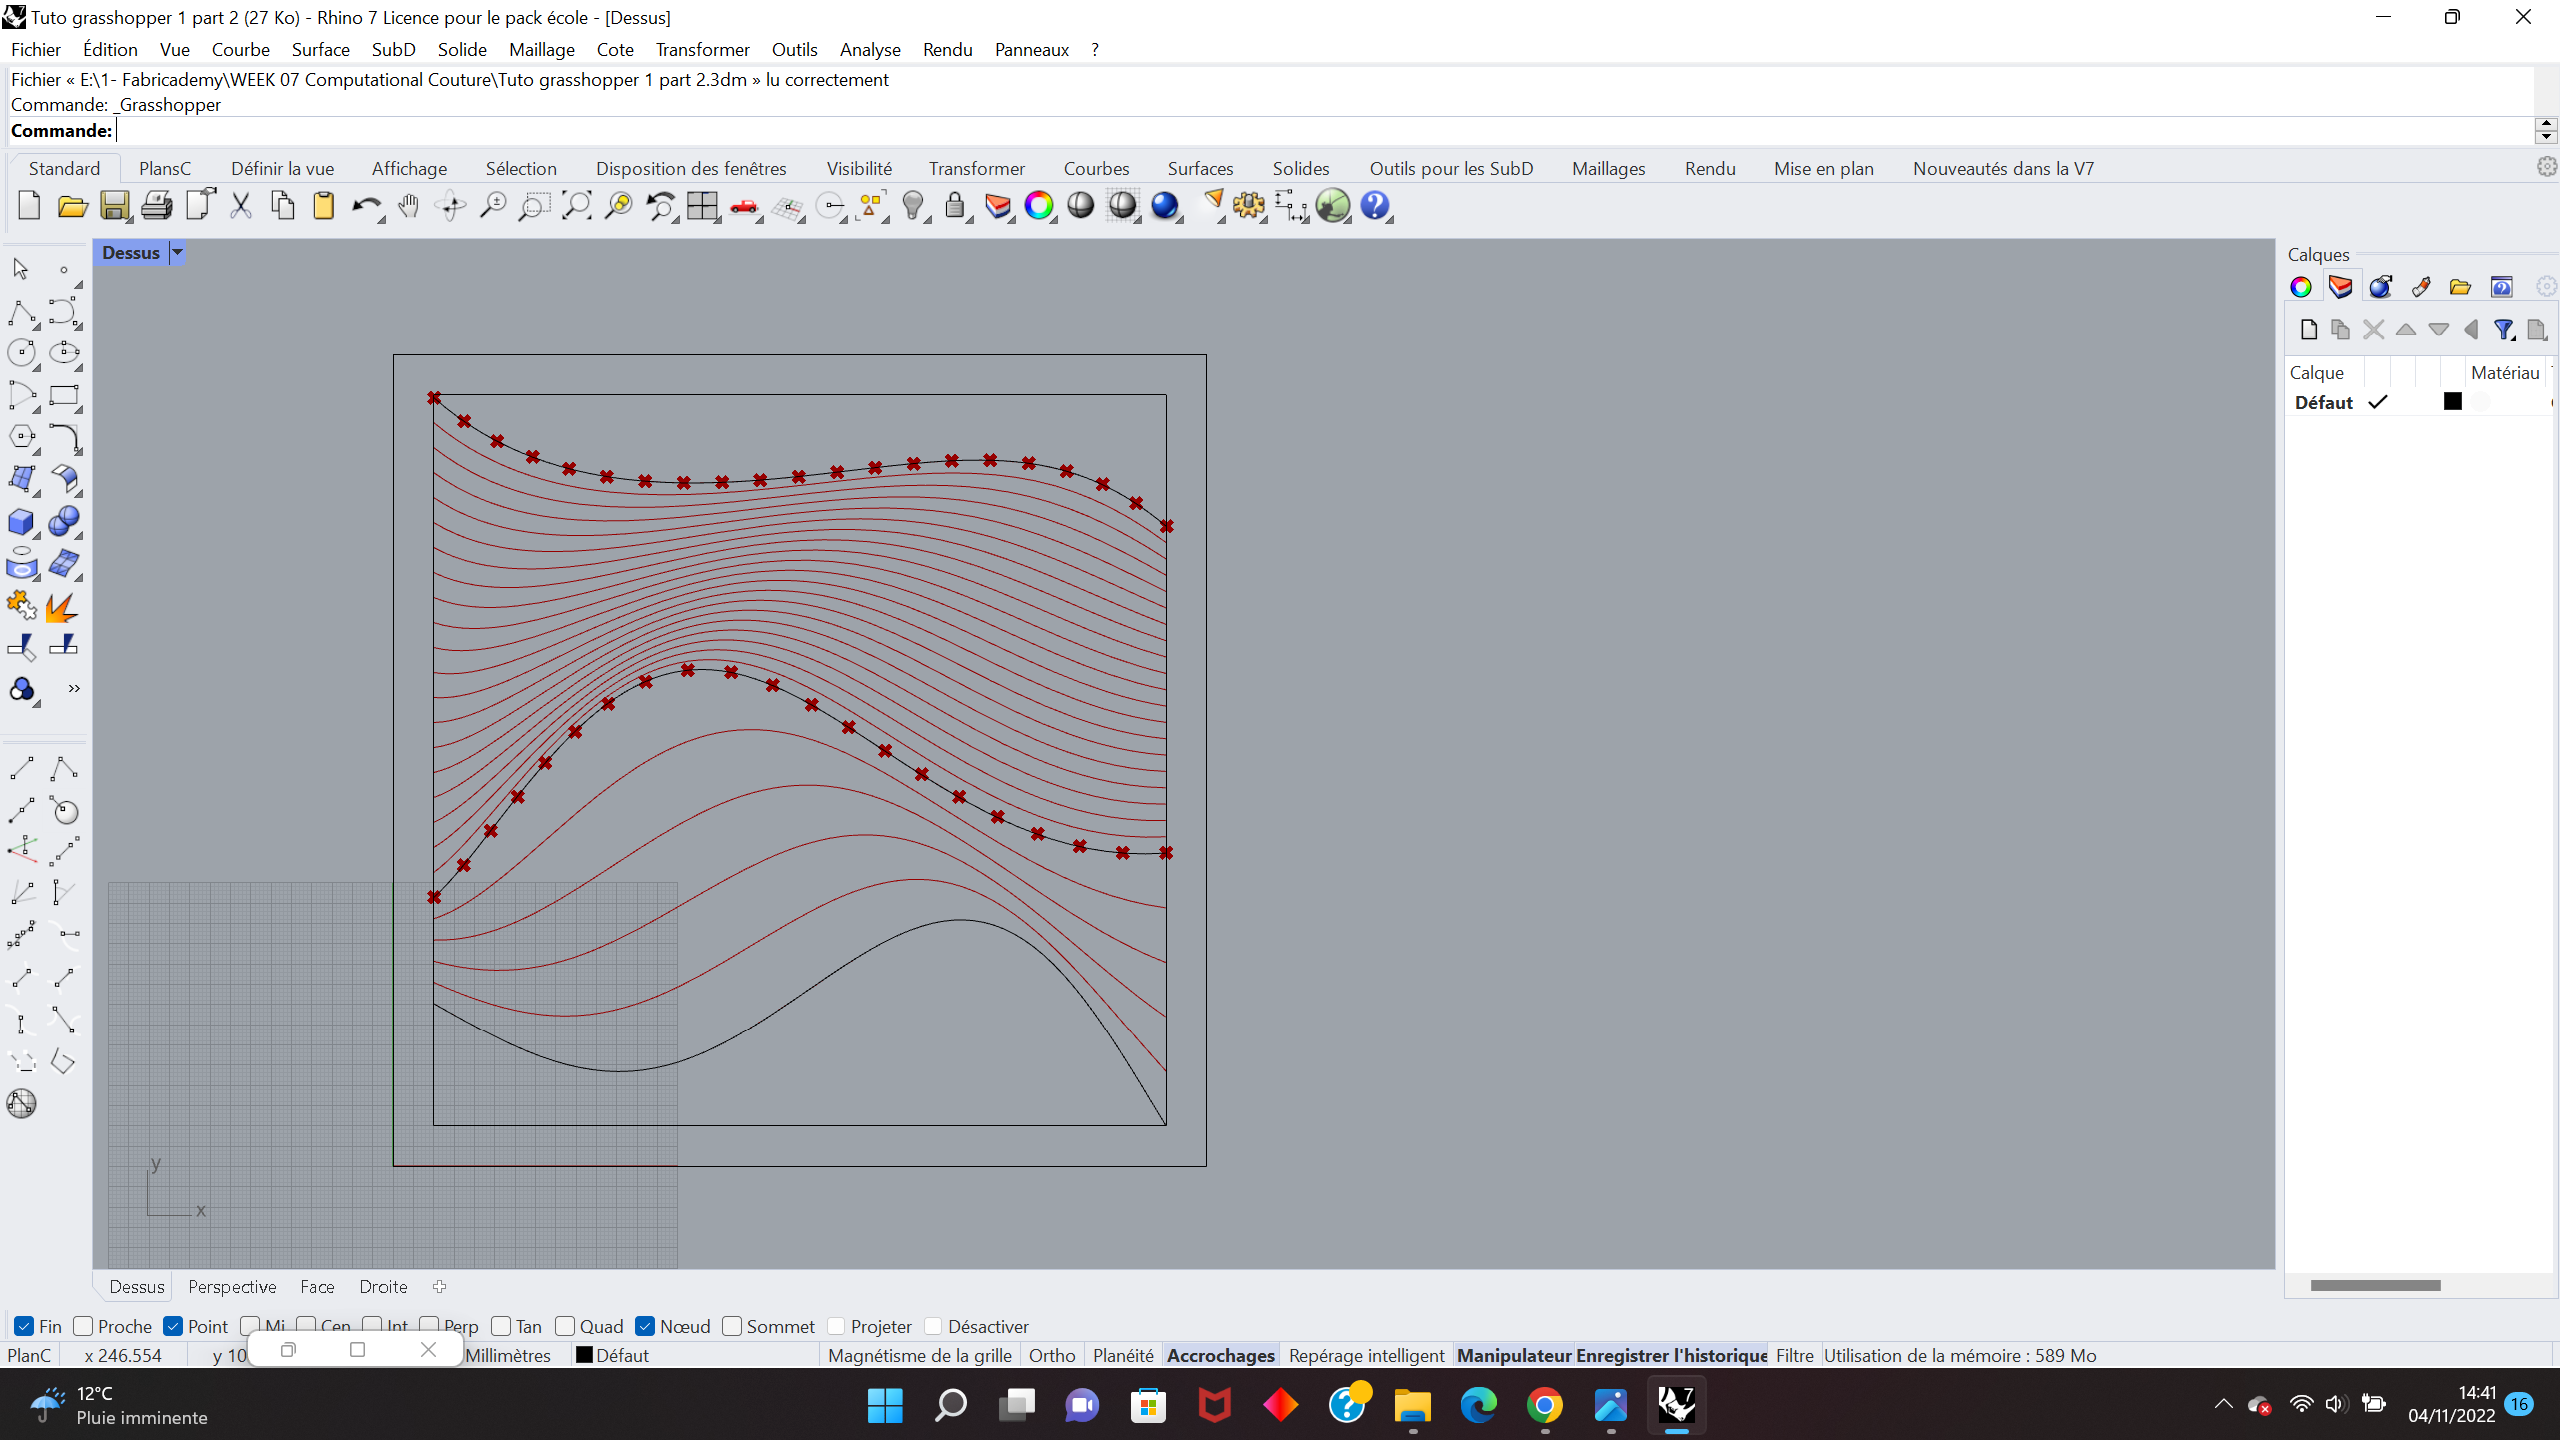
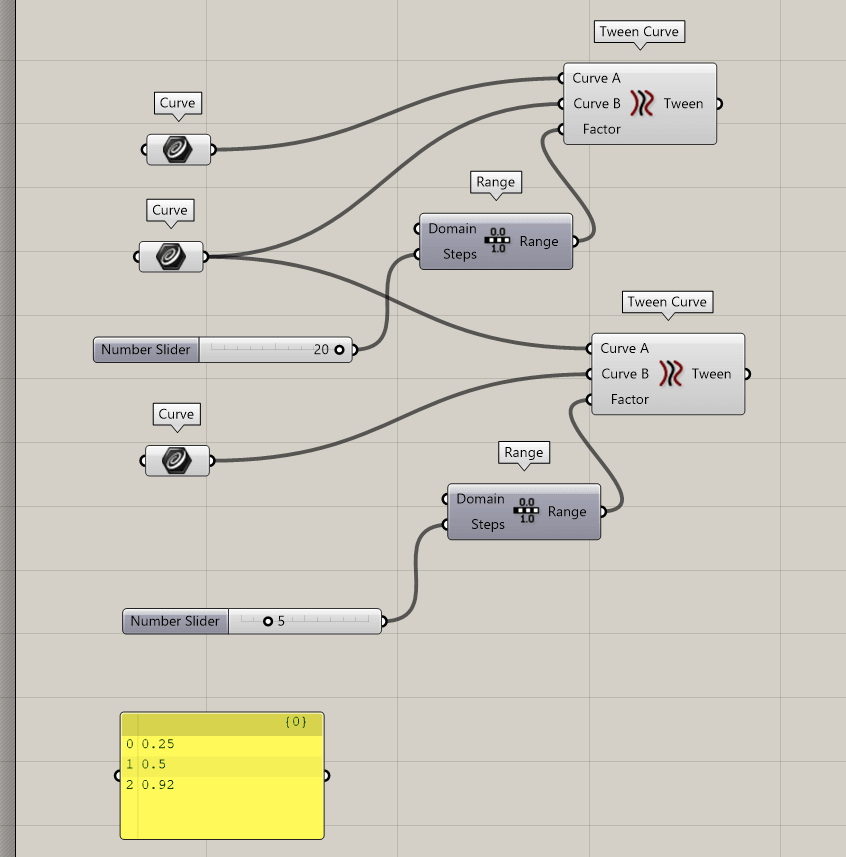
What happens here?
You create two Curves (A and B).
Connect them to the Tween Curve tool, on the Curve A and Curve B inputs.
Create a Range tool connect it to the Range input of the Tween Curve tool.
Create a Number Slider, connect it to the Steps input of the Range component.
What you generate here is a number of curves equally put between your curve A and B.Create a thrid curve (we will call it B bis, and the B of the previous step will here be called Abis)
Then, repeat the same process, connecting the Abis and Bbis into the Curve A and Curve B of the Tween Curve component.
Vary the range of curves into your second Number Slider component.
Repeat the same process the number of time you want!
Chainmail structure
Trying to create a chainmail, following Gediminas Kirdeikis' tutorial on "Easy 3D Printed Fabric tutorial ( Grasshopper + Rhino )"
This is a tutorial that requires having practiced Rhino a little before. I precise that I am an amateur on Rhino. I could follow the tutorial up to a certain point, but I got blocked before the end, for a simple reason: some steps at the end of the tutorial are skipped to achieve a working result.
Nonetheless, the general process remains the same for other types of chainmail structures:
Step 1 : creating the general shape of the chainmail-like structure.
In this case, it consists in two rectangles with a hole in the middle.
Creating a base for the double loop.
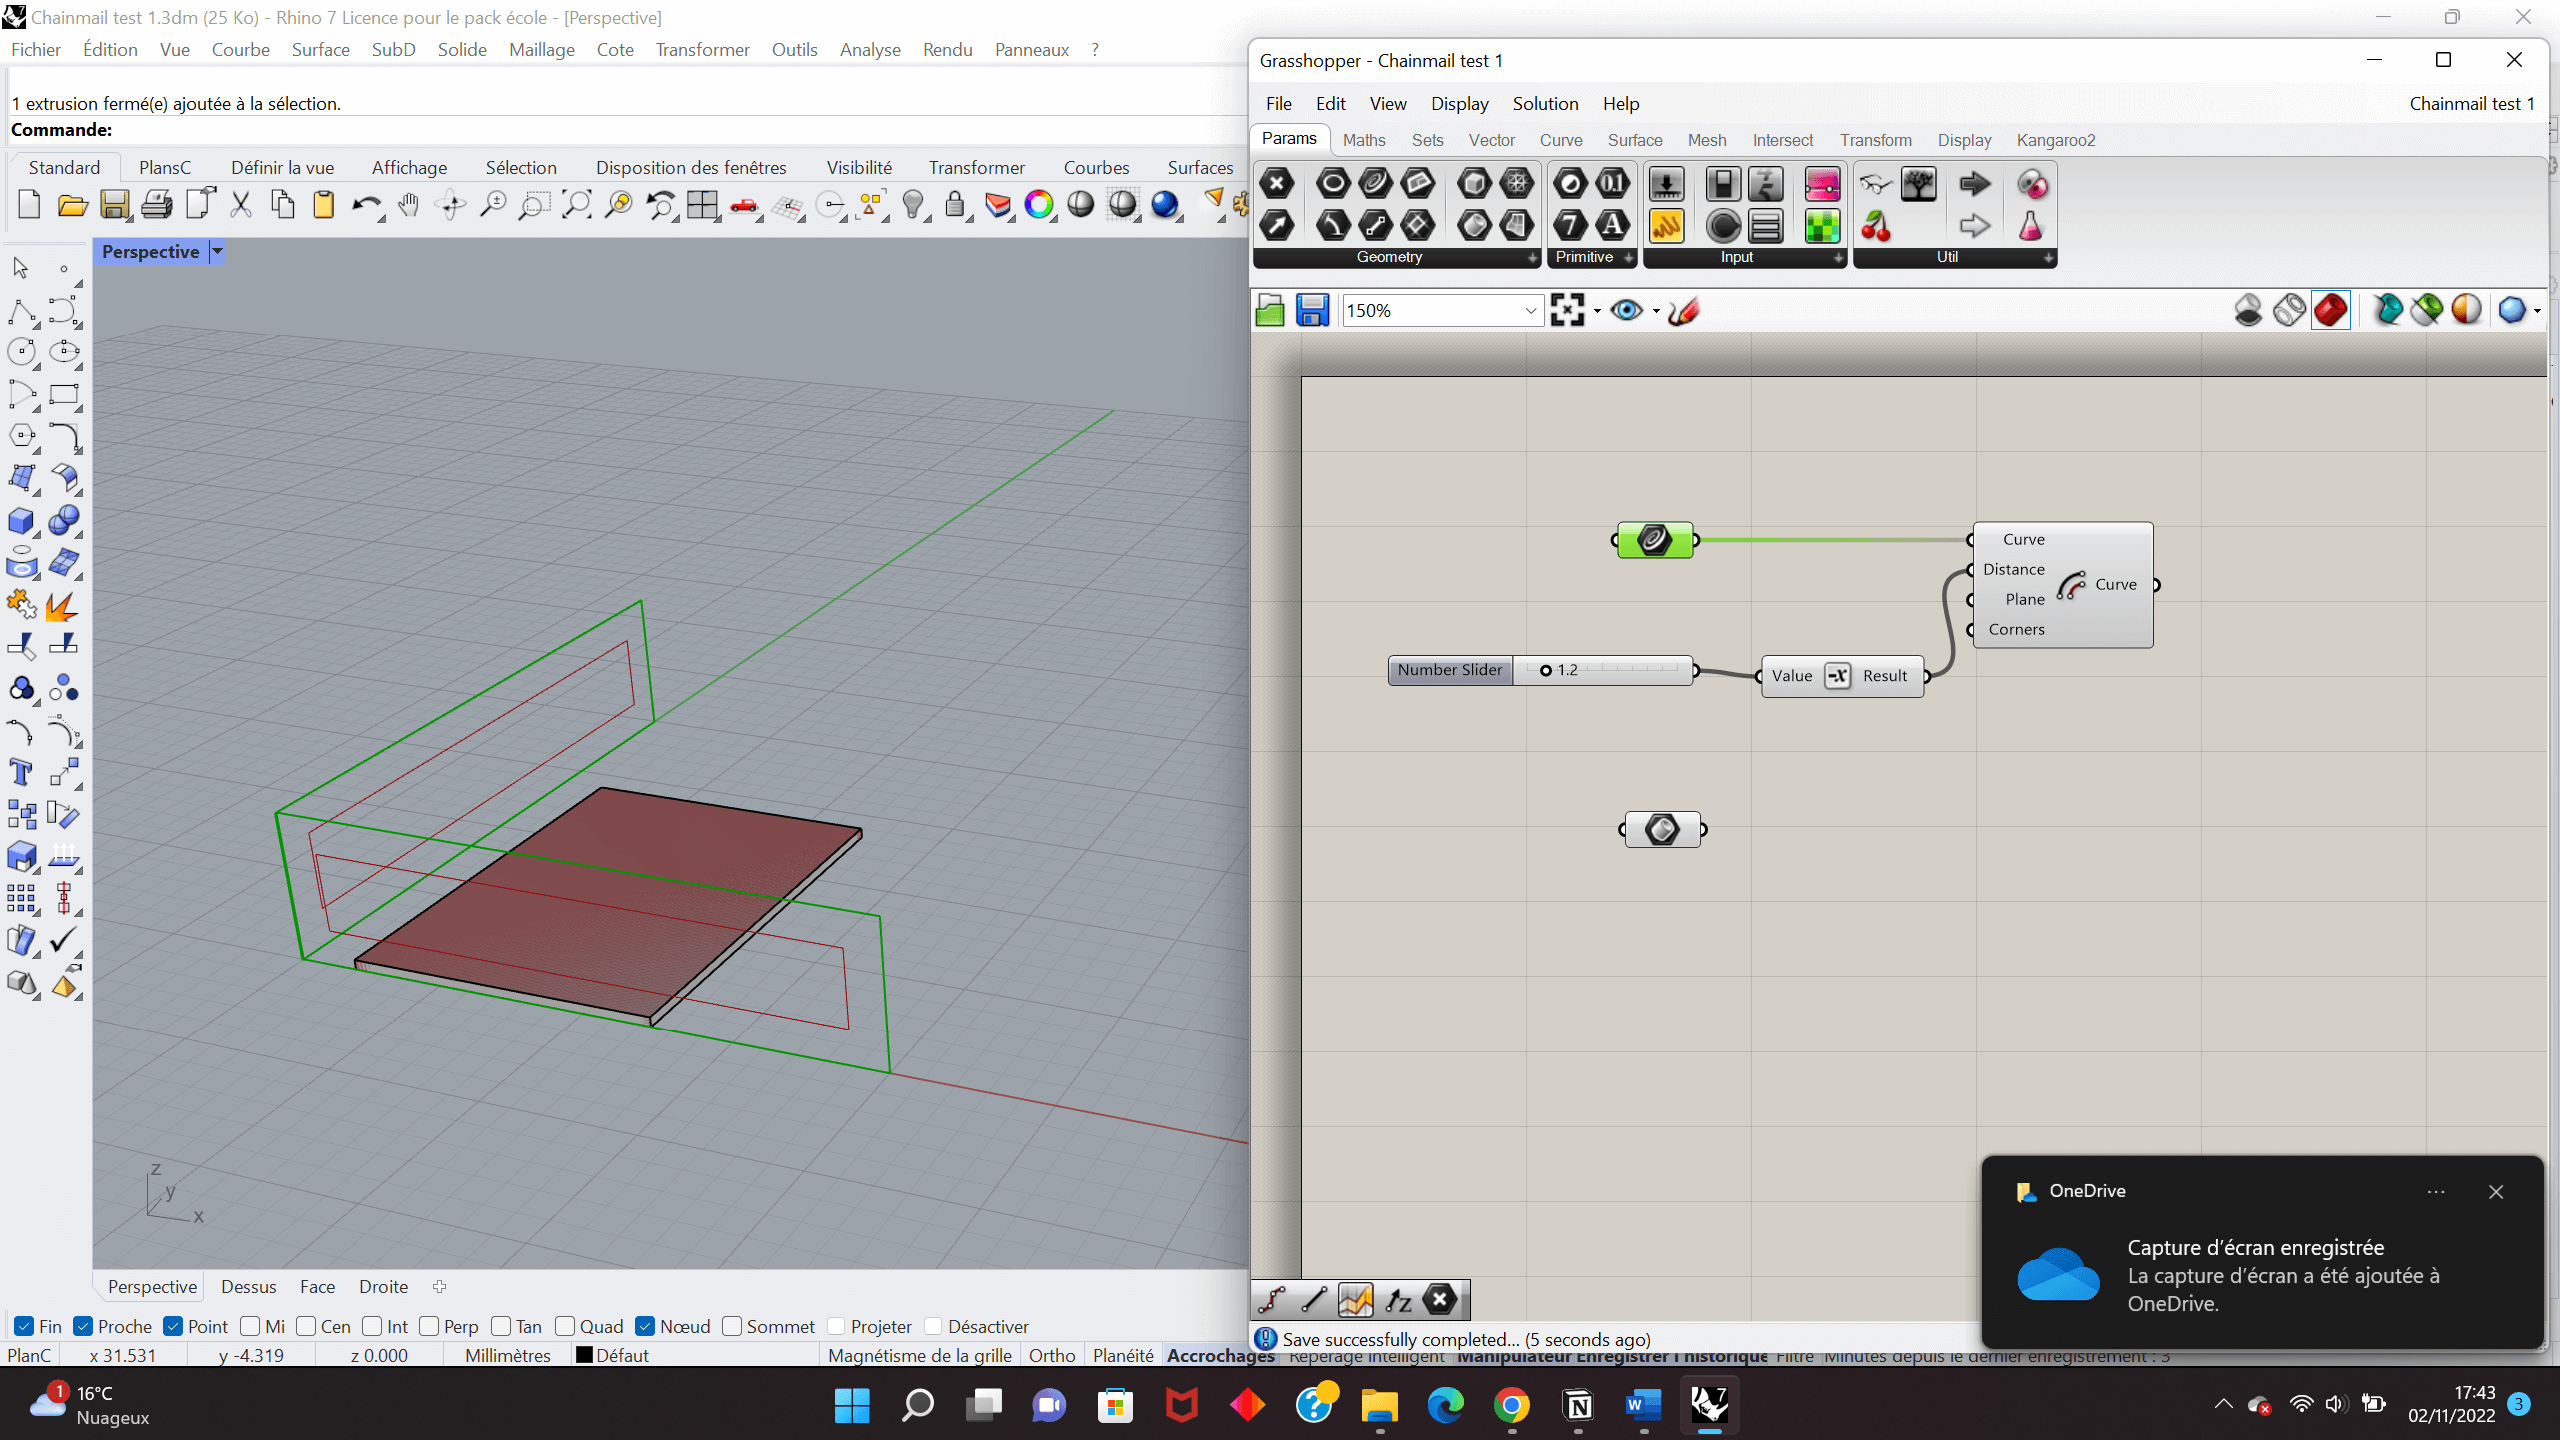
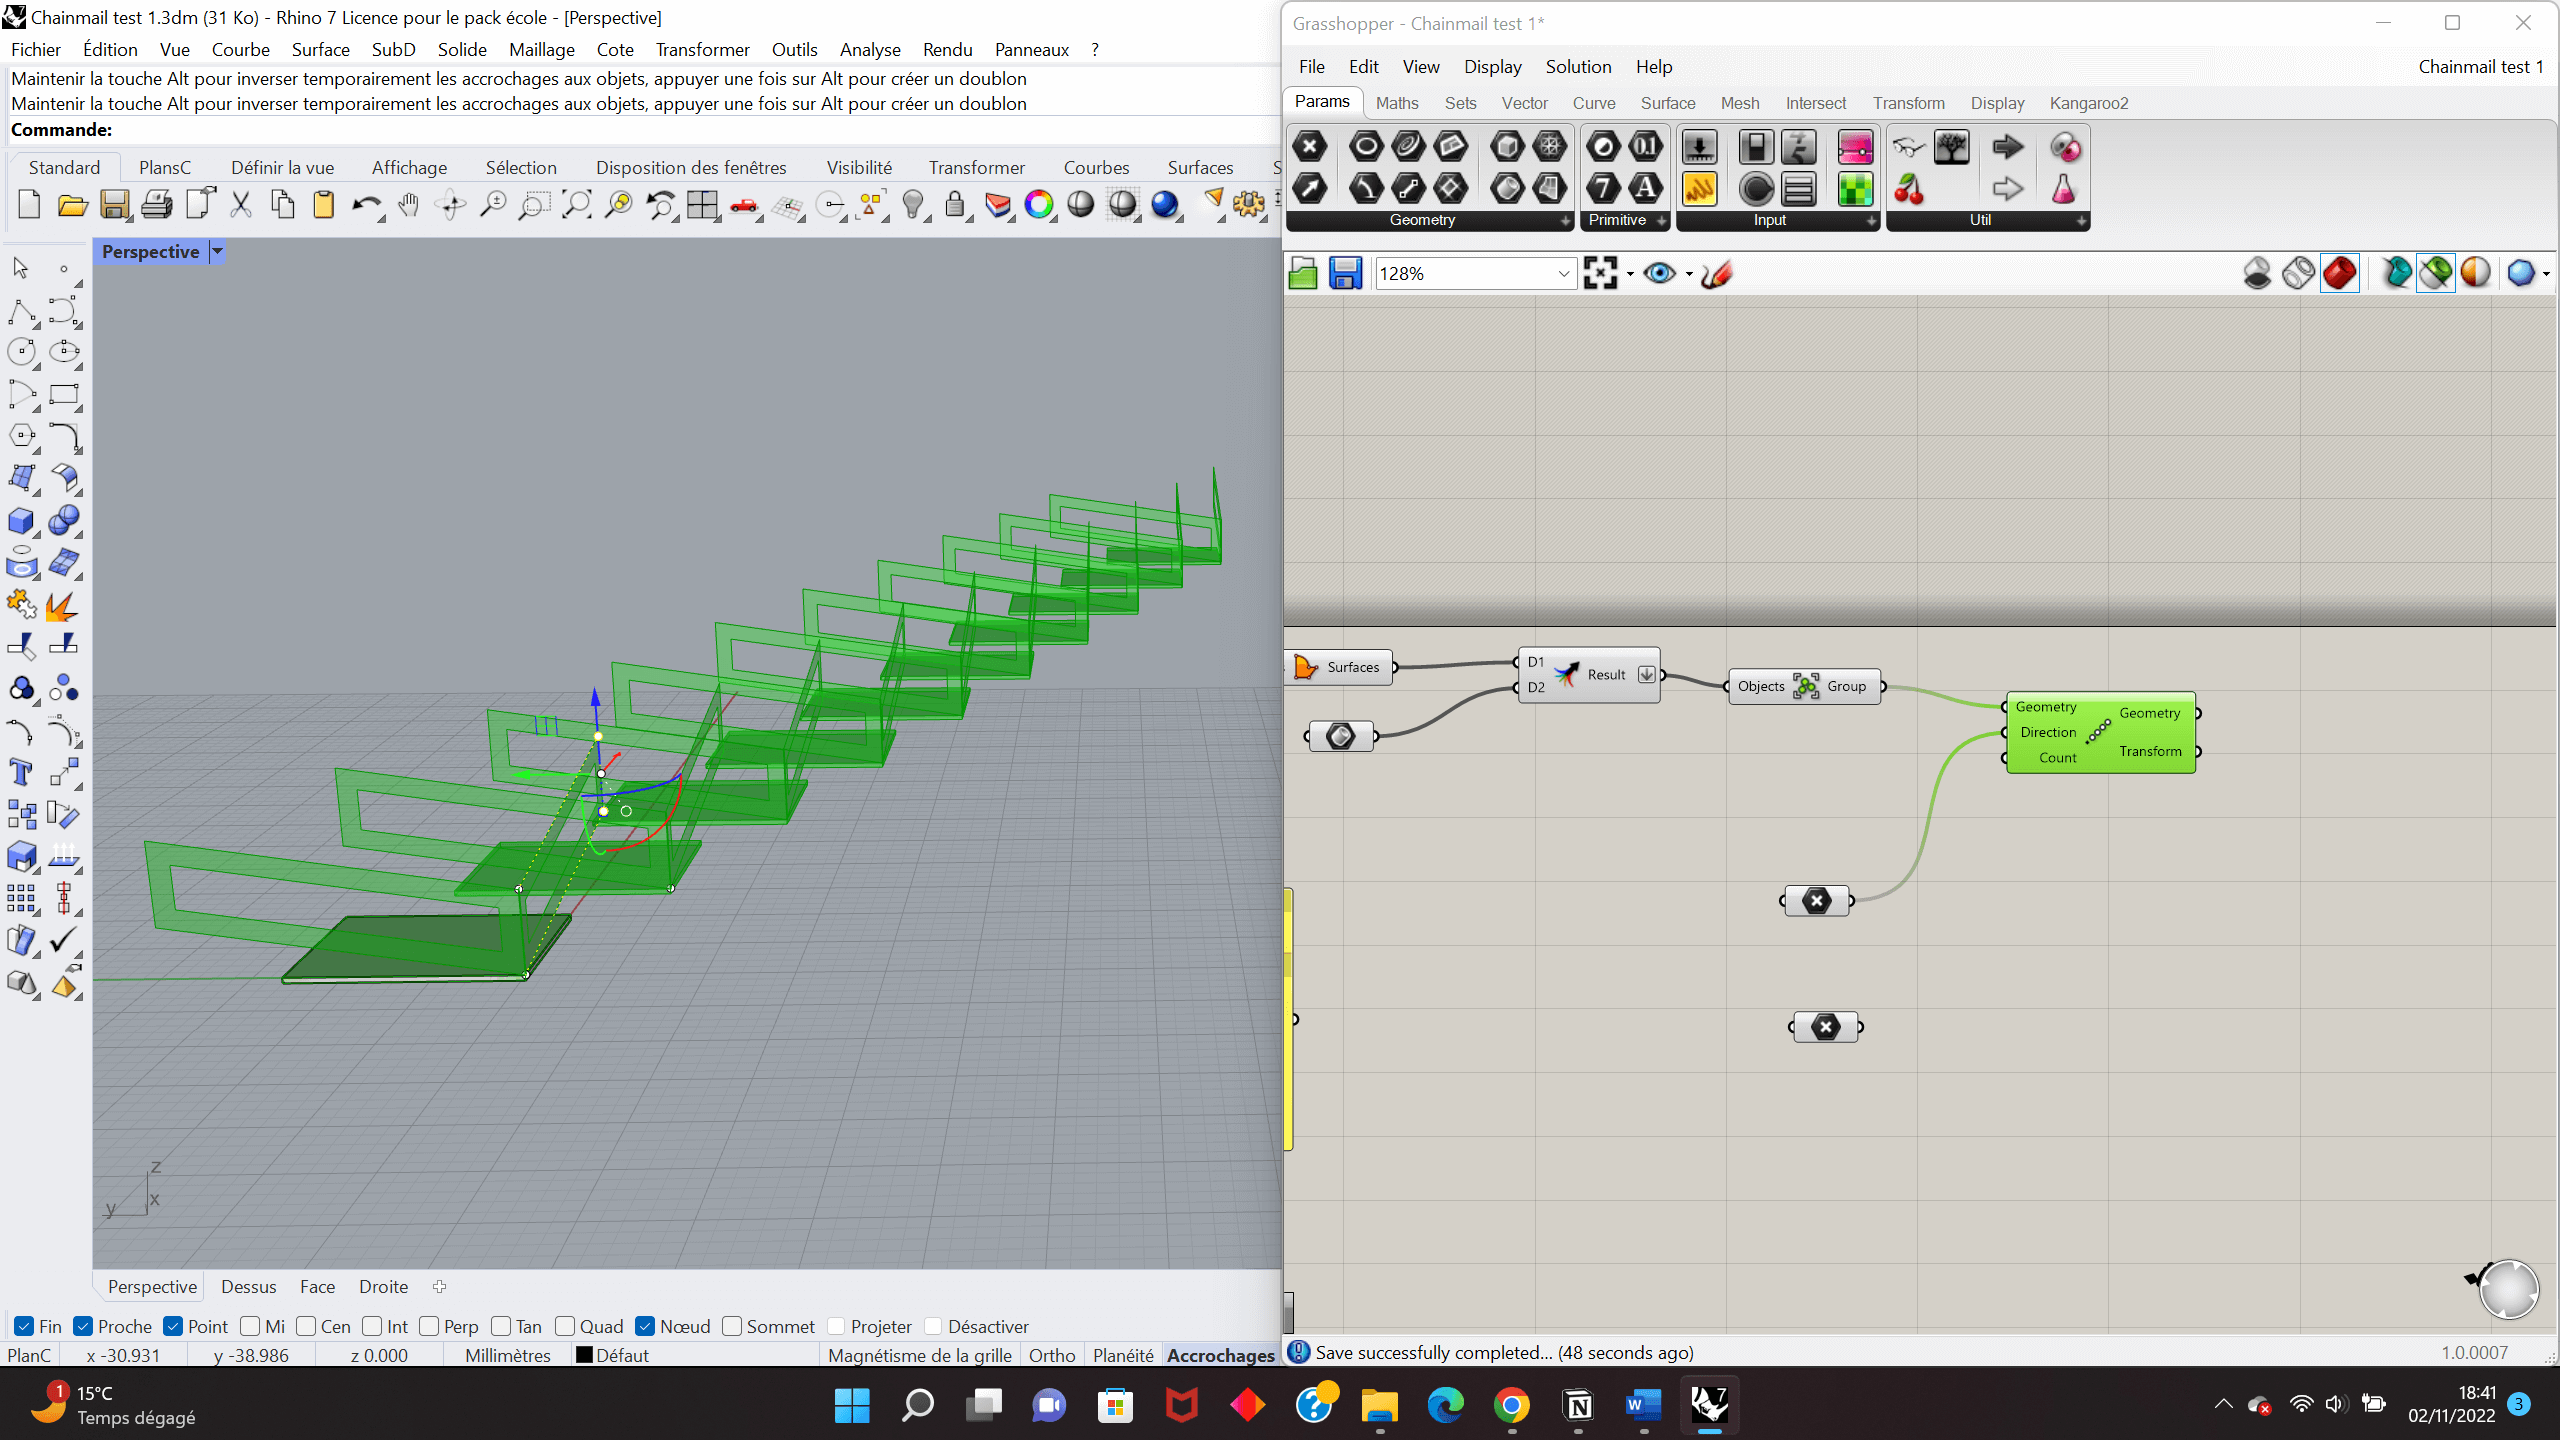
Step 2: adding this shape into Grasshopper.
Doubleclic > "Brep"
Right clic > "Set on multiple Brep" > in Rhino, click on the objects you want to add in Grasshopper (the double loops and the base)
Step
In Grasshopper, use the tool LinearArray.
Set a NumberSlider to give the count of the array.
For the direction, set a point into Rhino; it will be your reference point.
You have to check that your loops aren't intersecting, otherwise, it will be printed into one block of material, and won't be able to rotate.
Repeat this action in the other direction.
When adding the other direction's linear array, it can happen that one loop encircles two parts of the other direction's loop. This isn't a problem if nothing is intersecting.
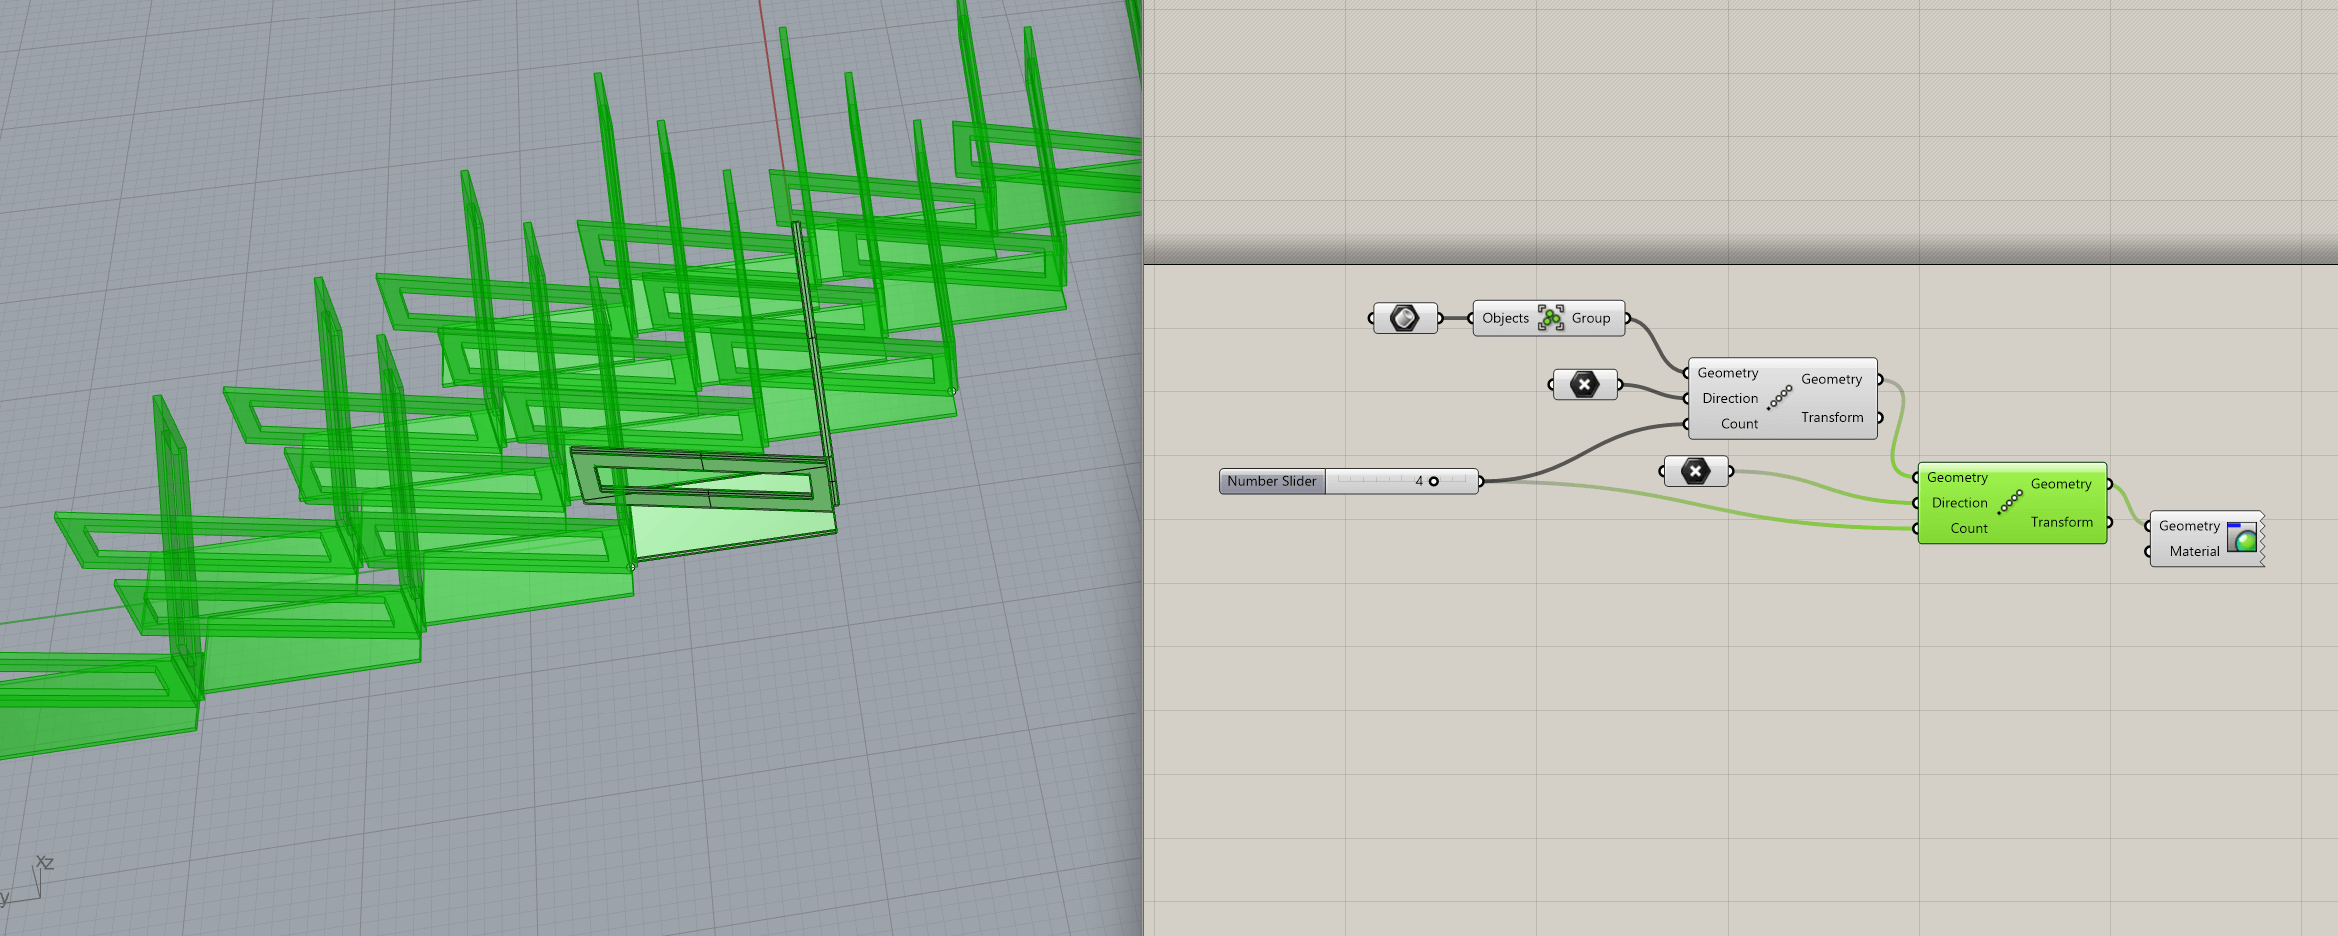
Why wasn't it working efficiently?
Actually, the hole into the loop was too big and the result was making a mess and nodes. So, the solution would be to create the same kind of loop but without such a big hole in it, for it to rotate in a smoother way.

Faux-fur
The work of Florencia Moyano, called "Beyond Feathers" really interested me, since it provides a possible solution to the problem of the use of feathers in the field of fashion. The designer really sought for an alternative to animal material.
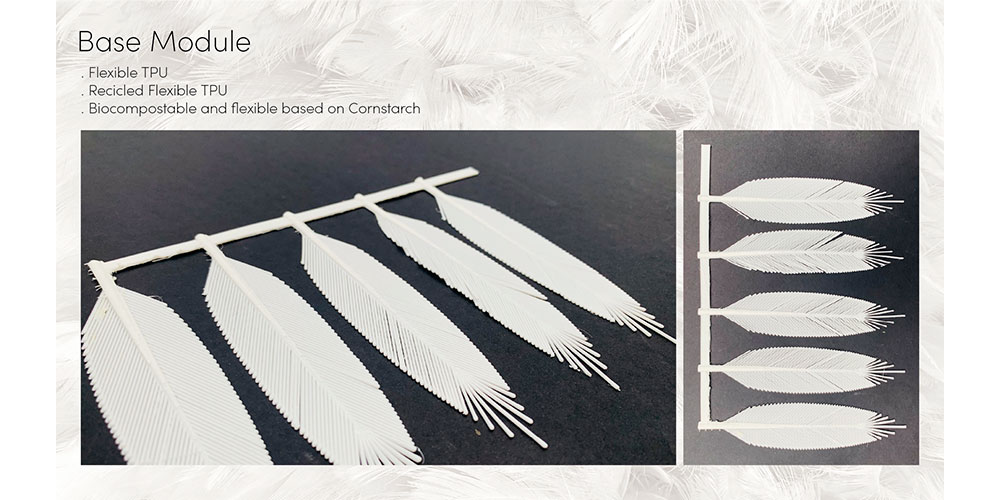
I wondered if it would be possible to create a "fur-like" 3D-printed fabric. What I wanted to do was to create a sandwich-like structure with various hairs coming from a fabric that would sandwiched between two layers of 3D printed material.
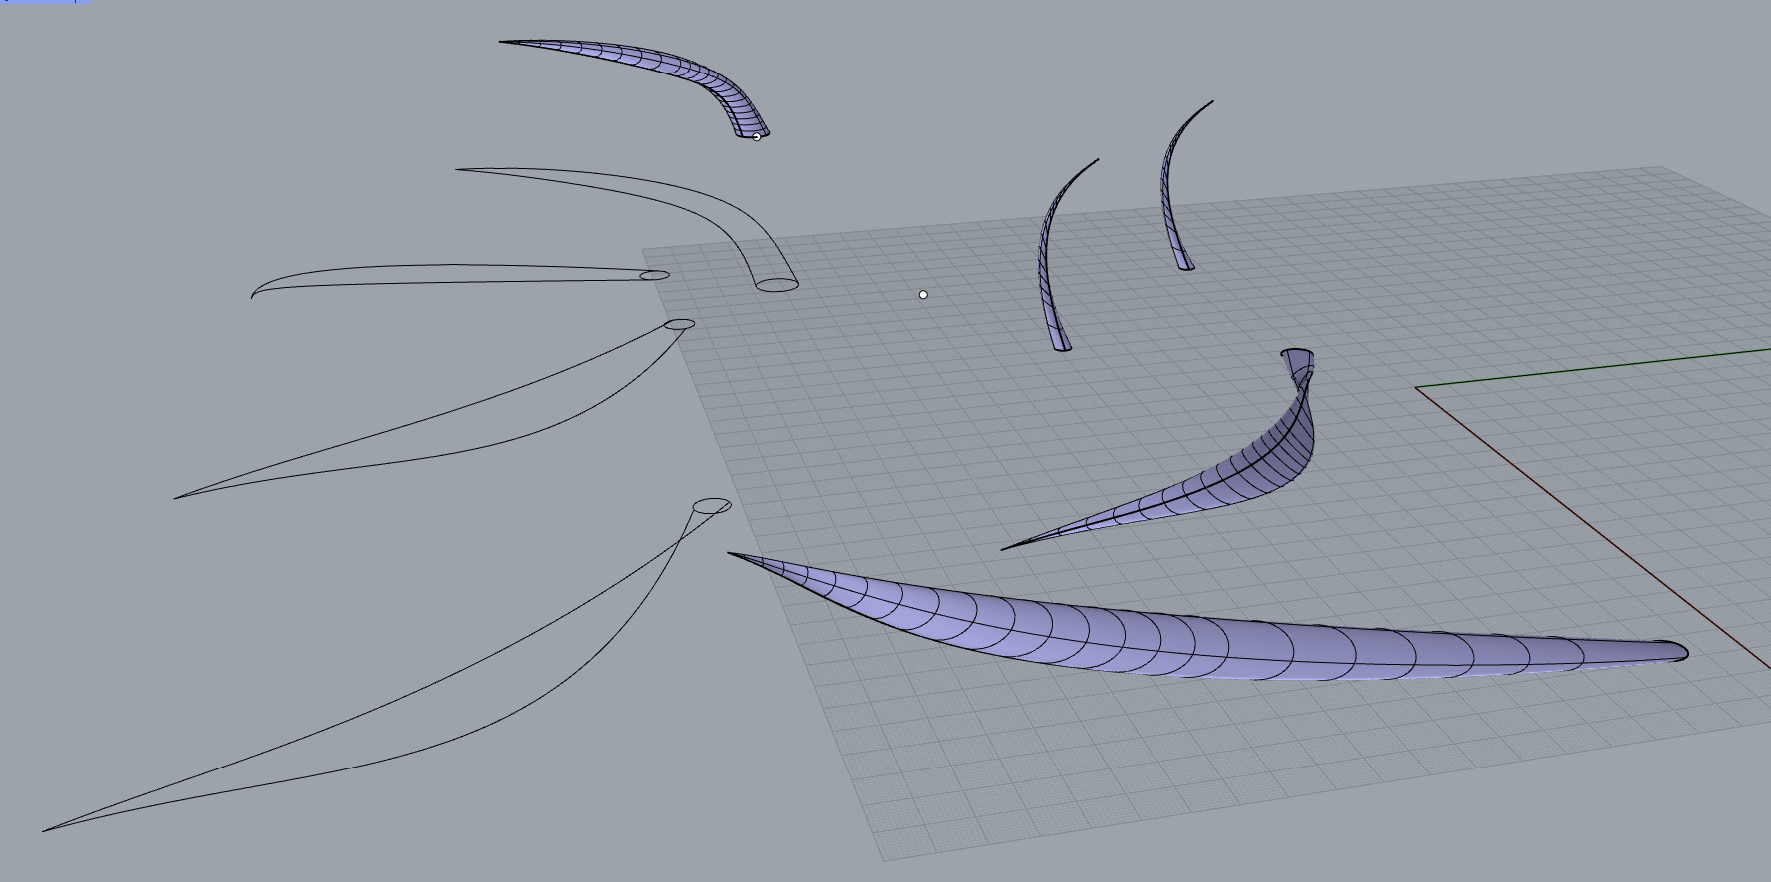
Creating the shape of the hair on Rhino 3D
Draw a circle (will be your hair basis)
Draw the shape of the hair, using two different curve joining at the top of the hair.
Use the command "Sweep 2". Click on the first curve, then on the second one, and finally on your circle. It wille generate a surface around these lines.
I tried several ones to create the hair I wanted:
First attempt of "hairs" placement
I wanted to get a sort of placement that wasn't too regular, yet quite dense in general.
I succeeded when using Hexagonal shapes.
Rectangle > set a rectangle into Rhino

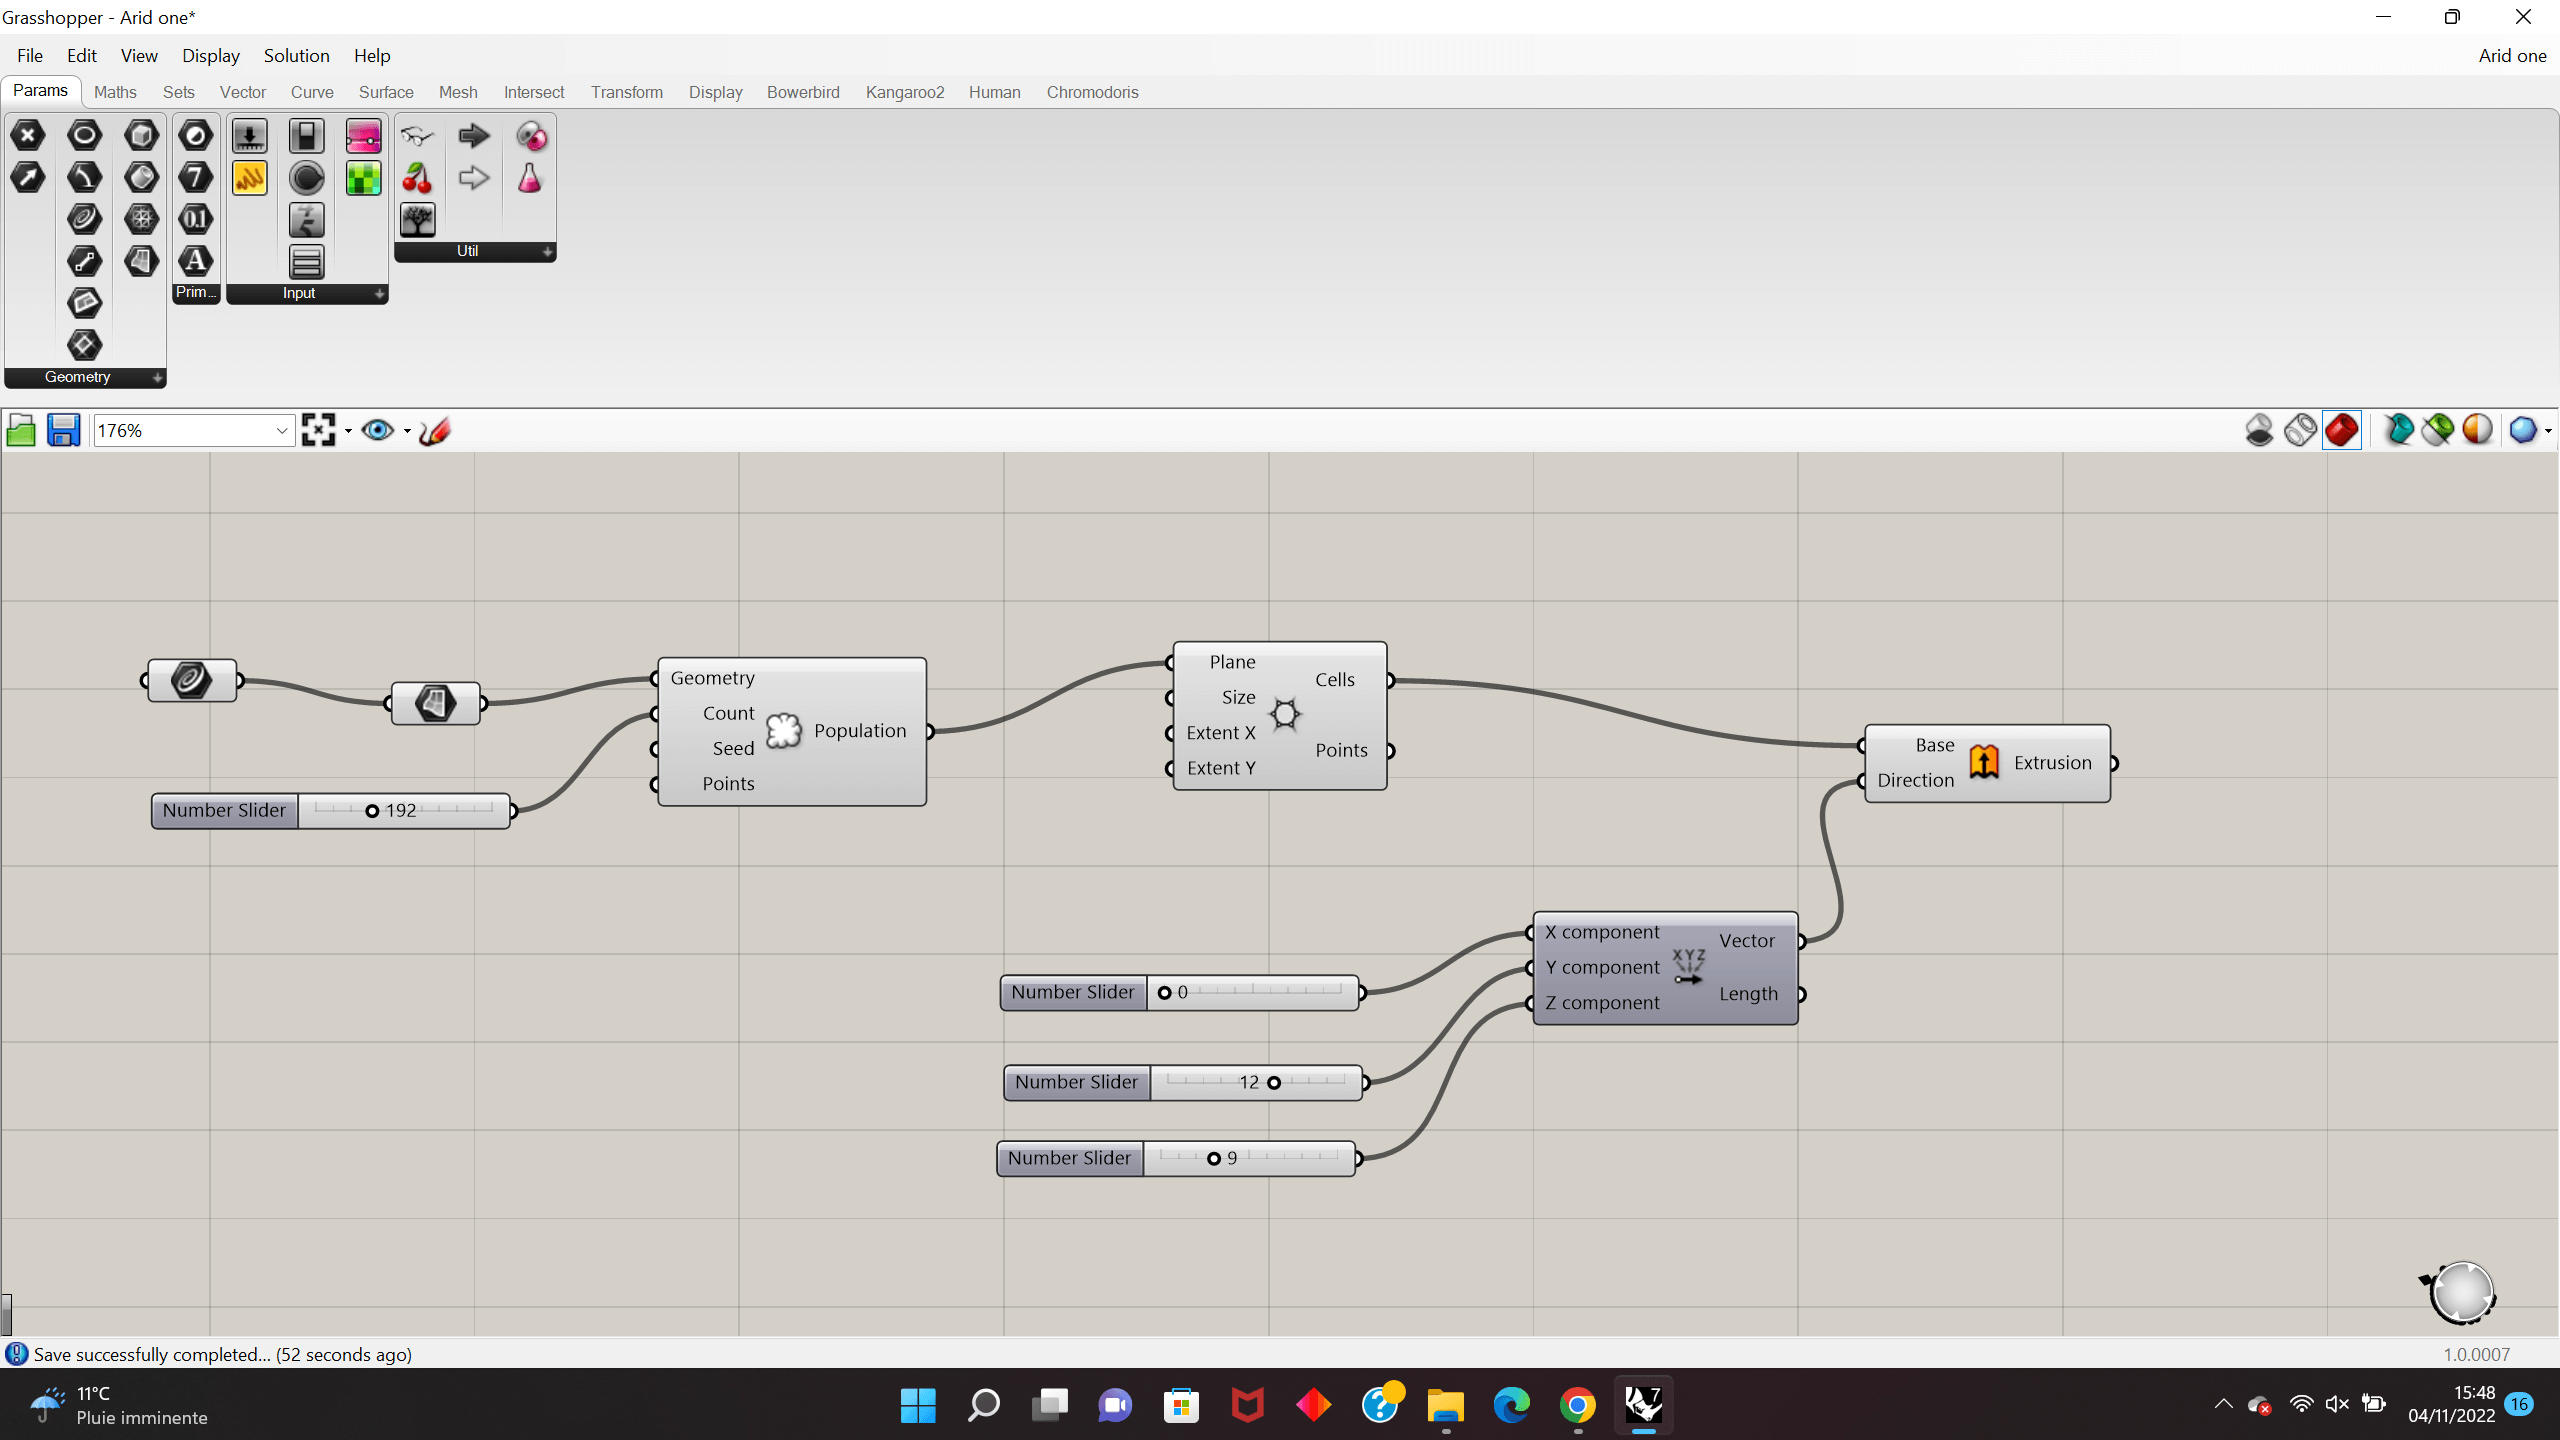
Ok, so what's happening here?
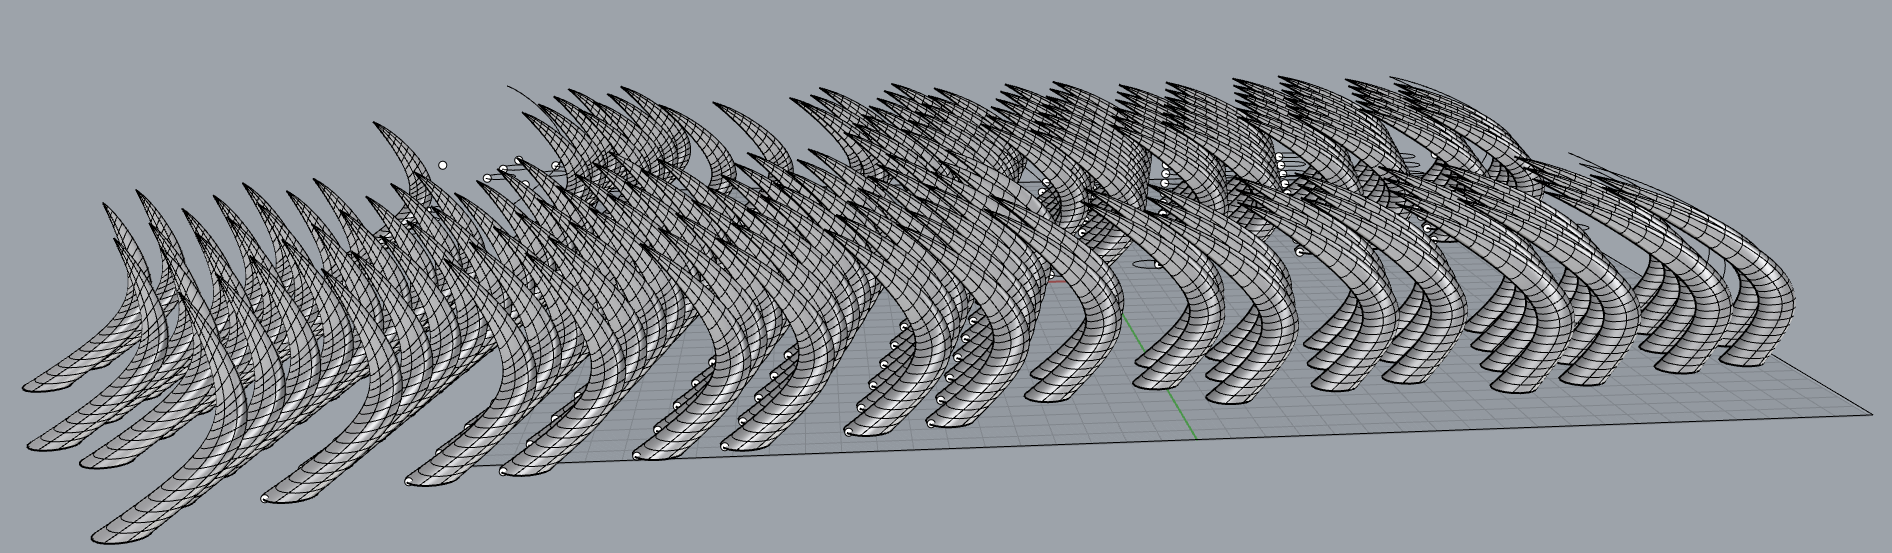
Create a rectangular curve. Set it in Grasshopper, using the param Curve. Drag and drop the param Surface Boundaries, connect it to the Curve output.
Add a Populate Geometry and connect it to the Surface Boundaries output.
With the Populate Geometry, you can vary some options:
- the Count (I connected a Number Slider to it, going from 10 to 200). It is the number of points that are randomly generated onto the geometry you want to populate.
- the Seed (if you connect a Number Slider to this input, it will modify the type of randomness of the points.)
- the Point (it corresponds to an optional pre-existing population, that I don't have in my code, so I don't need it.)
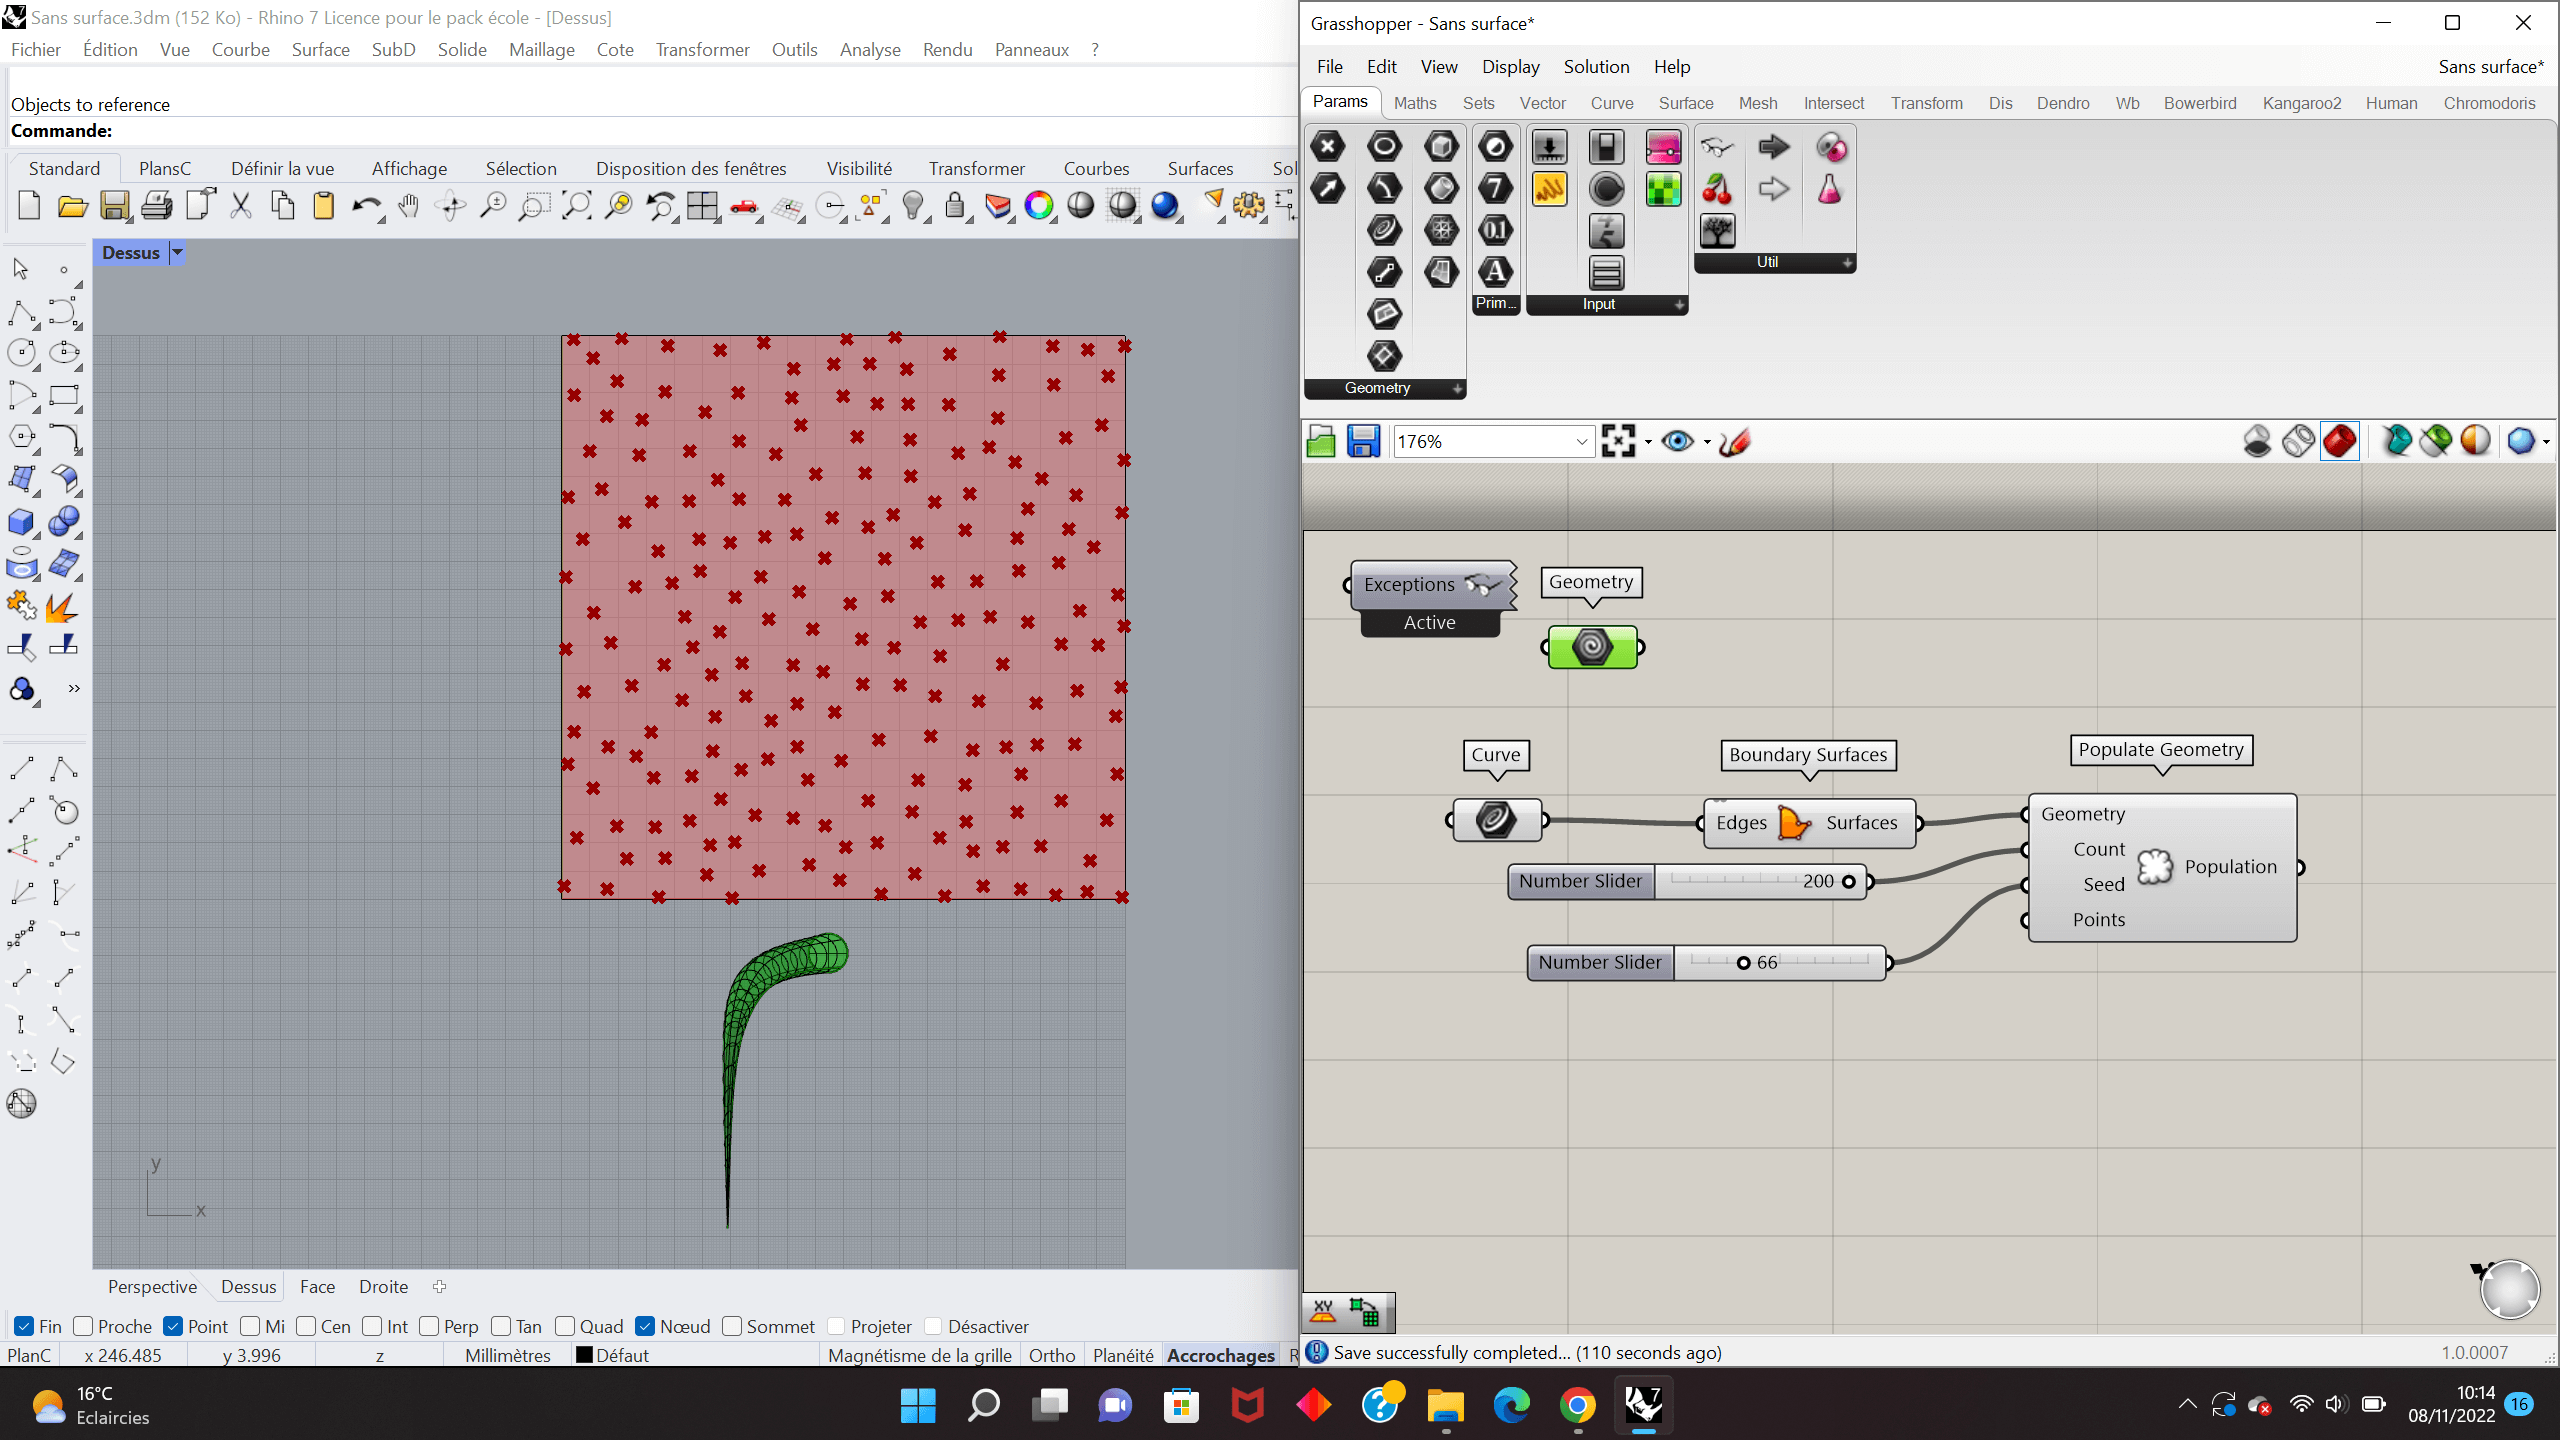
Drag and drop an Hexagonal, connect it to the Population output of the Populate Geometry. It generates a little 'bee nest' made out of hexagons on each point of your population of points. Then, add an Extrude. Connect the input to the Cells output of the Hexagonal component.
To create an inclination, add an XYZ vector component to the map. Connect it to the Direction input of the Extrude component.
Add three Number Slider and connect one to each X, Y, Z inputs of this XYZ vector component. When changing the numbers, you can see the direction of the extrusion changing.
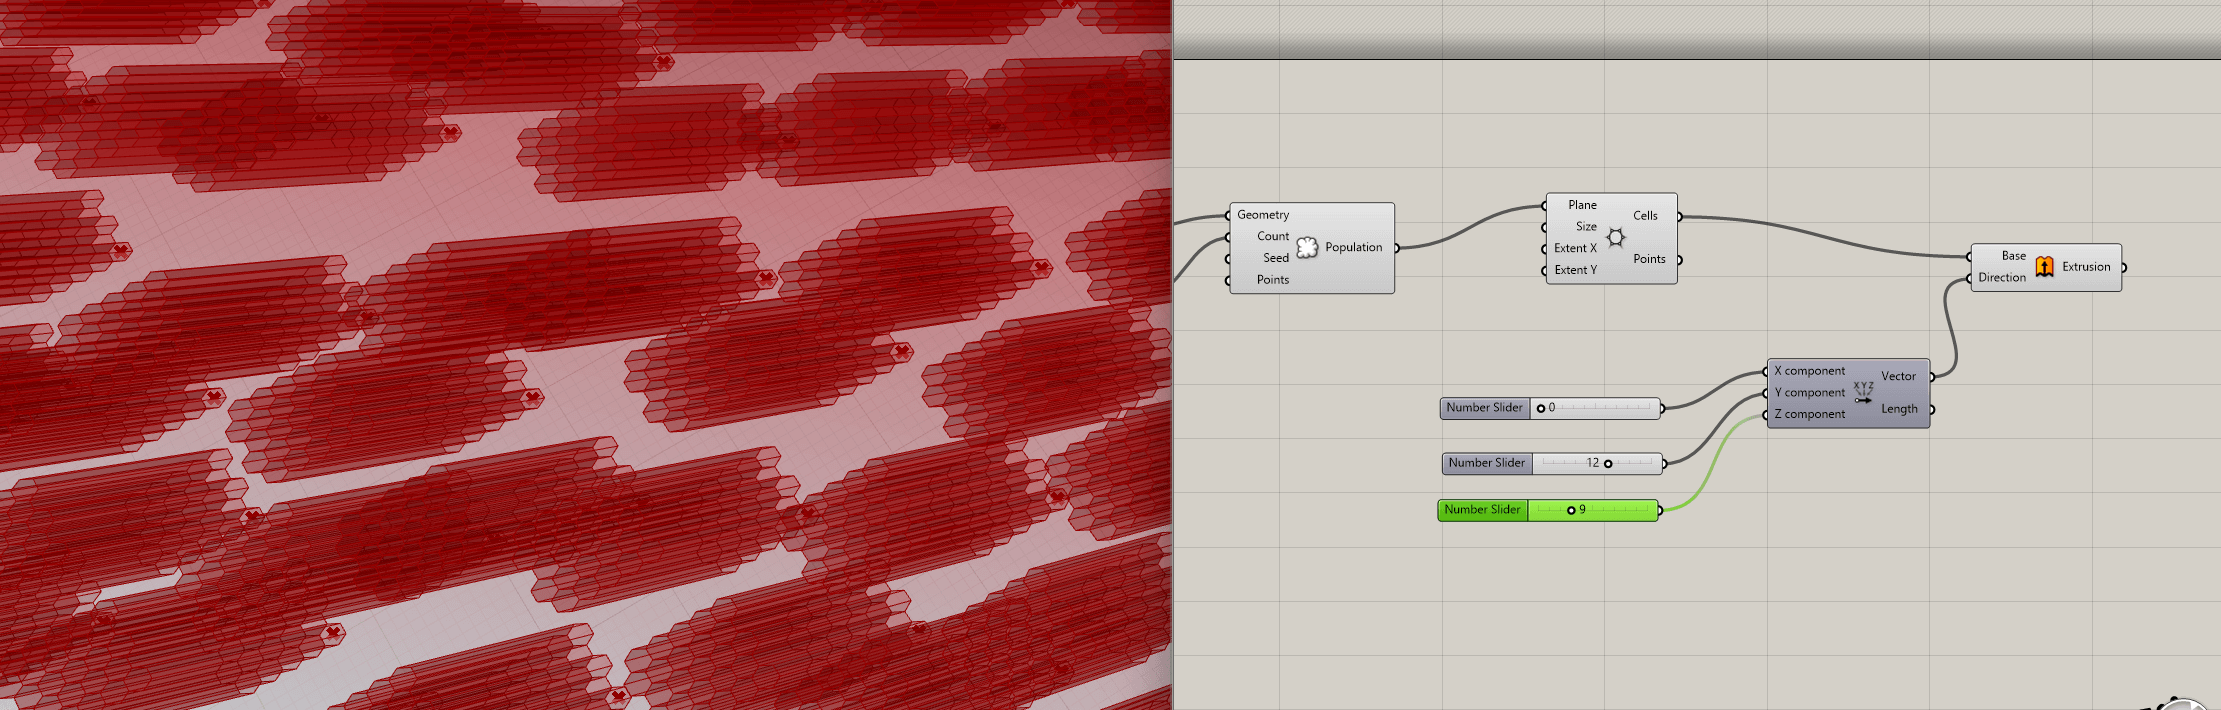
Happiness!! I thought when doing this. I was convinced that the next step (adding the hairs onto the surface thanks to the 2D populate )
But I could'nt replace the Hexagonal tool by my Brep, because the Population output of the Populate Geometry was made of points, and I had a missing step between the two. I had to try and find this missing step.
After several failures in programming this with the portion of code above, I decided to try something else.
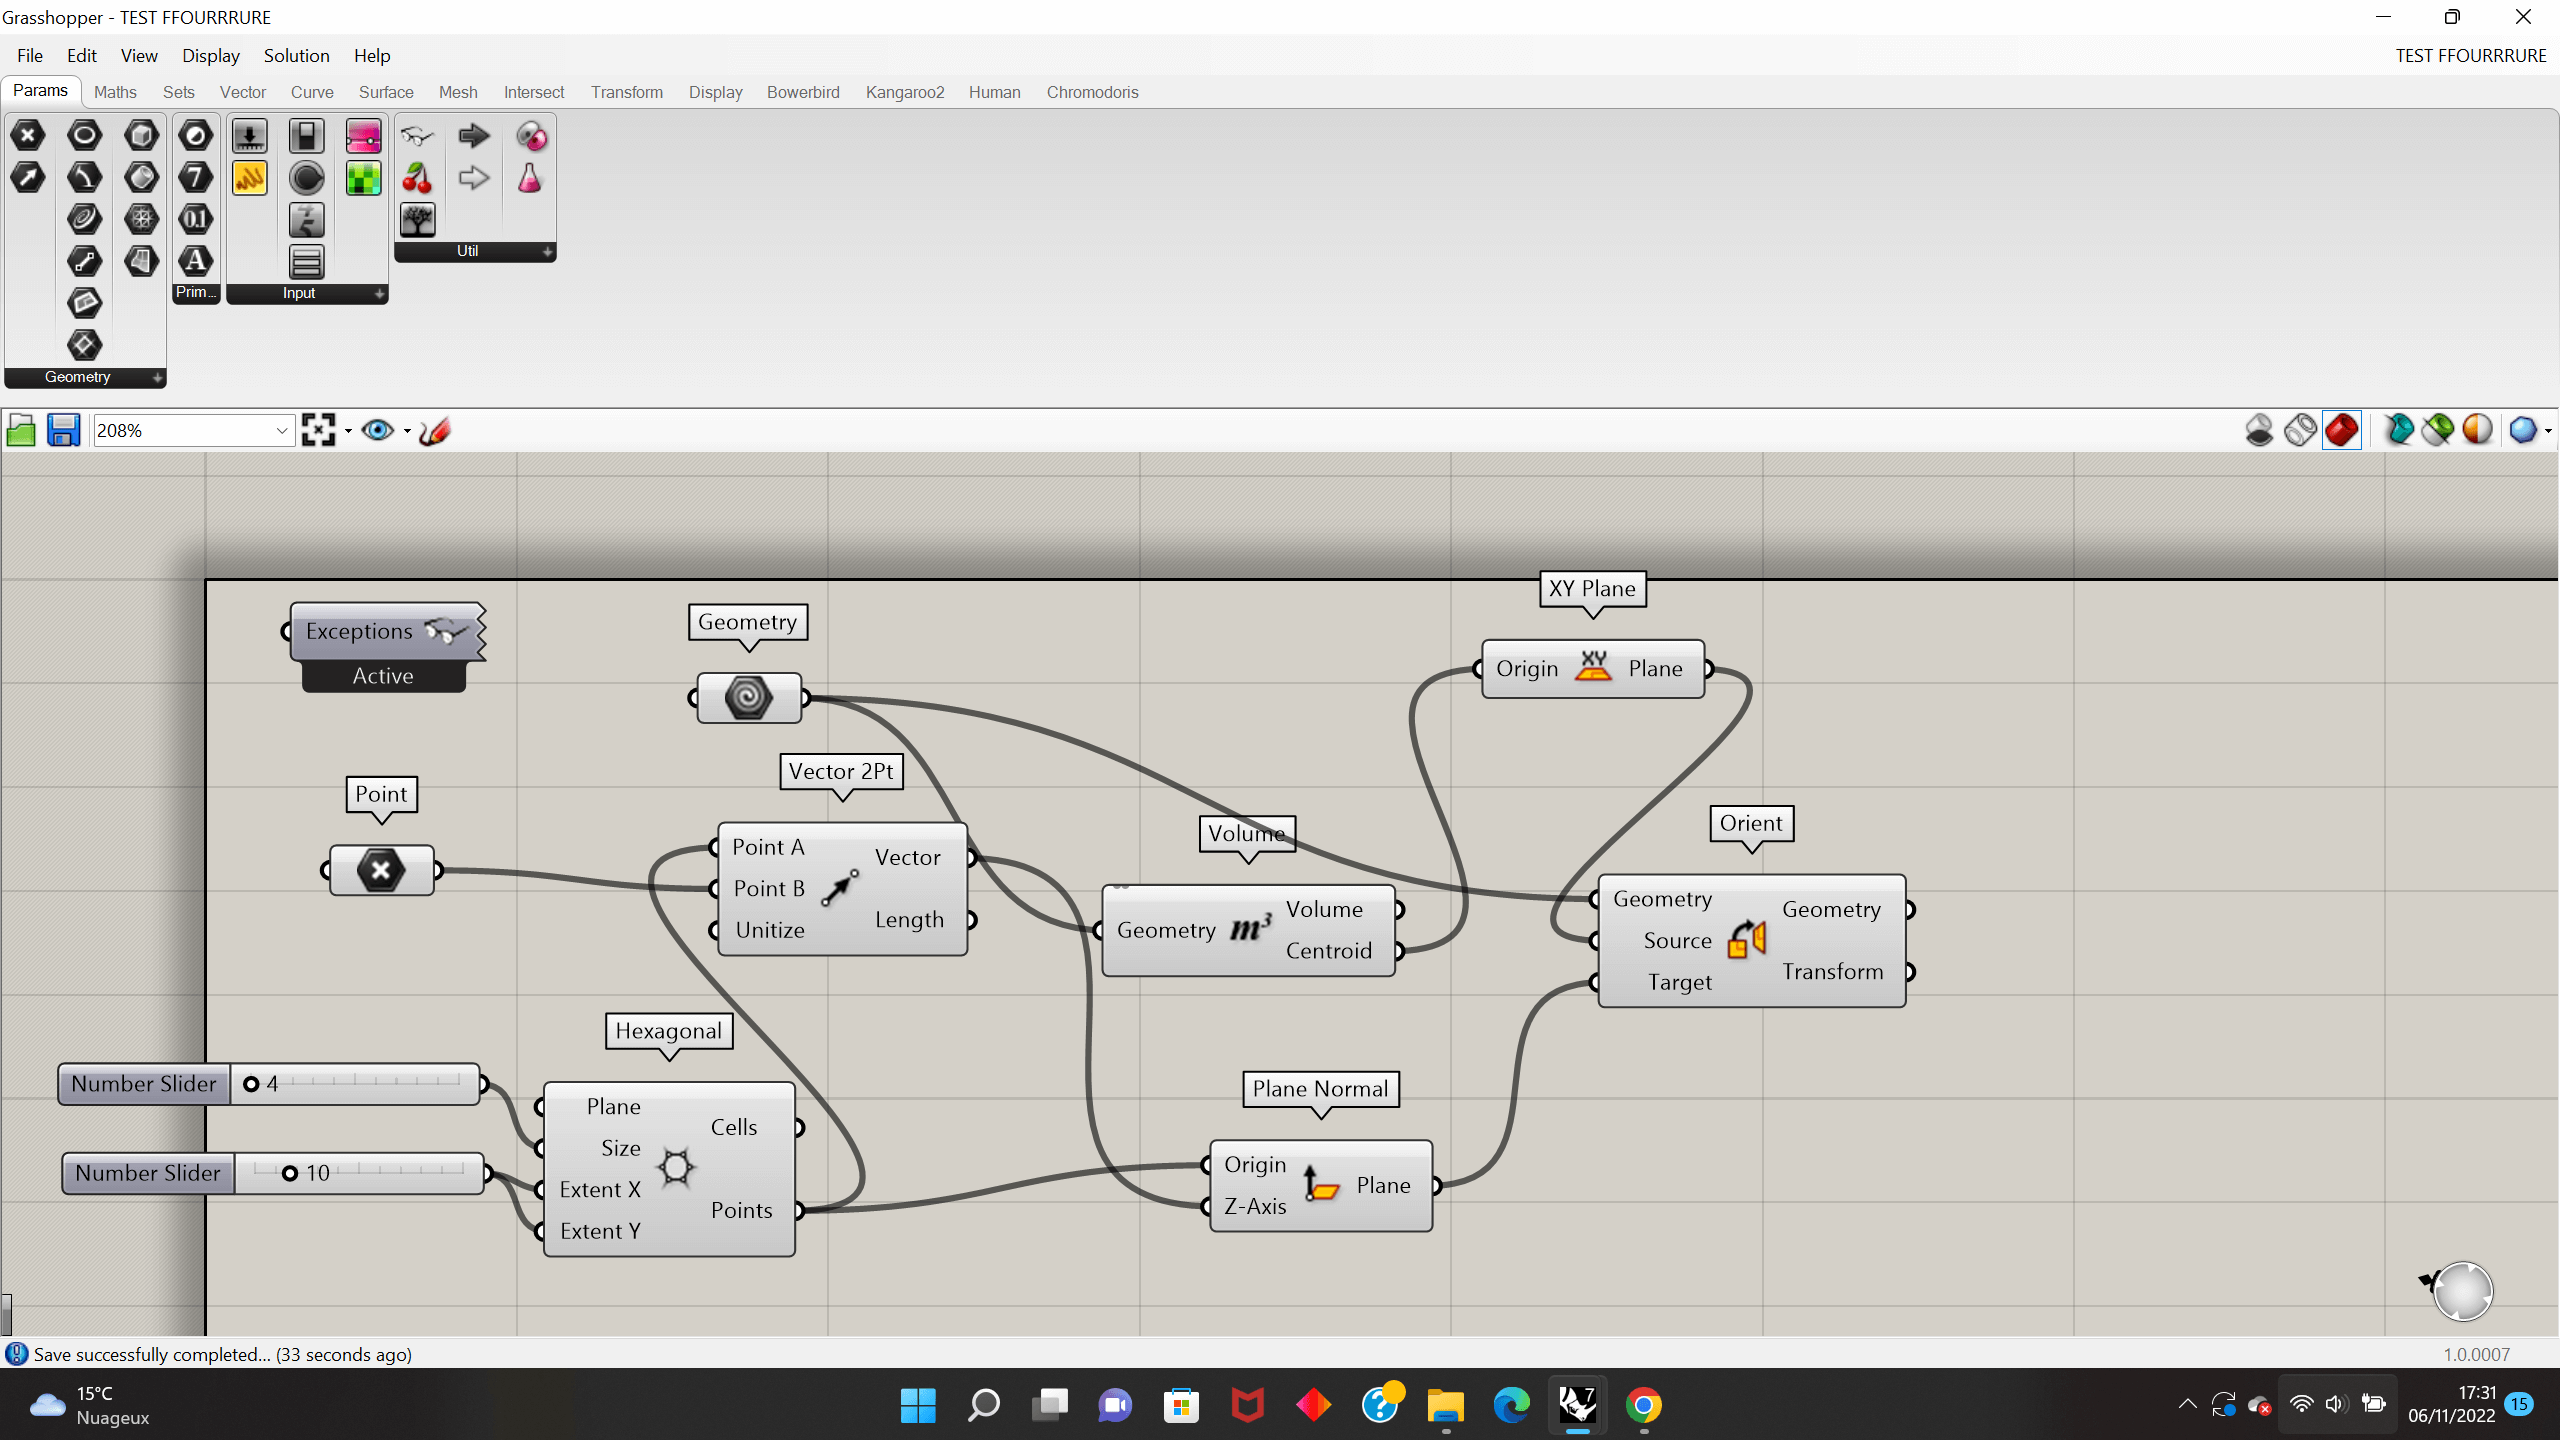
Second attempt of "hairs" placement
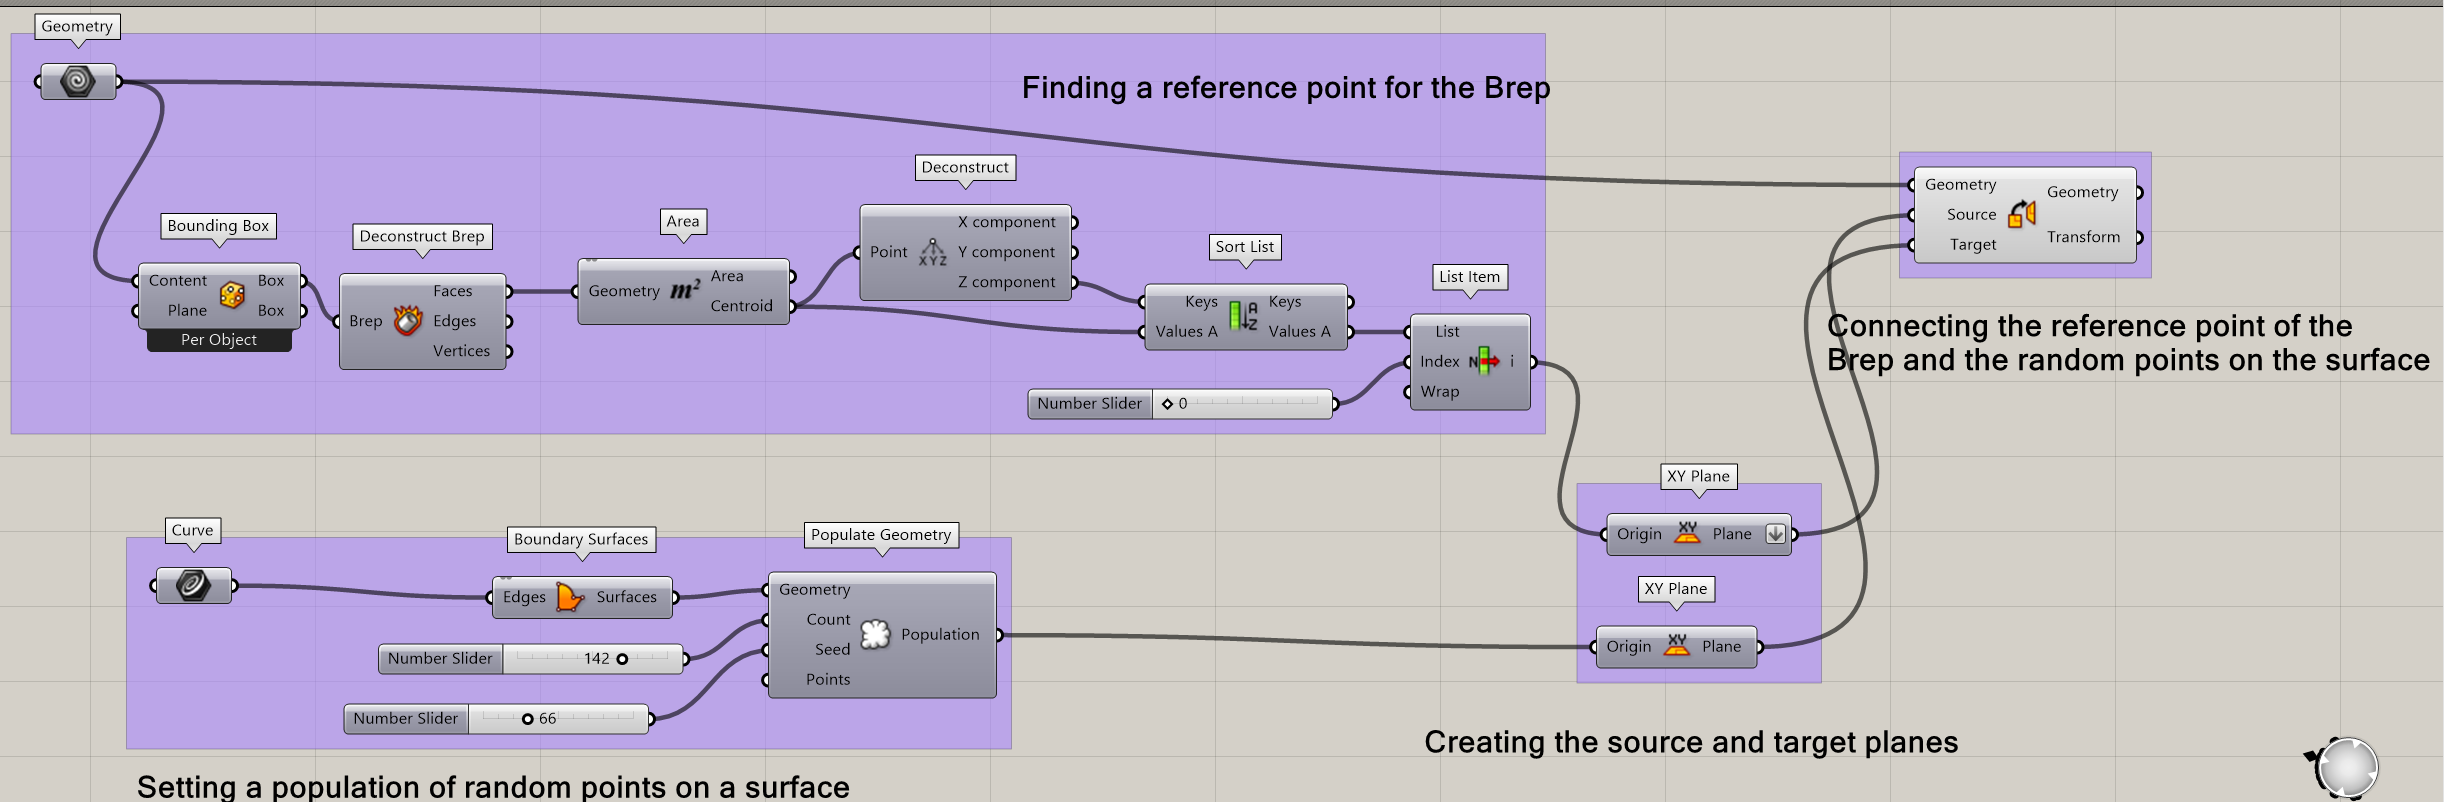
I found a tutorial by PC Sim about Orienting an Object to a Point.
So, basically, it was about adding an object onto a surface, in order to orientate it towards a selected point.
This wasn't exactly my goal, but it could be a possible solution to my problem of adding an object (Brep or Geometry) to a surface, with the Populate Geometry population of points as references to the placement of each hair.
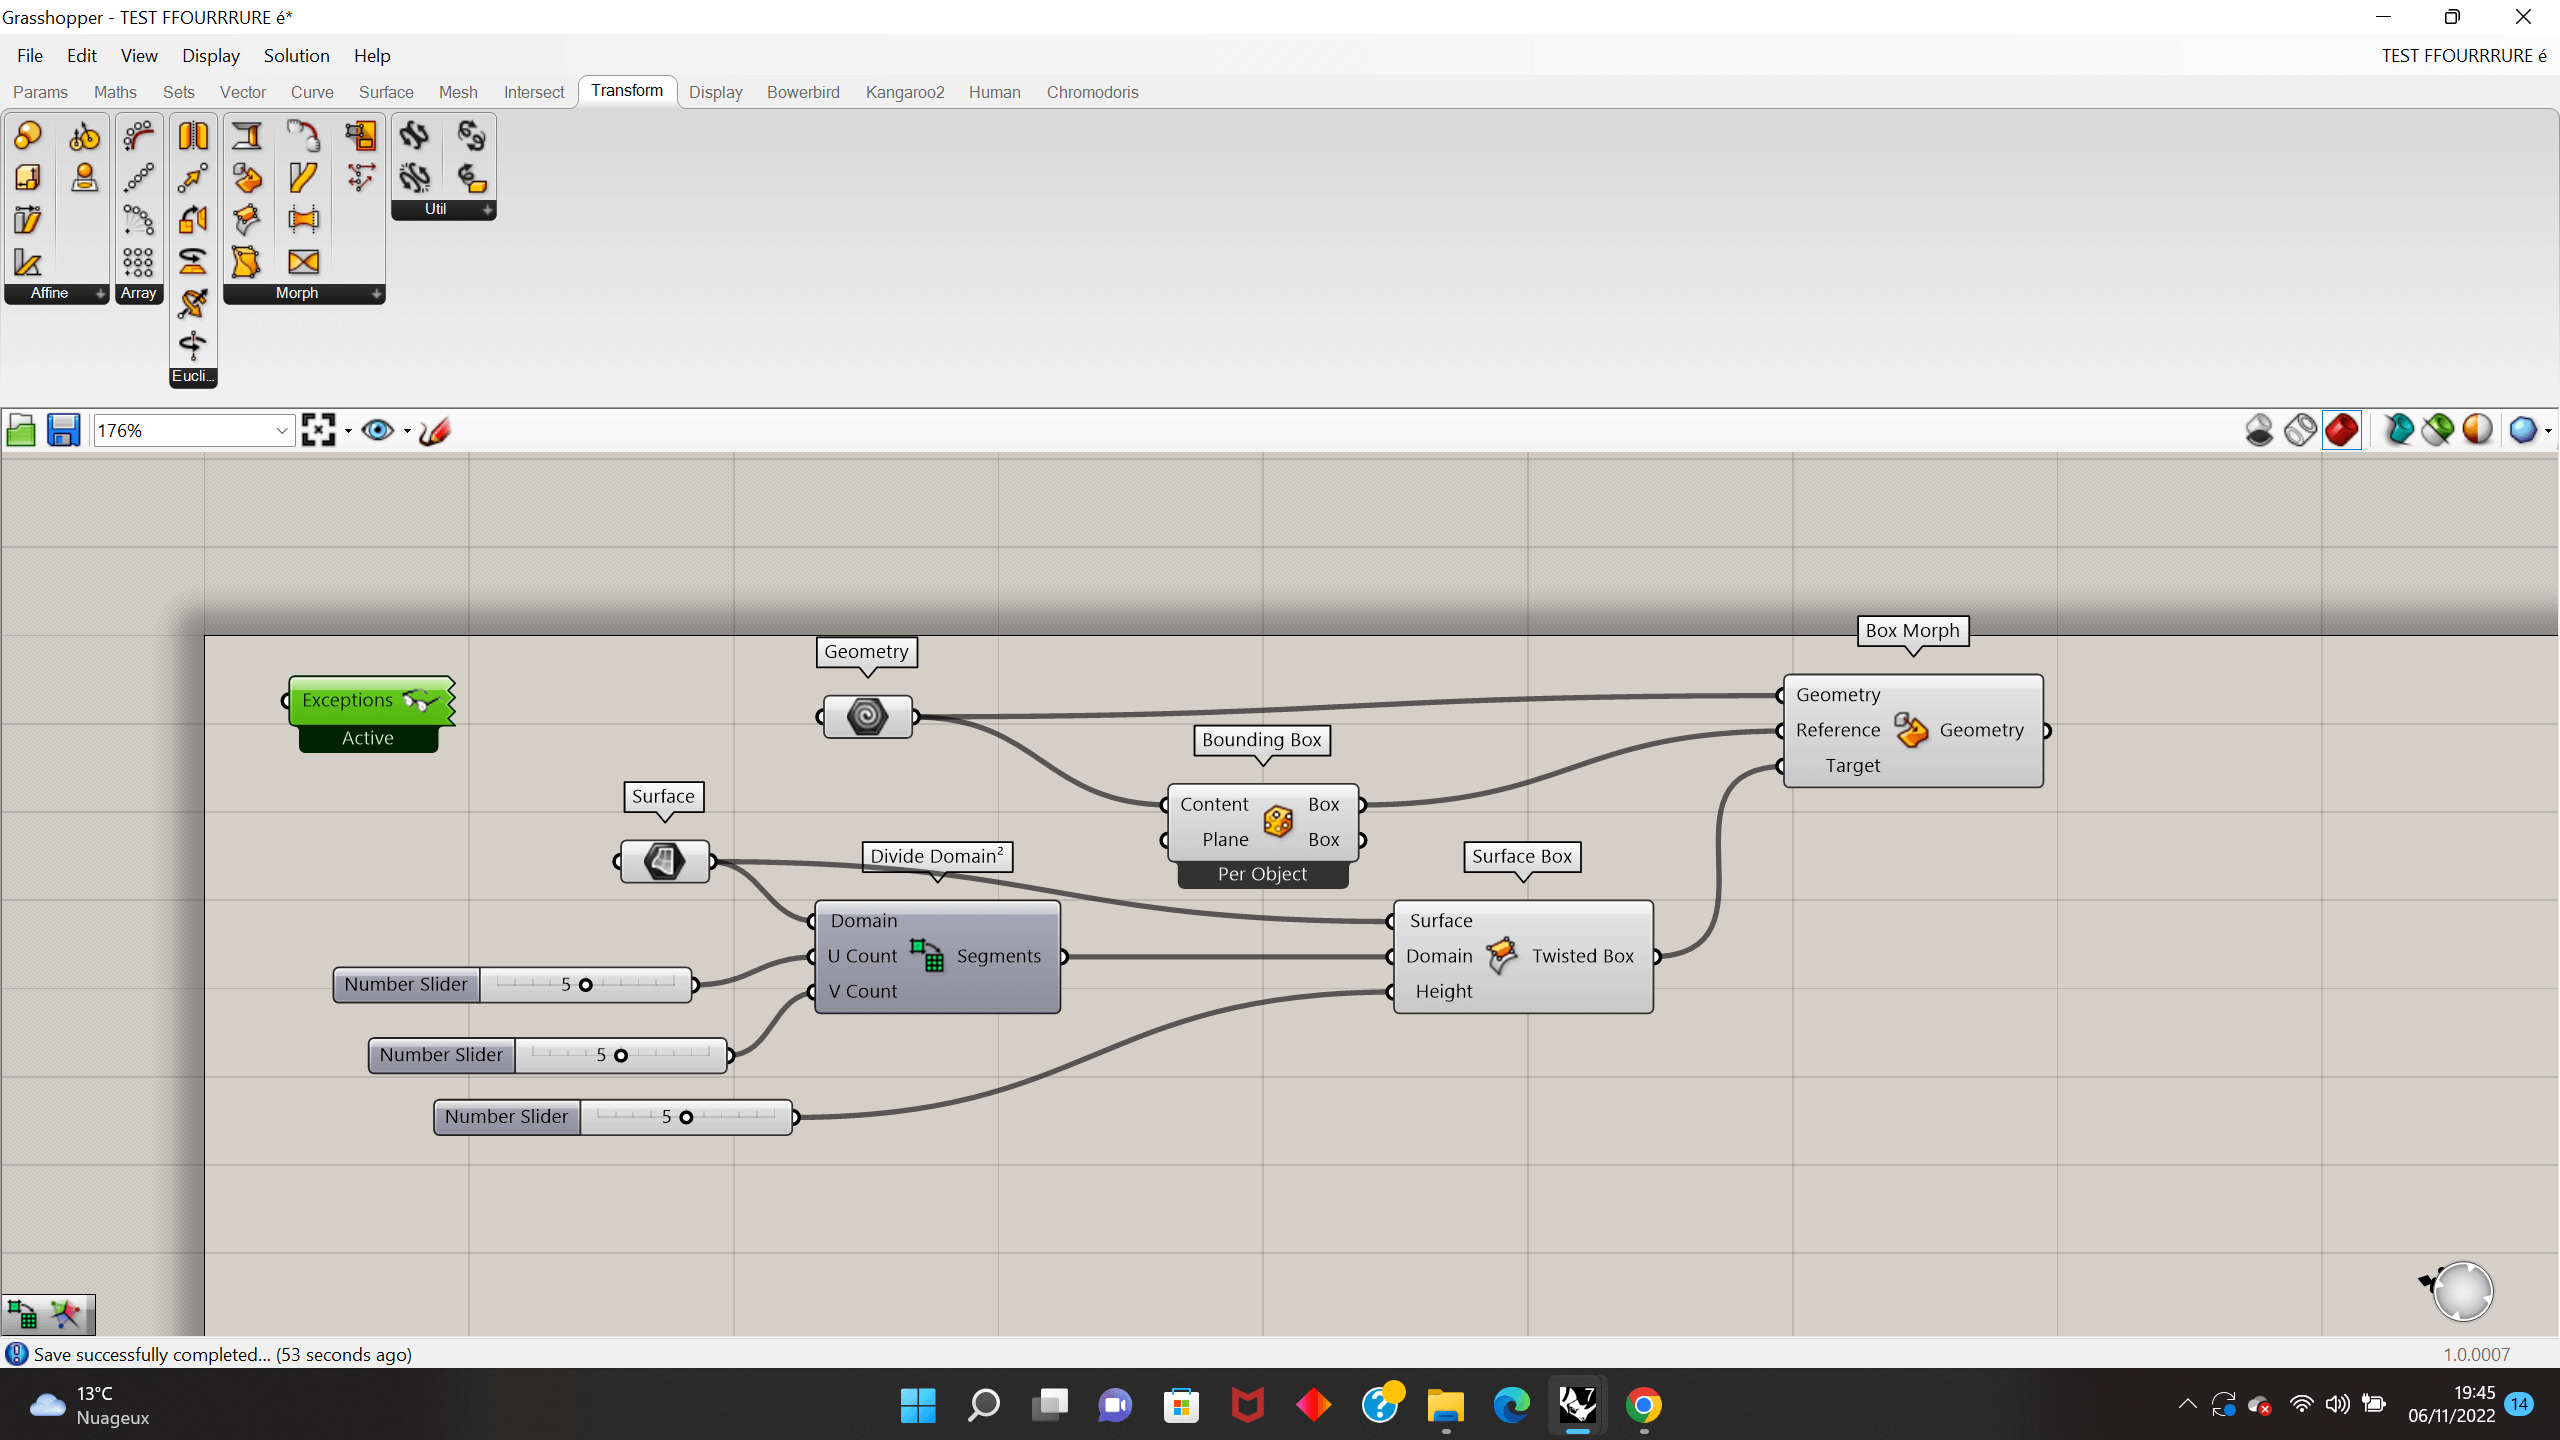
Third attempt...
Looking for another solution, I found the tutorial on Modelab which goal was to "box morph component to populate a NURBS surface with a geometric component.". The component was a geometry, and what was meant to achieve was having it all over a surface (that was made of the component.).
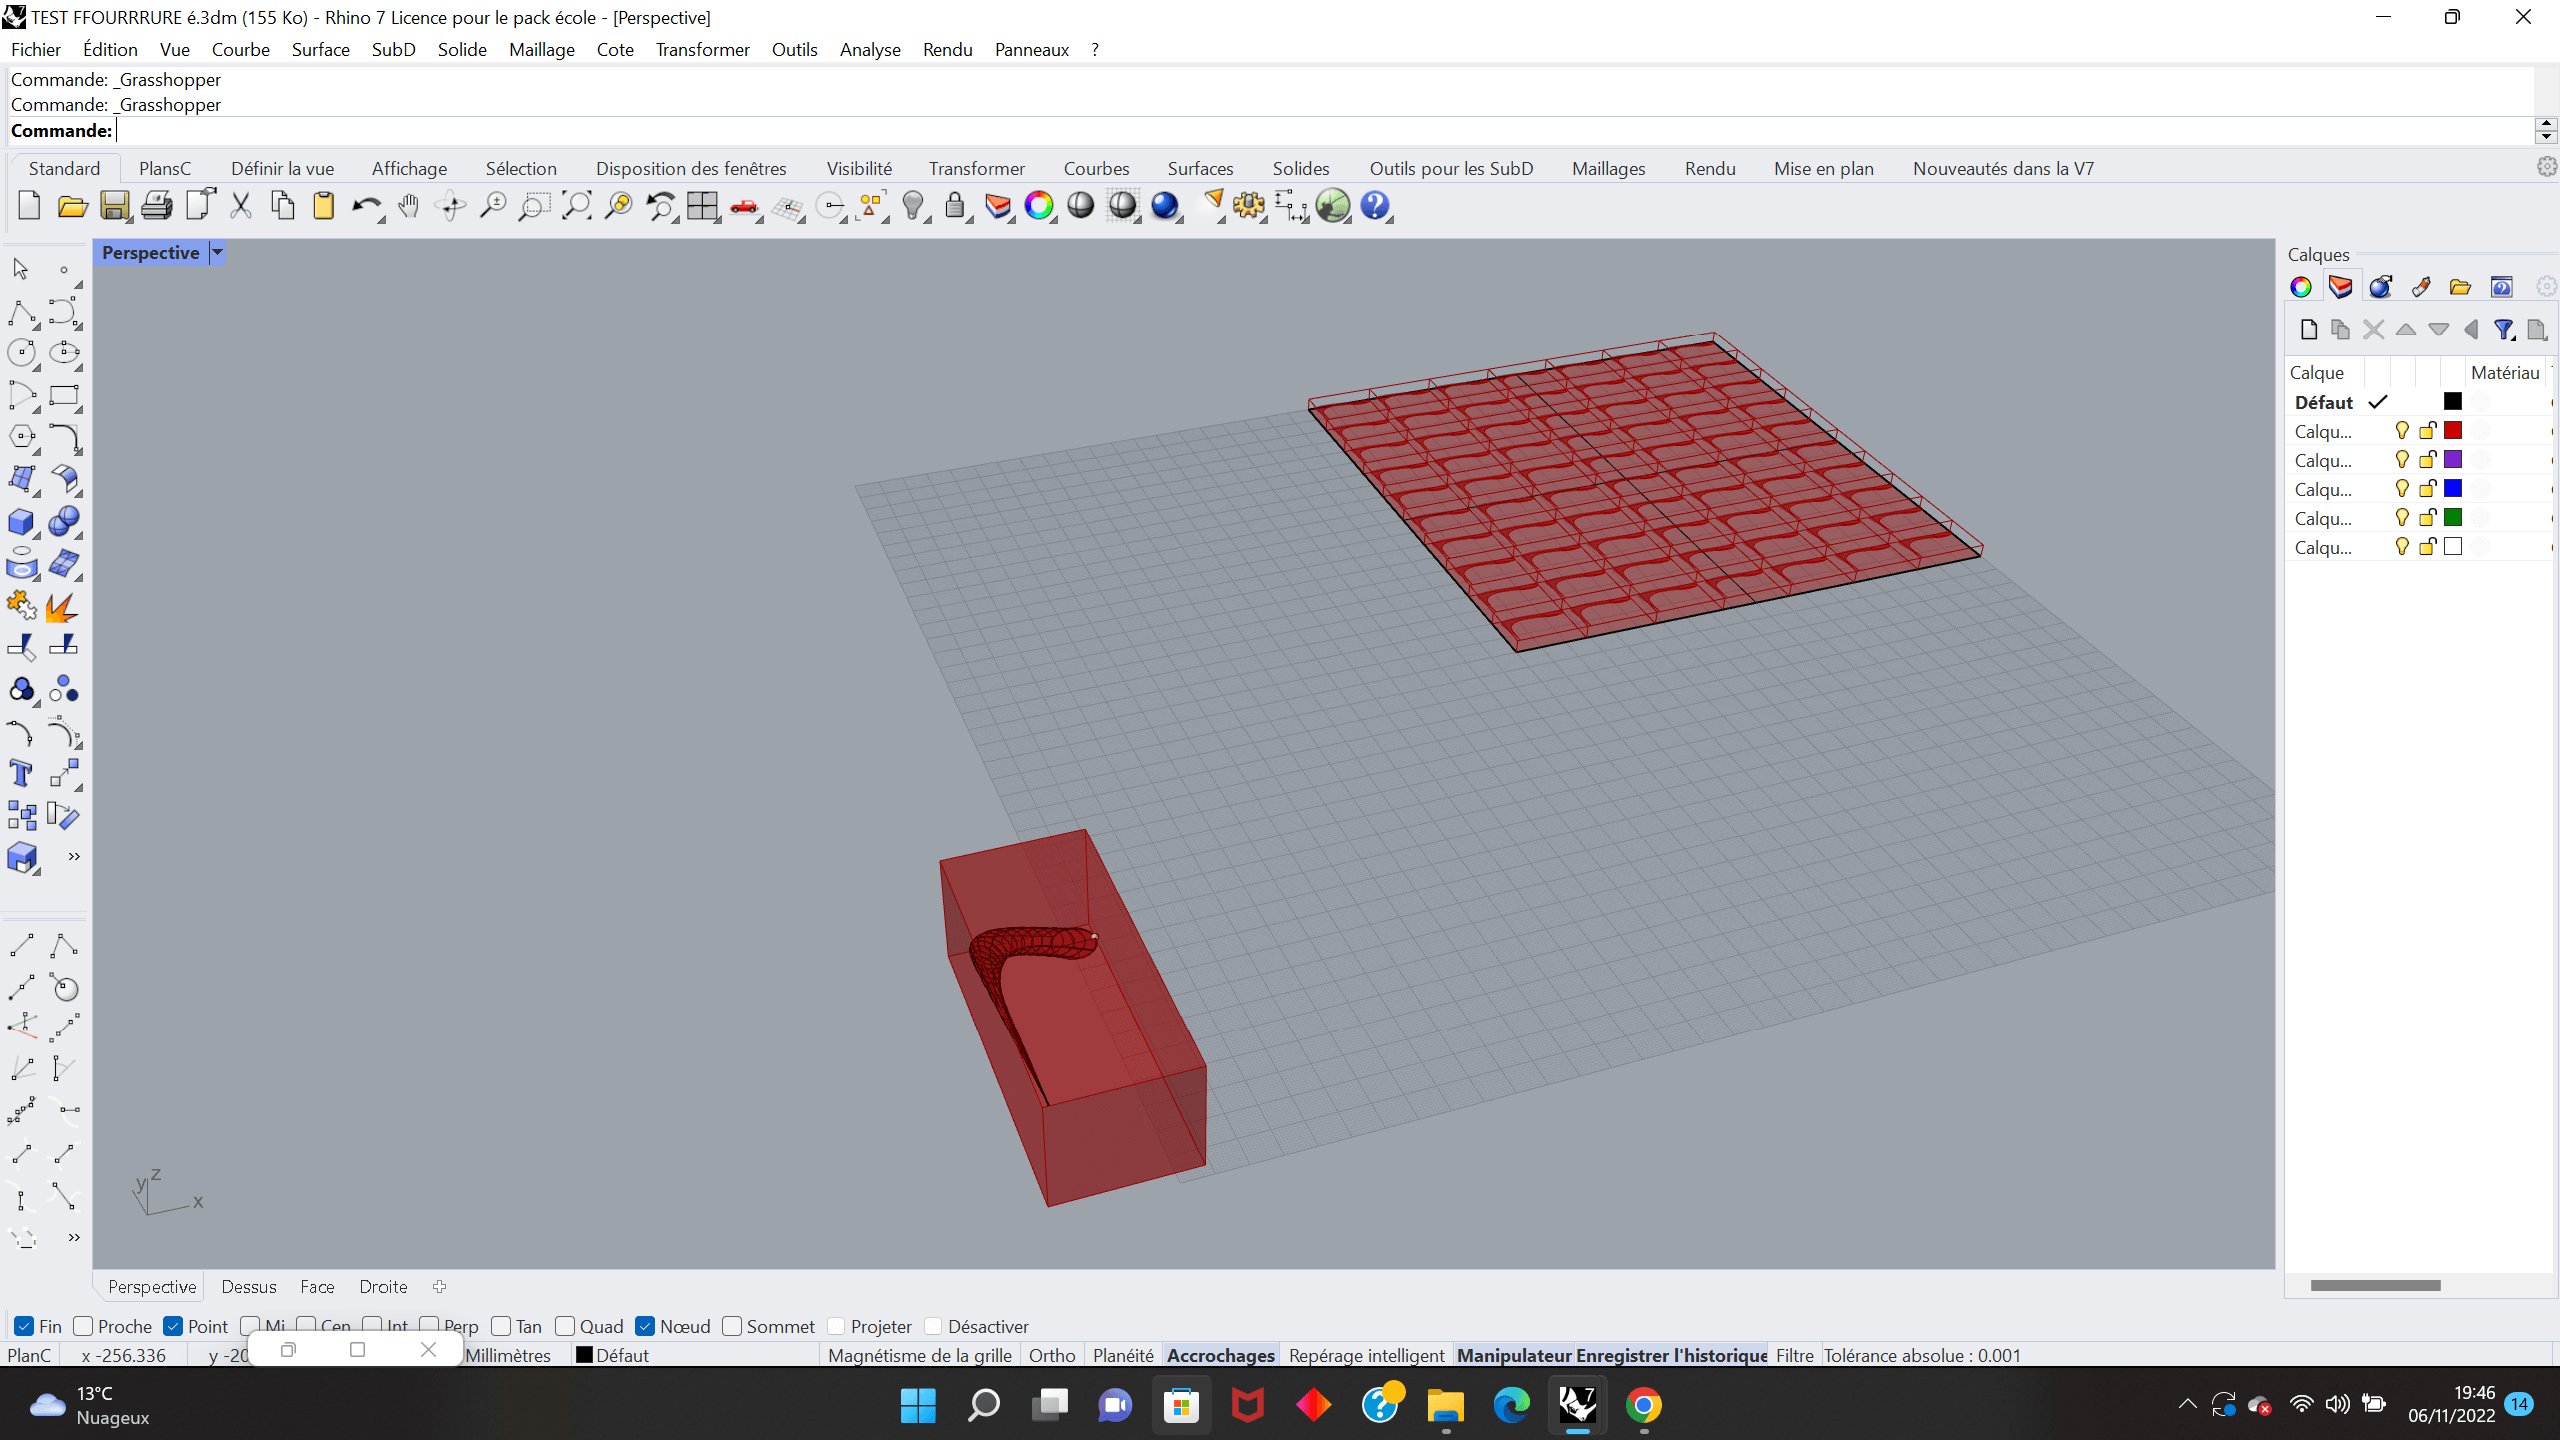
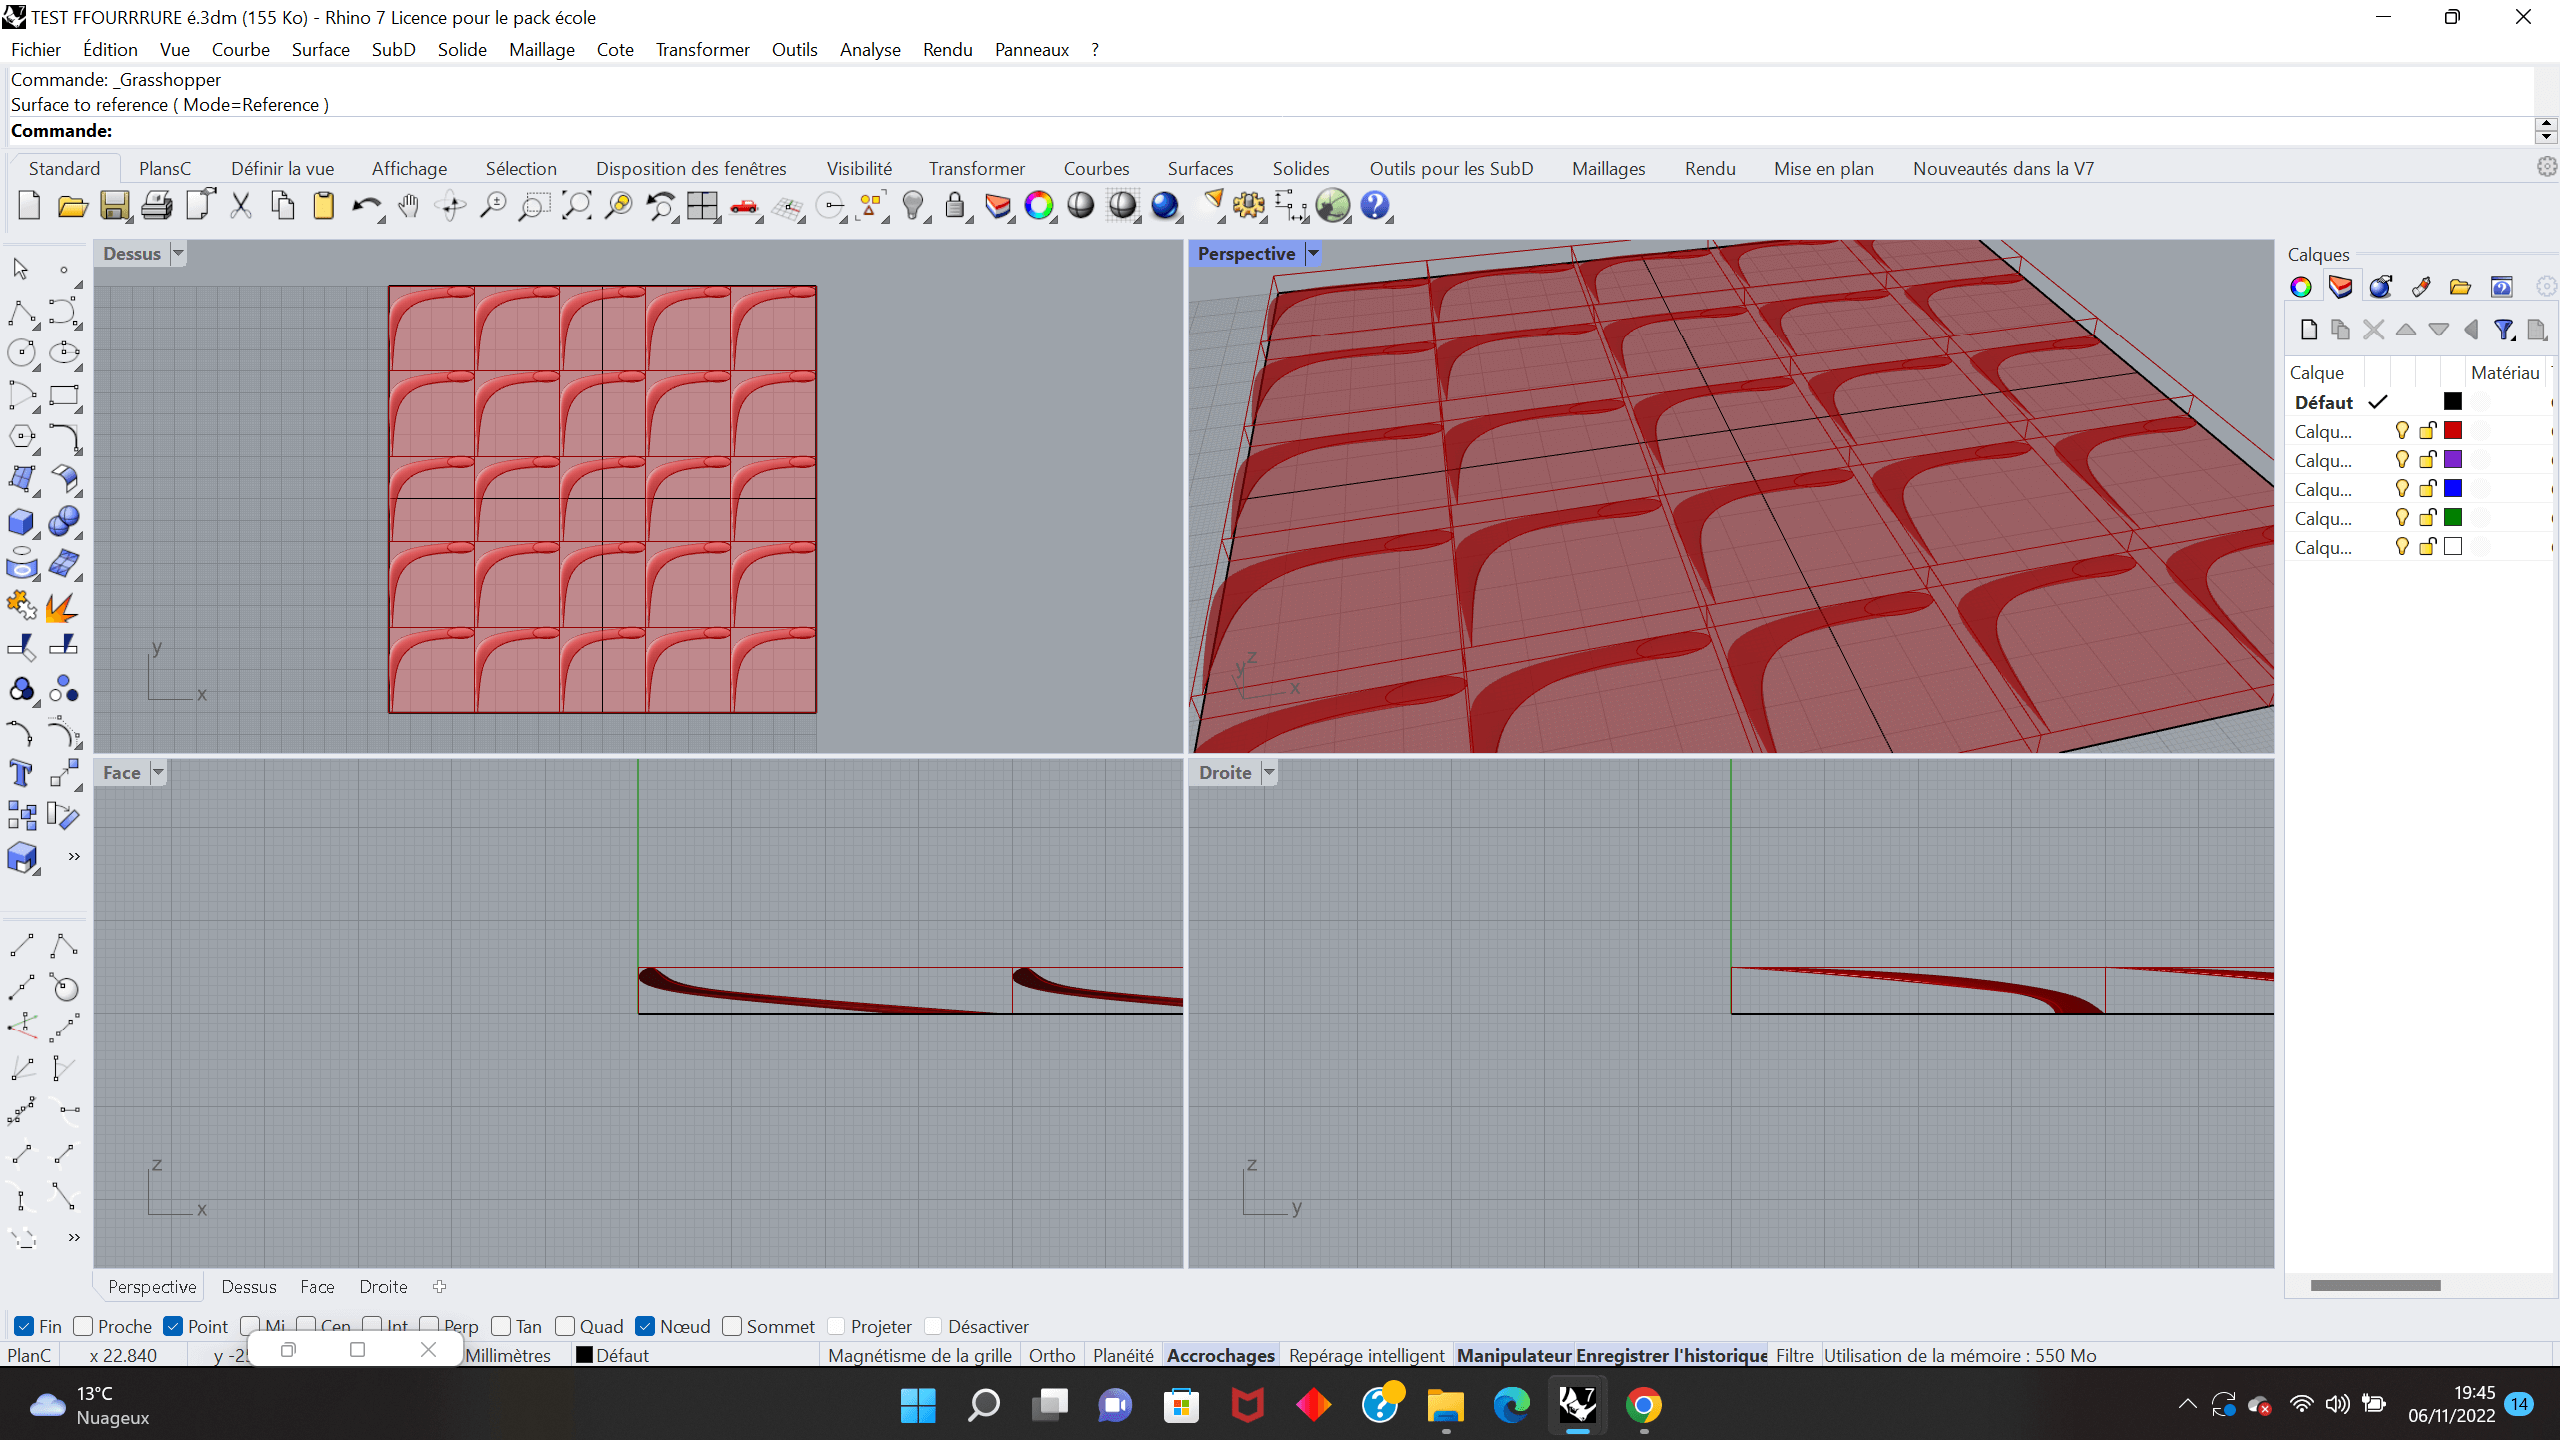
BUUUUT not working at all, since there is no surface underneath, and the object (the hair) is flattened and had no volume.
So this wasn't the solution I needed.
Quitting Grasshopper?
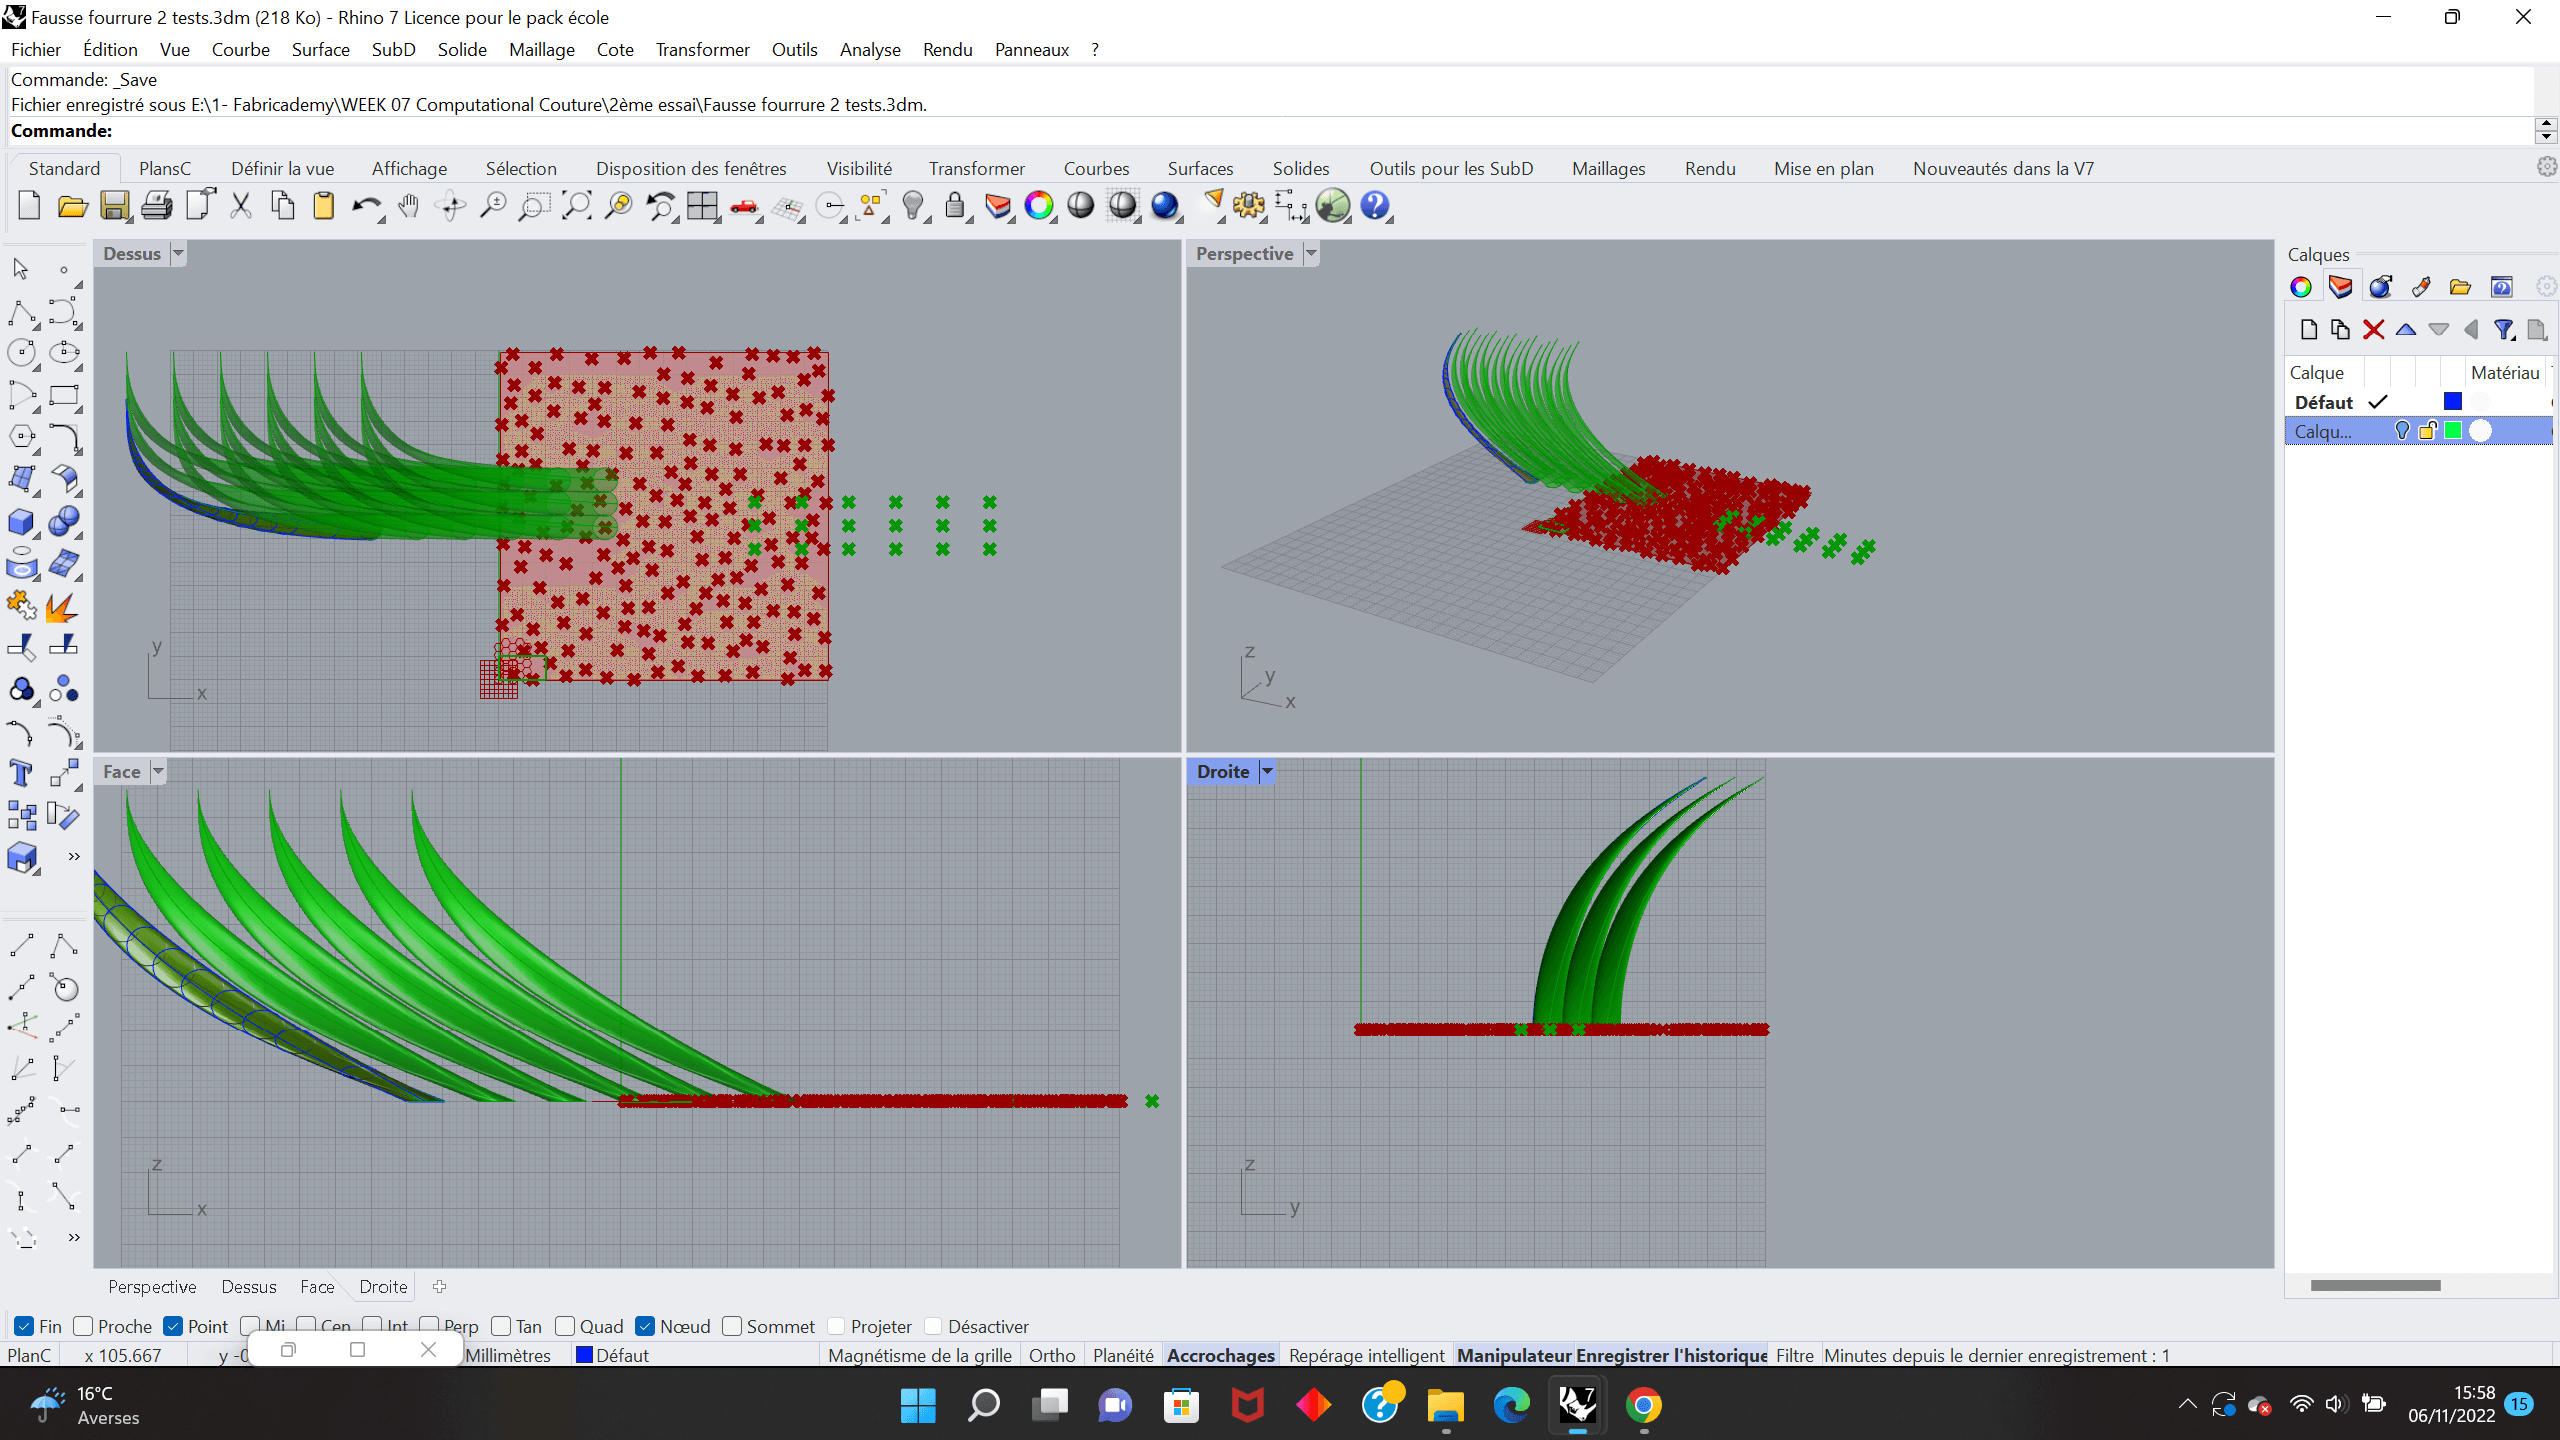
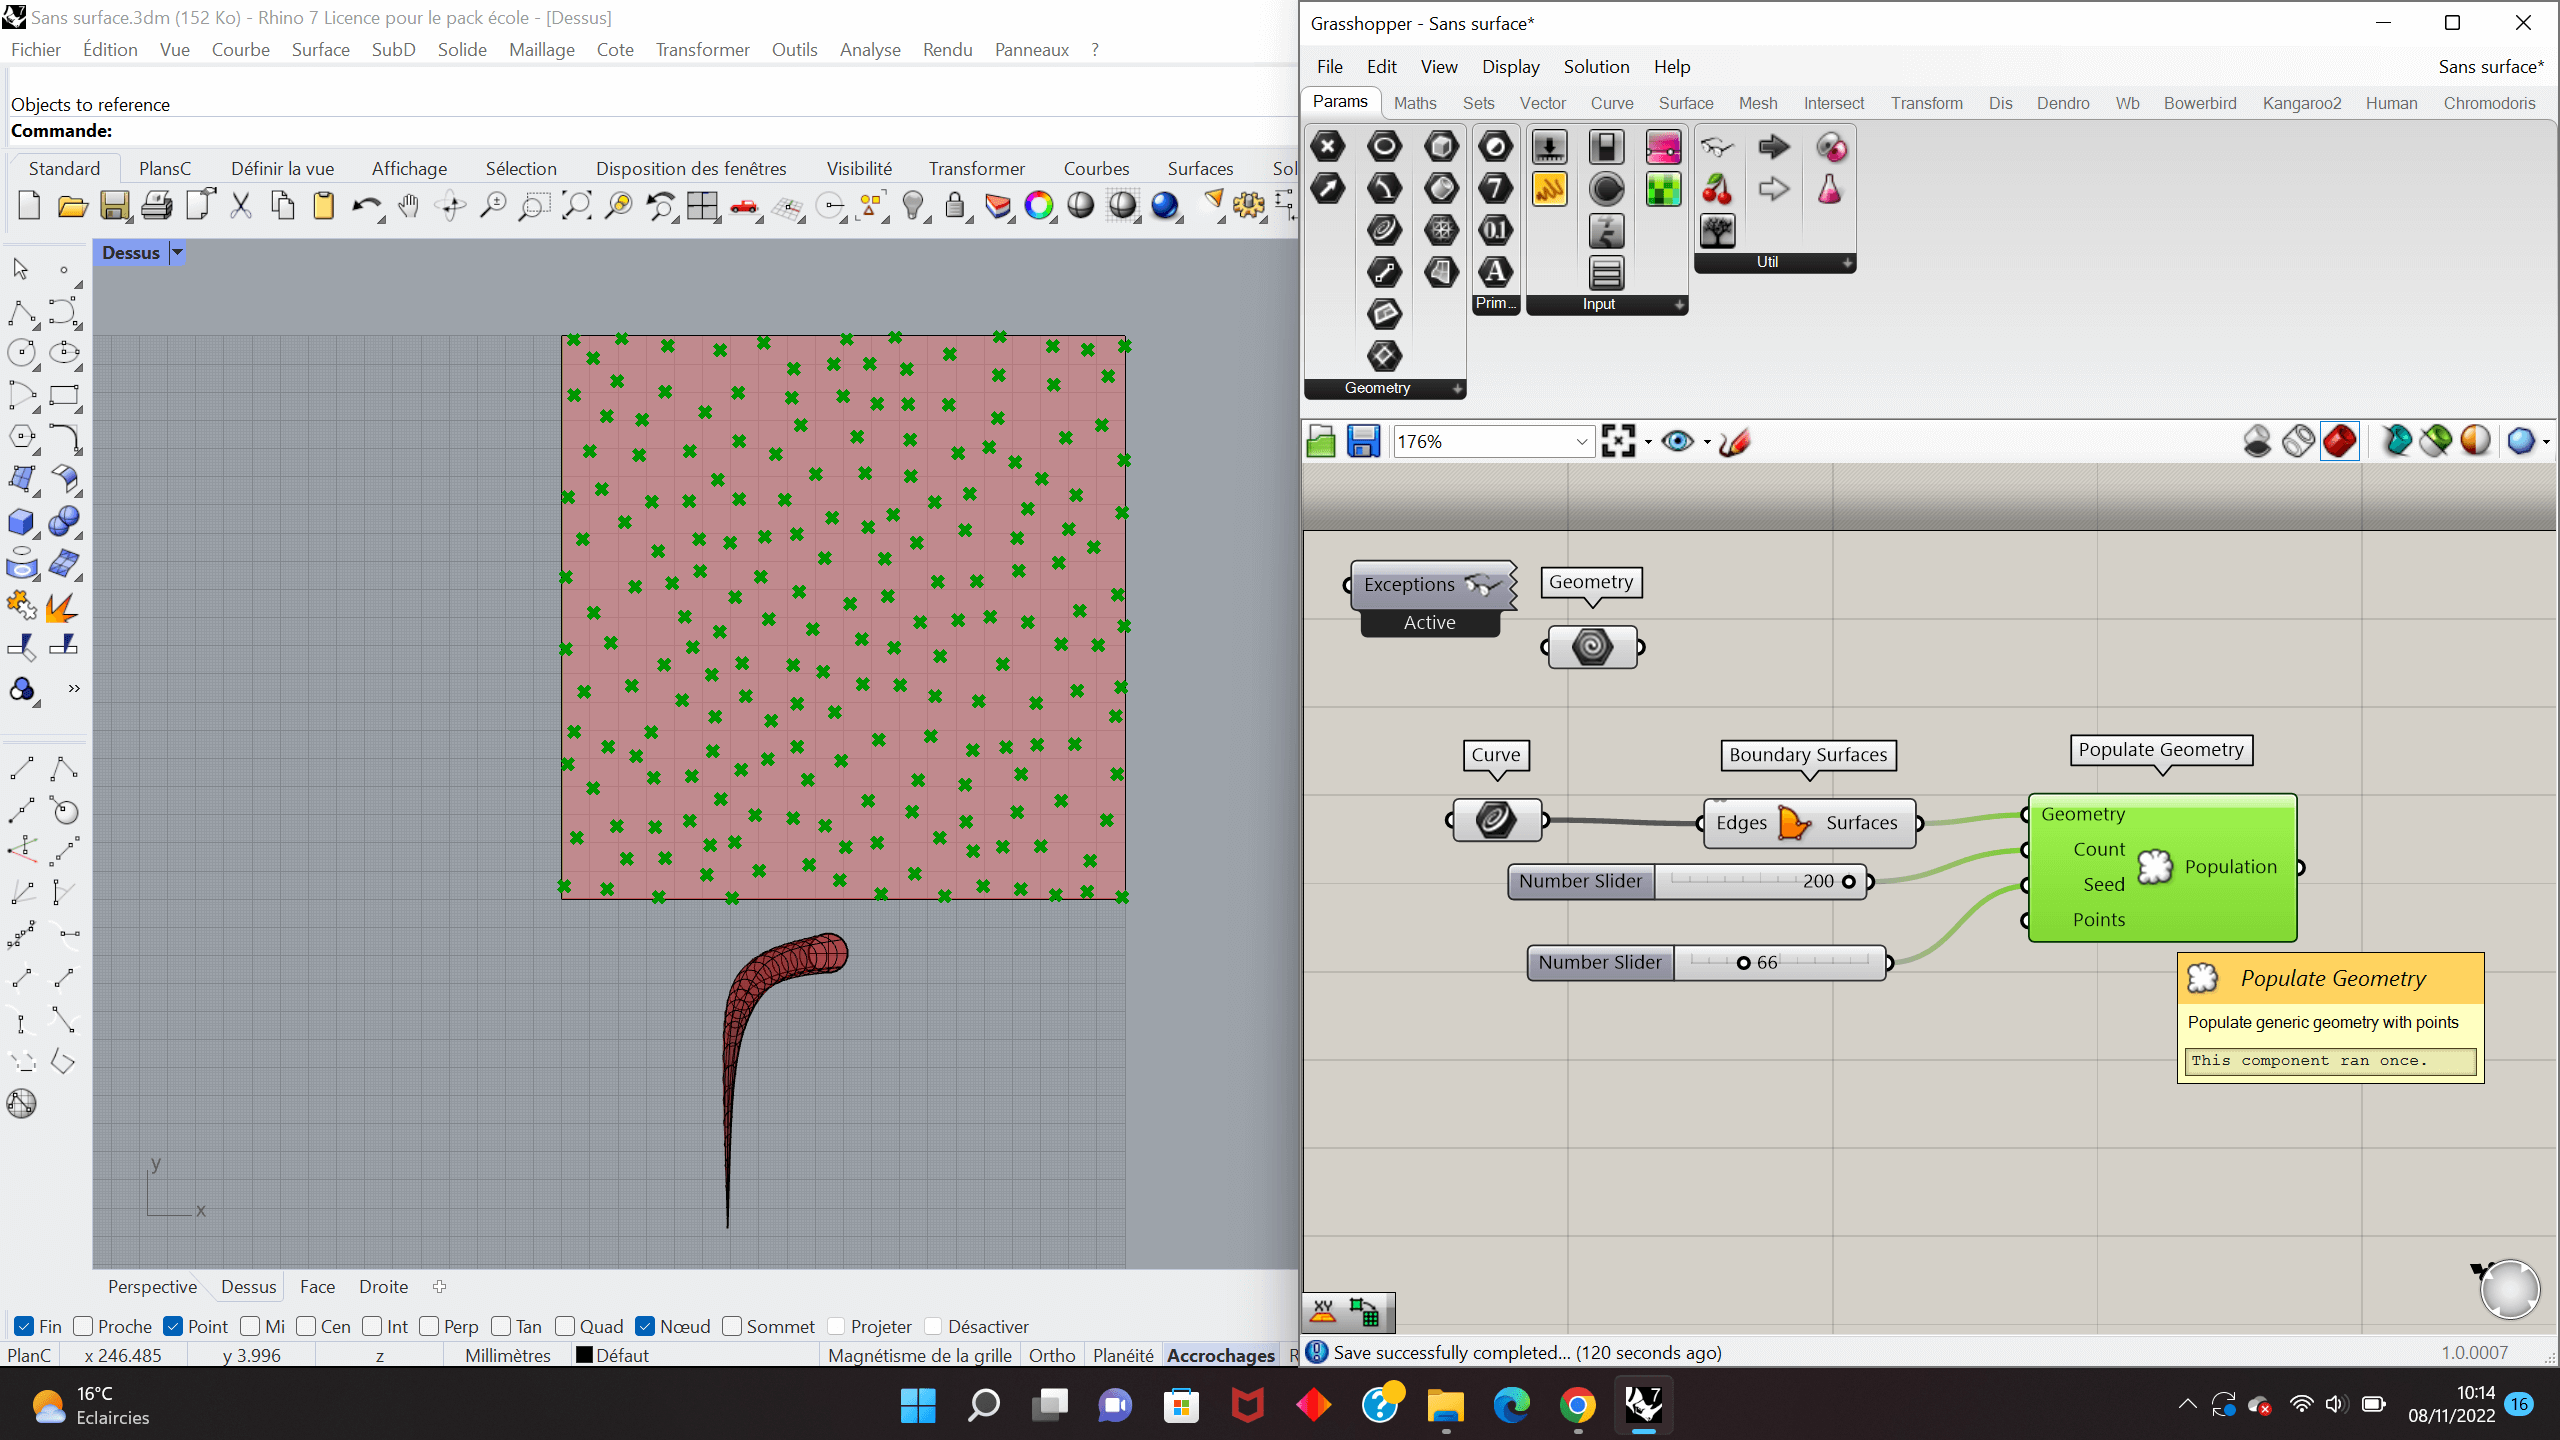
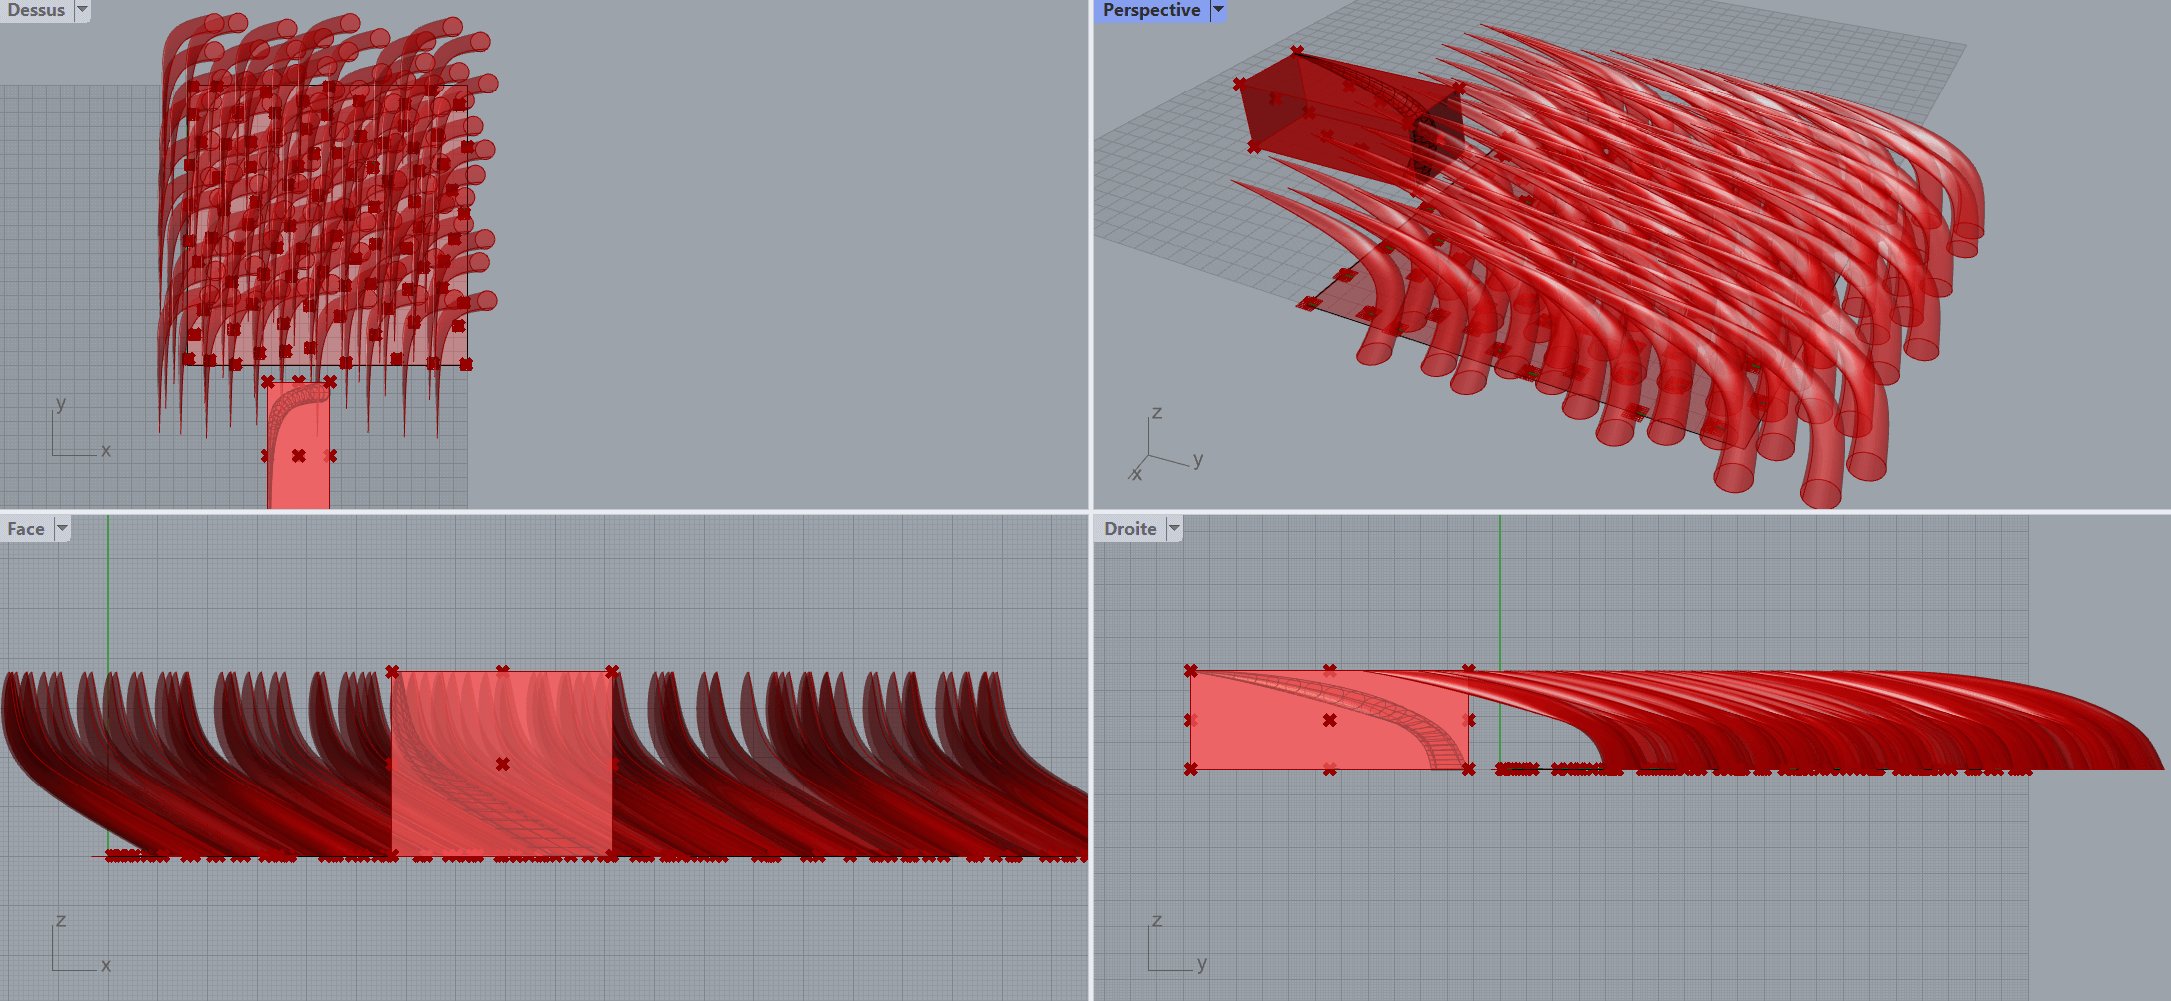
In desperation (well, not that much but I was getting upset of my inability to create something correct and viable), I came back to Rhinoceros 3D without using Grasshopper.

In Rhino: Command: LinearArray, set it the way you want. Repeat this process another time, to create a "forest" of hairs.
I guess this is the closest version I have of the result that settles in my head. But nonetheless, I am sure that there are possibilities to do it with Grasshopper, in a more efficient and easier way. Moreover, one of my goal was to get some randomness in the result. Indeed, hairs are not perfectly geometrically put onto the skin!
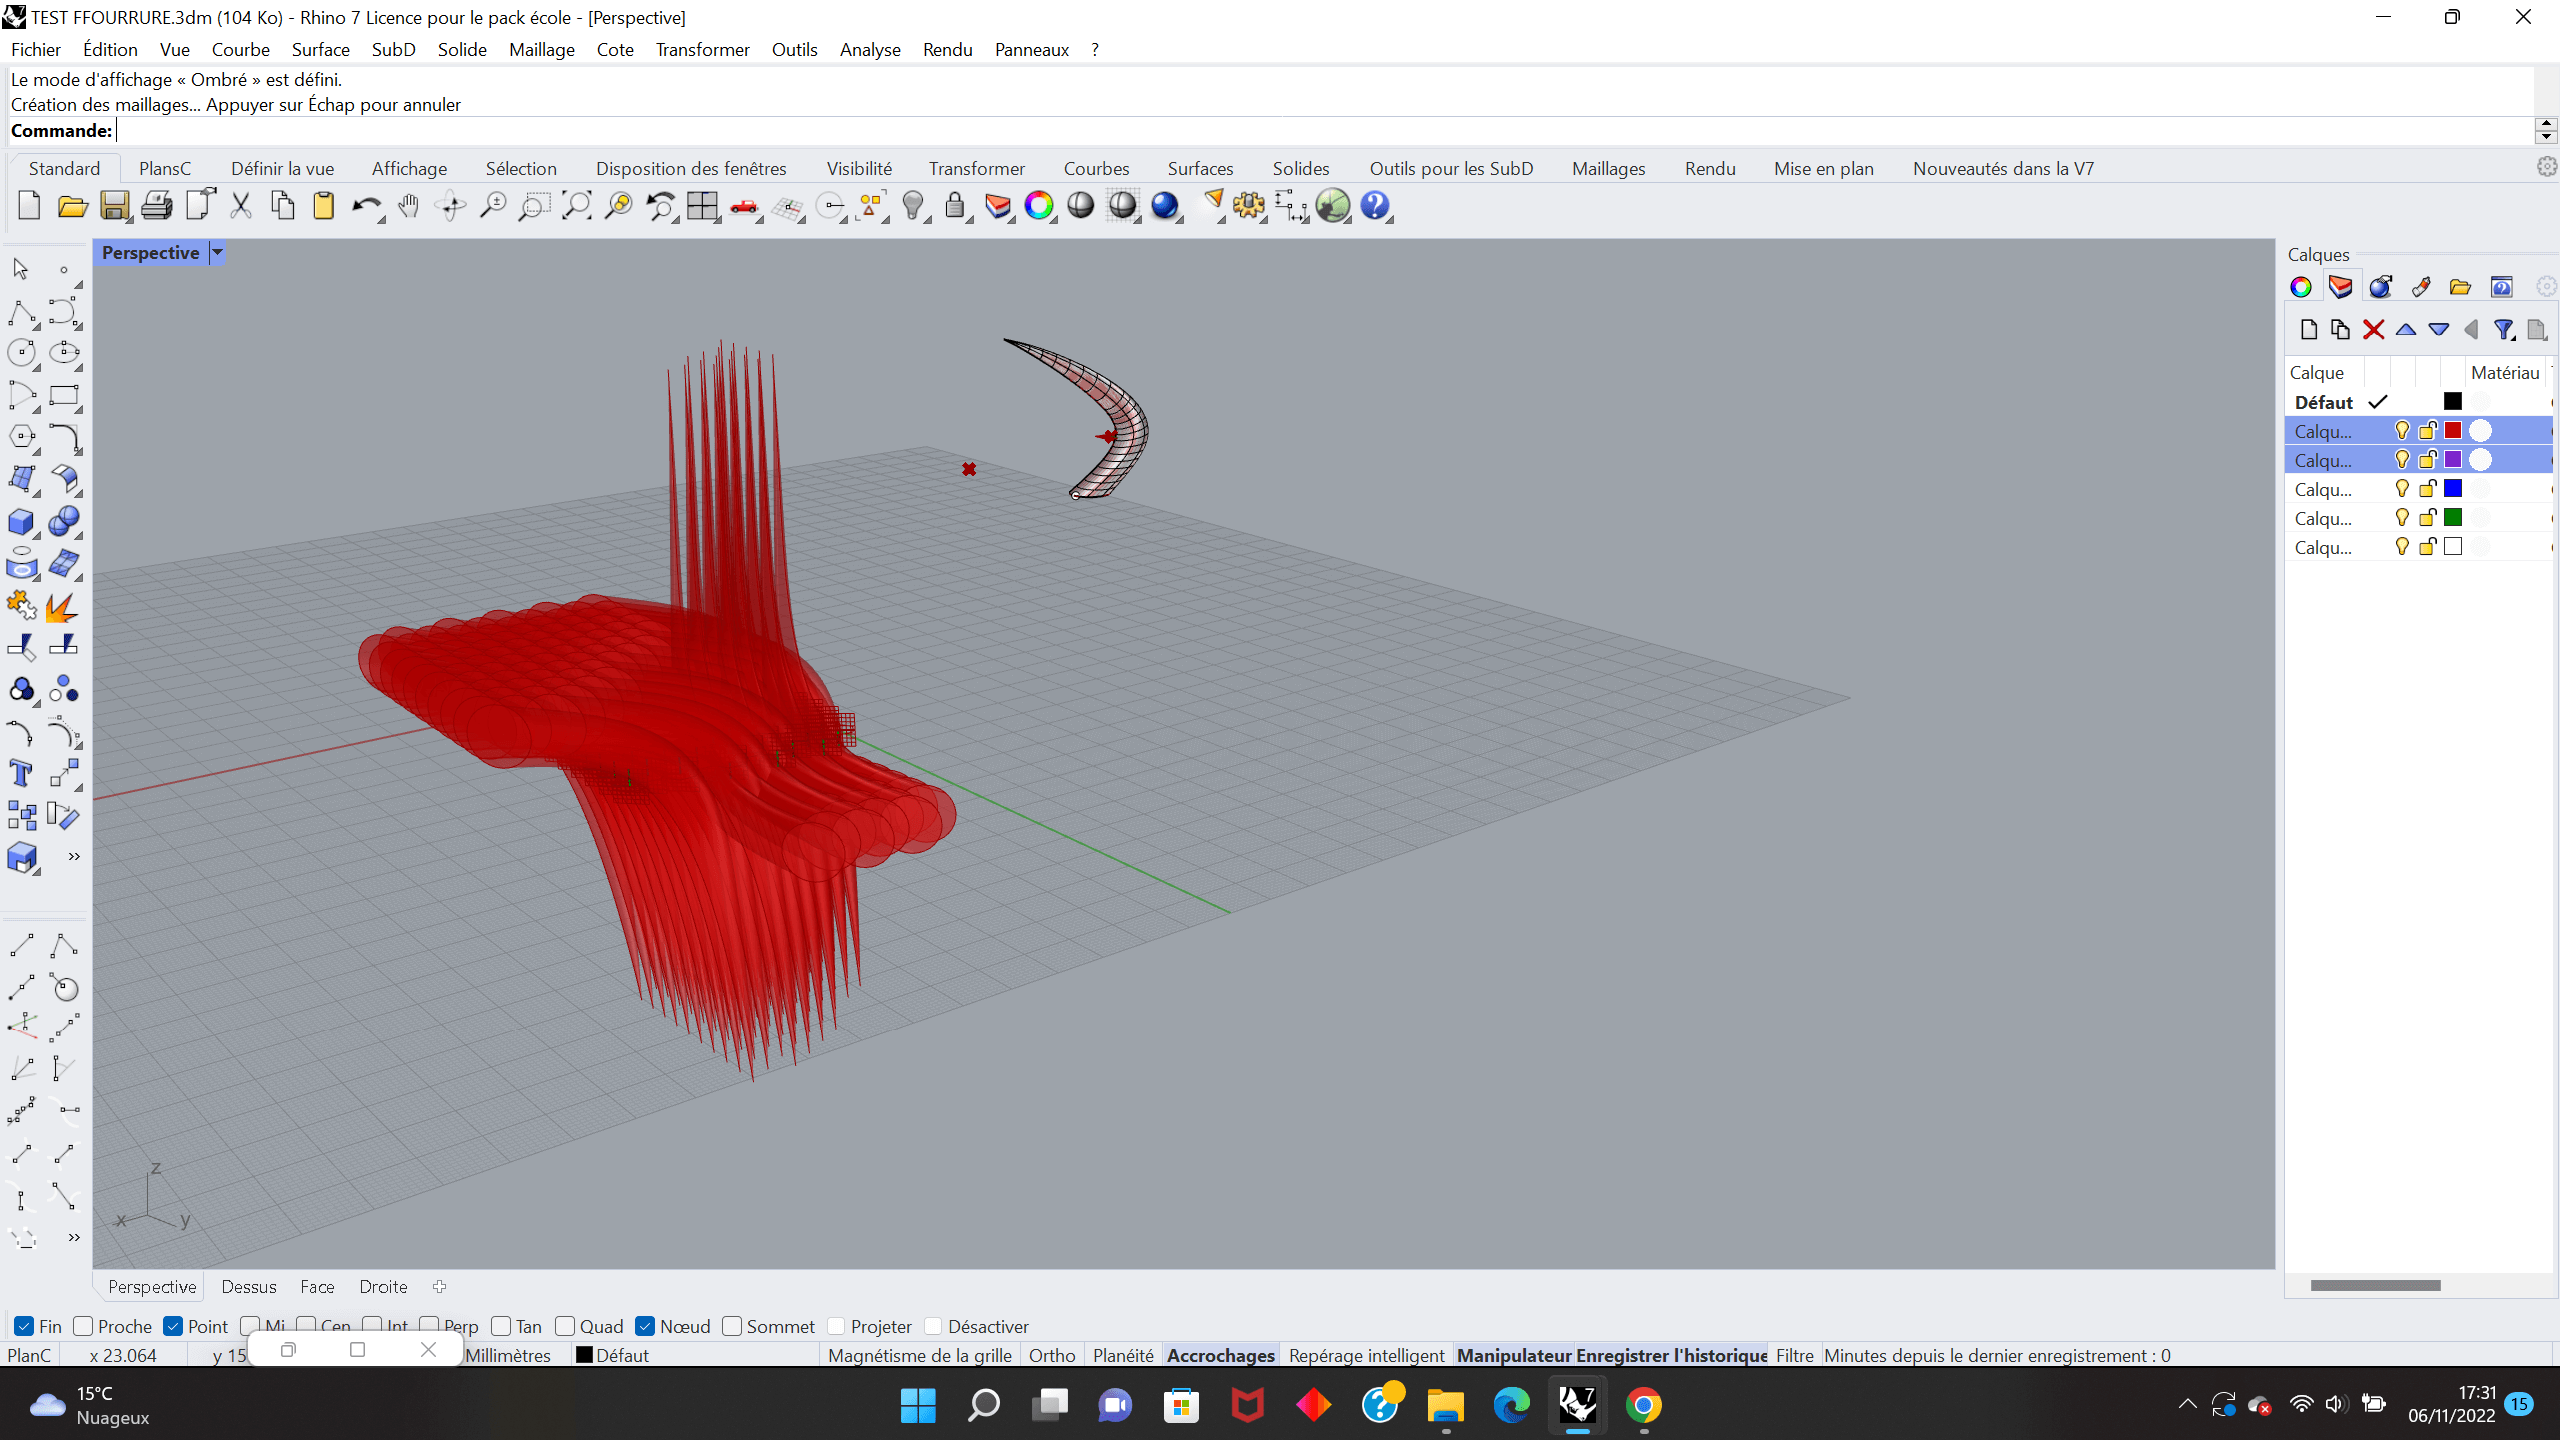
No I won't quit Grasshopper!
After some researches, maybe I have a solution with this tutorial of the Youtube channel How to Rhino about 'Scattering Geometry with Grasshopper'
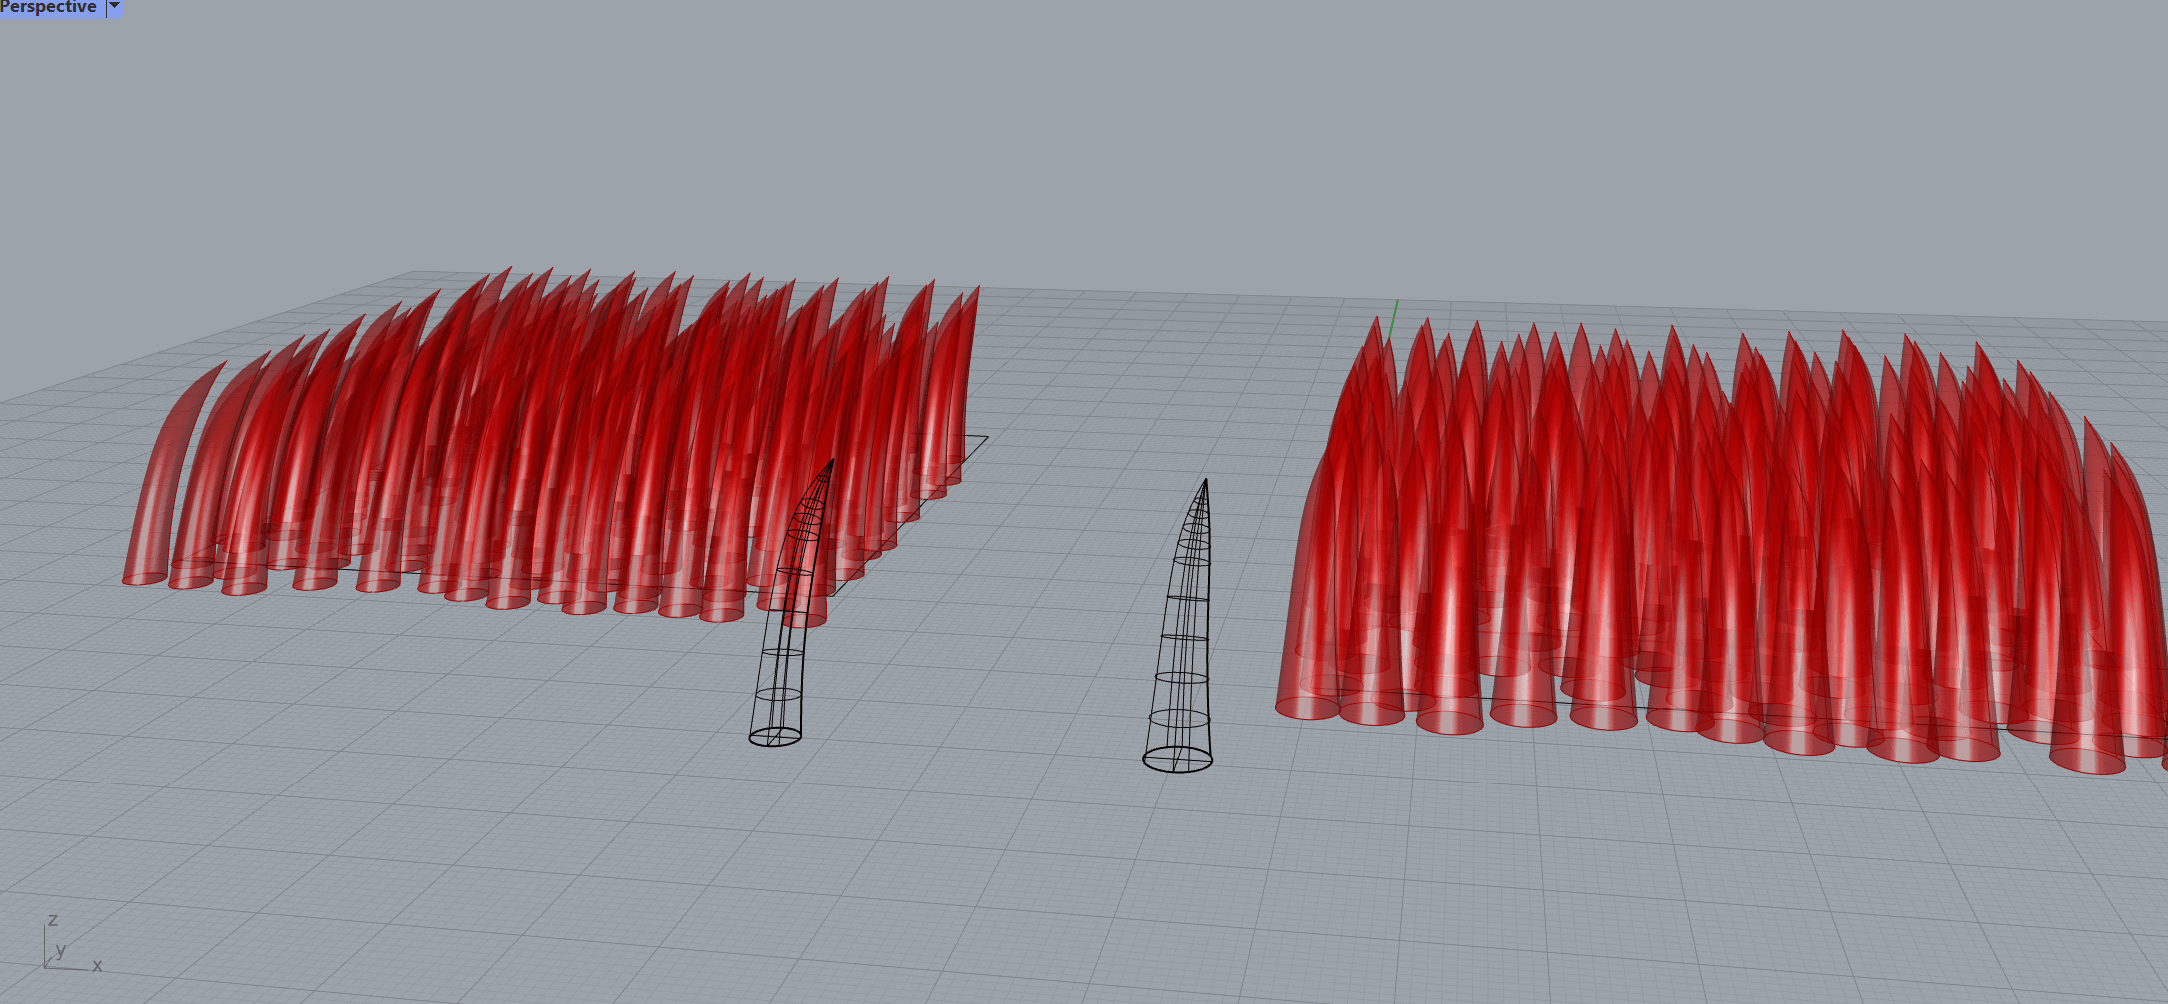
And... Finally, it worked !!

Exporting from Rhino/Grasshopper to work with Cura (3D printing)
When you're finished and your parametric design in Grasshopper and Rhinoceros 3D satisfies you, you have to export it.
Nonetheless, don't forget that you have to "bake" your design in Grasshopper, for it to remain in its state for the exportation in Rhinceros 3D.
In Grasshopper, go on the last useful step of your design > right click on it > bake
In the window that opens, select "group"
In Rhinoceros 3D, select "export" > stl file > save
Here is a very useful tutorial by Iorad that shows you the way of exporting a Grasshopper/Rhinoceros 3D document to be able to import in Cura.
Cura
Cura is an open-source software created by Ultimaker (a brand of 3D printing devices) that is used to prepare the objects you want to 3D print. Basically, it slices your object in several layers that the 3D printer can deal with (and print). It transforms the 3D objects in a series of instructions that the 3D printer can interprete and print, according to a certain path. It takes into account the temperature, the velocity of the printhead, the thickness of the layers, etcand other parameters.
To make it simple, it is a tool to translate a virtual 3D object into a 3D printed object.
Download Cura, and enter the machine settings.
Importing your document
Cura accepts several types of file format. The most common is .stl, but you can also import .3mf, .gcode, .jpeg, .jpg, .gif, .bmp...
All you need is a 3D file, then the software can deal with it.
Drag and drop your STL document into Cura.
Or go in the left up part of the screen : File > Open the file(s) > Choose your file(s)
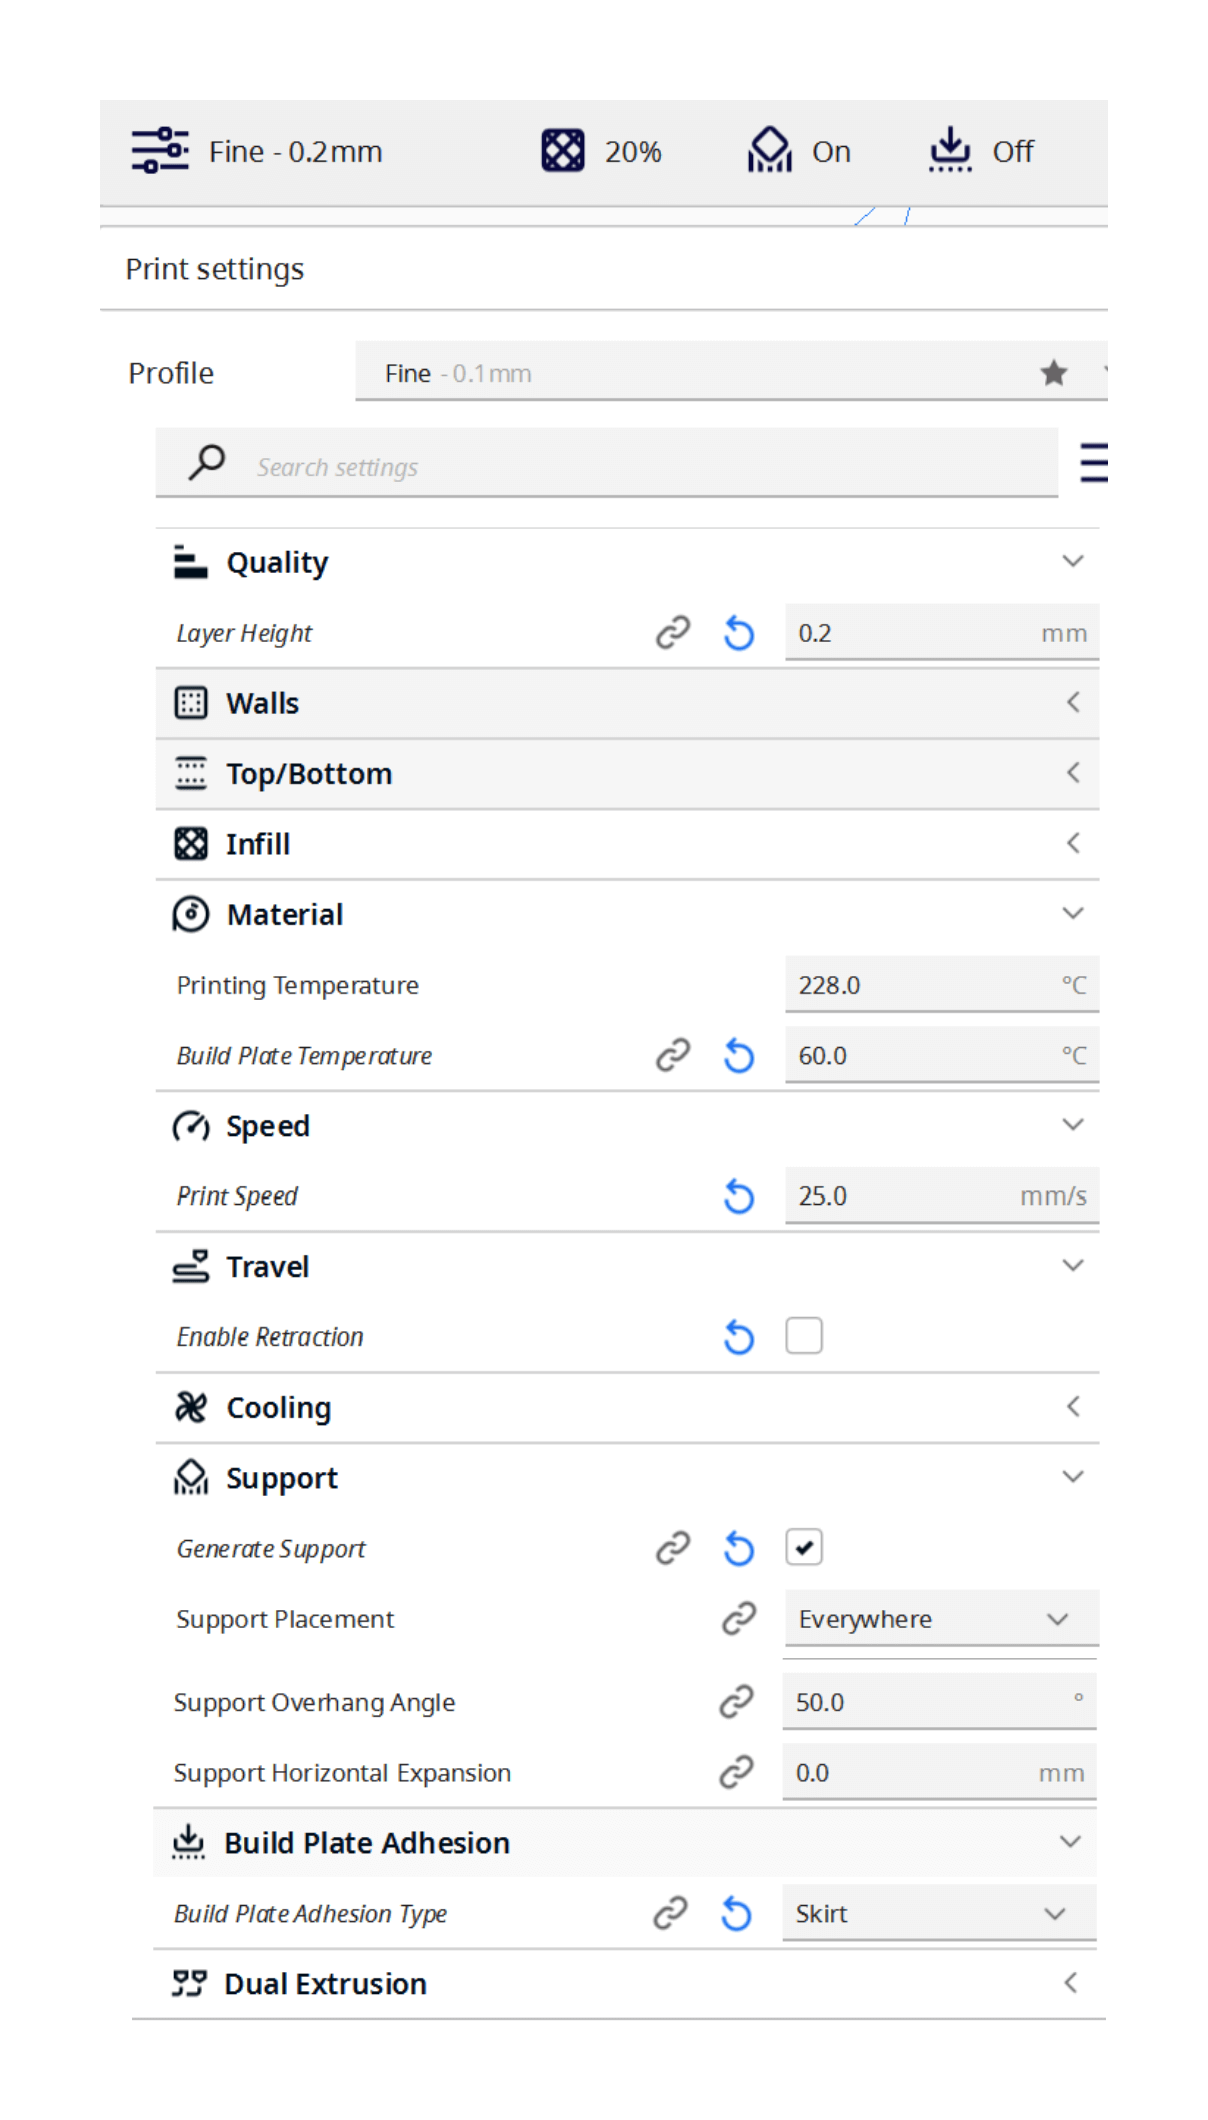
Once loaded in Cura, here is my temporary result.
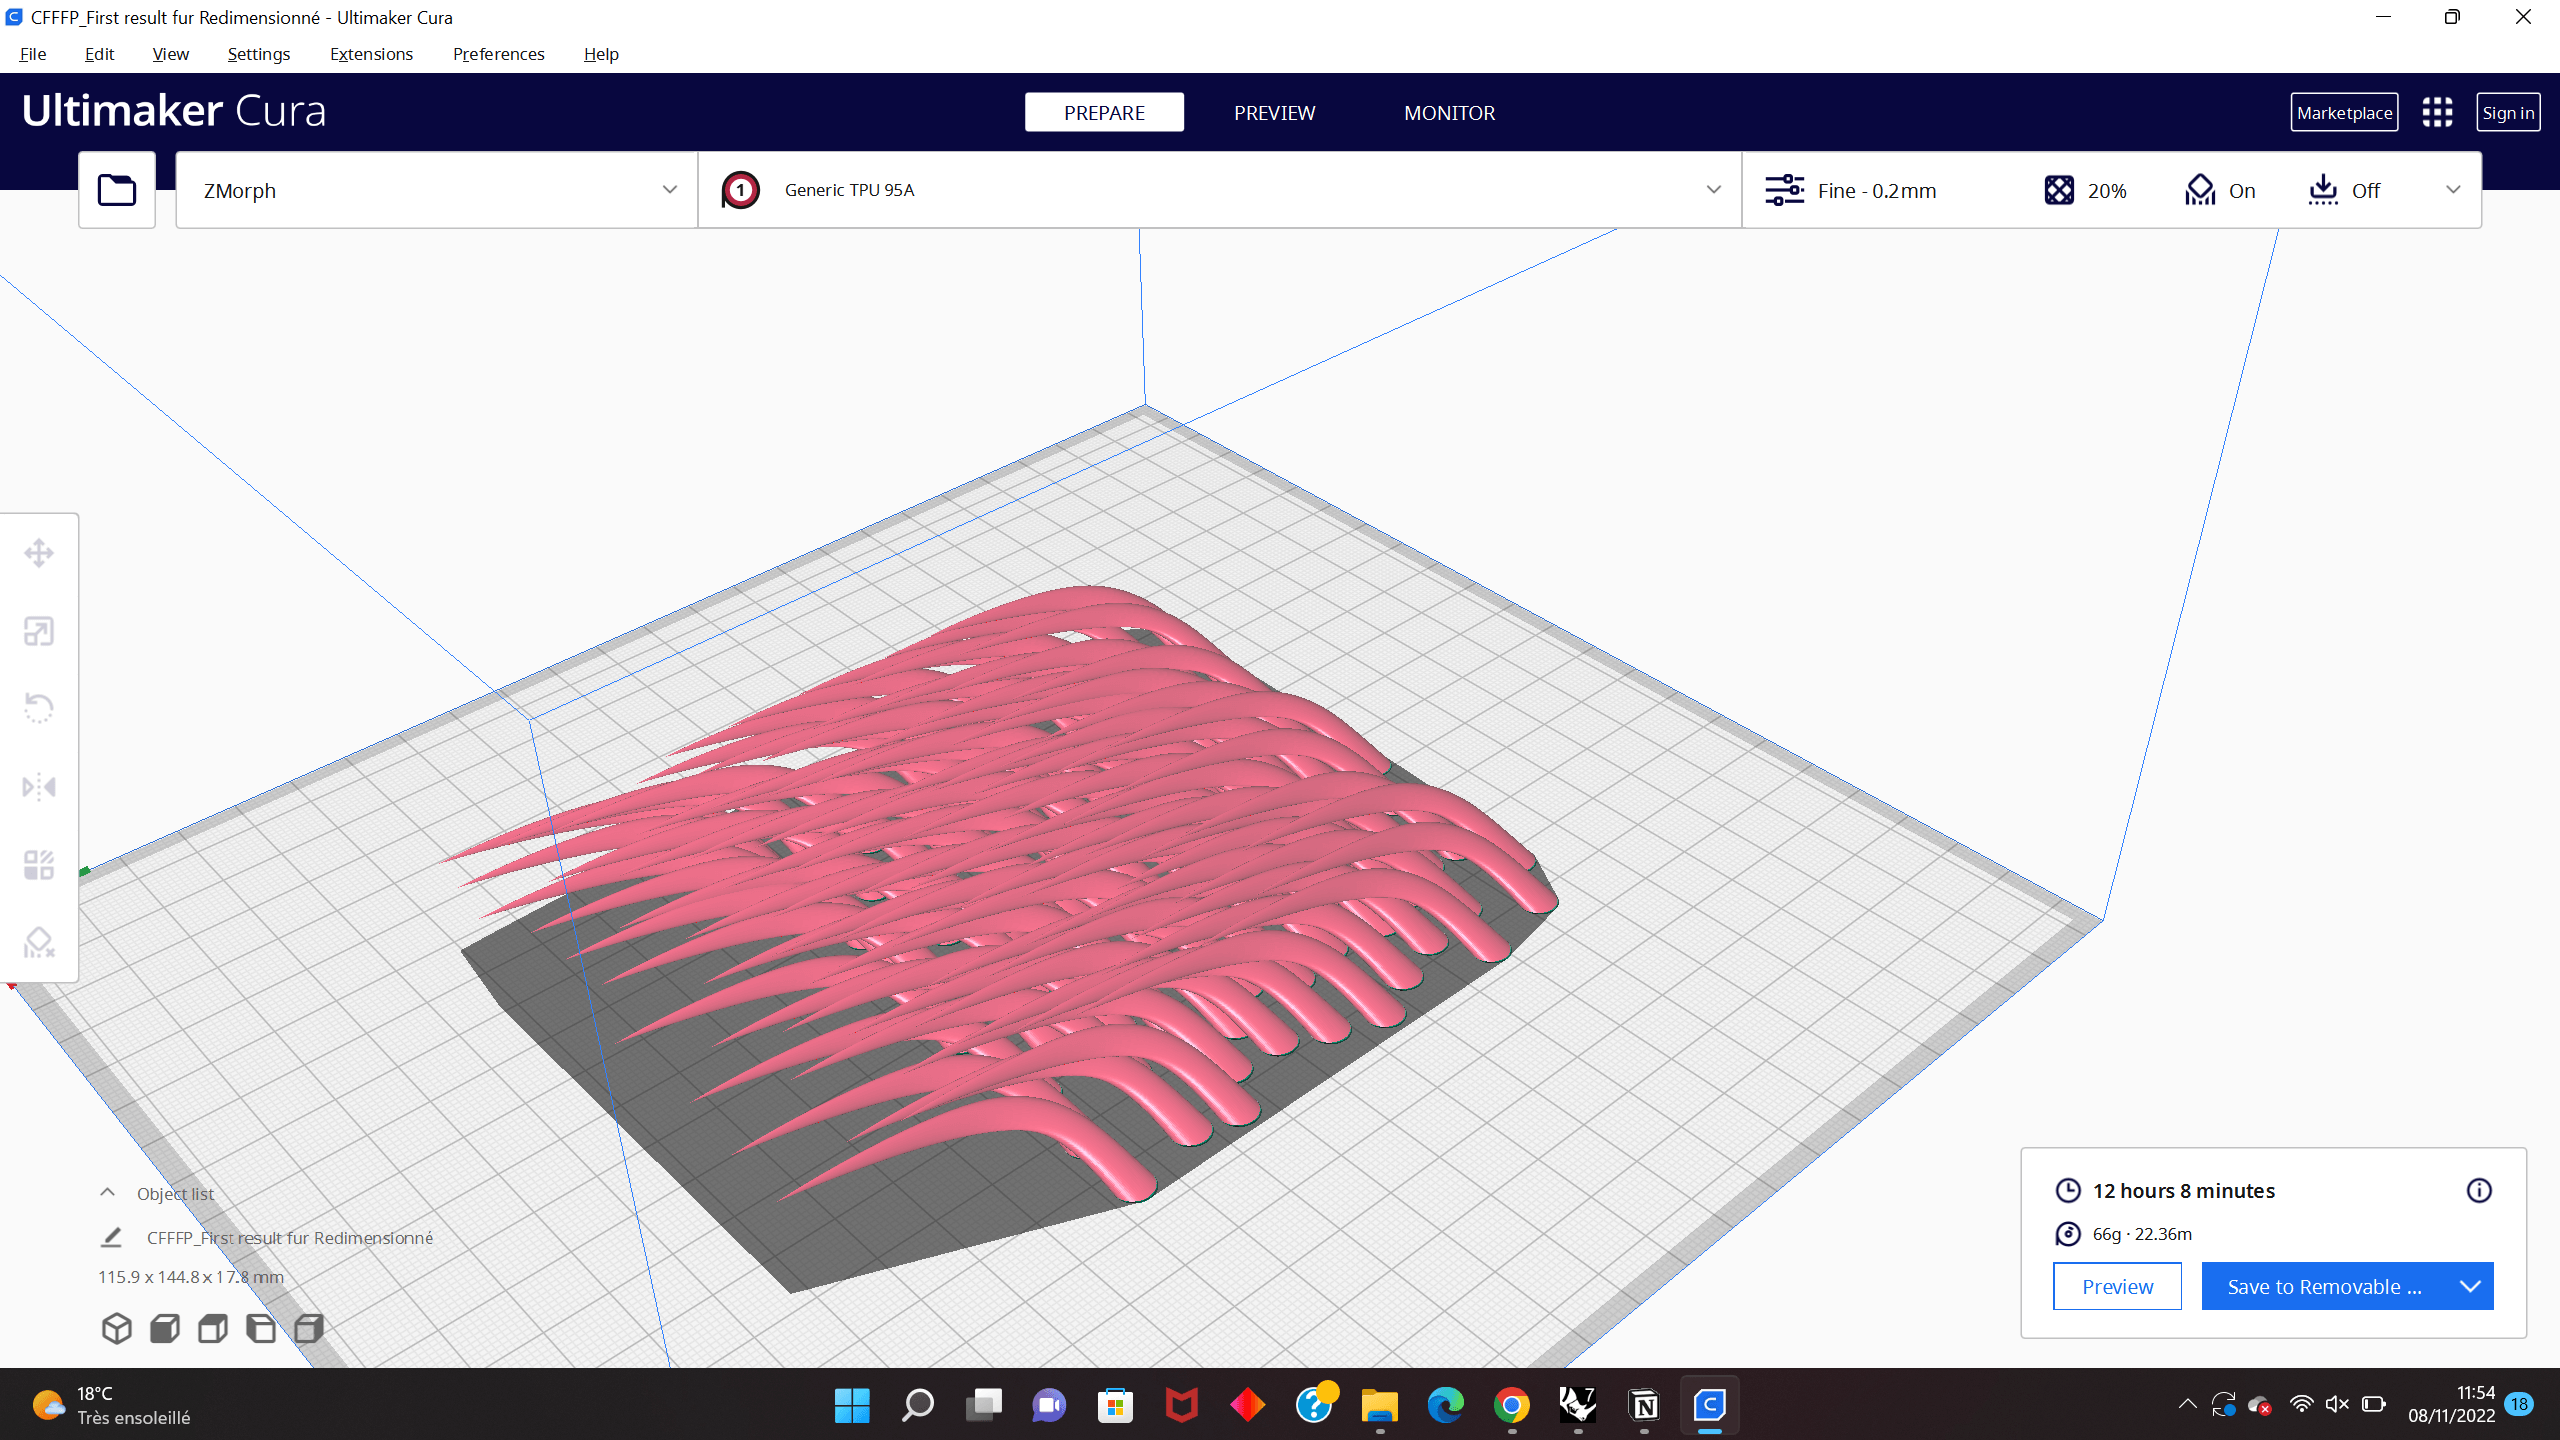
Why temporary? Because there are 2 problems here:
the shape of the hair (which is leaning in an angle too high.) constrains Cura software to generate too many support, that are taking time in the printing process.
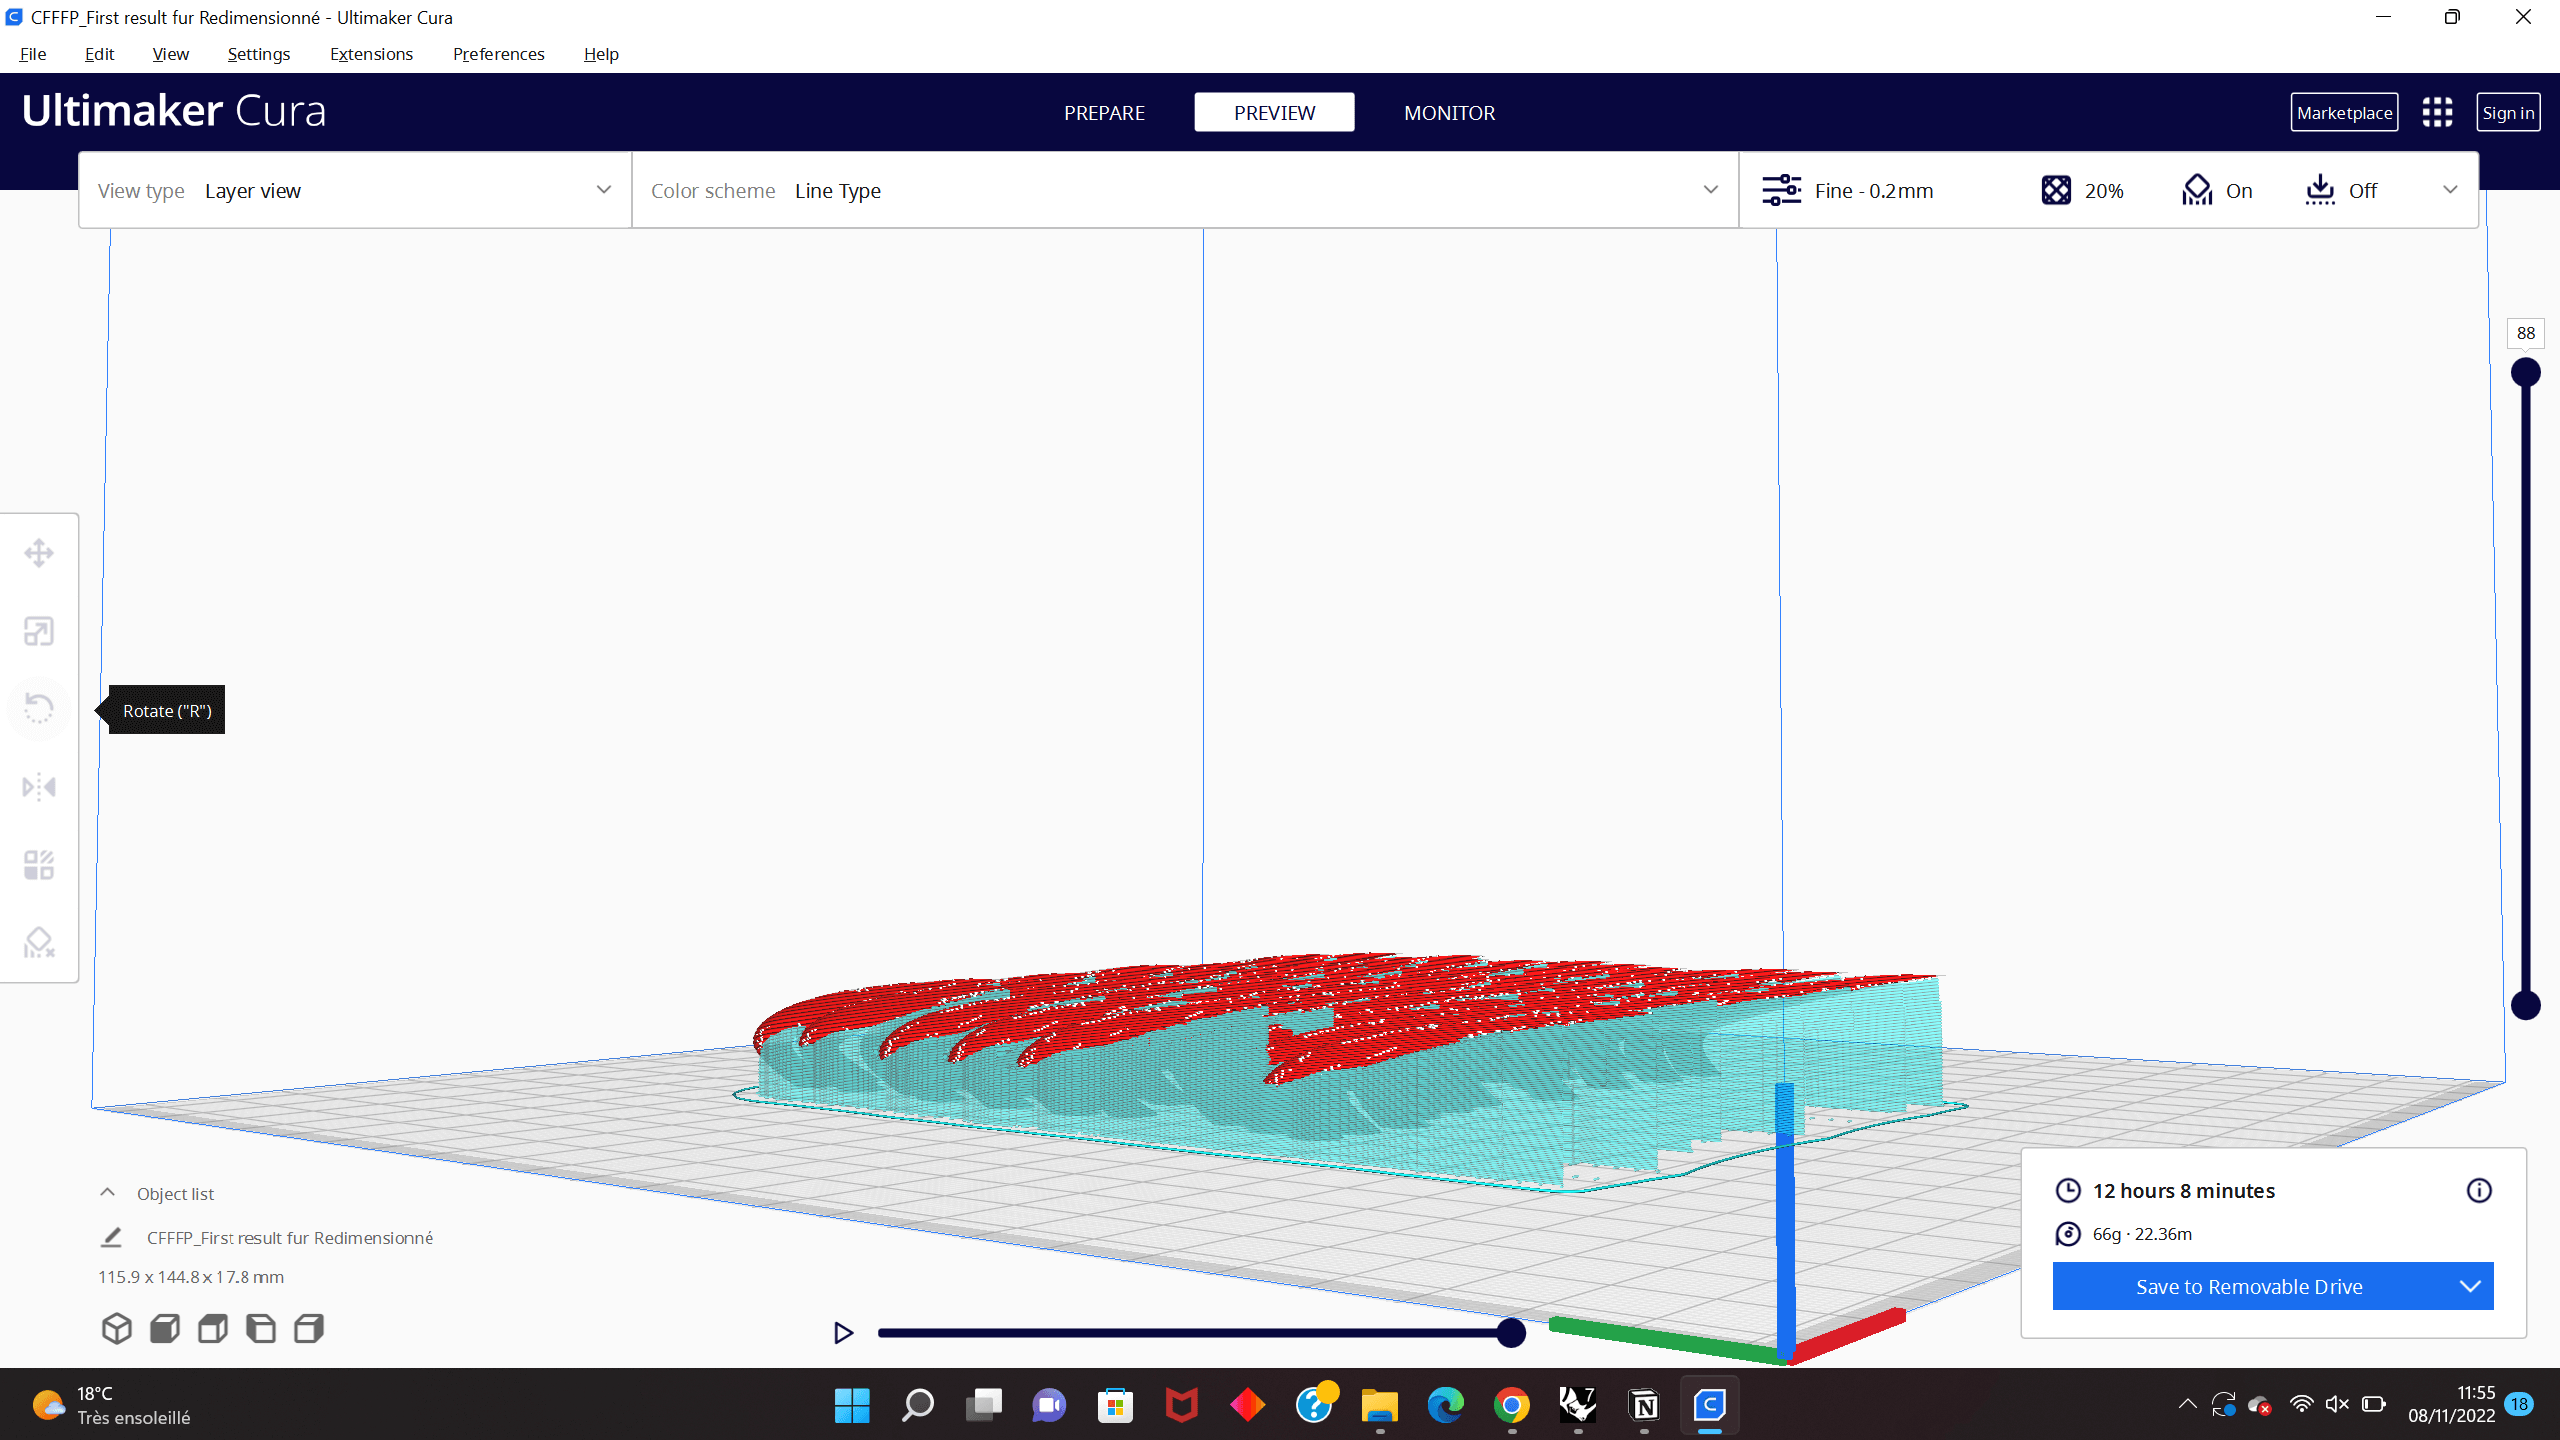
I had created a 20x20cm sample, but because of the height of the object, it would have lasted more than 12 hours of printing.
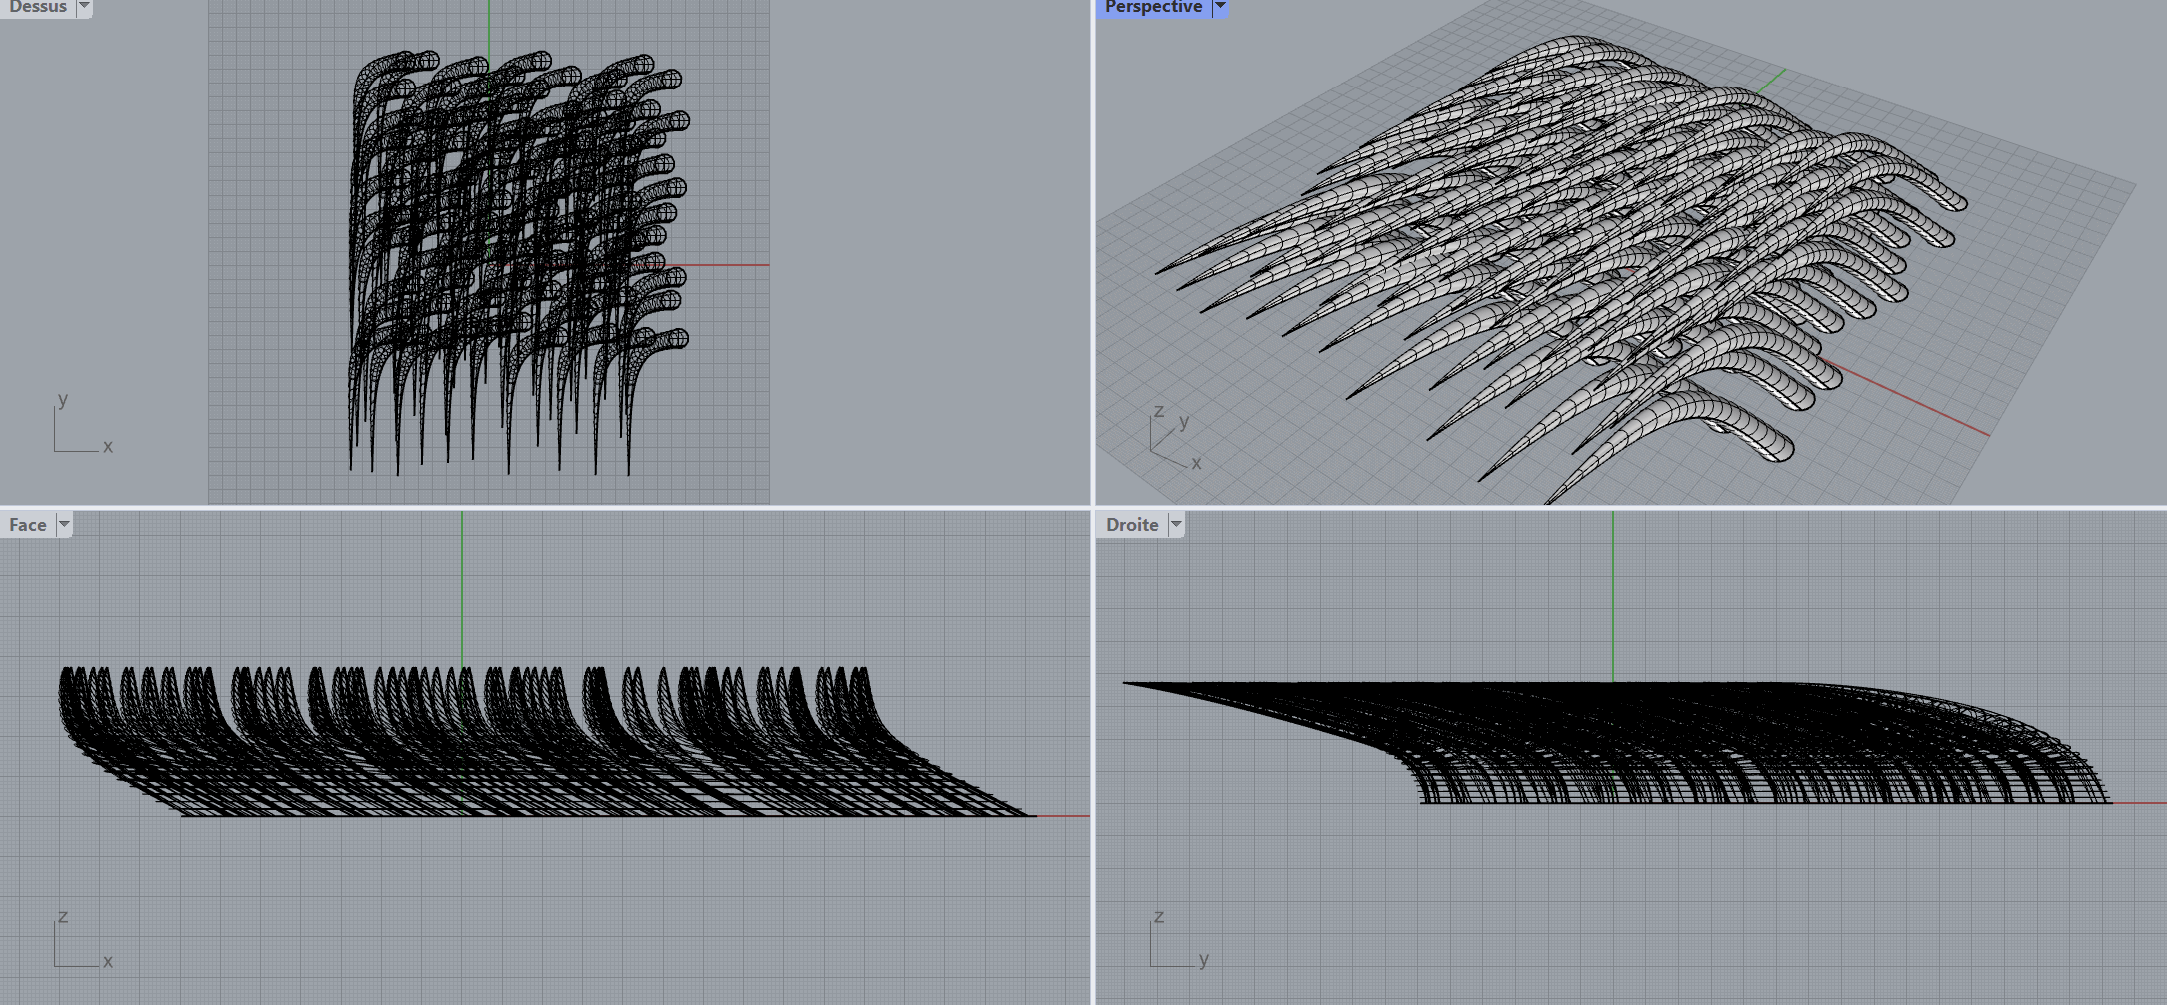
This was too much time, so I redid my file, modifying the size of the sample, and the general shape of the hair.
Here is the final result before the 3D printing test

3D printing test 1 2
Calibrating the 3D printer (Z Morph)
Calibrate it either manually or automatically. Define a new Z0, it will be the reference point for the new project. It depends on the material you're printing on, and the filament you're printing with.
Calibrating the 3D printer for flexible filament
When working with flexible filament, calibrate the machine manually, because the filament has to be closer to the plate, in order for it to adhere on it (or on the fabric).
Tips to 3D printing on fabric
When printing on fabric (and if you don't work with a sanwich structure), calibrate the machine with the fabric already installed on the plate.
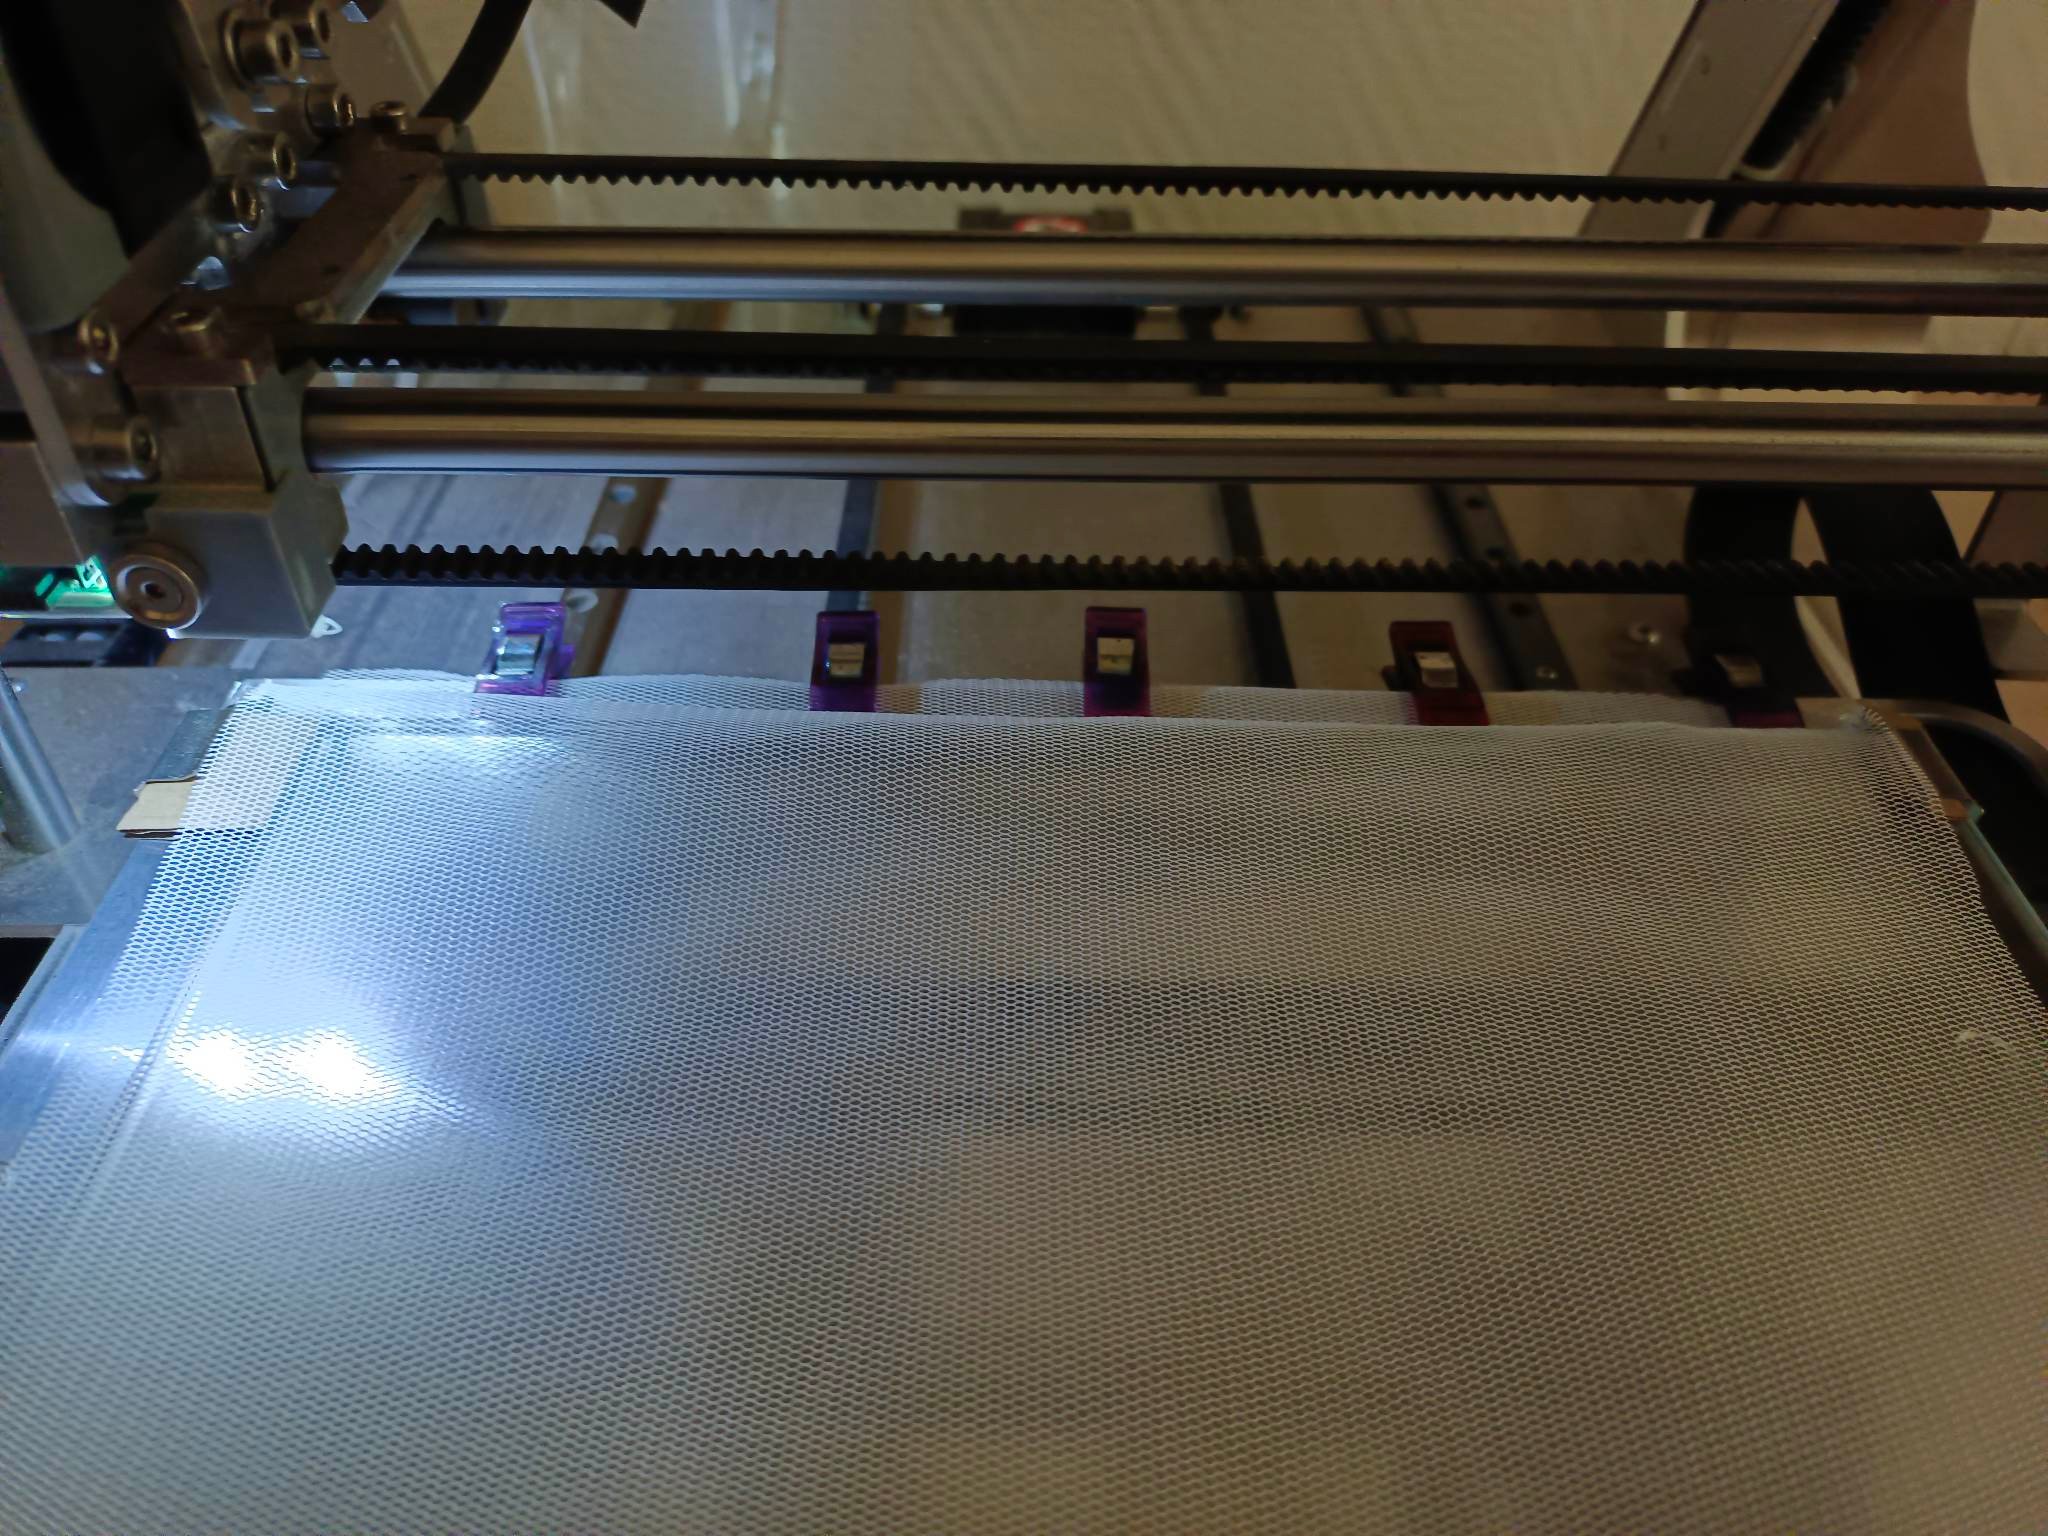
Fix it with little clamps all around the plate. Make sure that the clamps are not preventing the 3D printer from working, or that it won't damage the surroundings of the plate when it's moving during the printing process.
If you work on stretchy fabric (and if you want to use the stretchiness into your process, for instance in order to create volume onto the surface), stretch it when fixing it with clamps.
Here is an example of the clamps maintaining the fabric.
- Without the fabric, start printing your document. Stop it after 2-3 layers of printing.
- Fix the tulle on the 3D printer plate according to the tips seen above. Fix it on top of the previously 2-3 layers printed work.
- Rerun the work from where it stopped. Because the headprinter is heating the material for it to be printed, it will reheat the previously printed part, and because the tulle has holes in it (because of its structure), the bottom part and the newly printed part will melt together, taking the tulle in between the layer, creating a "sandwich" structure.

Filaments
Each filament, depending on its material, has a different fusion temperature point.
For example, there are:
-PLA
-ABS
-TPU
For my project, I used white TPU.
When you checked on your document in Cura, when the machine settings are OK for you, you can export it in the SD card.
Put the SD card into the 3D printing machine.
Press "New document".
Preheat the machine. Here the settings are 225 for the printhead and 60 for the plate. You can unload a little bit of filament before proceding to the printing, in order to check the good functionment of it.
Then, you can start printing!
Mixed result
The result
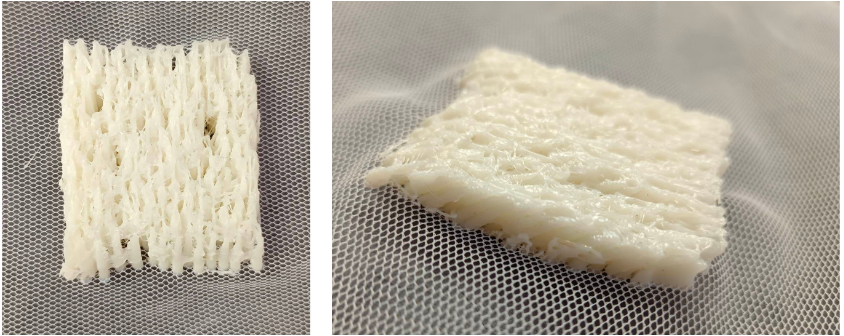
Because the printing file was rescaled and reduced in size, the result of the printing process was mixed.
It is a block of plastic that isn't that flexible, and it has nothing to do with the idea of faux-fur.
BUT I am very optimistic in the fact that, modified, this file and idea could work!!
Second skin sounds like the air
Here is a project that inspired me in this second phase of research.
After the failure of the faux-fur, I decided to work on skin, since it is made out of several layers of derm.
The air is a very good insulating material. In fabric, we can see it because it in puffy jacket for instance. The puffy characteristics are given by wadding put into the lining. Wadding capture air in itself, and this air works as an insulating for the body.
What I stated is that 3D printed material isn't insulating by itself, since its structure is dense.
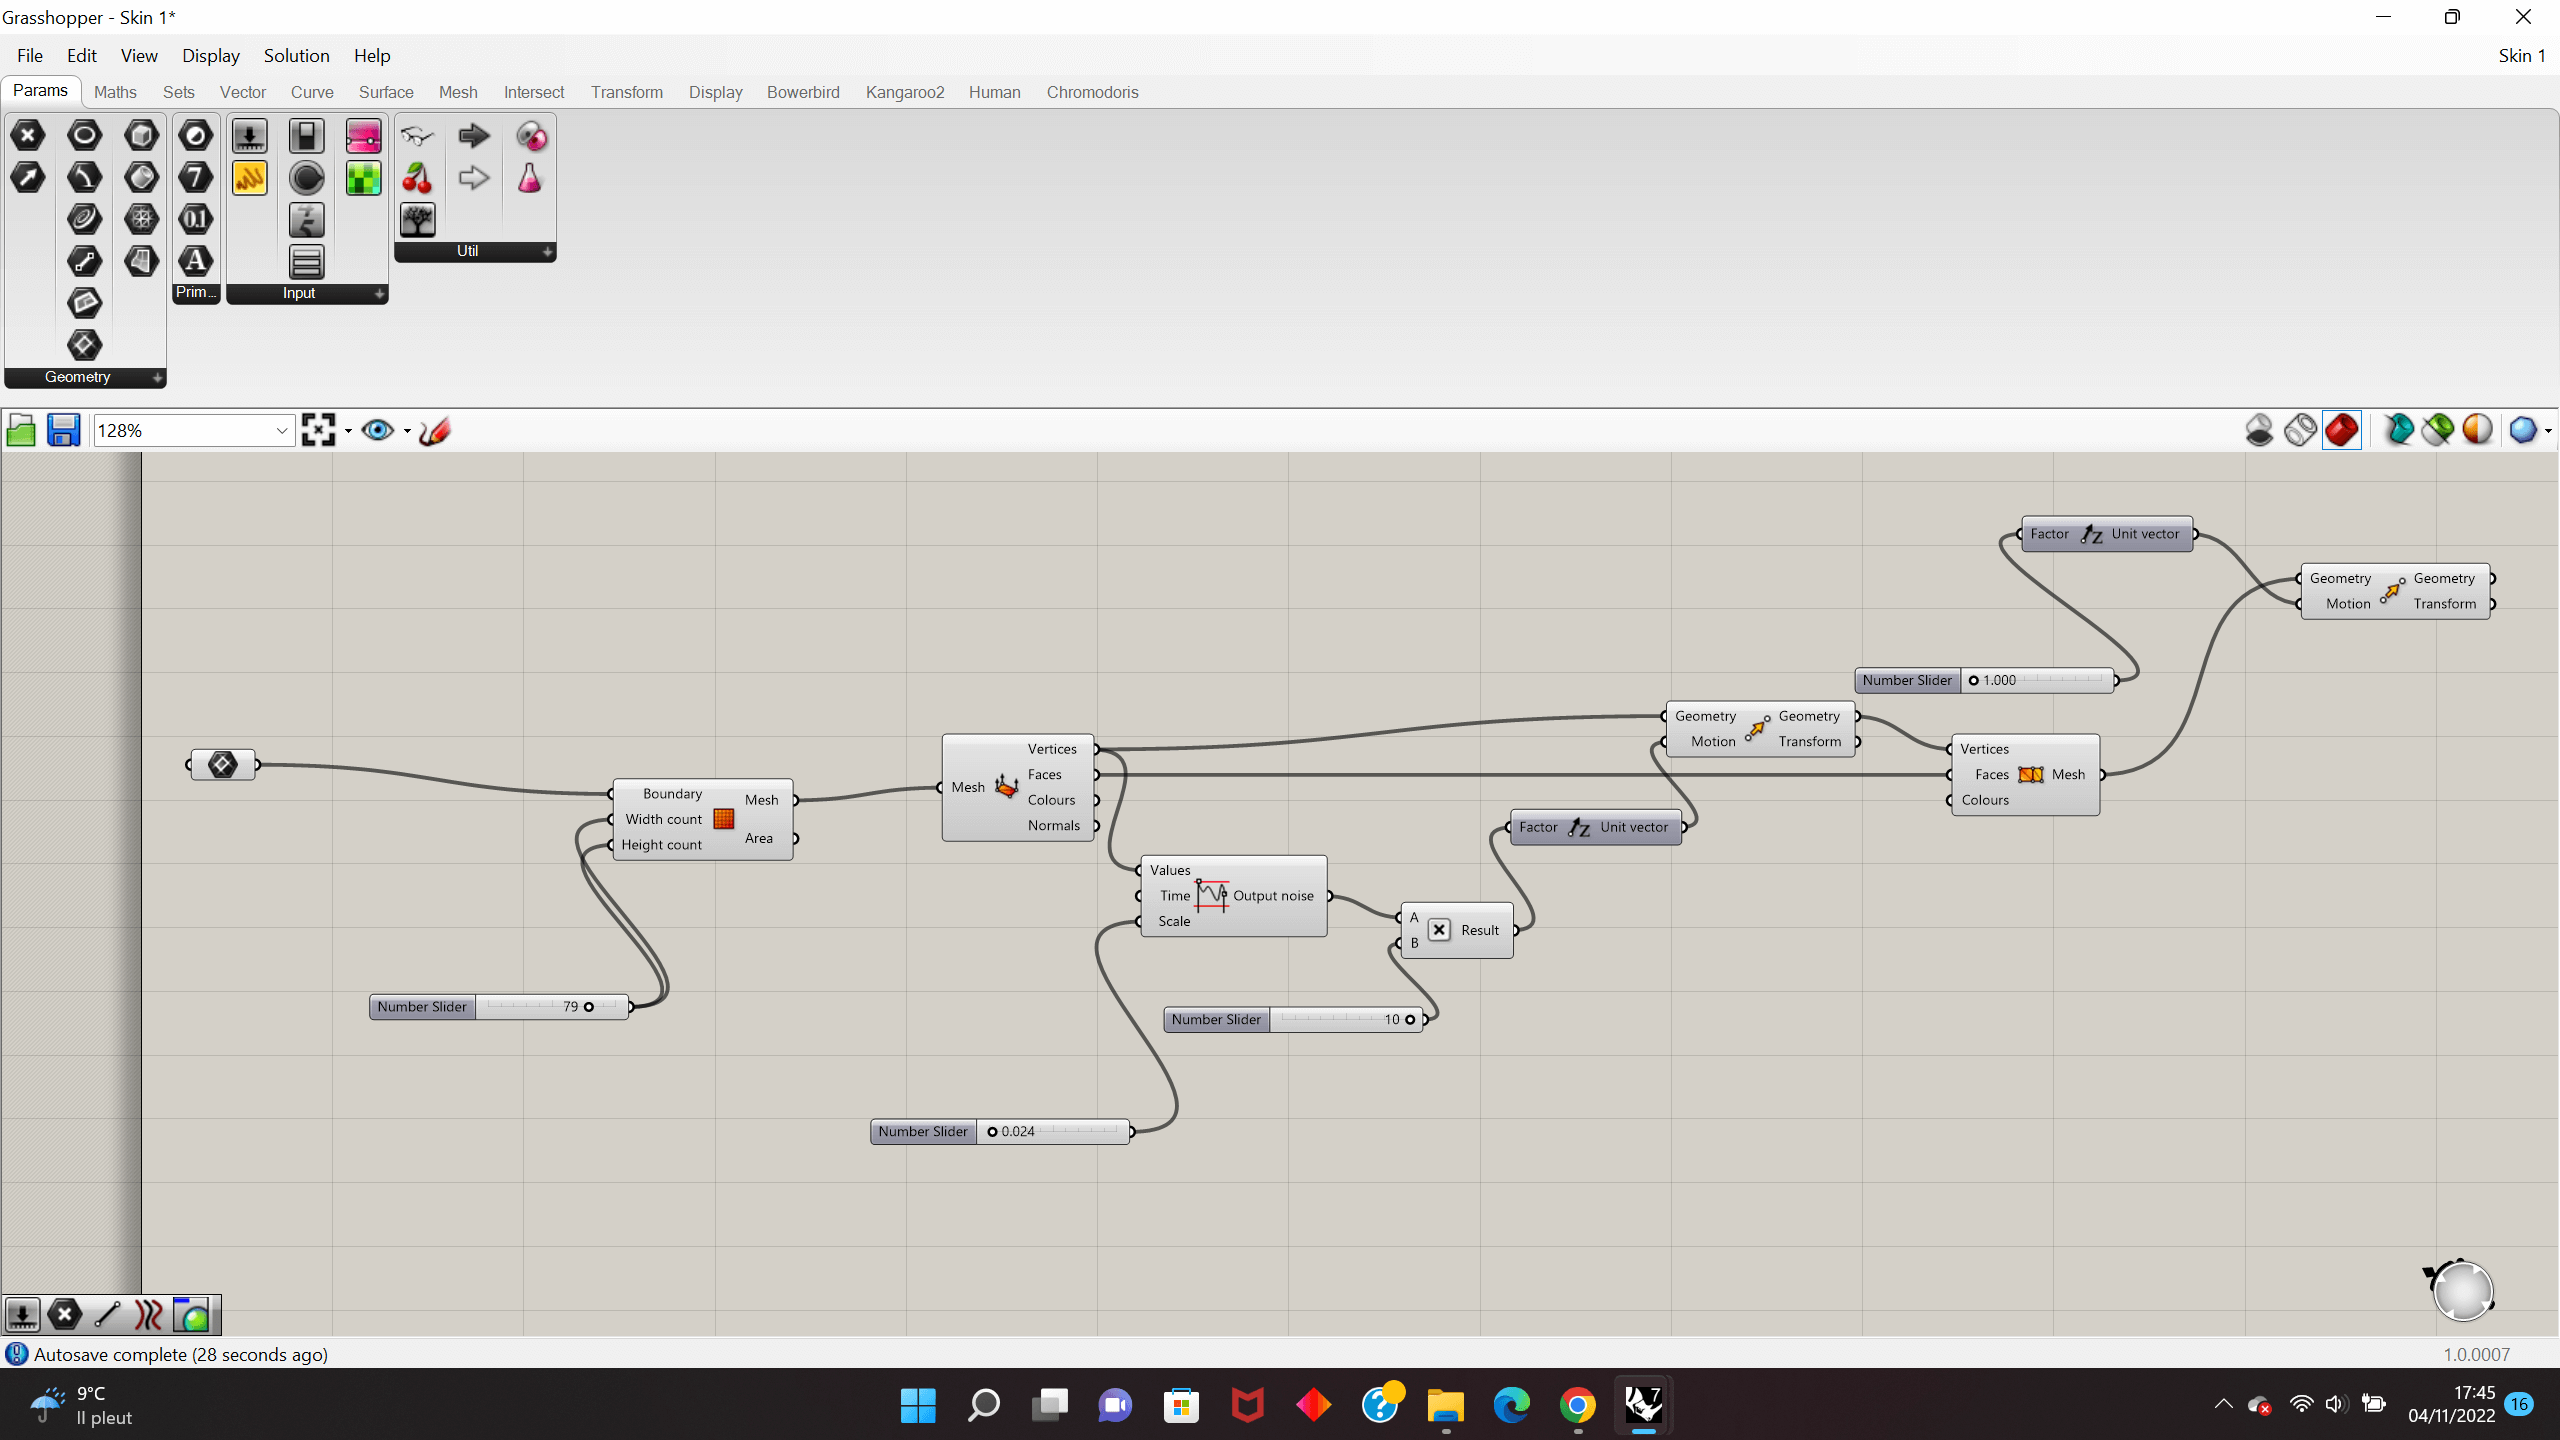
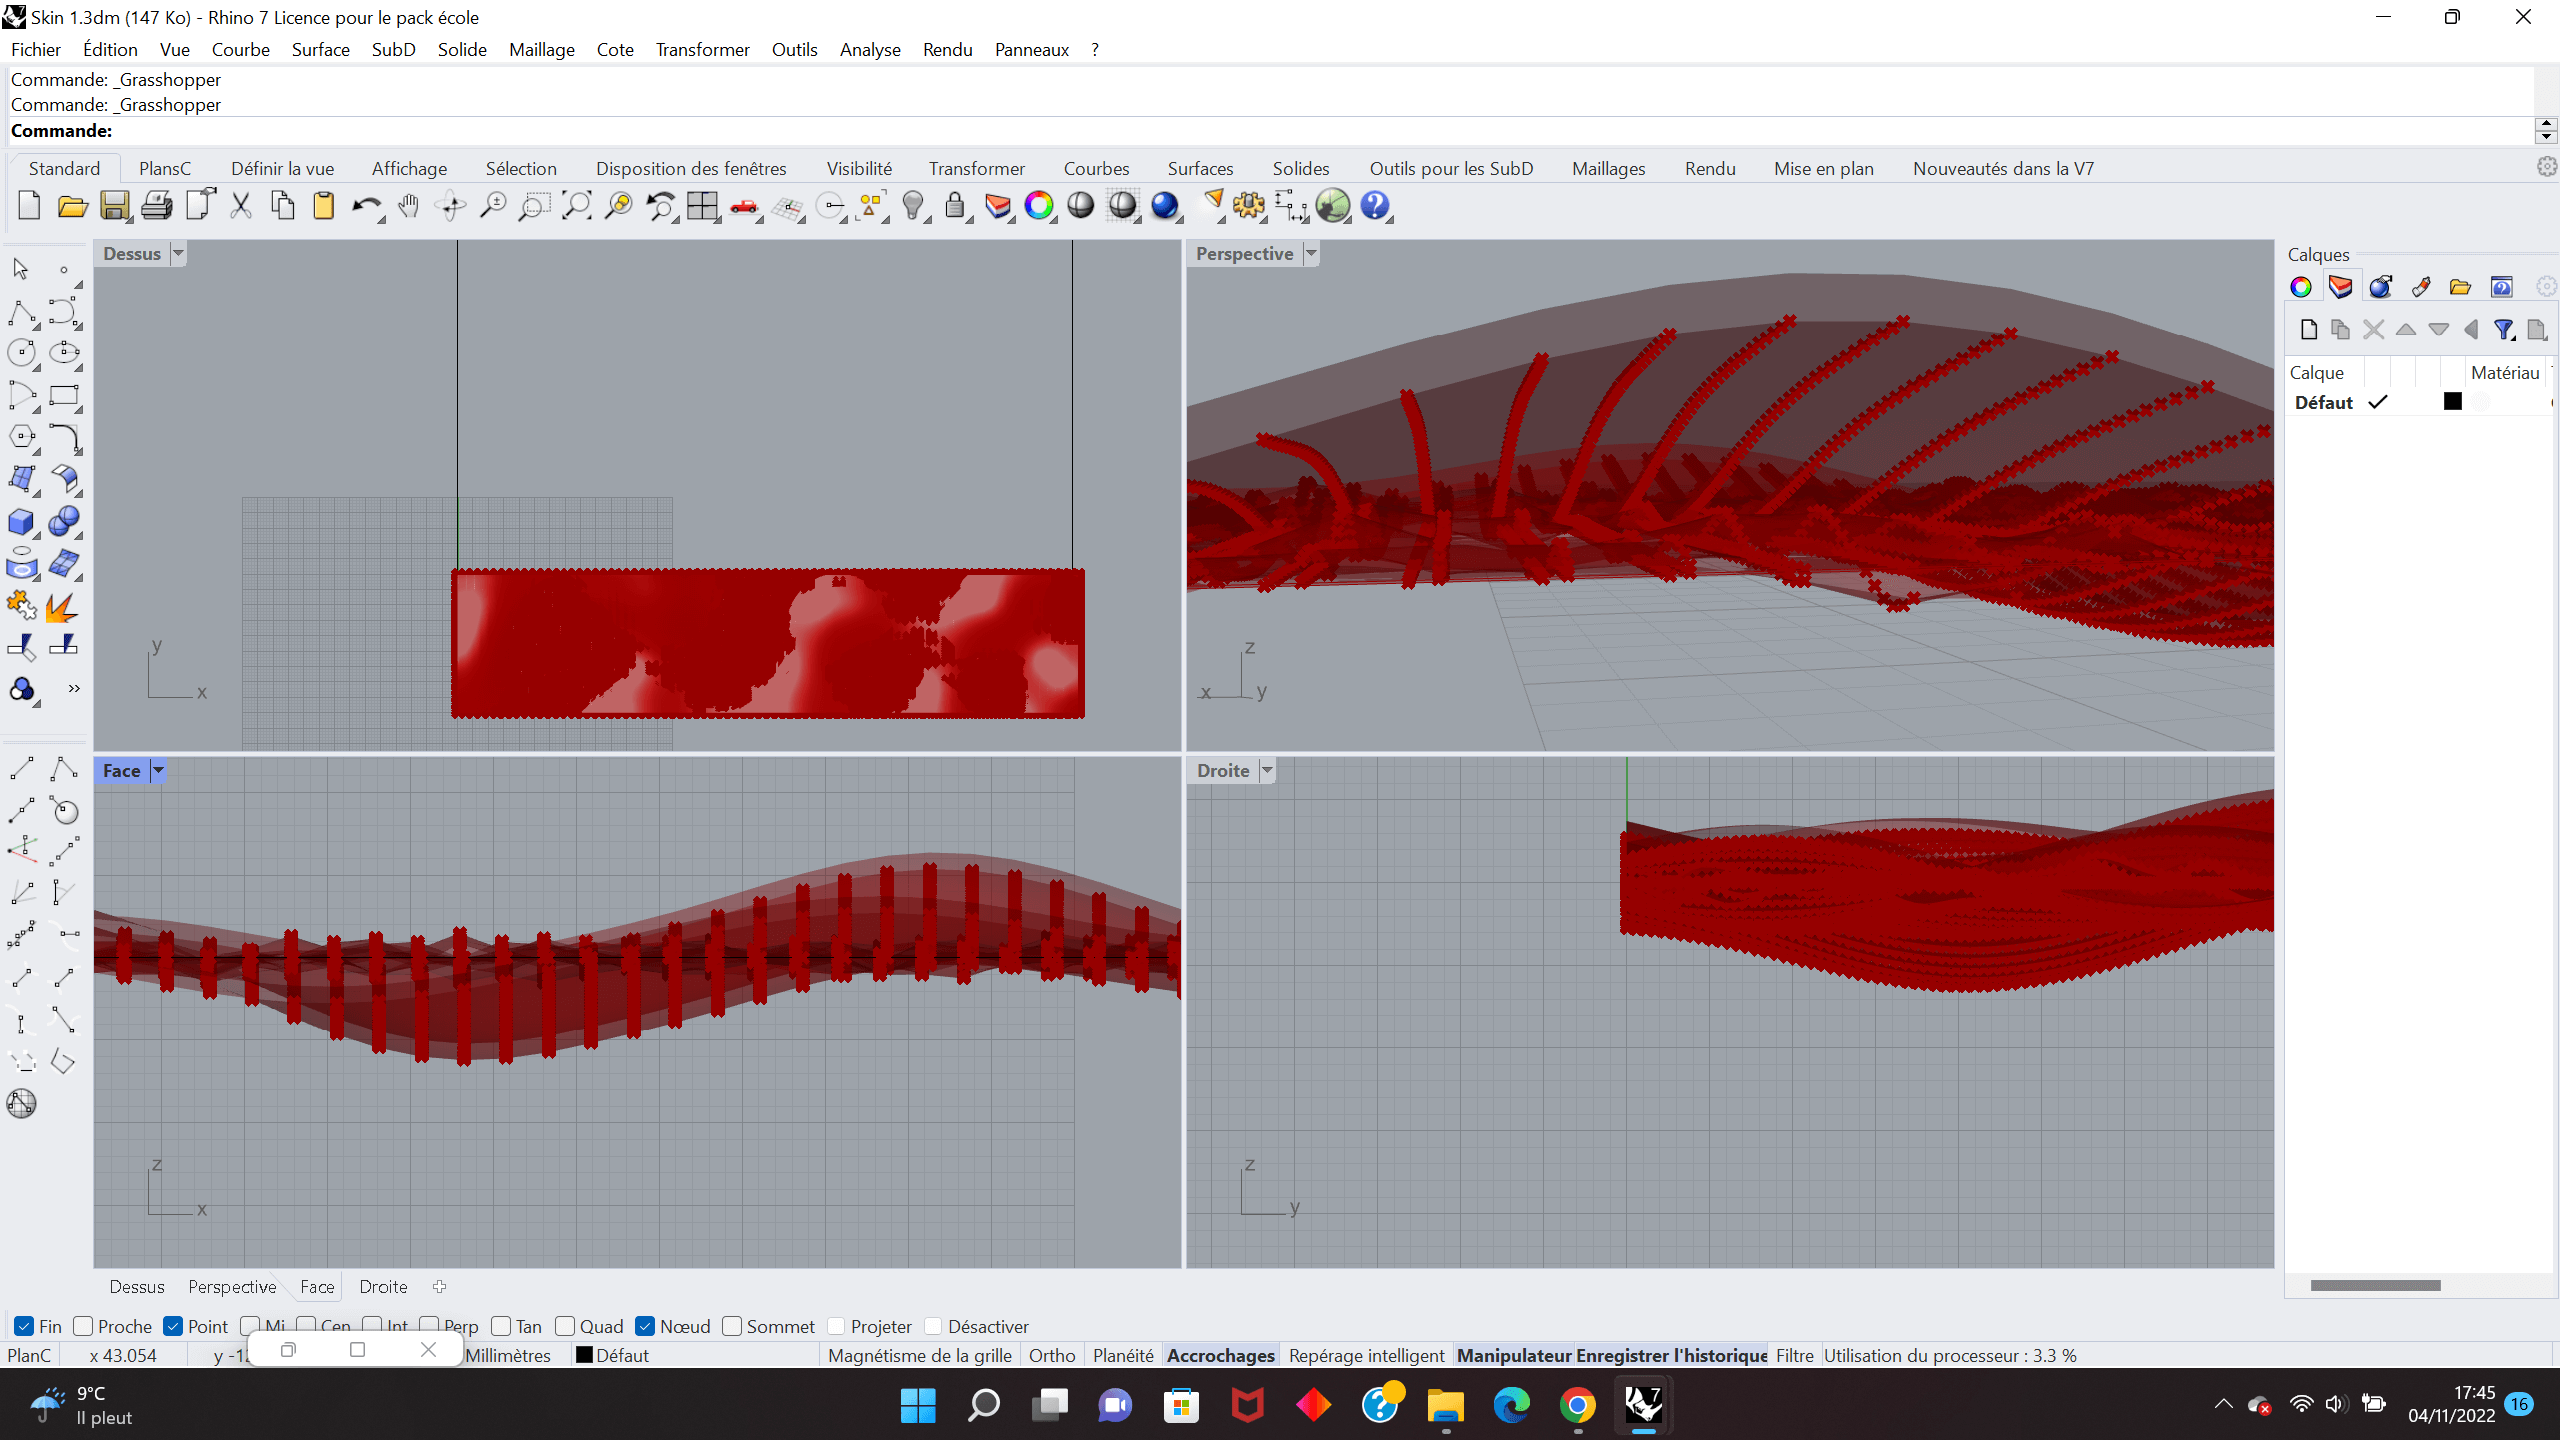
One
Two
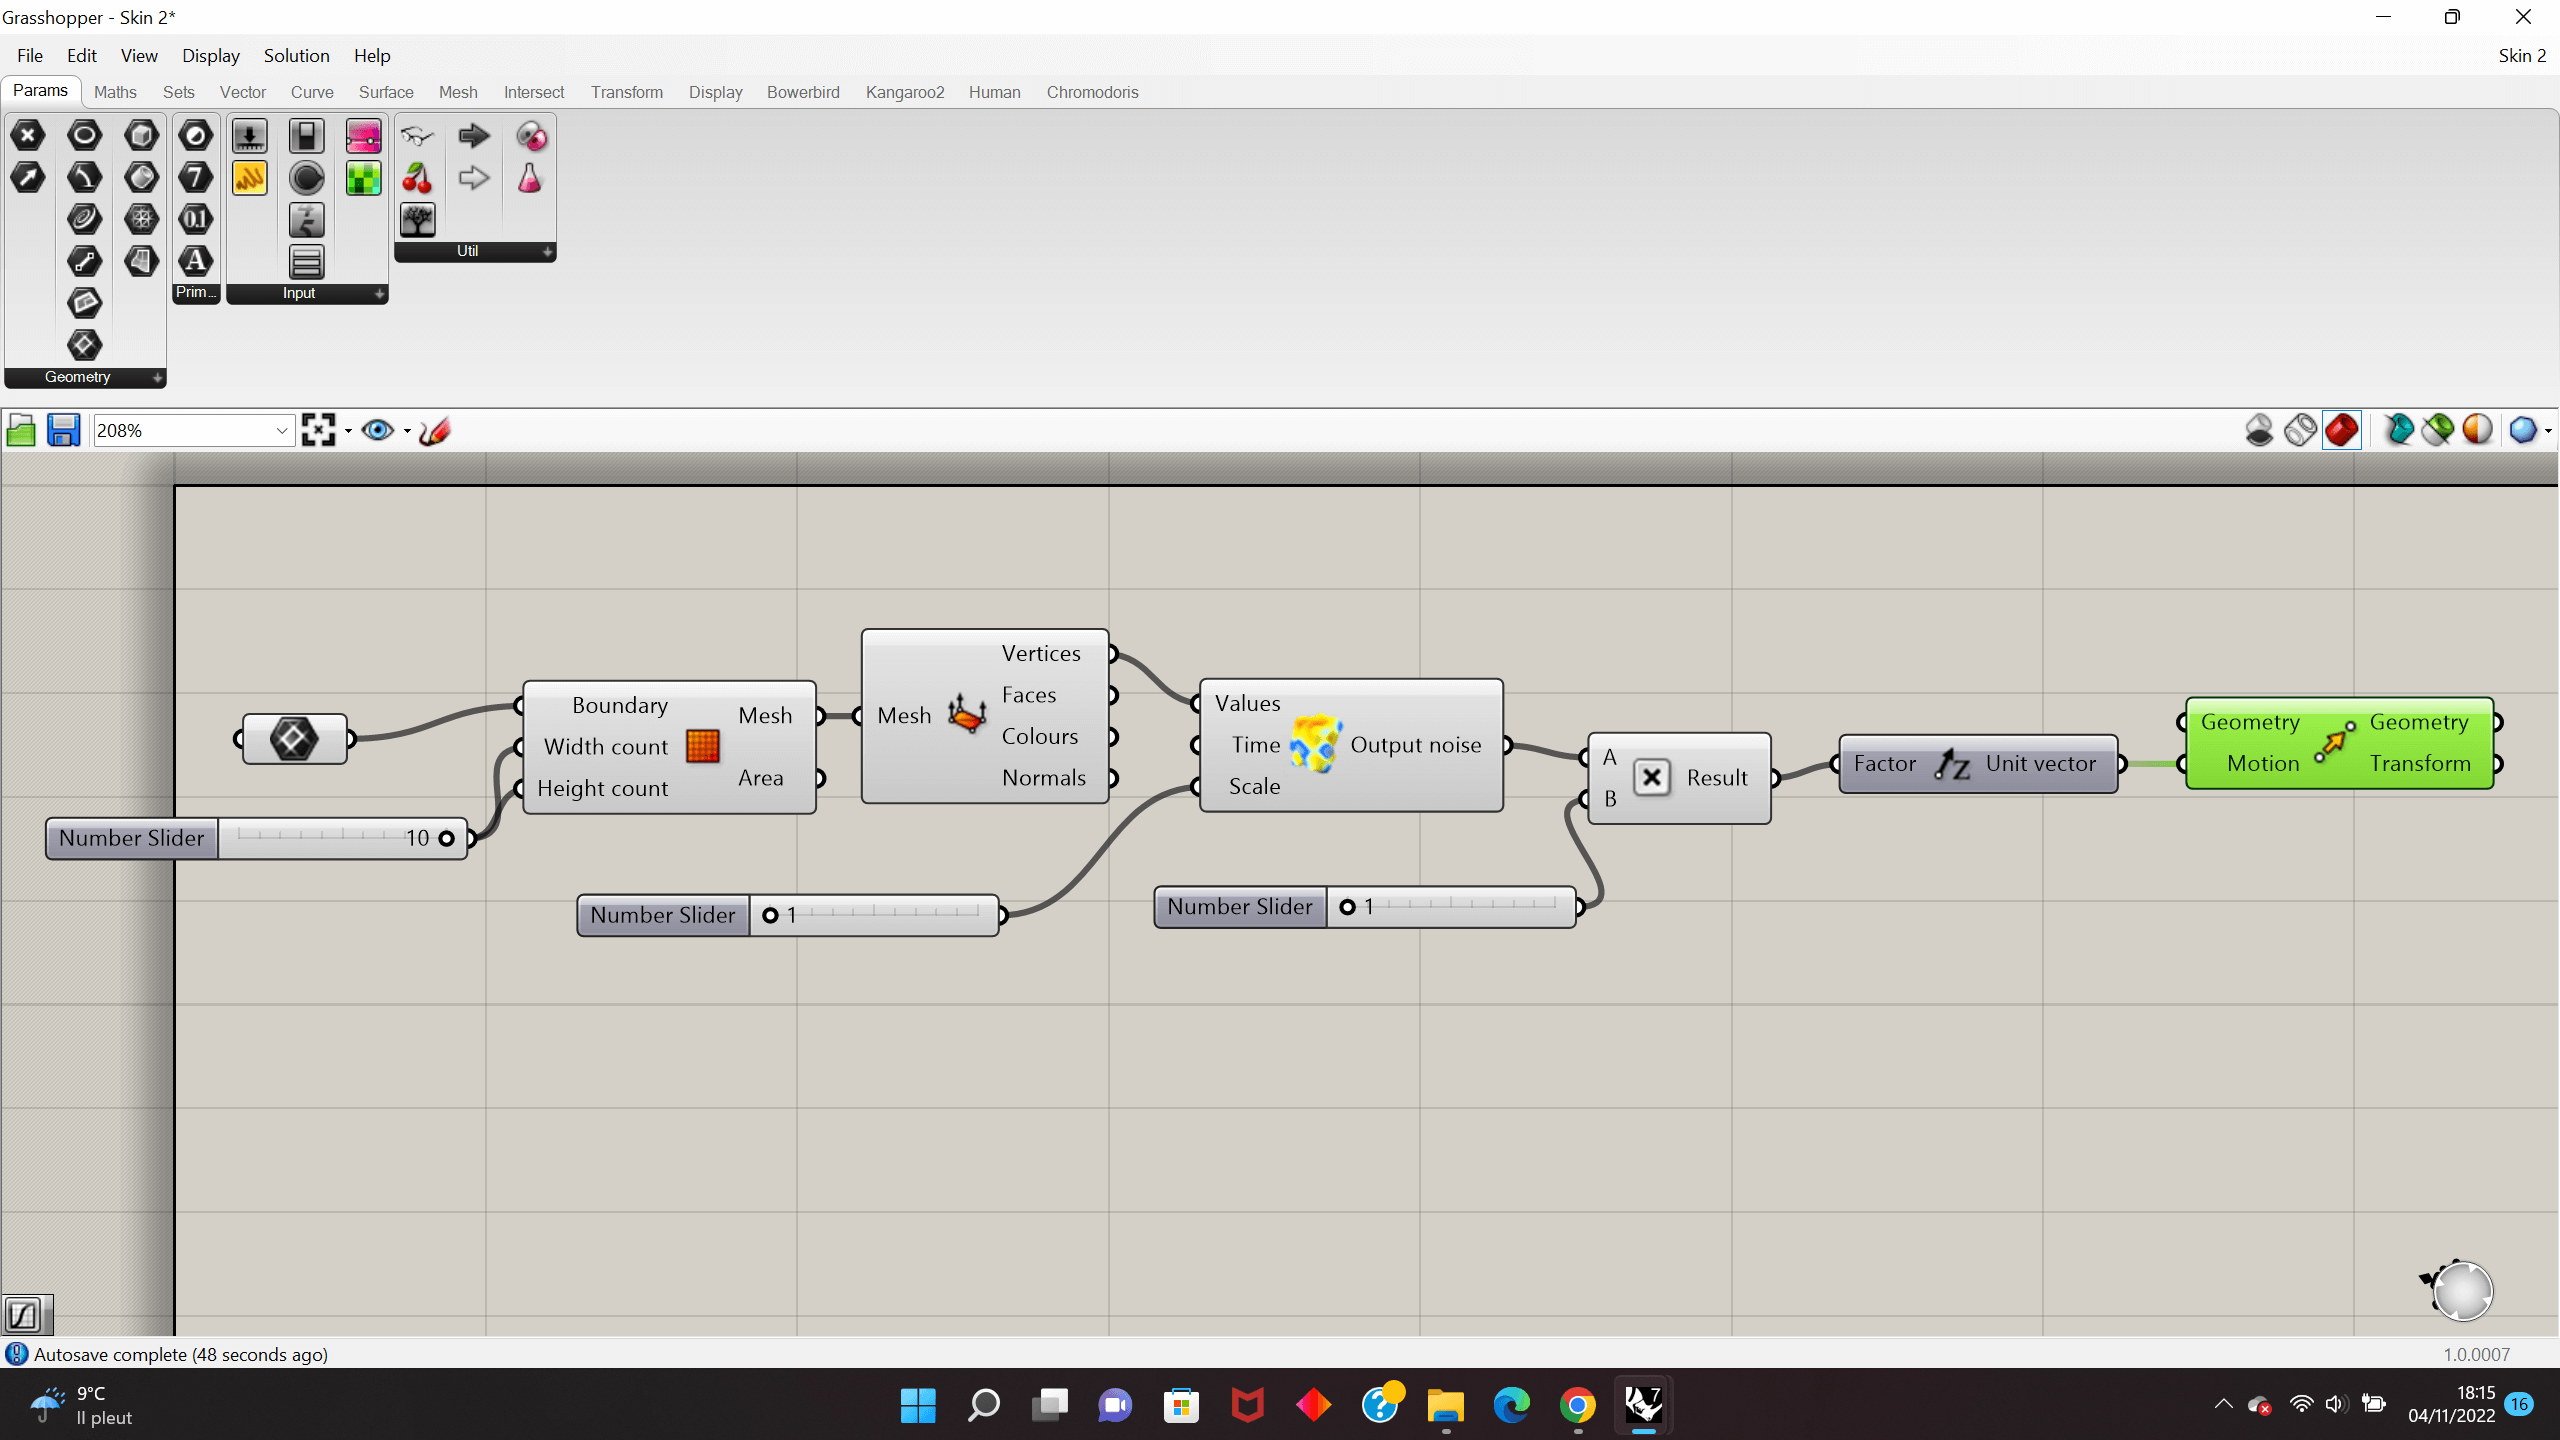
Two (next step)
So, I experimented on these tools.
But this will be to be continued, because I don't have time right now!
I know that I will have to use a very flexible filament to work with this design, otherwise it will be too thick and rigid, and it won't fit the body at all!
Fabrication files
-
File: Hairs before modification ↩
-
File: Hairs after modification ↩
-
File: Rhino for hairs placement ↩