WEEK 12. Soft robotics
Inspirations
Saskia Helinska
Saskia Helinska's work is impressive in the display and experimenting of various techniques around inflatables. Her site is a genuine goldmine!
I particularly liked the part where she experiments on different interhuman touch gestures, such as pressing, grabbing or stroking (as shown below).
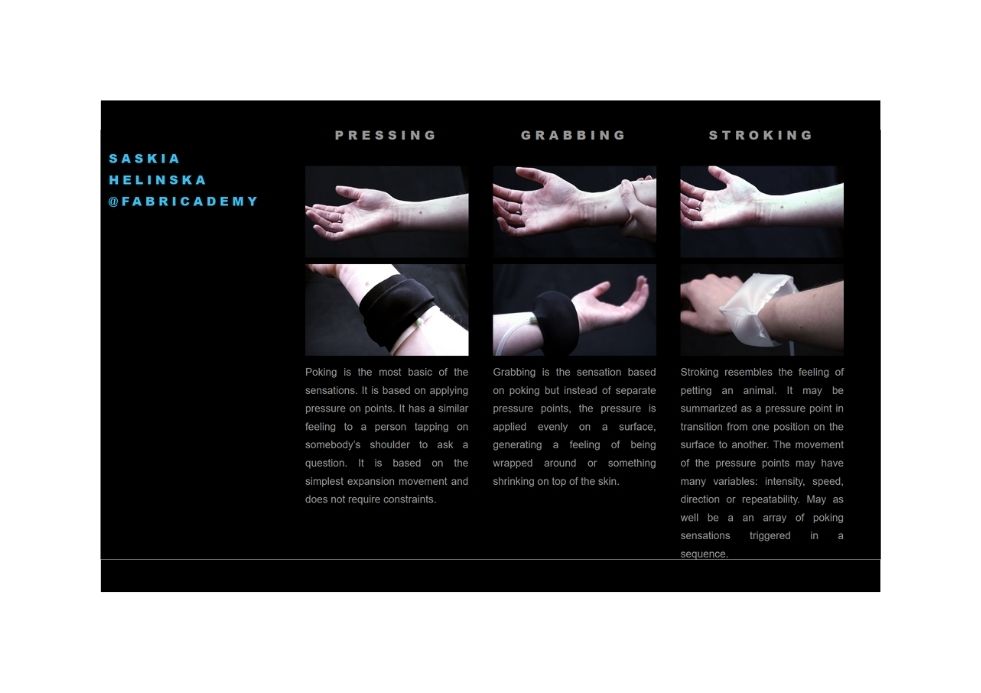
In fact, soft robotics are about these interactions with the human body. I guess we humans need some skin contact, if only in a handshake.
As she says in her project, sensations are indescriptible, it is already a whole language in itself: a language that has the particularity to be very personal, since we experience the physical touch differentlyn, considering that we have different nerves.
Biomimicry
What fascinates me is also the fact that some robotics, due to their softness, mimics the way animals move. It makes me unseasy sometimes, but it interested me, and I dug into the subject, especially in the field of ethics in this matter.
Here, it makes me feel a feeling of uncanny valley, because it really moves like a living being, and the fact that it is soft robotics and that it is really well done.
"In aesthetics, the uncanny valley is a hypothesized relation between an object's degree of resemblance to a human being and the emotional response to the object." (Wikipedia)
Some researches and understanding about biomimicry ethics
« C'est une triste chose de songer que la nature parle et que le genre humain n'écoute pas »
Victor Hugo, 1870
https://journals.openedition.org/tc/9299
"La « Nature » n’est plus vue comme une source de matériaux à extraire, mais devient un maître à imiter, et apparaît comme un laboratoire in situ fort de 3.8 milliards d’années de recherche et développement : nous gagnerions à « apprendre » de cette altérité dont on reconnaît qu’elle dispose de plus de « connaissances » que les humains."
"Janine Benyus, biologiste américaine, rassemble pour la première fois ces approches éparses sous l’appellation « biomimétisme » reprenant le terme forgé en 1969 par le biophysicien Otto Schmitt (Schmitt 1969). La publication en 1997 de son livre Biomimicry : Innovation Inspired by Nature, traduit en français en 2011 sous le titre Biomimétisme. Quand la nature inspire des innovations durables, marque un moment décisif de la démarche biomimétique.
Found this philosophical article about Biomimicry.
http://www.freyamathews.net/downloads/Biomimicry.pdf
Extracting some notions:
Traditional environmentalism, two branches:
Conservationists
Preservationists
| Strands | Centrism | Goal | Side |
|---|---|---|---|
| Conservationists | Anthropocentrism | "Maintaining ecosystems in states productive for human purposes" | "For humanity, valuing nature only as a resource, a “standing reserve”, for us." |
| Preservationist | Biocentrism | "Maintaining undisturbed ecosystems in their original condition or restoring disturbed ecosystems to something resembling the condition they had been in prior to human intervention" | "Truly for nature, in the sense of valuing it for its own sake" |
"If humanity is to be re-situated inside nature, in the interests of bringing humans and nonhumans into the same moral camp, then this must be achieved without reducing the human to the terms of the dualistically defined natural. In other words, it must be achieved in a way which opens up the terms of the natural so that they can become inclusive of the artefactual. Artefact must be seen as a potential expression of the natural.
Nature will then no longer be understood as that which is untouched by us but rather as something deeper, something which can be expressed in our handiwork just as it is in the handiwork of the spider or the bee."
"Les penseurs de la durabilité la plus récente ne préconisent pas de faire baisser la production, de réduire la population et d'adopter au maximum une approche de non-interventionnisme à l'égard de la nature, ce sur quoi les générations environnementalistes précédentes insistaient, mais ils préconisent plutôt de tendre vers une intégration des processus socio-économiques aux processus écologiques." (traduction personnelle)
"Benyus points out that it is not enough that products themselves be designed from nature.
The infrastructure and processes by which products are produced likewise need to follow natural design. So, for instance, industrial plants and large engineered systems, such as sewerage treatment plants, should generate their own energy and convert their waste streams into resources either for ecosystems (waste water, for instance, can be purified by wetland systems that can provide habitat for birds and aquatic organisms) or for industry."
---
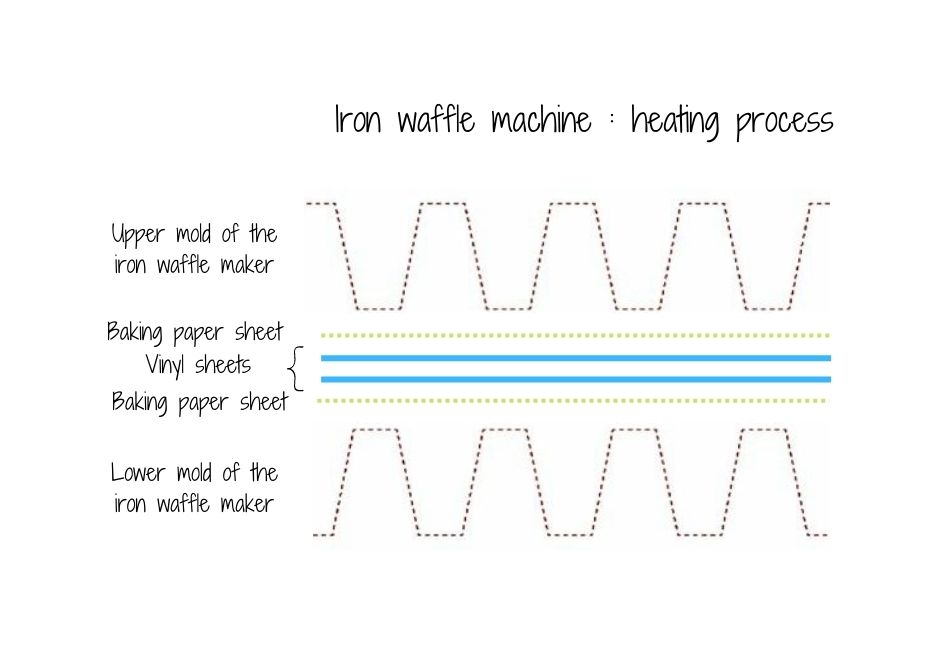
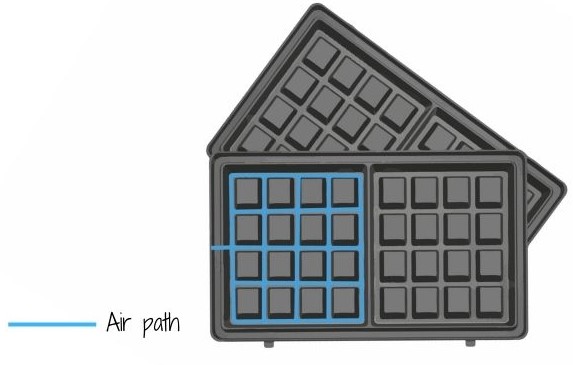
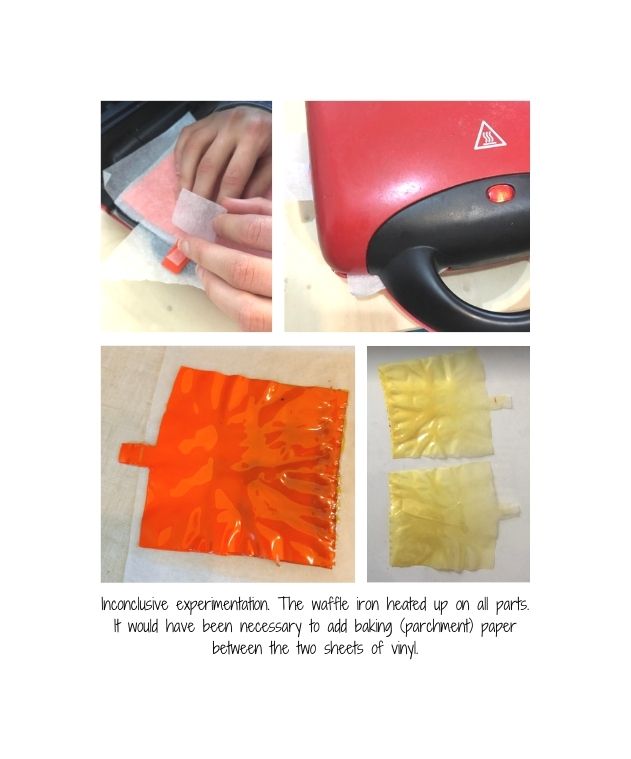
1. Vinyl test : using a waffle iron machine
Since Marion and I couldn't fully use the waffle iron machine to make a real heating press during the week 10, we decided, with Amandine, to use it to heat only some parts of the vinyl to create a path for the air.
BUT, WARNING: when burnt, vinyl can be extremely dangerous for the health. Since we could iron it, we thought that the waffle iron machine, when supervised, could be an alternative to the baking paper. First, the result wasn't conclusive. Second, we supervised the process, checking the progressive melting of the material, but nonetheless, it burnt a little. Bad idea, not to reproduce!
Nevertheless, let's explain what was our idea.
Classic way to use vinyl in the creation of the air path :
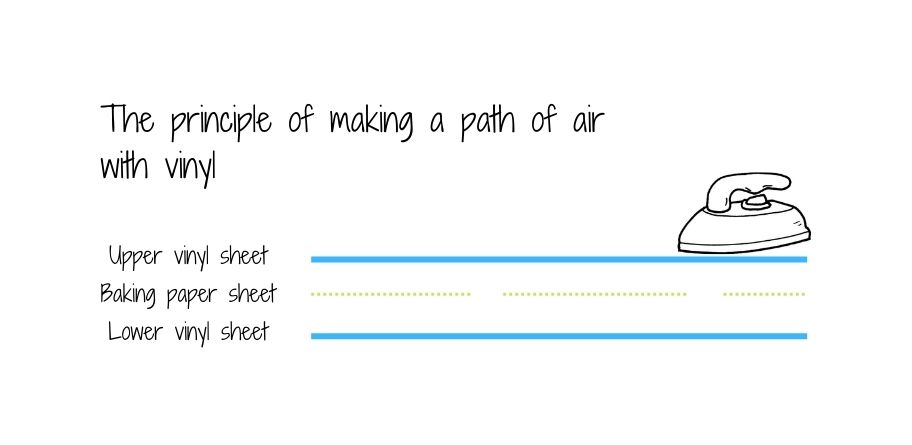
How we diverted this technique with the waffle iron machine :
 The result
After 7 minutes of progressive heating, here is the result :
I repeat it, we don't recommend you at all to reproduce this.
---
2. Leaf comeback
*
Previously, during Week 06 - Biofabricating materials - ...
We had the will to create a mold in the shape of a leaf, to mold something into it. We didn't have time to pursue this track, but this week was the opportunity to do so.
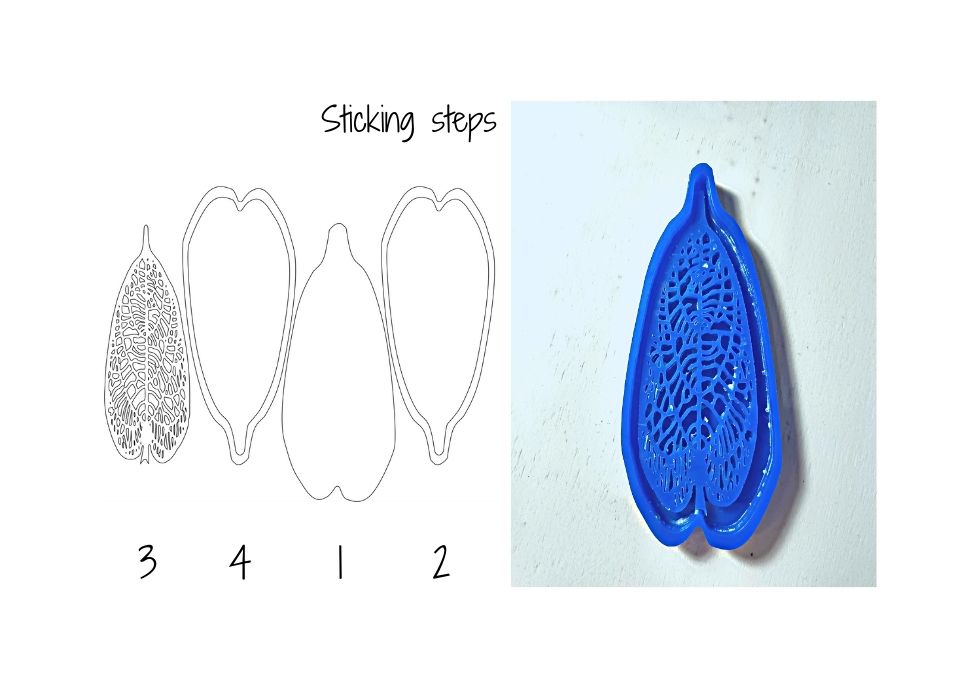
Making a leaf-shaped document 1
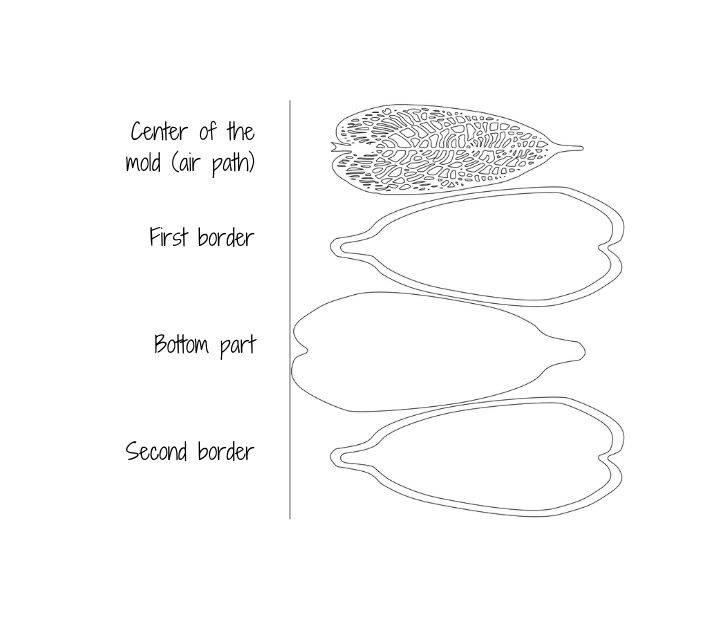
This mold is then laser-cut in a 3mm acrylic blue sheet.

Then, we used silicone to fill the molds. Some molds were 3D printed, some other were laser cut in acrylic.

* Silicone RTV 181 | 100 grams
* Catalyzer | 5 grams
Process and tip of silicone pouring
Wear gloves, silicone is nocive for the skin when not dry.
Mix the Silicone and the catalyzer together. Stir it well.
Pour it in the mold. In order to avoid making a mess, pour it just like you would pour Morocan tea: place the beaker high, and pour a thin streak of silicone at a time. Don't go too fast to avoid bubbles later, and make sure that you fill completely the mold.
Once it is filled, place your mold 10 cm above the table, and drop it, repeat this several times. The impacts will help getting rid of the bubbles stuck inside the silicone.
Watch the silicone for the next ten minutes, piercing the eventual bubbles that would come to the surface.
On the side, pour some mixture onto a piece of fabric (you'll need some fabric that wouldn't be too dense.).
Pour approximatly 2 or 3mm of mixture on it, spread it out with a spoon or spatula.
Let it dry for 24 hours before assemblying the molded piece and the silicone/fabric part. This silicone/fabric part will help seal you mold completely before inflating in.
Assembling both parts: using some more silicone to assembly the two parts. Let it dry for 24 hours at least.
Cleaning process: so hard! Don't put water in it, wait for the silicone to be completely dry, rub it with fingers, then throw it in a trashbin, not in the sink.
Unfortunately, we didn't get the chance to try the silicone molds.
They were thick and solid.
The idea with the cross-shaped molds was to create a prehensible soft clamp (a soft robotic gripper). The pine tree-shaped molds were supposed to create a single soft robotic "finger", that could fold when inflated. Below is an example of what can be created with these fingers and clamps.
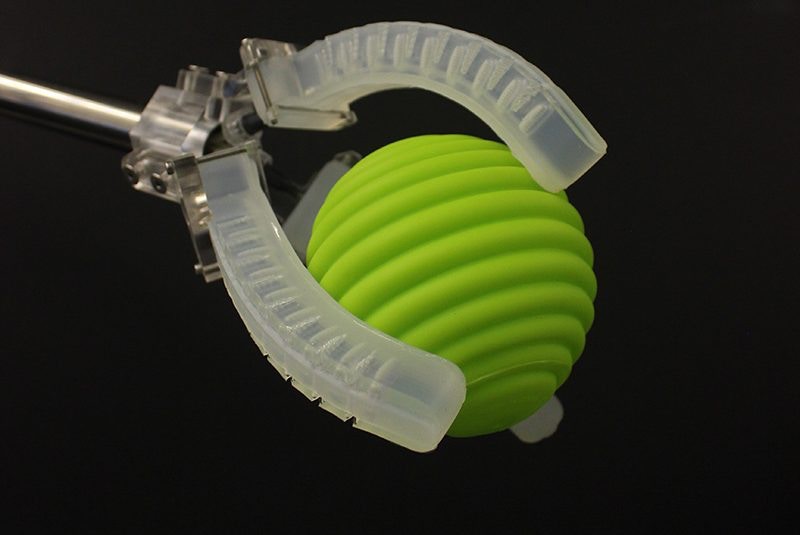
Source : The Robot Report
---
3. Sea, 3D and cold
We are in winter, and here in Lyon, it is cold! Sun and holidays were so far behind us, we couldn't help but bring some sea waves into our week!
We worked with the 3D printing machine, thanks to Saskia Helinska's documentation, who made her final project on research about inflatables.
What we need:
- a plastic bag (e.g. plastic bag with a zip)
- a piece of Neoprene (we used a 1.5mm thick Neoprene fabric)
- some baking paper
Test with the 3D Doodler Create pen
I tested this technique to check if the 3D printing would work with the material. The 3D pen has the same nozzle than the 3D printing machine.
The result
Preparing the file for 3D printing 2
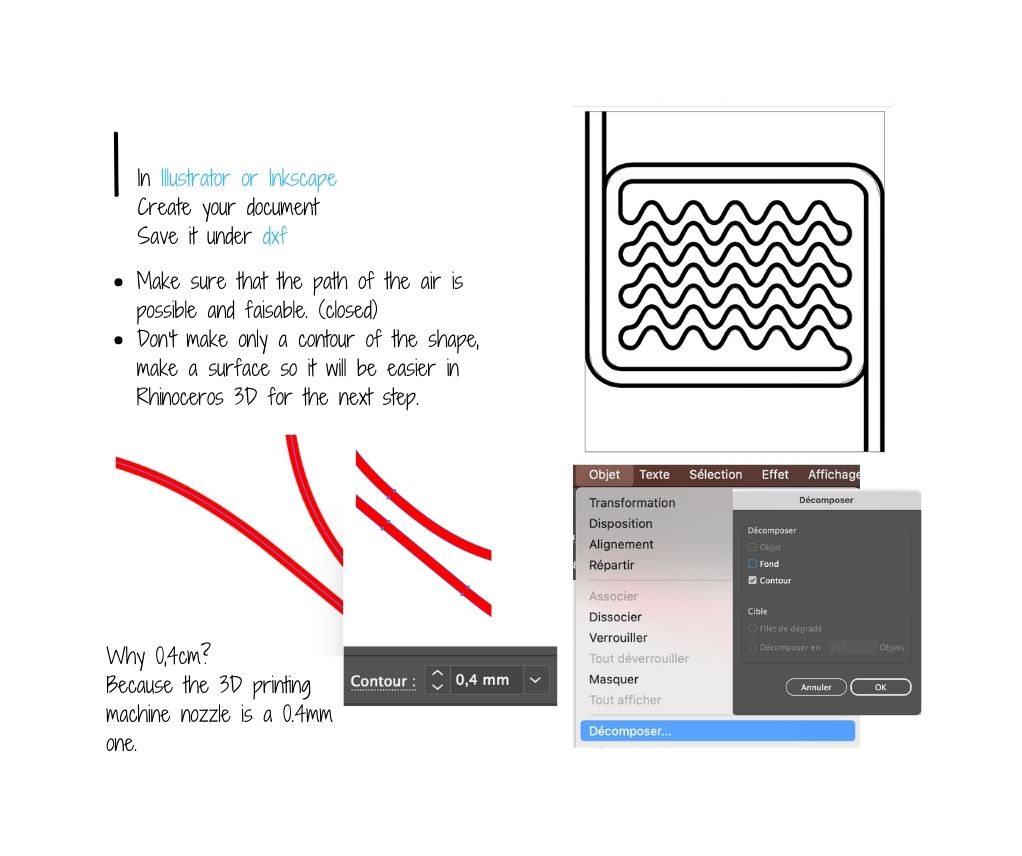

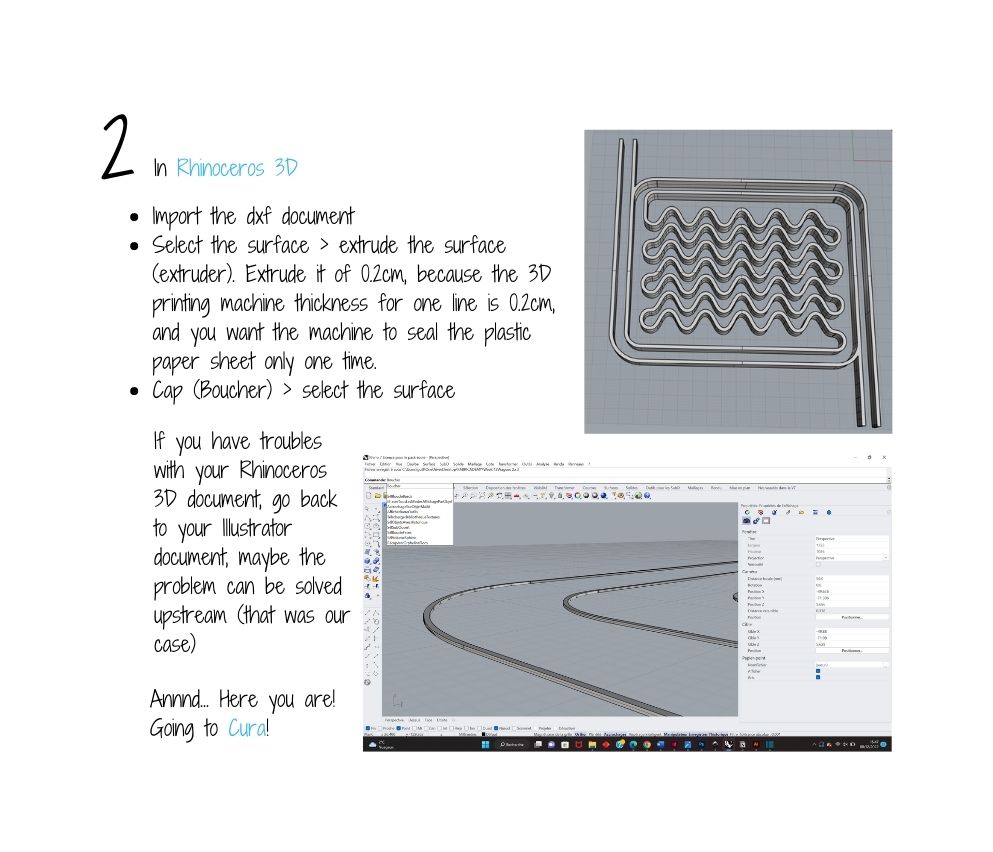
Printing with the Z-morph 3D-printing machine
 Several tests with several materials were needed to achieve a satisfying result. First of all, we used waste plastic sheet (a zip one), then we tried with garbage bag.
Calibration of the 3D printer
On this notion made by Amandine, you can find all the information you need on the calibration of the machine. It took us several tests to achieve something working!
This was the calibration of the 3D printer for the successful test!
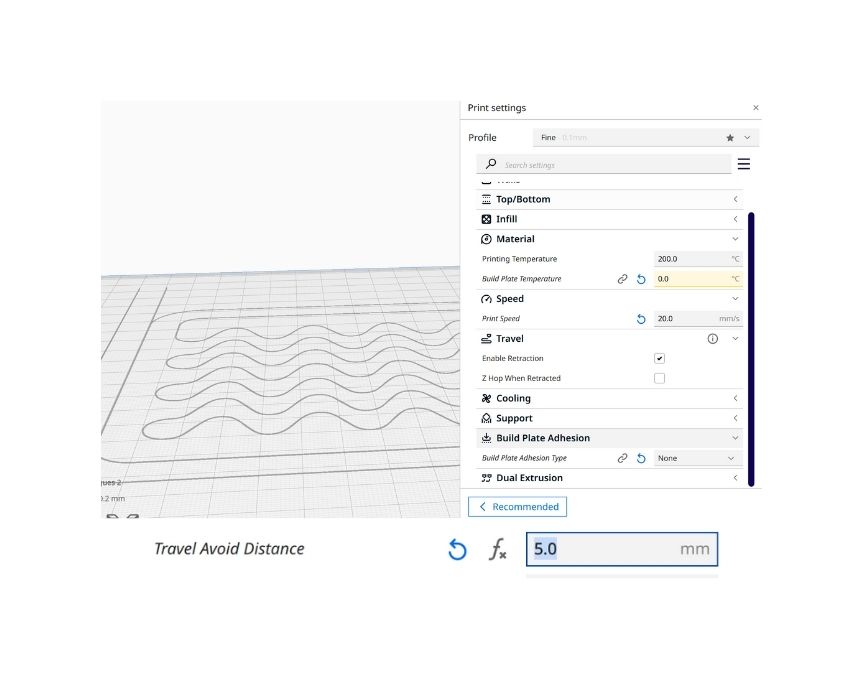
Our most conclusive test was the following one :
---
4. Sensorial communication
During the week 08 about Wearables, this technology made me think about synesthesia. It also evoked me the idea of synestesic communication, going through other ways than writting, speaking, or signing. More especially, I focused on visual language, such as lightening morse language.
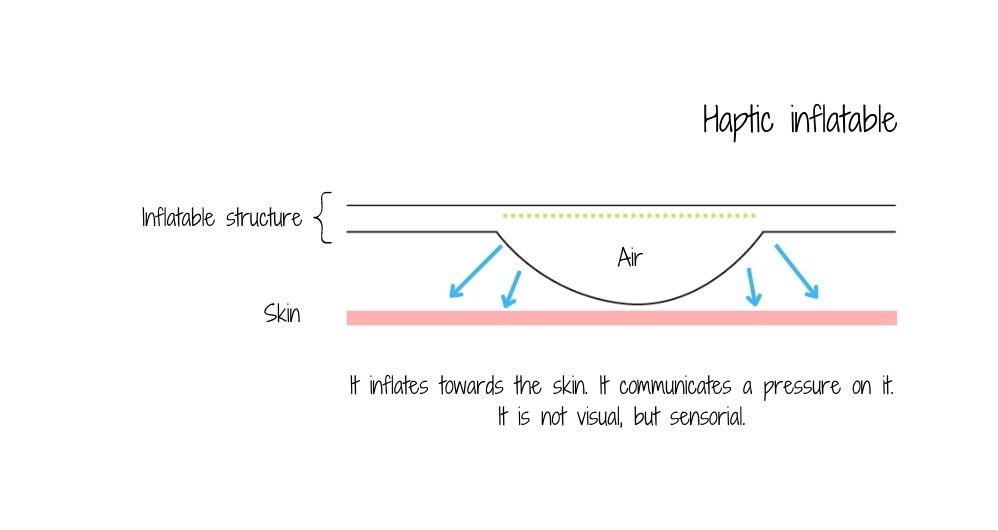
Haptic?
The word haptic nominates every thing relating to the sense of touch, in particular relating to the perception and manipulation of objects using the senses of touch and proprioception.
Another sort of communication could then be highlighted: transcripting words into pulsation following a morse sound rythm.
EFT (Emotional Freedom Techniques)
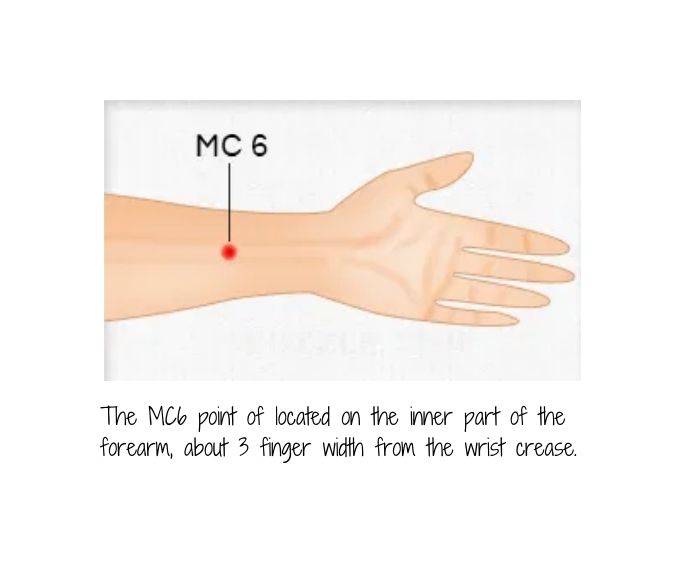
This technique of freeding oneself of emotional blockage linked to passed or current traumas relies on traditional and ancestral therapies that combine both psychology and acunpuncture. This more emotional version of acunpuncture is practiced without any needle, it is inspired with digipuncture.
The objective is to stimulate the body in order to help healing those traumas (once they are identified); it is a psychocorporal technique.
It relies on the reequilibrating of the body's energetic flows. This reequilibrating occurs by gently tapping some energetic meridian ends (these meridians coming from acunpuncture in the first place), which will allows the free flowing of energy. It would contribute in reducing the emotional charge associated to a traumatic memory, and in changing one's attitude face to his/her problem.
We decided to create a healing bracelet, to create this digipuncture with an inflatable point located on the wrist (on the MC6 point).
The Morse pressure bracelet
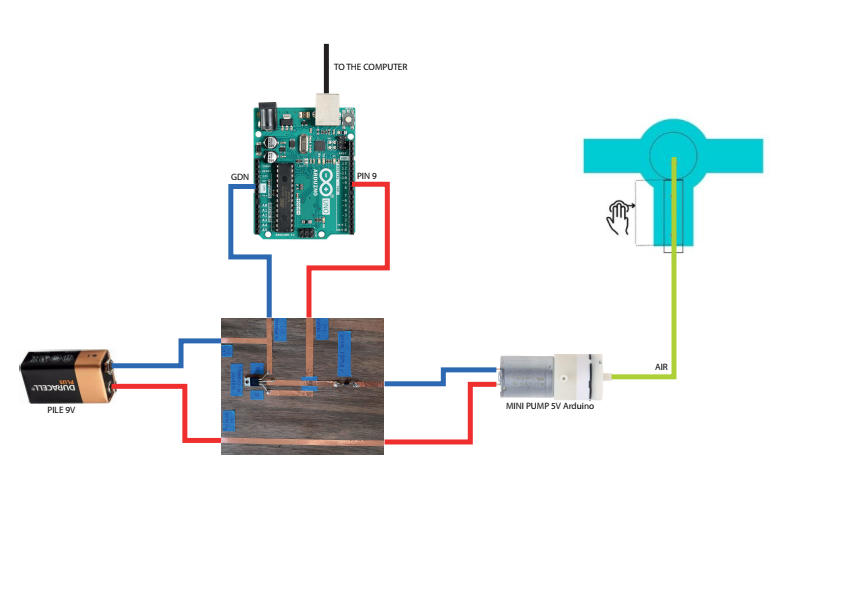
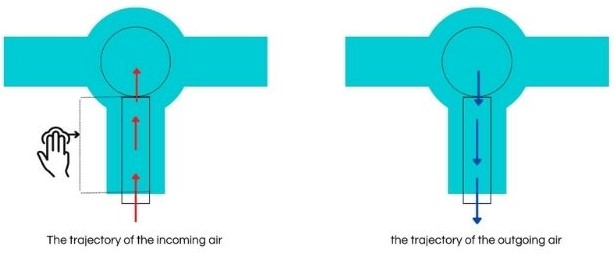
Path of the air
For the documentation of the process of making the bracelet, here is the link towards Marion's page
"Message me"
The idea was to convert Morse sound into inflating motion, following the text "Message me", and to embed it into the bracelet functionning. Why "Message me"? Because you could program this inflating pulsation to follow whatever Morse message you would like, and it would be very personal, linked to your personal problem. Moreover, it sounds a lot like "Massage me", so reminding me of the skin contact.
I translated it with this Morse Code Translator
Arduino
I found a code to translate a written message in Arduino to a Morse code linked to a buzzer on the website Device Plus, and a code to work with a pump on this site. I made a mix of both of them, to connect a pump to an Arduino circuit, in order to encode Morse language into it.
// constants won't change
const int PUMP_PIN = 9;  // the Arduino pin, which connects to the IN pin of the pump

// the setup function runs once when you press reset or power the board
void setup() {
  // initialize digital pin 9 as an output.
  pinMode(PUMP_PIN, OUTPUT);


int timeUnit = 100; // This variable will be used to measure dots, dashes, breaks, and pauses
char input; // Variable to save the input to

void setup () {
Serial.begin(9600);//for the connect with the board
}

void loop () {
if (Serial.available()) {
input = Serial.read();//read the input
if (input == ‘a’ || input == ‘A’) {lA();}//if the input is a or A go to function lA
if (input == ‘b’ || input == ‘B’) {lB();}//same but with b letter
if (input == ‘c’ || input == ‘C’) {lC();}
if (input == ‘d’ || input == ‘D’) {lD();}
if (input == ‘e’ || input == ‘E’) {lE();}
if (input == ‘f’ || input == ‘F’) {lF();}
if (input == ‘g’ || input == ‘G’) {lG();}
if (input == ‘h’ || input == ‘H’) {lH();}
if (input == ‘i’ || input == ‘I’) {lI();}
if (input == ‘j’ || input == ‘J’) {lJ();}
if (input == ‘k’ || input == ‘K’) {lK();}
if (input == ‘l’ || input == ‘L’) {lL();}
if (input == ‘m’ || input == ‘M’) {lM();}
if (input == ‘n’ || input == ‘N’) {lN();}
if (input == ‘o’ || input == ‘O’) {lO();}
if (input == ‘p’ || input == ‘P’) {lP();}
if (input == ‘q’ || input == ‘Q’) {lQ();}
if (input == ‘r’ || input == ‘R’) {lR();}
if (input == ‘s’ || input == ‘S’) {lS();}
if (input == ‘t’ || input == ‘T’) {lT();}
if (input == ‘u’ || input == ‘U’) {lU();}
if (input == ‘v’ || input == ‘V’) {lV();}
if (input == ‘w’ || input == ‘W’) {lW();}
if (input == ‘x’ || input == ‘X’) {lX();}
if (input == ‘y’ || input == ‘Y’) {lY();}
if (input == ‘z’ || input == ‘Z’) {lZ();}
if (input == ‘ ‘) {wordPause();}
Serial.println (input);

}
}
//Letter functions
void lA () {dot();dash();letterPause();}//letter A in morse code!
void lB () {dash();dot();dot();dot();letterPause();}//same for B
void lC () {dash();dot();dash();dot();letterPause();}
void lD () {dash();dot();dot();letterPause();}
void lE () {dot();letterPause();}
void lF () {dot();dot();dash();dot();letterPause();}
void lG () {dash();dash();dot();letterPause();}
void lH () {dot();dot();dot();dot();letterPause();}
void lI () {dot();dot();letterPause();}
void lJ () {dot();dash();dash();dash();letterPause();}
void lK () {dash();dot();dash();letterPause();}
void lL () {dot();dash();dot();dot();letterPause();}
void lM () {dash();dash();letterPause();}
void lN () {dash();dot();letterPause();}
void lO () {dash();dash();dash();letterPause();}
void lP () {dot();dash();dash();dot();letterPause();}
void lQ () {dash();dash();dot();dash();letterPause();}
void lR () {dot();dash();dot();letterPause();}
void lS () {dot();dot();dot();letterPause();}
void lT () {dash();letterPause();}
void lU () {dot();dot();dash();letterPause();}
void lV () {dot();dot();dot();dash();letterPause();}
void lW () {dot();dash();dash();letterPause();}
void lX () {dash();dot();dot();dash();letterPause();}
void lY () {dash();dot();dash();dash();letterPause();}
void lZ () {dash();dash();dot();dot();letterPause();}

void dot() //Emit sound for 100 milliseconds
{
tone(PUMP_PIN, HIGH, timeUnit);
delay(timeUnit * 2);
}

void dash() //Emit sound for 300 milliseconds
{
tone(PUMP_PIN, HIGH, timeUnit * 3);
delay(timeUnit * 4);
}

void letterPause() //Delay between letters for 300 milliseconds
{
delay(timeUnit * 3);
}

void wordPause()
{
delay (timeUnit * 7);
}
Then, you can enter whatever work you want in the Arduino board, and it will result in the translation of this written language into a sensible Morse code if it it connected to our bracelet.
Test