8. WEARABLES
I-Actuators
During the E-textiles week, we learnt about sensors and how to build them. This week was more focused on the coding to make actuators work and also about how to put the code in a more discrete and transportable tools such as ATtiny. There are different types of actuators:
a-Visual actuators
- LED : Light Emitting Diodes
- SMD LED are very flat and can be put on top of fabric/plastic and can be sewn on it.
- Neopixels are a series of SMD LEDs in a row. They have drivers embedded in the chip so they are adressable and adjustable in color. To use Neopixels, one has to pay extra attention to the power needed. The amount of Amp needed is (nb of pixels * 40 mA)/1000. To program Neopixels on Arduino, one has to upload the Neopixel library.
- Fiber optics are not really electronics, it is basically a pipe reflecting the light on its lenght. They can be end emitting or side emitting and neeed a powerful source of light at the base. High voltage LED are recommanded.
- Thermochromic ink is an ink whose pigments turn colorless when heated. The painting has to be applied in an even way if we want to have a even change of color. The temperature of change is around 20°C. The heat can be generated by a resistive conductive thread (copper is not resistive enough, stainless steel is a better option) or by the body. To have enough power to produce the necessary heat, a secondary power source can be used and controlled with Arduino with the intermediate of a transistor (for this application, prefer N-Mofset transistors).
b-Sound
A coiled wire with current is generating a magnetic field. If we increase the amount of coils, it generates an electromagnet with a negative and positive pole. By creating an electromagnet and putting it next to a biger magnet, we can make vibrations. If a streched fabric is next to it, it will vibrate at the same frequency and generate compression and dilatation waves in the air, creating a speaker. The electromagnet can be made by coiling a wire. The tighter the coil, the louder the volume. The loudness can also be affected by the strenght of the magnet and by adding a raffle fund.
c-Motion
- Shape memory alloys are metals that change shape when heated to a certain temperature. They get back to the regular conformation when cooled down or with gentle pulling. For instance, flexinol shrinks by 10% when heated and when it is trained, it changes from a specific shape to another. It is important to note that the longer the flexinol wire, the bigger the resistance and the more power required. If the diameter is bigger, the change is going to be more dramatic but will require more power too. The heat generated by the flexinol resistance can also be used for the thermochromic painting.
- Flip dots are beads of hematite flipping back and forth depending on the current. The current runs in a coil under the bead and when it is inverted, the magnetic field is also inverted generating the flipping of the bead. Bigger beads require more power and the bead has to be secured but should not be sewn too tight! -Vibration motors are small motors that vibrate. They can either be Eccentric Rotating Mass or Linear Resonant Actuators. To control the intensity of the vibration, a motor driver will be needed (it can not be encoded with Arduino only).
d-ATtiny
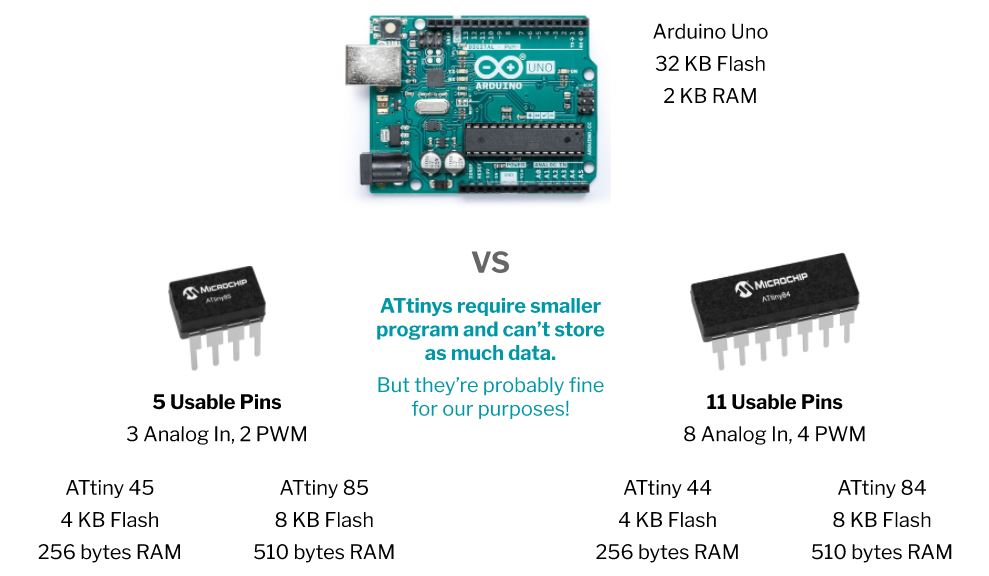
ATtiny is a smaller and more discrete version of Arduino, making it easier to embed in a garment. It requires smaller programs because it can store less data and does not support all the funtions of Arduino (it only supports pinMode(), digitalWrite(), digitalRead(), analogRead(), analogWrite(), shiftOut(), pulseIn(), millis(), micros(), delay() and delayMicroseconds()). To program ATtiny, one can use an Arduino or an AVR programmer (quicker and easier).
II-Assignment
- Document the concept, sketches, references also to artistic and scientific publications.
- Create a swatch using an ATtiny with one input and one output, using hard-soft connection solution and battery.
- Create 2 actuator swatches. Test them with the Arduino or ATtiny.
- Learn how to program an ATTiny , add the libraries and links used for the code.
- Document the schematic and the programming code, the libraries added and the power requirements.
- Upload a small video of your object working
- EXTRA POINT Integrate it to a project
III-Making a transistor
Since Arduino and the USB port of my computer can only deliver a 5V power, they can not power something requiring more than 5V. These kind of actuators will require an external power source but if we put more than 5V in an Arduino or in an ATtiny, it will dammage it. This is why we need a transistor. The following image features a transistor and the circuit it requires. Through the gate, Arduino sends the command to open or close the path between the source and the drain, turning on or off the actuator.
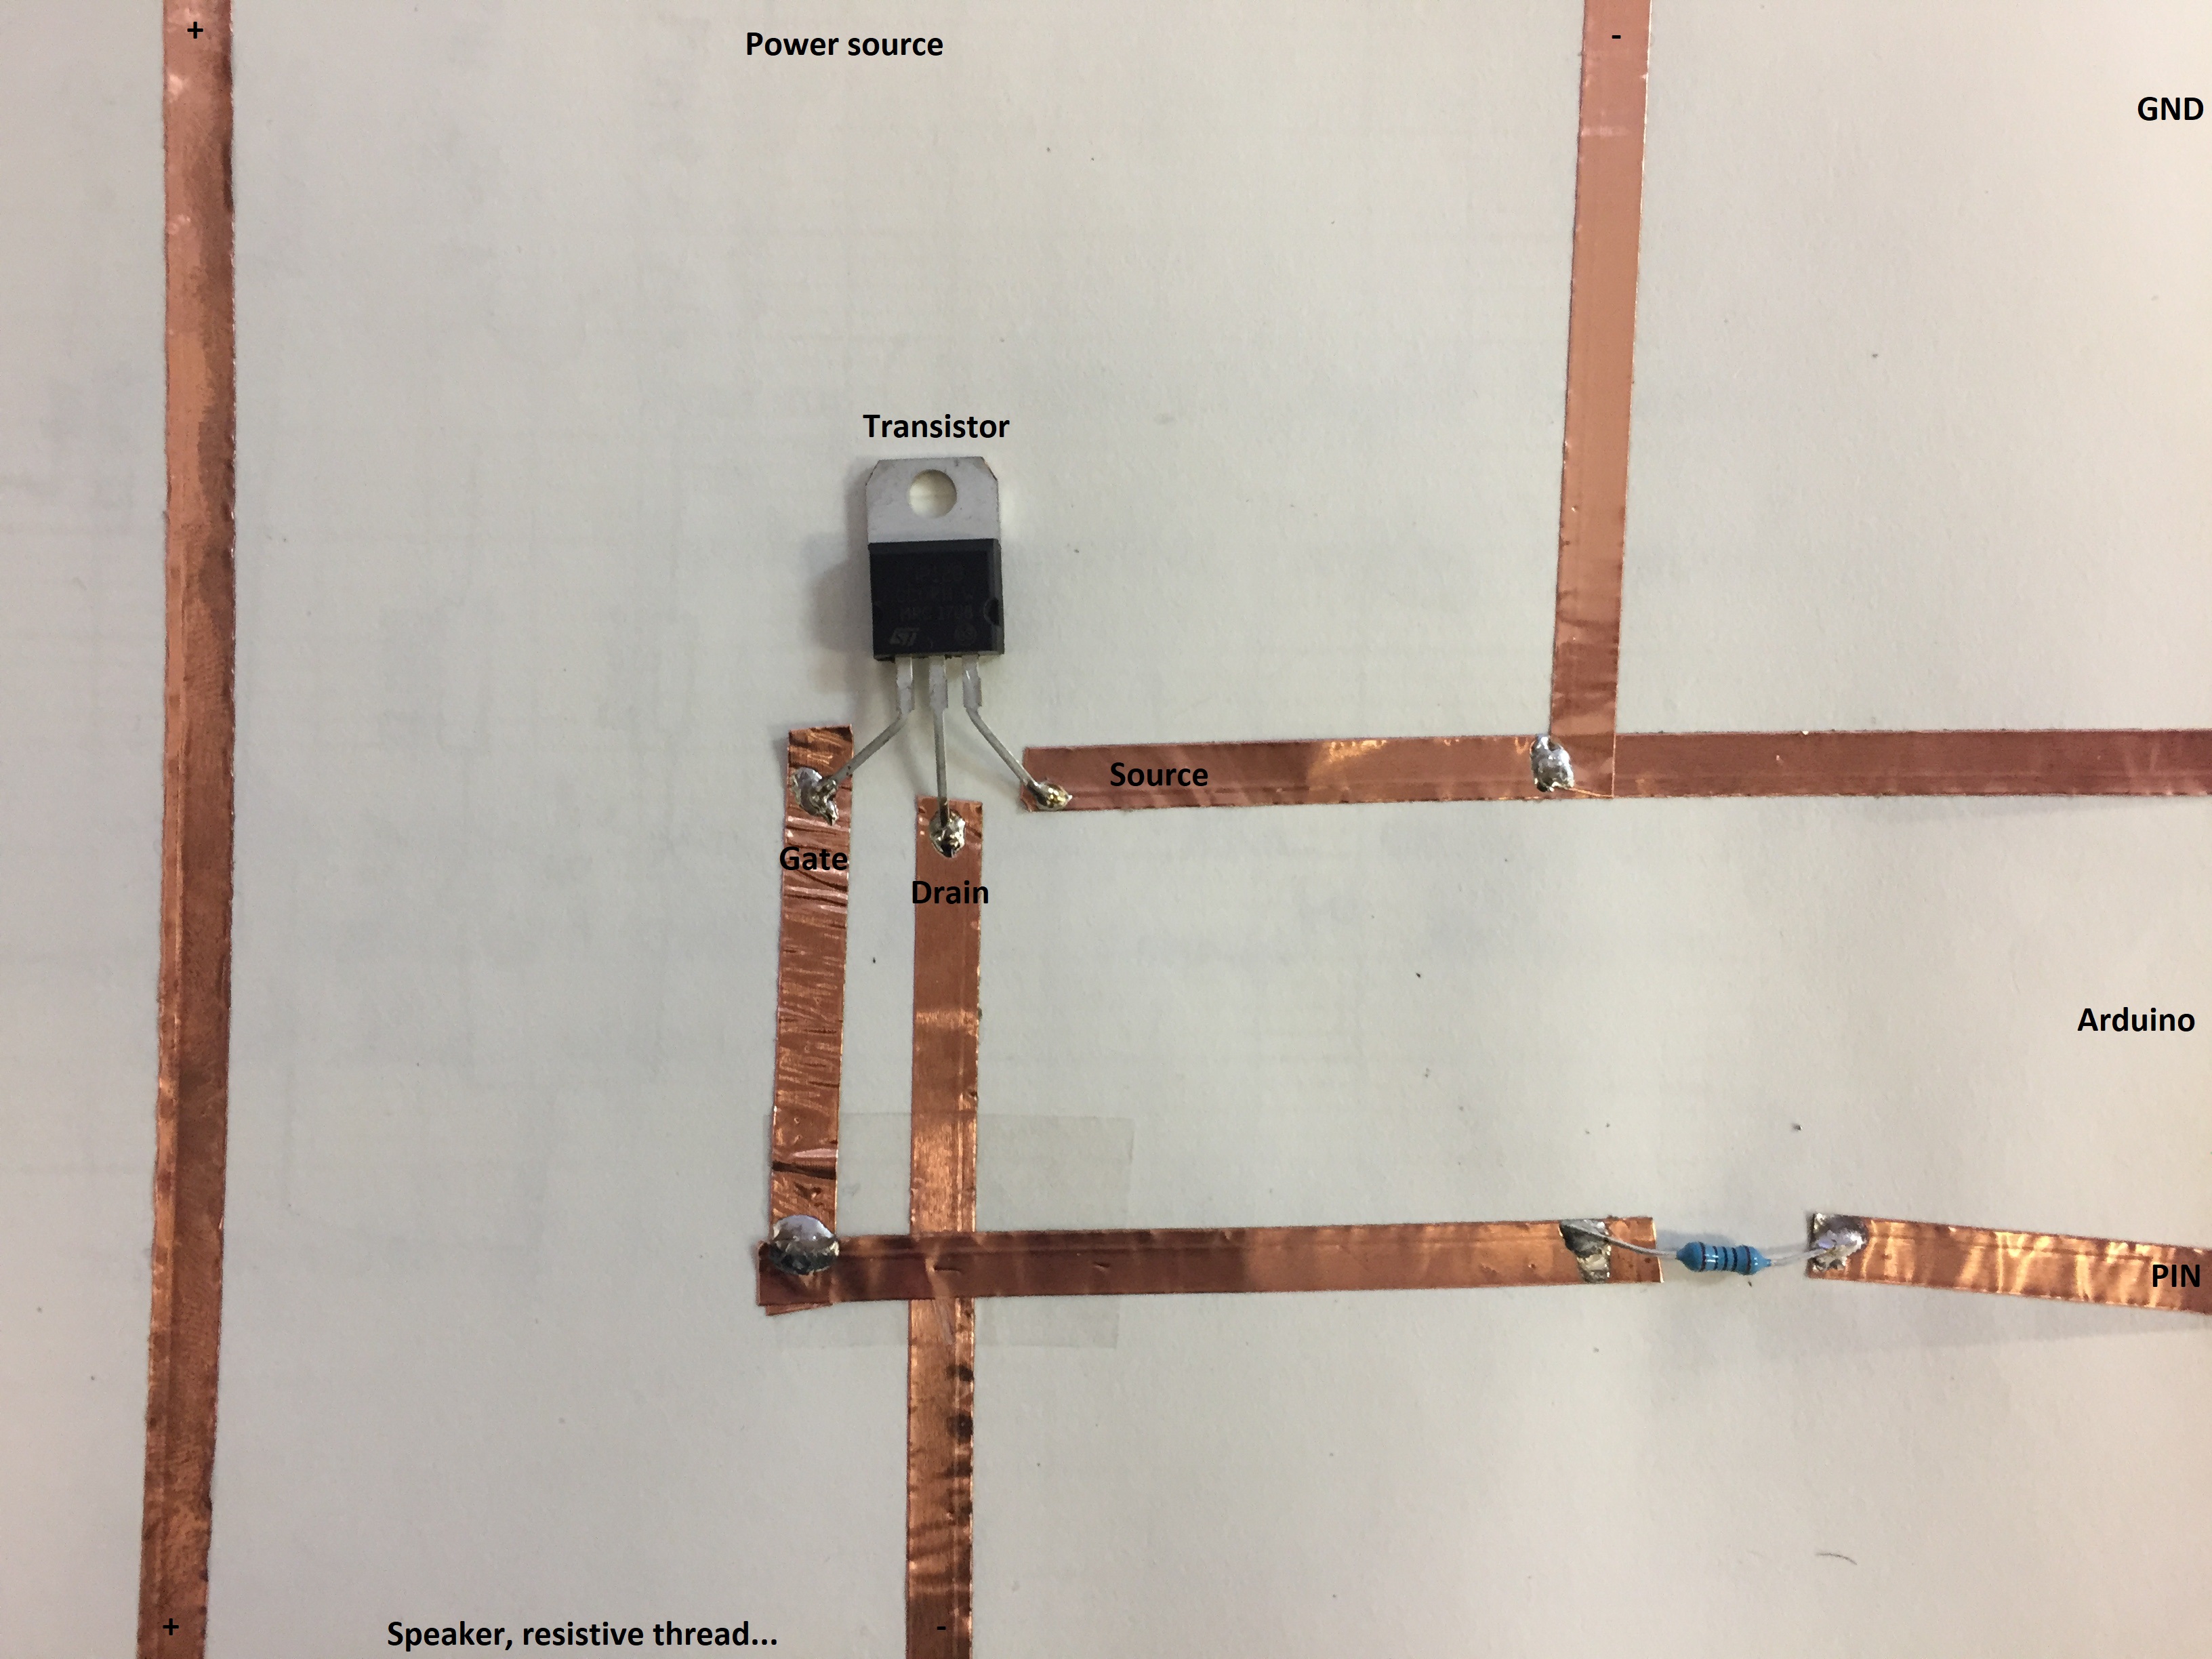 This structure also implies the use of two different power sources: 5V for Arduino and another one of more than 5V for the actuator.
During this week, I did not need transistors because my project worked with 5V.
This structure also implies the use of two different power sources: 5V for Arduino and another one of more than 5V for the actuator.
During this week, I did not need transistors because my project worked with 5V.
IV-Not A Monster
We had the chance to have a tutorial from Nuria Robles about how to make a soft circuit on how to make a RGB light change colors and then incorporate it into a cushion like fabric of the desired shape. It was initially made to be a monster but I preferred making a little heart.
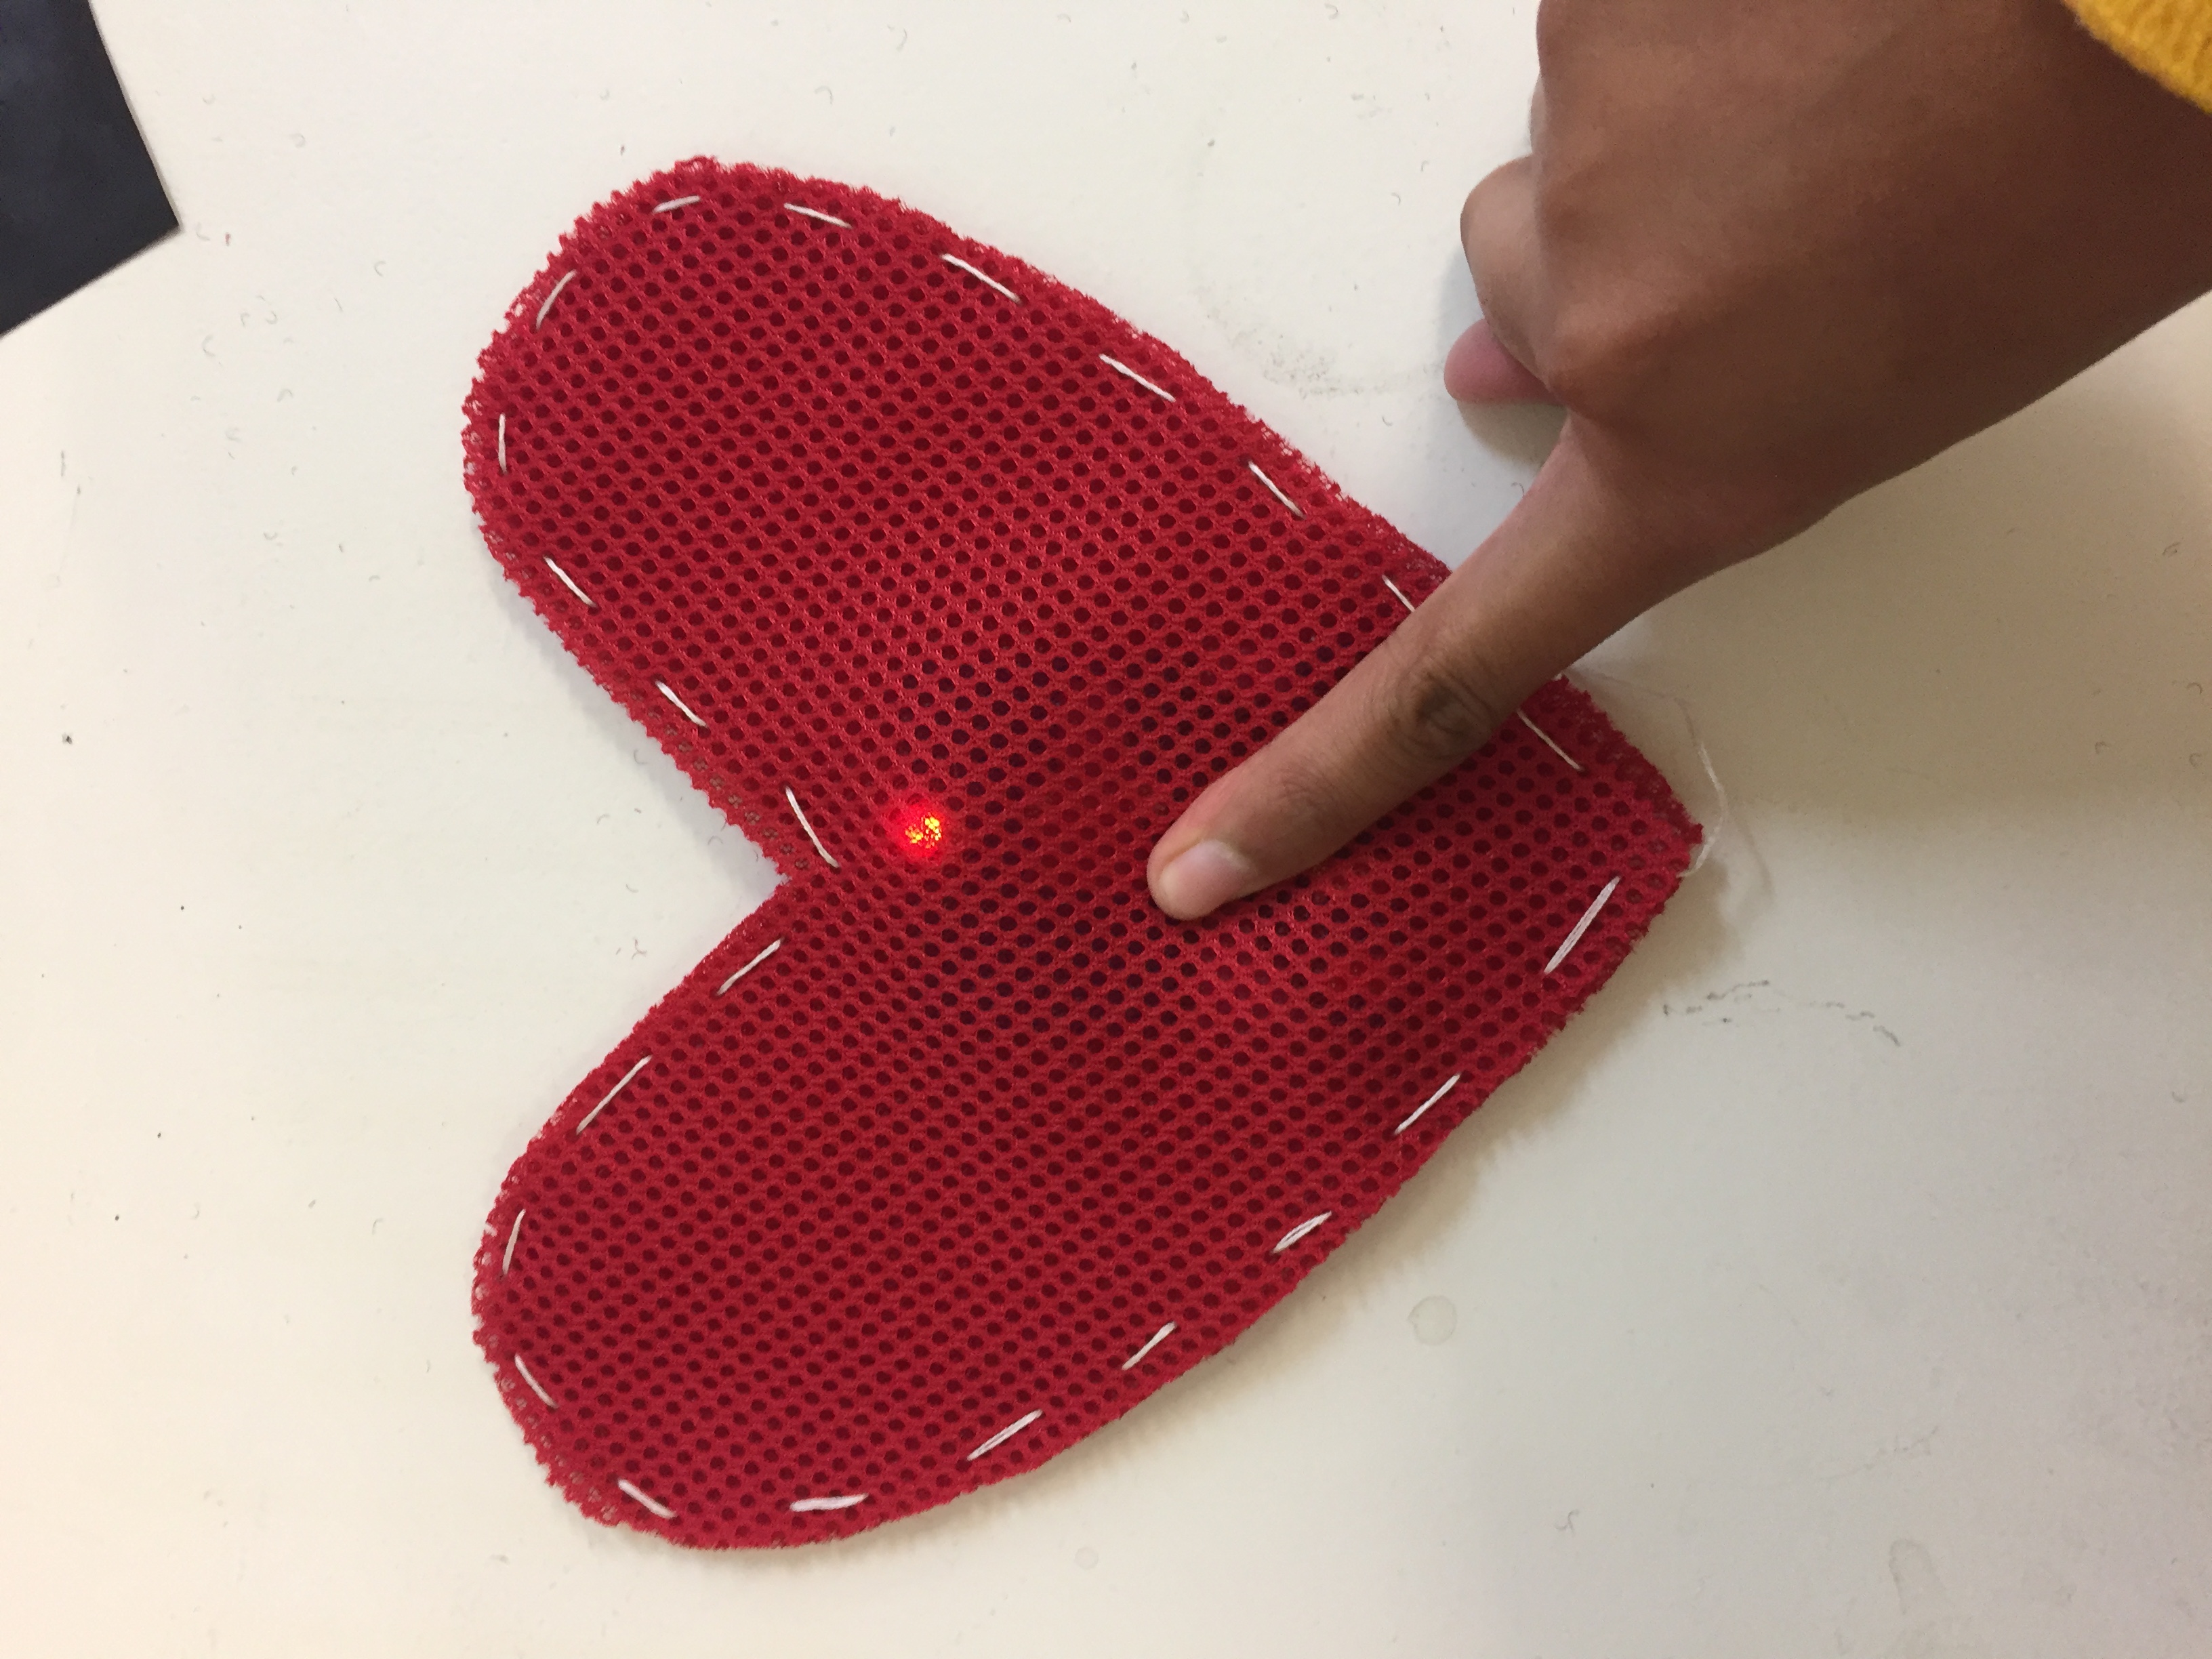 In order to make the soft circuit, we used a foamy fabric, copper tape, a RGB LED with a common anode, a 3V battery, velostat fabric (soft piezosensor) and regular tape.
We first made sure to separate the 4 branches of the LED in order to connect each of it to a separate piece of copper tape. The negative branch was connected to a piece of tape on one side of the foamy fabric and the R, G and B branches were connected to pieces of copper tape on the other side of the fabric. We put the battery negative side facing down, touching the anode of the RGB LED and folded the foamy fabric over the battery so that the copper tape pieces connected to the R, G and B poles could connect to the positive pole of the battery. Between the battery and the RGB poles, we sandwiched some copper tape and the velostat fabric so that the RGB poles would not directly be connected to the battery. Instead, the current's resistance would decrease with the pressure applied on the copper tape. The structure was maintained in place mediating tape and we had our soft circuit !
In order to make the soft circuit, we used a foamy fabric, copper tape, a RGB LED with a common anode, a 3V battery, velostat fabric (soft piezosensor) and regular tape.
We first made sure to separate the 4 branches of the LED in order to connect each of it to a separate piece of copper tape. The negative branch was connected to a piece of tape on one side of the foamy fabric and the R, G and B branches were connected to pieces of copper tape on the other side of the fabric. We put the battery negative side facing down, touching the anode of the RGB LED and folded the foamy fabric over the battery so that the copper tape pieces connected to the R, G and B poles could connect to the positive pole of the battery. Between the battery and the RGB poles, we sandwiched some copper tape and the velostat fabric so that the RGB poles would not directly be connected to the battery. Instead, the current's resistance would decrease with the pressure applied on the copper tape. The structure was maintained in place mediating tape and we had our soft circuit !
 I then inserted the circuit in a heart shape and I had my little piezo-sensitive-gradient-light-emitting-cushion !
V-Making a speaker
a-Coding
During the lecture, we learnt how to make a speaker (which is surprisingly easy) and to be honest I chose this actuator because I loved the way it looked like ! I mean, how beautiful is this speaker from Adrian Freed and Jess Rowland?
Before making a speaker, I had to learn about how music can be encoded so I looked for examples on Arduino and found an example on Maker Pro. This way, I understood that first the notes have to be encoded in a separate tab and then they are called in a separate program.
This code allows to create the melody of your choice (I put the song "Au clair de la lune"):

#include"pitches.h"

// notes in the song 'Mukkathe Penne'
int melody[] = {
NOTE_C4, NOTE_C4, NOTE_C4, NOTE_D4, NOTE_E4, NOTE_D4,
NOTE_C4, NOTE_E4,NOTE_D4,NOTE_D4,NOTE_C4,0, END

};

// note durations: 8 = quarter note, 4 = 8th note, etc.
int noteDurations[] = {       //duration of the notes
4,4,4,4,8,8,
4,4,4,4,8,8,
};

int speed=90;  //higher value, slower notes
void setup() {

Serial.begin(9600);
for (int thisNote = 0; melody[thisNote]!=-1; thisNote++) {

int noteDuration = speed*noteDurations[thisNote];
tone(3, melody[thisNote],noteDuration*.95);
Serial.println(melody[thisNote]);

delay(noteDuration);

noTone(3);
}
}

void loop() {
// no need to repeat the melody.
}
Within this code, there are some parameters I did not understand, especially the logic of the for function with the "melody[thisNote]!=-1; thisNote++" parameters, but I understood that the following code is the most important and allows playing any frequency.
tone (pin, frequency)
delay(duration);
noTone (pin);
delay(duration);
Notes frequency code.
This is the file that encodes the frequency of the different notes:

#define NOTE_B0  31
#define NOTE_C1  33
#define NOTE_CS1 35
#define NOTE_D1  37
#define NOTE_DS1 39
#define NOTE_E1  41
#define NOTE_F1  44
#define NOTE_FS1 46
#define NOTE_G1  49
#define NOTE_GS1 52
#define NOTE_A1  55
#define NOTE_AS1 58
#define NOTE_B1  62
#define NOTE_C2  65
#define NOTE_CS2 69
#define NOTE_D2  73
#define NOTE_DS2 78
#define NOTE_E2  82
#define NOTE_F2  87
#define NOTE_FS2 93
#define NOTE_G2  98
#define NOTE_GS2 104
#define NOTE_A2  110
#define NOTE_AS2 117
#define NOTE_B2  123
#define NOTE_C3  131
#define NOTE_CS3 139
#define NOTE_D3  147
#define NOTE_DS3 156
#define NOTE_E3  165
#define NOTE_F3  175
#define NOTE_FS3 185
#define NOTE_G3  196
#define NOTE_GS3 208
#define NOTE_A3  220
#define NOTE_AS3 233
#define NOTE_B3  247
#define NOTE_C4  262
#define NOTE_CS4 277
#define NOTE_D4  294
#define NOTE_DS4 311
#define NOTE_E4  330
#define NOTE_F4  349
#define NOTE_FS4 370
#define NOTE_G4  392
#define NOTE_GS4 415
#define NOTE_A4  440
#define NOTE_AS4 466
#define NOTE_B4  494
#define NOTE_C5  523
#define NOTE_CS5 554
#define NOTE_D5  587
#define NOTE_DS5 622
#define NOTE_E5  659
#define NOTE_F5  698
#define NOTE_FS5 740
#define NOTE_G5  784
#define NOTE_GS5 831
#define NOTE_A5  880
#define NOTE_AS5 932
#define NOTE_B5  988
#define NOTE_C6  1047
#define NOTE_CS6 1109
#define NOTE_D6  1175
#define NOTE_DS6 1245
#define NOTE_E6  1319
#define NOTE_F6  1397
#define NOTE_FS6 1480
#define NOTE_G6  1568
#define NOTE_GS6 1661
#define NOTE_A6  1760
#define NOTE_AS6 1865
#define NOTE_B6  1976
#define NOTE_C7  2093
#define NOTE_CS7 2217
#define NOTE_D7  2349
#define NOTE_DS7 2489
#define NOTE_E7  2637
#define NOTE_F7  2794
#define NOTE_FS7 2960
#define NOTE_G7  3136
#define NOTE_GS7 3322
#define NOTE_A7  3520
#define NOTE_AS7 3729
#define NOTE_B7  3951
#define NOTE_C8  4186
#define NOTE_CS8 4435
#define NOTE_D8  4699
#define NOTE_DS8 4978
#define END -1
I could test this program thanks to my Arduino and an industrial speaker we had at the lab and this is the final result.
But the problem with it is that in order to have a sound, one has to encode it on Arduino in a program. I wanted to be able to play a music from a Jack input on a phone, so I looked how that worked and it was pretty easy ! Using an amplifier just allows me to get rid of Arduino or ATtiny so no need to encode anything, and the amplifier required 5V intensity so I had no need to use any transistor. The only thing I needed was to connect the amplifier to a 5V power source and it basically played the musics of my phone !
b-Trial and errors... lots of errors...
In order to make a speaker, one needs a Neodymium magnet, an electromagnet, a surface to vibrate, a power source and an imput. My first idea was to make a speaker on a pocket, connected to an amplifier and a Jack cable and a battery in the same pocket. I am looking for presents to make to my family for christmas and I thought about making a nice speaker in the shape of a painting my brother made (here is his work), embroider it on a piece of material and sew it on a shirt.
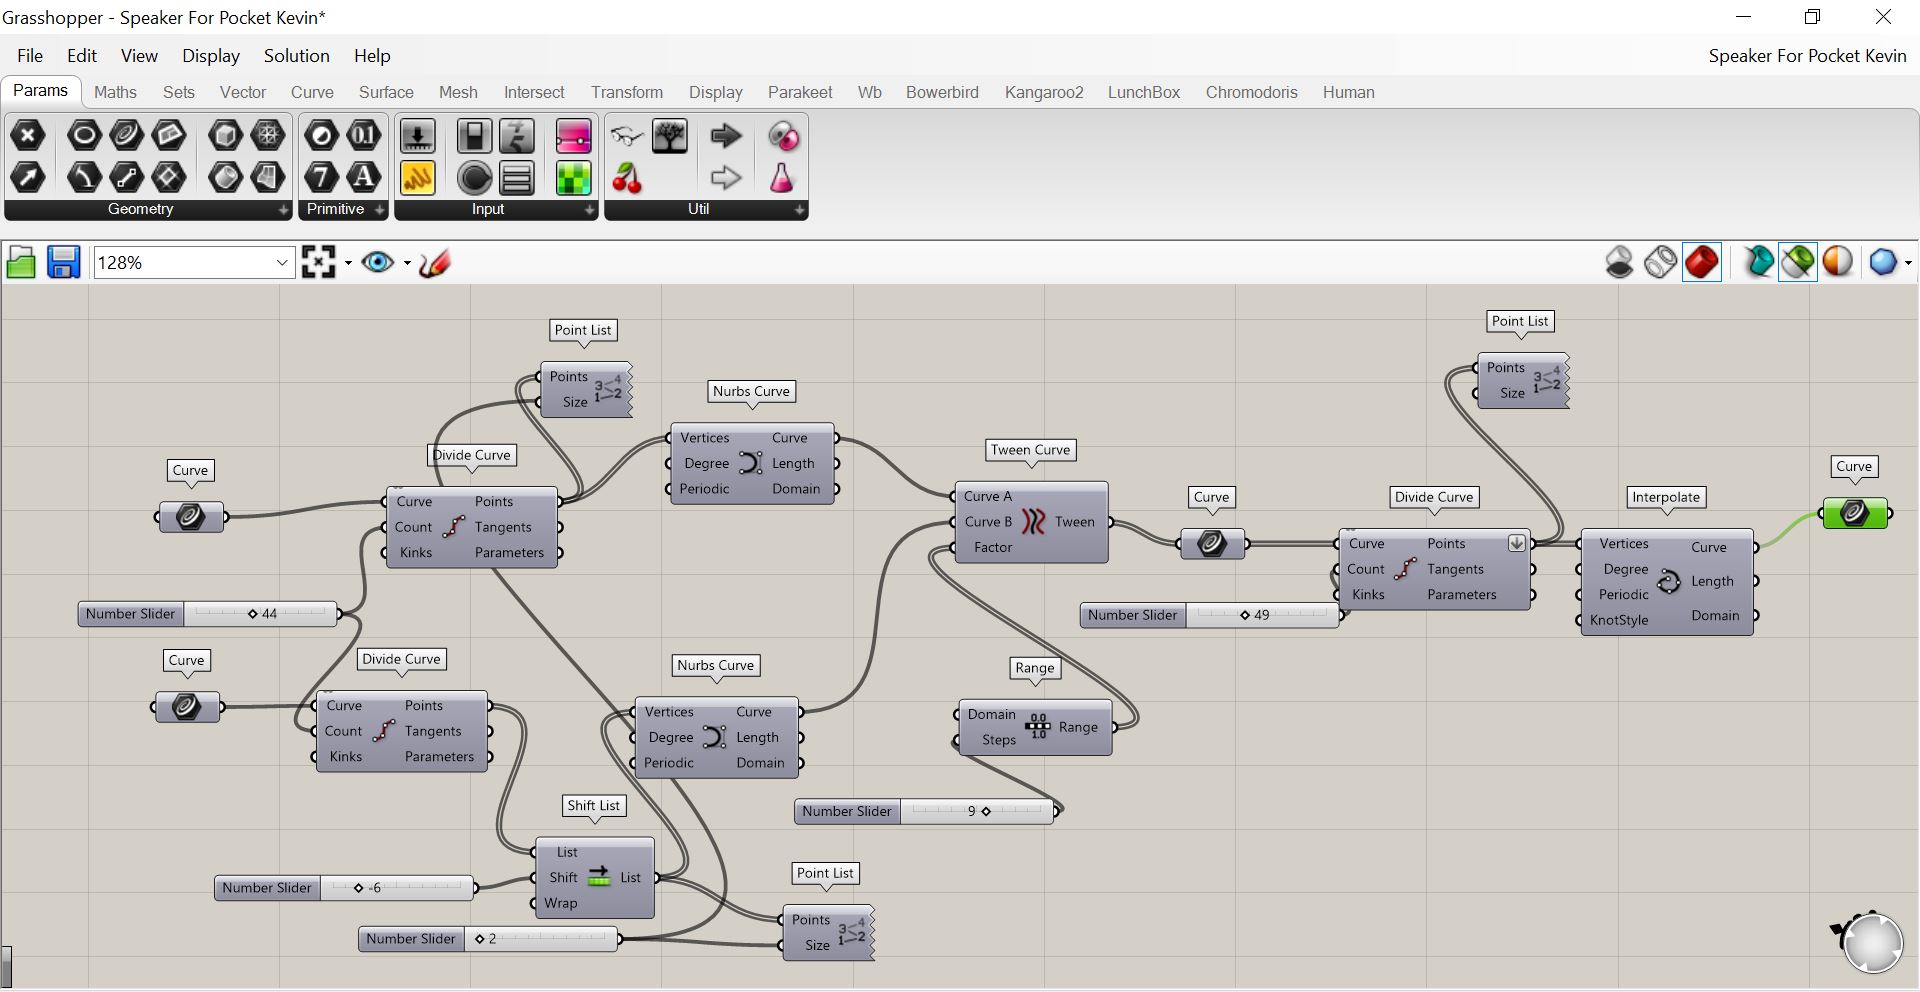
Soooo just like everyone else, I started working on the design first instead of the technical part. Using an image of the painting and drawing the outilnes on Rhinoceros3D, I generated a spiral from the eye to the contour of the face using Grasshopper.

BUT (here comes problem n°1), in order to make a speaker, the total resistance of the thread must be 8 ohms. In order to know what material would be more suitable, I measured the resistance of the different threads we had in the Lab.
| Karl Grim Silver Conductive Thread | Thin Copper wire | Silicone coated wire from Adafruit | |
|---|---|---|---|
| Resistance | 2 ohms/m | 0.6 ohms/m | 0.8 ohm/m |
| Lenght needed to reach 8 ohms | 4m | 13.3 m | 10 m |
| Coated | No | Yes | Yes |
From this table, we can easily understand that the most interesting option for me was the Karl Grim Silver Conductive Thread since I wanted to draw a face on a pocket which is a limited surface. But the problem is that Karl Grim Silver Conductive Thread IS NOT COATED so to make a spiral without the wires touching would require me to scale up the drawing. But when the drawing was scaled up to have the right lenght of conductive thread to be 8 ohm resistive, the drawing itself was too big to fit in the hoop of the embroidery machine.

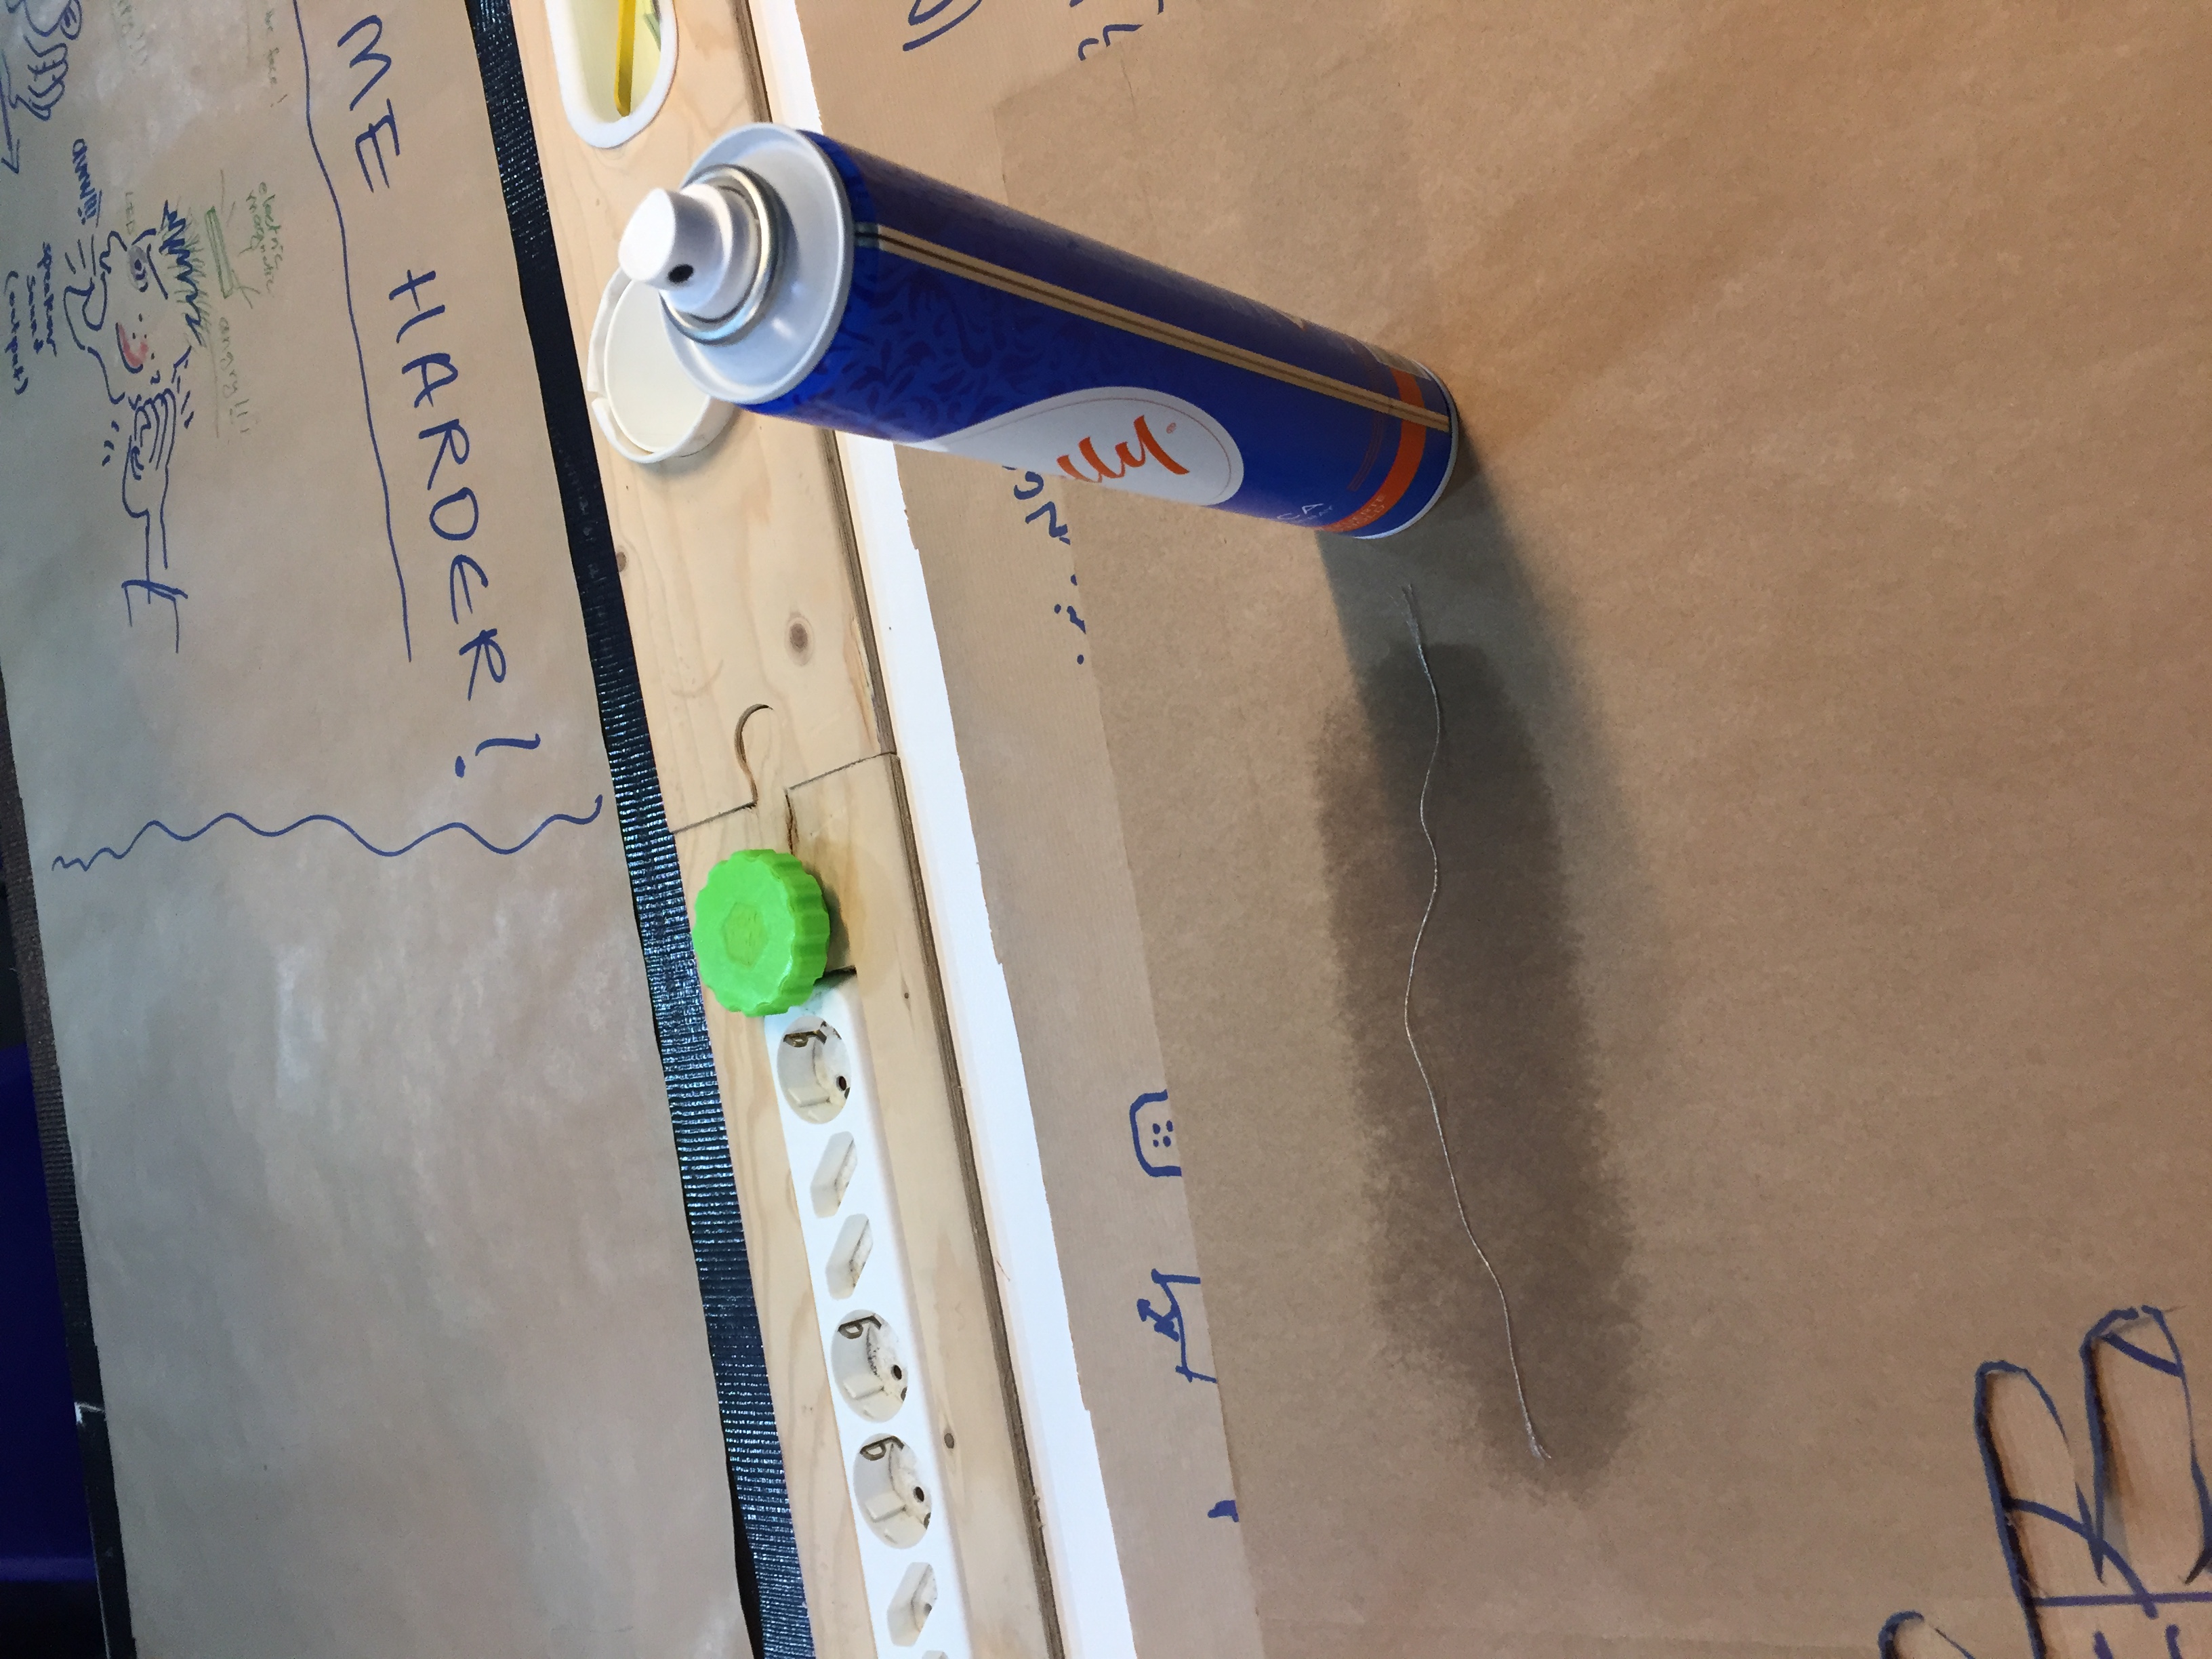
I wodered if it was possible to coat the thread manually using hairspray but it was not isolating it enough and the current was still detectable on the entire lenght of the thread...
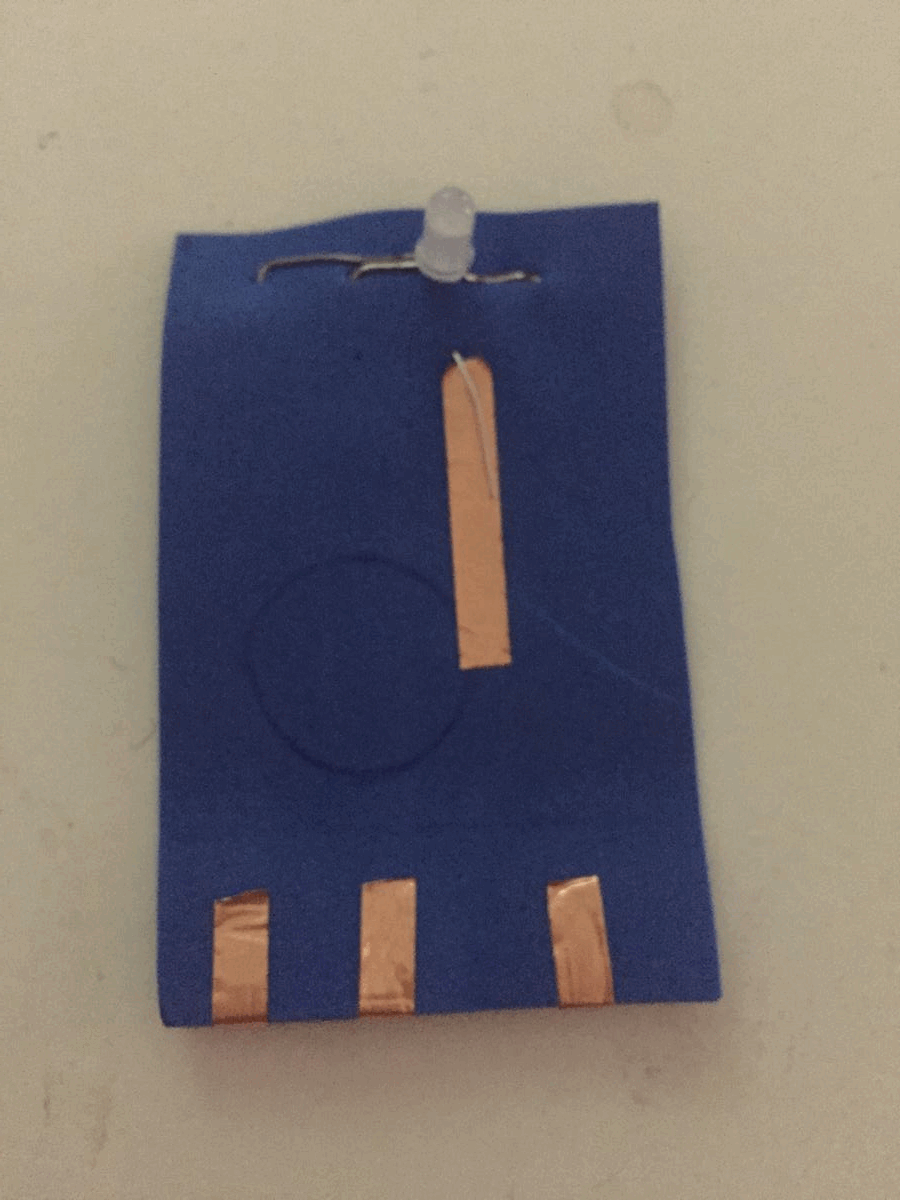
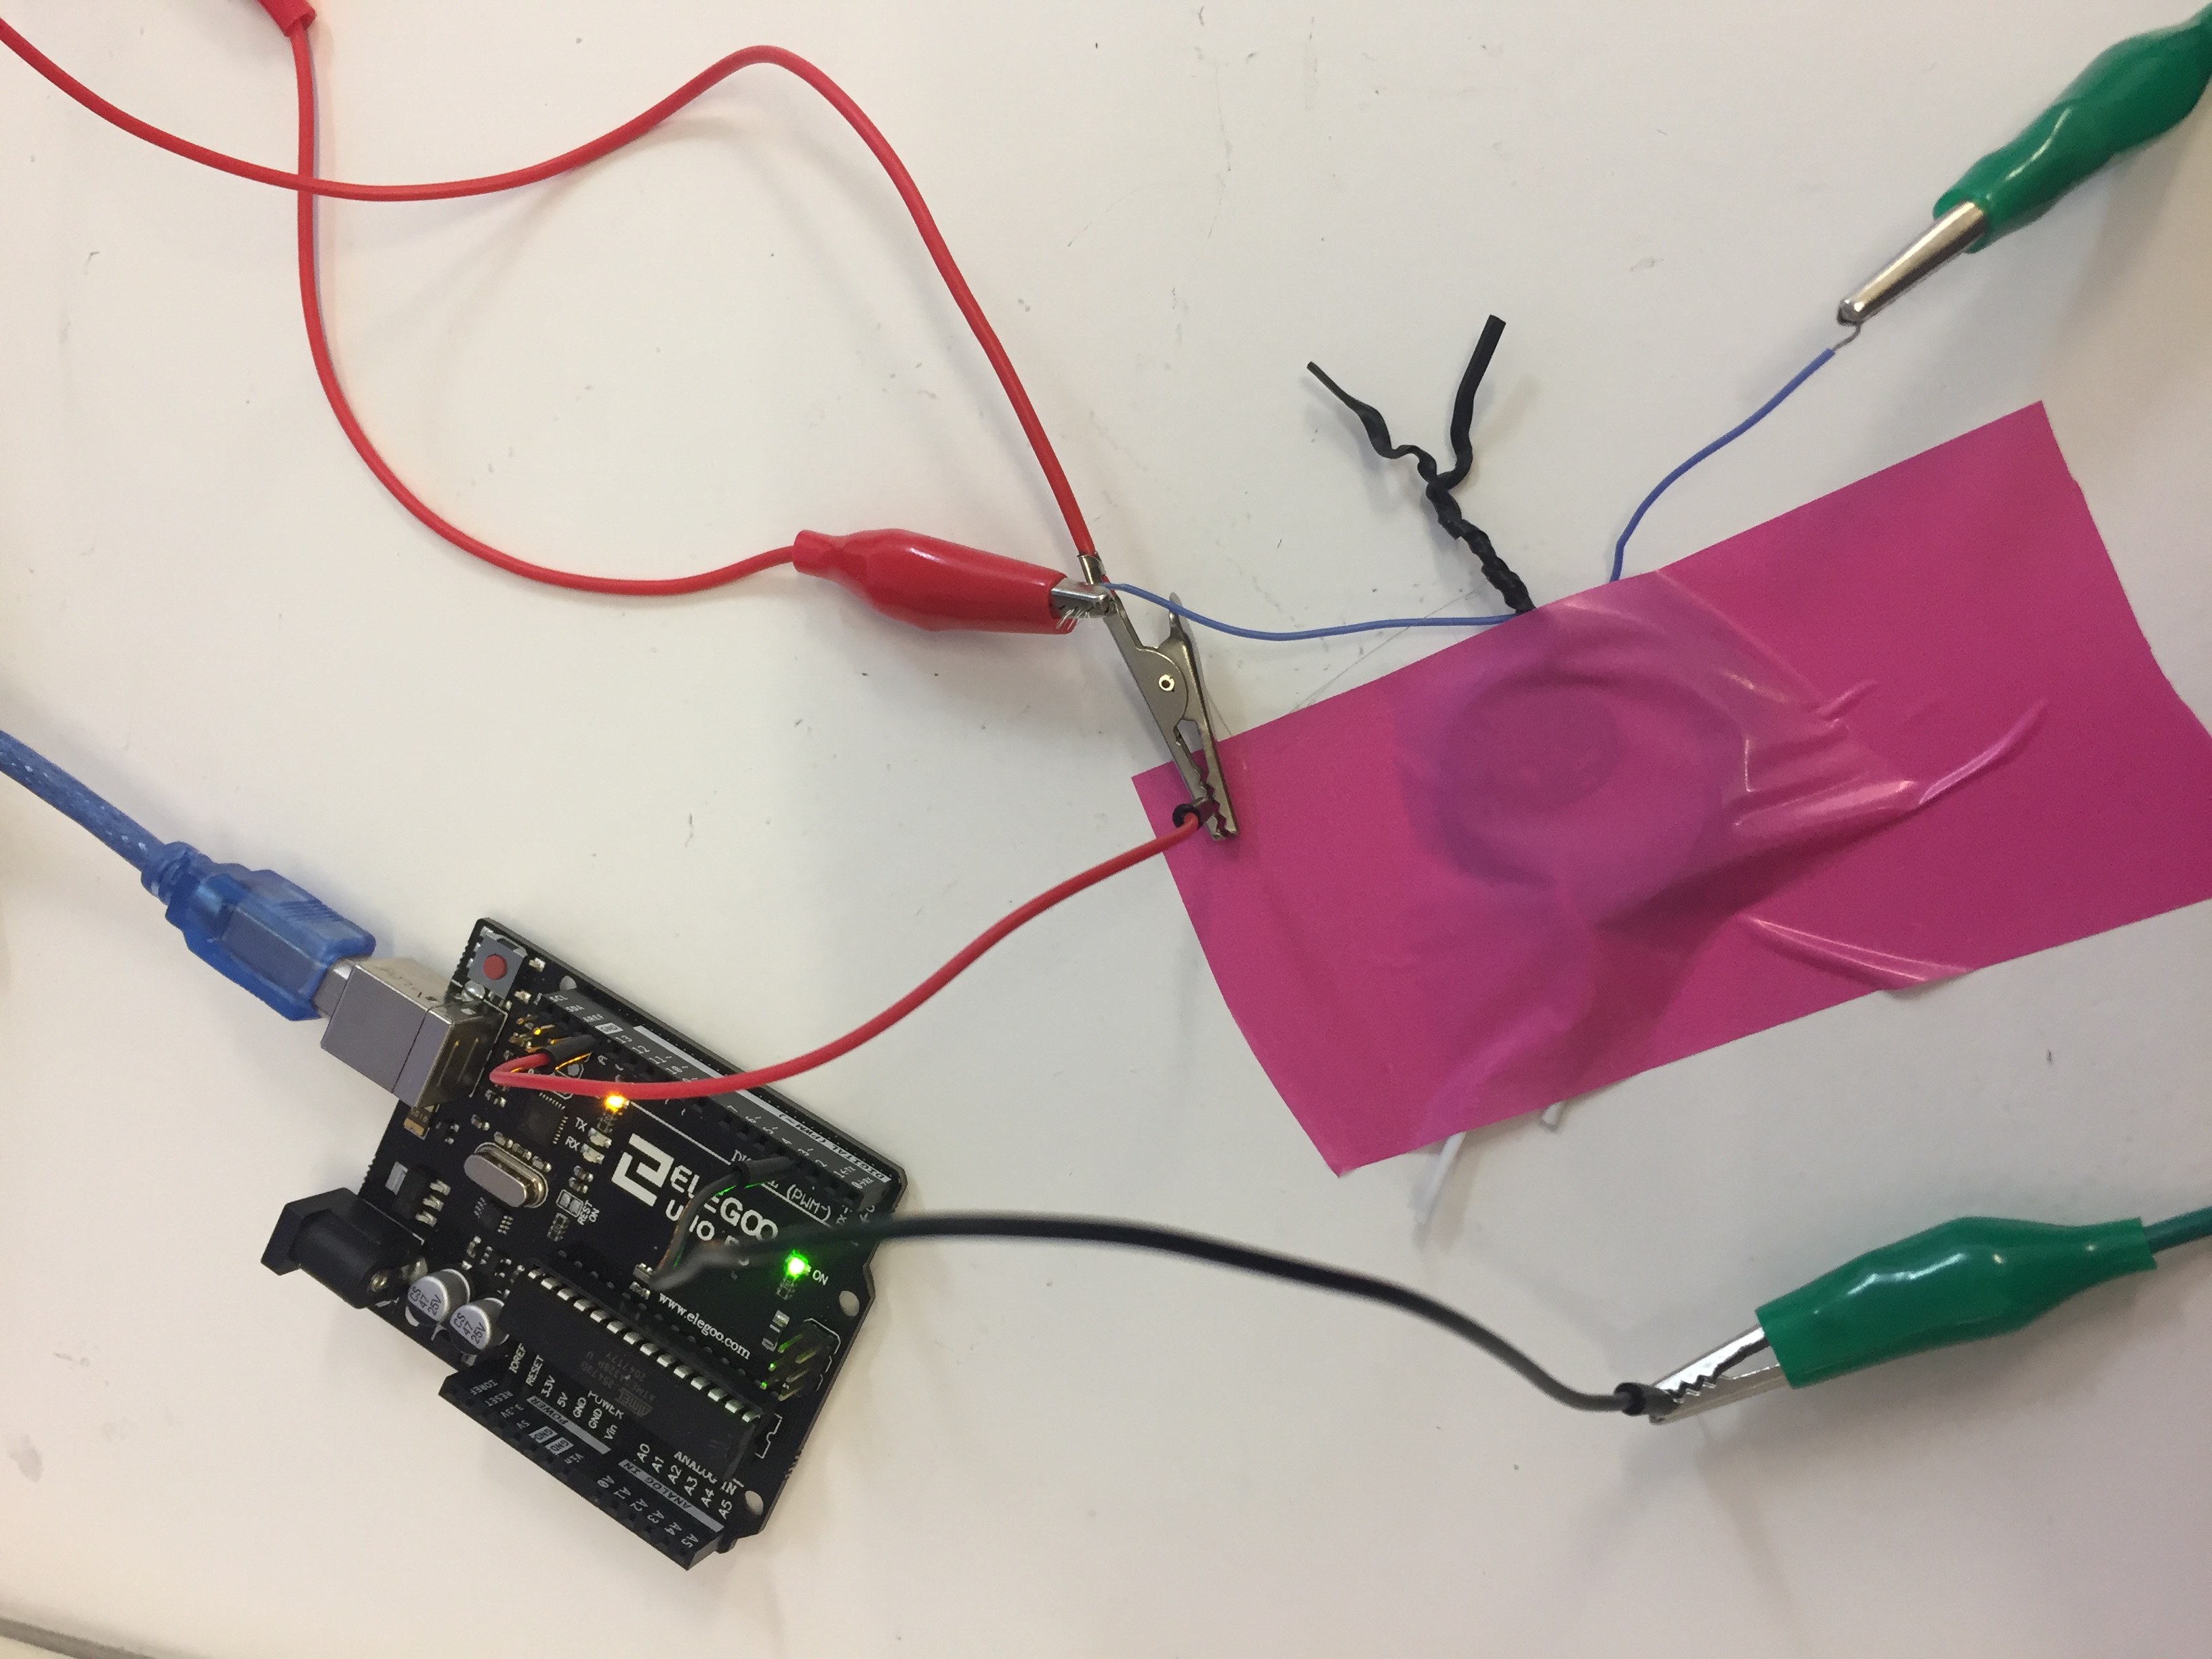
At this point I was kind of stuck. I had not tried anything yet and the only speaker I had from the previous year did not work for unknown reasons (later I found out it might be because the resistance of the thread was way too high, around 430 ohms). I did not know what to do and almost gave up on the entire week since I really wanted to make the embroidery in that very special shape. But since I really had NOTHING working, I tried to at least make one quick and dirty speaker, using some Silicone coated wire I rolled in my fingers, a magnet and some tape as a vibrating membrane. And it worked! The volume was very low but it worked! Even though the resistance of the thread was inferior to 8 ohms (1.2 ohms).
At this point, I was kind of confused about the necessity of the 8 ohms resistance. But since the quick and dirty speaker worked, I accepted to make a speaker in a regular spiral of 8 ohms resistance and see if the volume would be louder.
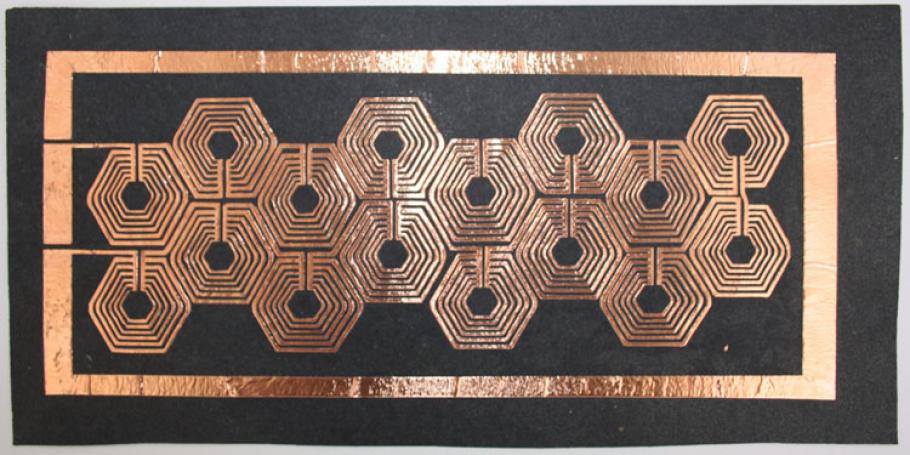
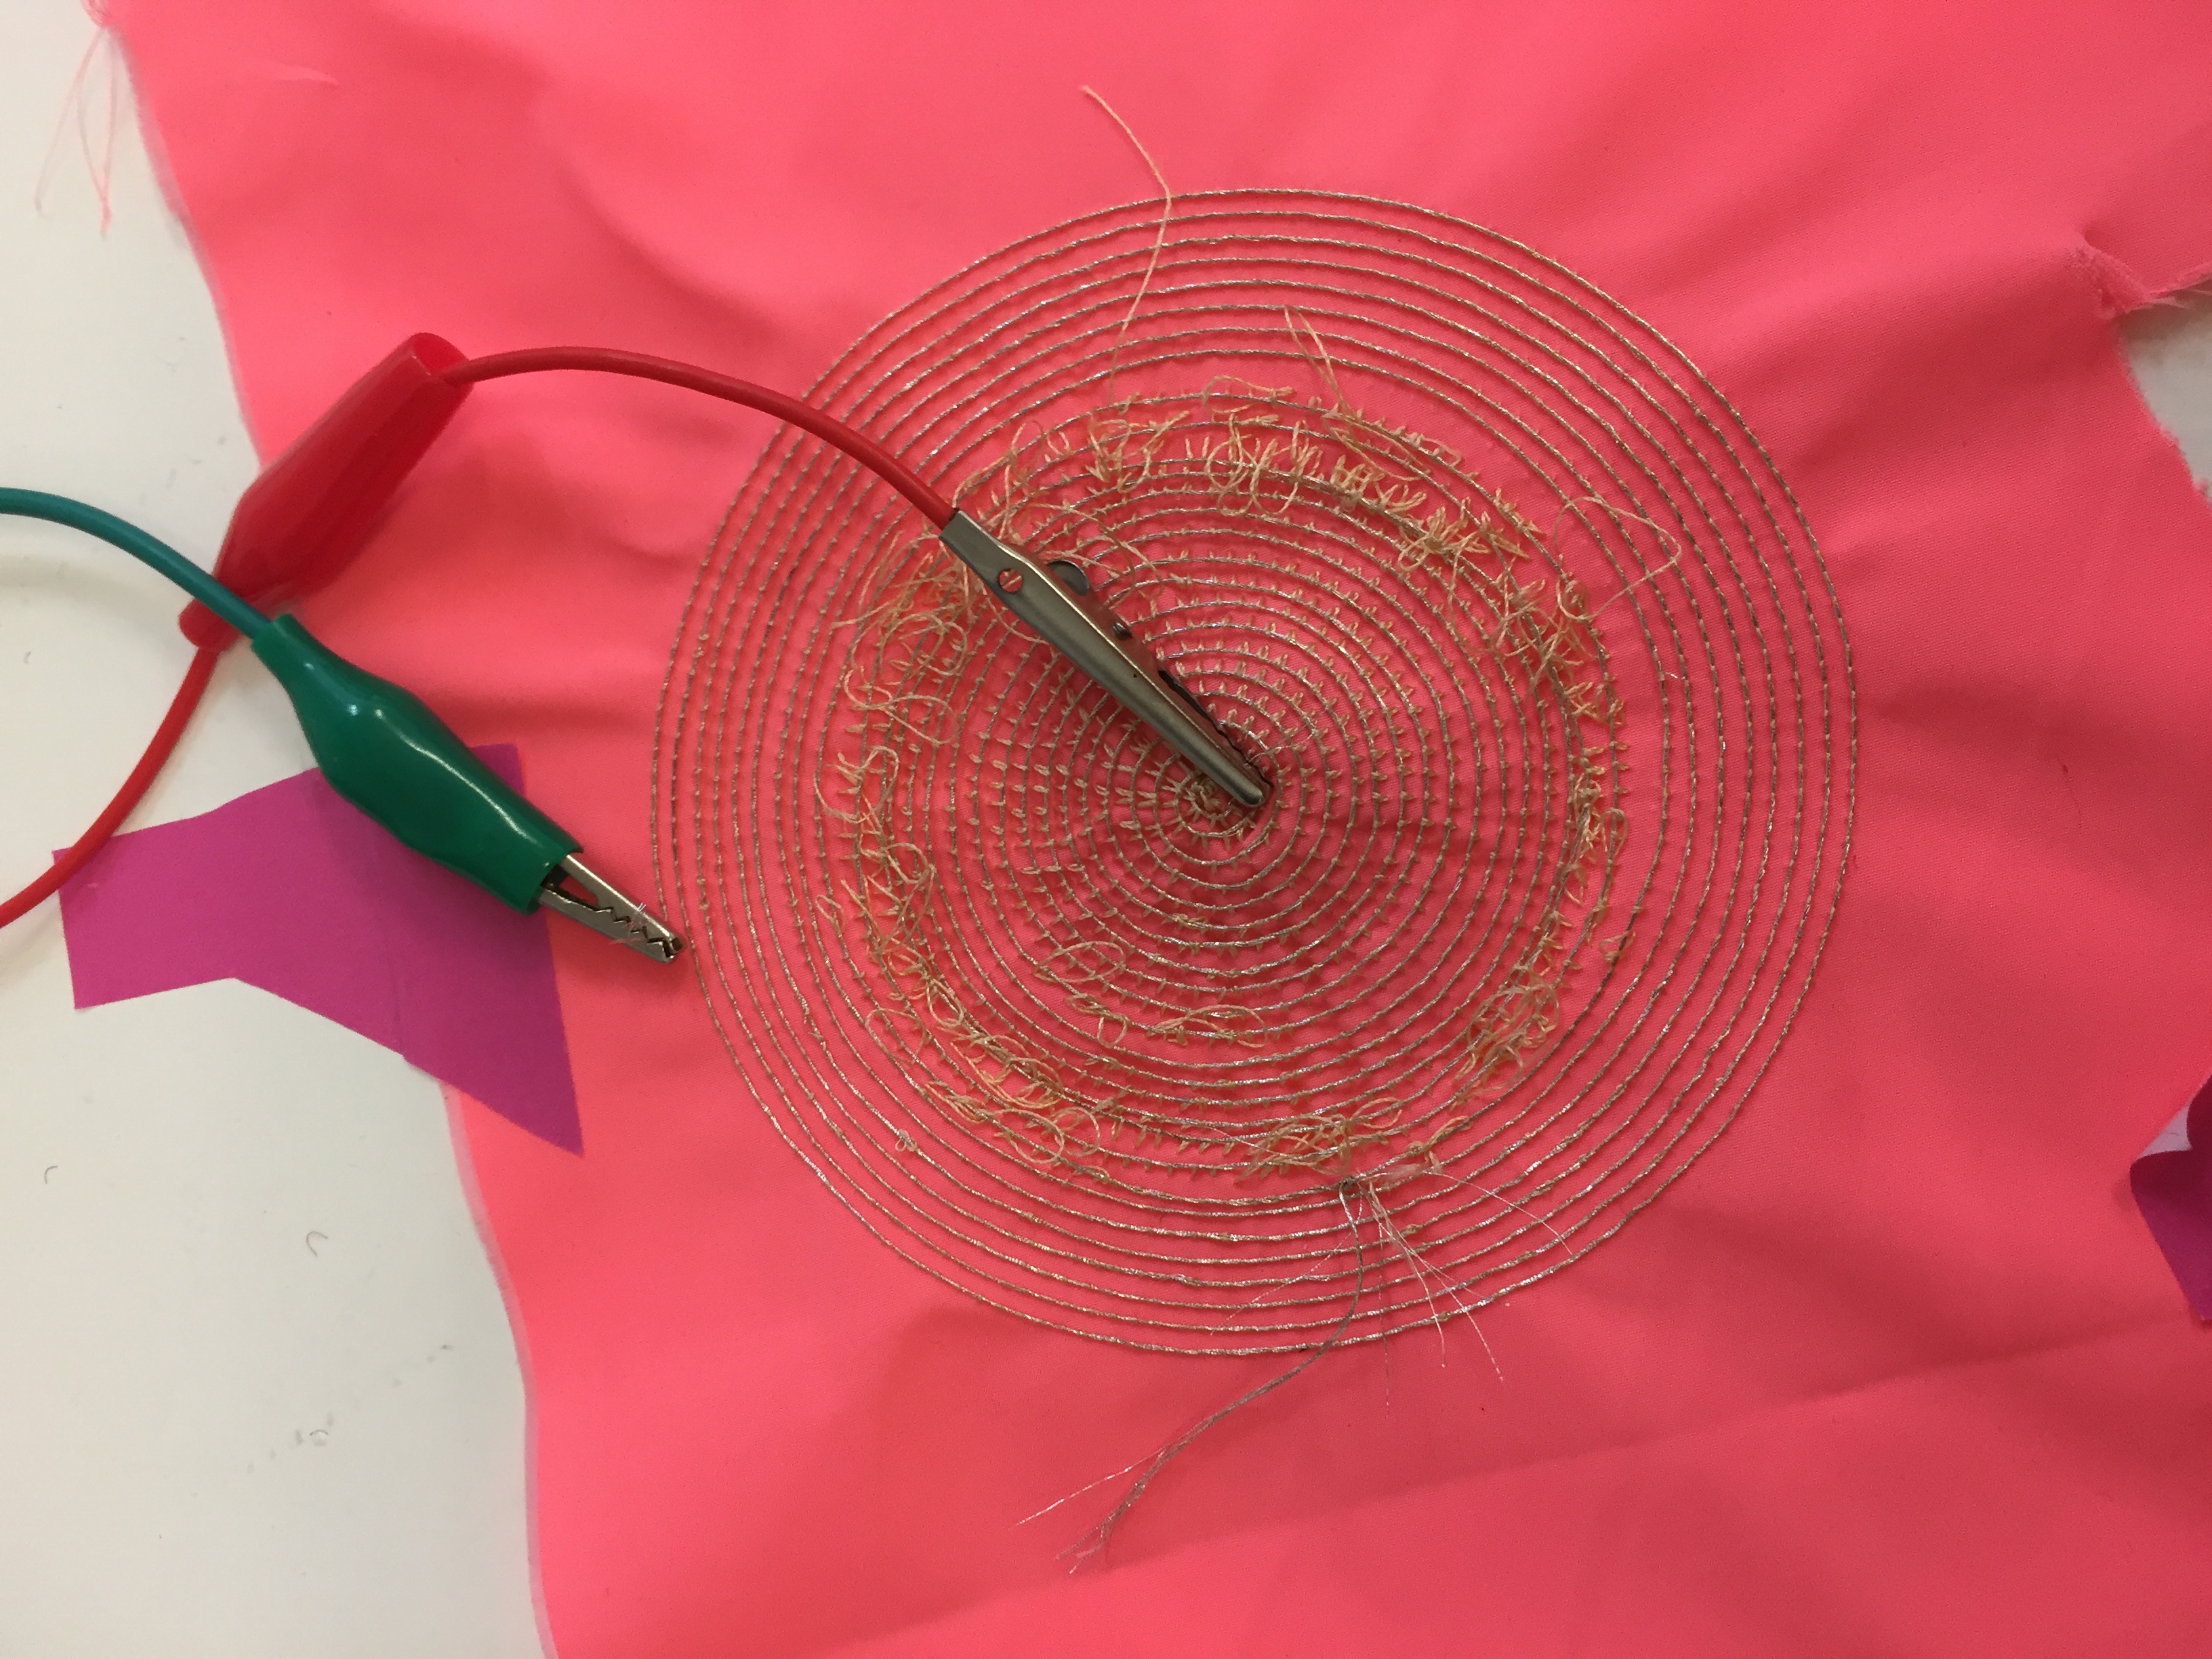
I did a spiral embroidery using the embroidery machine and Karl Grim Silver Conductive Thread on the machine's bobin. I ebroidered on two different types of materials: parachute material (very thin but very resistant, plastic like) and fabric made out of recycled plastic bottles (also plastic like) because these materials were thin enough to be in the ebroidering machine and were air proof enough to generate vibrations and thus generate sound.
I experimented with the embroidery machine for the first time and learnt how to use the proprietary software that comes with it, and also learnt that embroidering with Karl Grim Silver Conductive Thread is not something the machine really likes and makes it mess with the tension. This it how the spiral embroidered on the plastic bottle came out : pretty bad. But when I tested it, it worked and made sound! However, although the resistance of the spiral thread was of 8.8 ohms, the volume of was still very low.
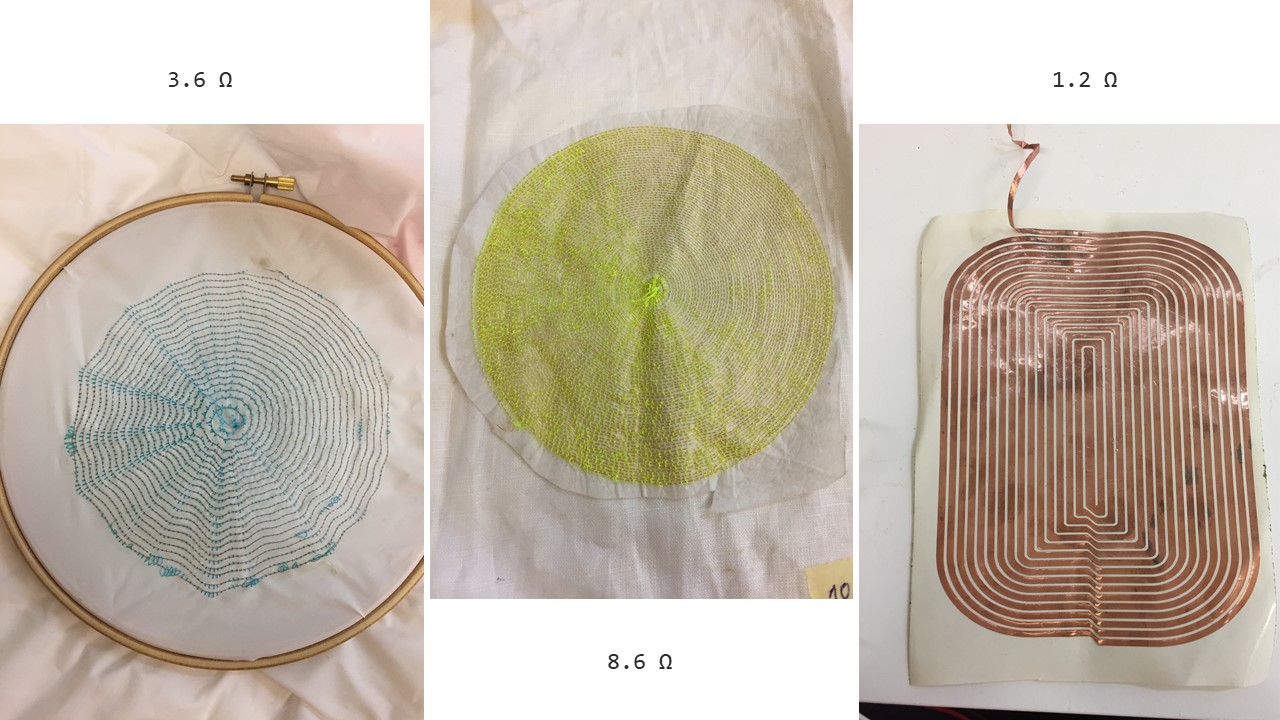
Finally, the next day, we found some previous projects of soft speakers and I was able to test them too in order to compare their proprieties. They all had different resistances but produced the same amount of sound. Knowing this information, the necessity of having a 8 ohm resistive thread remains a mystery... But this means that my initial project of ebroidering a face could potentially work using covered copper wire.
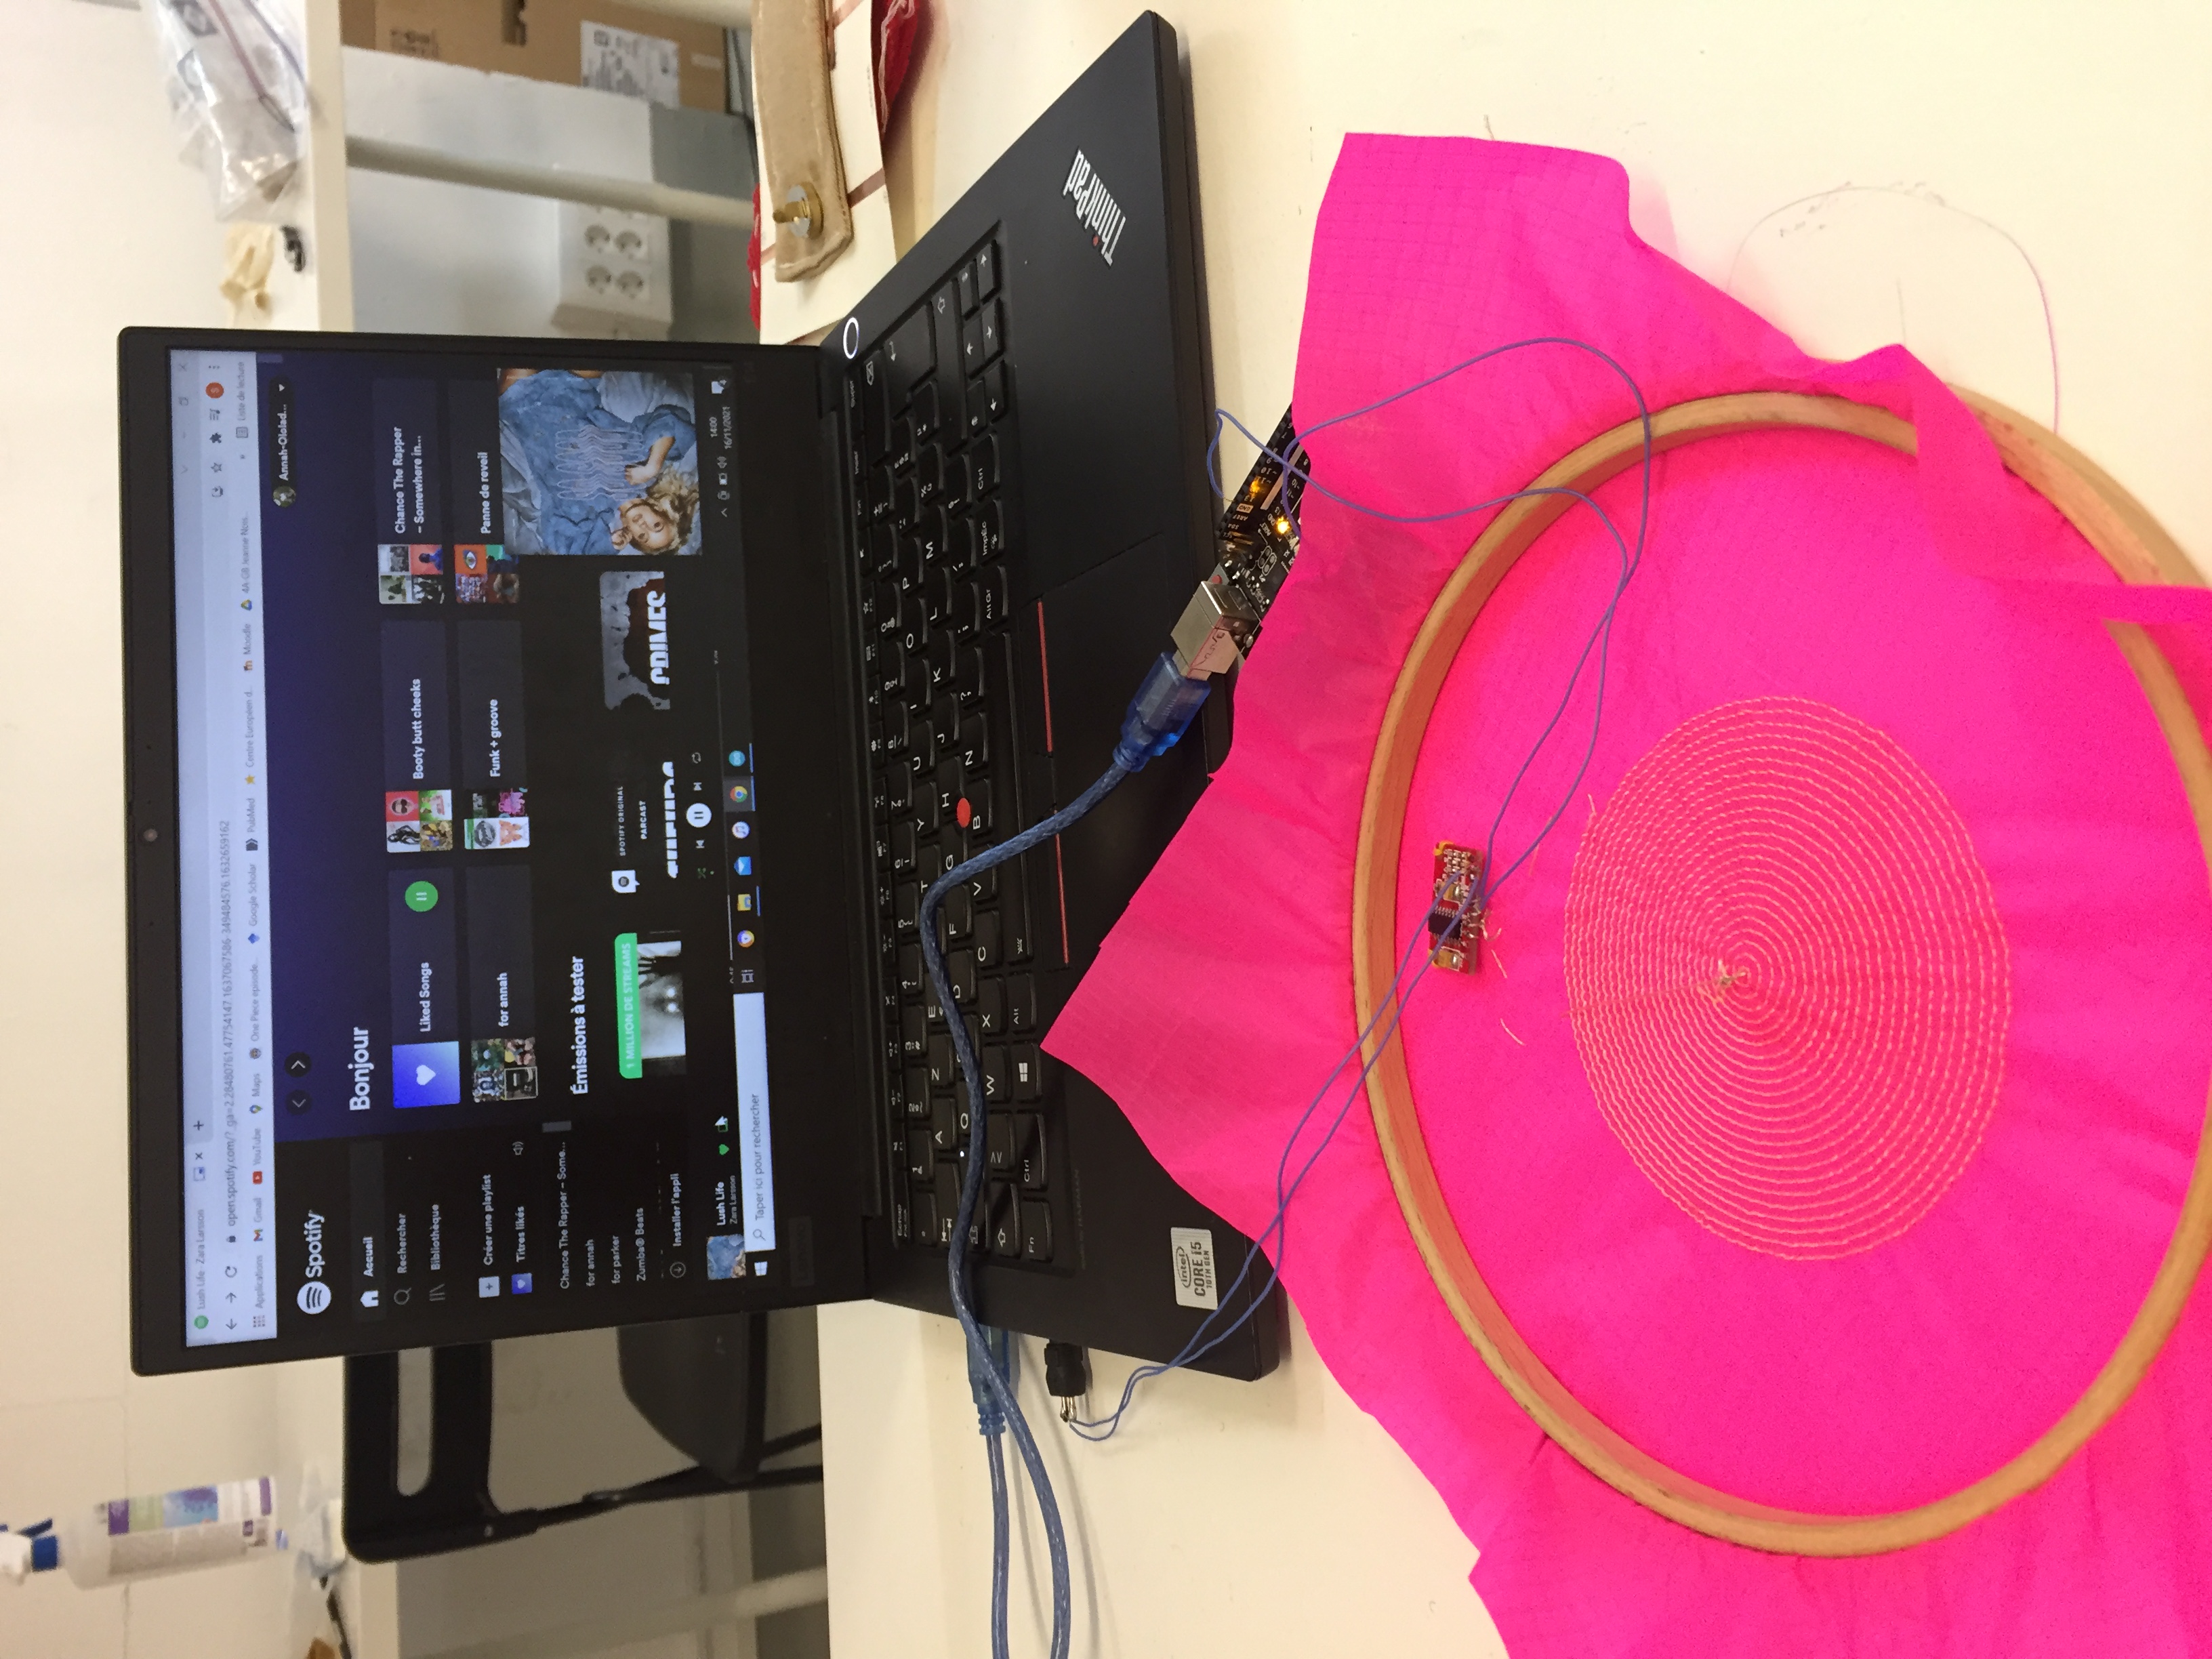
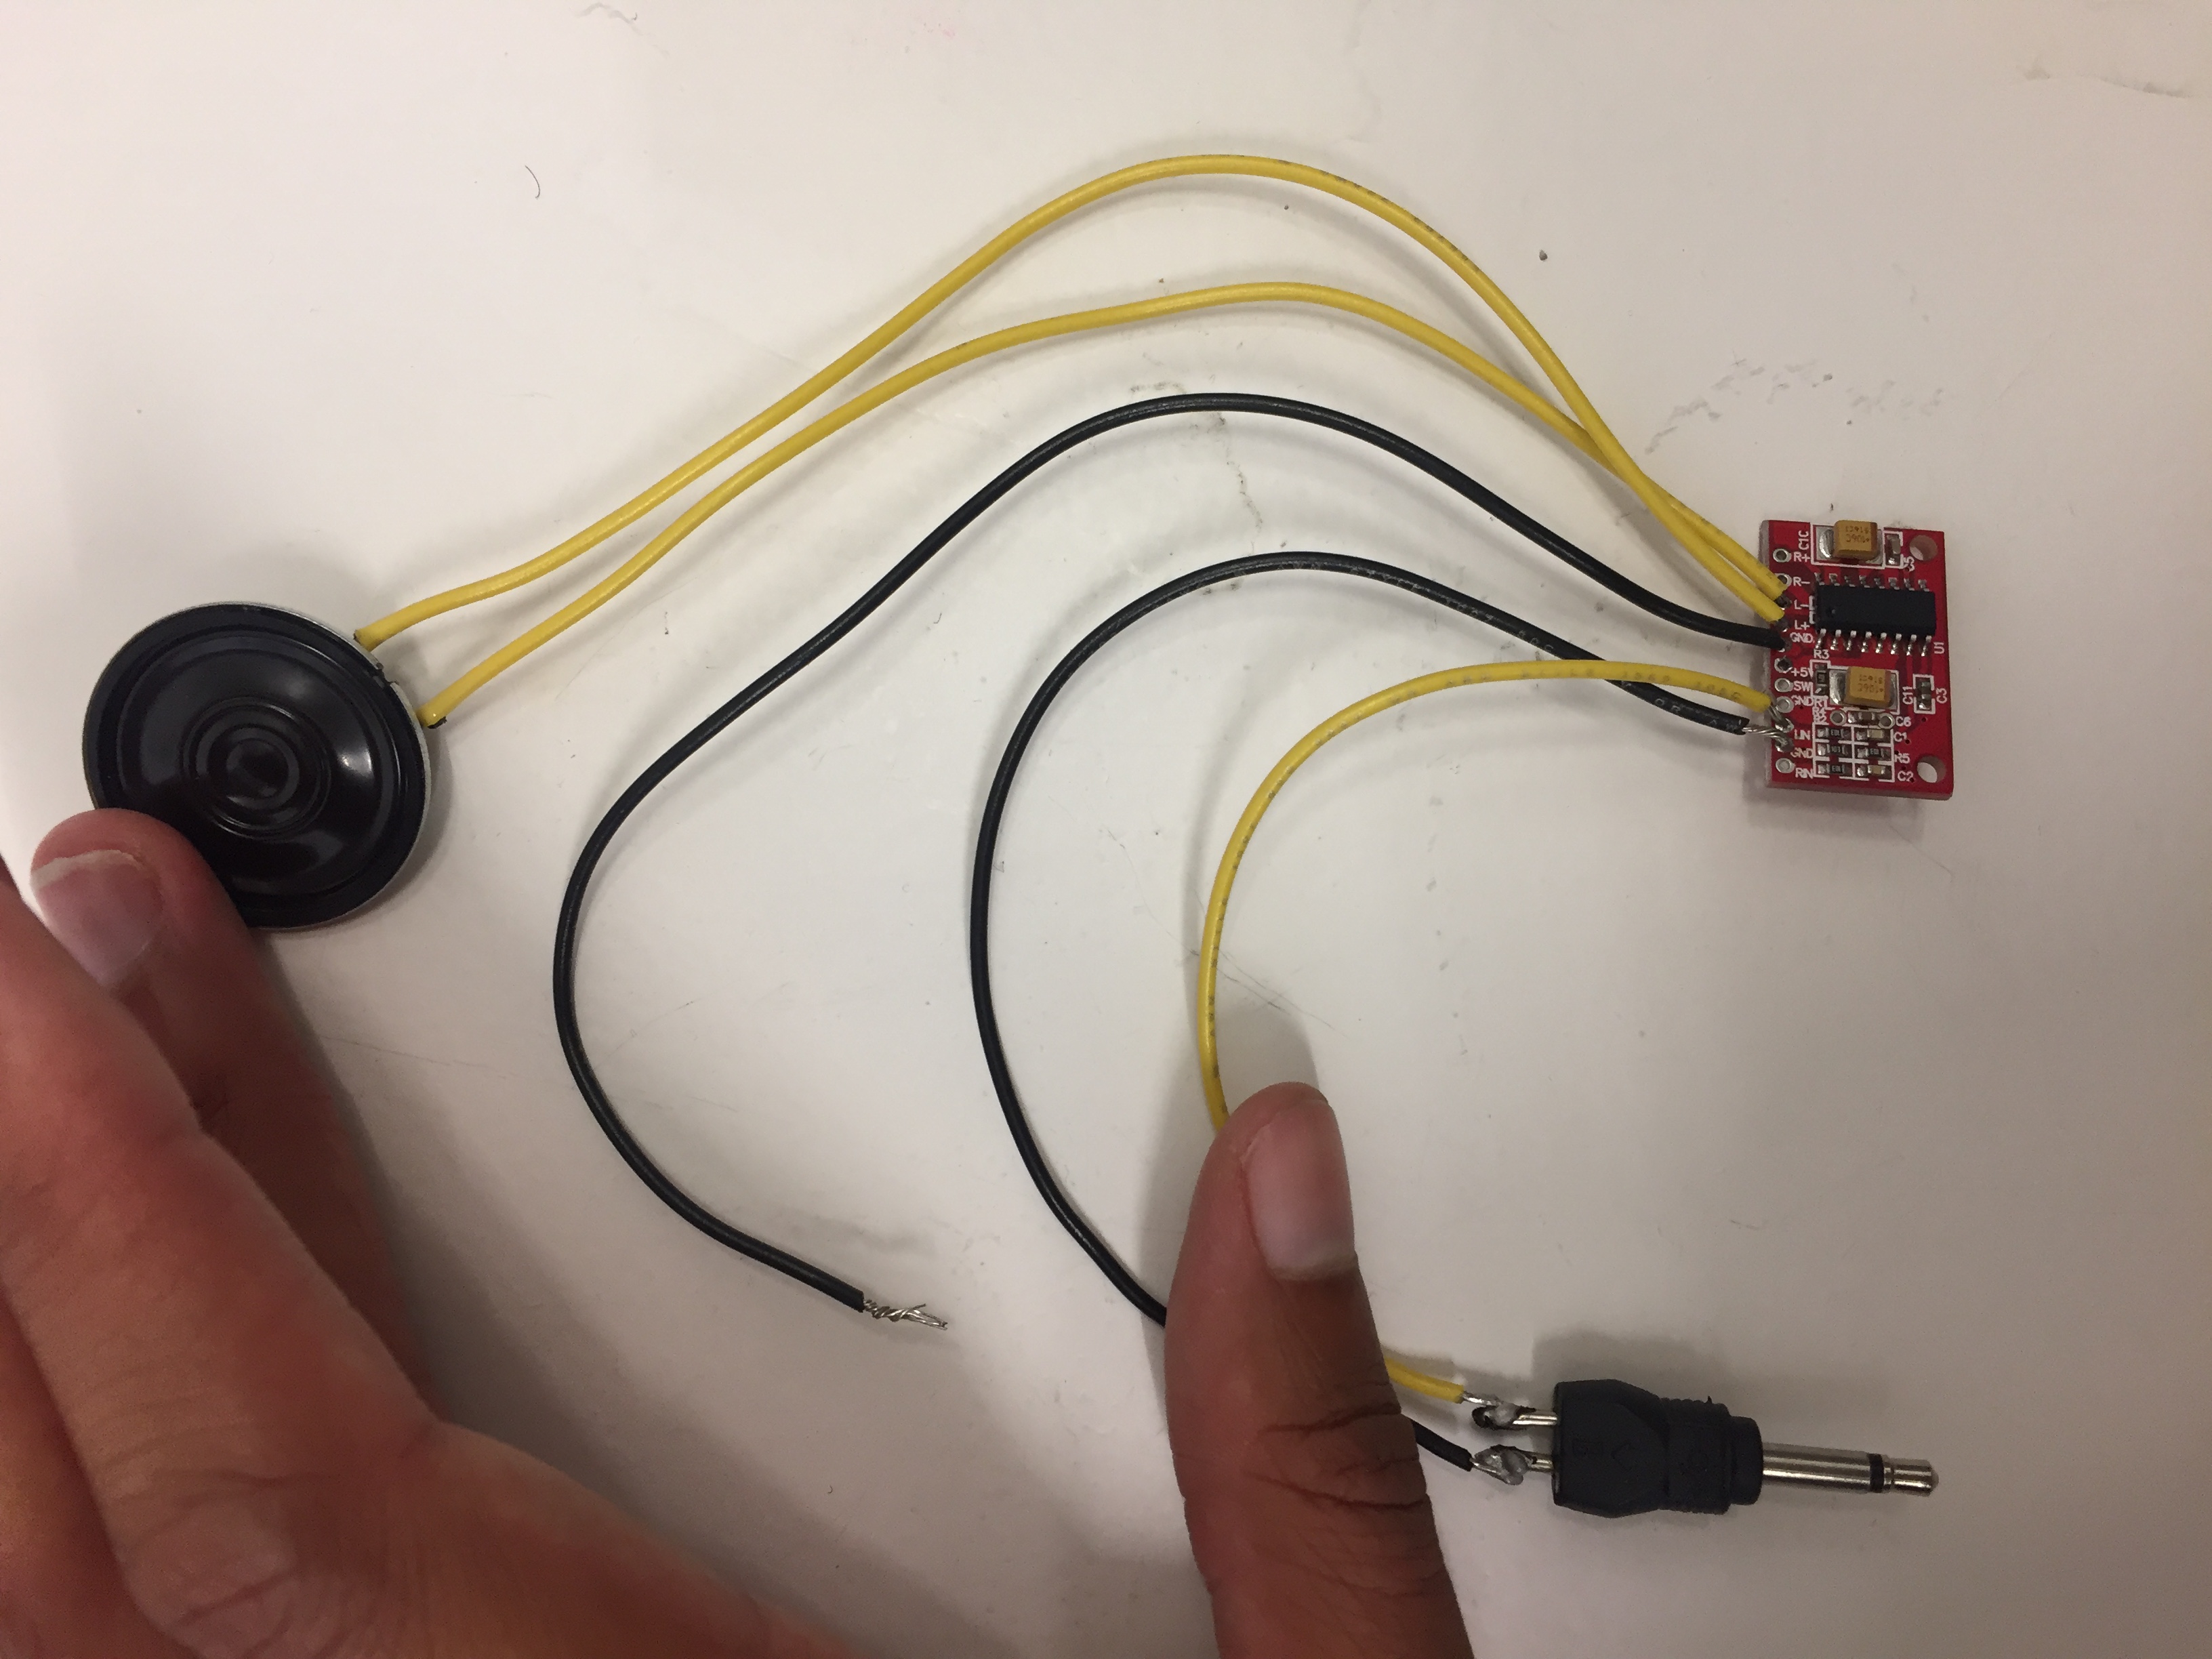
Since I was running out of time, I still decided to make a finished object using the spiral embroidered on the parachute material (this embroidery was successful), a neodymium magnet, an amplifier and a Jack output. I soldered the Jack cable to the LN and GND pins, embroidered both ends of the Karl Grim Silver Conductive Thread coil to the +L and -L pins and finally soldered the power source to the +5V and GND pins.

In this video, you can see the process of making the speaker. It is still connected to the computer with the Jack cable because I was using my phone to film, and is connected to the Arduino because it requires a power source of 5V.
In this last video, you can see the soft speaker totally disconnected from the computer, powered with a battery and reciving information from my phone. As I said previously, the sound is not very loud nor strong in the basses.
That week was already very packed in terms of work and I could not manage to work with ATtiny. However, I learnt how to program it in the skin electronics week, follow the link ;) !
More documentation on wearables here.