9. Textile as scaffold
1) A biocomposite is a natural material combining a natural polymer and a natural fiber. The polymer and the fiber can be mixed or sandwiched.
(Non bio) composites usually use Epoxys as polymers. For biopolymers, PLA (not that bio...), PCL, natural resins, animal glues, waxes or gelatin (among others) can be used. Mycelium can also be used even if it is not a polymer. Other microorganisims can be used as a polymer like in the project from Bastian Beyer and Daniel Suarez who solidified a structure using microorganisms catalyzing the calcite precipitation reaction. The advantage of epoxys is that they are not water based and can dry without air within 1 to 3 days. For comparison, the setting time of Gelatin is of 3 to 5 days and the one of mycelium can be up to a month. Some synthetic resin are a bit more ecofriendly as epoxys, such as BASF's water-based acrylic resin Acrodur used by Werner Aisslinger. For the fibers, carbon fibers and fiberglass are often used in cars, planes and other transportation means (carbon fiber is more used because it is very light). Using human hair fibers does not require resin because it is made of keratin which fuses and forms cystein bonds when heated and compressed enough.
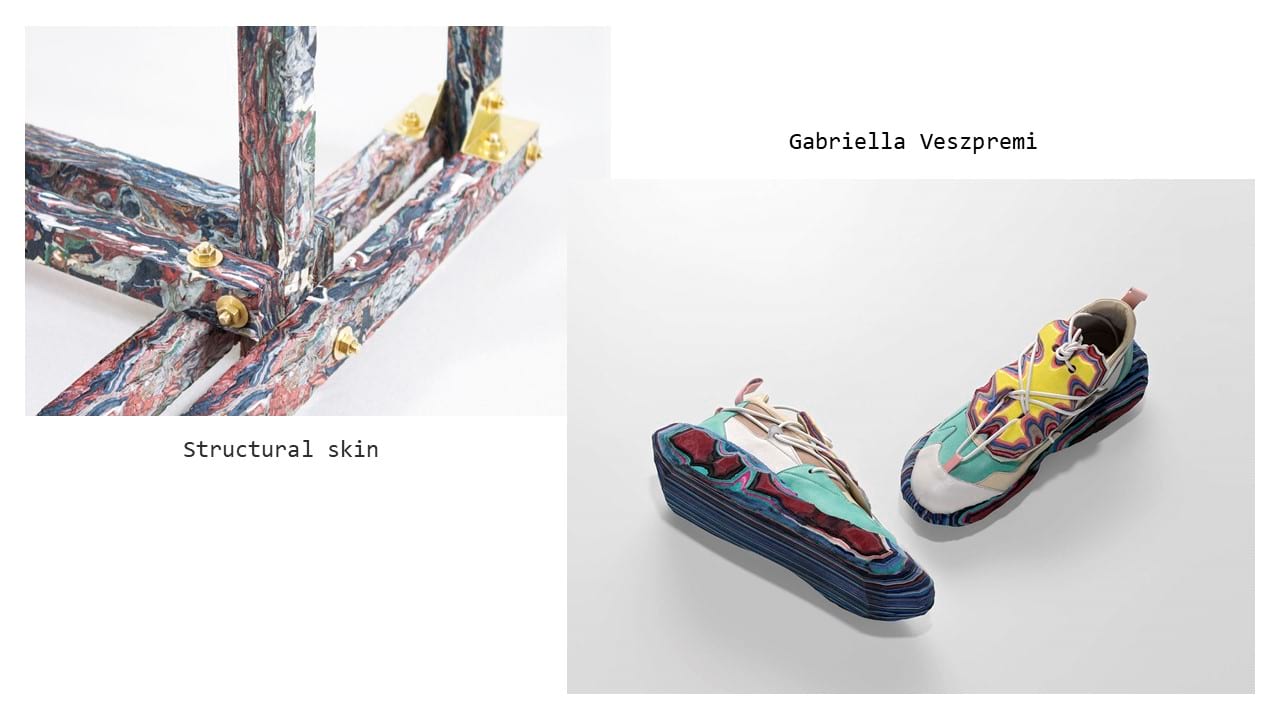
Leather leftovers and polyester resin can make a great and very strong composite. Structural skin uses this composite to make furniture. The composities generated can be molded using different techniques inclunding compression molding. This technique consits in having a mold in 2 parts, melting the composite and then shaping it by compression. As it can be seen in the work of Tesler and Mendeloviz, textile and wood can also form a very beautiful biocomposite.
2) Leather can also be molded thanks to the wet leather molding technique (cuir bouilli). Leather is a very interesting material since it can be very elastic when moist and be shaped as desired, and then go back to rigidity and keeping its shape. The shape can be done using weight or even some DIY vaccuming box.

3) Fabric formwork is a technique for molding a material to a shape it does not usually have. Material perception is contreintuitive and the shape does not match the effective texture of the material. It usually uses concrete in very bubbly and foamy shapes.
4) Cristallization: solidification of cristals on material.
Assignement
- Document the concept, 3D model of the piece and document the design process.
- Make two samples with 2 out of the 5 techniques to make a prototype of a textile form: fabric formwork with casting crystalization wood-textile resin-textile leather molding or other Document the process from CAD to CAMM, document how to use the CNC mill and prototype your textile composite.
- Upload your 3D model and CAMM file.
- Document the 2 processes you have followed step by side from design to machine and hands-on making, materials you used, your mistakes, failures and achievements.
- Use 3D modeling software to simulate your fabric deformation.
- For this assignment you will require to build up your tools (container for molding, vacuum bag set up, frames, matrix, recipients) and process for your workflow.
I-Making cristals
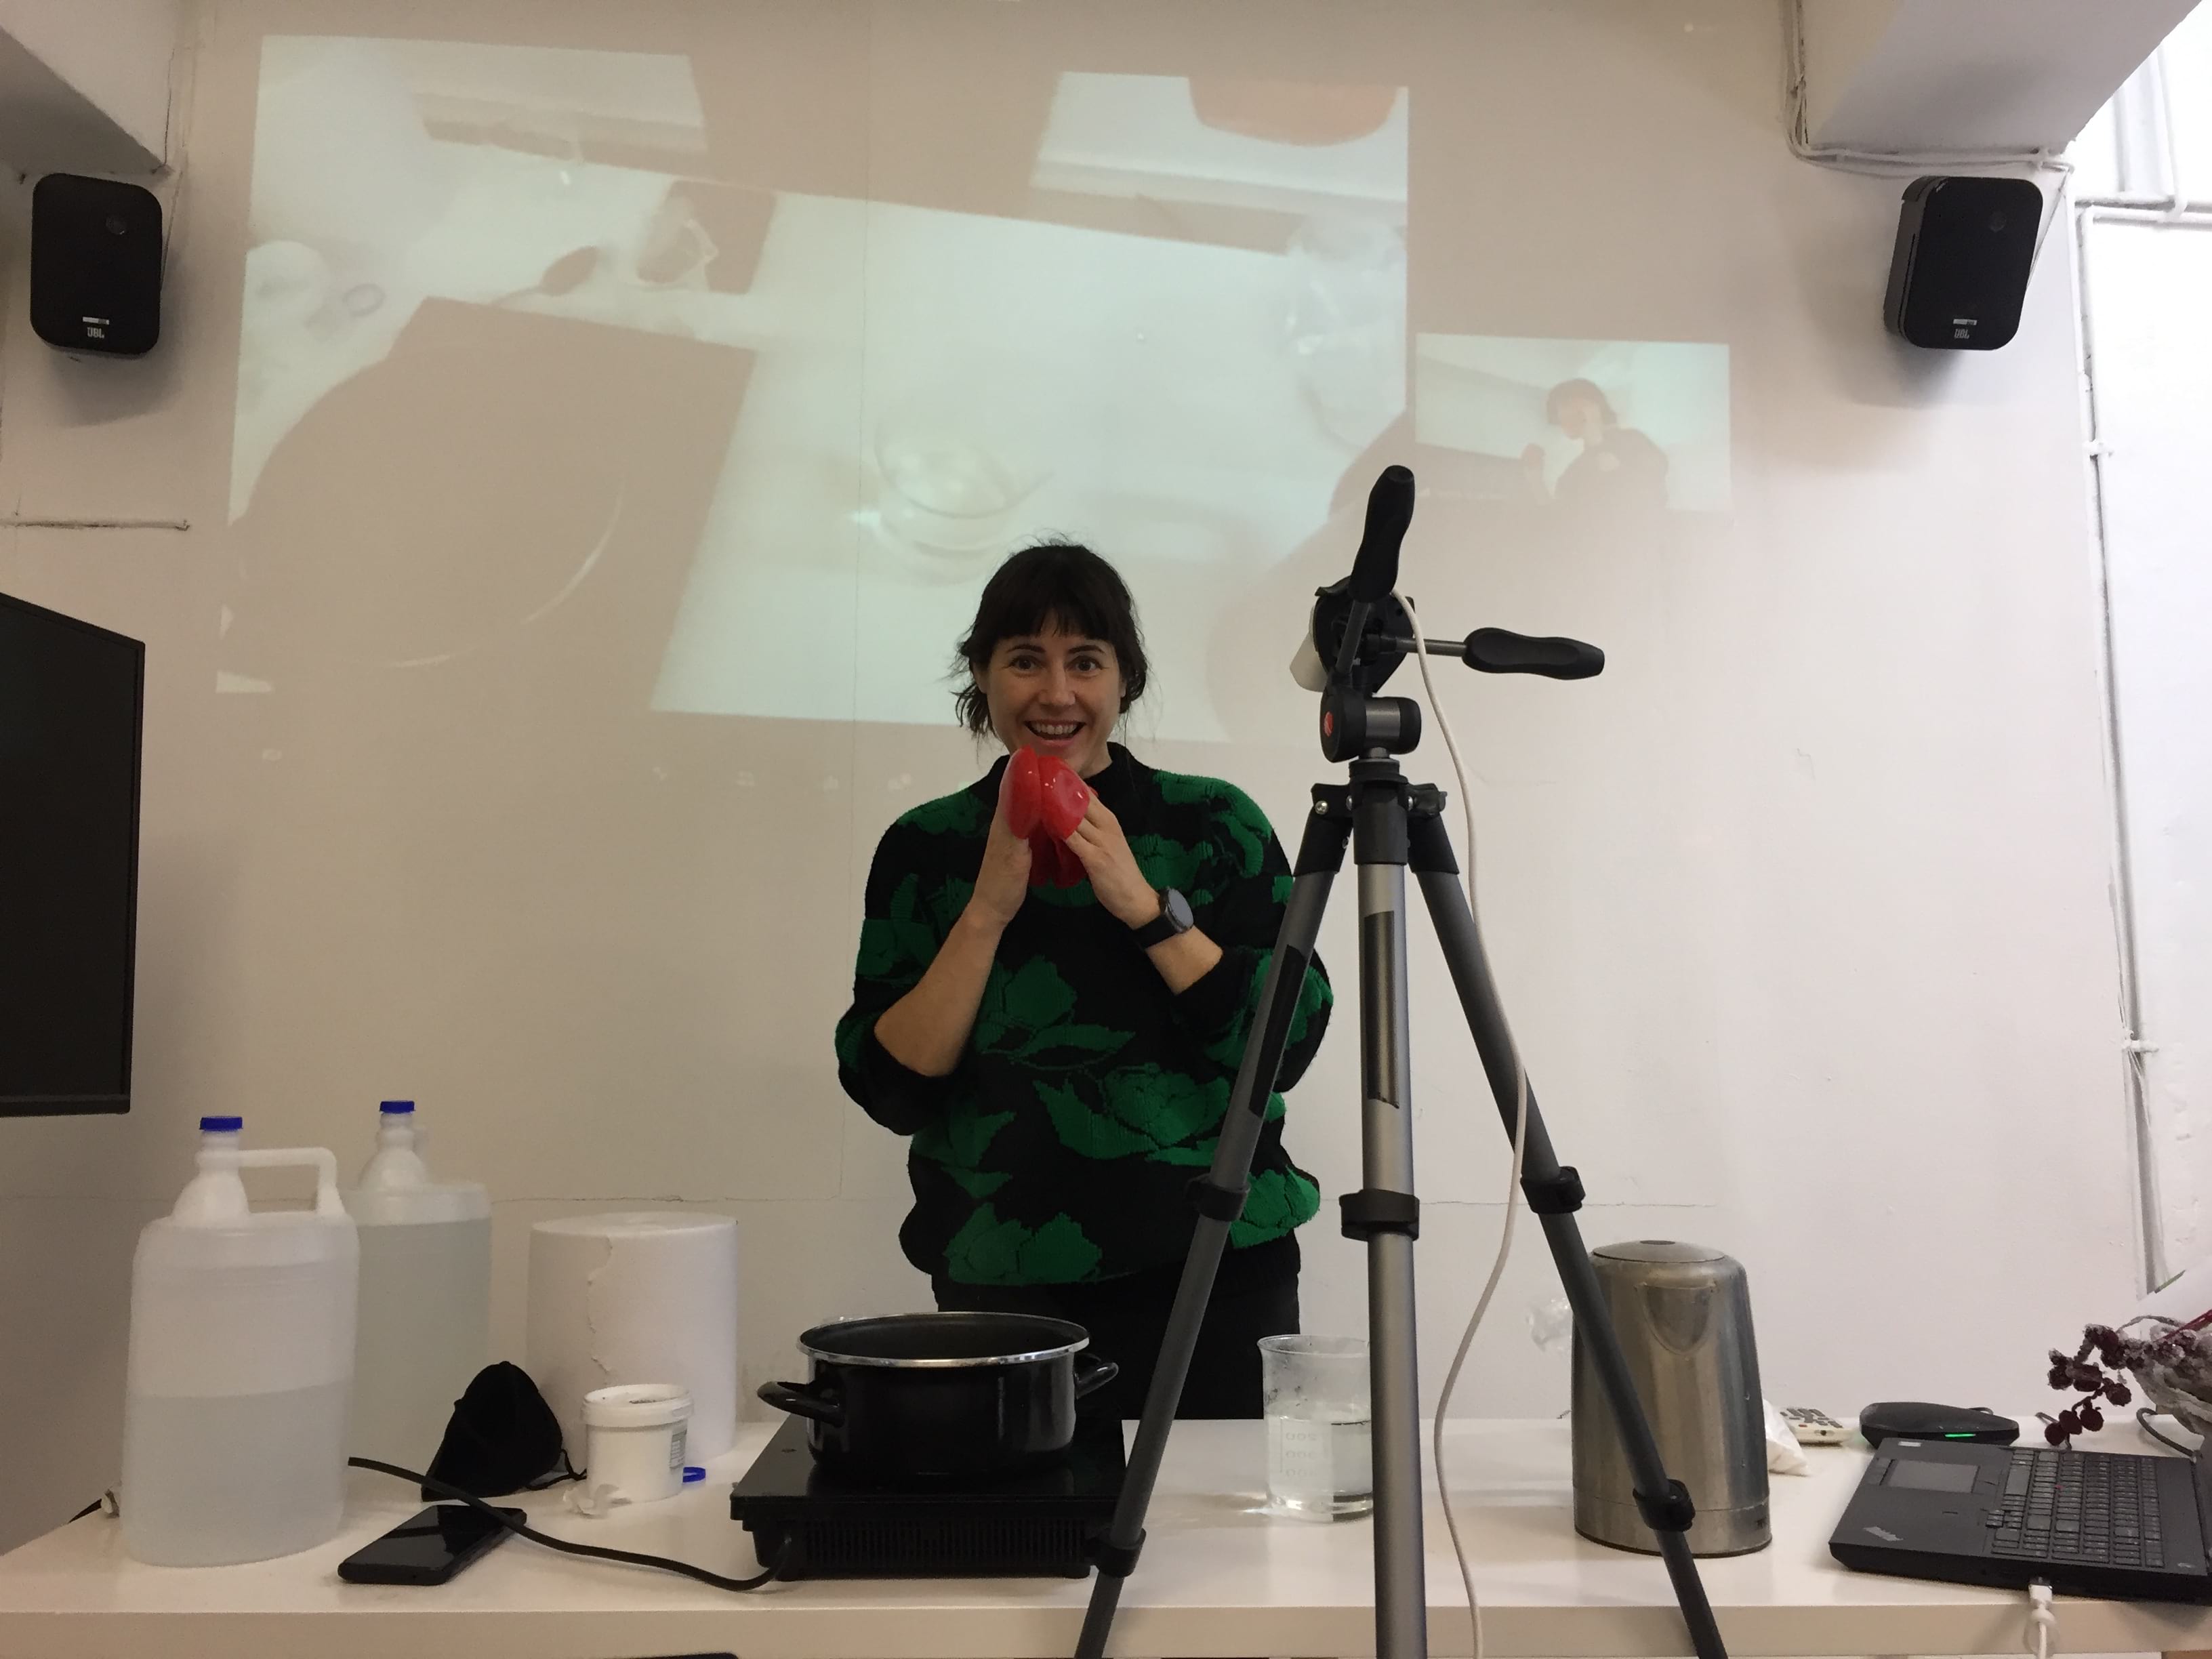
Anastasia filming the tutorial for crystals making !
 IMPORTANT RULE: DO NOT USE THE SAME POTS YOU USE FOR EATING.
The following steps describe the procedure for making crystals of alum.
1. Boil 1L of water and dissolve 200 g alum sulfate powder in it. This quantity is approximative, the important point is to have a saturated solution. Eventually add colorants.
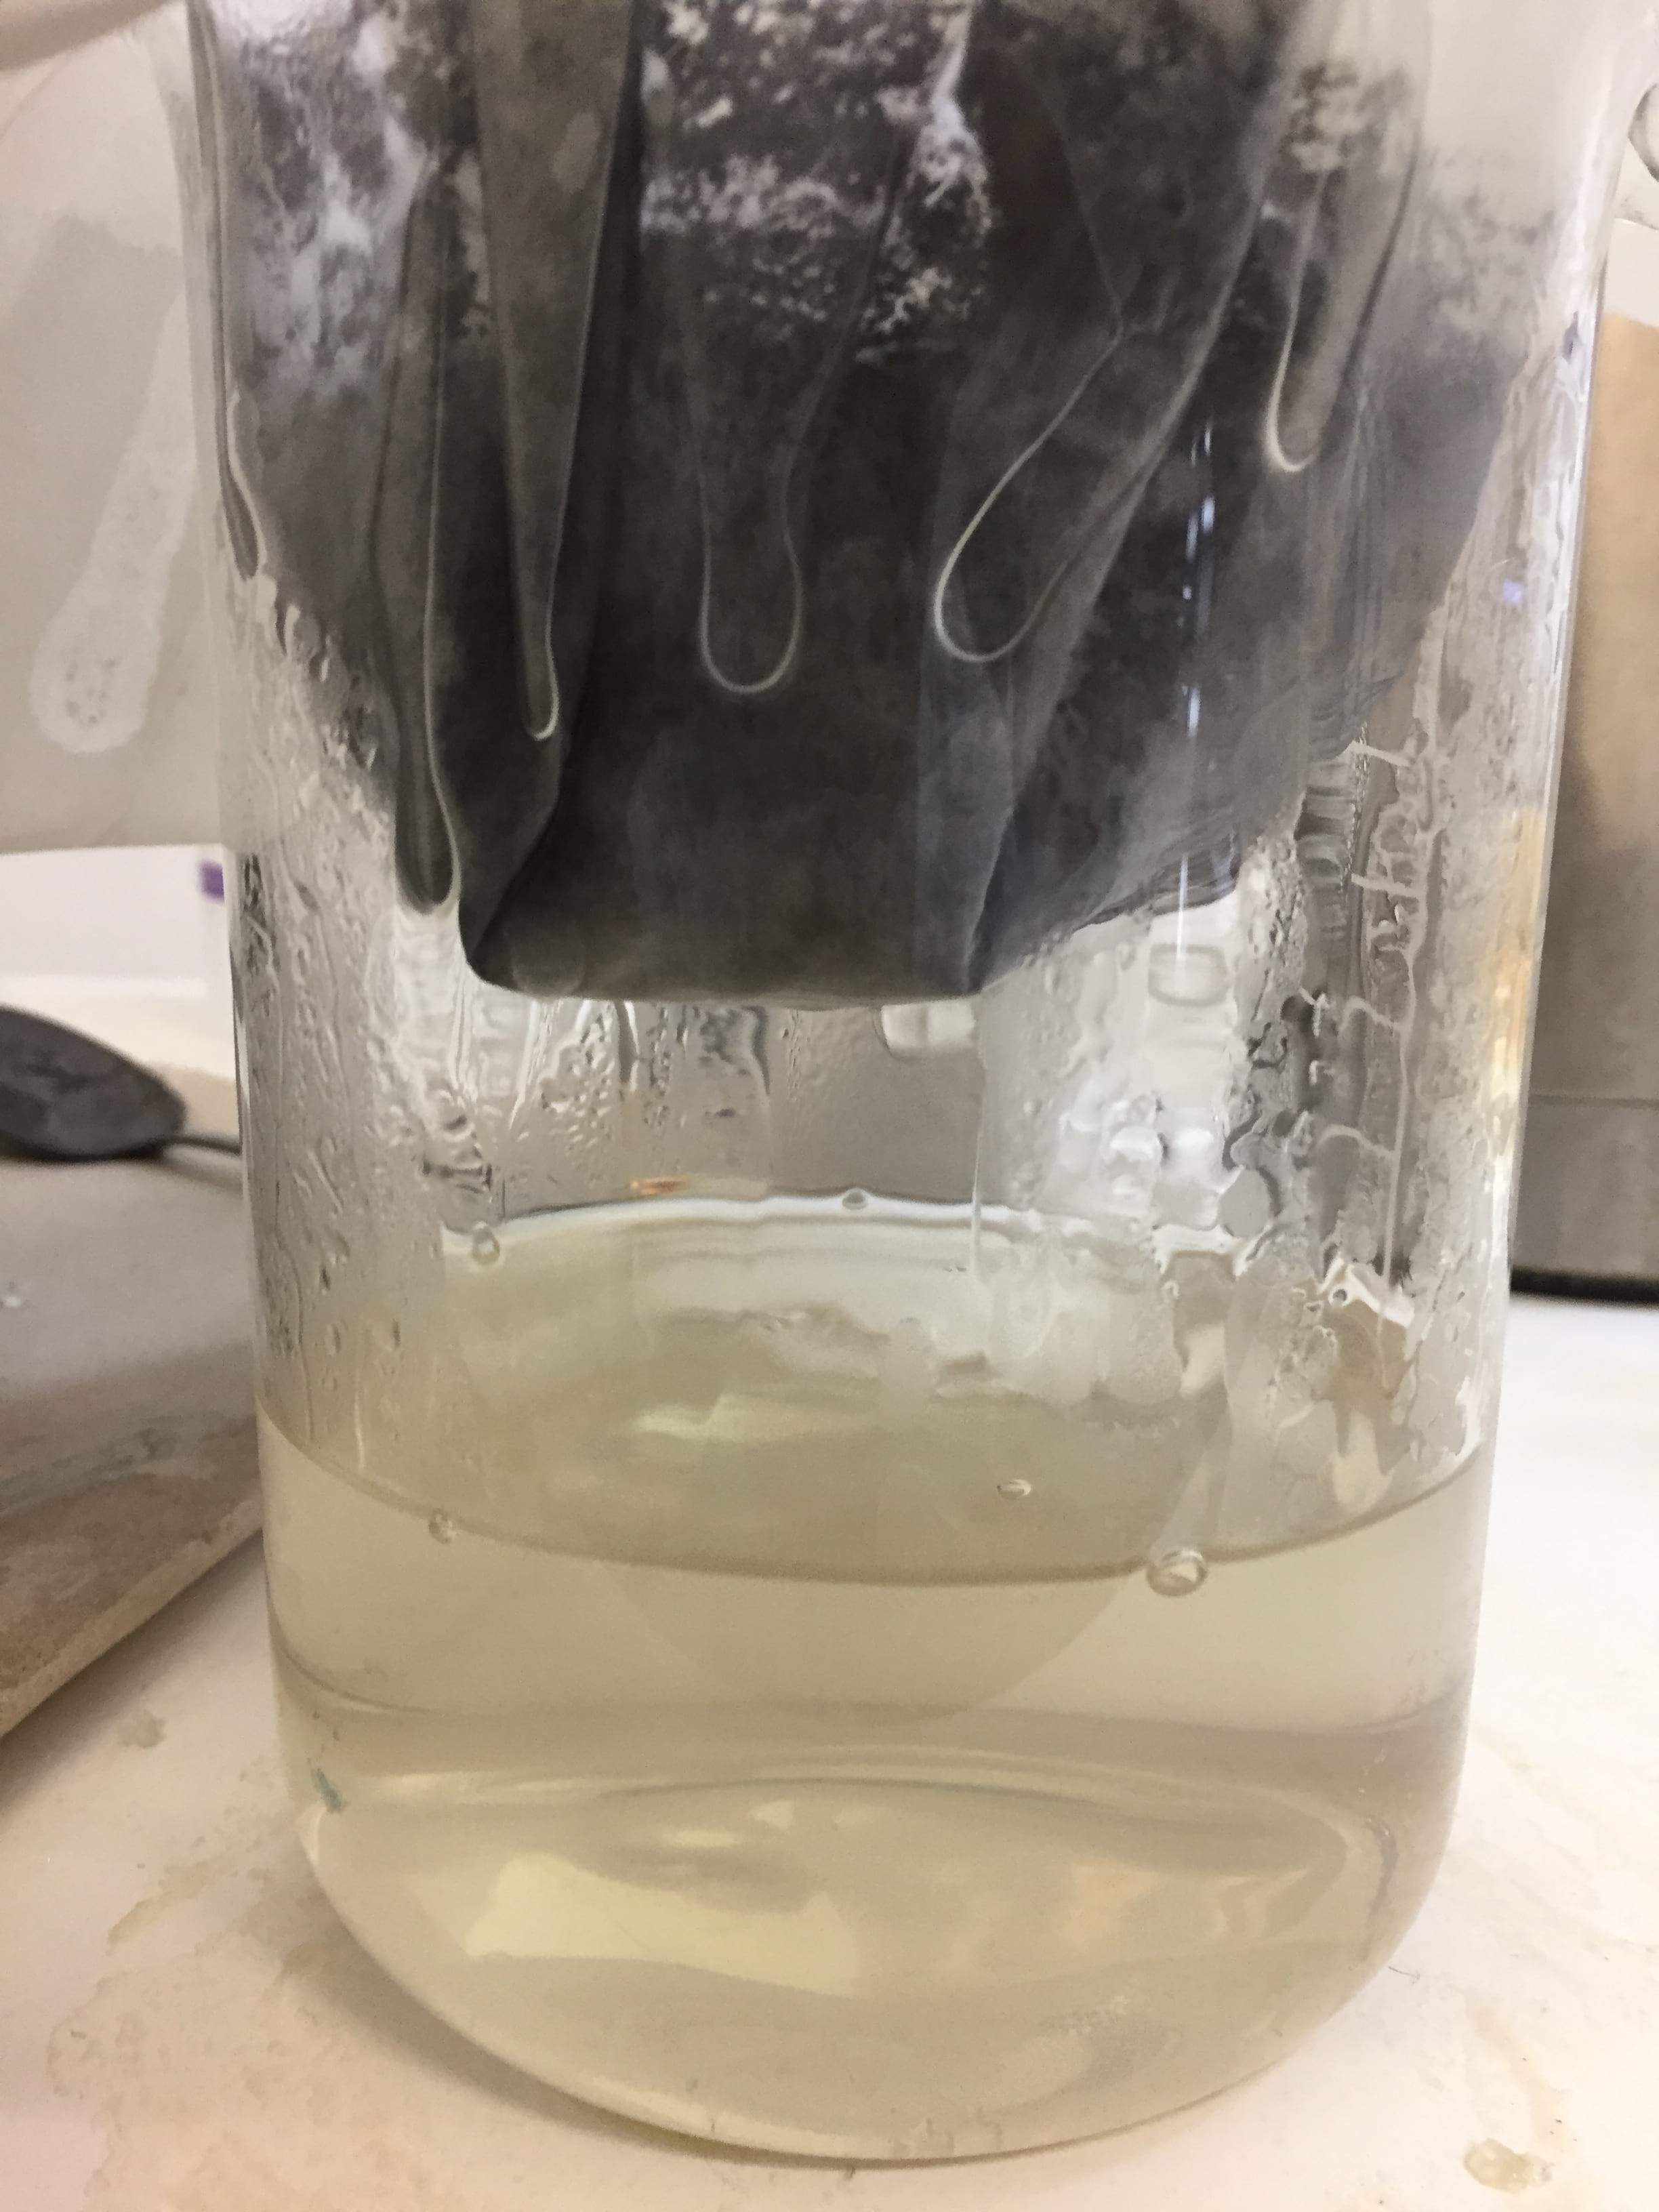
2. Filter the solution.
3. Dip the object on which you want the crystals to grow in the solution, cover it and let it cool down.
4. To have bigger cristals, the solution can be replaced by a new saturated solution. One can also use a seed crystal (basically another crystal which is going to attract the formation of new crystals. Patterns can also be drawn using glue and some alumn powder. When put in the saturated solution, the mix is going to behave as an atttractor. If crystals starts growing in the bottom, it is necessary to take them out and remelt the solution. If not, all the crystals are going to grow on the bottom of the jar and not on the object. The same way, if you are not satisfied by the result, crystals can be remelted and grown again.
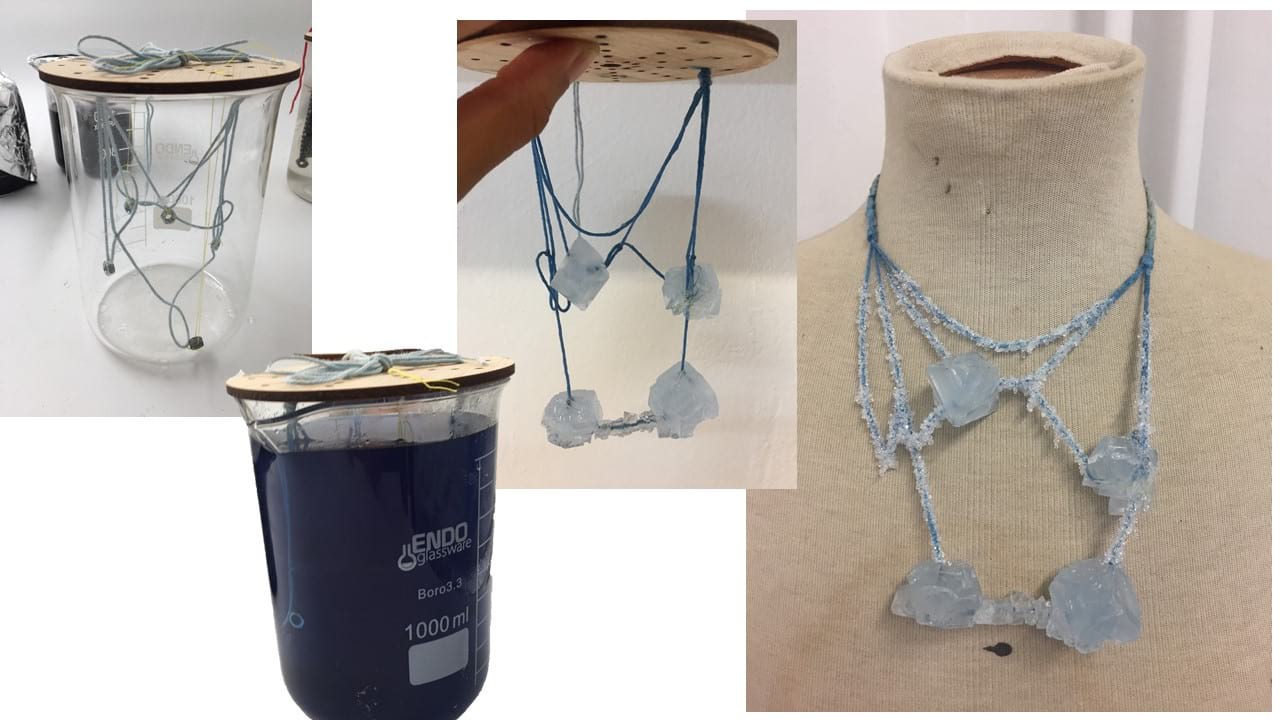 For this project, I used the given recipe to make an alum coated necklace (the frame is emboidery wool). I first wanted to make copper crystals but it is hazardous for the skin so I just decided to use alum ones with a colorant! My prime idea was to make black crystals on the thread using biochar (biological charcoal) but after the filtering step, I figured out charcoal is insoluble... I just put some blue food colorant in the remaining solution and continued filtering, and finally dipped the necklace into the beaker. Here are pictures of the insoluble charcoal on the filter after filtering the charcoal and the alum solution with colorant. Is isn't it beautiful ?!
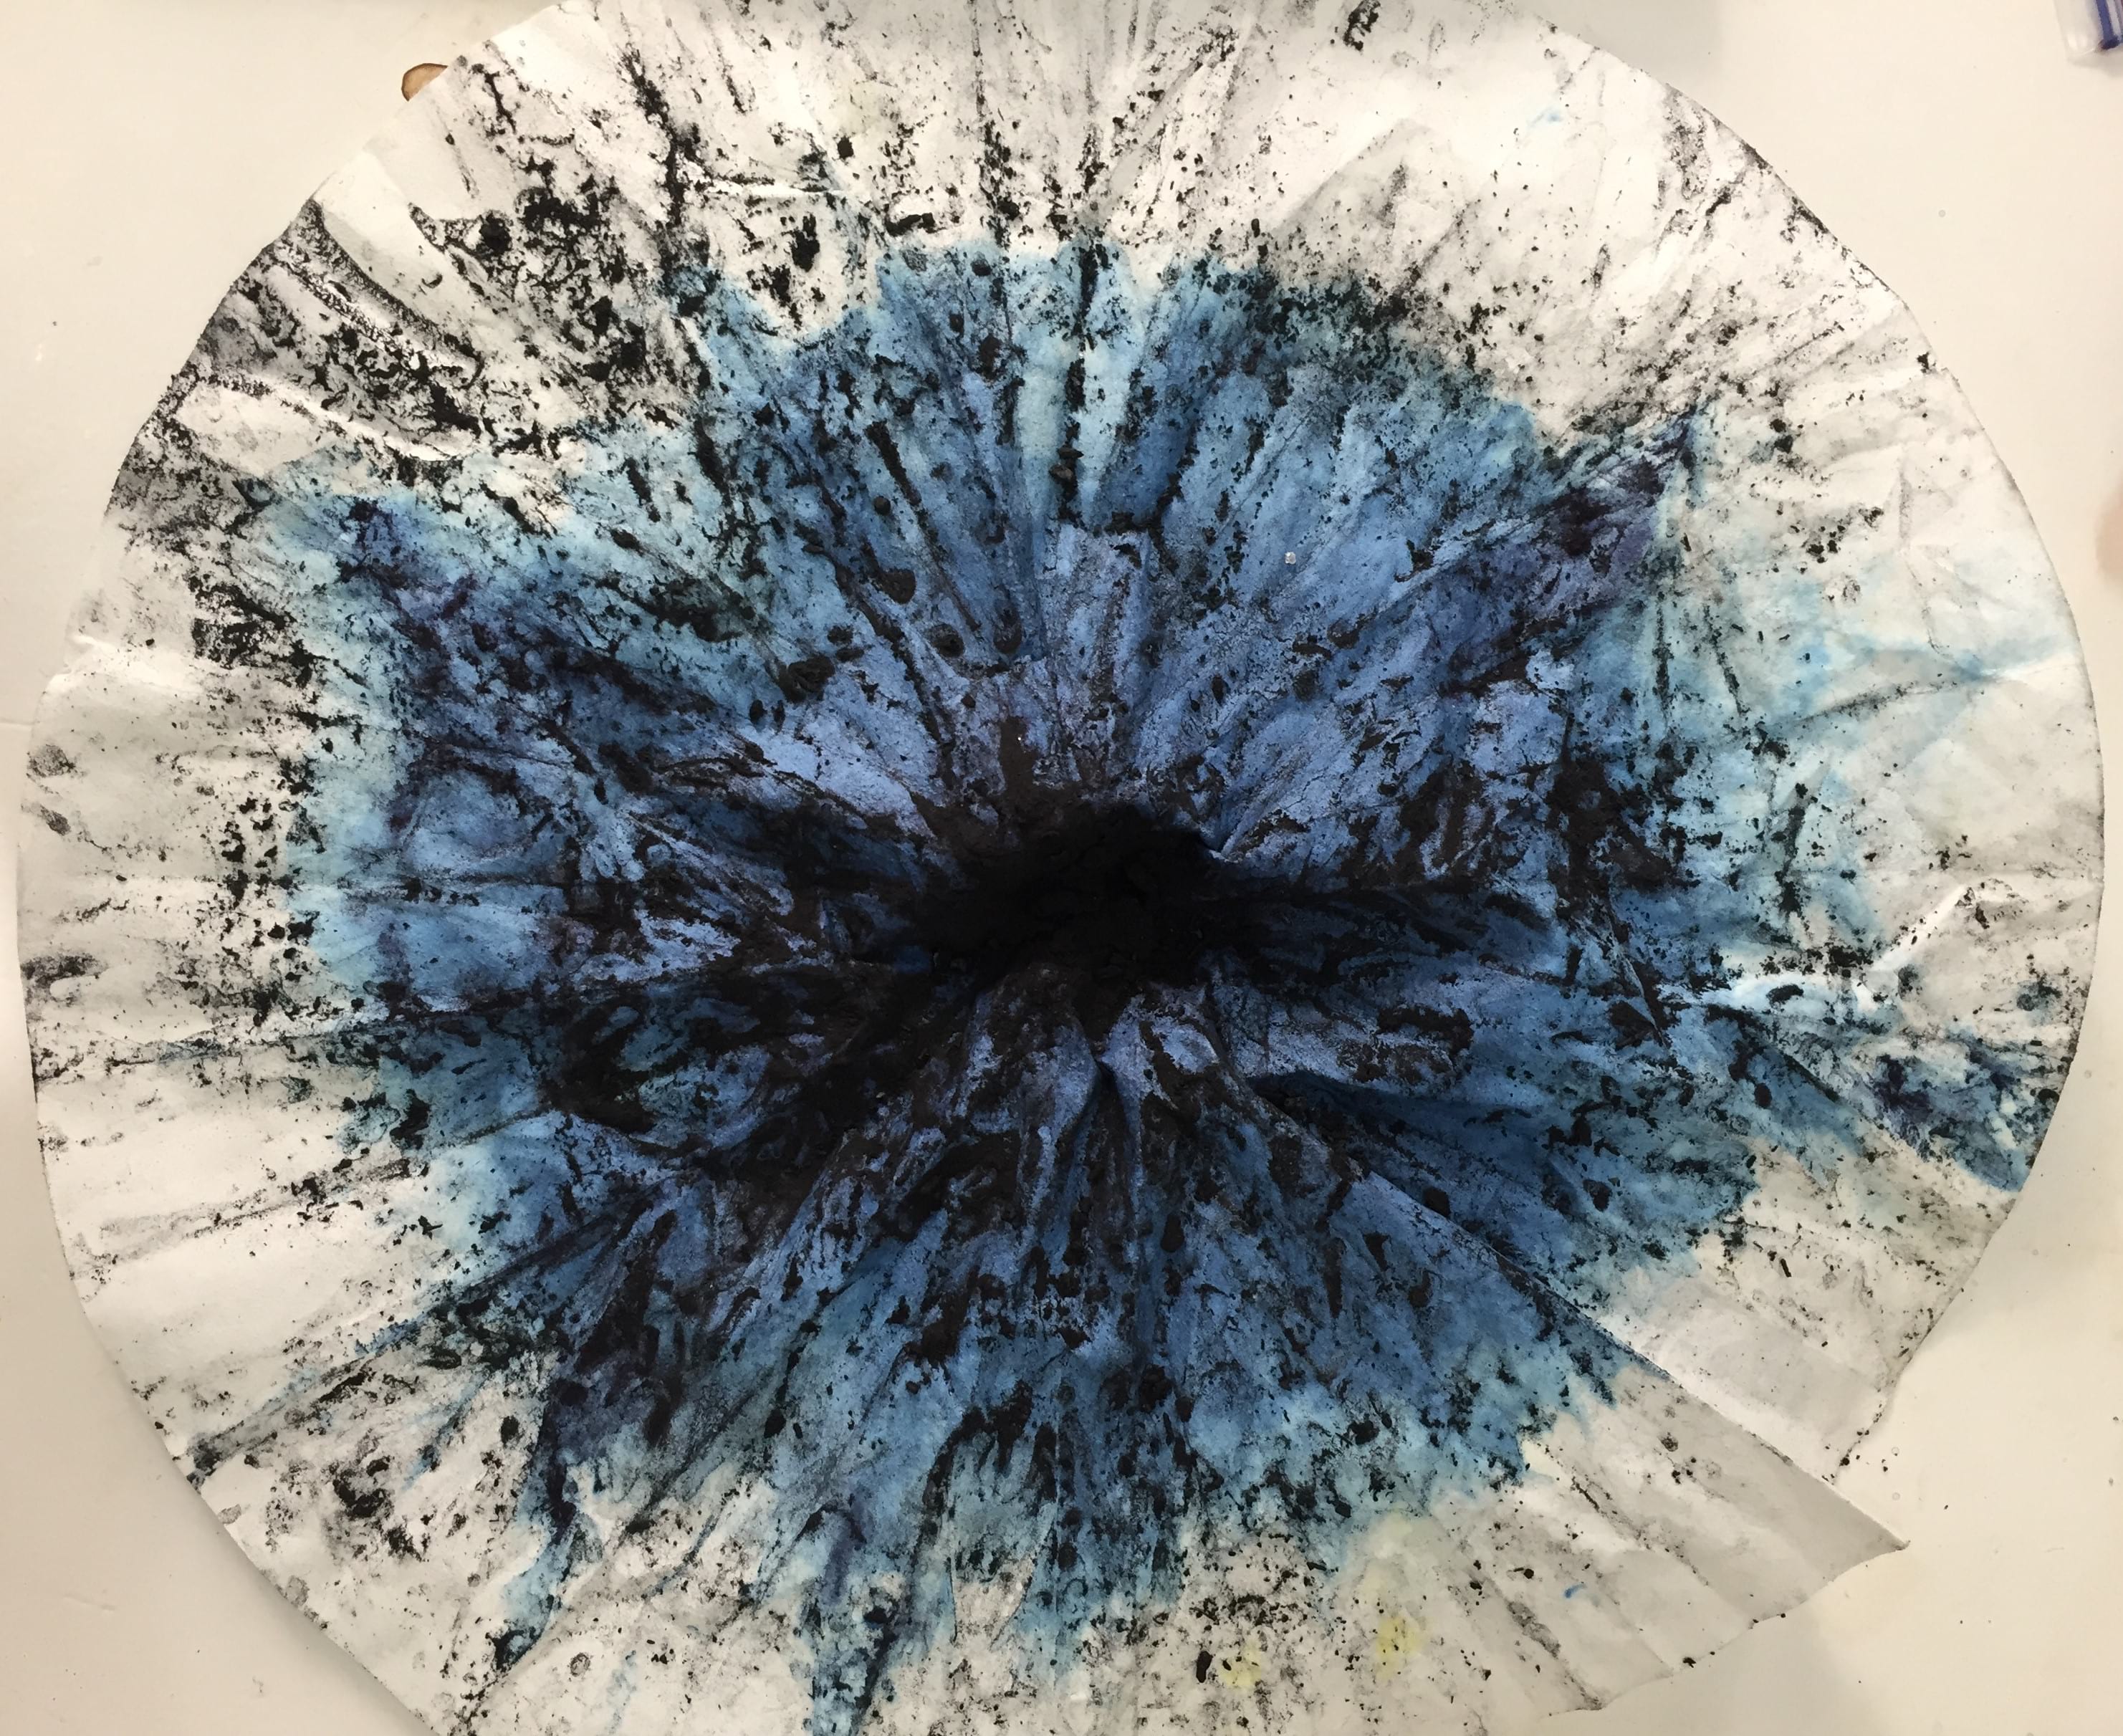 After letting the threads soak in the saturated solution overnight, I had a very interesting result with 4 huge crystals located on random parts of the thread system ! At this point, I decided to take the bolts I put as weights on the threads off since the crystals were pretty heavy and were starting to grow on them. I took the necklace out of the solution, heated the remaining solution to dissolve the crystals in the bottom of the beaker and put the necklace back in to grow overnight. That way, the small crystals that started growing all along the thread would also grow. And here is the final result !

II-CNC milling: sustrative manufacturing
 In order to use the CNC milling, we first need to prepare a Rhino3D file of the mold and treat it with the RhinoCAM2018 plugin to generate a milling file directory. In the following lines, I am describing the main steps I followed to prepare mine !
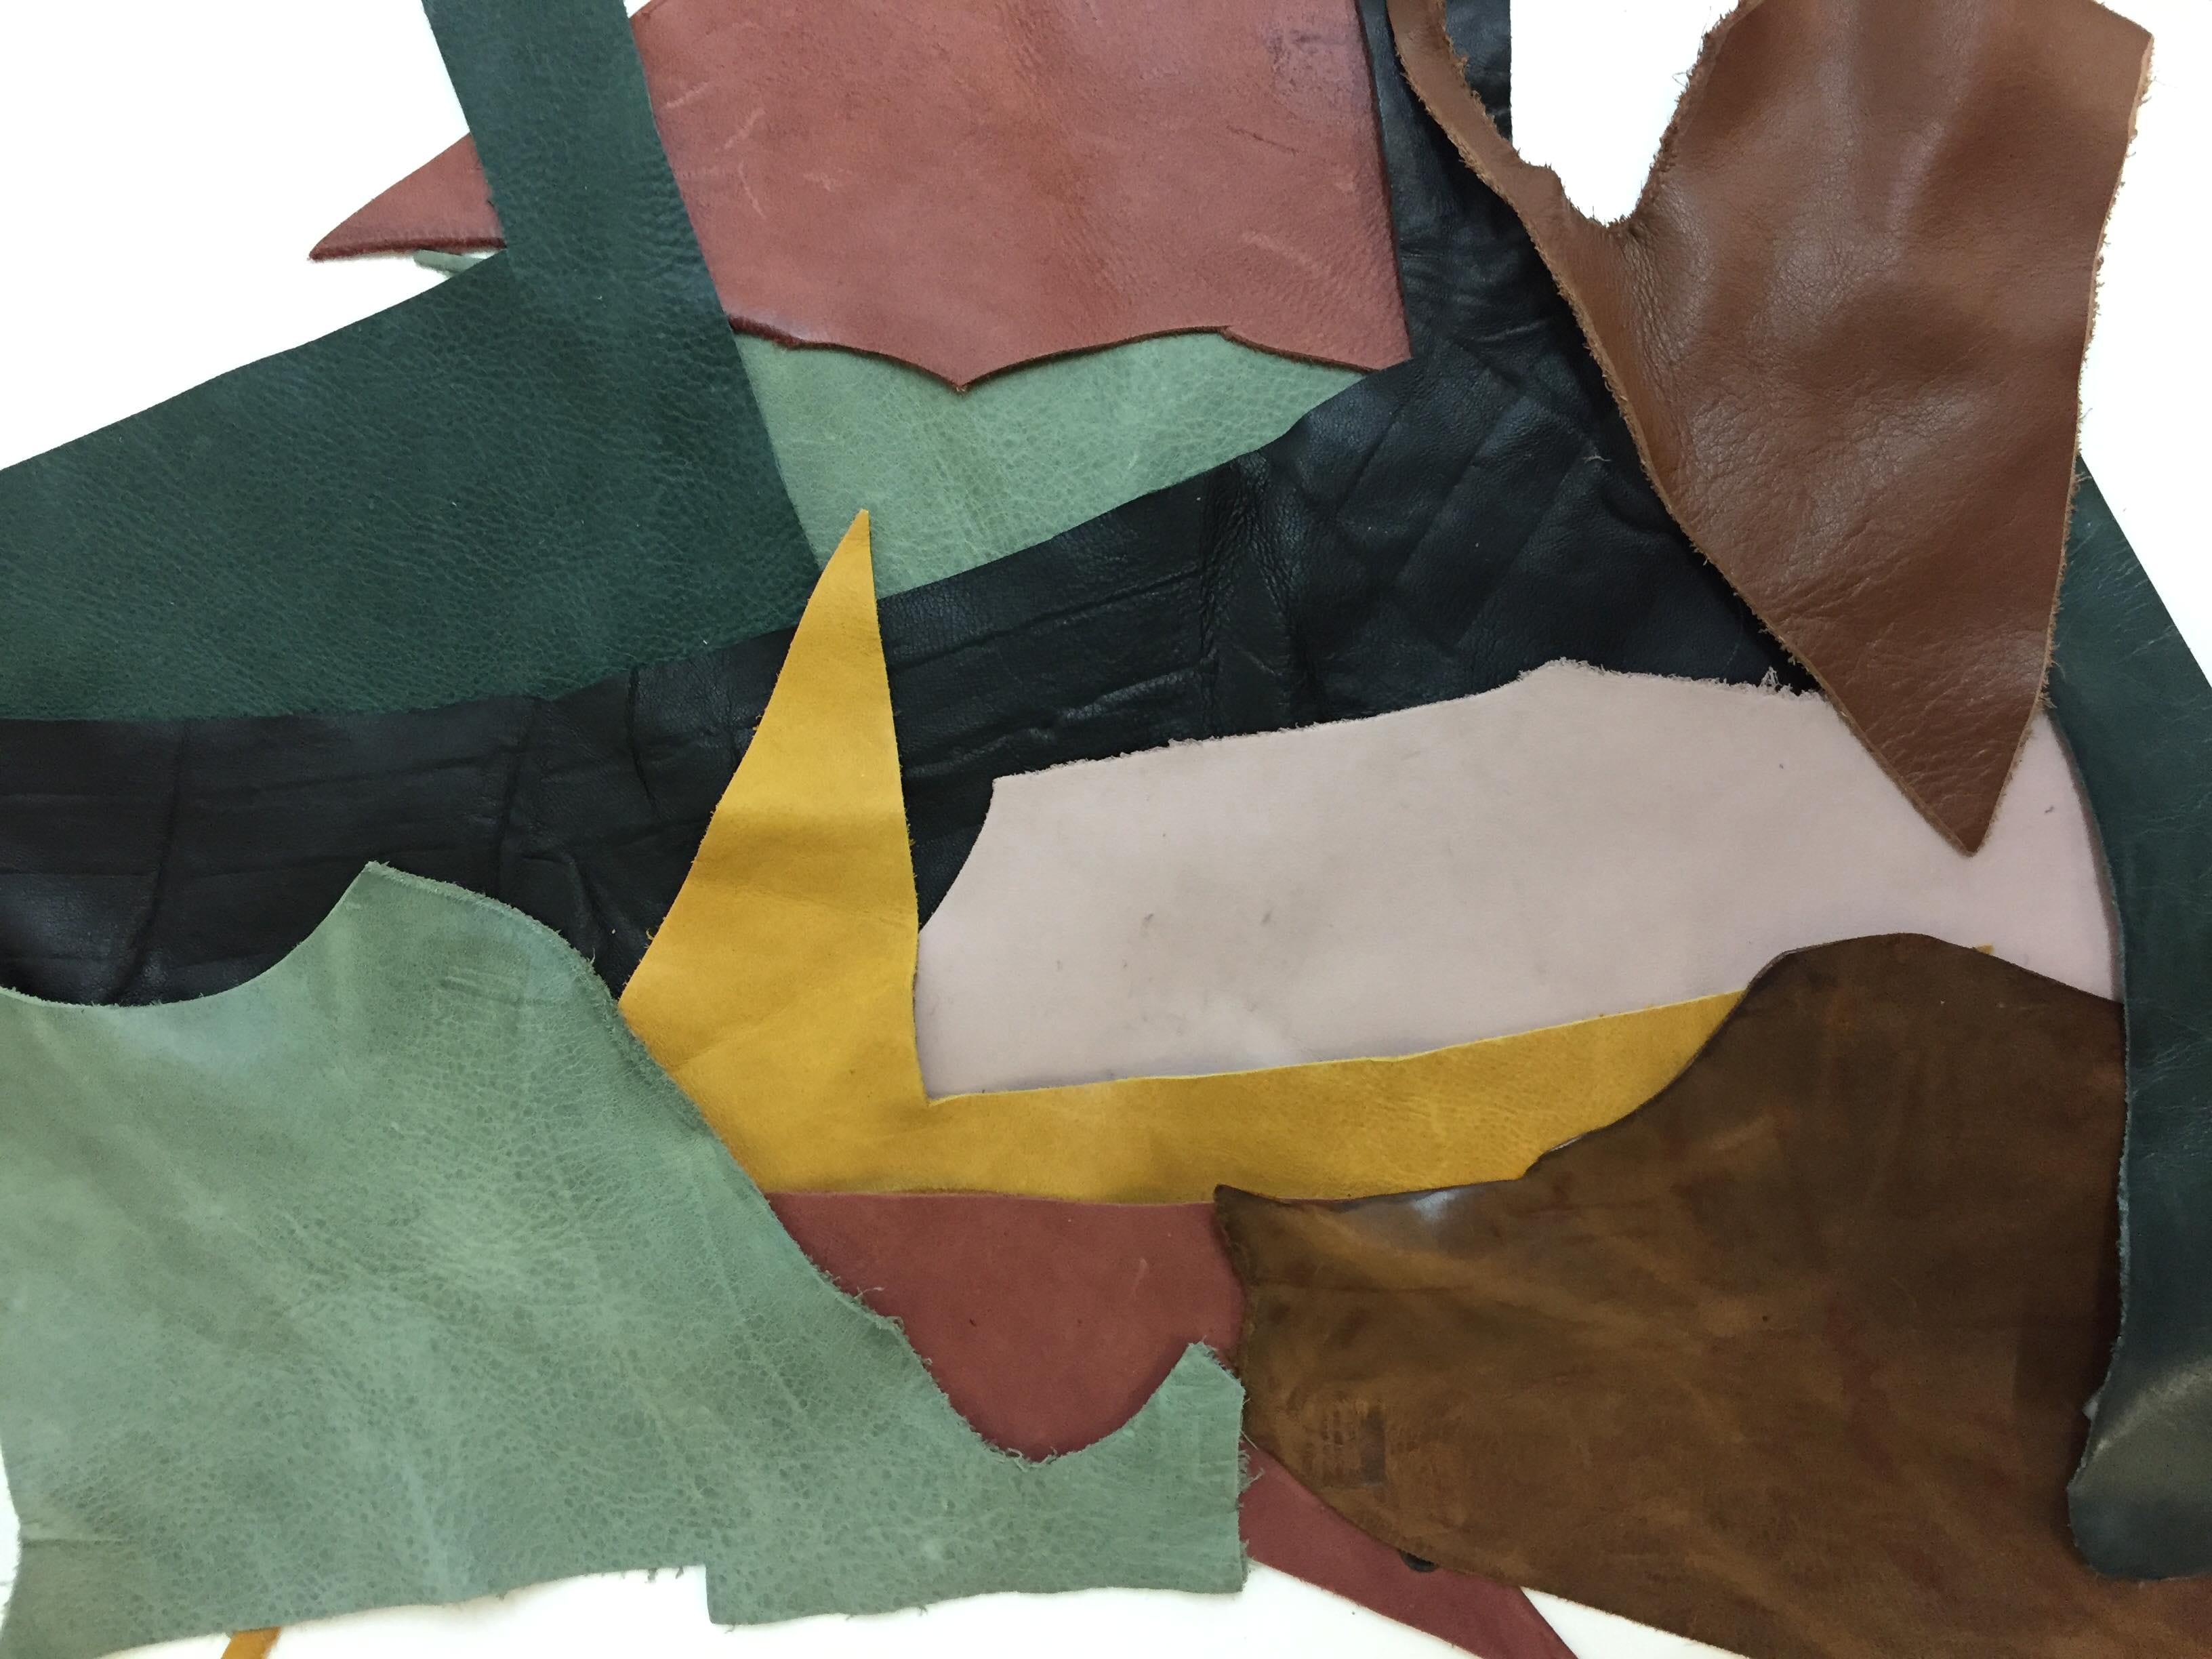
My initial idea was to make a shoe out of leather scraps doing a patchwork shape and see if the scraps stick one to the other without stitches using the technique of leather molding.
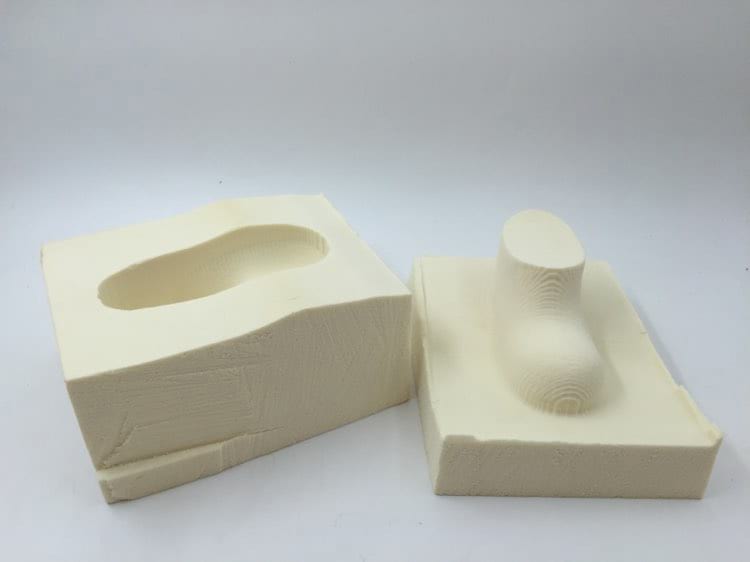
In order to make the mold, I took a 3D model of a boot I found on Free3D. I then modified that 3D file (cropped it basically) to my taste and then created a 2 pieces mold out of it.

Making a mold in a CNC milling machine requires some precise steps I describe below. First, put the mold designed in a bounding box and place under the 0:0:0 point so that the highest point is at z=O and the others are in z < 0. RhinoCAM2018 is a plugin that needs to be used but it is not free and only available on the computers of the fablab.
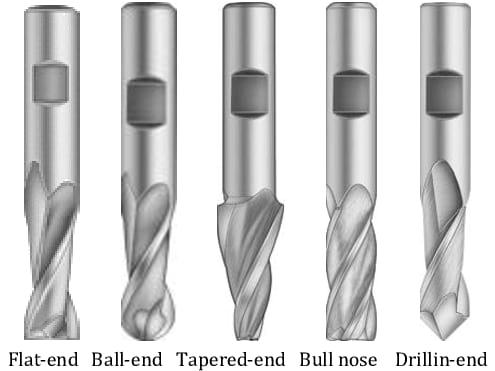
To do the milling, there are various types of end mills: ball end, flat end, tapered end, bull nose, drilling end... It is recommended to mill with a flat end mill for the horizontal roughing and with a ball end mill for the finishing. The mills used should be defined in the create/select tool window of the operation selected. Flute is the sharp part and is the part where the material is cut. The machine rotates clockwise but depending of the End mill (upcut or downcut), the material will be cut from top to bottom or bottom to top. For plywood, upcut is better and for plastic, downcut is better. There are also compression mills combining upcut and downcut. The bigger the mill, the lower the definition.
The milling of the mold should be done in two times: 1st the horizontal roughing which will give the global shape but not much definition and then the finishing. For the horizontal roughing, open the RhinoCAM plugin and click on Stock > Box Stock. Define the size of the model, which can be done easily with a bounding box. Then, select Machine Operations > 3 axis adv Horizontal roughing. A window with multiple tabs will appear.
- Control geometry: select curve/edges region by selectig the 2D bounding box of the object (from the surface
- Tool: in this tab, you should document all the information about the mill you are about to use by clicking on Edit/select tool. The tool should be selected accordingly to the material you want to mill, the definition you desire and the amount of material to remove. Not only the properties should be documented, but also the feeds and speeds that need to be calculated. The feed rate kind of defines the speed of the CNC. It can be calculated as Feed Rate = RPM x Number of Flutes x Chip Load. The spinder we have in the lab can go from 18000 to 24000 RPM. The chip load depends on the material and the diameter of the endmill. These parameters are given by the vendor. The "cut" speed is actually the only one for the milling, all the other ones are for touching the material, entering it or getting out of it. We usually put a lower value for these ones.
- Feeds and Speed: just press "Load from tool" and it should work if you filled the previous parameters correctly.
- Clearance plane is where you should put a z offset (around 10mm is ok) so that the mill does not leave traces on the material when traveling from one point to another.
- Cut parameters: for the roughing steps, a stock of 0.6 should be put in order not to mill too much the final structure. Make sure to also select tick offset, direction: mixed, start point : inside, and a stepover distance that should not exceed 35%.
- Cut levels: the stepdown control should never be more than 50% of the diameter if we do not want to dammage and overheat the mill. Tick depth first to save some time.
- Engage/Retract: always select Path. Once you put all these informations, you can right click and generate the path. Now you have the file you need for the horizontal roughing.
The Parallel finishing path can be generated only after the path of the Roughing is generated. Usually, the mill is changed from one step to the other so the parameters of the new tool should be filled too. The stepover control should be smaller to have a better definition (about 25%). Once the two paths are generated, they can be exported as NC files by righ clicking on the files and selecting post. A NC file is a file with different types of instructions written in G code for the CNC milling machine.
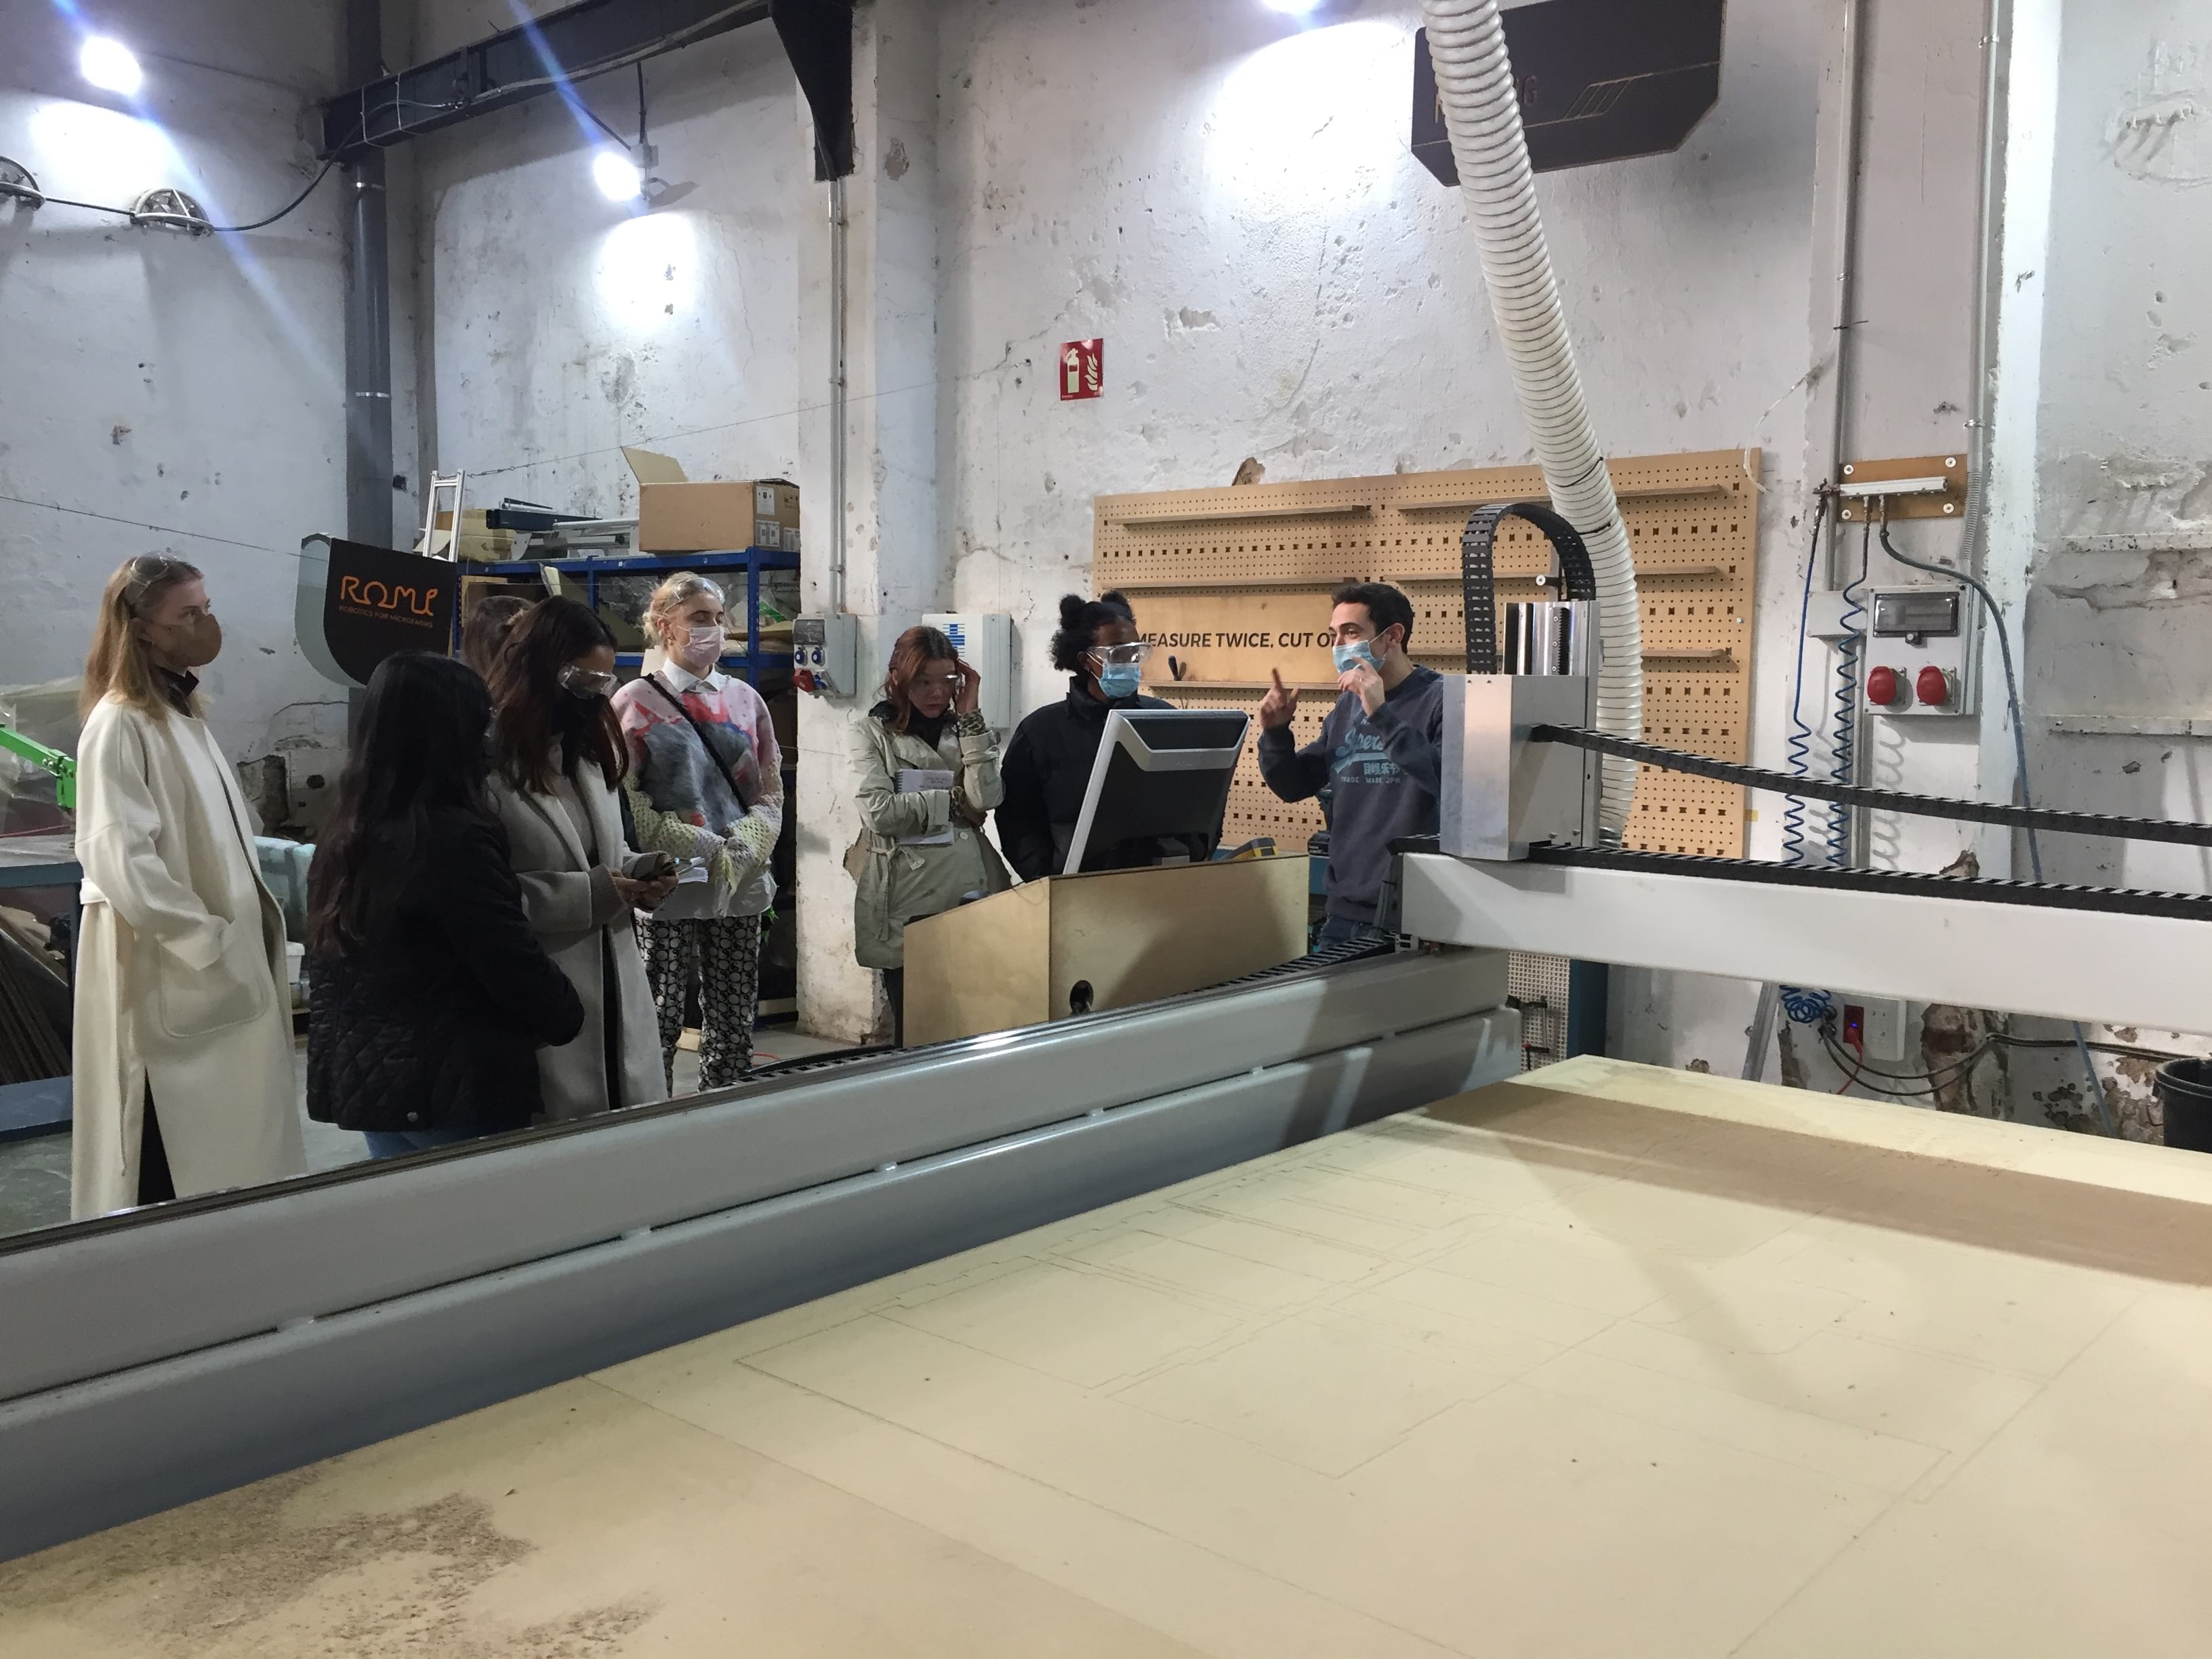
Here is a video of how to select the different parameters on RhinoCAM for the CNC milling of the shoe mold, followed by the simulation of the milling.
For both steps (roughing and finishing), I used a 12mm ball end mill so I just posted both steps at once. I milled on polyurethane high density foam 80. It took me 16 mins for the horizontal roughing and 5 minutes for the parallel finishing. As you can see on the Gif, the foam is maintained to the CNC milling machine with some pieces of wood screwed to the socle.
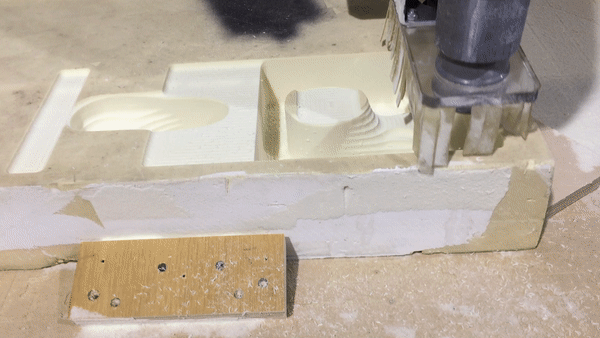
If, like me, you are making a mold with a positive and a negative, it is better to have an offset . It can be generated with the option "stock" in cut parameters, general parameters. Do not forget to put holes in the mold if you need to vaccum the piece. We should also not forget to make bridges if we have to cut the piece entirely which will maintain it in place. These bridges can be cut manually afterwards.
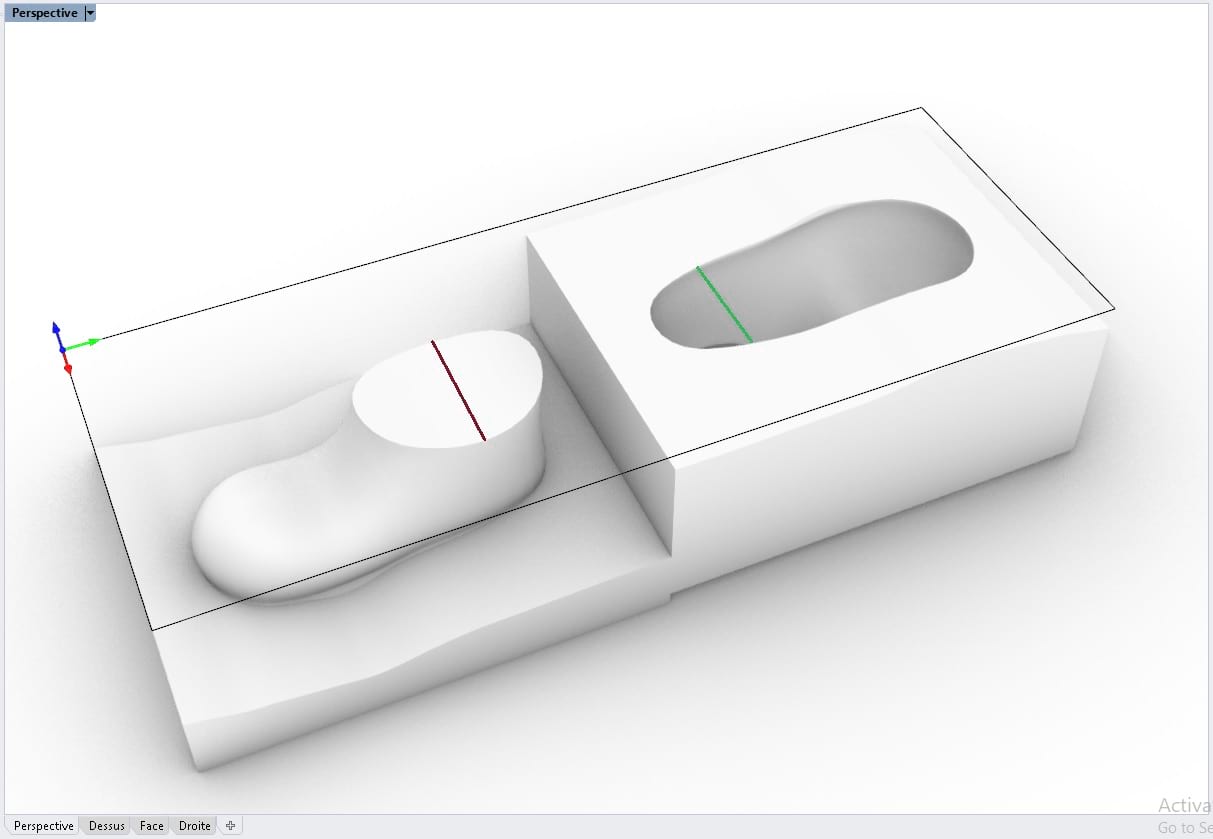
BUT IT IS NOT THE ONLY THING TO WORRY ABOUT! It is also really important to check that the section of the top of the object (red line) is not bigger than the section from the bottom of the object (green line), if not, you will end up with a 2 pieces mold that is not assembling, like me!!
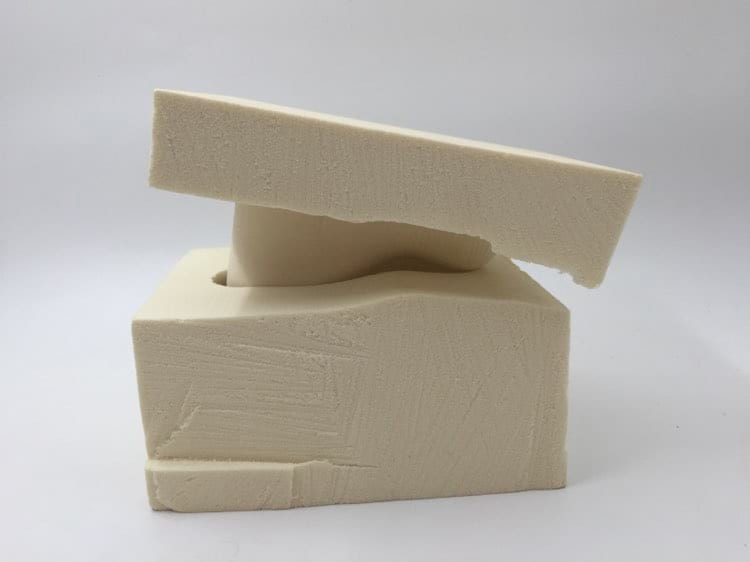
I tried sanding the mold to make the two pieces complementary but I did not succeed... Managing some holes, the two pieces of the mold can at least still be vaccumed in a vaccum machine and be used.
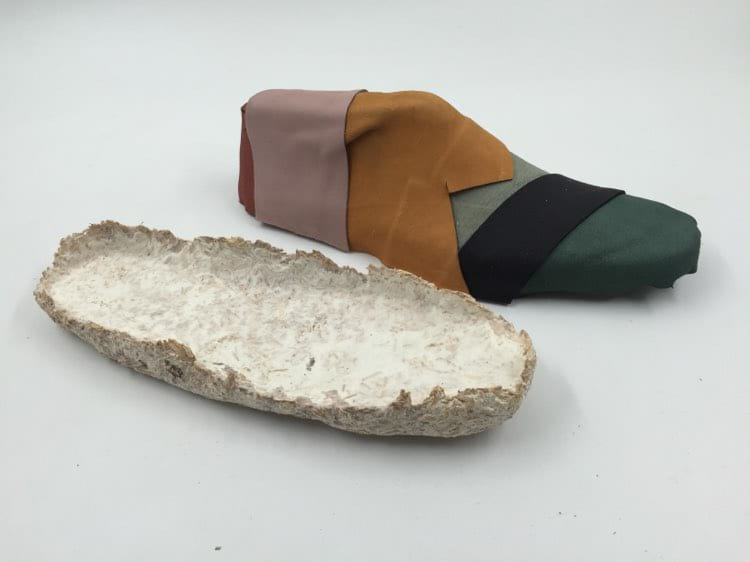
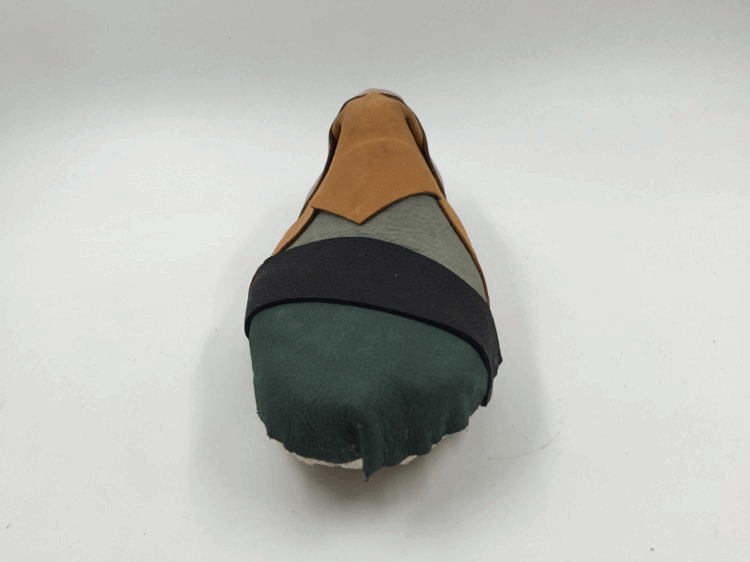
In order to test the boiled leather technique with the different leather scaps, I decided to use the foot model available in the textile lab and make a shoe sample. This same foot model was used in the biomaterials week for making a shoe sole out of mycelium!
After vaccuming the boiled leather, the leather scraps unfortunately did not stick together... Nevertheless, I decided to make a prototype of shoe sticking the leather parts together with white glue and combining it with the mycelium shoe sole I made during week 6: biomaterials. I also used white glue to combine the two parts together.
III-Composite materials
a-Epoxy resin
During this week, we learnt how to use epoxy resin in the process of making composite materials. I am not that interested in using epoxy resin since it is not sustainable enough for my own criteria (how pretentious am I hahaha) so I did not make it on my own, but no knowledge is wasted so I documented it anyways !
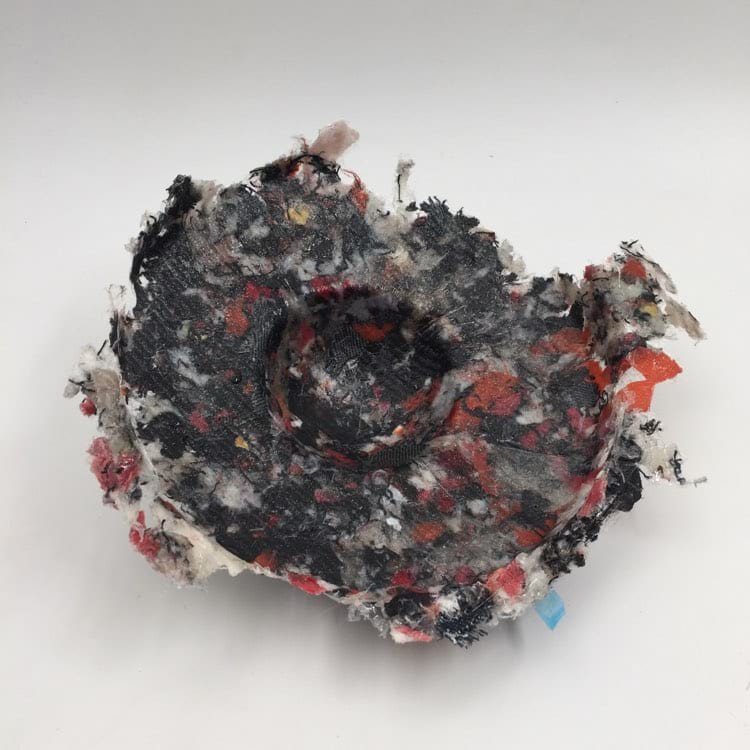
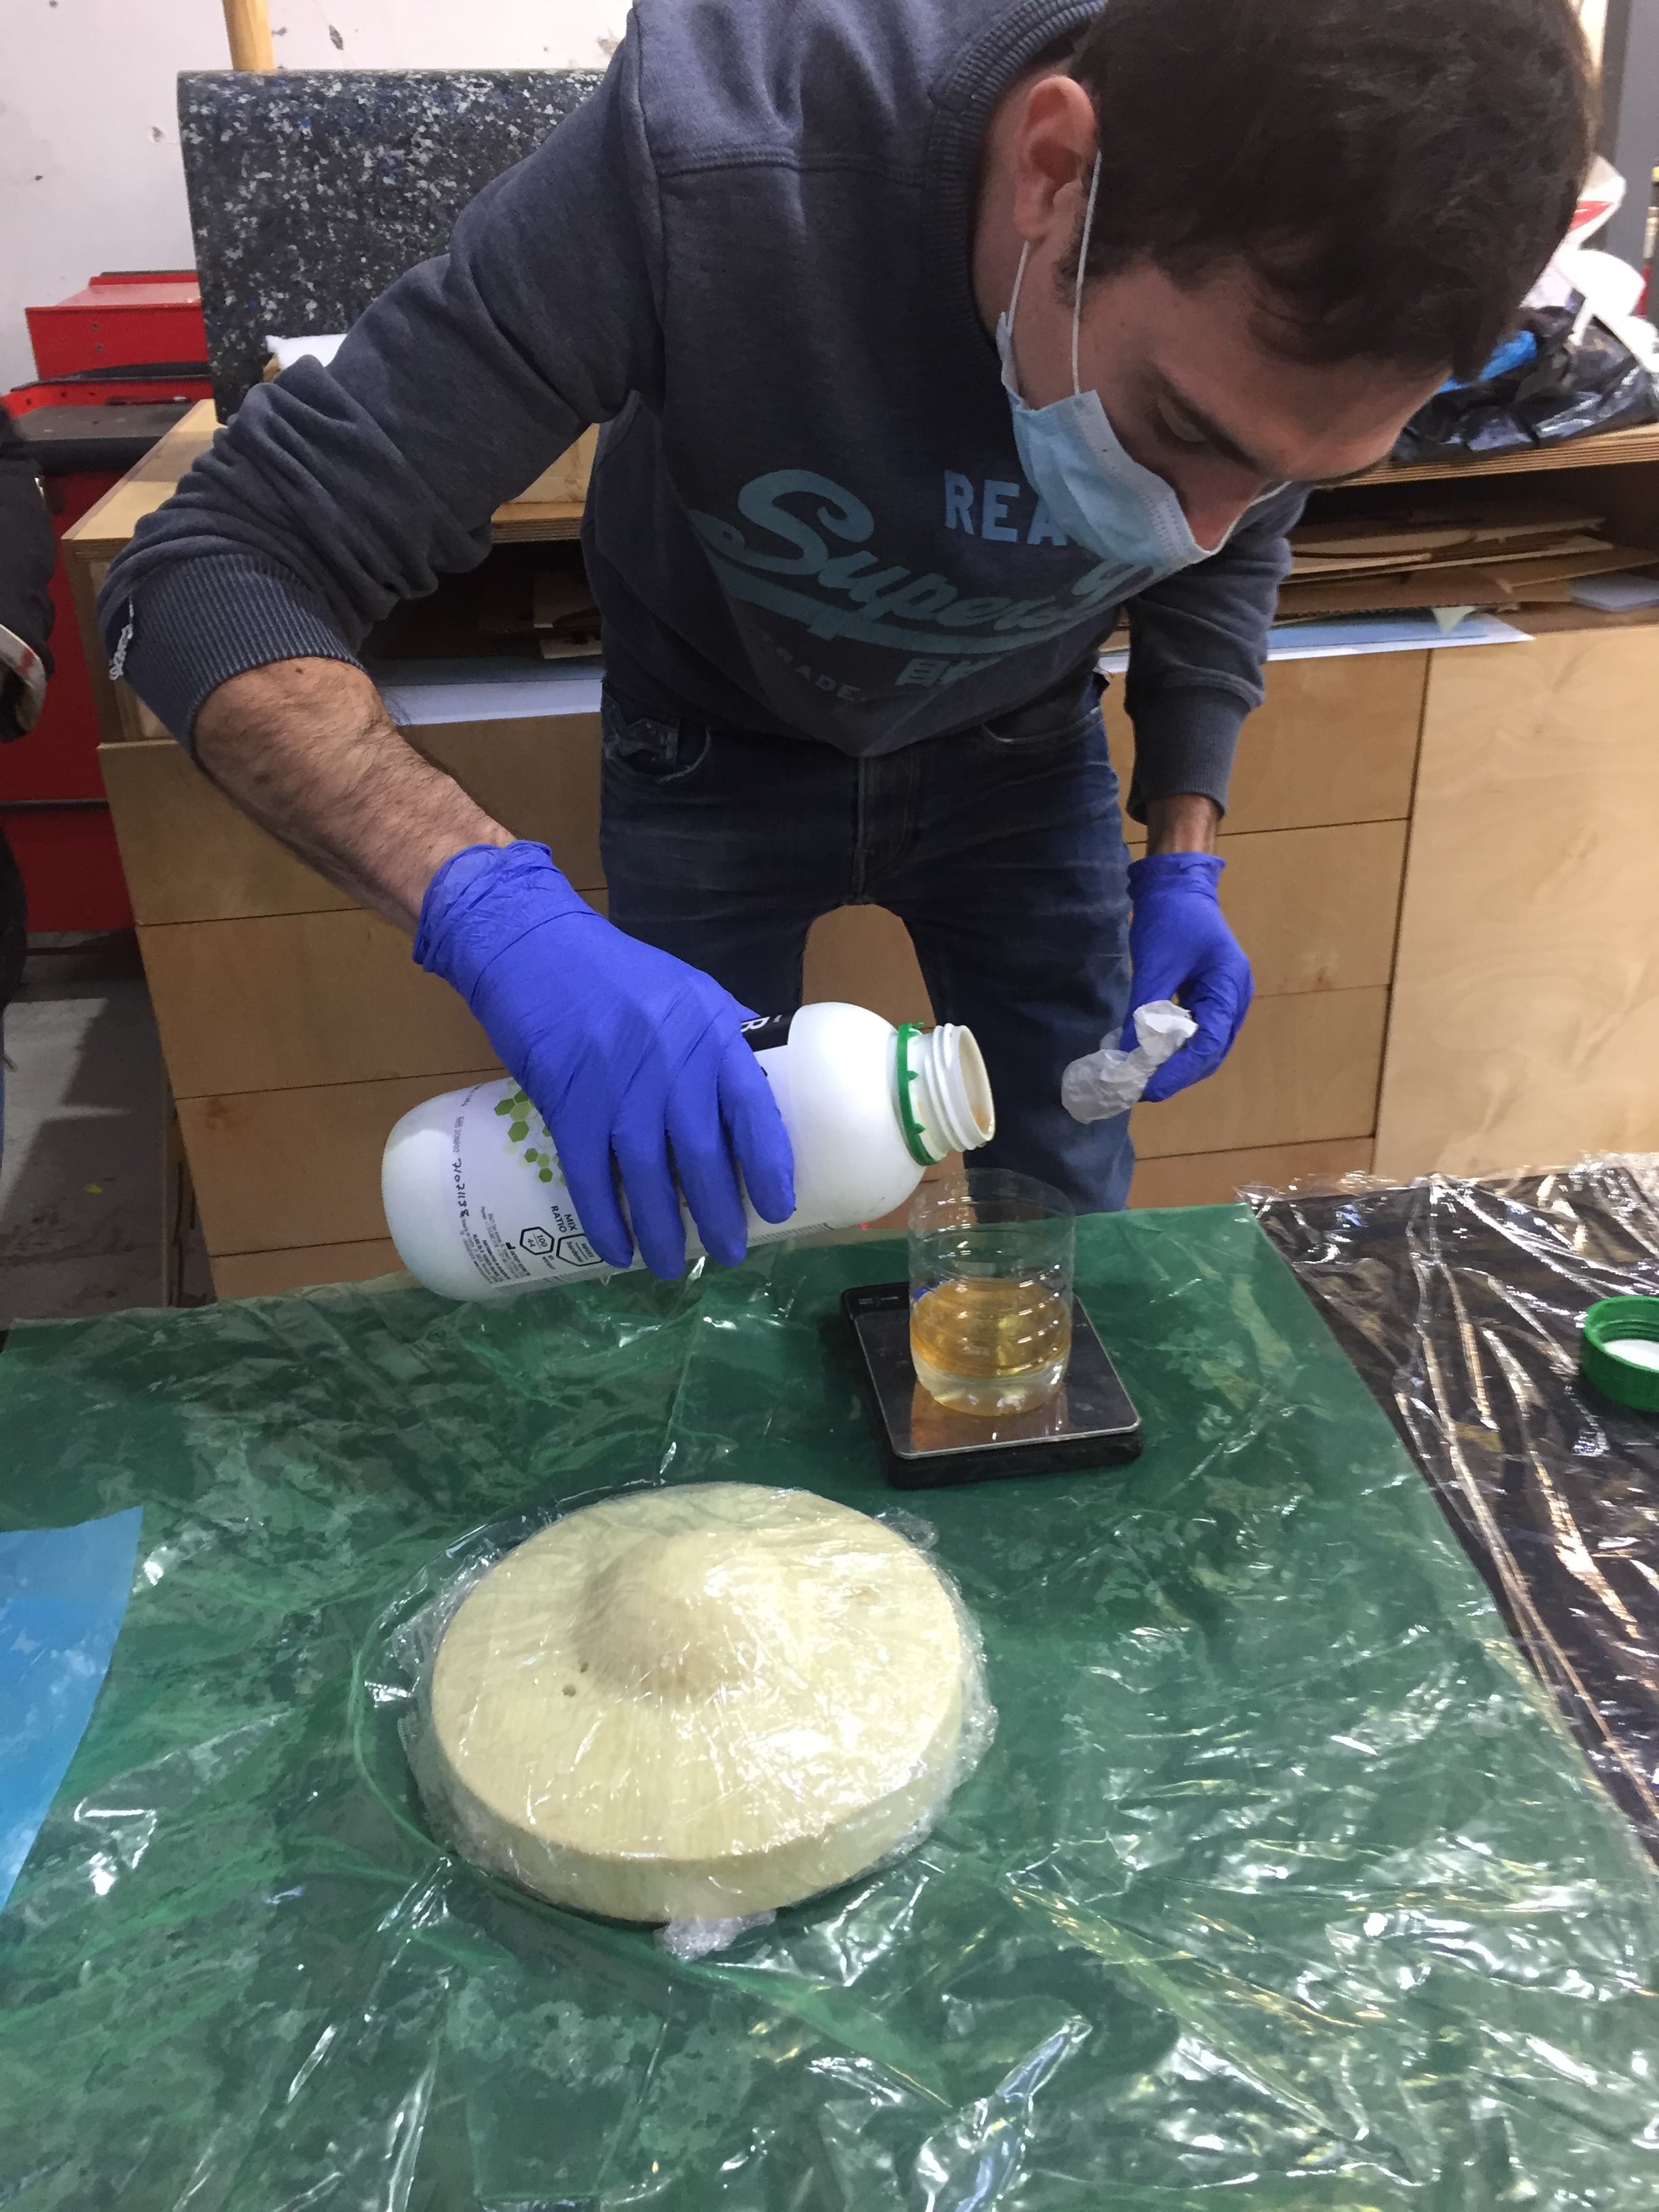 The epoxy resin we used at the Lab is called Super Sap ONE Eco-Resin. In order to polymerise and solidify, it needs to be mixed with its solidifier called ONF hardener. The ratio, indicated on the bottle of the resin, was of 44 ml of hardener for 100 ml of resin. The two of them should be well mixed together for some minuts, mixed with the fibers of our choice (we did it with shredded fabric) and then poured on the desired mold. It is important to use silicon molds or to cover the mold with cellophane. Once the liquid composit mix is poured on the mold, it should be covered with a layer of plastic with holes and an absorbing fabric on top. Then we had to wrap it all up in another plastic (more and more plastic) and put it in the vaccum machine for around 24hrs to give it its shape.
It is also important to know that epoxy resin can not be rememelted.
The epoxy resin we used at the Lab is called Super Sap ONE Eco-Resin. In order to polymerise and solidify, it needs to be mixed with its solidifier called ONF hardener. The ratio, indicated on the bottle of the resin, was of 44 ml of hardener for 100 ml of resin. The two of them should be well mixed together for some minuts, mixed with the fibers of our choice (we did it with shredded fabric) and then poured on the desired mold. It is important to use silicon molds or to cover the mold with cellophane. Once the liquid composit mix is poured on the mold, it should be covered with a layer of plastic with holes and an absorbing fabric on top. Then we had to wrap it all up in another plastic (more and more plastic) and put it in the vaccum machine for around 24hrs to give it its shape.
It is also important to know that epoxy resin can not be rememelted.
b-Mycellium, the comeback
Since the biomaterial week, I had in mind to make mycellium threads (see Week 6: Biofabricating materials). During that week, I learnt that mycellium can feed on anything when it is well trained, up to plastic and cigarette buts. The first idea that occured to me was to make mycellium feeding on textile waste in the shape of threads. Nowadays, there are a lot of problems of accumulation of textile waste in uncontrolled dumps (in deserts in Chile or beaches in Ghana for instance) because the clothes are too numerous and the fabric used is too modified to be biodegradable. Cotton counts for 35% of the clothes produced annually. Since Mycelium can grow on cigarette buts when it is well trained, why could it not digest modified cotton ? Mycellium basically feeds on cellulose which counts for 90% of the composition of cotton fibers, so I decided to give it a try. During this experiment, I thus used some denim textile waste I found in the lab. At first I wanted to do everything at the same time and try to produce the threads directly, but I am first going to try to make the biocomposite grow flat on different types of substrates and see how it reacts and after try to make it look like threads.
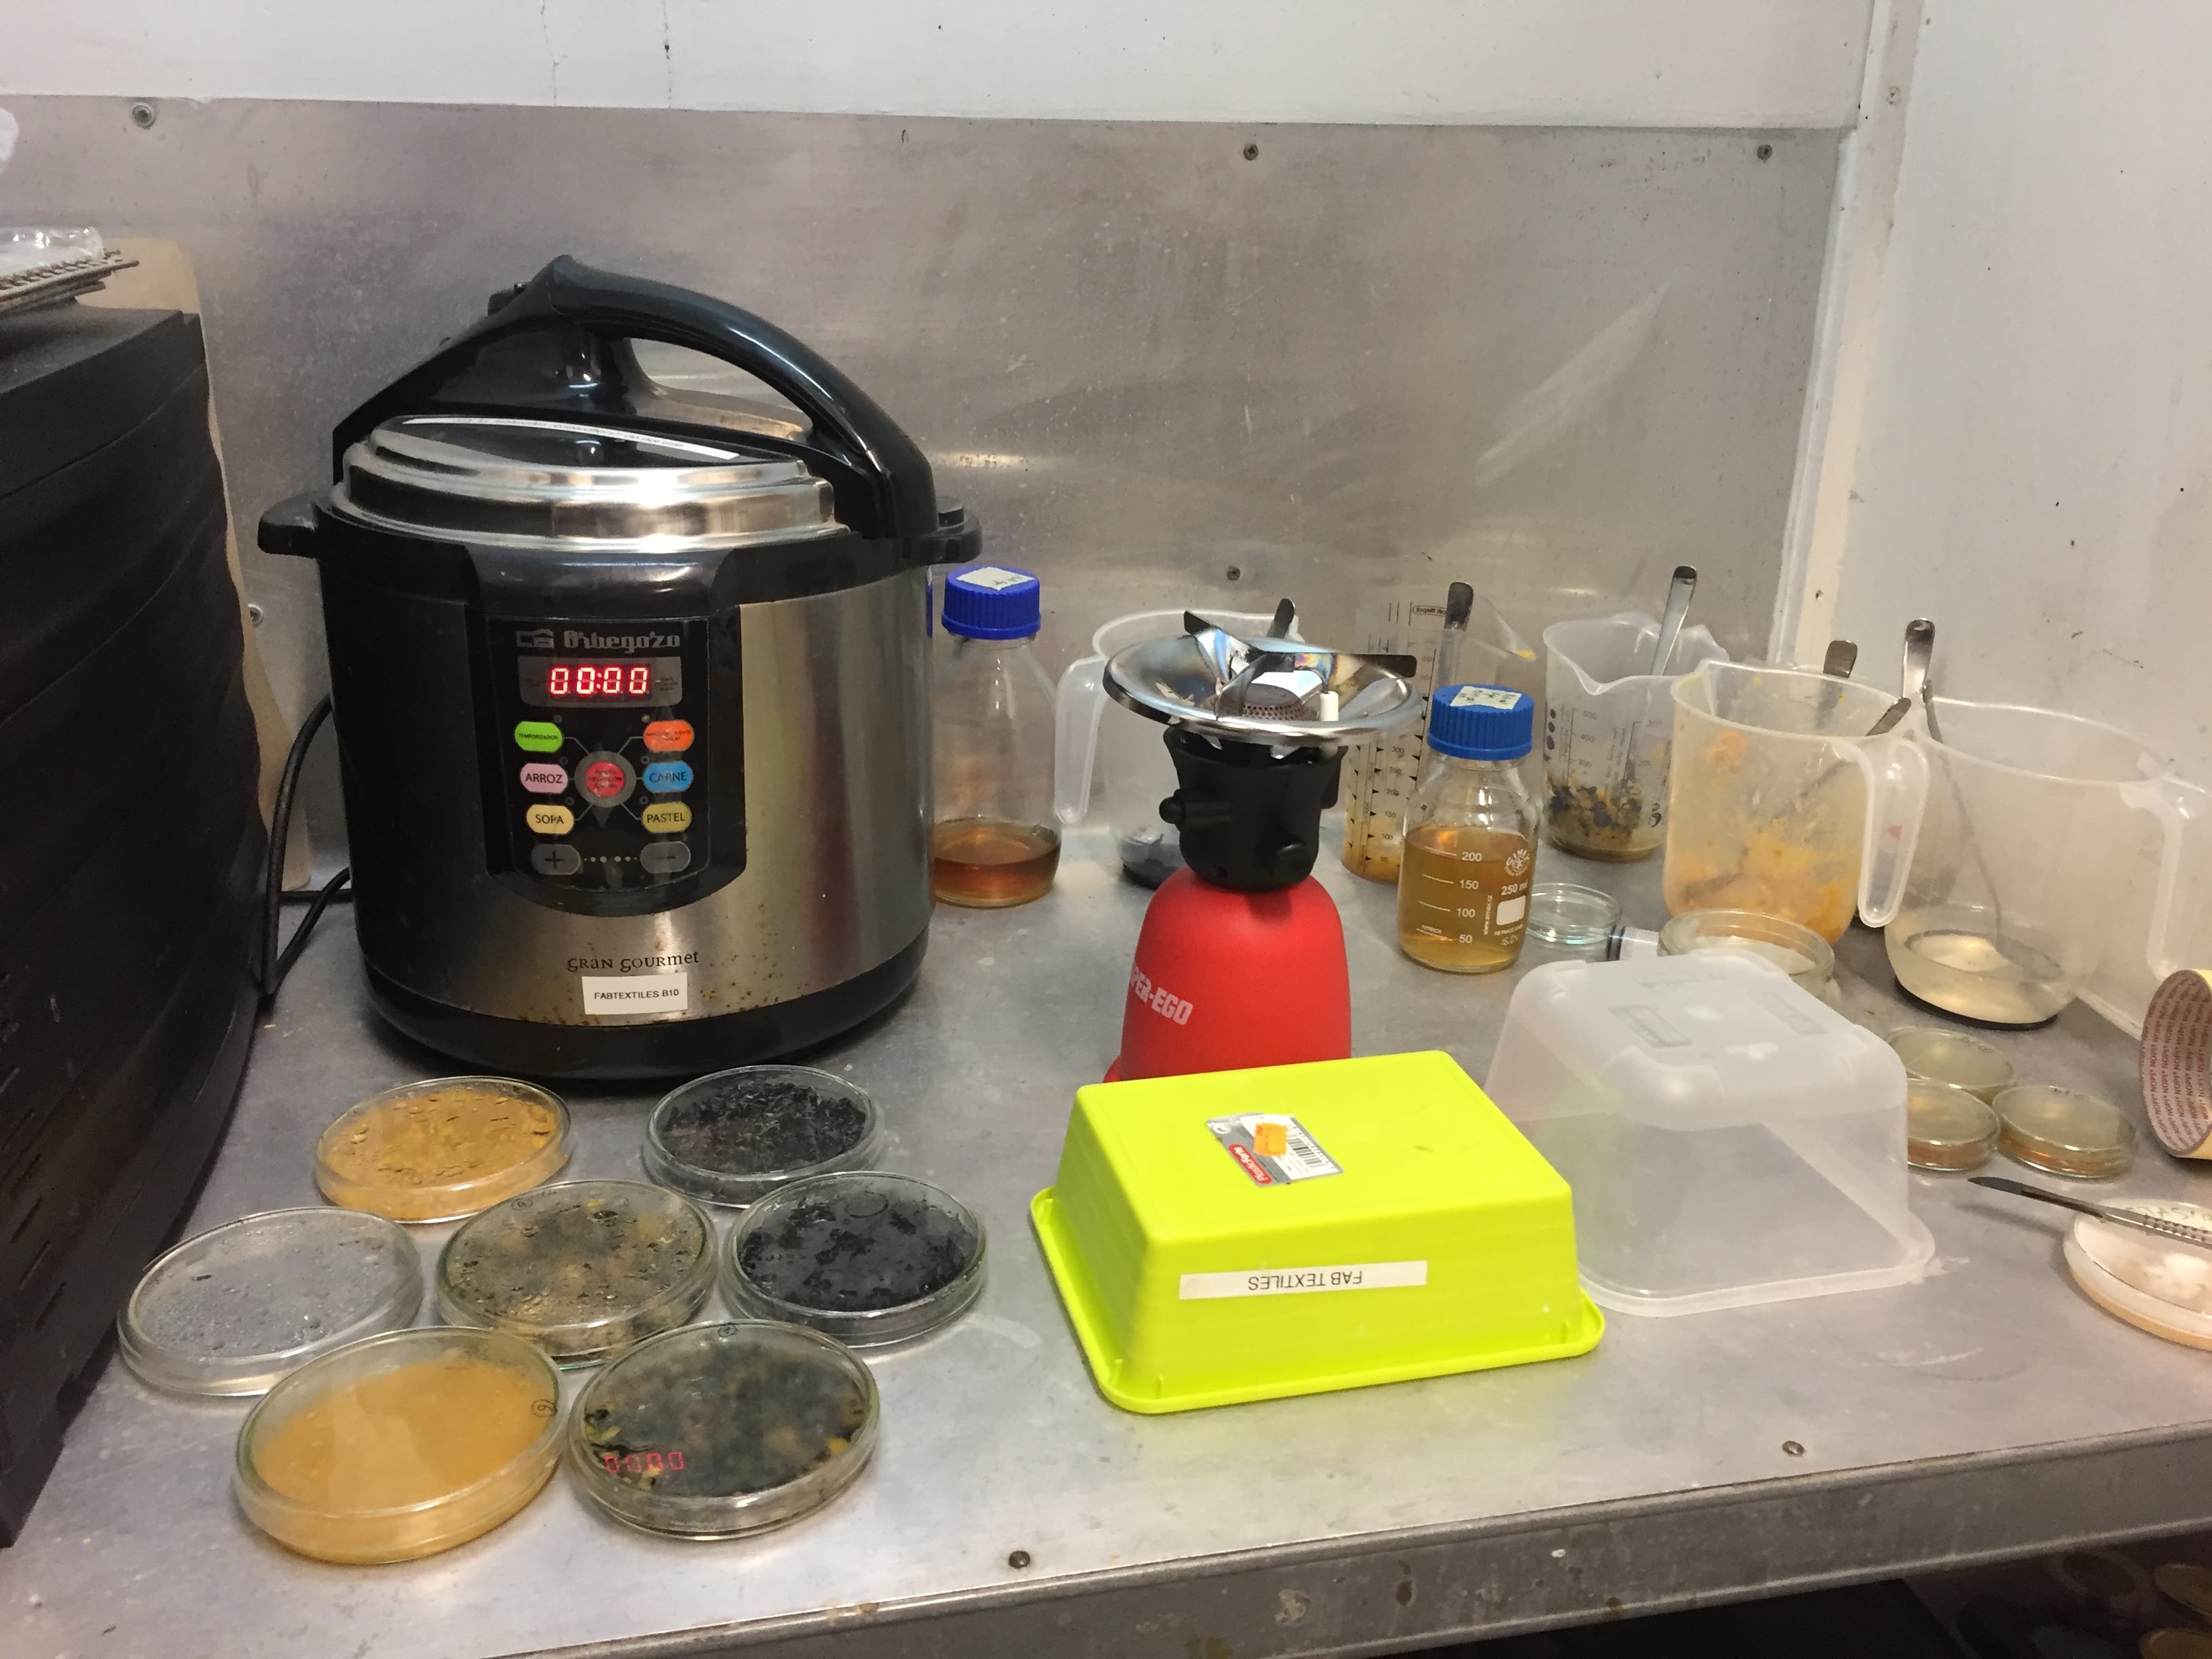
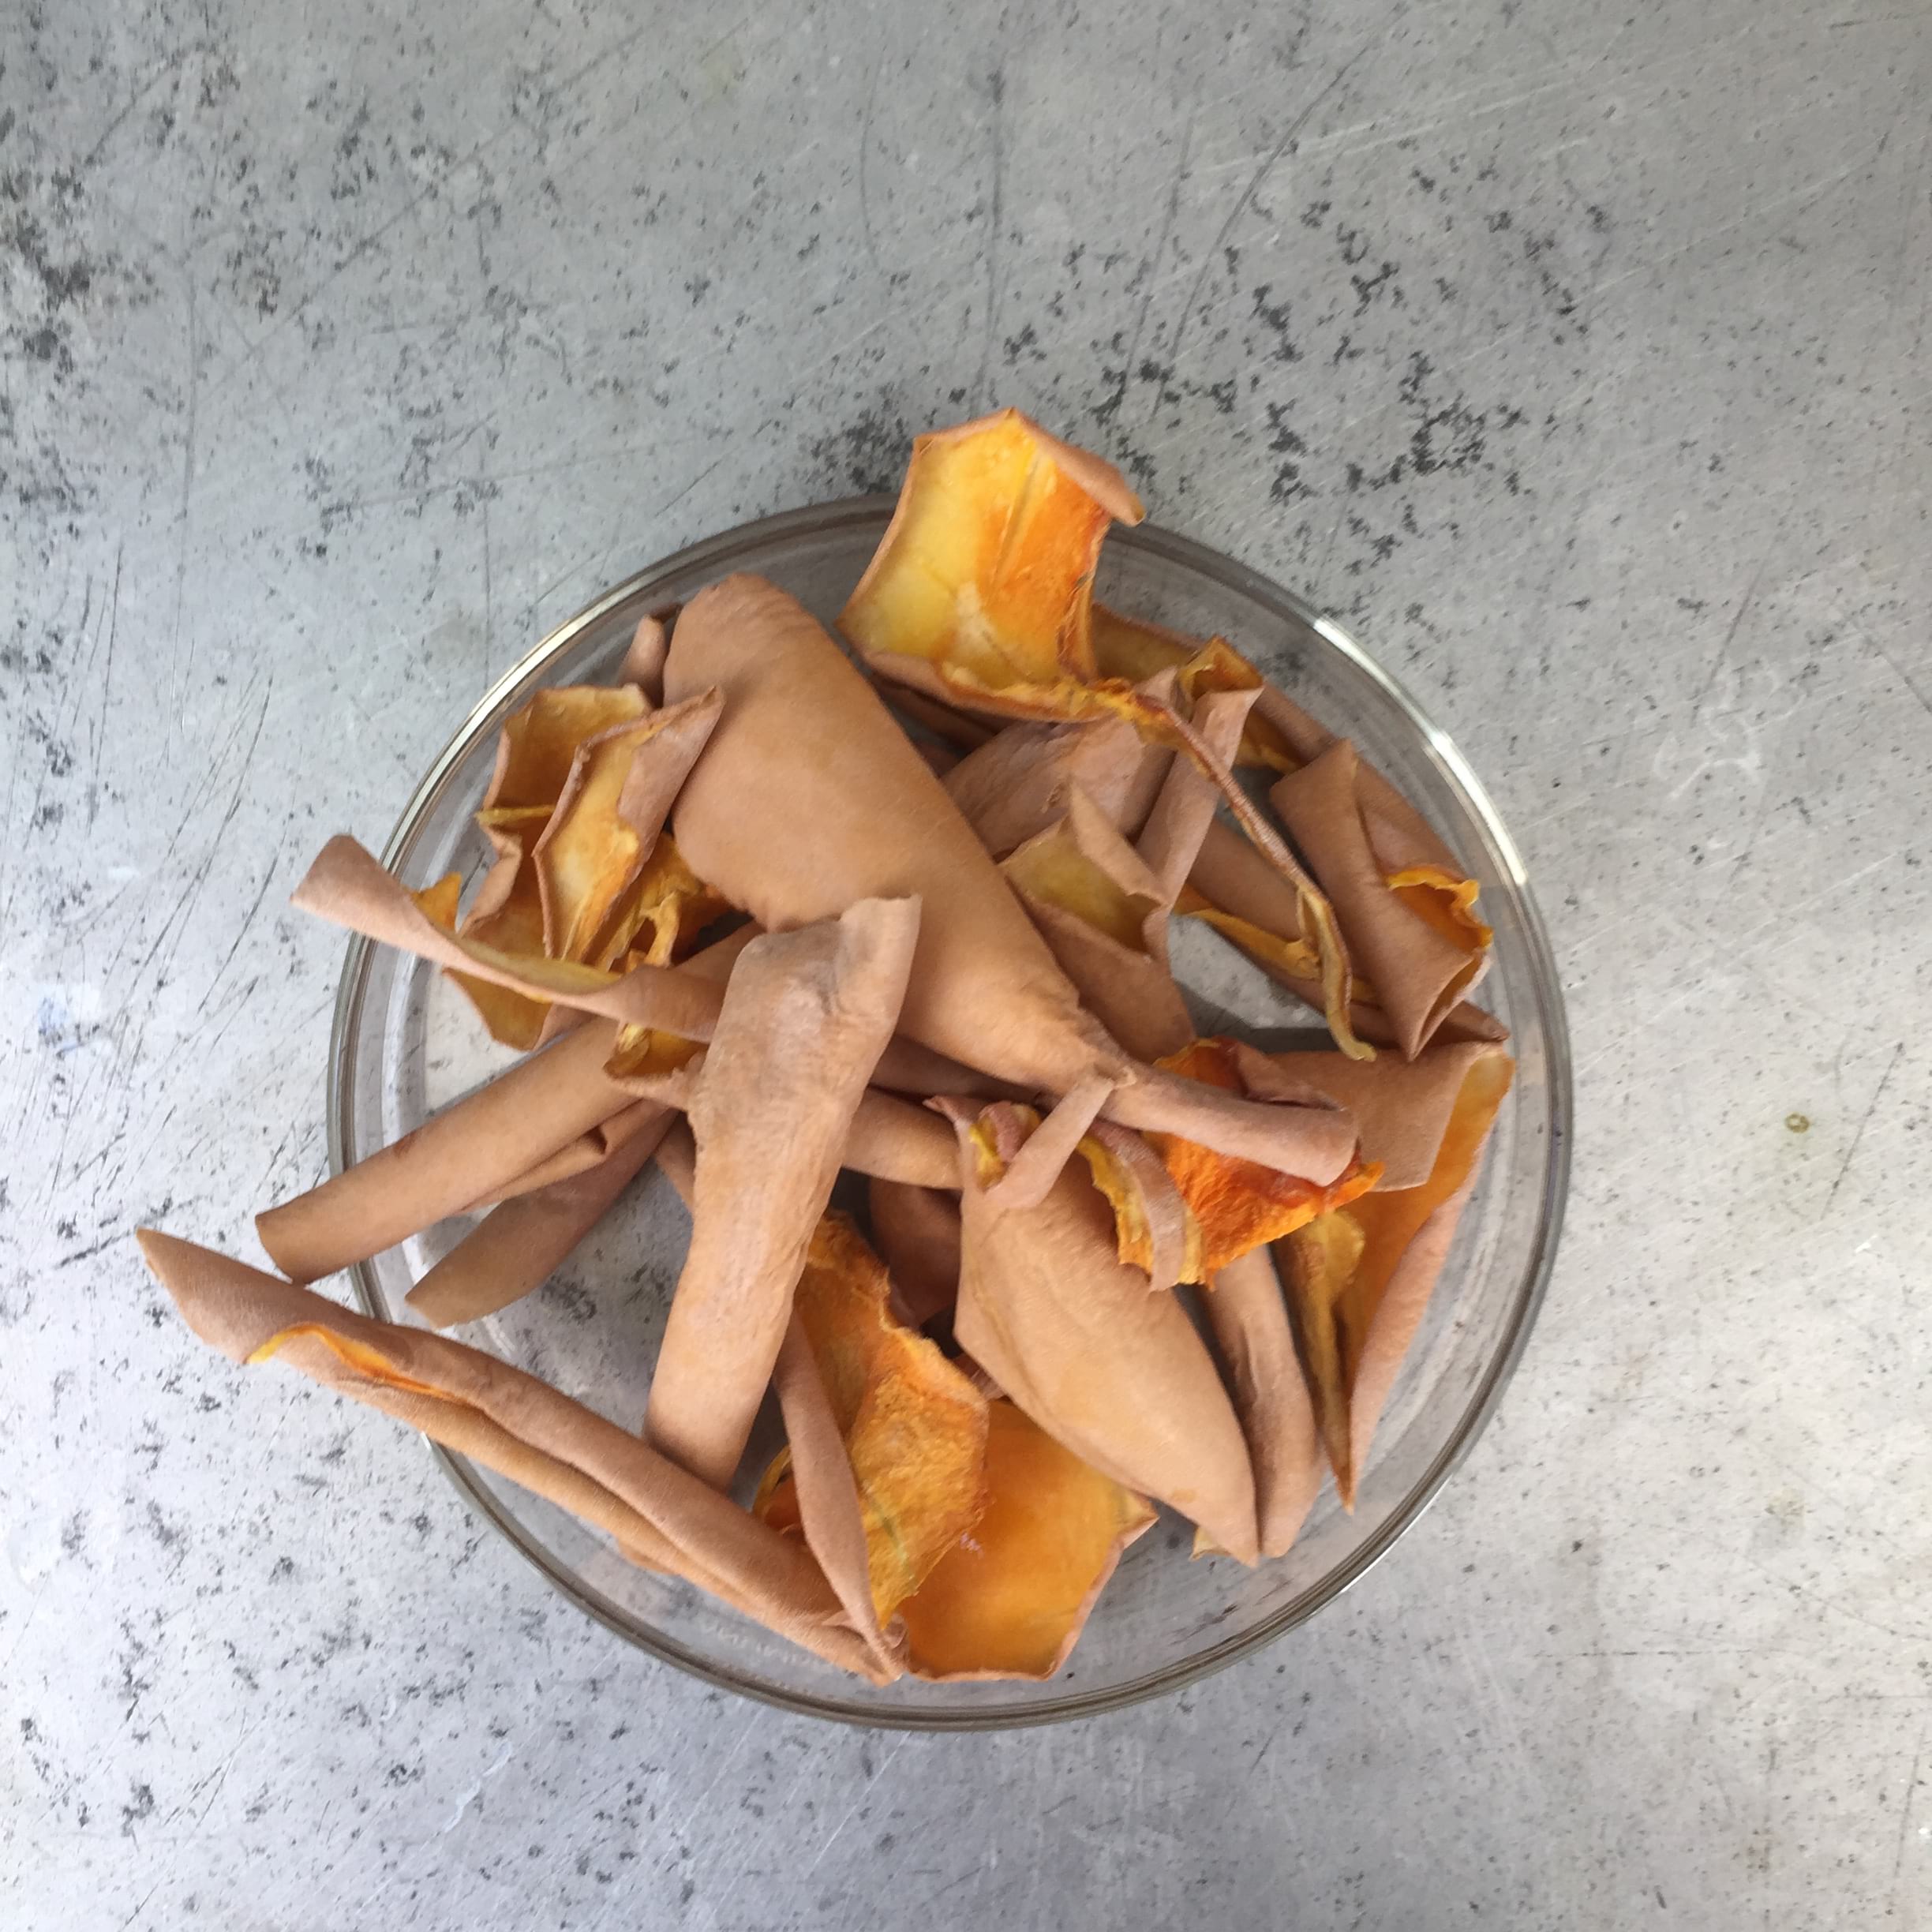
During my research and a visit in Materfad, I was adviced to use potato starch and spores to make the mycelium threads. My hippie a** had the idea to work with waste only, so I thought I could give it some food waste as a substrate to grow instead of agar. This is getting quite far from the optimal conditions and I am not too sure this will work but hey, I should still give it a try ! I used some butternut peels because honestly, it is the only food waste I had at home that could potentially contain a lot of starch and cellulose and dried it.
My experiment was very easy. The idea is to try and make the mycelium gow on various substrates, from the purest to more degraded materials. Since I also knew that mycelium feeds on cellulose, I decided to also try another ingredient we had in the Lab which is CMC, Carboxy Methyl Cellulose. The only mushroom stain we had in the lab was a pretty resistant Reishi so I decided to cope with it.
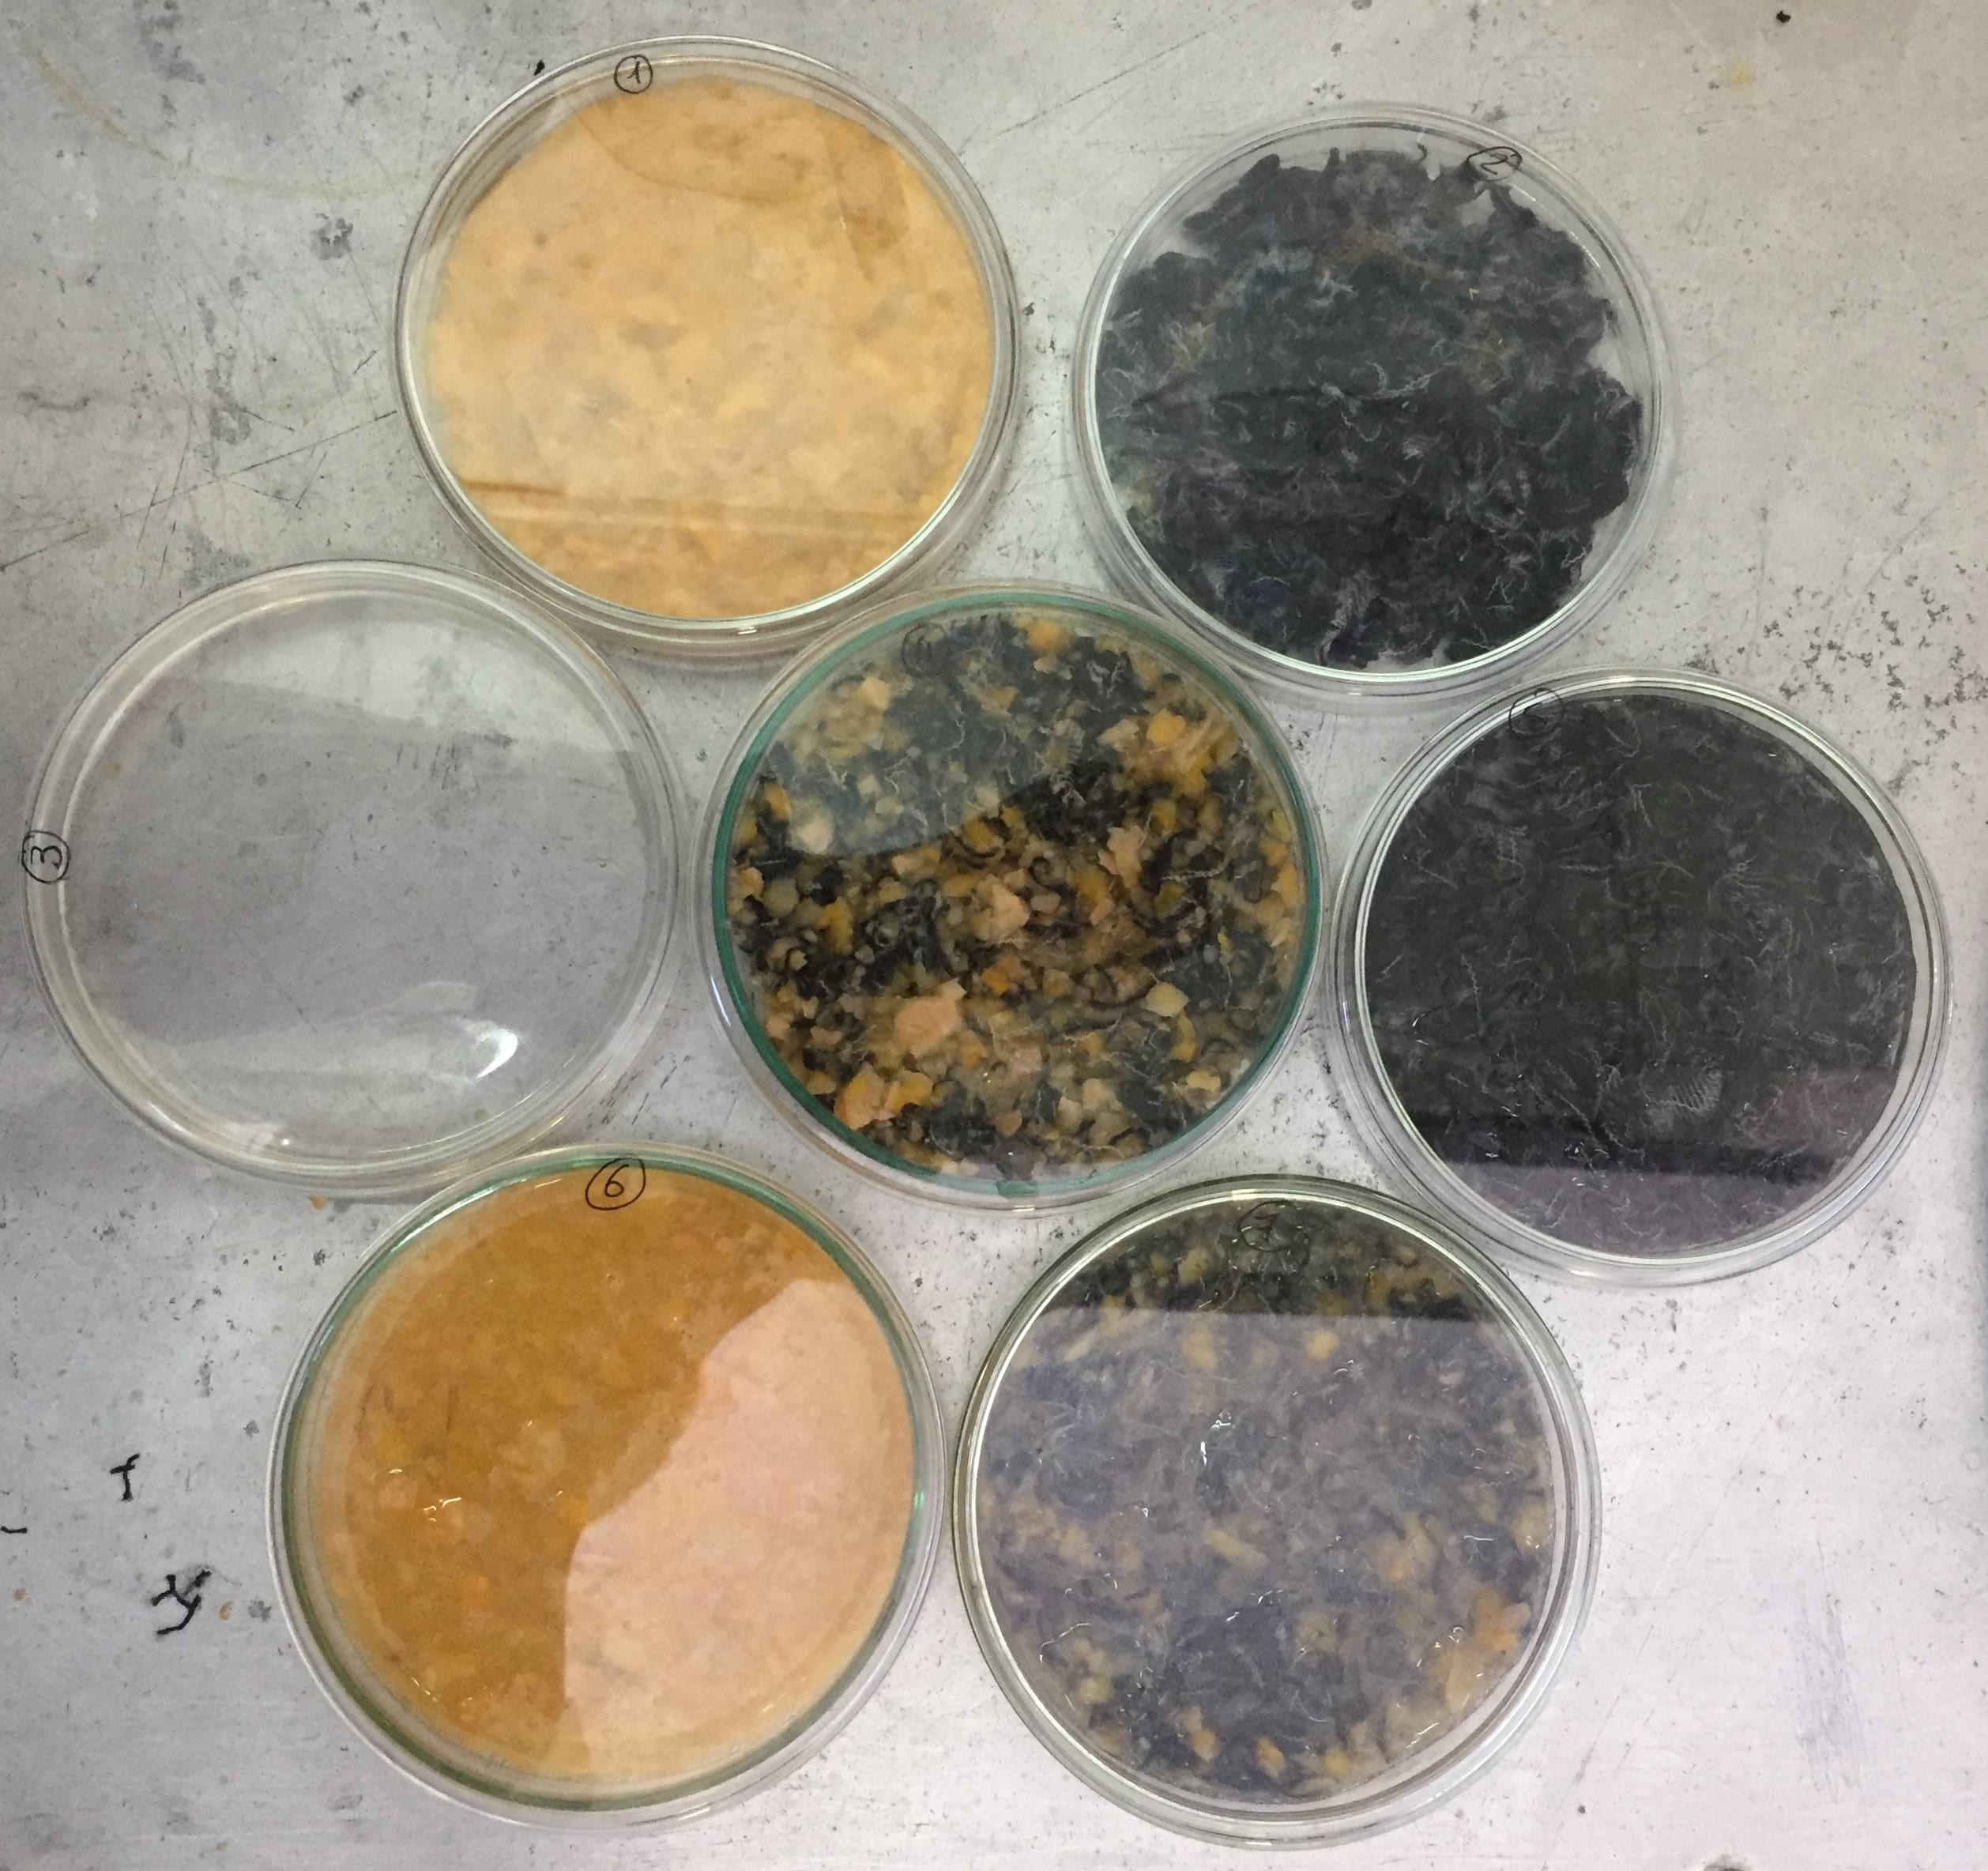
In the following table are listed the different conditions I tested during this experiment.
| Mix n° | 1: Butternut peels | 2: Denim textile waste | 3: Cellulose | 4: Textile and food waste | 5: Textile waste and cellulose | 6: Food waste and cellulose | 7: Cellulose and textile and food waste | Positive control | Negative control |
|---|---|---|---|---|---|---|---|---|---|
| COMPOSITION | 43g butternut peels + 300 mL water | 15g denim textile waste + 200 mL water | 2g CMC + 200 mL water | 50g mix n°1 + 20g mix n°2 | 30g mix n°2 + 50mL mix n°3 | 40g mix n°1 + 50mL mix n°3 | 50g mix n°1 + 30g mix n°2 + 50mL mix n°3 | Malt agar | Malt agar |
| pH | 6 | 4.5 | 6 | 6.5 | 6 | 5.5 | 6 | - | - |
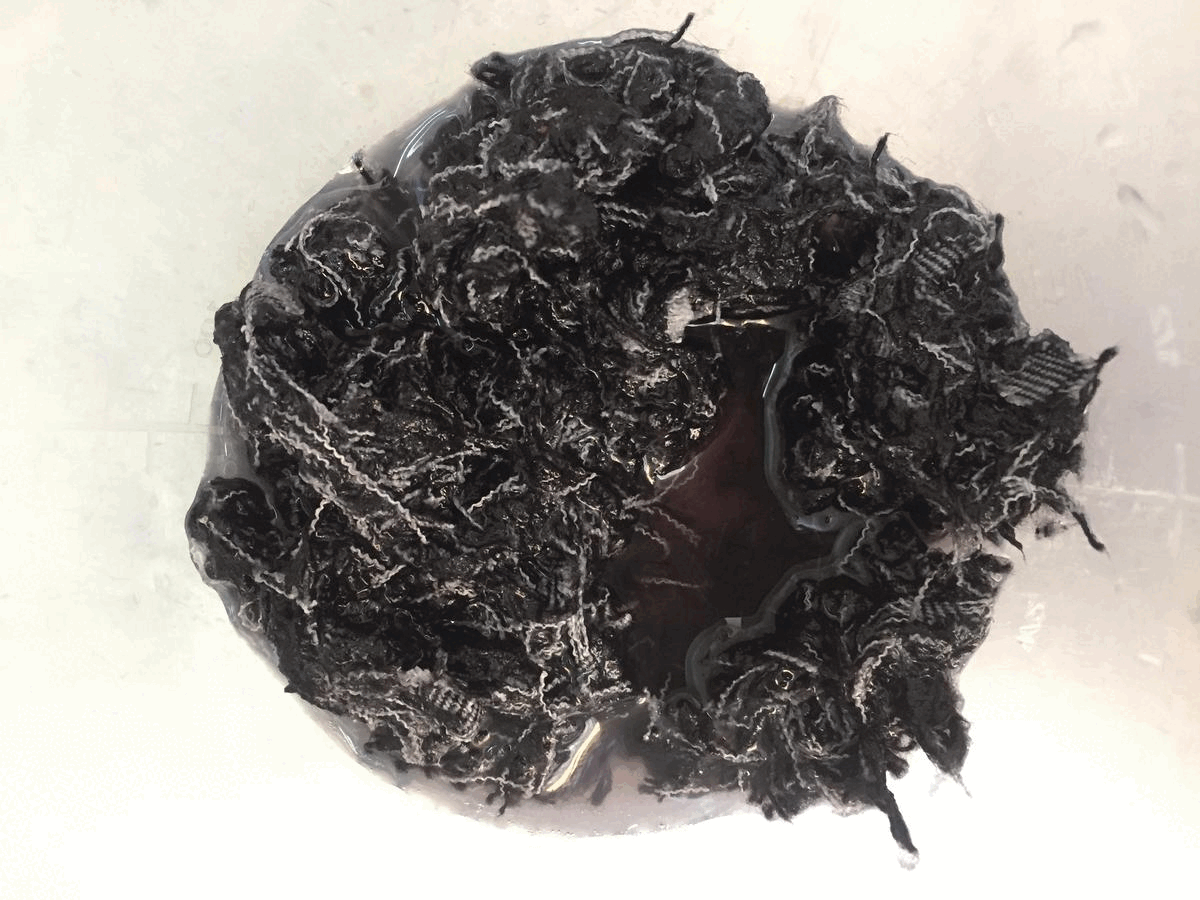
During these experiments, only deionized water was used. I first and foremost started by cleaning all the glassware I had and the table I was working on with 96° ethanol. Then, in different beakers, I began preparing the first 2 mixes respectively using the textile and the food waste. I poured them with the water and shredded them using a hand blender. As soon as I did it, I realised I should have found a way to shred these material another way when they were dry, using for instance the shredder downstairs or this textile shredder I designed and lasercut afterwards.
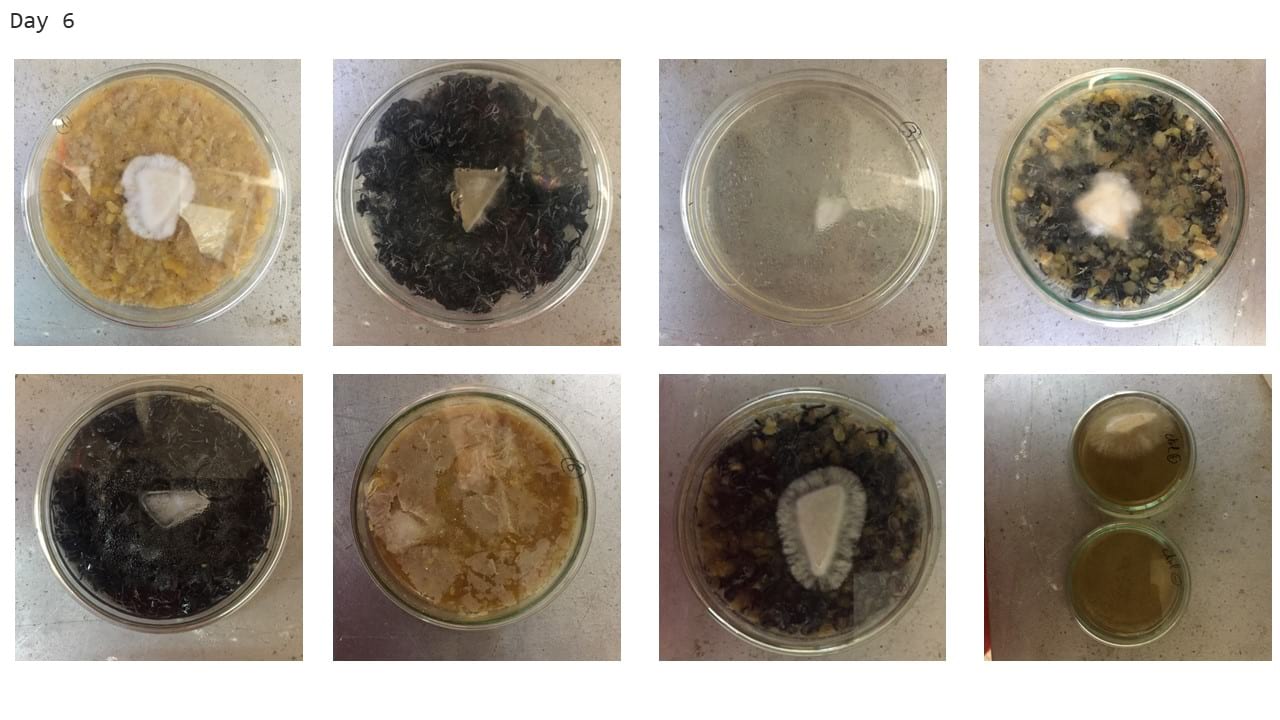
After I poured the water, mix n°1 weighted 250g and mix n°2 weighted 185gr. Then, I prepared all the other mixes. I casted 30g of each mix in a petri dish and sterilized them in a pressure cooker for 15 mins. Once sterilized and cooled to room temperature, I inoculated each petri dish with a triangle of the Reishi mycelium strain from Anastasia in a sterile environment. The positive control consisted of that same mycelium put to grow on Malt agar and the negative control is just malt agar without bacteria. The positive control helps me know if a lack of growth of the mycelium is due to the substrate I used or to the strain itself and the negative control helps me know if I manipulated well and did not get any contaminations. Then, I put the petri dishes in the dark at 25°C and added some good spells for the experiment to work out !
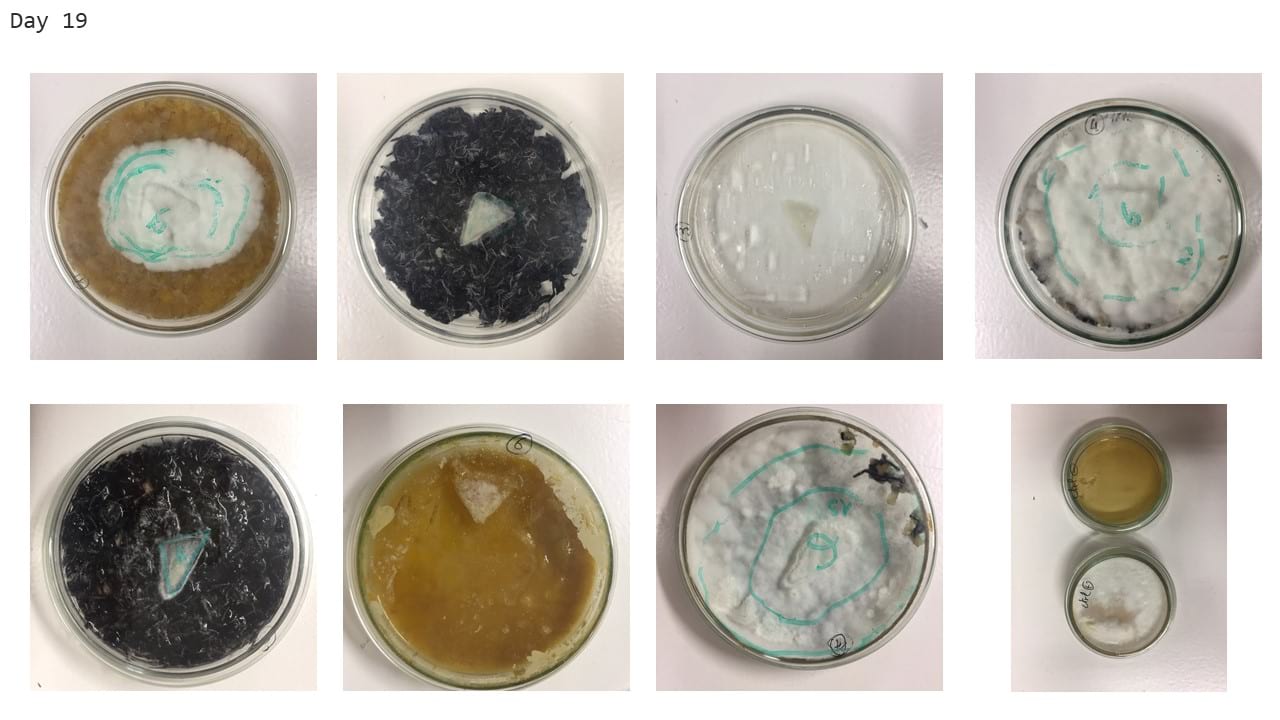
Here are pictures of the evolution of the growth of each petri dish on day 6, day 13 and day19.From these experiments, we can see that mycelium is growing best when put on textile and food waste, where it colonized the entiere petri dish within 19 days. The addition of cellulose to that mix was pretty unhelpful, as the mycelium grew the same way with or without. Food waste only allowed it to grow well but not optimally, maybe meaning that the addition of textile cellulose is really enhancing its growth! Mycelium does not grow on cellulose only nor on textile only, maybe meaning it needs other nutrients than cellulose to develop. We can see that the mycelium did not entierly die when put on the textile waste only, giving us hope to make it grow on textile solely one day.

In the end, here is a video of me trying to make mycelium threads. The outcome was very brittle but I think it can lead to threads if I take thicker mycelium layers, let it dry for an optimal time and temperature so that it is still flexible and use the right coating to keep the flexibility for a long time.
Next steps :
- Mix the foodwaste and shred the fabric when still dry so that they can be extruded in the shape of a thread using a srynge easily.
- Try other mushroom strains.
- Supplement the medium with malt since it worked well for Jessica Diaz's experiments.
- Try to grow the mycelium on textile fibers mixed with grinded foodwaste that can afterwards be washed away.
- Gradually reduce the foodwaste part in the petri dish to train mycelium to grow on textile only.
- Get some documentation about Carole Collet and Catherine Euale who inoculate mycellium and textile together.