04 | BIOCHROMES
WEEK 04 | BIOCHROMES This week was about exploring dyeing alternatives to synthetic dyes used in industrial processes. We discovered natural dyes, inks and pigments but also how to dye with bacteria. There was an emphasis on the circularity of the process and how leftovers could be reused for pigments or biomaterials. This was an intense week but we had fun together :)
INSPIRATION
Old work with Natural Dyes
During my studies, I learnt how to dye and screen-print only with natural dyes. Here are the different dyes I tried :
*Reseda = weld I also experimented with indigo. And then I did a mini collection of textile with natural dyes... and chose to work on green (I didn't know this is the hardest colour to get haha).
Some Cool Natural Dyers
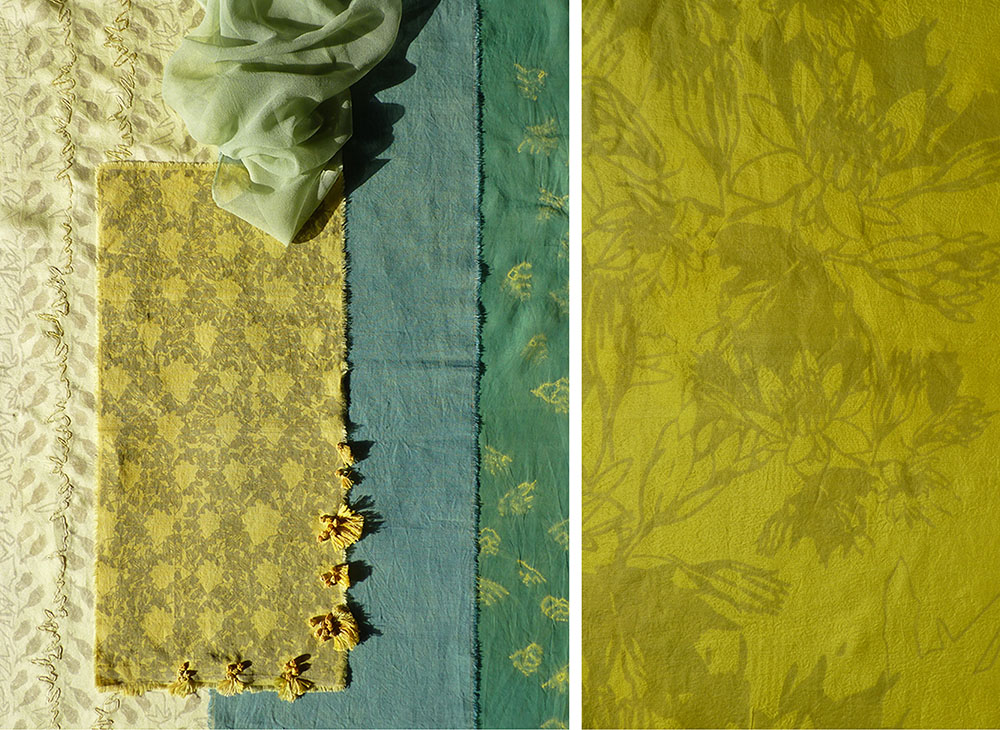
For this assignement I wanted to try new techniques. We didn't have the medium for the bacteria so we haven't made it yet. Considering that we were focusing on natural dyeing I though about the brand Woola la ! by Sandrina Rocha based in Lyon. She makes beautiful scarves using only natural dyes. For some textile pieces, she uses the technique of ice dyeing and eco-printing, two techniques I wanted to try for a while.
 Left picture, textile by Sandrina Rocha | Right picture, textile by Micaela Larraín
THE DYEING PROCESS(es)
Step 1 : Preparing the fibers | Mordanting
Recipe 1 (M1)
- (w) weight of fibers
- 20% to 30% of (w) in alum
- half of the alum weight in sodium carbonate
- vinegar : 1L for 100g of alum
- water (vinegar included) : 3L for 100g of fibers
Recipe 2 (M2)
- 20% of (w) in alum
- water
Recipe 3 (M3)
- 20% of (w) of alum
- half of the alum weight in lime (be careful not to use quicklime !)
- vinegar : 0,5L for 100g alum
- water
Step 2 : Preparing the Natural Dyes
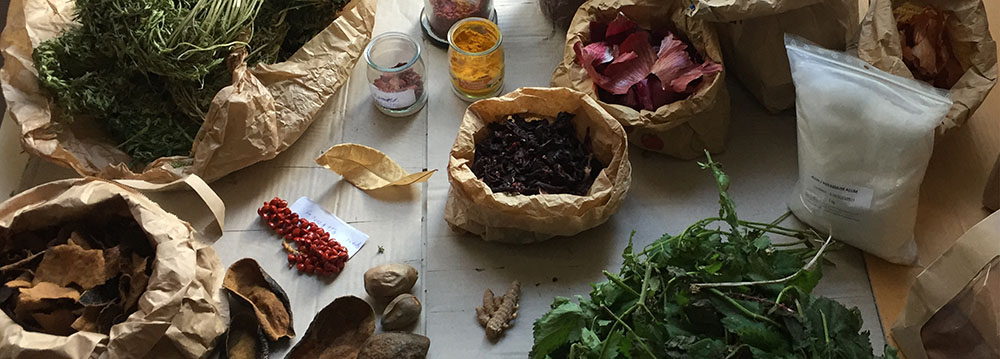
We weighed the different dyeing stuff to prepare and make the dyeing baths.
Quantities od dyeing stuff according to fiber weight
- Dry dying stuff : 100% of fiber weight
- Wet dying stuff : More of fiber weight
- Dying extract : 10% of fiber weight
Except for the madder extract, the different dyeing stuff were immersed in hot water to make the decoction. Baths remained one all night in hot water to activate the dye colour.
Step 3 : Dyeing the fibers
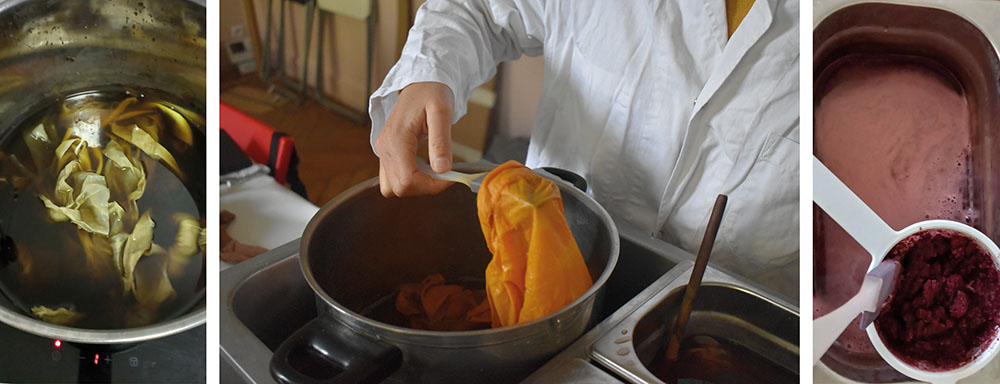
After the fibers are mordanted and rinsed they can be put in the dyeing bath (no drying required).
Dyeing Process
- Wait for the bath to be between 40°C to 50°C to put the fibers in
- Put the fibers in and make sure they are all immersed into water (add water if not)
- Heat up to 60°-70°C slowly
- When it is 60°-70°C let the fibers in for 45min. Don't forget to mix once in a while to be sure that the dye go everywhere on the fabrics. Be careful not to heat the bath up to 90°-100°C otherwise it will damage the fibers.
- After at least 45min (but it can be less or more depending on the intensity of the colour that you want), rinse the textiles. Be careful with thermal shocks ! Especially for wool and silk.
- Time for drying / shibori and a second dyeing bath / iron modifying
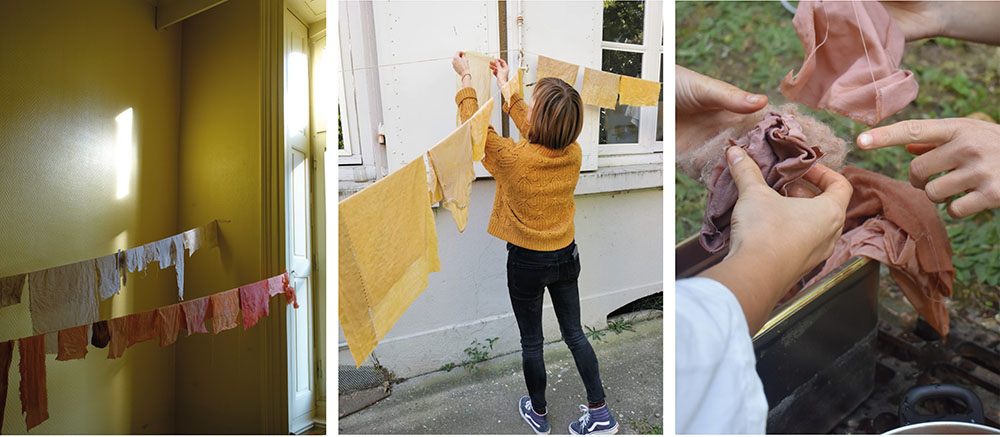
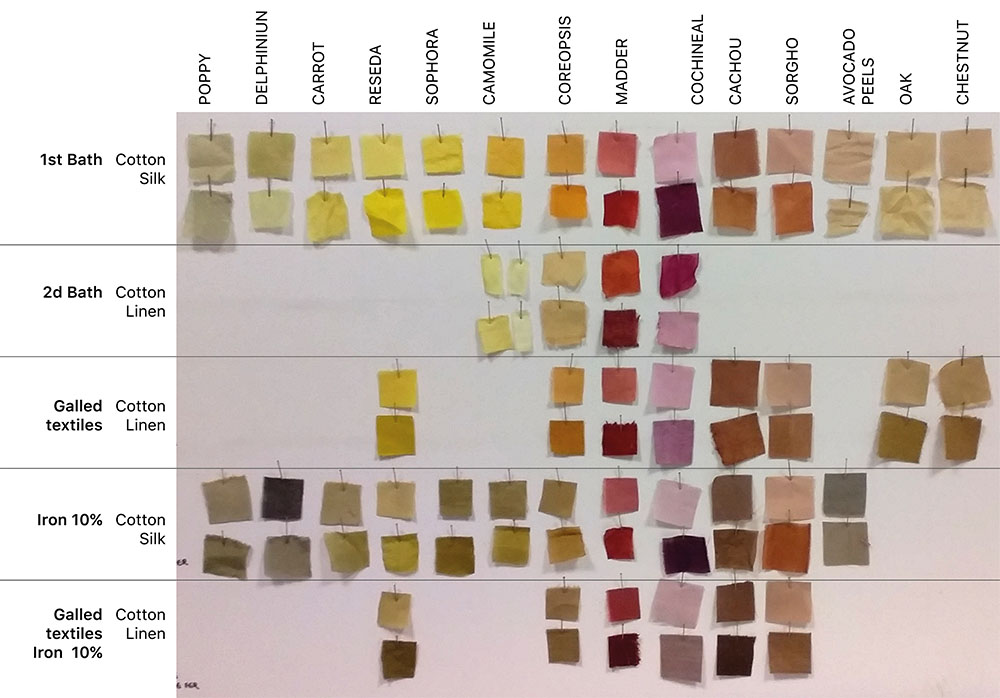
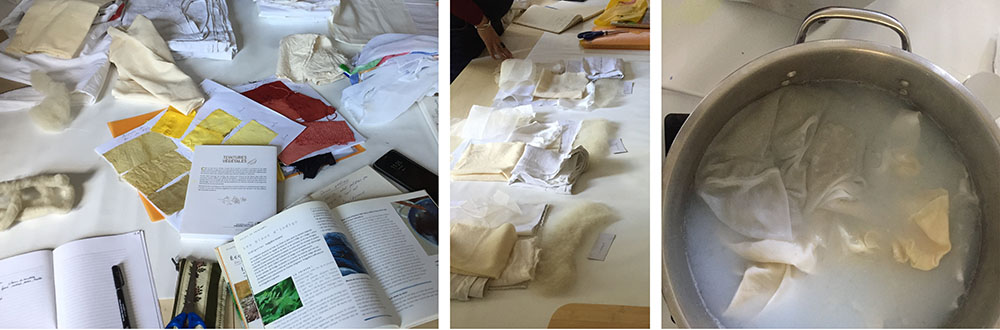
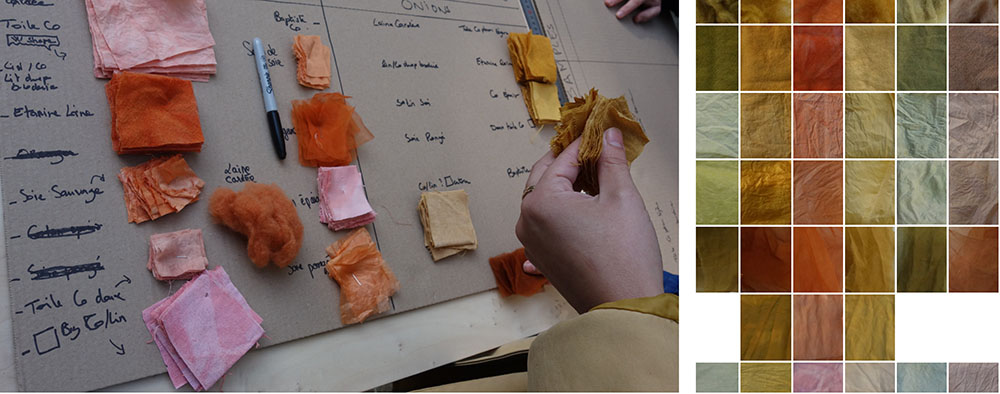
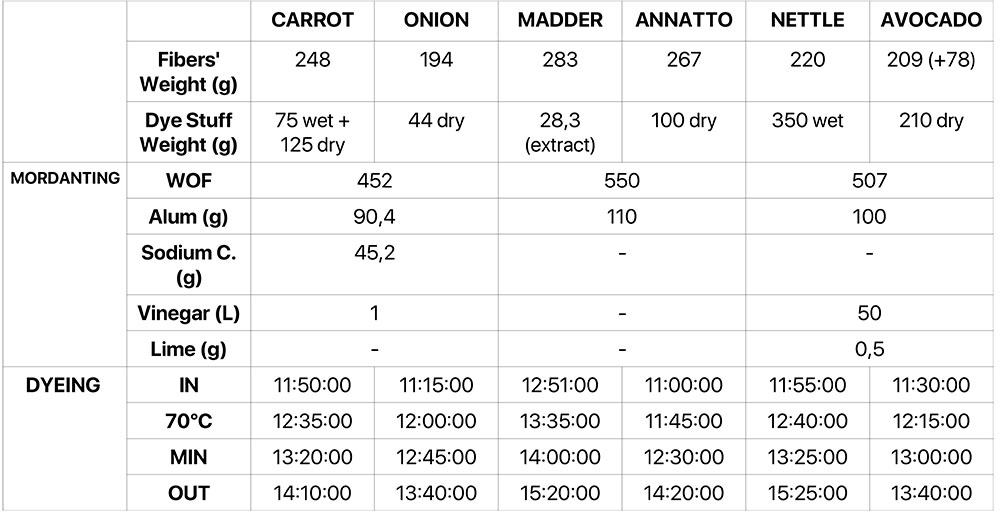
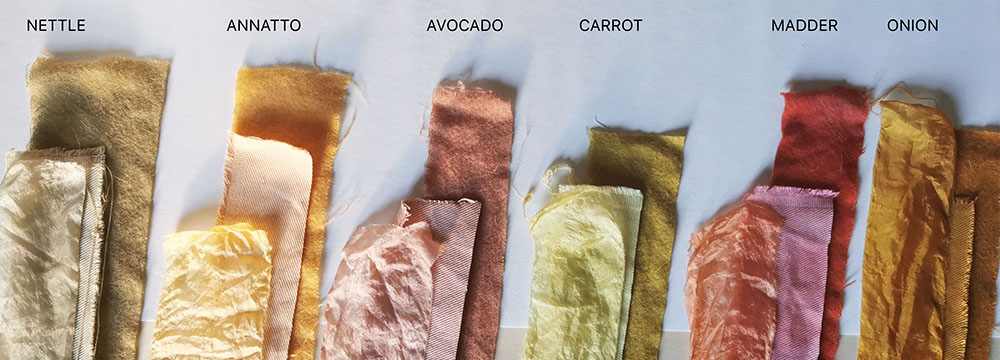
After our fabrics were dry we had to organise them, cut them into small samples for everyone so that each one of us can make a colour scale of the natural dyes. Here, you can download the sample table.
Note : When filtering the bath we kept the ingredients for future experimentations with inks/pigments - we placed the different ingredients on cardboard and let them dry, we grinded some, as carot’s leaf and nettle, directly before drying.
Note : Stir the textiles regularly in the bath.
Note : Textiles should not be too tight in the bath, and be easily submerged so that the dye can act evenly on the fibers. In order to have a more uniform shade and result.
Sum-up of the table we did to organise the dyeing process :
Step 4 (optional) : Using Iron as a modifier
A way to modify the obtained colours is to modify them with Iron. This will give you beautiful greys and khakis depending on wich plant you used first.
Recipe for a solution with 100% Iron
- 200g Iron (sulfate)
- 2L Vinegar
- 100g Sodium carbonate
Be careful it blows up if you add the Sodium carbonate entirely ! You need to do it step by step. To use it for modifying the fibers' colours, you need to dilute this solution and make it with a maximum concentration of 10% Iron otherwise it will damage the fibers.
For example, if you made 1L of solution 100% Iron and you want to have 10%, you need to dilute 100mL of Iron 100% in 900mL of water (at room temperature).
Here, you can download the iron modified samples table.
SCREEN-PRINTING
We tried to make screen printing ink with guar gum. We mixed 200mL of madder dye bath with 20g of guar gum and we heated it up. This experiment was not successful : the mixture was too thick and viscous, moreover guar gum didn’t melt properly.
Another recipe I used 2 years ago (but we didn't have the time to try it) : Screen-printing paste = extract + water + gum + oxalic acide (anti-precipitant) + mordanting agent
Preparing the gum
- Tragacanth gum : 30g for 1L hot water
- OR Guar gum: 20g for 1L hot water
Preparing the paste (for 100mL)
- 1g (2%) to 5g(5%) of extract
- 50mL hot water
- 5g alum
- 0,5g oxalic acide
- 50 mL gum
For textiles made of cellulose, you need to add a third of the volume of beaten egg whites to the paste. Then, after screen printing with this paste, you have to fix the screen printed pattern by putting the fabric in steam for at least one hour.
Note : If you are working on textiles which are already naturally dyed, you can add Iron to the paste (with the same extract). The screen printed pattern will appear the same colour but darker.
Note : this paste isn't opaque ! The chosen colour will blend with the background's colour. For instance, if you screen print blue on a yellow fabric, the screen printed pattern will turn out to be green.
Note : the screen printed patterns are printed into the fibers (not only on the surface)
ECO-PRINTING
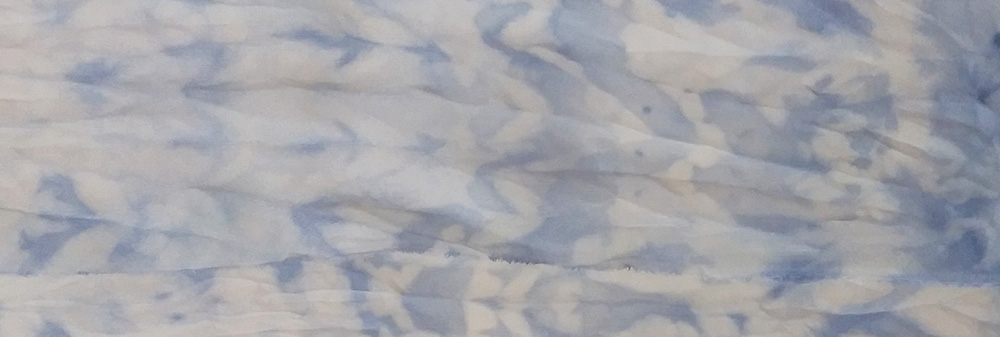
First I wanted to try ice dyeing. The only ressources that I found on internet about it was using synthetic dyes each time. I know that Sandrina is using this technique with plants (leftover flowers from wedding bouquets) and I found a video on her Instagram describing a part of the process. So I gave it a try. I put a mordanted cotton on a colander with onion peels (flakes), madder extract powder and ice cubes on top. I let it melt for one night but the dyes didn't take on the fabric. I think that I should try again but with a mordanted silk pongee or twill and with bigger onion peels. And maybe, make the ice cube melt with steam ?? so that the dye follows the ice patterns but is heated and fixed on the fabric anyway. But then the interest of this technique (low energy) will be lost... Then I decided to try eco-print because I though that I could have the same kind of patterns.
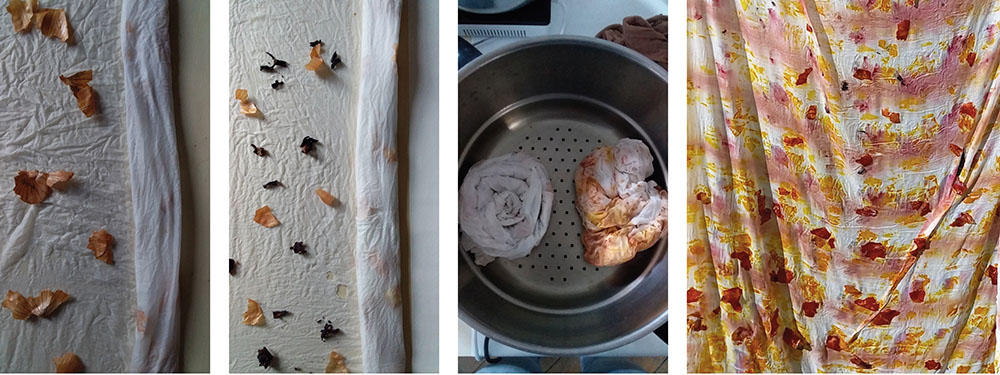
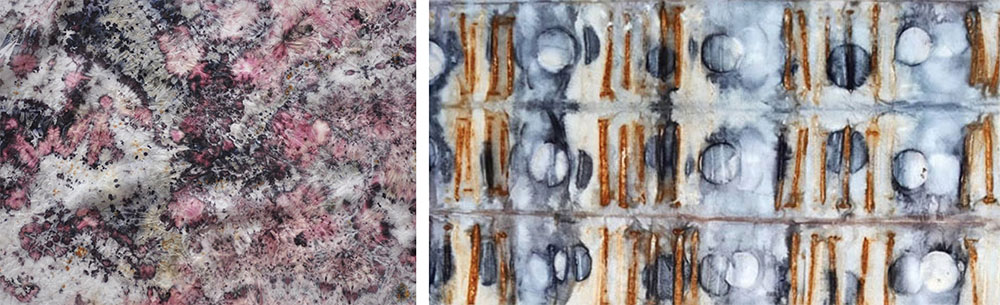
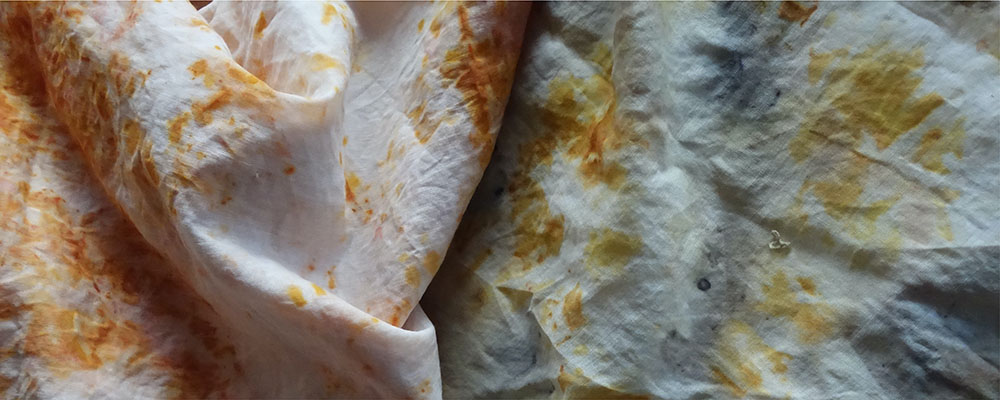
Eco-printing process - Mordant the textiles you want to dye - Roll them including plants during the process (here it was onion peels and dry hibiscus flowers) - Put the rolls in a colander and put them in steam for at least 45min (I did 1h30 because I forgot them) - Let it cool down (actually I don't know if this is necessary, next time I'll try without this step) - Unfold the textiles, remove the plants and rinse the fabric until water is clear. - Let it dry :)
For the first cotton fabric, I used onion peels and hibiscus. It gave bright orange stains and lines of pinkish dyes when I unfoled the fabric (see picture above). Unfortunately, when rinsing the textile, I noticed that the pink was turning grey/green. I though that maybe it was because of the pH of the water. //check hibiscus natural dye colour ??//
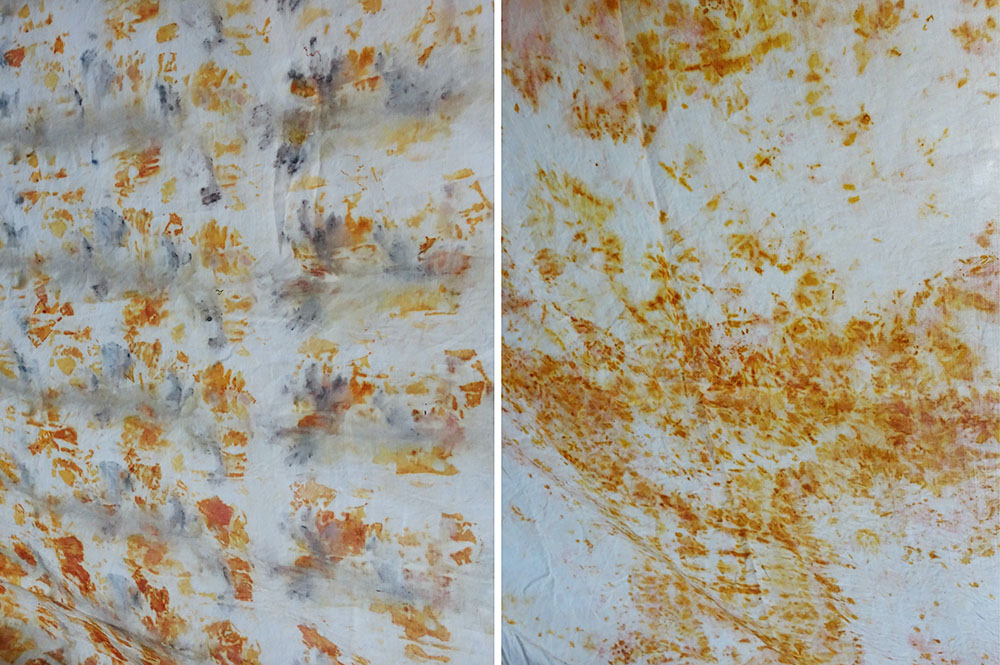
It appears that the small pieces of onion looks like stains, not really the effect I was looking for.
Note : Maybe, if I hadn't wait for the fabric to cool down and rinse it right away I would have avoid the pink lines (caused by too diluted/fusing dyes)? Note : Next time, I should try with silk ?
INKS and PIGMENTS
Pigments
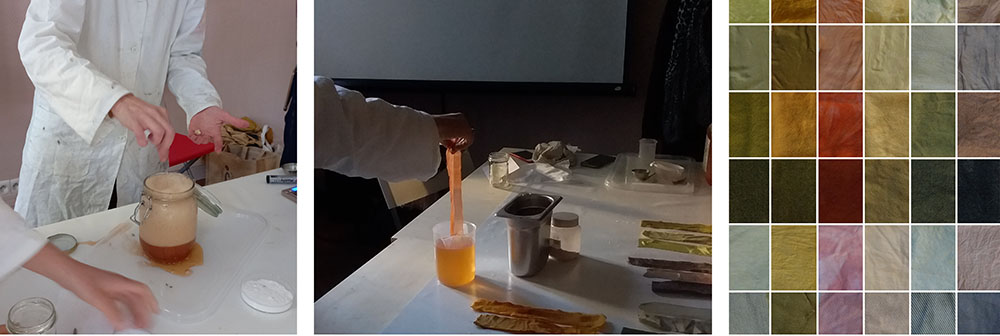
We made pigments from the red onion dye bath. Pigments can be used for inks, biomaterials, oil paint… Pigments dissolve very well in oil but not in water.
Recipe to make pigment from a dye bath
- 200mL of the dye bath
- 20g of alum
-
5g of sodium carbonate
-
Put 200mL of dye bath in a jar
- Dissolve 20g of alum in hot water in a pot
- Dissolve 5g of sodium carbonate in hot water in an other pot
- Put the alum solution in the jar (with the dye bath)
- Add slowly the sodium carbonate in the jar, be careful because it may go up
- Let the jar open for 2 hours
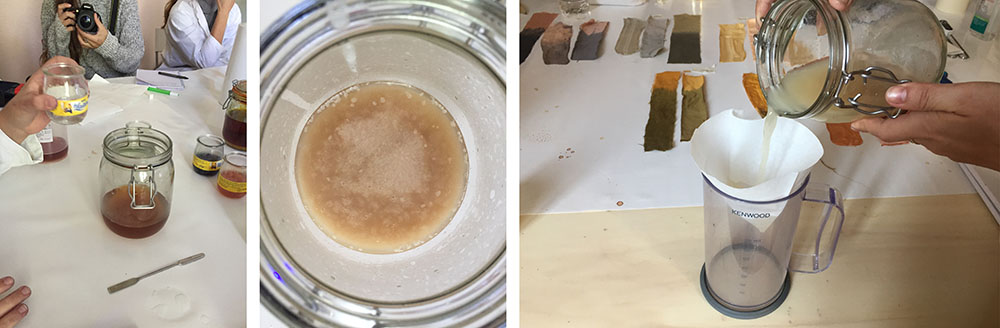
The solution will separate into 2 phases, one liquid and one solid. After 2 hours, it must be filtered (we used a coffee filter), then dried and grinded. We didn’t have time enough to grind it because it wasn’t dry enough.
Inks
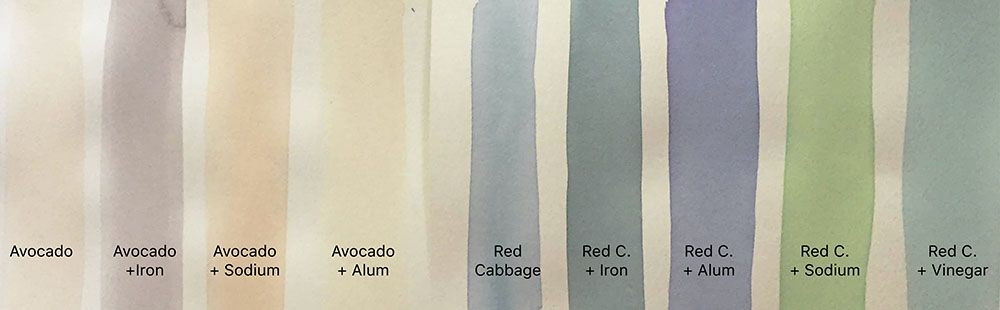
Diane showed us how to make ink from red cabbage. She immersed it and boiled it in hot water (time?). Then, we took some of the liquid and put it on paper : it gives a purple. With alum, iron, vinegar or sodium carbonate we obtained colour changes.
There is another way to make ink with 90% ethanol that we didn’ tried. For instance it works very well with turmeric, we have an example of this ink in Oullins.
BACTERIA DYEING
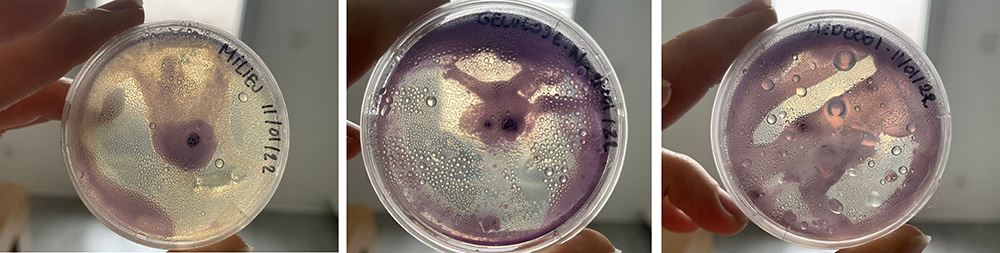 Pictures from Pauline when she started the bacteria cultures with 3 different foods(medium) :)
Bacteria colonies are growing and purple is getting reaaly intense as you can see below :D Time to dye the textiles !
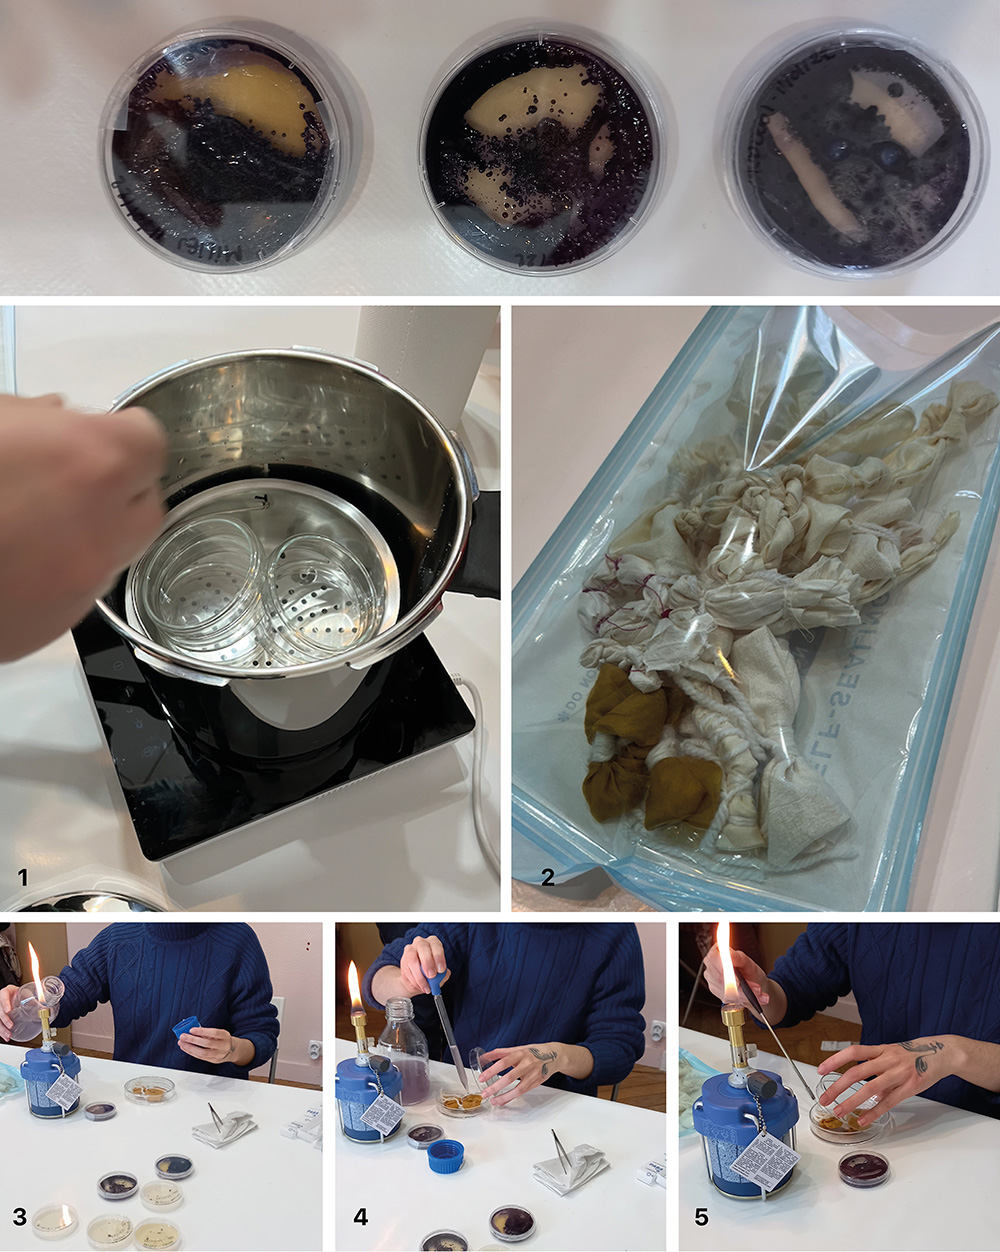
First we need to sterilize our tools and materials (petri dishes (1), textiles in a sterilizing pocket (2)...) with 15min steaming. Then we have to keep our working environment sterilized. For that we create a sterilized bubble with a flame and put ethanol on the table (but keep it away from the flame !). After all that sterilization process we can add the textile in the petri dish and add the nutritive solution in it. Open the bottle and sterilize the opening by putting it into the flame ! you can see on the pictures (3)(4) that the solution is purple, this is because it was contaminated by the bacteria we're working with during the culturing (oops). We tried with this solution anyway. Before closing the bottle sterilize AGAIN. After the food, we can add the bacteria (5). We use a little tool for inoculation previously sterilized in the flame to get the bacteria and put it all around the textile. Sterilize the tool again to kill any remaining bacteria and close the petri dish with a parafine tape. Note on the cap the date, bacteria you're using, what kind of food you gave it and your name.
KOMBUCHA for week 06
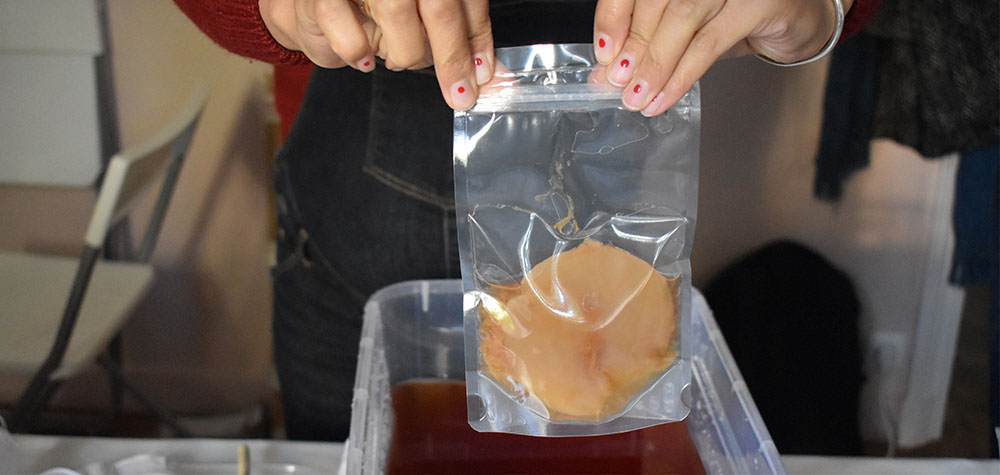
To be ready for the week of biomaterials, Surzhana showed us how to start our Kombucha. We used a classical recipe with black tea to start with and later on we might make other recipes.
Recipe for 1L of water
- 1,5 to 3 gr of tea ( we used black tea,but it can be any tea, depending what color of material you want)
- 100 gr. of sugar
- Vinegar from 0 to 100ml (depending on PH of your liquid)
- Scoby mother
In our case as we want a little bigger of a piece of Kombucha material, so we made 7 L of water.
For 7L of water
- 21 gr of black tea (+ filter bag or tissu)
- 700 gr of sugar
- Vinegar - we added around 100 ml of vinegar untill it got to PH 3
- Scoby mother - 15cm ø
Steps
- Prepare all the ingredients, tools, utensils that you need at your workspace.
- Sterilise your equipment, especially the tray where you gonna grow your material and make sure that all is clean as Kombucha can get contaminated by various microorganisms around us.
- Boil water in a pot and add tea into it and keep boiling a bit, in our case we didn't have extra pots, so we added boiling water directly in a plastic tray and then we added tea in a coffee filter bag closed with a thread that leaves don't go all over.
- Add sugar and mix it well until it dissolves, the best to do is to add it while its hot, it will work better.
- Let it cool down until room temperature, for us it took almost 2 hours for 7L of water. If we add Scoby into hot liquid it will most likely kill it, so we better wait !
- Then Measure the PH with PH strips or PH meter, french tap water measures around PH 7. So we added around 100 ml of Vinegar until it got to PH 3.
- Now when we set up good sweet, acicid conditions we can add our Mother Scoby, make sure you do it with gloves or desinfected hands.
- Cover the tray with thin breathable cotton fabric so that insects and dust can't get in, put an elastic around it, it will be well covered and can be easily opened for our weekly check-ups.
- Place it in a warm (ideally 30°C) temperature, we put it on a special matrass for germination of seeds. The speed of growth depends on the ambiant temperature.
Note : Don't move the tray while the Kombucha is growing, keep it in a dedicated place. The desired Kombucha material will appear in about few days - week as a thin layer. The second part of the Kombucha travel will be later on the Biomaterials week.
REFERENCES
- Honeycomb Shibori Tutorial by Amanda Rouse
- DIY How to ice dye in Jojotastic
- Natural dyers in France : Michel Garcia, Sandrine Rozier, Aurélia Wolff (WHOLE)
| Videos | Class, Reviews, Tutorial Textile Dyeing Part 1, Tutorial Bacterial dyeing and bioshades, Workshop Myco-composite |
|---|---|