10 | OPEN SOURCE HARDWARE
WEEK 10 | OPEN SOURCE HARDWARE, From Fibers to Fabric This week is about building our own machine or hacking an existing one using the open sources resources that can be find on internet. The machine can be entirely mechanic or it can be connected to an Arduino. With Ségolène and Surzhana we made a loom :) we also learnt how to knit on a knitting machine and Pauline introduced us to her textile drawing machine (so cool !)

BUILDING A WEAVING LOOM
With Ségolène and Surzhana we wanted to build a loom for this week ! We chose to use the DIY Laser Cut Rigid Heddle Loom - Part 1: Building the Loom from Instructables because all the steps are really well detailed.
This loom has a rigid heddle which, in fact, works as a bi-heddle (the name we came up with during the week). When you weave a plain weave (the most basic weaving pattern, one thread up, one thread down) you need two heddles. With this loom, the two heddles are combined in the same piece : the bi-heddle. We were interested in having 4 heddles to be able to diversify our weaving patterns. And we came up with the idea that instead of making 4 heddles we would make 2 bi-heddles.
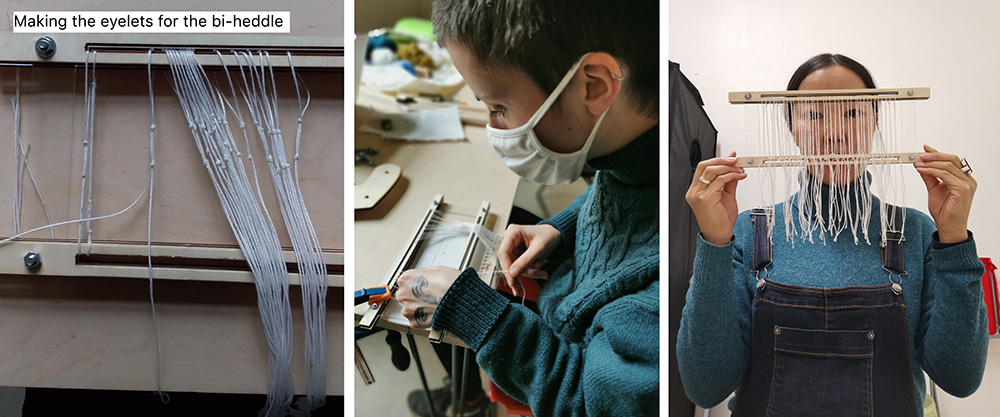
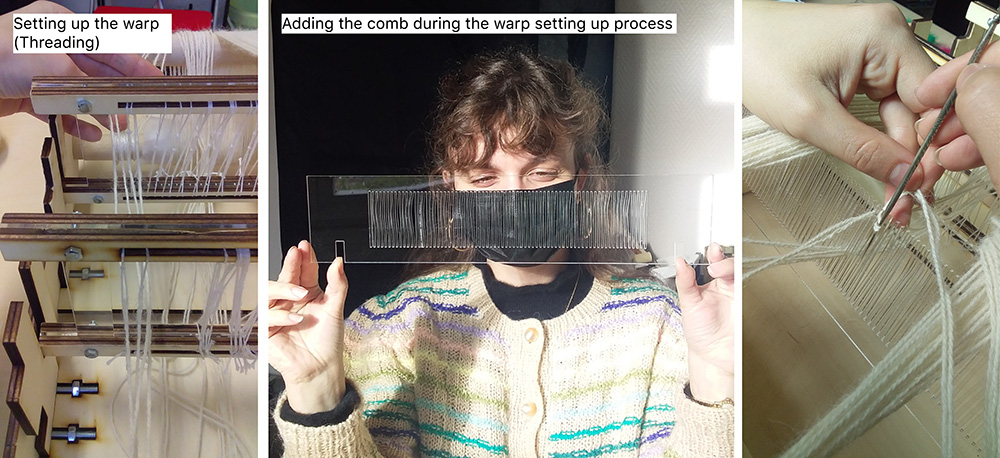
We also decided that instead of a rigid bi-heddle we would work with eyelets made with threads. It would then be easier to change the density of the weaving. It also meant that we had to make a comb. We laser cut it at the end after we had decided what thread we would use for the warp.
Steps
- Translating the materials so that we know what to buy
- Modifying the files of Instructables to add a second bi-heddle
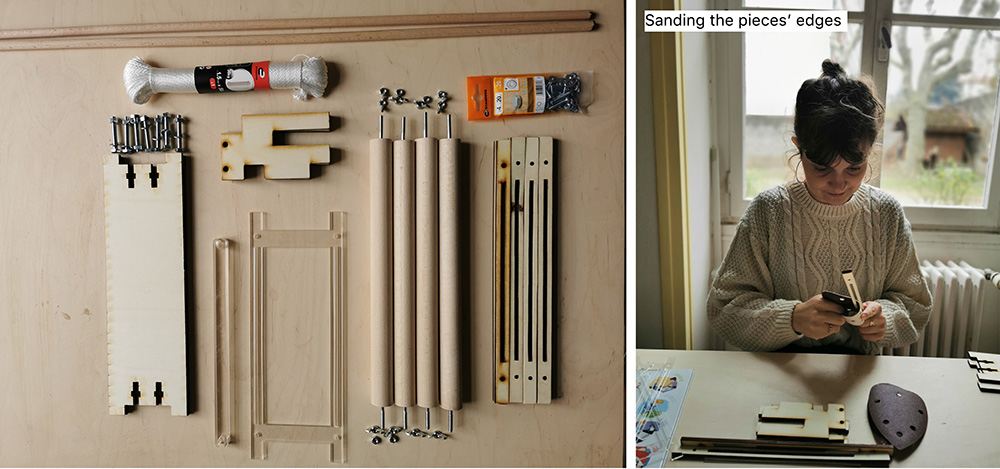
- Laser cutting the pieces we need
- Preparing the others (drilling holes, adding cords...) following the (tutorial from Instructables](https://www.instructables.com/DIY-Laser-Cut-Rigid-Heddle-Loom-Part-1-Building-th/)
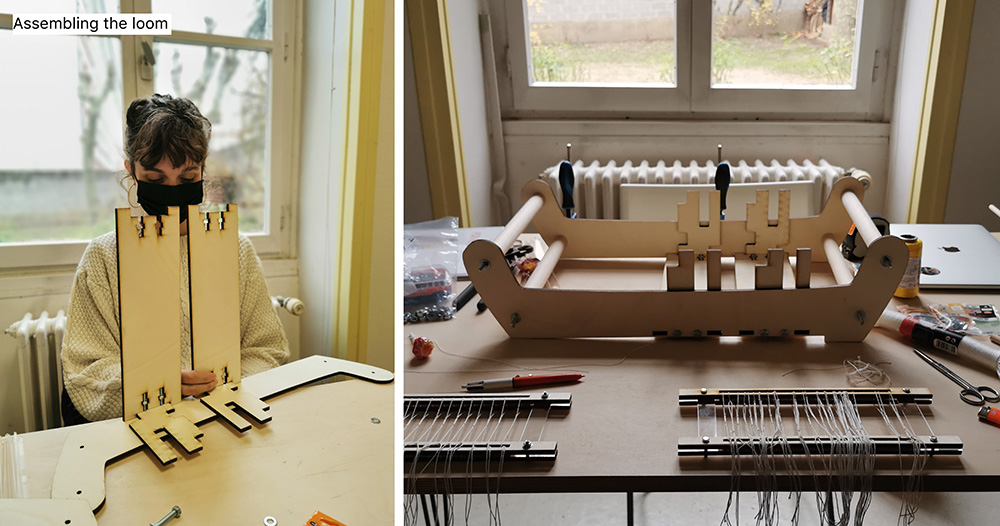
- Assembling all the parts together
- Setting up the warp
- Laser cutting the comb
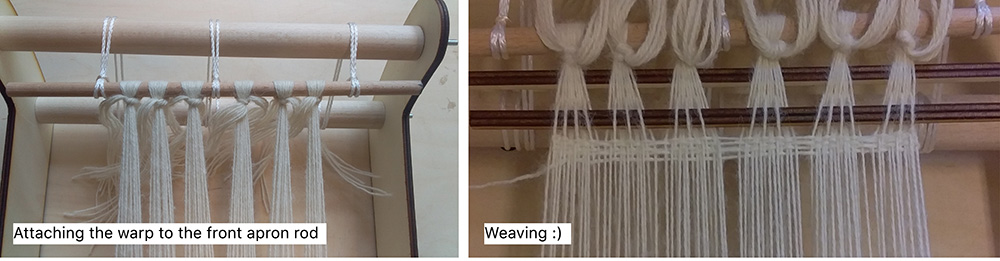
- Time to test the machine and weave :)
You can download the files here
Modifying the files
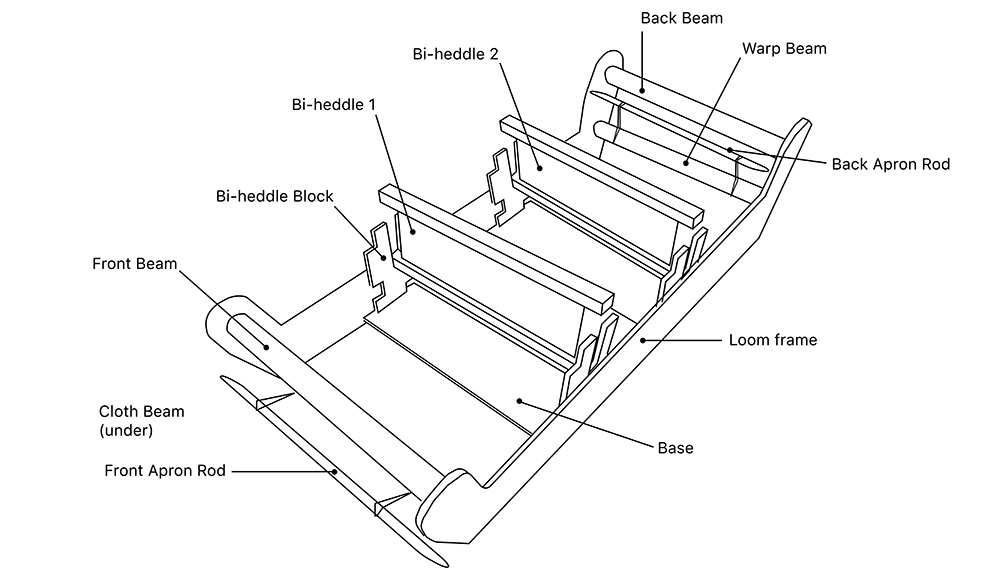
We used Illustrator to add small changes. We replicate one time the heddle part on the loom frame to be able to add a second one.And we transformed the original bi-heddle into a frame with 2 slits where we would be able to knot our eyelets on.

How to Laser cut pieces for the machine
Make your file (pdf, svg) : choose the order of the cutting for your lines with the layers. The layer in the background (last one) will be the first to be cut !
Steps to use the laser cutter
- Open the computer
- Open the chiller (ON)
On the laser cutter
- Switch on the laser cutter with the key on I, be sure to have the lid shut down
- Put your fabric/sheet inside the laser cutter | for plexi, raise it on small objects, it will help not to have burning traces and fumes | for tulle, be sure it is flat, you can tape it on the sides
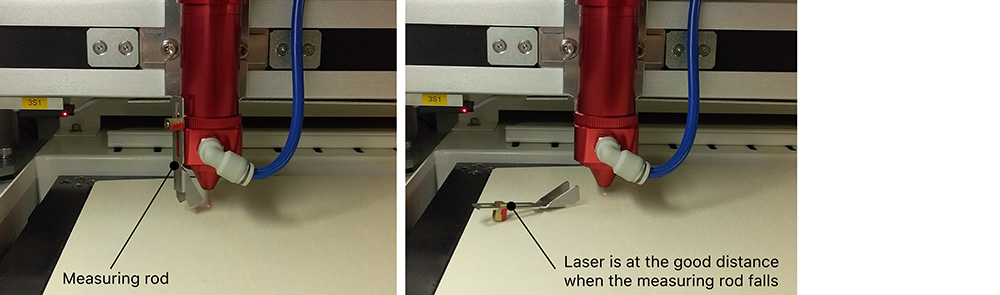
- With the measuring rod, lift the laser cutter plate up to the laser and stop when the measuring rod falls
- Put the laser at the chosen origins (X=0 Y=0)
On the computer
Inkscape Software
- Open your file (pdf, svg) in Inkscape
- Chose the right settings : Cutting = Red | Engraving = ? | Lines = 0.001pt
- Print > Rayjet > Settings > Minimize the size of the job (checked) | Resolution : 500dpi (for lines) | Materials : standard
- PRINT : it should open the file in the Rayjet Manager Software
Rayjet Manager Software
- Connect the computer to the laser cutter, you should see the laser's position on your screen
- Insert the file and adjust it to the laser's position
- Right clic in the grey part > materials configuration > chose your material's settings in the textile lab library > OK
SWITCH ON THE COMPRESSOR
You can clic on Start in the Rayjet Manager Software. At the end of the laser cutting don't forget to wait for the ventilation to be finished before opening the lid !
Making our loom

Weaving tests
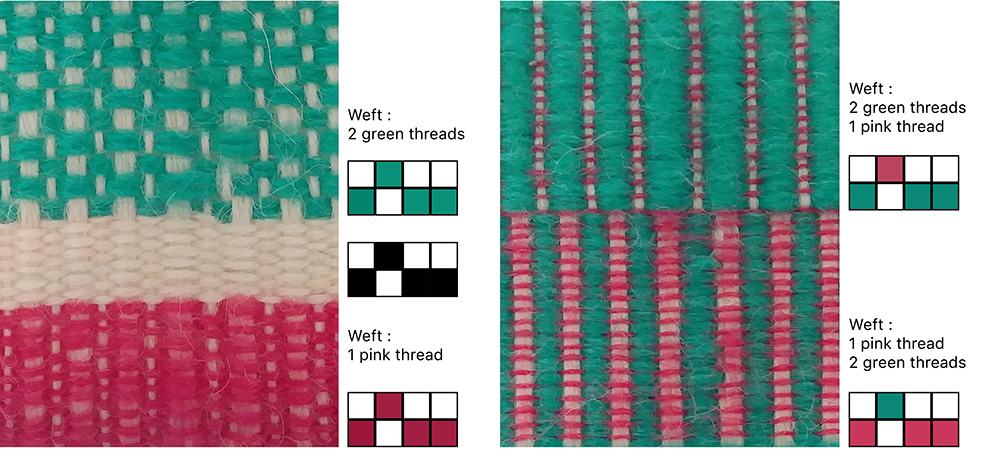
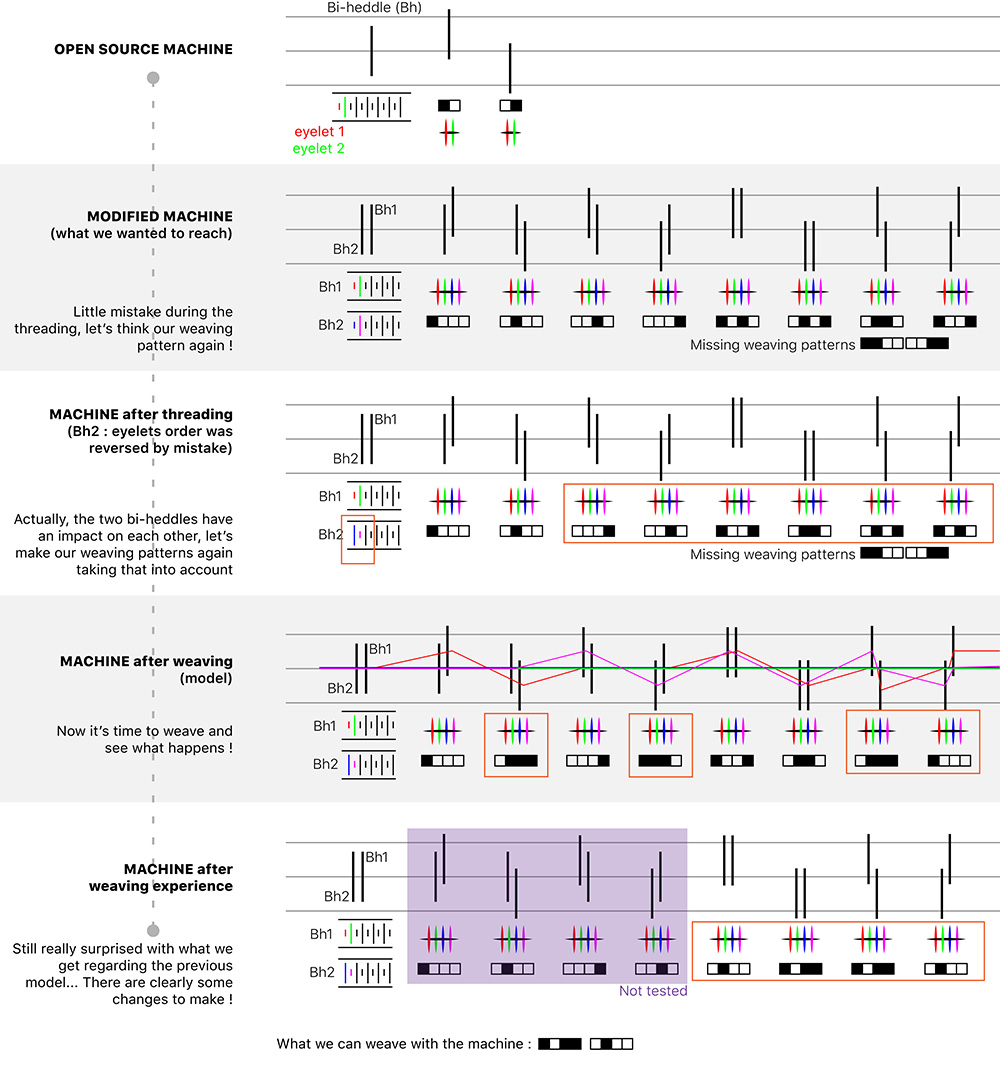
How to read a weaving pattern
- From bottom to top
- One square - one thread (at least when you're at the beginning of your weaving journey :) )
- Black square means that the thread is up
What went wrong, why and how it could be better
With two bi-heddles we were supposed to be able to make several different weaving patterns. It clearly didn't work as expected ! Actually, we can only have two different combinaisons... We screwed up somewhere in the process...
Note to myself : here is a little sum up/schemas of what we wanted to do and how it turned out
Some solutions to explore to improve the loom and finally be able to make 4 heddles weaving patterns :)
- The distance between the 2 bi-heddles could be reduce
- To minimize the impact of the first bi-heddle on the second maybe the first could be bigger in height than the second ?
- The loom frame could be longer and higher to be able to move the bi-heddles with more extent.
- Be careful that all the bi-heddles start with the same type of eyelet (short or long)
KNITTING MACHINE and AYAB
On Monday we learnt how to knit with a knitting machine and then how to knit with the hacked knitting machine with AYAB software and hardware. I'm now supposed to be able to make jersey knitting, some patterns that are already in the knitting machine memory and some patterns (2 colours) made on Photoshop (bitmap):) can't wait to learn more about it !
Knitting machine : Brother KH 9** (950) Hacked Knitting Machine : Brother KH 950 + Arduino + AYAB shield
How to use a knitting machine*
How to make the first row
- Put the thread in the tensor
- Make the first row as below
How to knit
- Put the thread in the carriage (A)
- Put the comb on the first knitted row (each tooth between 2 stitches)
- Put the weights on the comb (on the sample edges)
- Make a second row with the carriage (NL for jersey)
How to choose a specific pattern on the knitting machine
- Put the carriage on the far left behind the small mark
- Follow the step on the handbook : for TUCK patterns don't forget to push twice on the M button and to push the 2 Tuck buttons together on the carriage, otherwise it won't work
How to secure your work
This is the longest step because it has to be done by hand. You can refer to the handbook to know how it is done. Be aware that the way to do it is different depending on where the carriage is (left/right).
How to use the knitting machine with AYAB
How to enter your pattern
- Switch on the hacked knitting machine
- On the software : Tools > Load Ayab firmware > Brother/Arduino
- Open file (.jpg)
- Ckeck single bed / Number colours / Infinite repeat (if you want to repeat the pattern along the height)
- Carriage on KC2
- First row with colour A
- put the second colour (B) in the carriage
- Second row, Hold the B thread in your hands during this row (then you can drop it)
- Carriage on MC
How to make your pattern
On Photoshop : Bitmap | 1px = 1 stitch (if you have 180 stitches on the knitting machine, you can make a pattern with 180 px width)
Different ways to create a pattern
- (Basic one) Jersey with one thread | Pattern can be created by the changing colours of the thread (a bit like ikat) | Structure can be build up in 3D (bubbles like)
- Tuck patterns and lace patterns | Specific repetitive structural patterns from the knitting machine's memory, instructions can be found in its handbook
- Jacquard knitting | 2 colours | Pattern can be programmed or can be made manually (take more time)
REFERENCES
- DIY Laser Cut Rigid Heddle Loom - Part 1: Building the Loom, Instructables
- Open design. Fabrication numérique et mouvement maker, Camille Bosqué, B42 editions, 2021 [not translated]
- Emotional Fabric with the Textile Drawing Machine, Pauline Gamore
| Videos | Class, Workshop HILO Machine Part 1, Workshop HILO Machine Part 2, Workshop HILO Machine Part 3 | Sara Diaz | | - | - | | Softwares | Illustrator, Inskape, Rayjet Manager | | Tools | Laser-cutter, 3D printer, Drilling machine |