12. Soft robotics
This week we are going to work with inflatables, artificial muscles and all the infinite options we can do with the various movements depending on the design, material, airflow, or the vinegar reaction!
A new dimension it's up!
Soft Robots are systems that are compliant and flexible. Have a feedback sensory and control system.
Soft actuators are systems that are compliant and flexible. Used for shape changes, joining, and locomotion:
- Fluidic
- Biological
- Thermal
- Chemical
- Magnetic
And the Hybrid System
1. Investigation
Let's start with a brainstorming:
HOW NASA WORKS WITH INFLATABLES?
Inflatable habitats are pressurized tents capable of supporting life in outer space whose internal volume increases after launch.
Explore inside SNC's Inflatable Space Habitat:
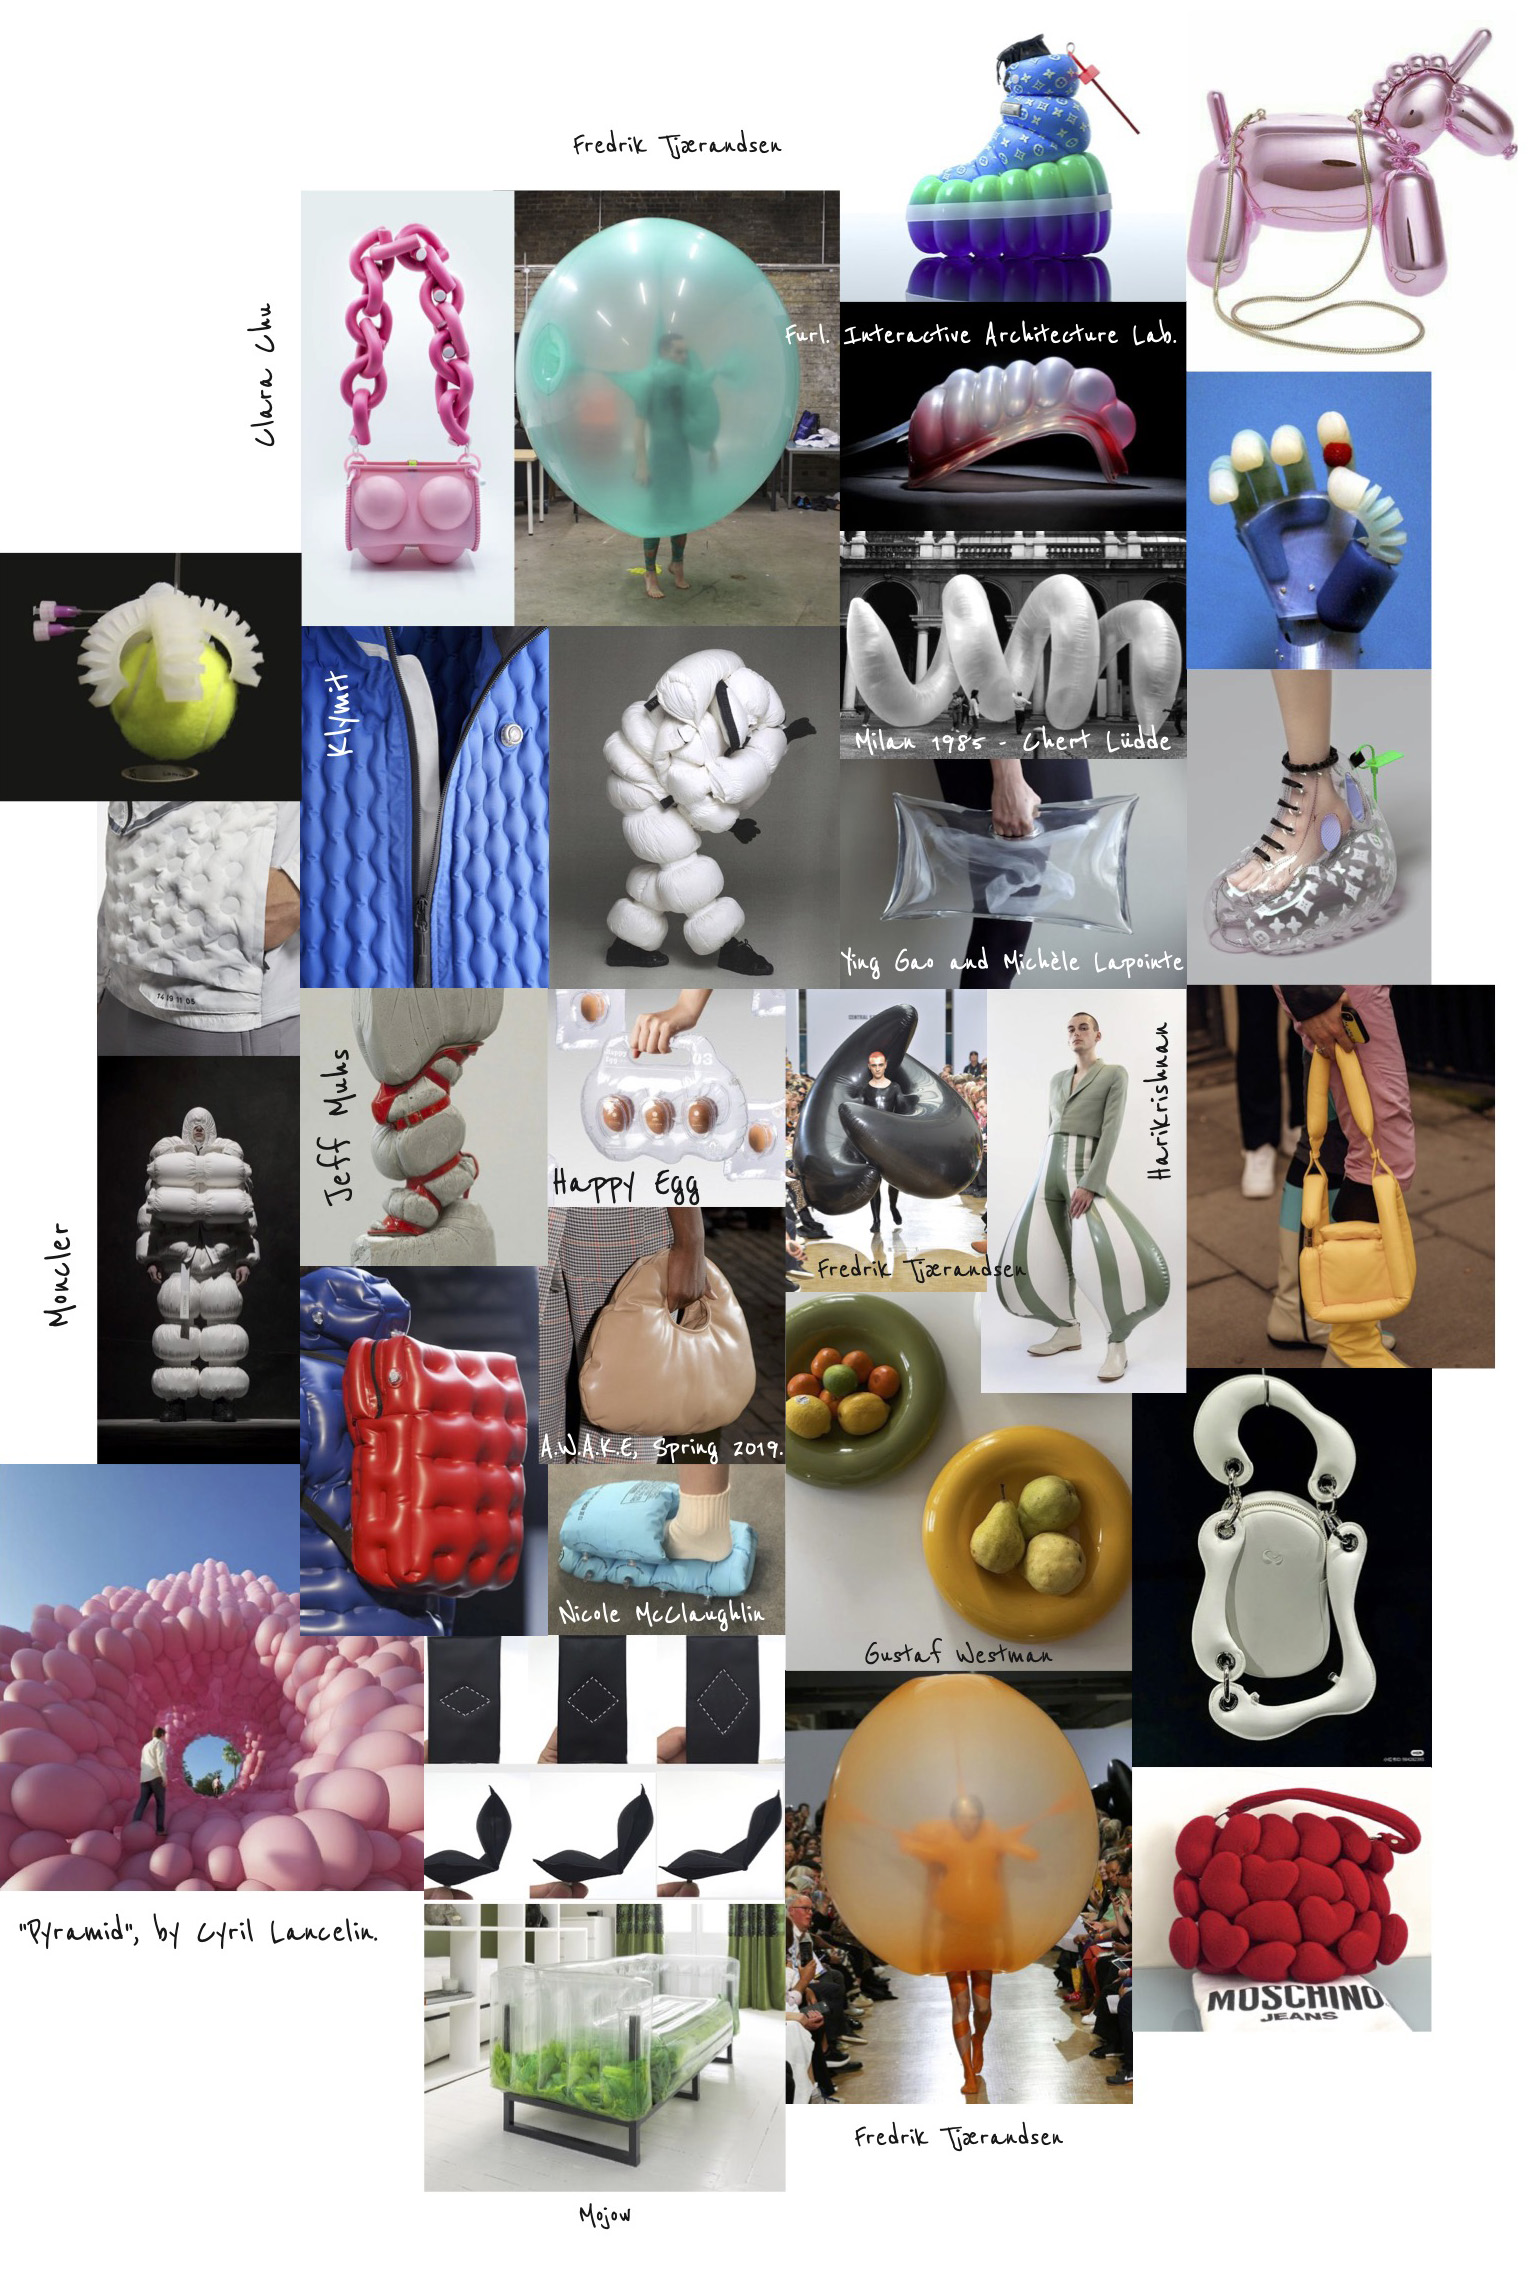
During this week I also search some Fabricademy projects:
- Saskia Halinska Final Project UNFLATABLES (2021/22) Folllow the link to exlore all the differents forms and reactions depending on the design which she is investigating during the project.
- Montserrat Ciges BODYMIMICRY (2018)
Learn all the processes behind the final silicone sample:
- Aybak Aldaamsa
A soft robotic used as a hand to move objects is a fascinating application for business activity:
The same method but a little bit more complex sample:
More about:
1.1 Lecture with Brujxs Lab
This week we are glad to have a talk with Giulia Tomasello and Cristina Dezi, both of them postgraduates in Fabricademy. They continue their professional career by creating the Brujxs Lab, where they are working and promoting projects around women's intimate biotechnology, body fluids, sexuality, and microbiology.
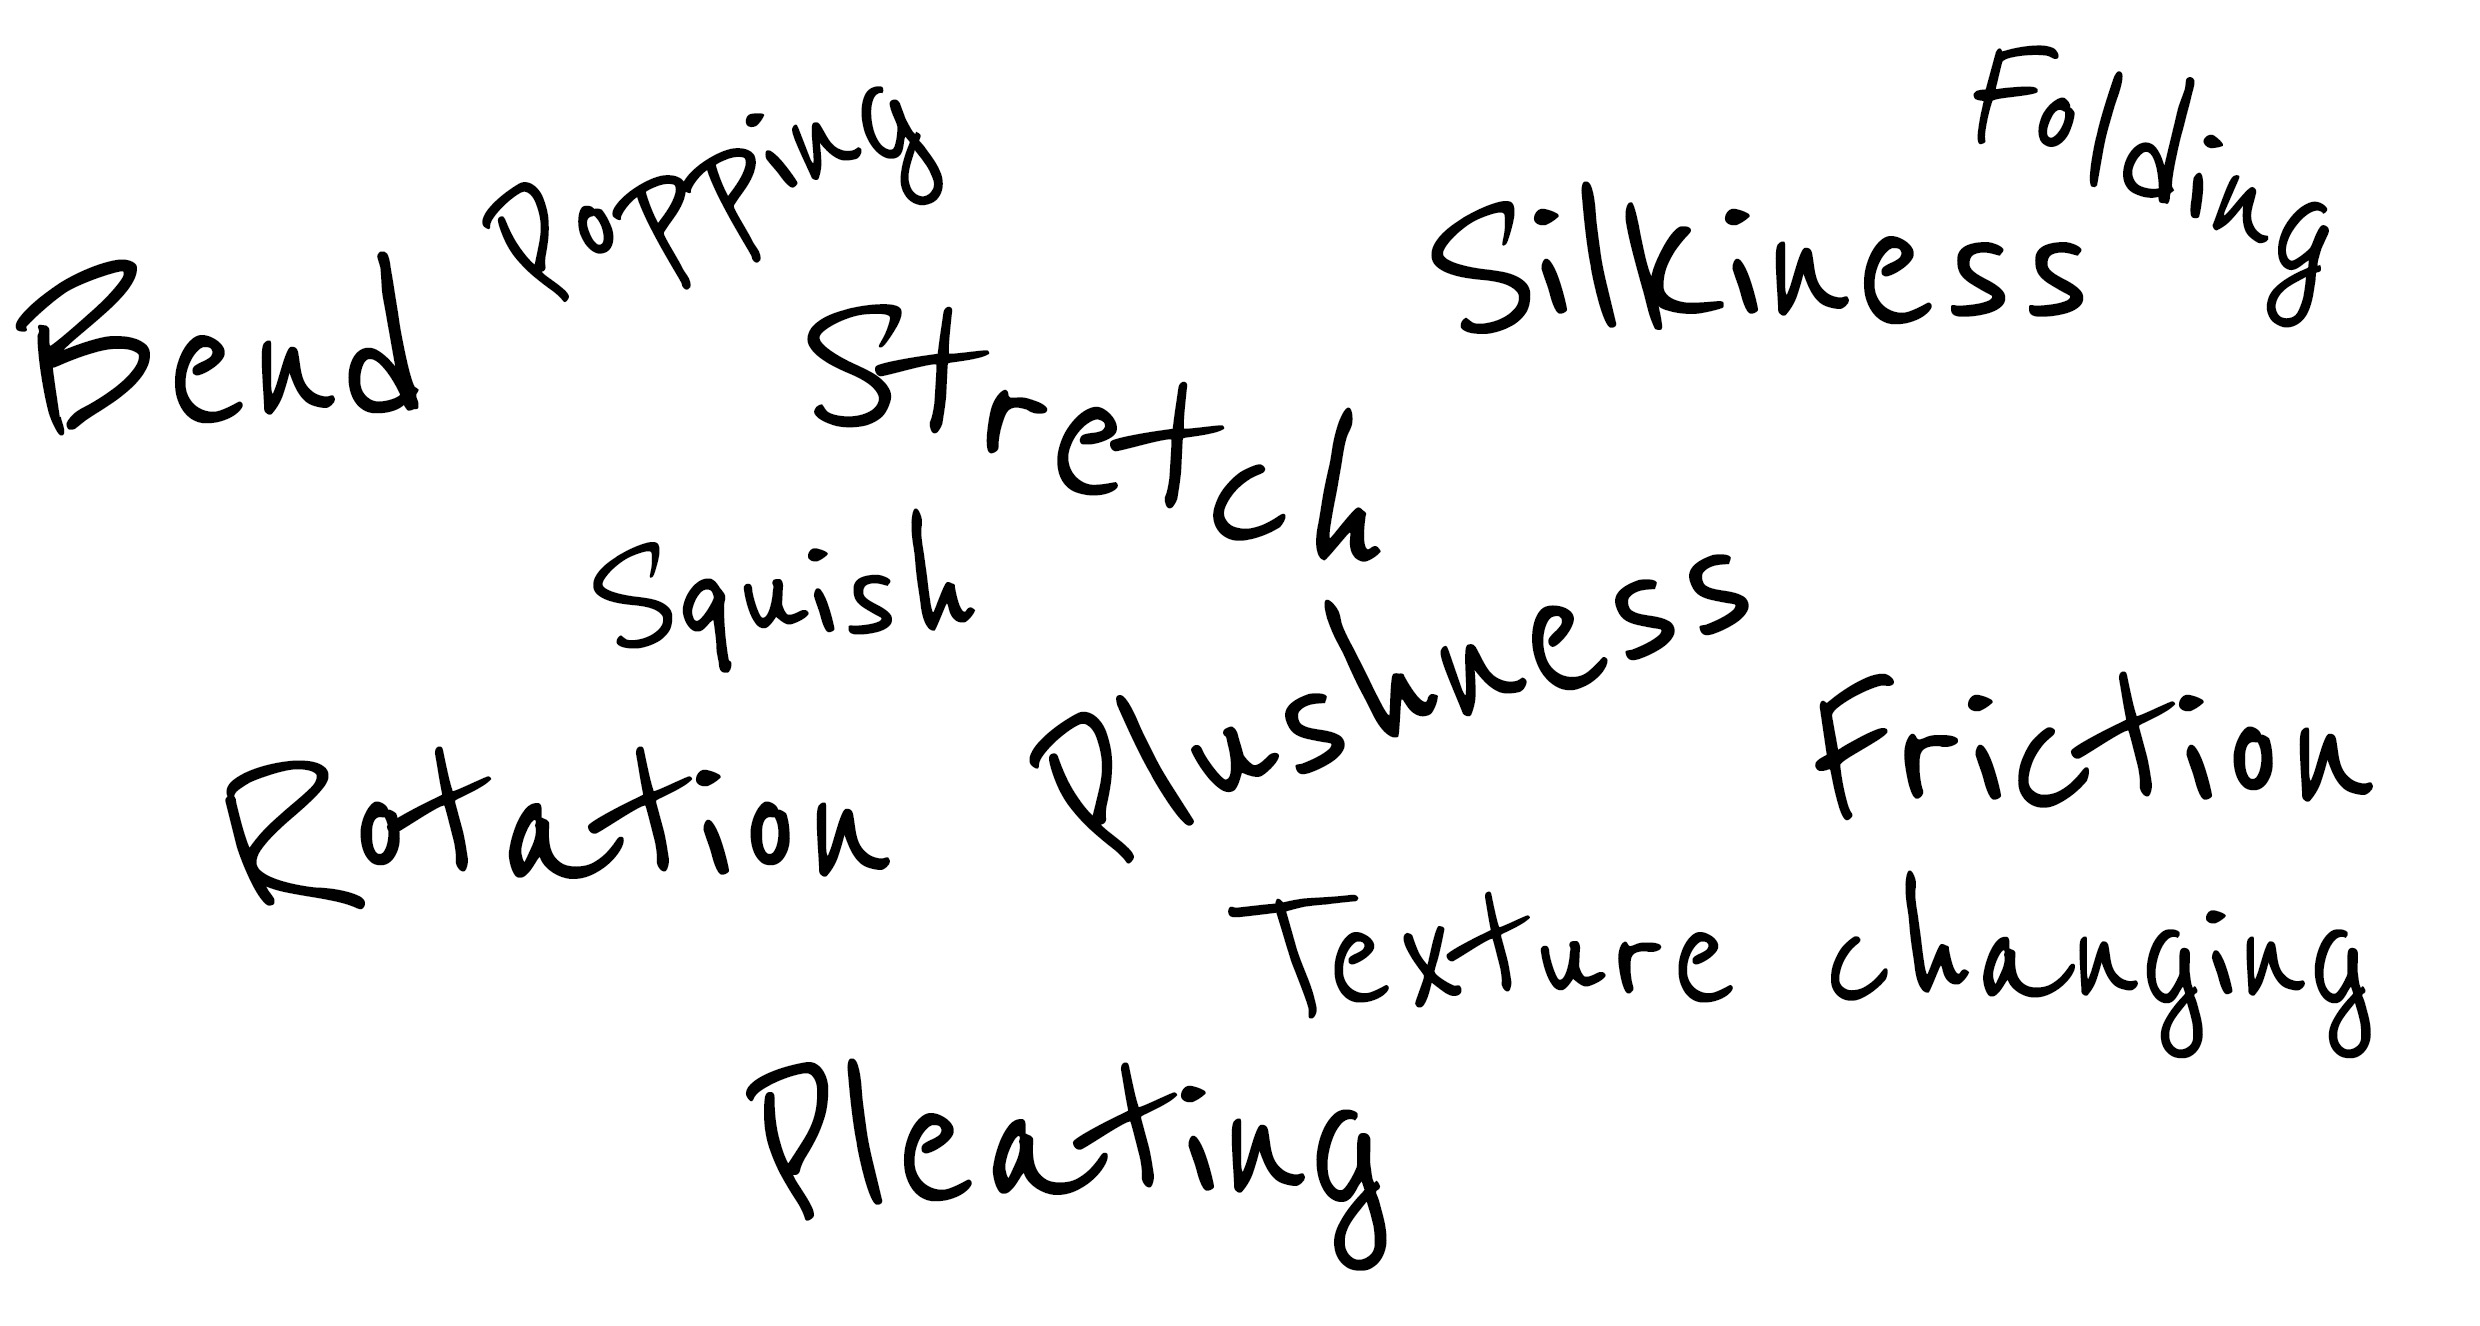
2. Movements
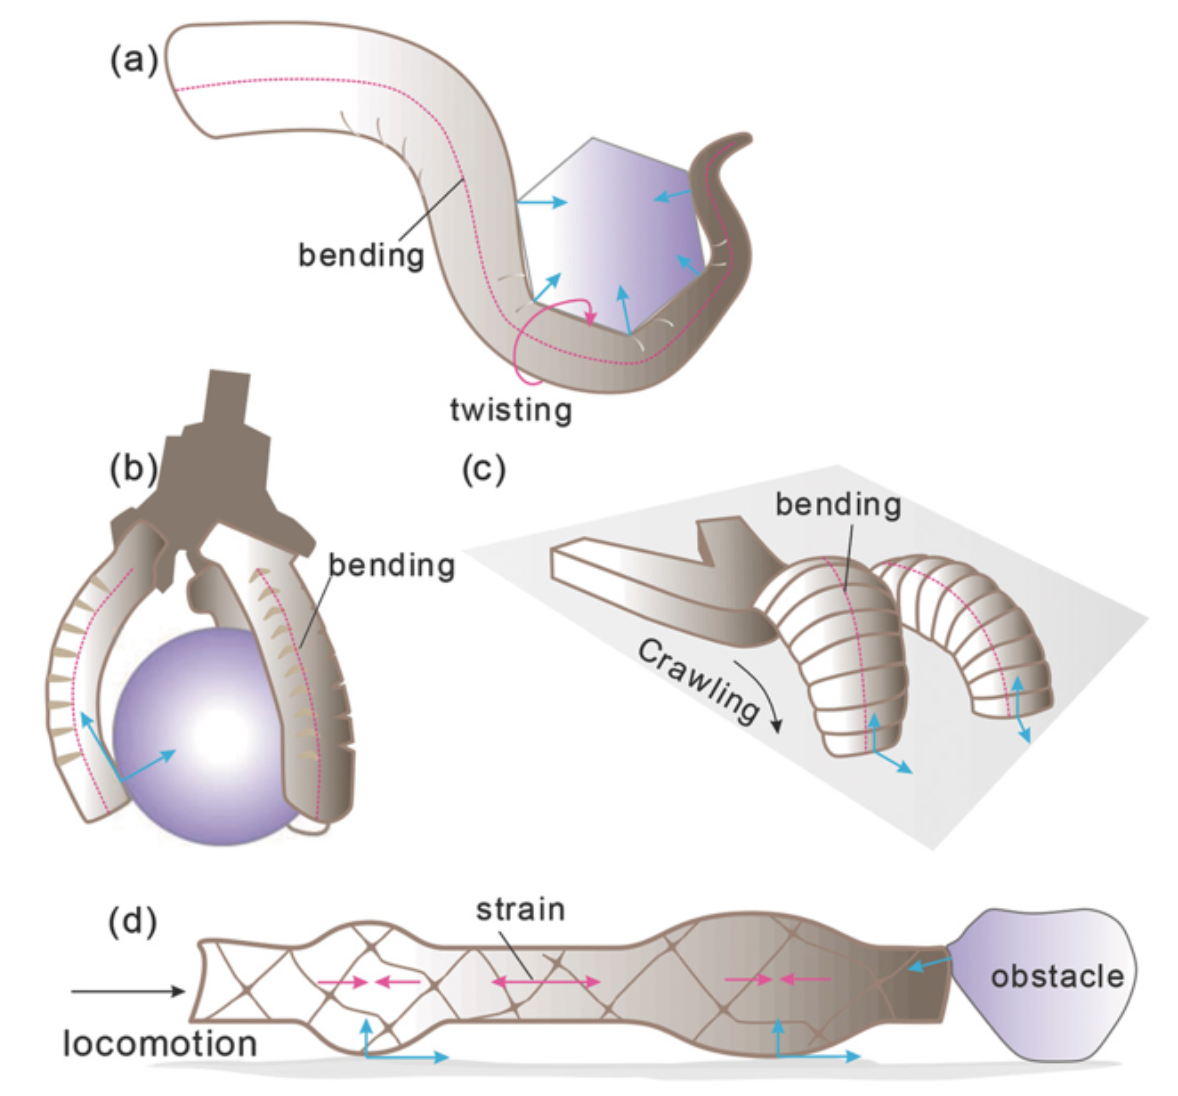
- A) Continuum arm
- B) Three-finger gripper
- C) Crawling robot
- D) Worm-like robot
Which kind of movements we could get with Soft Robotics?
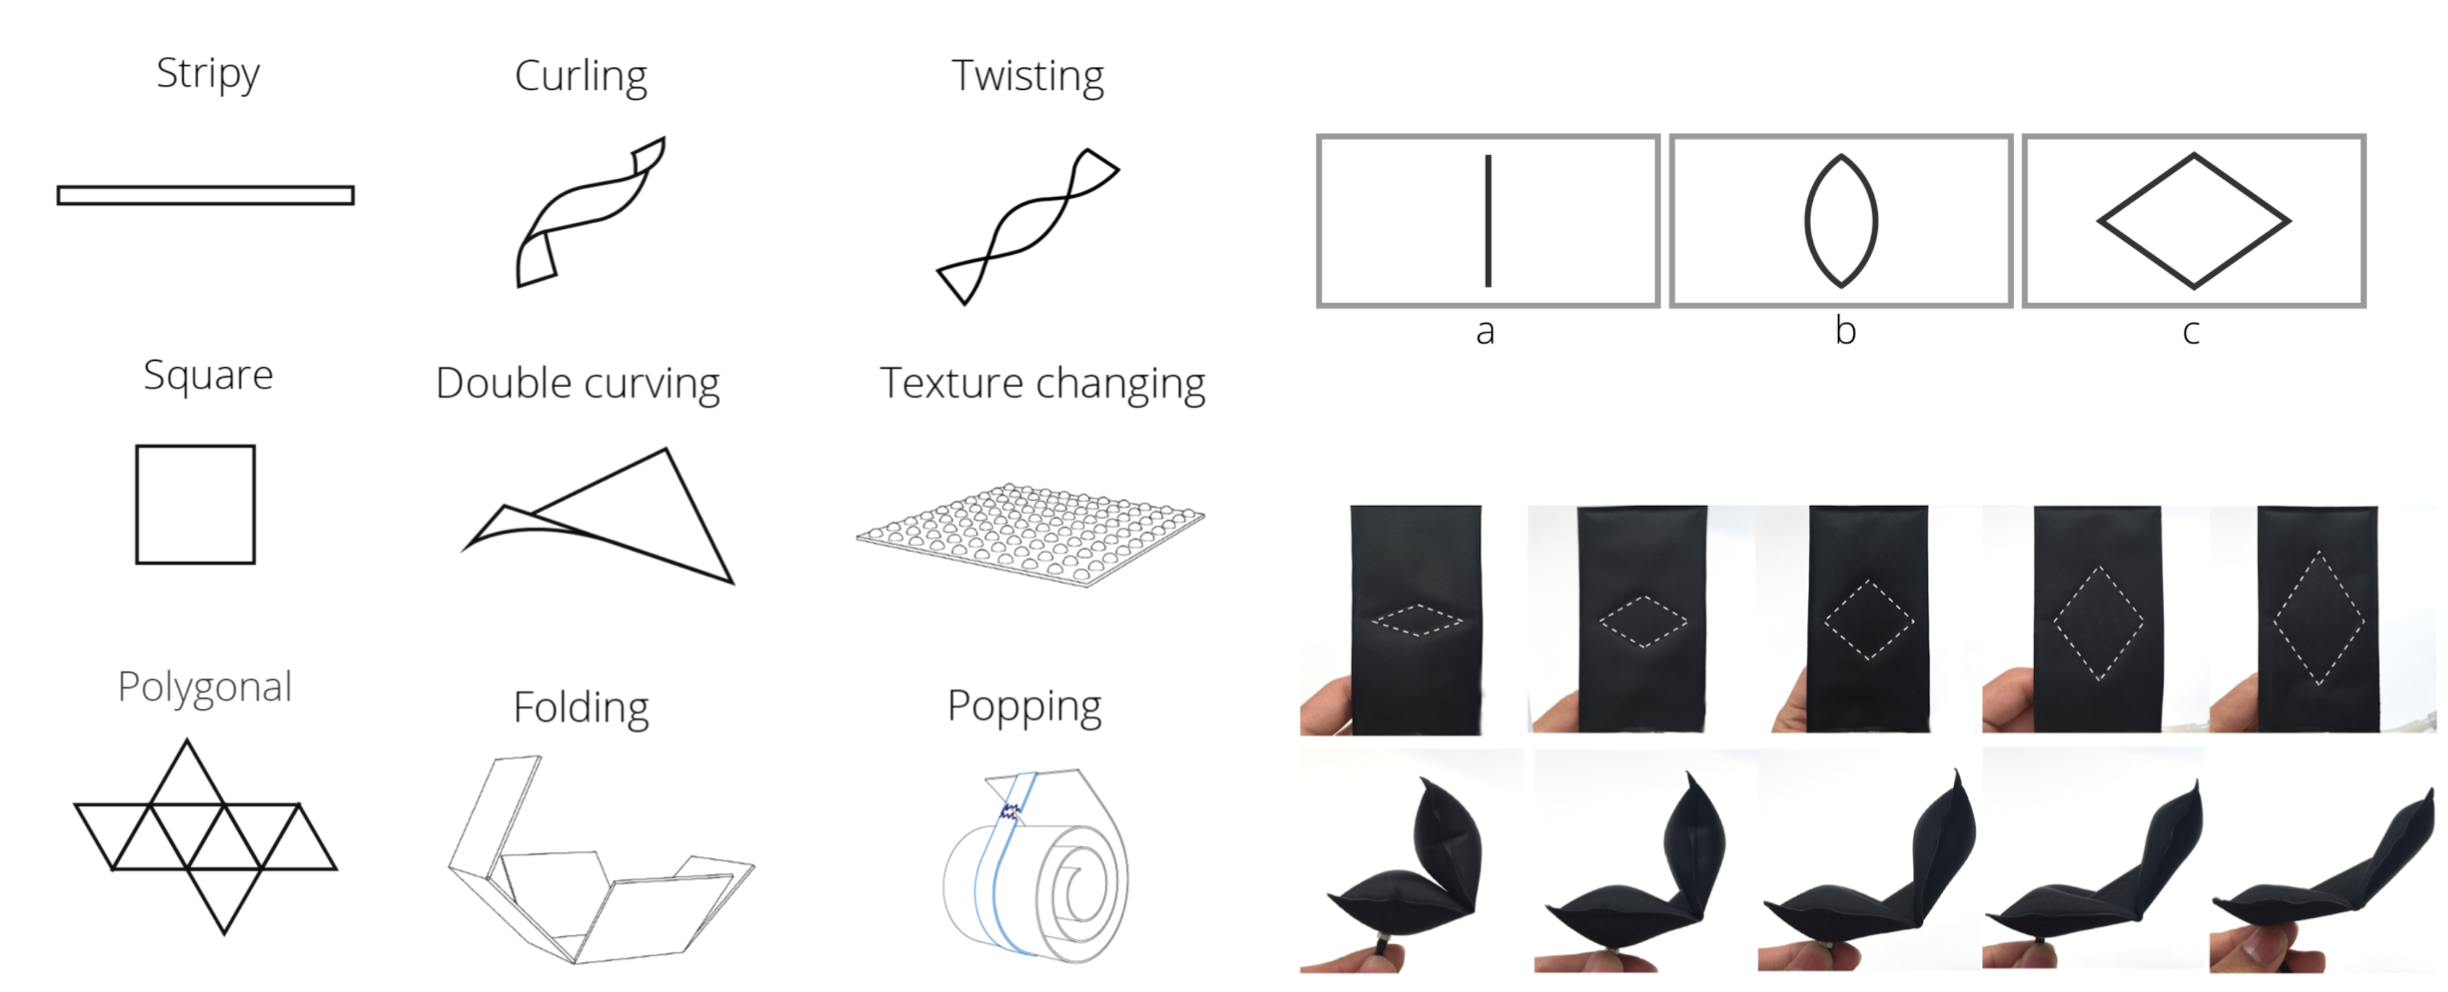
Various methods to obtain the movement we want:
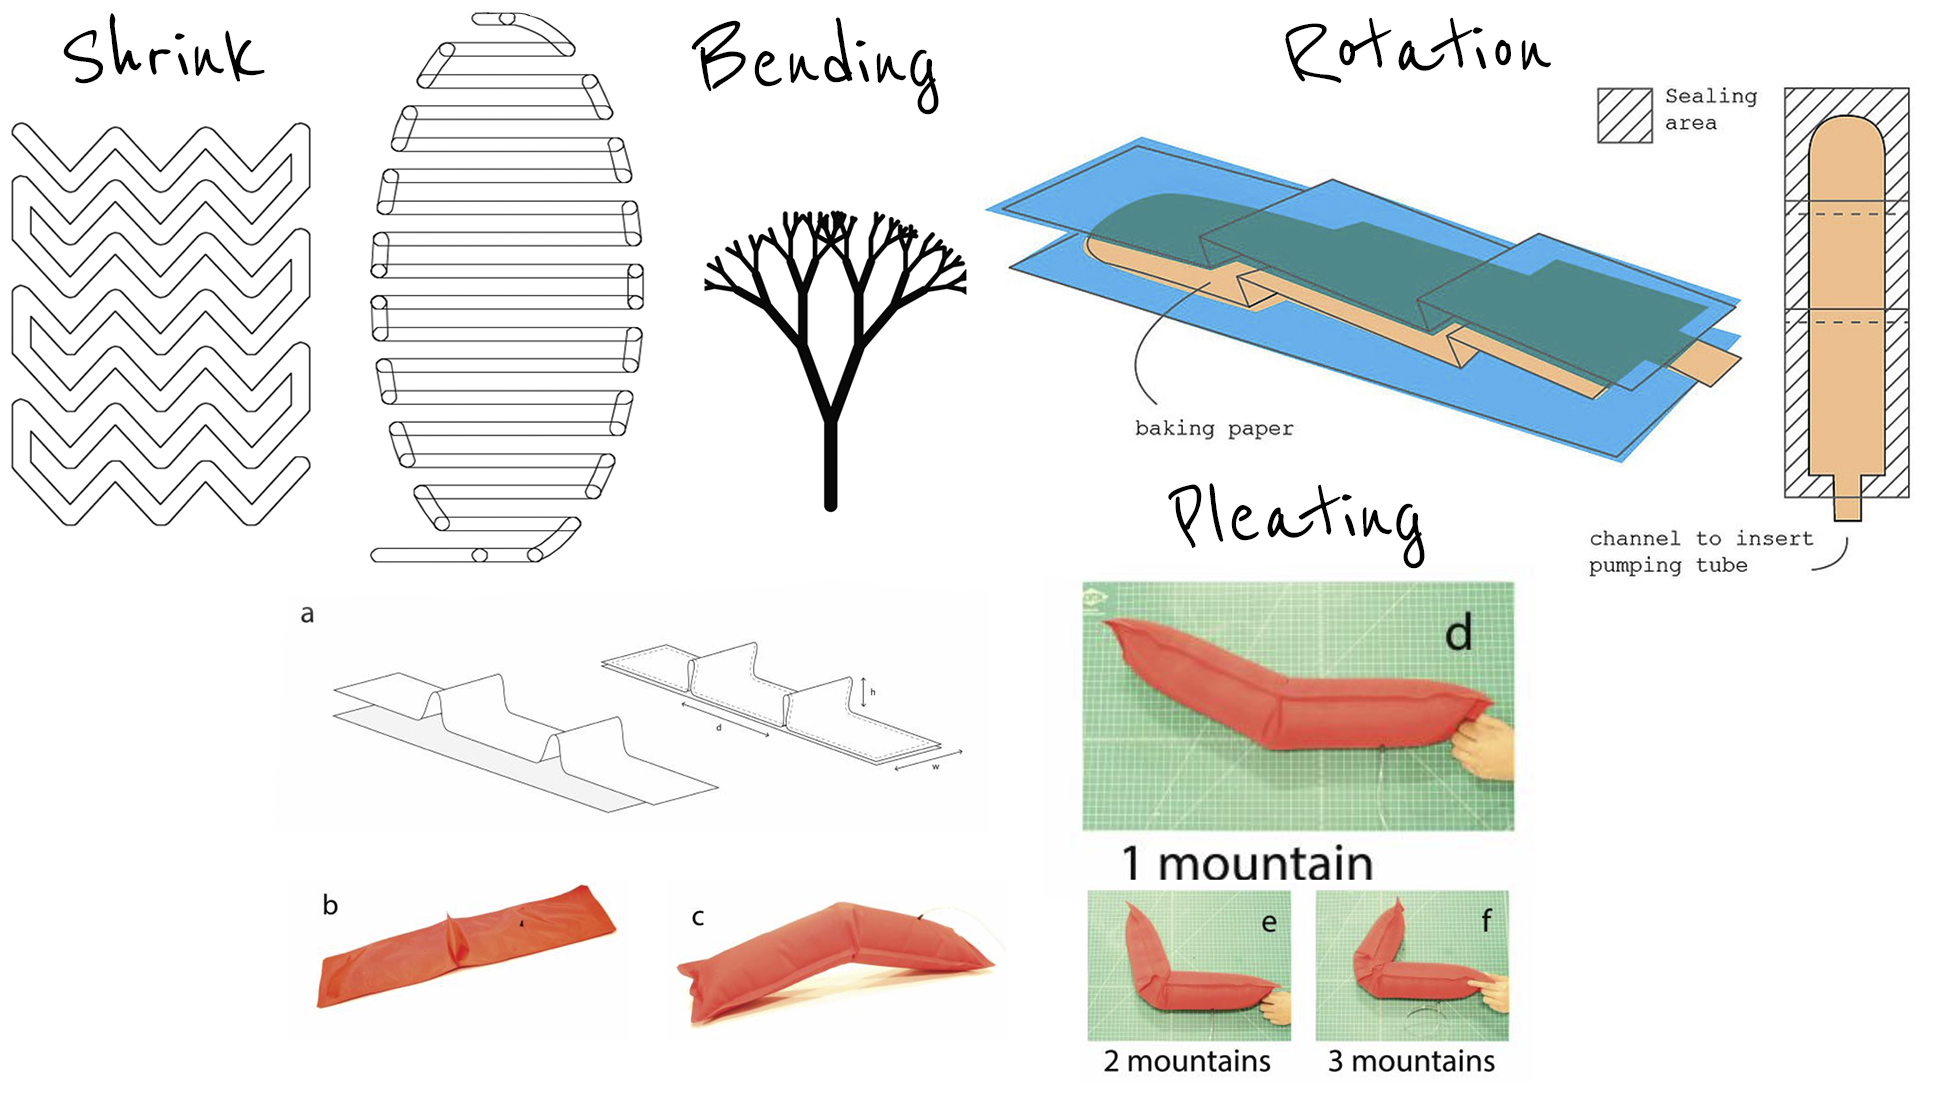
3. Method
There are different techniques to get a Soft Robotic:
3.1 Thermo transfer inflates
Workflow:
* Vinyl Sheet
* Baking paper (both sides with paraffin)
* Scissors or laser cutting
* Iron or heat press
* Syringes or air pump
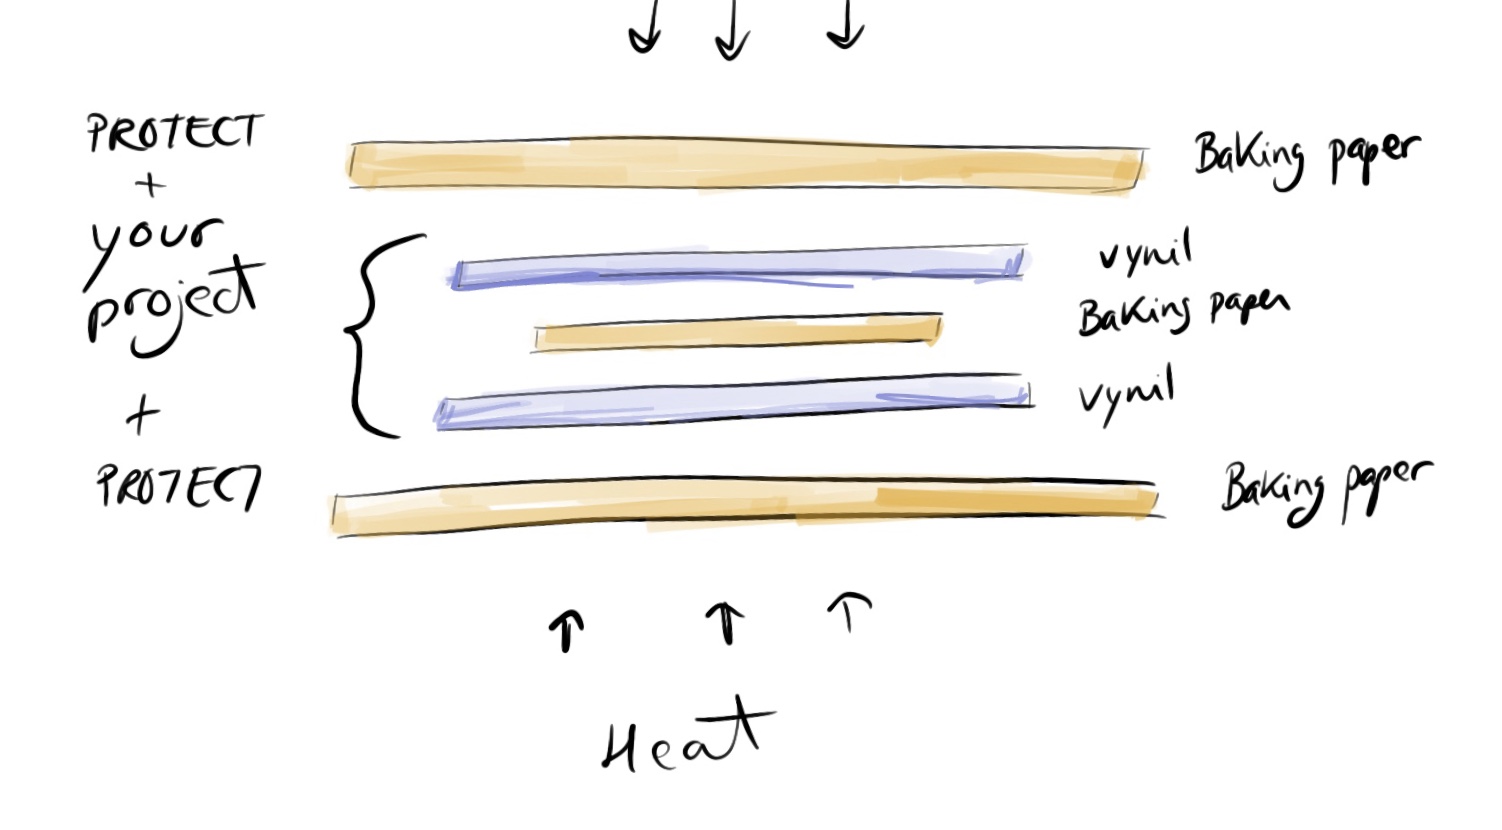
* Design your patter in a sheet to know which parts are you going to inflate. Remember the baking paper is the part of your inflatable that is going to inflate, get volume.
* Make the pattern in Rhino. Select diferents colors to be the order of the laser cutting. First red, blue and the last cut in green color.
* Save as a Rhino 5 and upload in the IAAC Cloud.
* Download the file and press cmd P to print. Adjust your project in the print box.
* Send it to Print software.
* Drop your file in the cutting table.
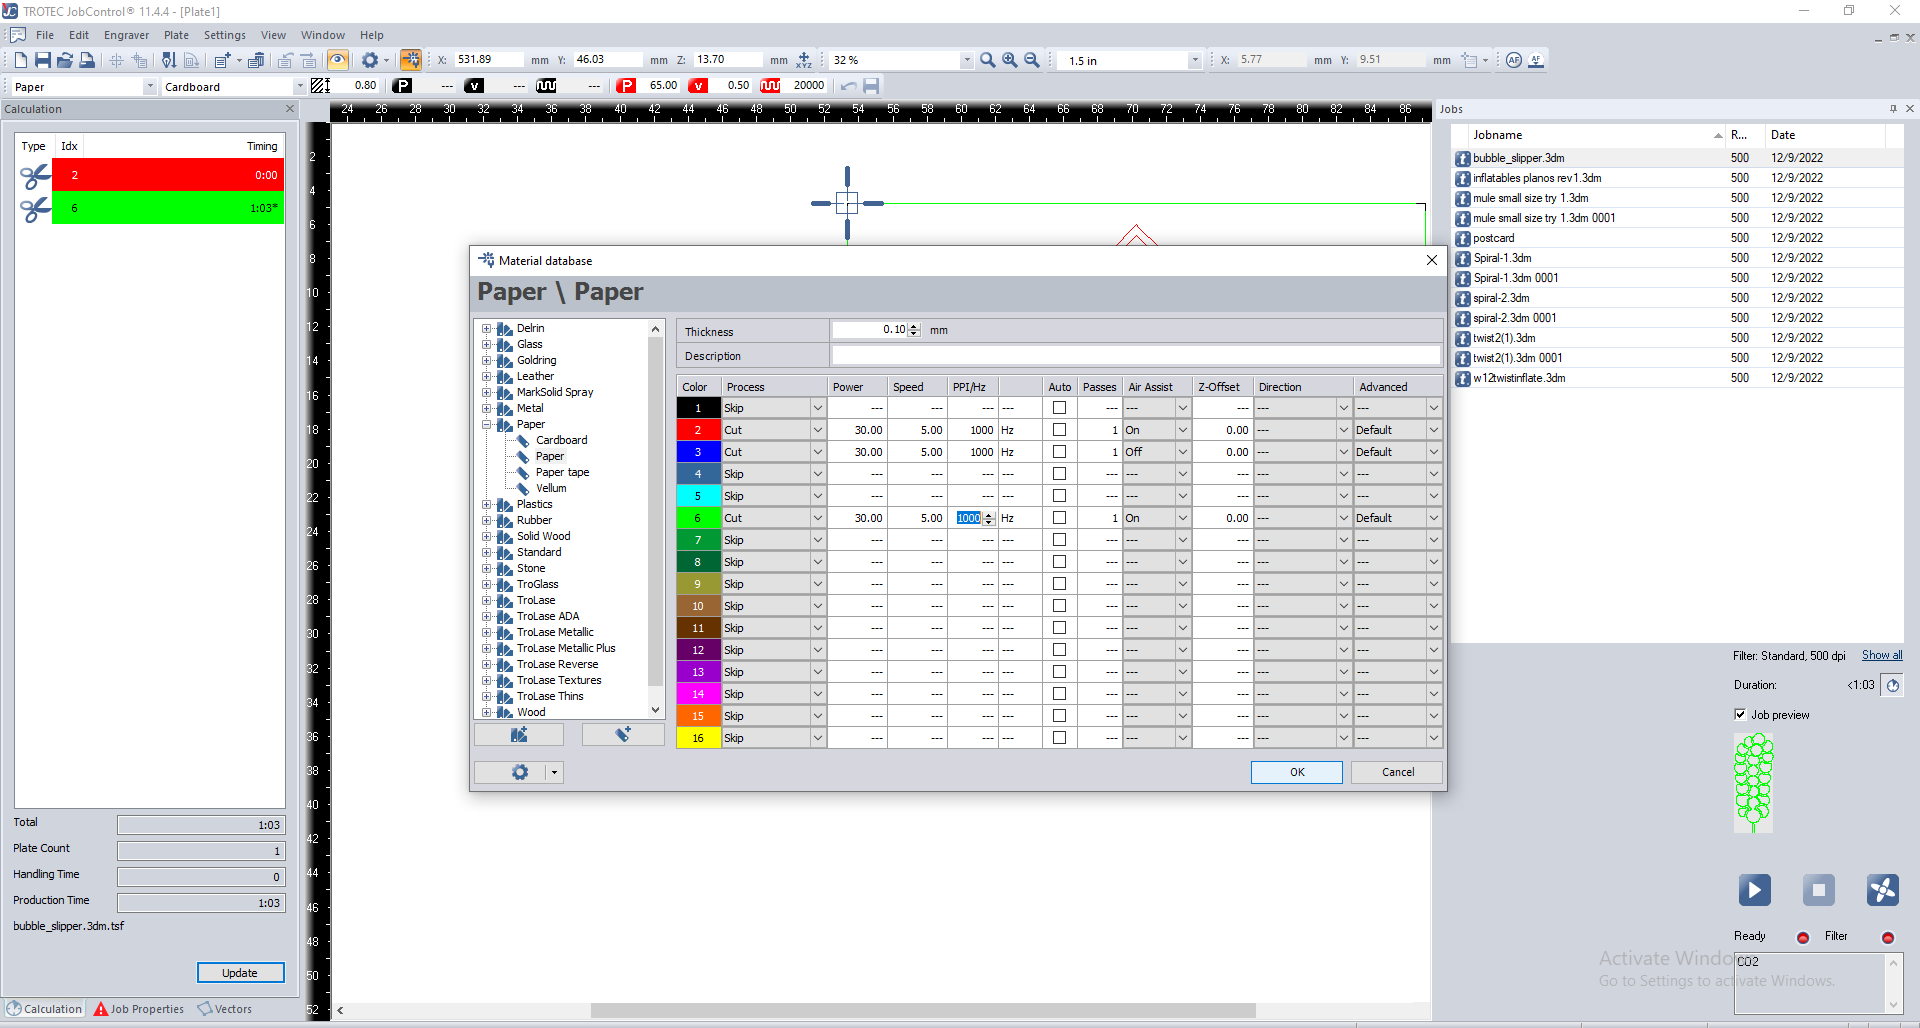
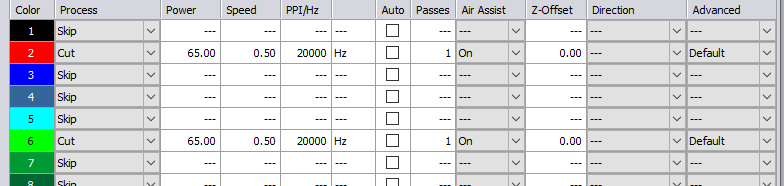
* Select the properties of the baking paper. Power: 30.00 // Speed: 5.00 // PPI/Hz: 1000
* Turn on the laser cutter machine and the air extractor.
* Prepare the sheet of baking paper you will need and tap in cardboard to let them cut and not fly away.
* Adjust the nozzle height of the material.
* Start cutting. During this process, you will need to pause sometimes because the littles pieces will come up, so you will need to tape it to don't let burn or cut it wrong.
* When you have the baking paper cut. Cut with scissors 2 pieces of vinyl sheets, one for the top and one for the bottom bigger than you need (+ 2cm around the shape). The vinyl it's not able to cut with the laser cutting.
* Preheat the heat press.
* Add baking paper beween your project, so you will have: baking paper + vinyl + baking paper (part to inflate) + vinyl + baking paper. Be carefull! The vinyl have two differents sides, the plastic one goes outside.
* Start with a low teparature and time to don't burn it: 120ºC for 15/20 seconds.
* When you have the vinyl sheets join, cut with scissors the exterior shape you want, let minimum of 0,5cm of edge.
* Remove the transparent sheet from both sides.
* Try the inflatable shape with a syringe. In case some parts of the project do not be joined properly iron an other time with baking paper between them.
* Add a tub to the final sample. Cut the inside part in angle and the exterior straight to be able to plug.
Project 1
First of all, I try with some little samples to test how it works with the scissors, the iron and a straw to blow:
Some samples I made to try different movements:
Inflatables samples de Emma
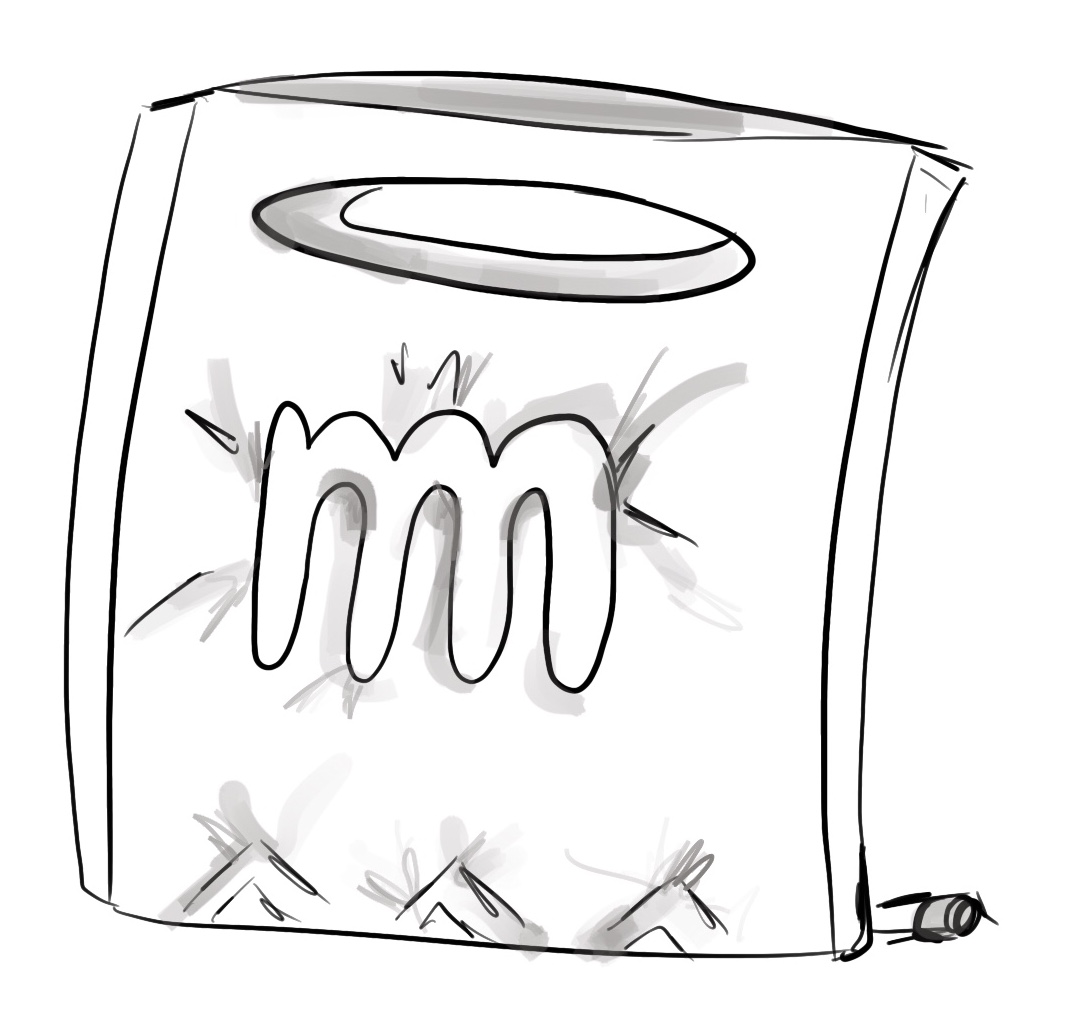
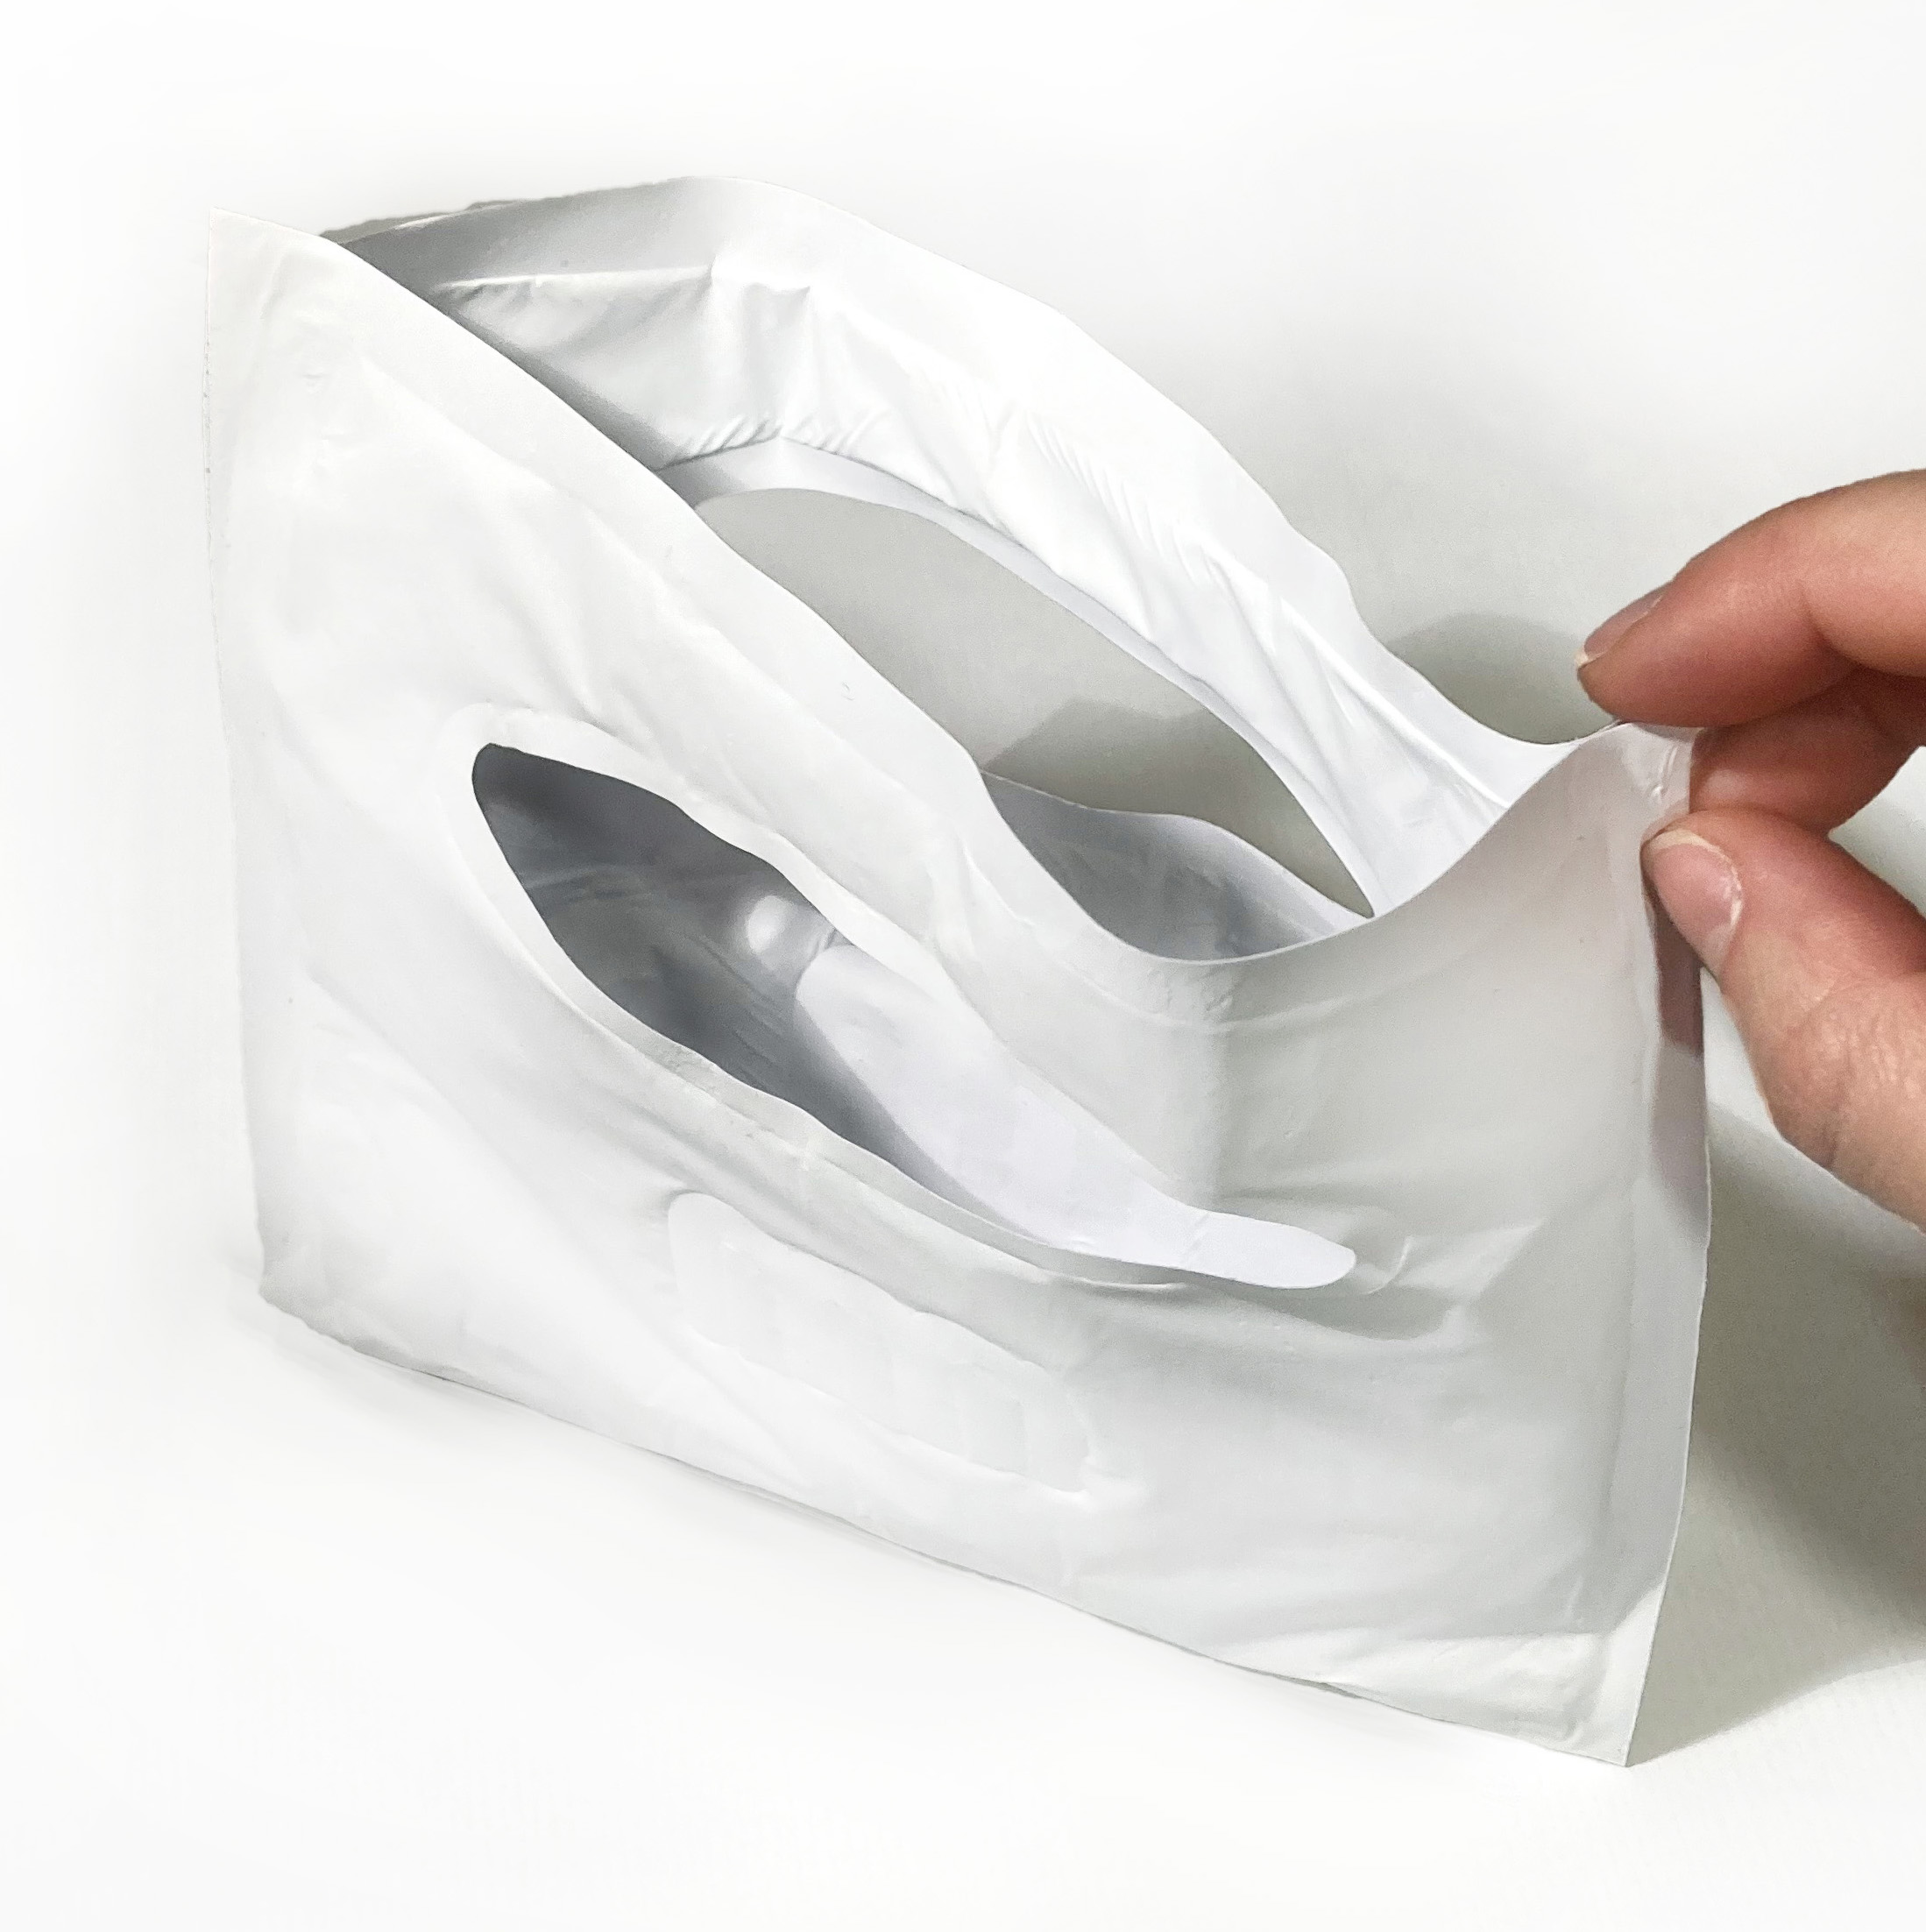
After I understand the workflow and the possibilities I design a little inflatable handbag.
We have the idea!
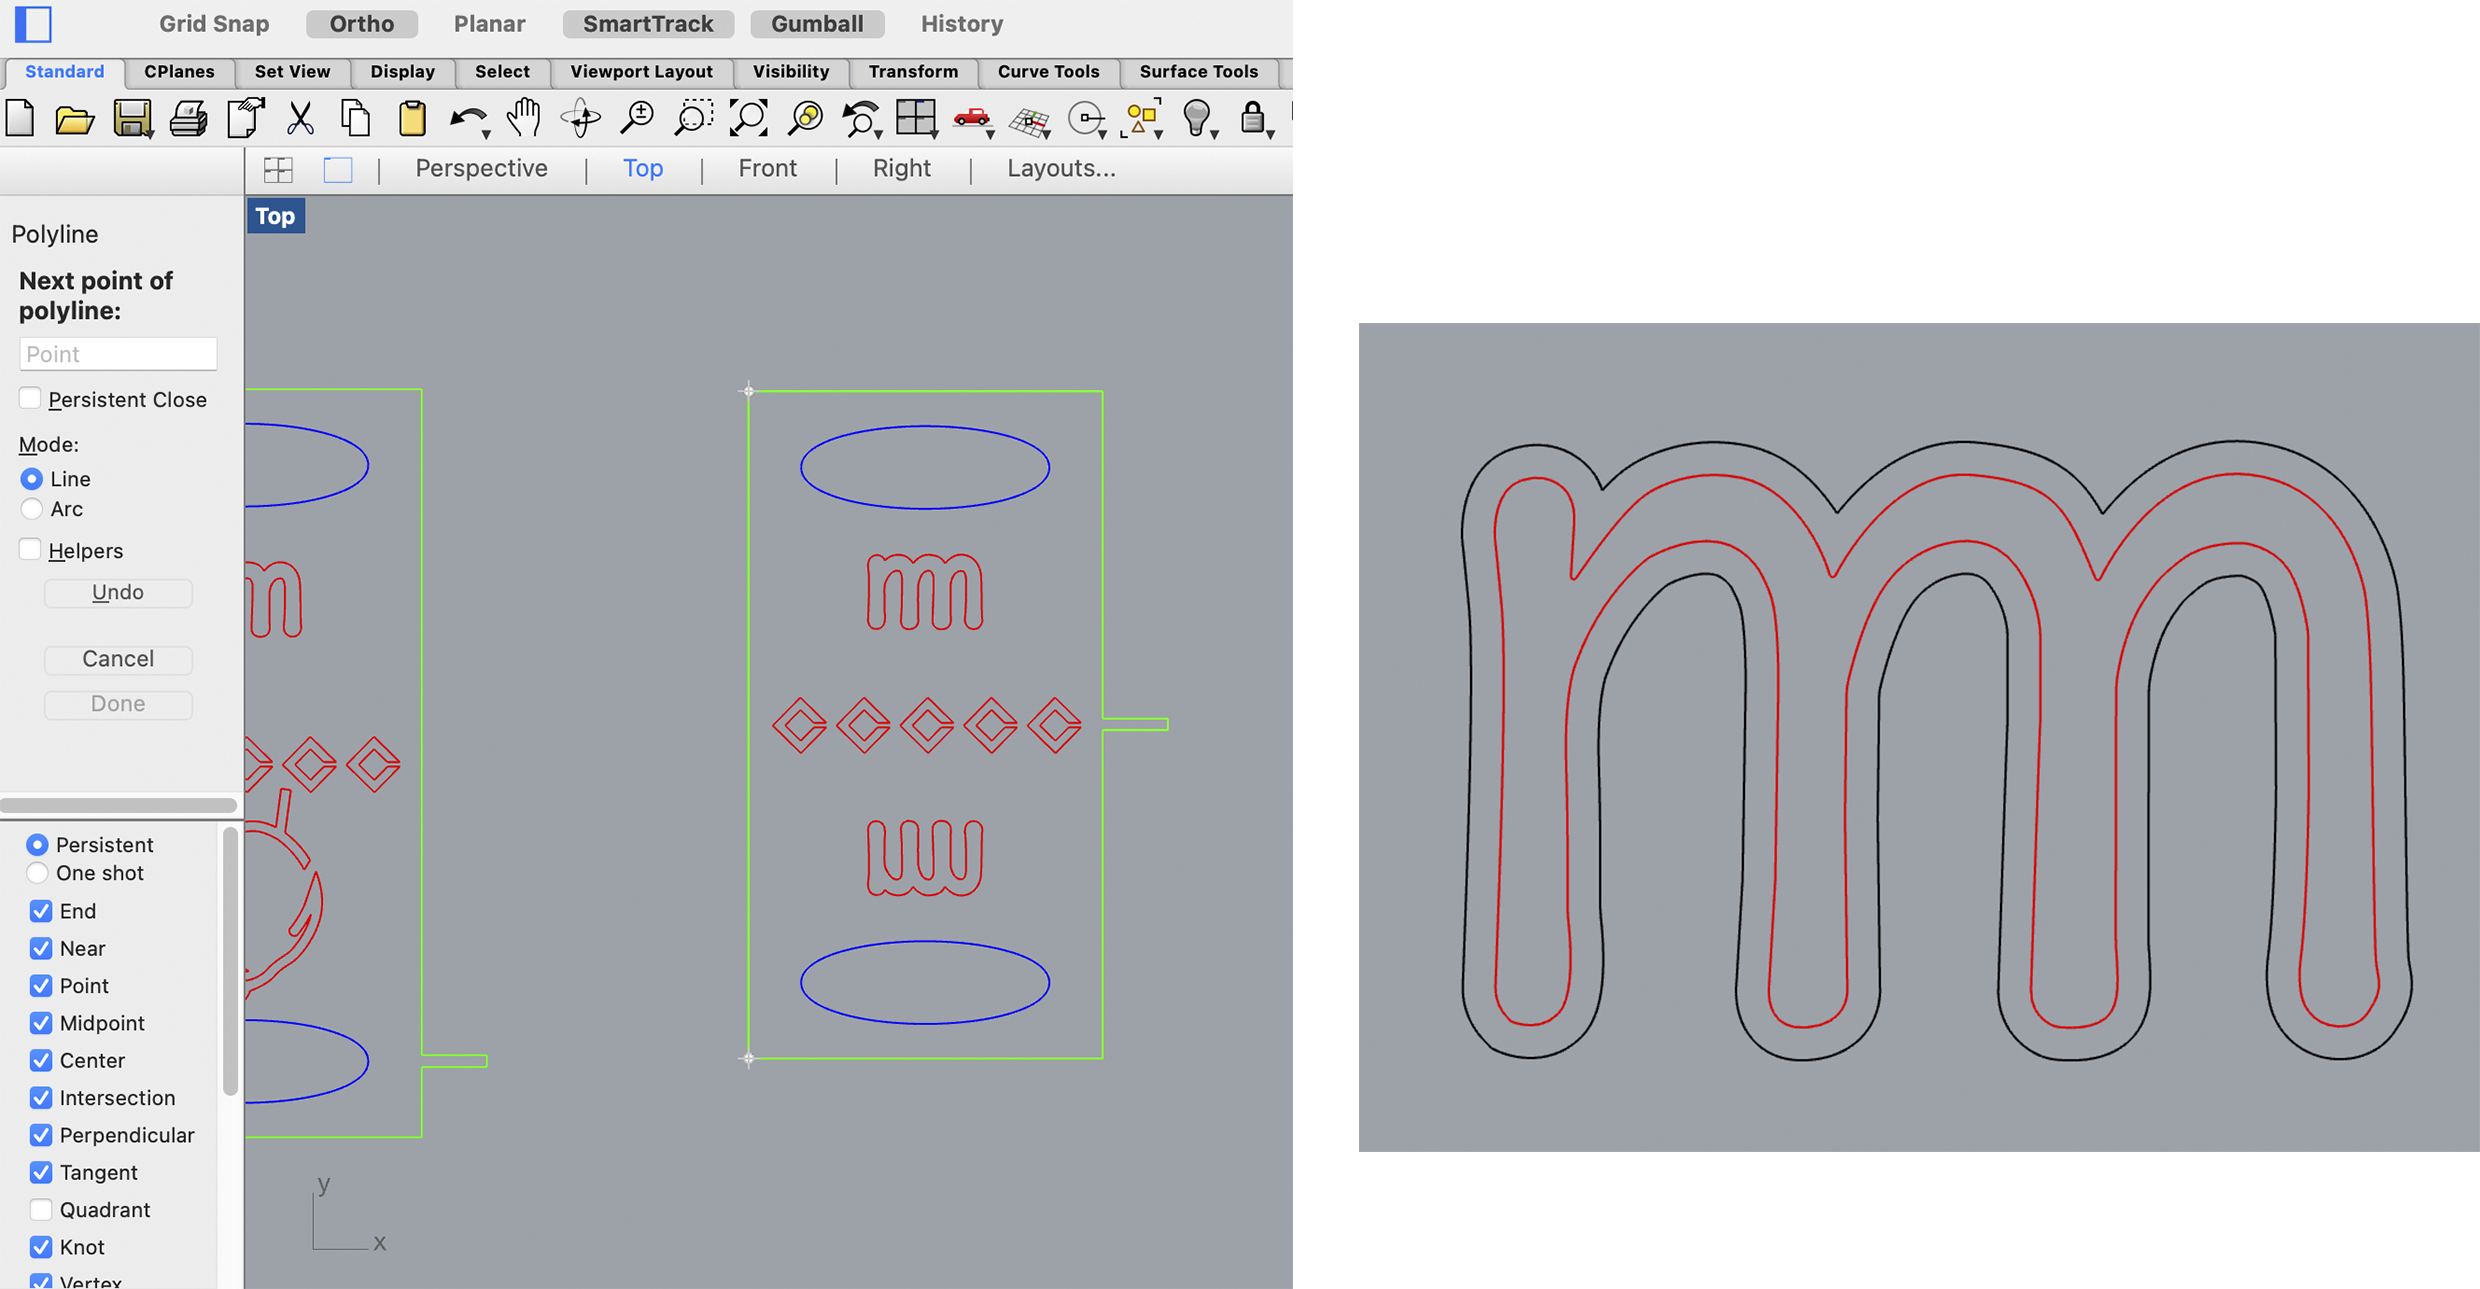
The following step is to create the patterns to cut in Rhino.
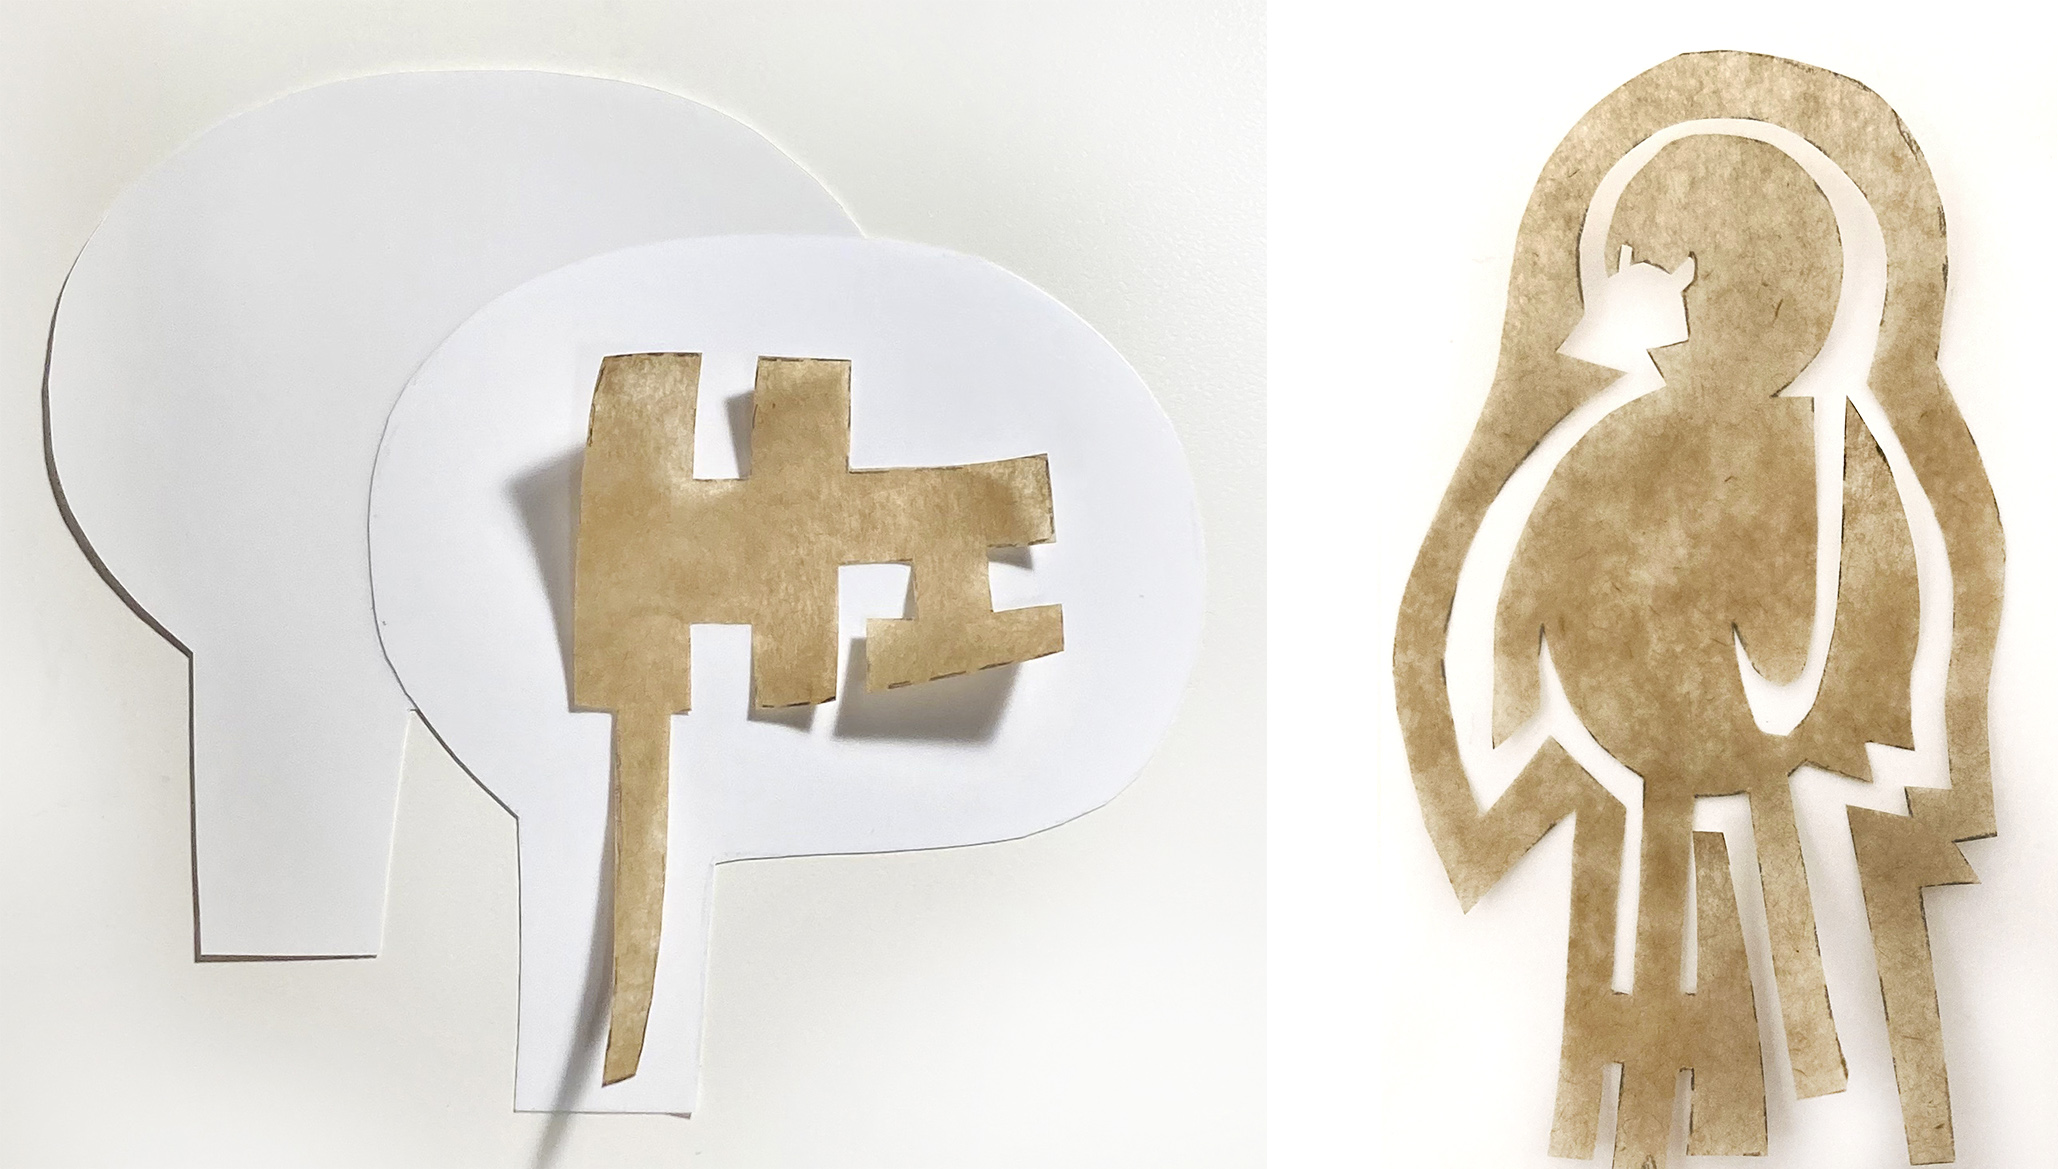
The file has 3 different layers/colors to send it to cut: It will start with the inside red shapes (the rhombus, the logo, and the bird), then will continue with the blue handle and the green exterior lines of the accessory shape to end.
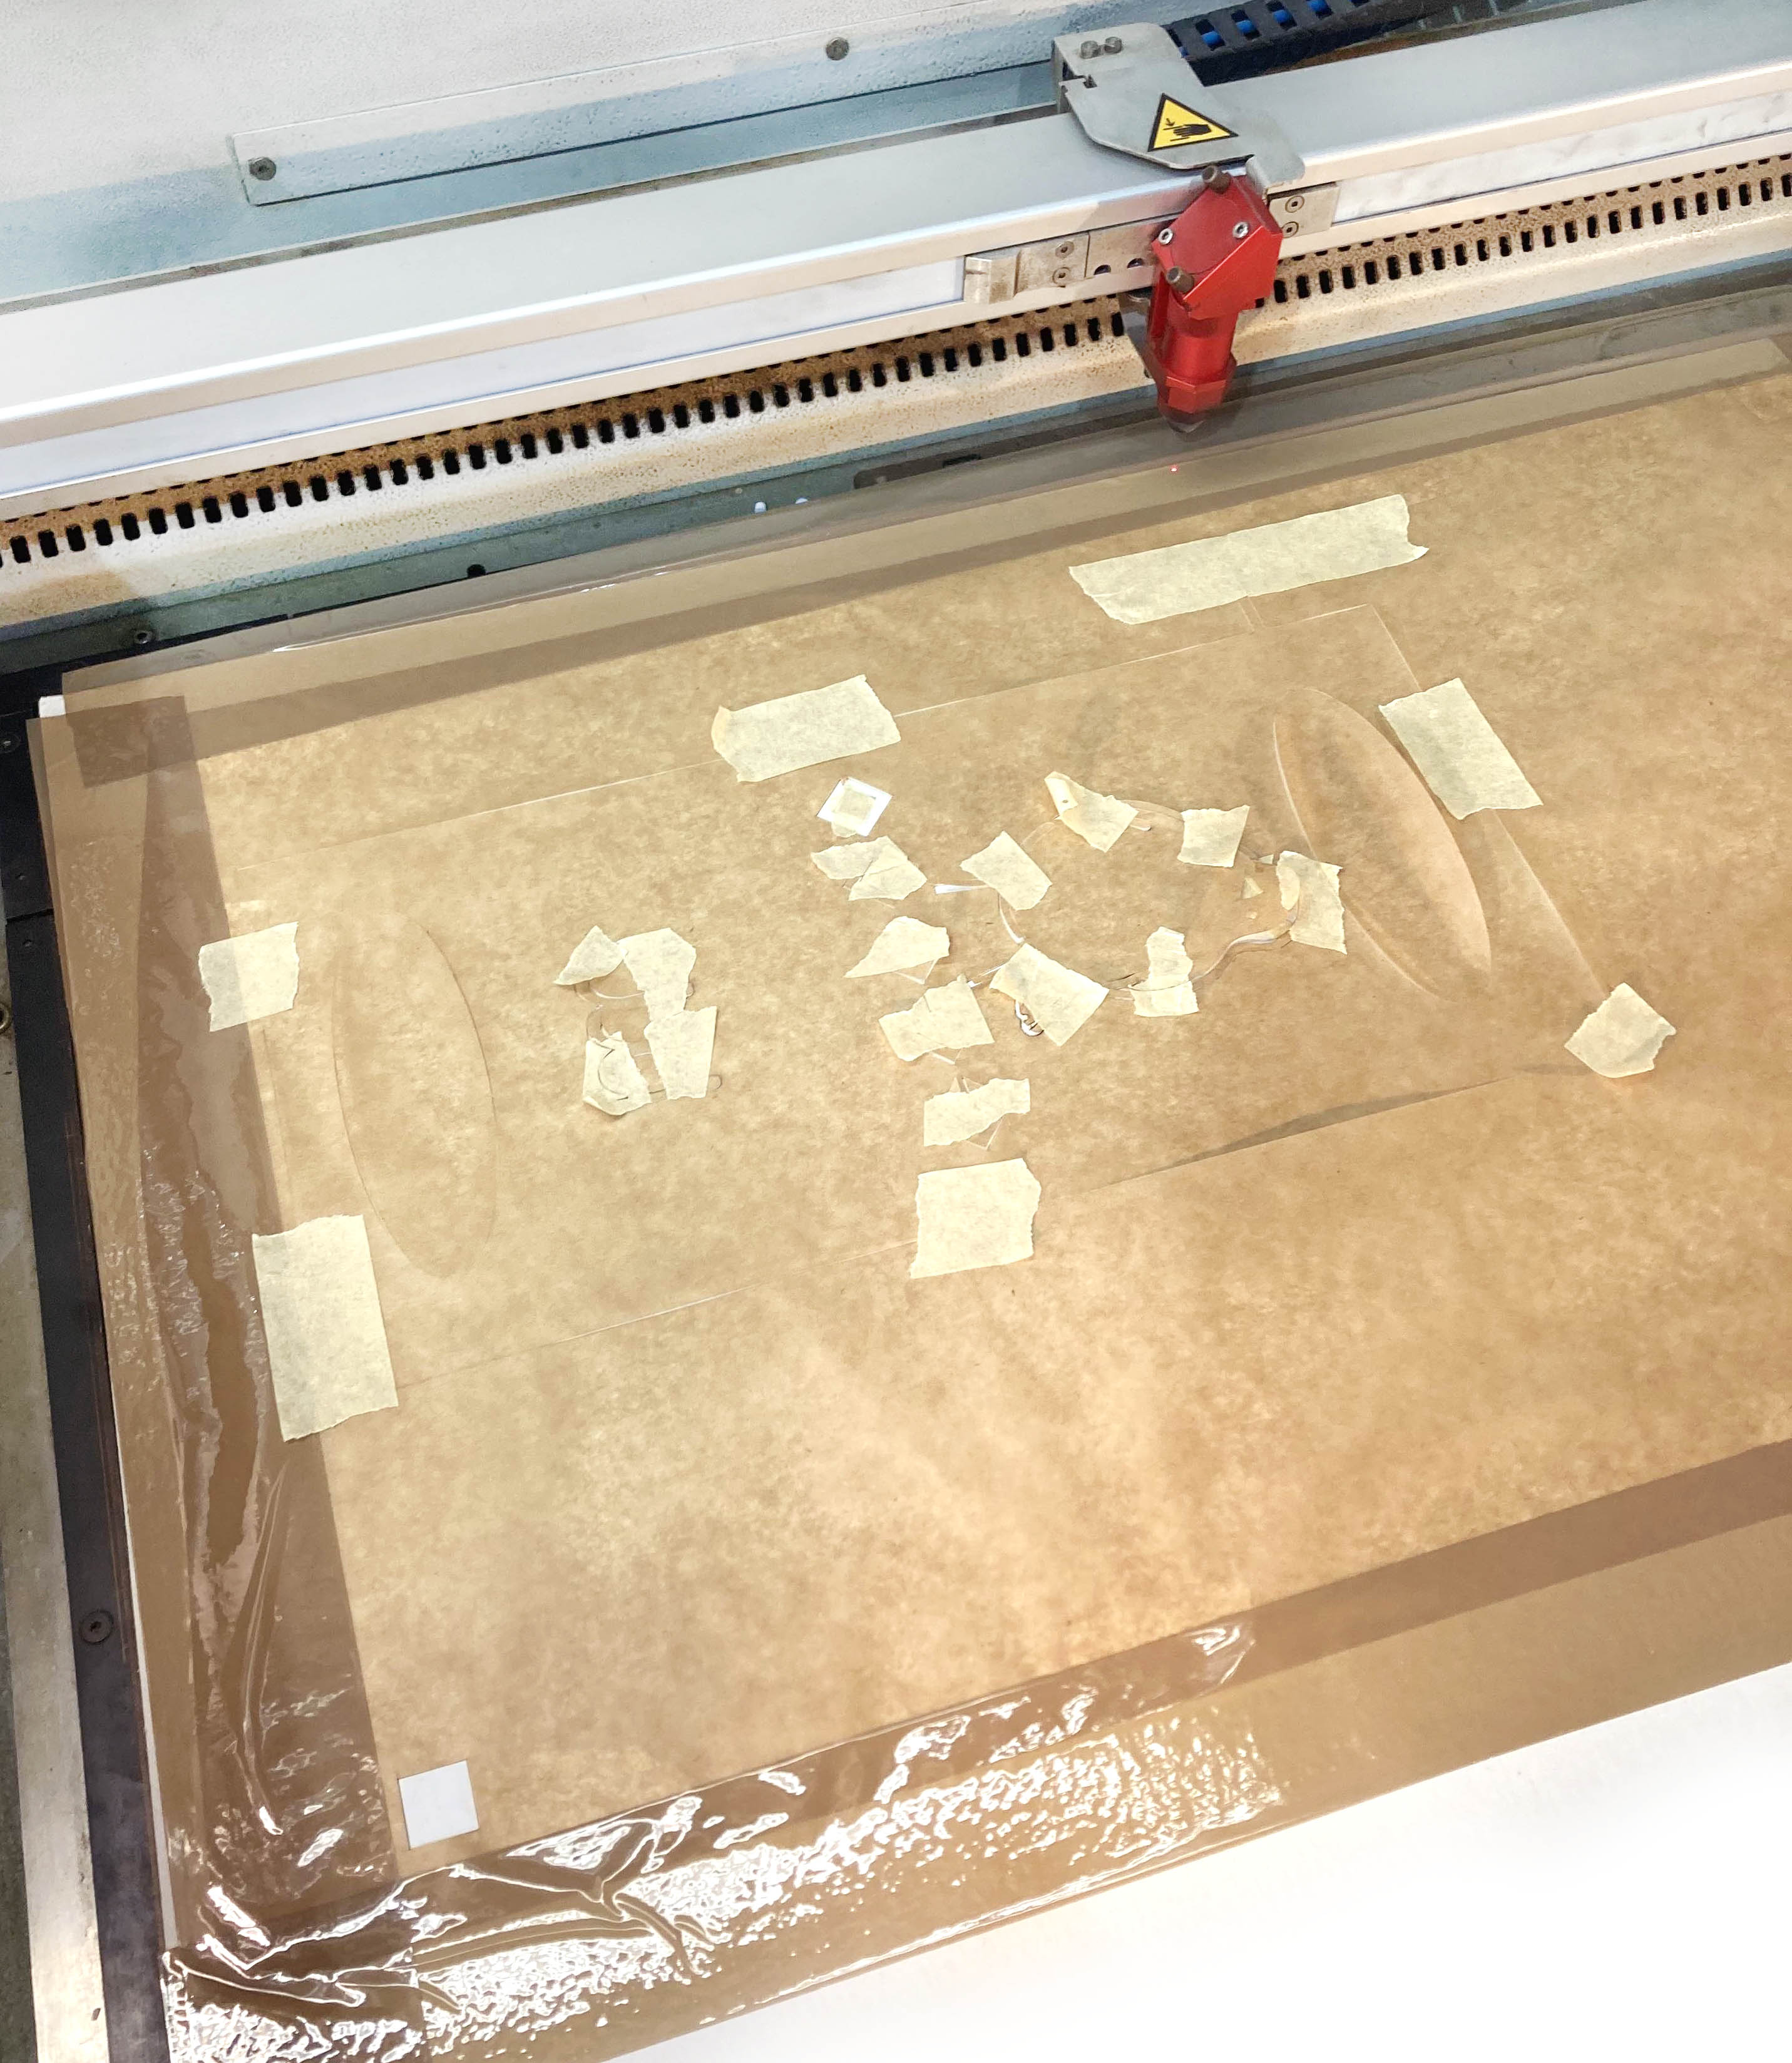
While the laser cutting was working I have to be attentive with the little pieces to not fly away or move. So, I pause the machine every time it was needed and taped the pieces which stand out.
Unfortunately, this result didn't work. The thickness of the logo and the bird was super thin, so when I inflated it unstuck. Moreover, I heated for the second time with the iron to glue properly, but then the space between the "m" and some parts of the bird was joined. So I lost the figure.
SECOND TRY:
Let's improve the errors!
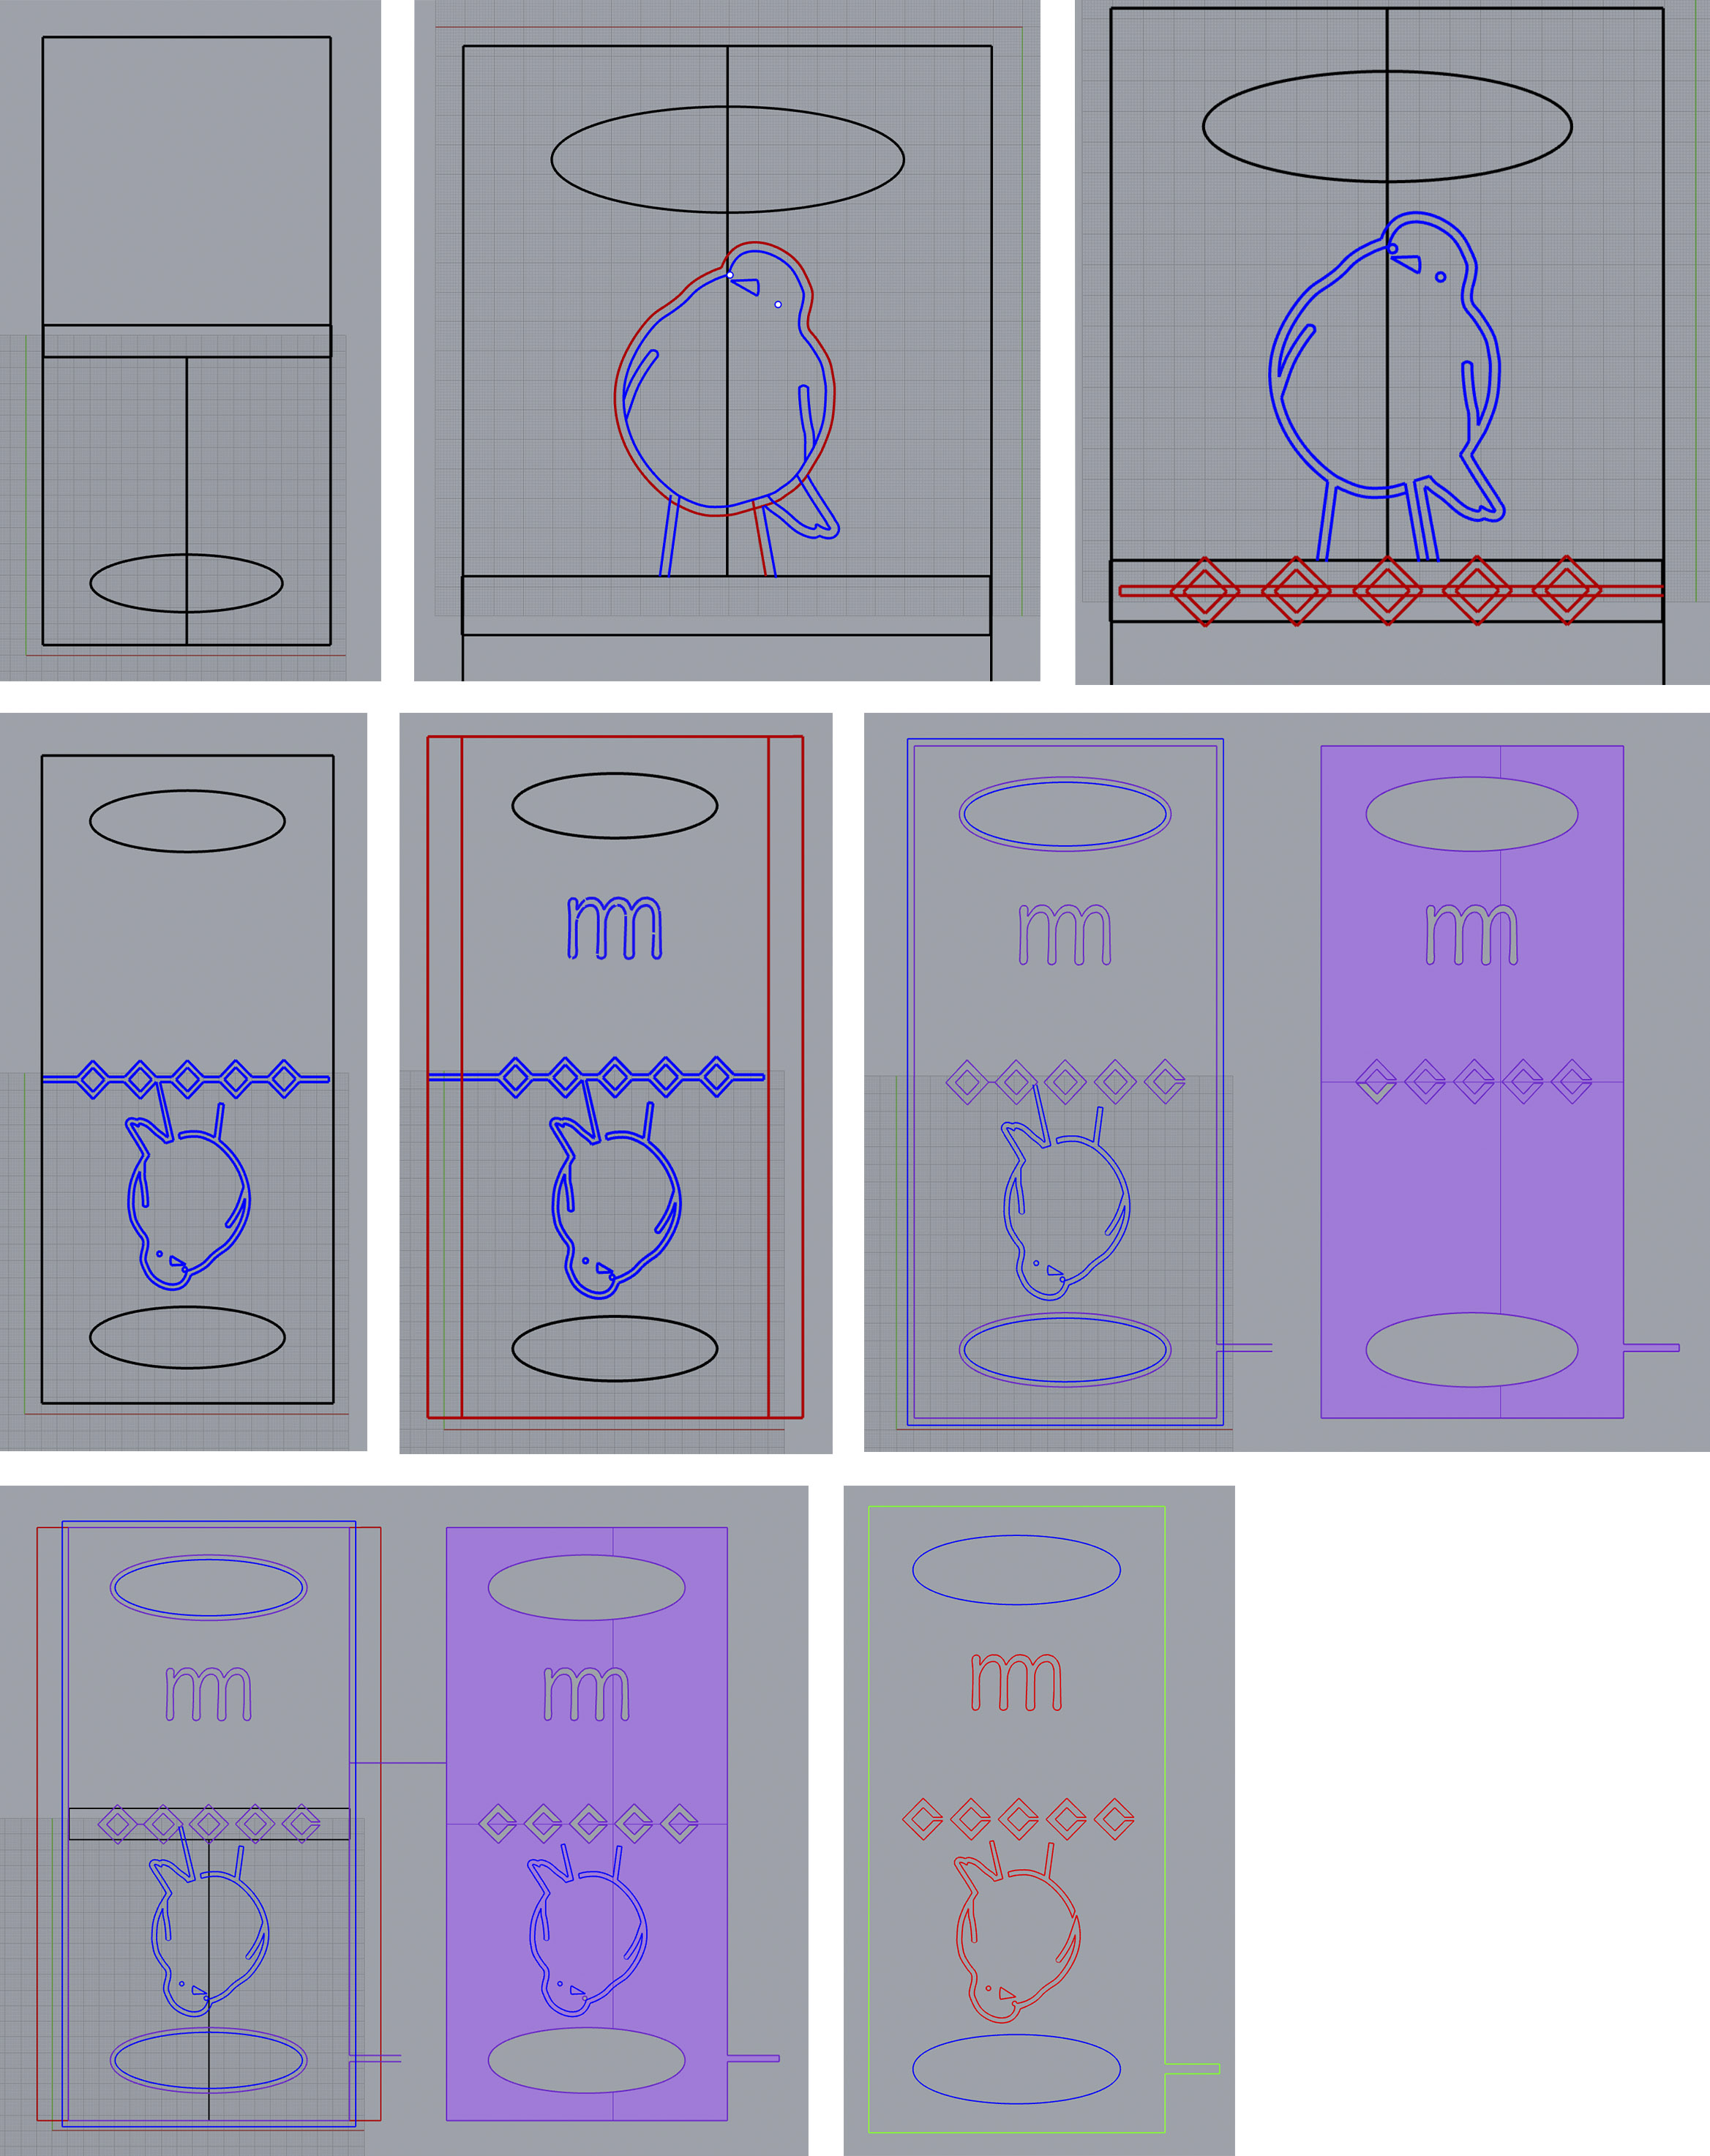
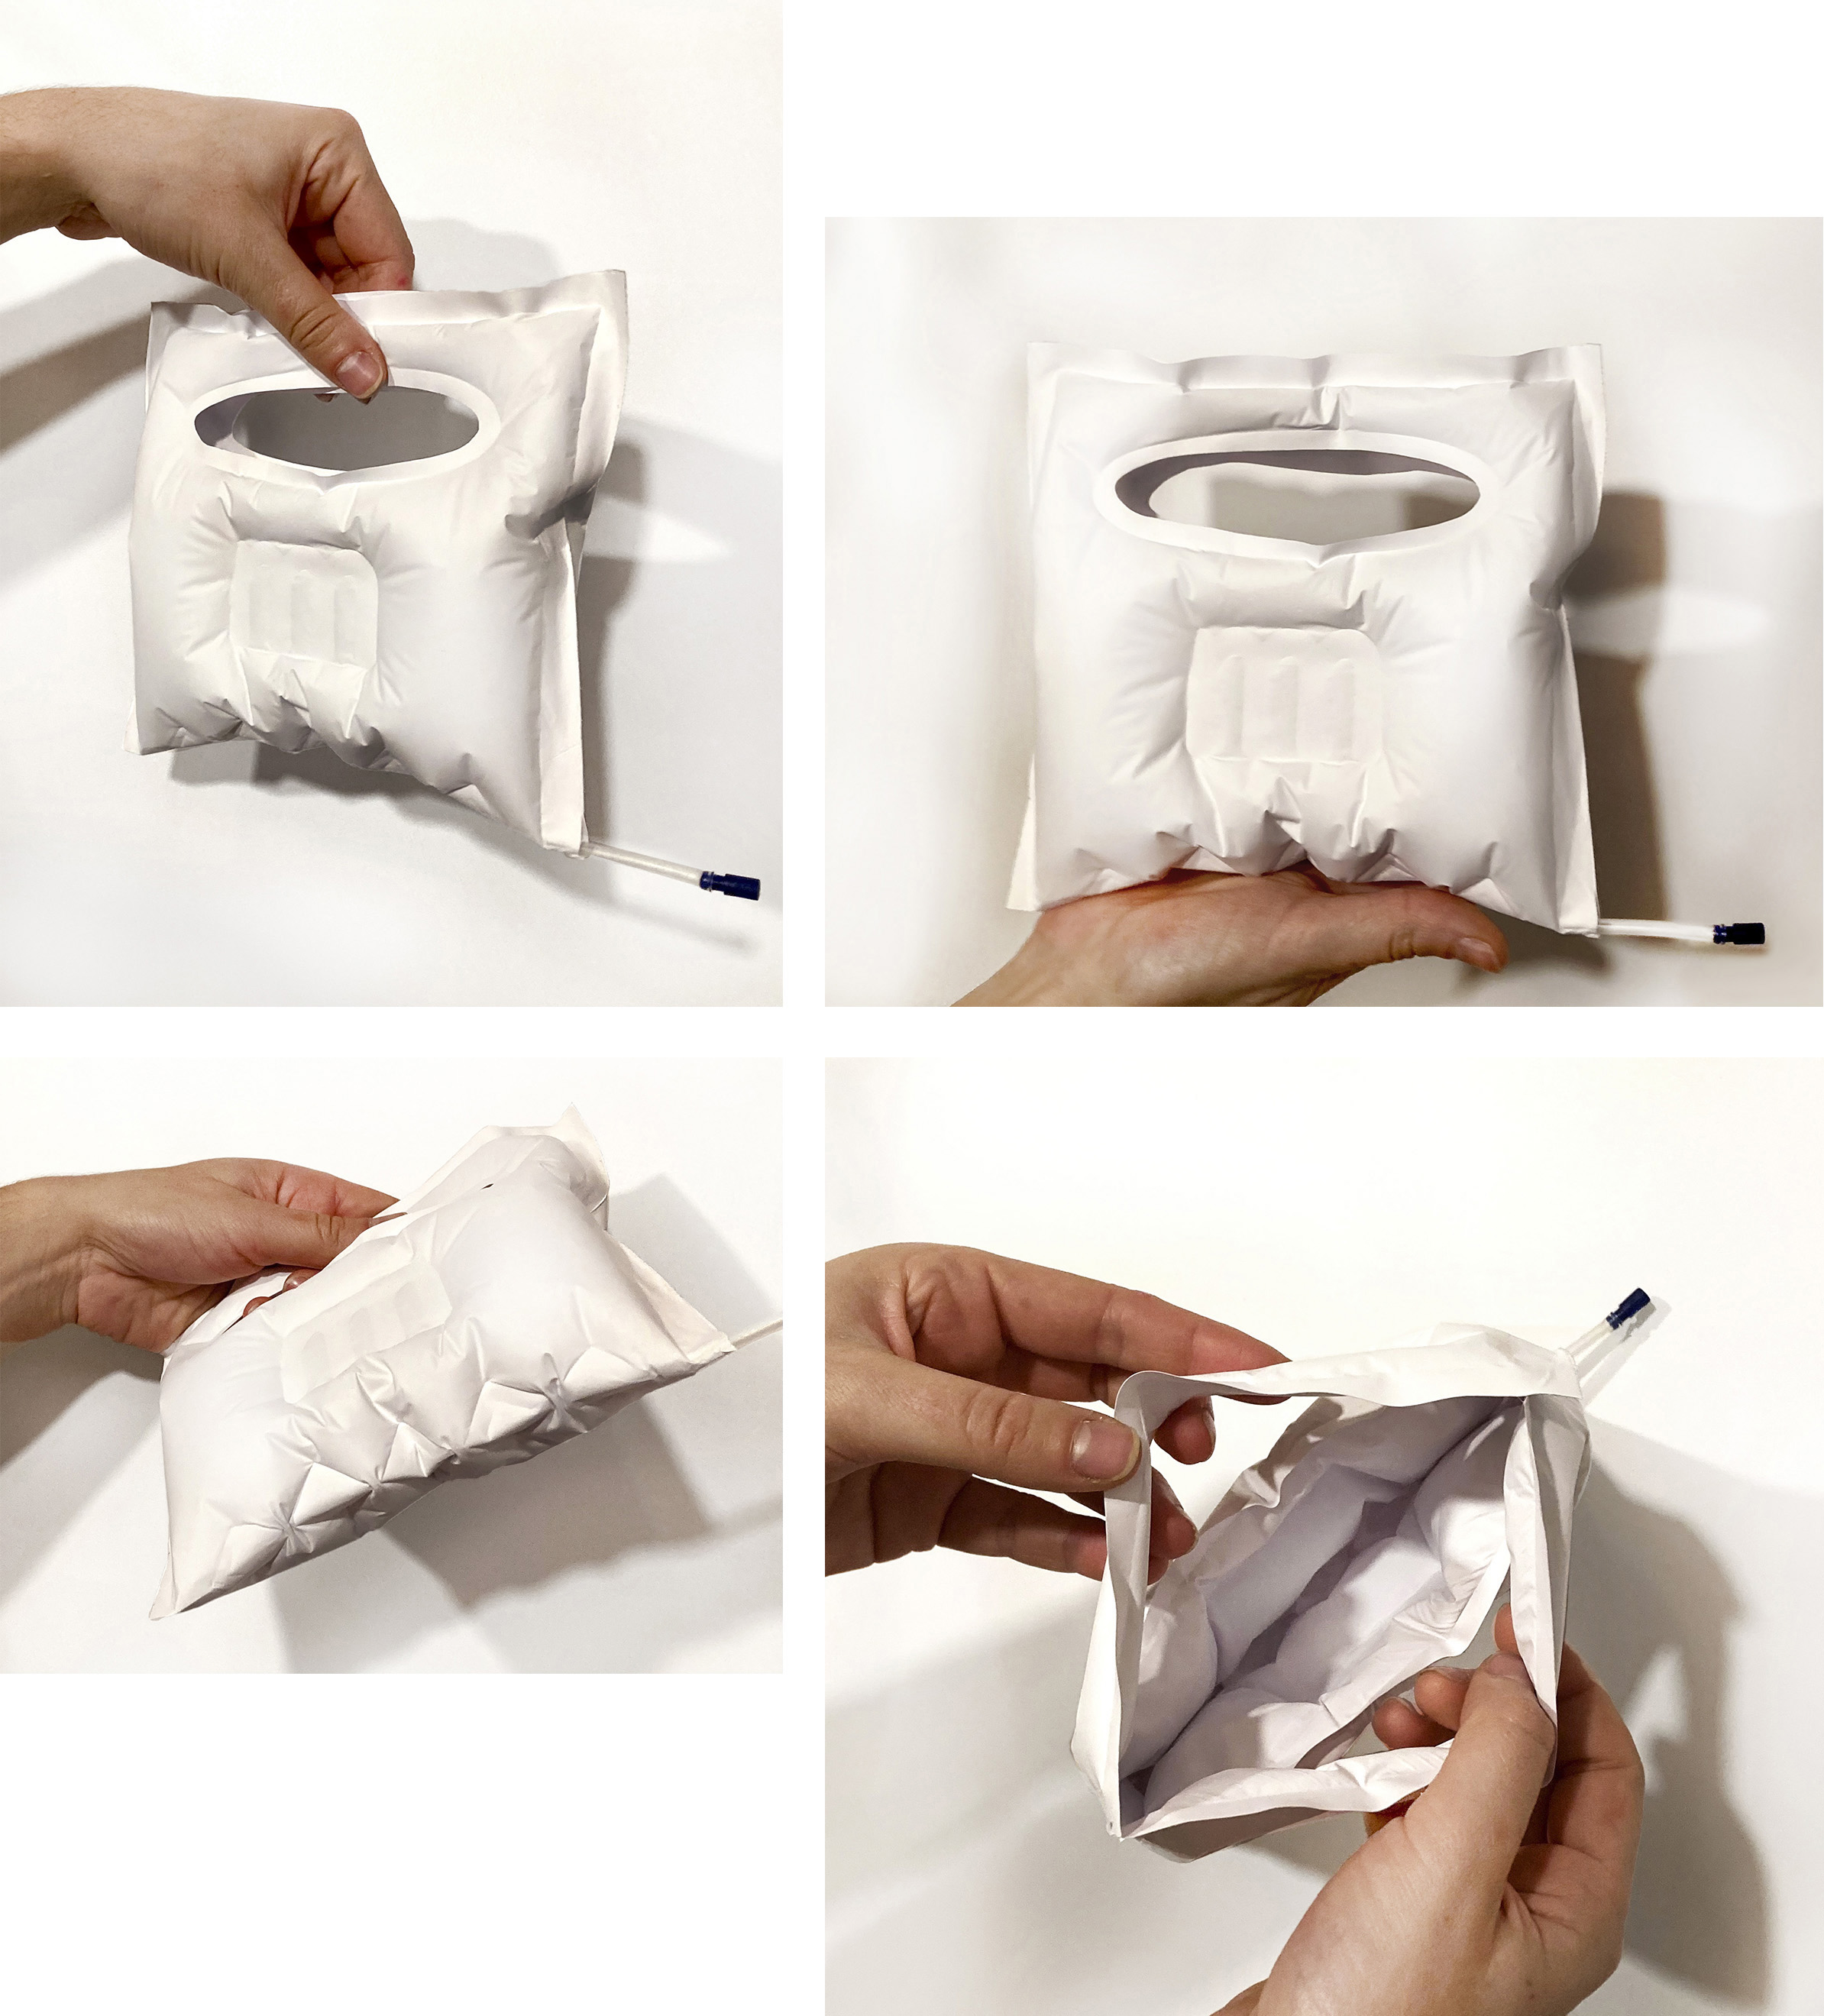
For the second sample, I increased the thickness of the logo and the pieces to bleed on the bottom of the bag in Rhino. Additionally, I reduce the handbag to get easily the shape (338mm x 213mm), and the entrance I located in the middle of the pattern to get reciprocal growth.
Download the Rhino handbag pattern file here.
Additionally, you could use the following software to simulate your sample inflatable:
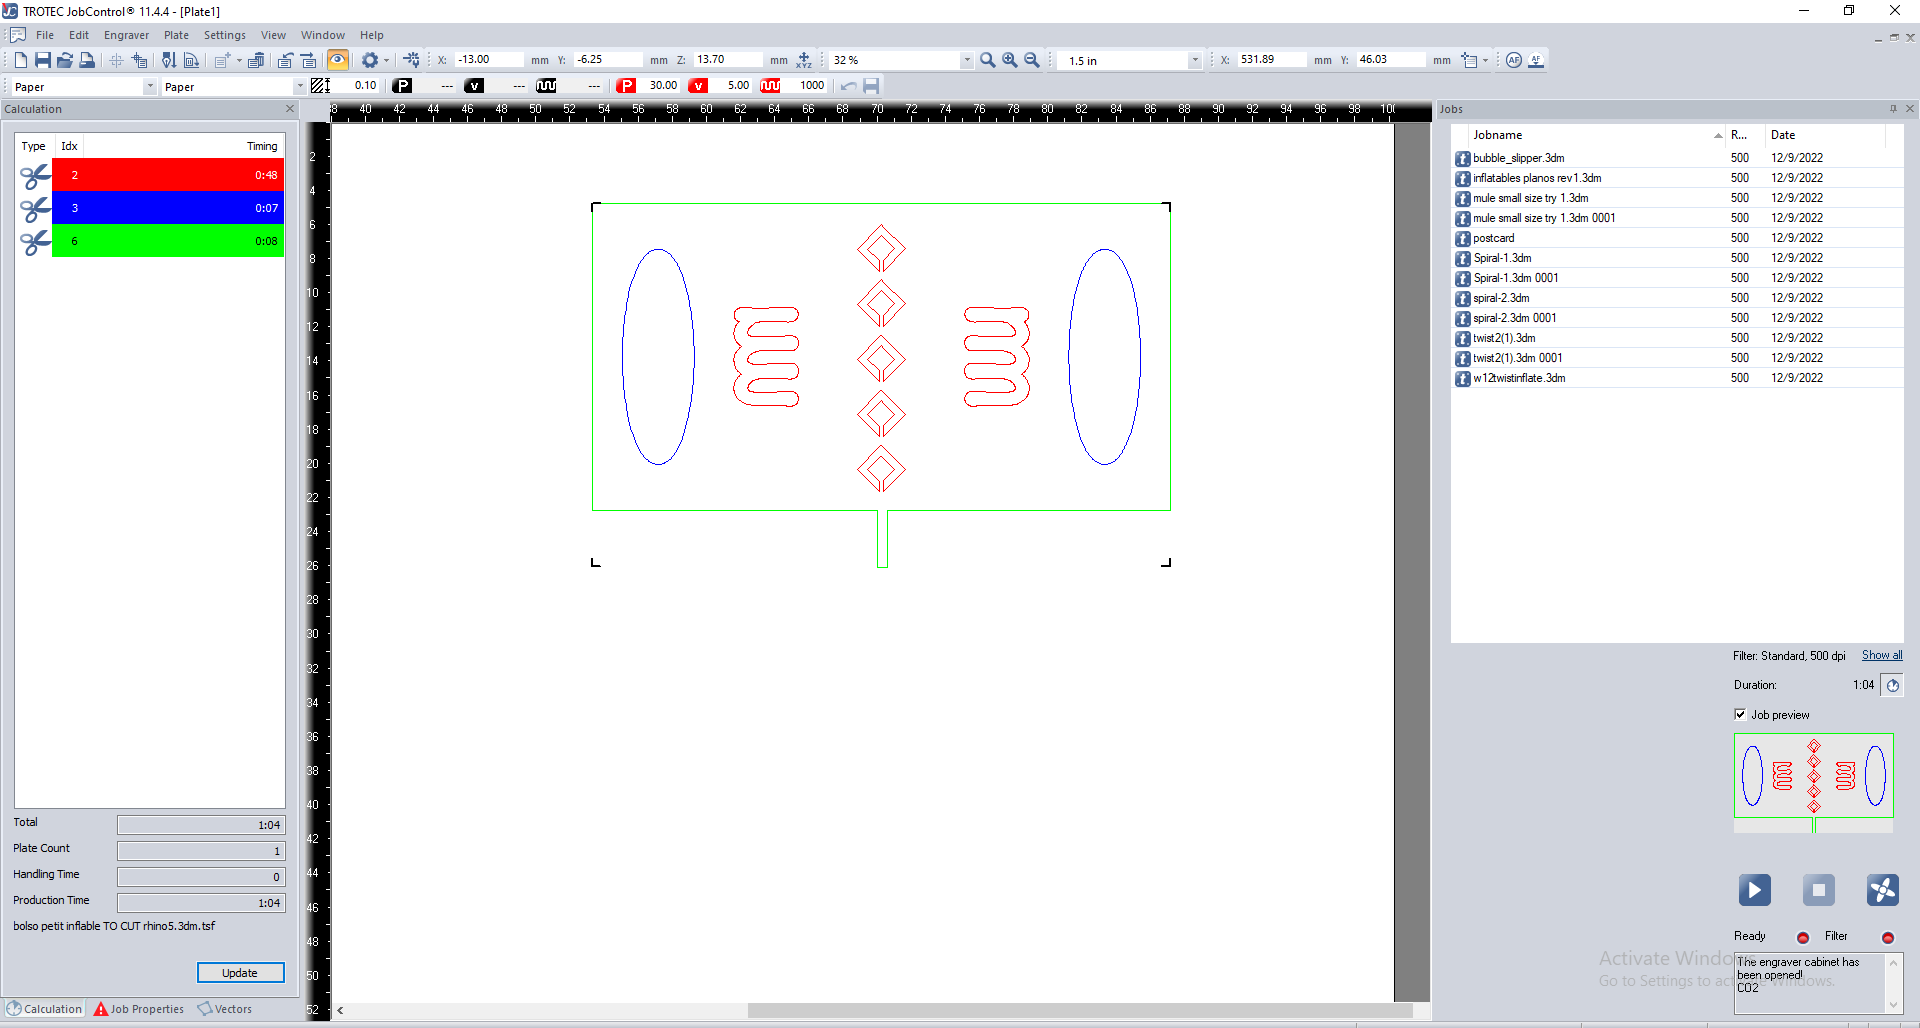
For this design we divided the cut process into 3 sections, starting from the inside to the outside (Color order). The next step is to send the file to the laser-cut machine.
Remember: It has to be saved in Rhino 5.
ATTENTION: Read the instructions of your vinyl, each brand has different temperatures and times to heat.

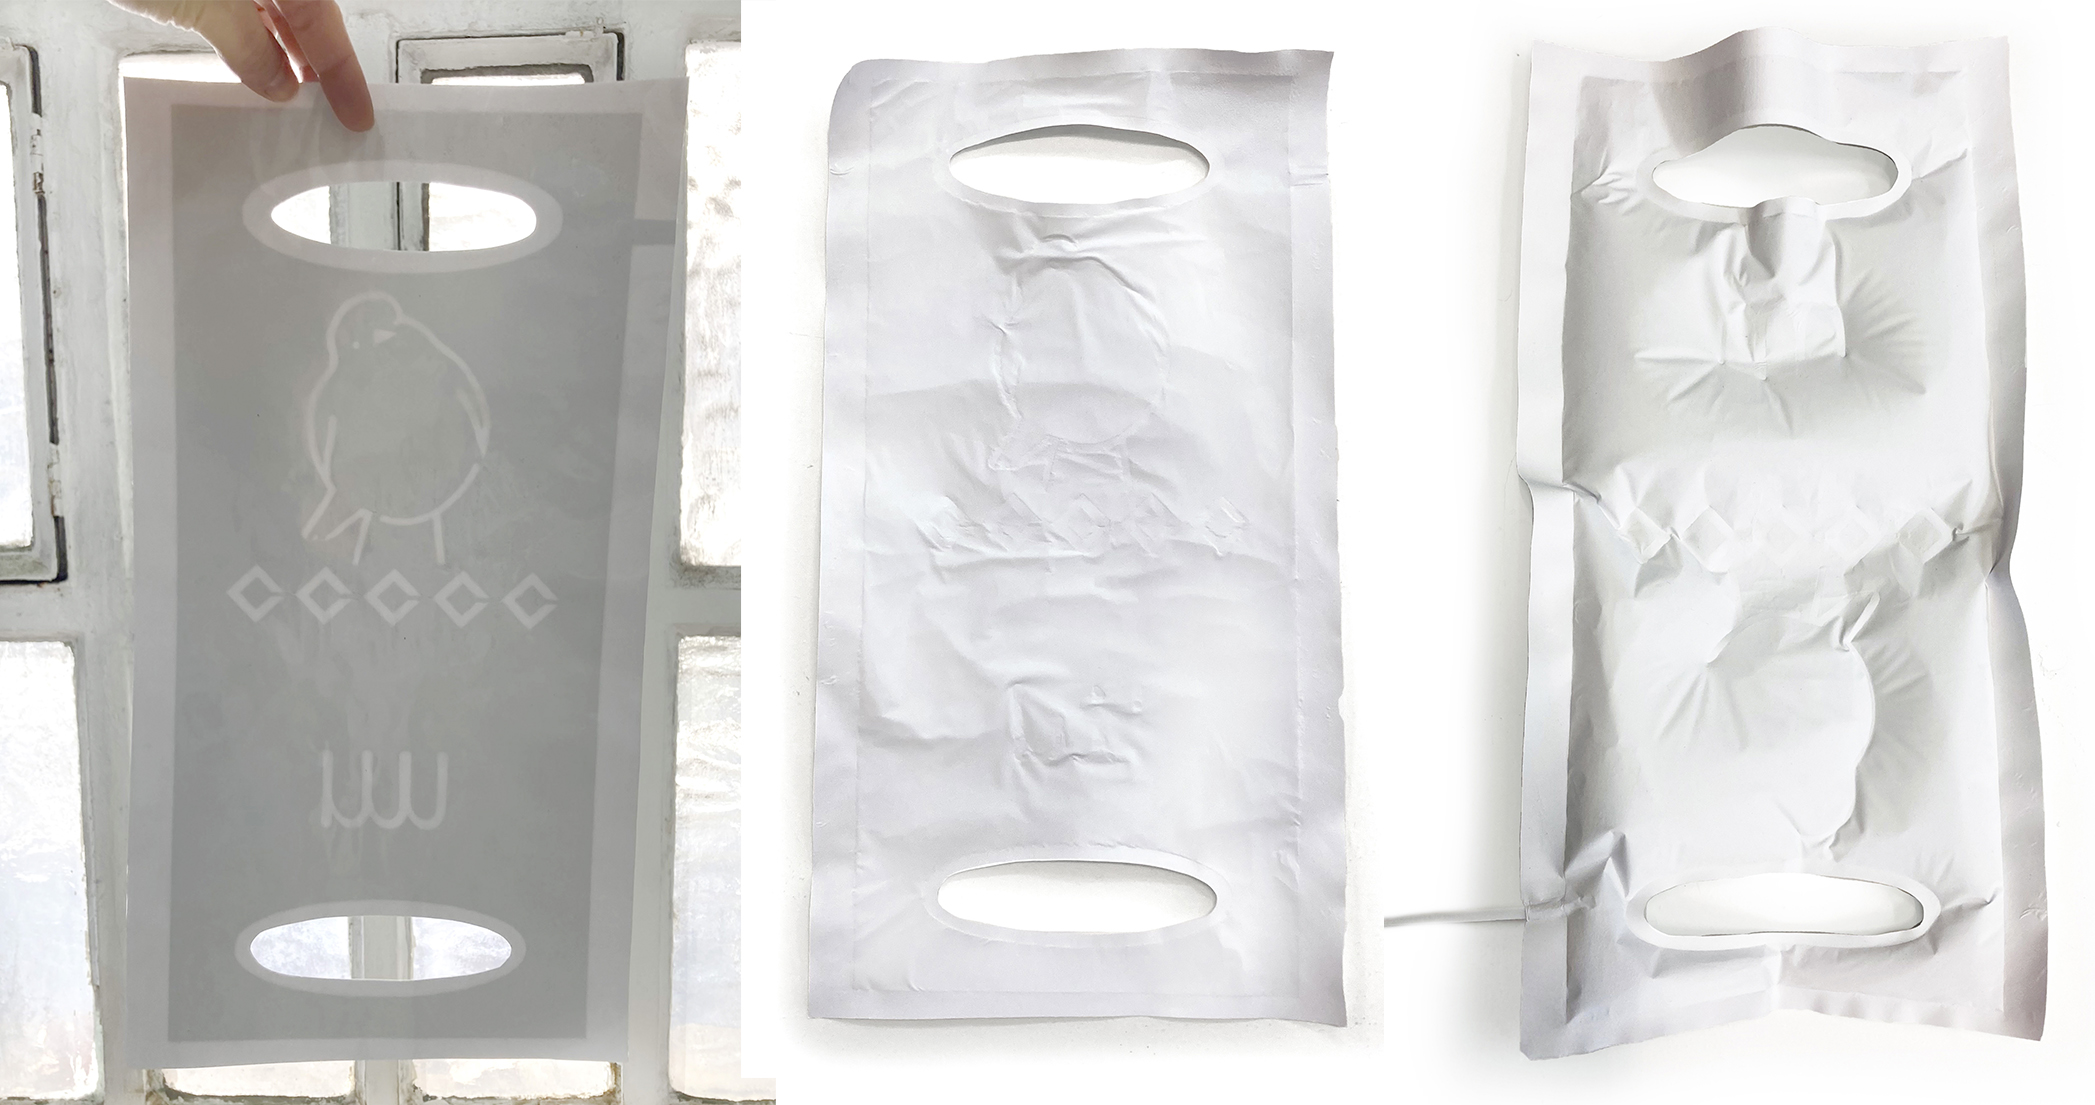
To get precise edges results I use a permanent marker and a ruler to draw on the top of the transparent layer to know where to cut with the scissors, after cutting we will remove this plastic sheet.
Another good tip is to pass a straw at the entrance before cutting it to the correct edge. If not, it's getting hard to open the hole with the pipe.
See the result of the second try in the following video:
Inflatable handbag de Emma
On the left side, you could see how the pattern blends when it blows up. The right video is the final result of the handbag joined with the iron on the sides and how it takes the volume when you inflate it.
Finally we get the result!
After different trials with a straw to blow up, we change it to a transparent plastic pipe of 0.5mm in diameter and add a plug that I already have at home, lucky to find it!
It's recommended to choose a thin diameter size for the tube and the inside part cut with an angle, not straight.
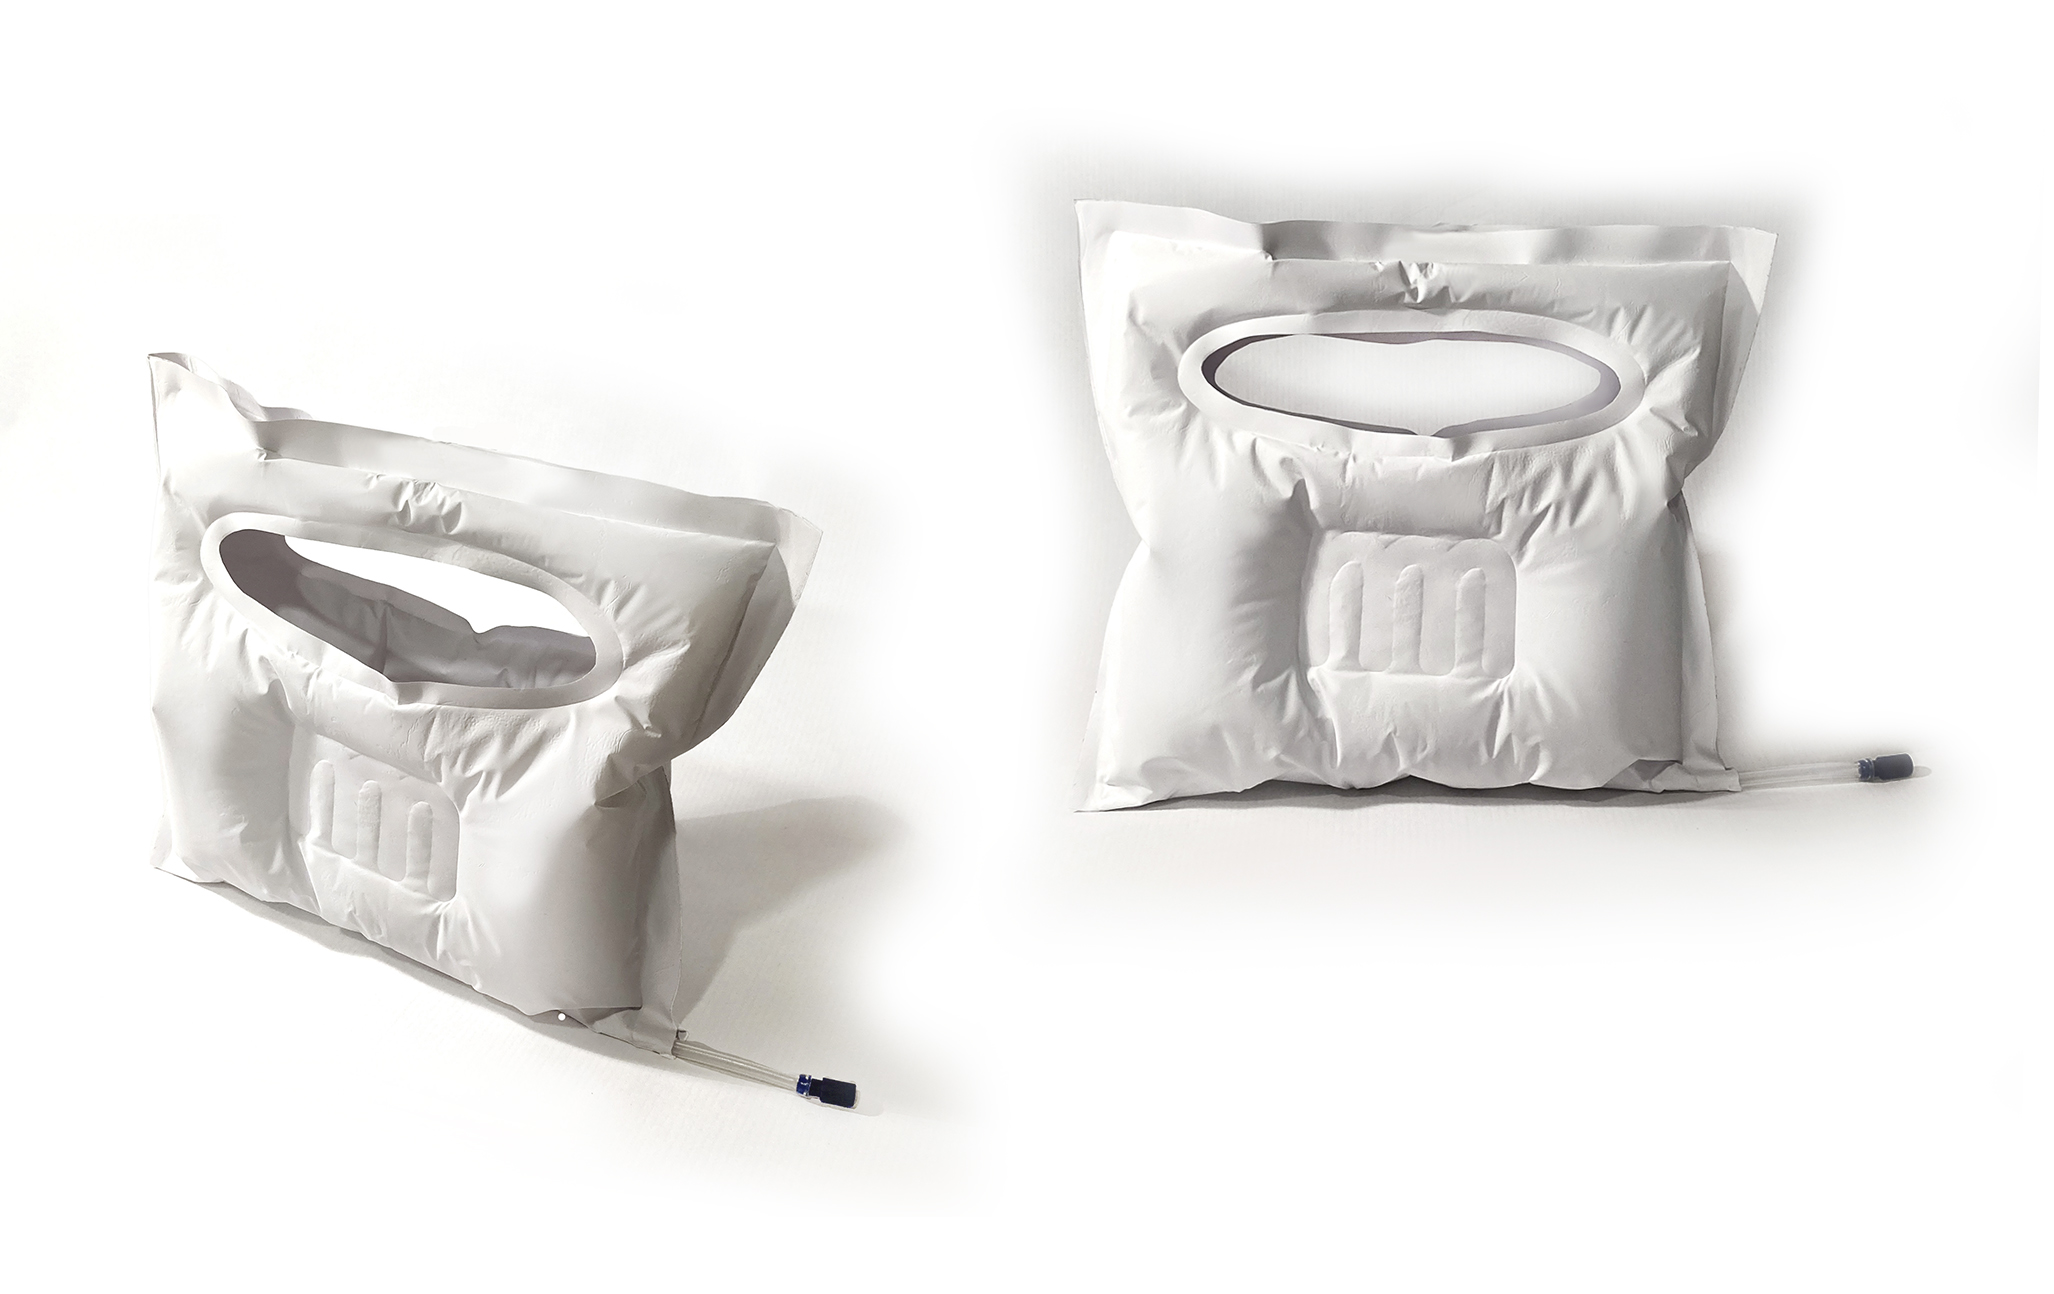
In conclusion, even if I increase the thickness of the "m" it was enough and has been joined inside. However, the vinyl let you join the parts when you heat it so it's an efficient finish.
3.2 Moulding & casting
In the videos below is a sample of casting silicone result and the process:
Furl: Soft Pneumatic Pavilion from Interactive Architecture Lab on Vimeo.
Making off:
The Making of Furl: Soft Pneumatic Pavilion from Interactive Architecture Lab on Vimeo.
The material could be Silicone or a Biomaterial such as Gelatine or Alginate.
THERE ARE 2 SYSTEMS TO CREATE A MOLD:
- 3D Printer
- Laser cutting
3.2.1 3D Printer mold
We are going to use this method for complex mold forms or little shapes.
First of all, we will create a Rhino file to export to the printer. Important, for the settings of the Printer we should add a high resolution to do not get holes in the mold or an irregular mold shape. Consequently, the time printer process will increase considerably.
Material: PLA
ATTENTION: Sometimes, to accelerate the dry process we let the sample in the dehydrator or oven, for the 3D printer mold you can not! It will melt it.
To know more about casting and moulding with 3D Priner follow Alve Documentation week.
3.2.2 Laser cutting mold
We will use this system to get big and simple molds shapes. Moreover, it used to be a faster method rather than the 3D printer.
To know the procedure with the laser cutting mold check my second project of the week.
Project 2
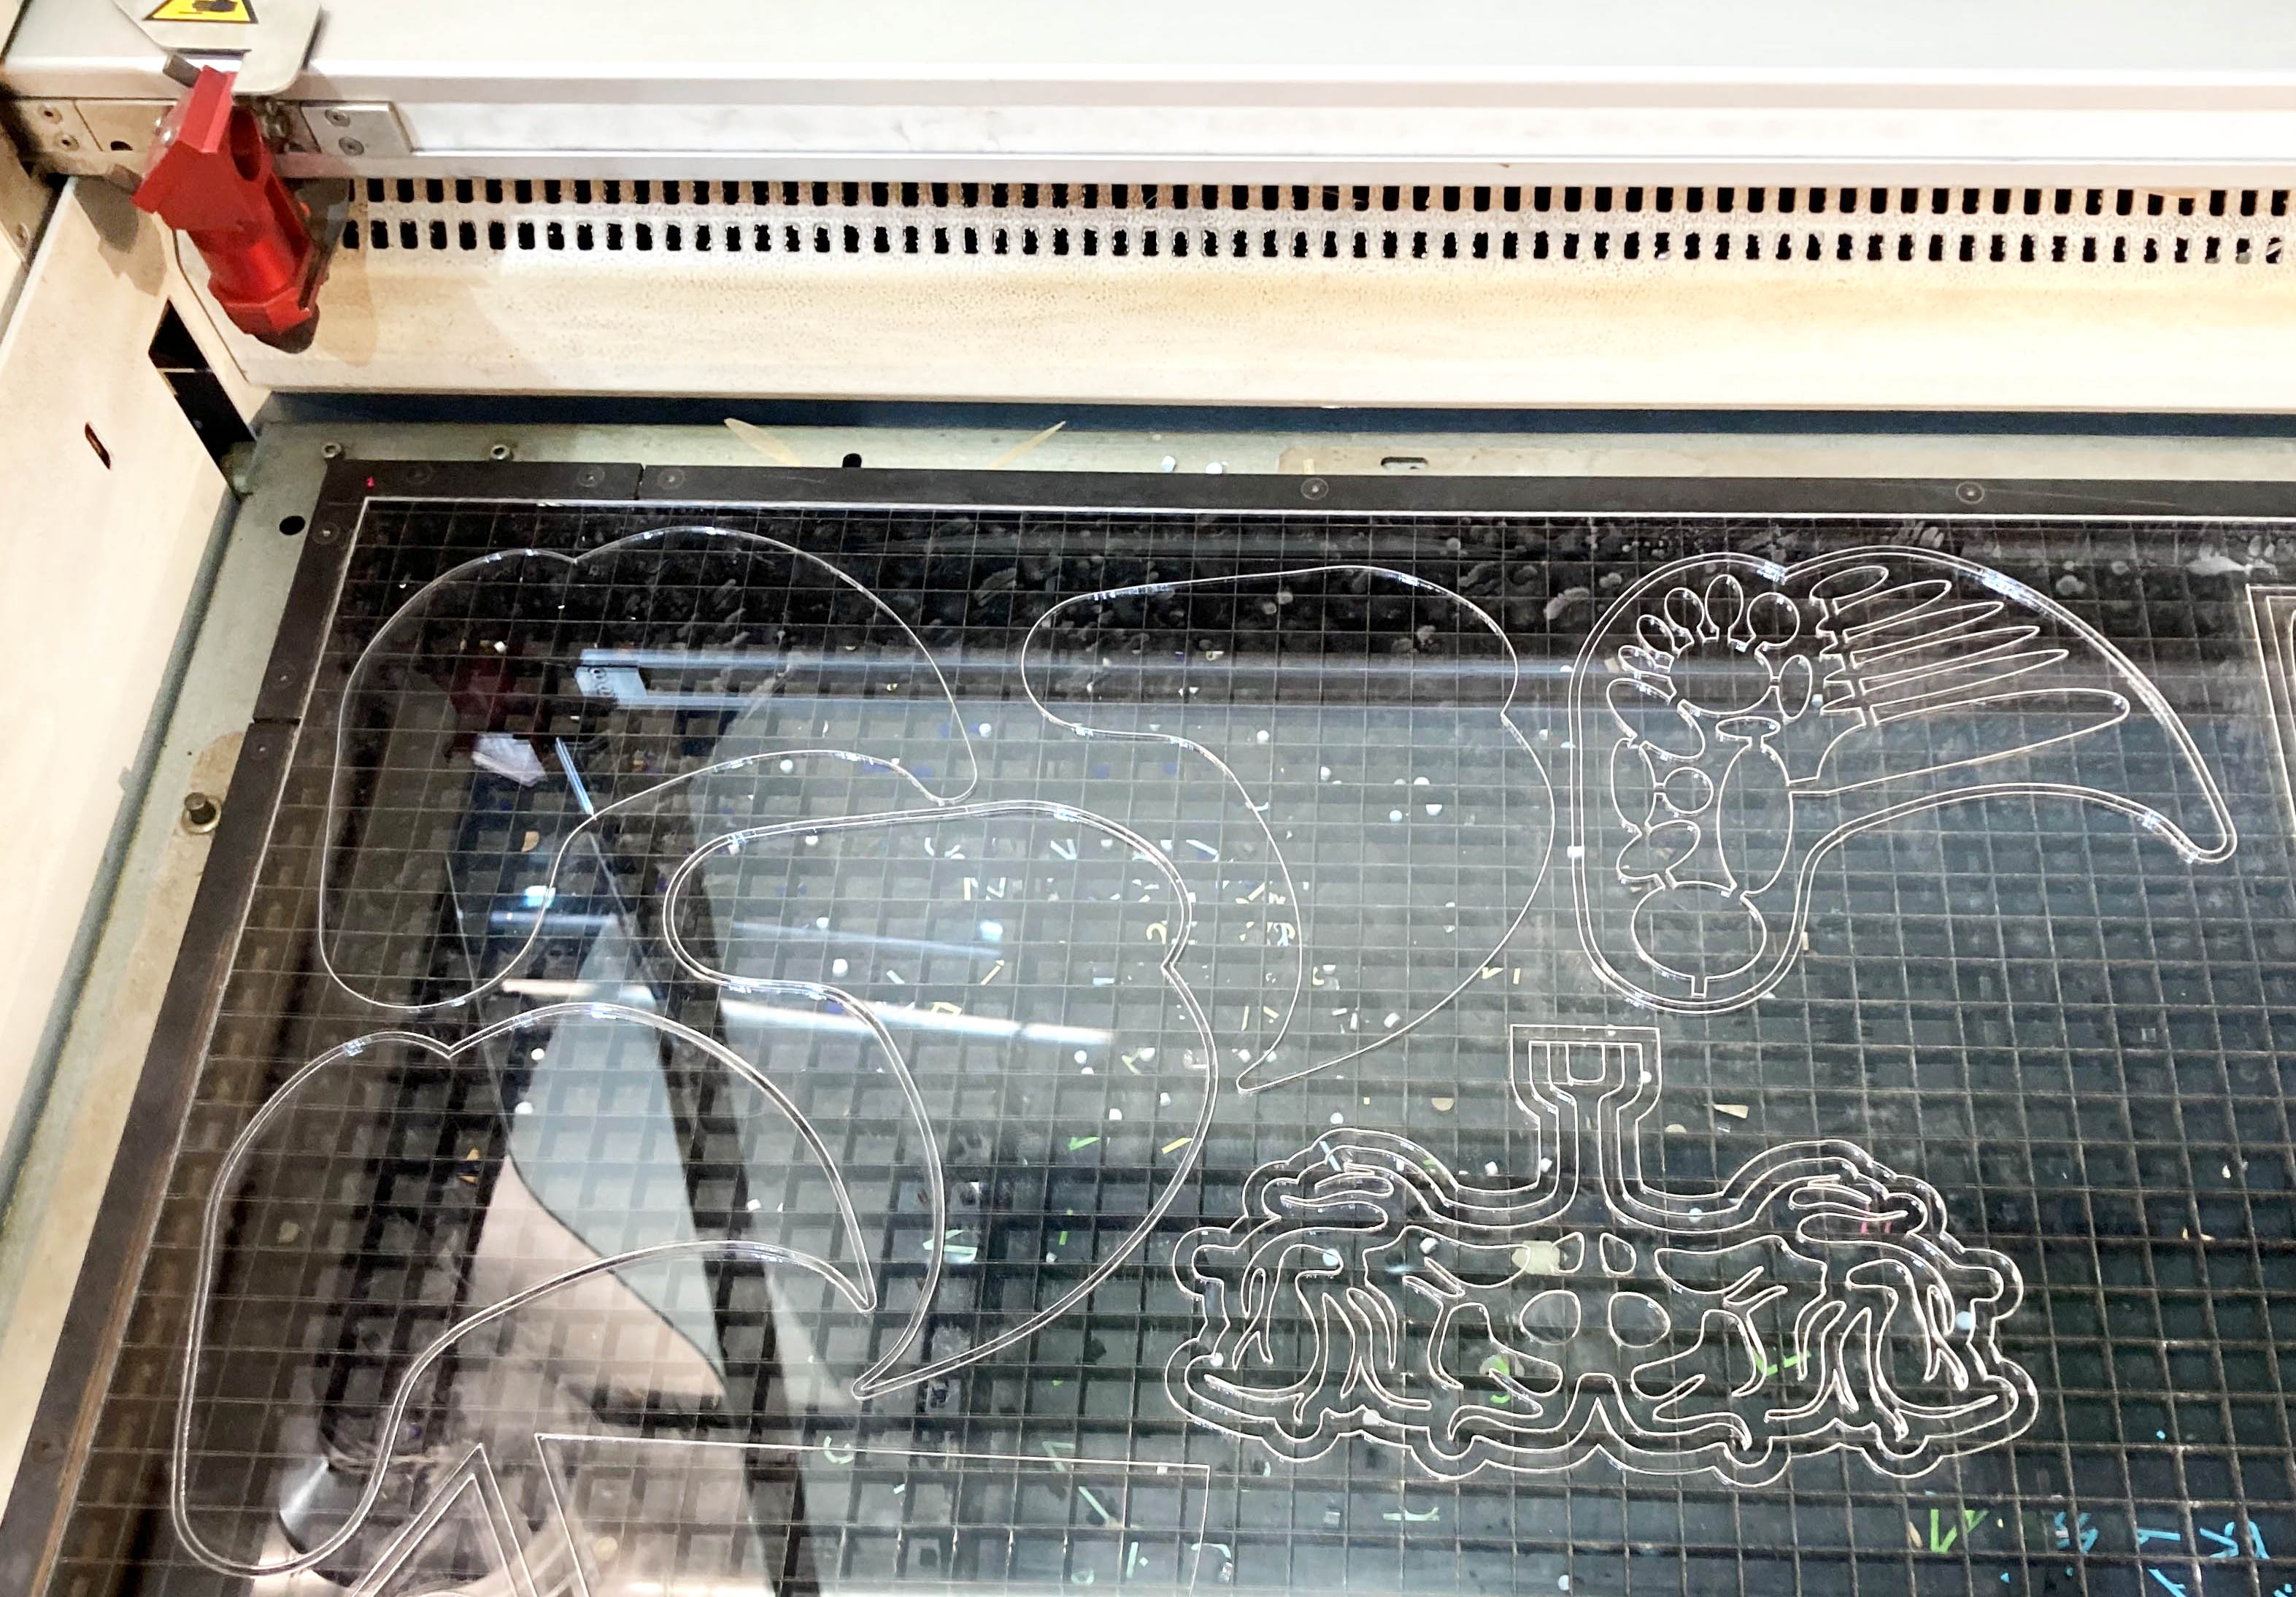
For the second sample, I will design a shoe with a laser cut mold and Silicone technique.
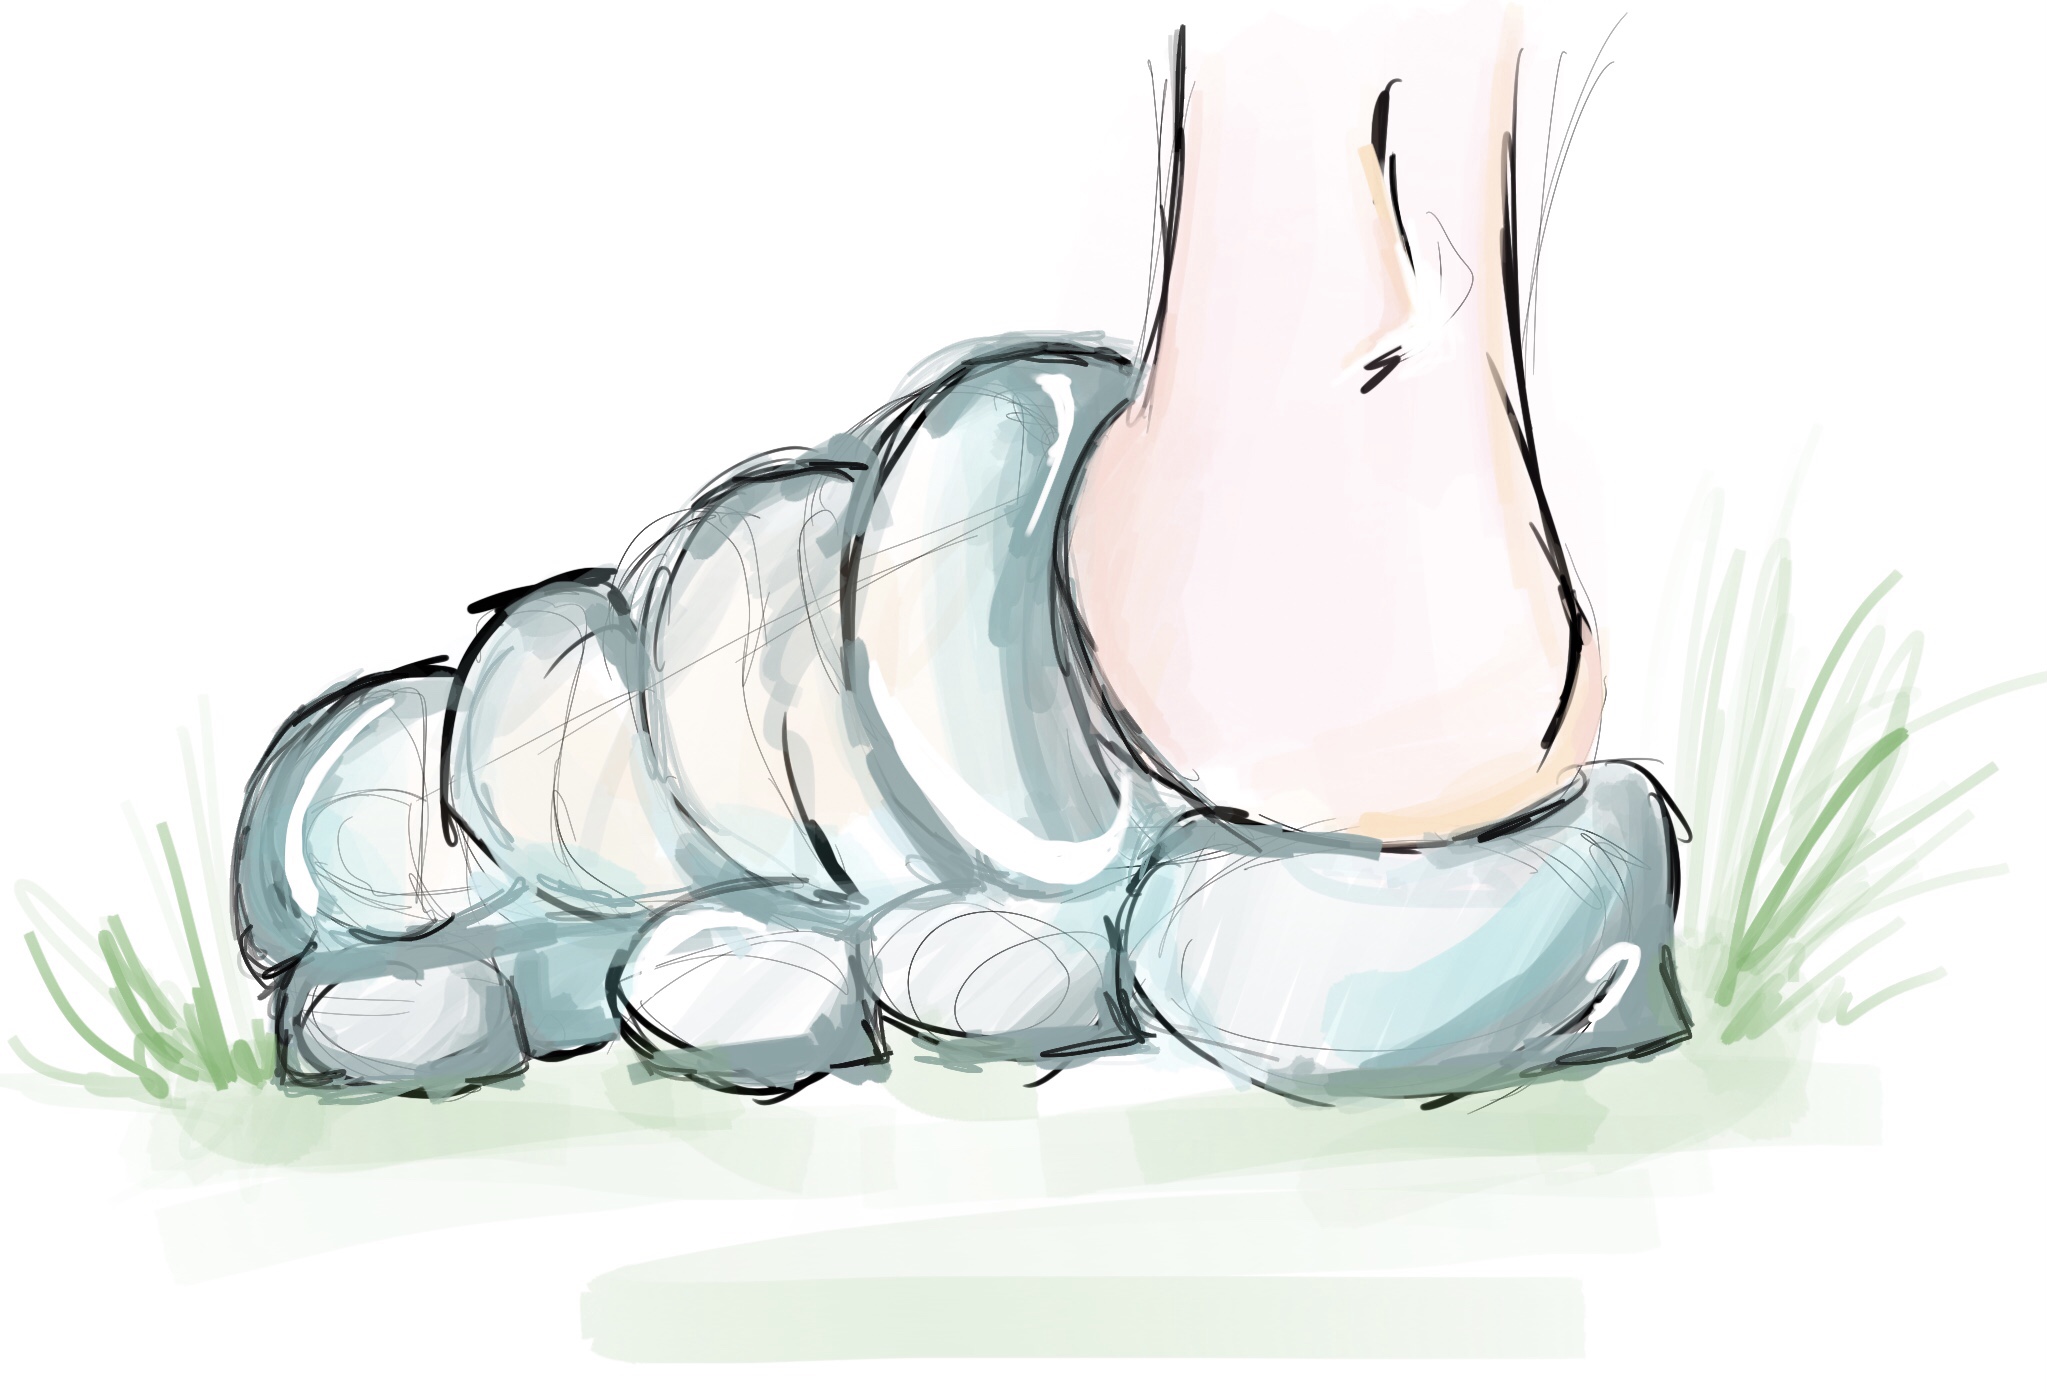
Let's start with a simple pattern to create a mule:
The pattern consists of the sole part and the top part blending and joining in the exterior side of the foot to get a mule.
Create the Rhino file:
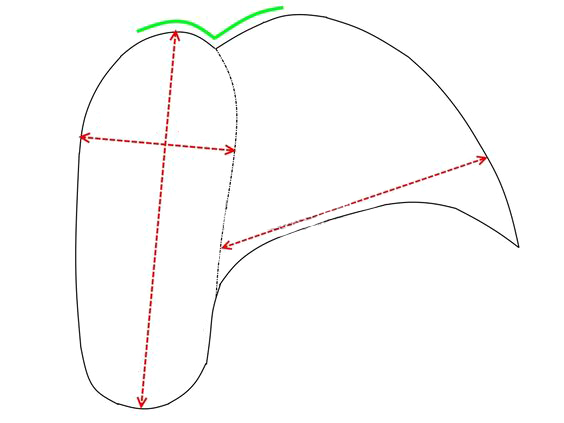
Import the picture in Rhino (cmd Picture). Measure the length of the food size that you are going to use to make it in real size.
- Start creating the inflate parts of the sole on the top of the pattern picture. Keep in mind the ergonomics of the foot. Use the cmd Polyline.
- Connect each part to be able to inflate all at once. Do not forget the entrance, measure the pipe you are going to use to fit properly (5mm). Use the cmd Trim to cut and Join to connect the lines.
- Draw the outside part of the shoe.
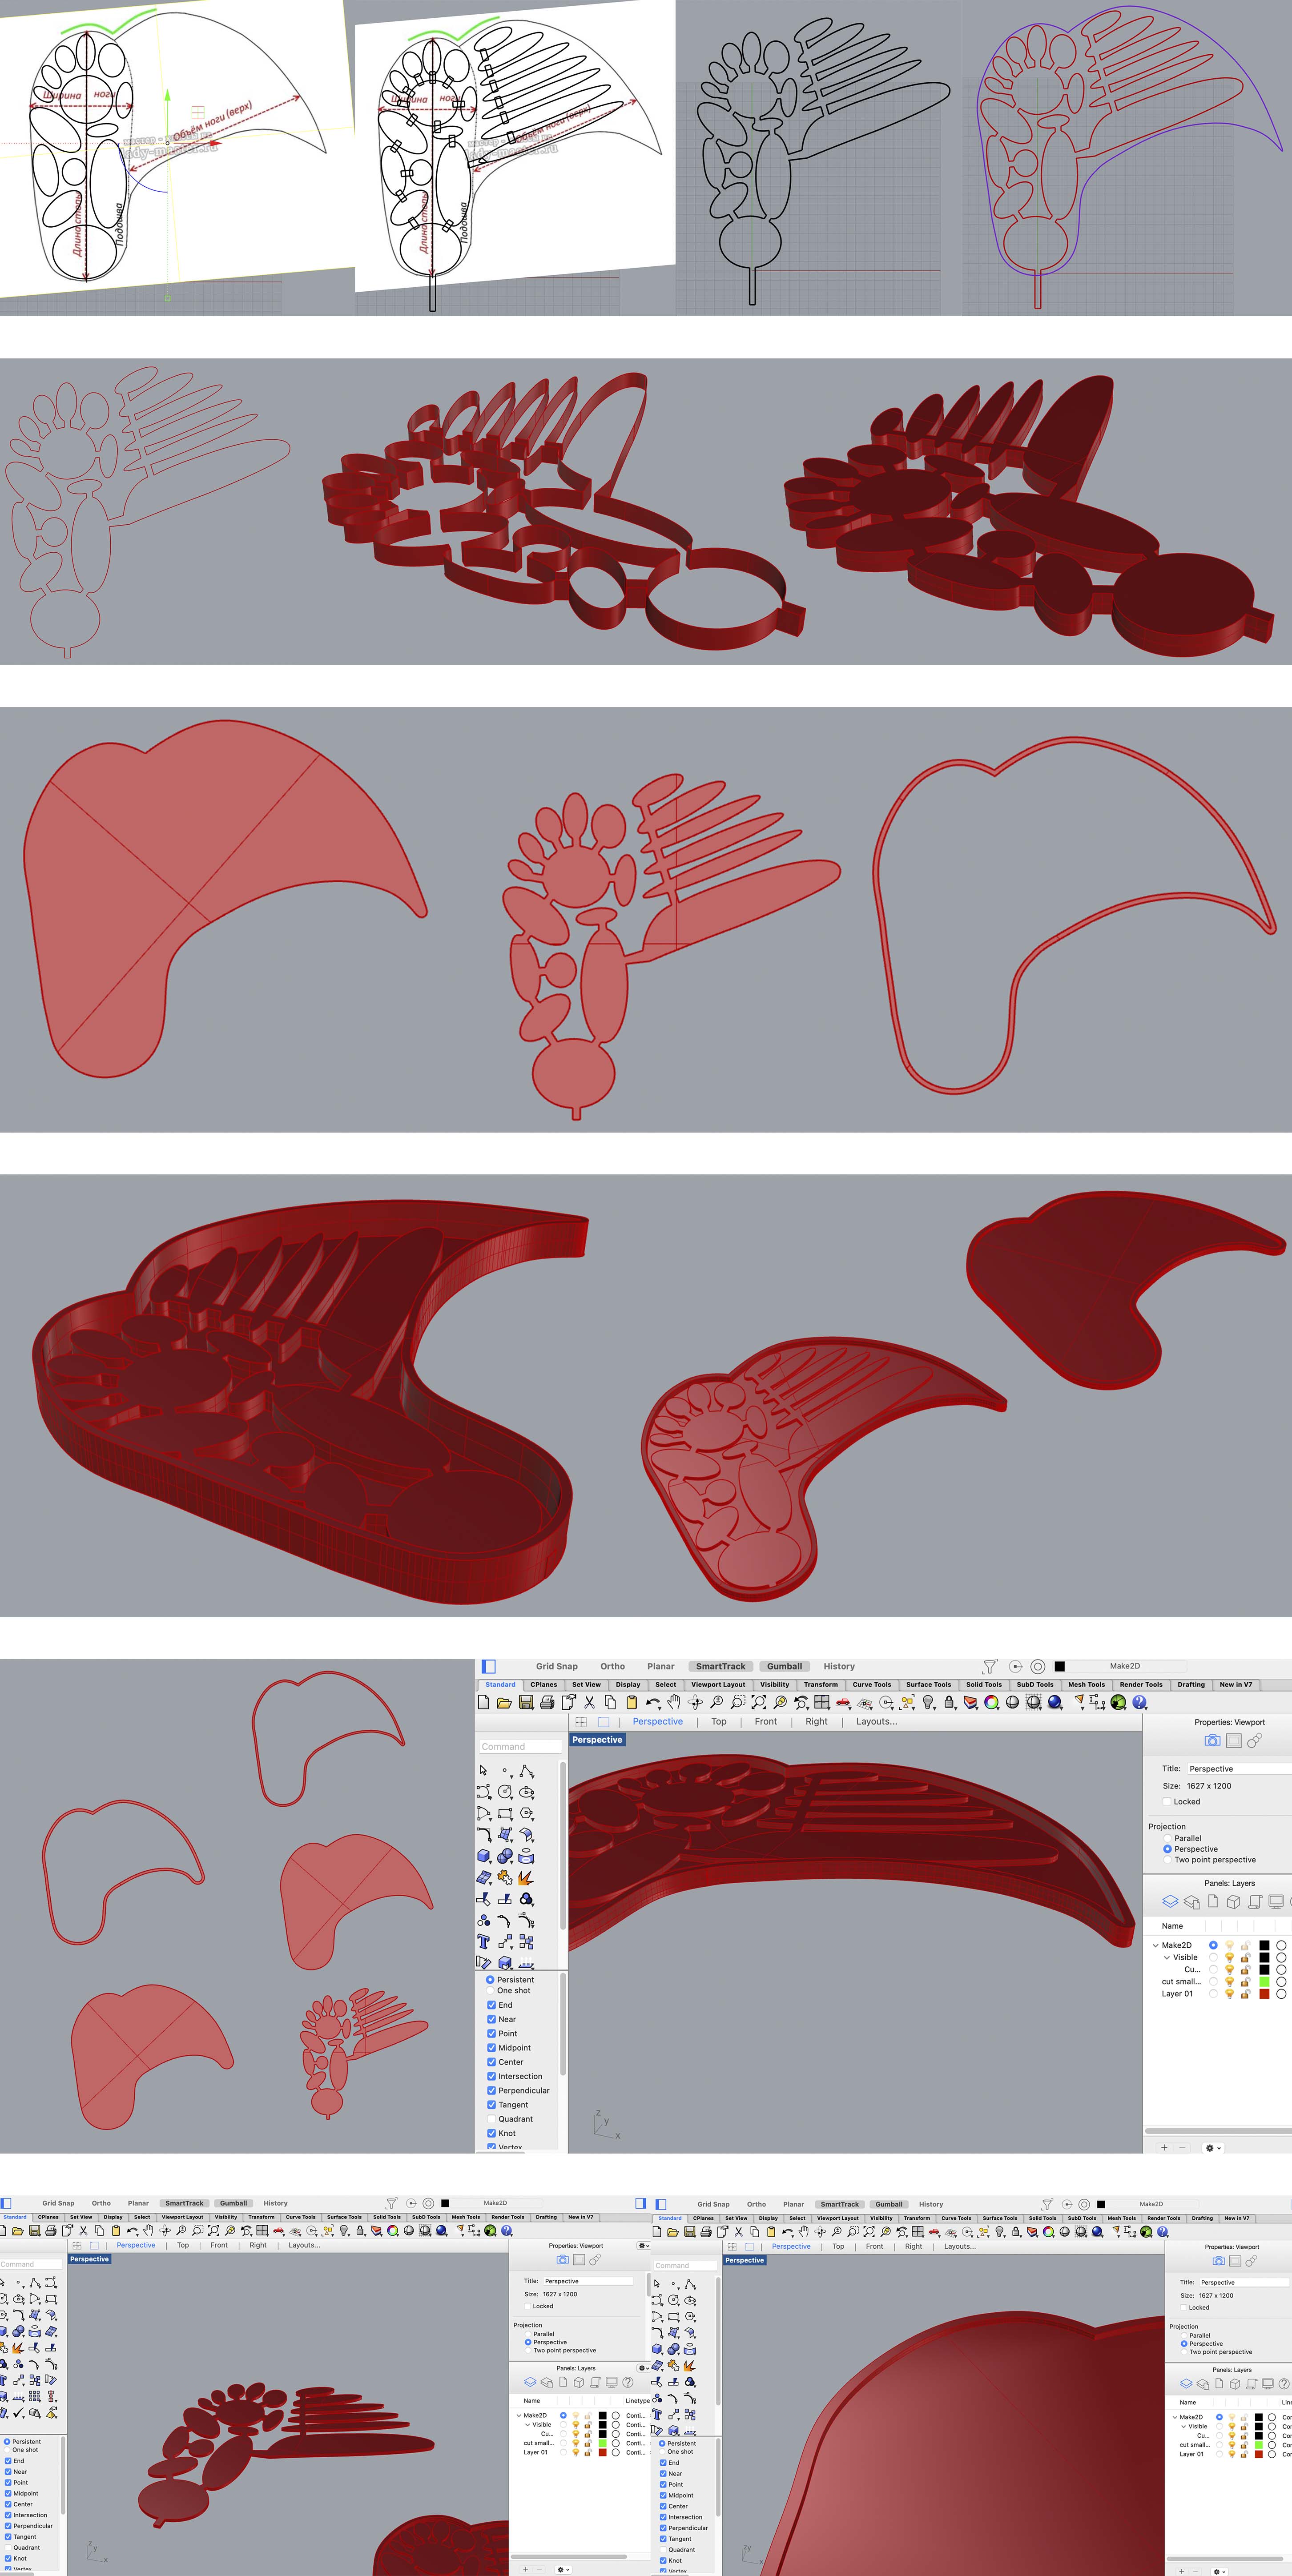
- Convert the polyline shape into a surface, cmd PlanarSrf. Is recommended to use the Shaded View.
- Create an Offset for the walls of the mold. Be careful to do not to create a fragile sample.
- Extrude surface. Measure the thickness of the material that you are going to use. In that case, we are going to use the Transparent Acrylic 3mm.
Therefore we will have:
MOLD 1: The base mold of 3mm, the inflate layer also of 3mm, two same peaces for the walls 3+3mm = 6mm of a total thickness (These walls always have to be higher than the inside part).
MOLD 2: The 5mm bigger layer base of 3mm thickness and one flat wall of 3mm.
- Cap planar holes to close and get solid. Make sure to join and close it all.
- Assemble in Rhino the different parts of the two molds to make sure everything fits.
- For the laser cut we just need the lines, so convert the 3D design into 2D, cmd Make 2D. For this project, we need just one layer/color.
- Save the file in Rhino 5 and upload it in the IAAC Cloud.
The mold ready to cut:
For this sample, I start with a reduce scale to test.
Keep in mind the size, the bigger piece more air you will need, so do not forget how you are going to inflate.
Here you could download the mold file to cut.
* Super glue
- Silicone (A + B mix)
- Fabric (optional to get the layer more rigid)
- Thin plastic pipe
- Acrylic transparent plate (3mm thickness)
- Silicone (A + B mix)
- Fabric (optional to get the layer more rigid)
- Thin Plastic pipe
* Digital scale
* Plastic pot
- Laser cut machine
- Gloves
- Spoon or stick
- Mold the bottom and the top layers
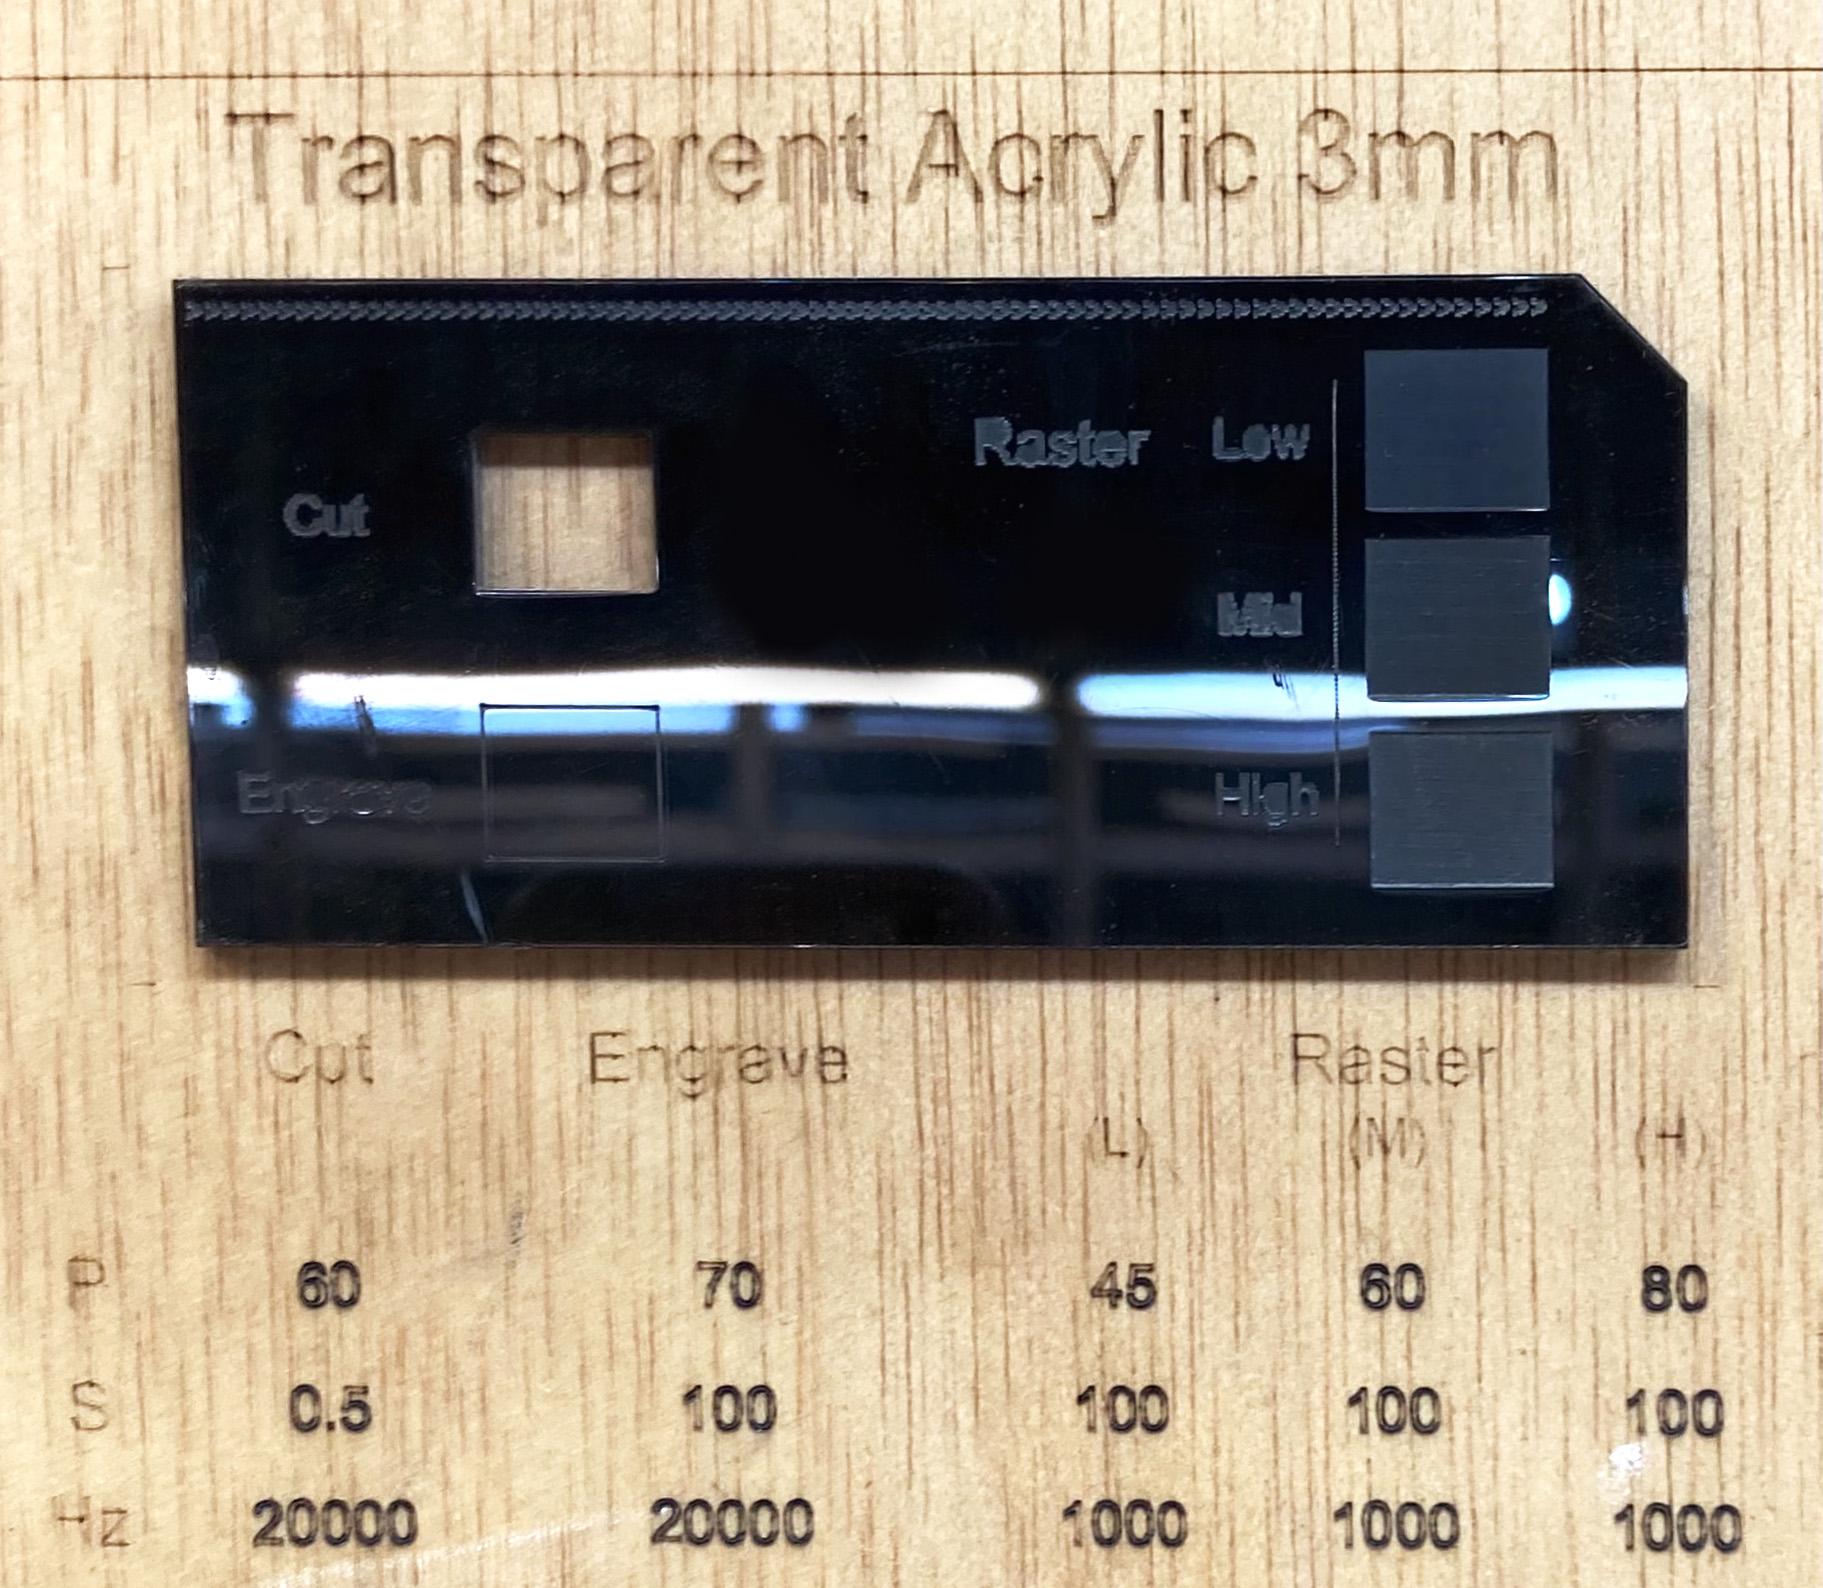
To optimize the time of the laser cut and the Acrylic sheet, we make a common Rhino file with the classmate's projects. Team workflow!
Laser cut Acrylic de Emma
Before remove the sheet from the table cut, make sure it's cut properly.
Be careful with the thickness of the mold, in my case I made it super thin, and meanwhile, I was extracting the pieces from the Acyrilic sheet some of them broke. Consecutively, I repeated the cut of the broken parts.
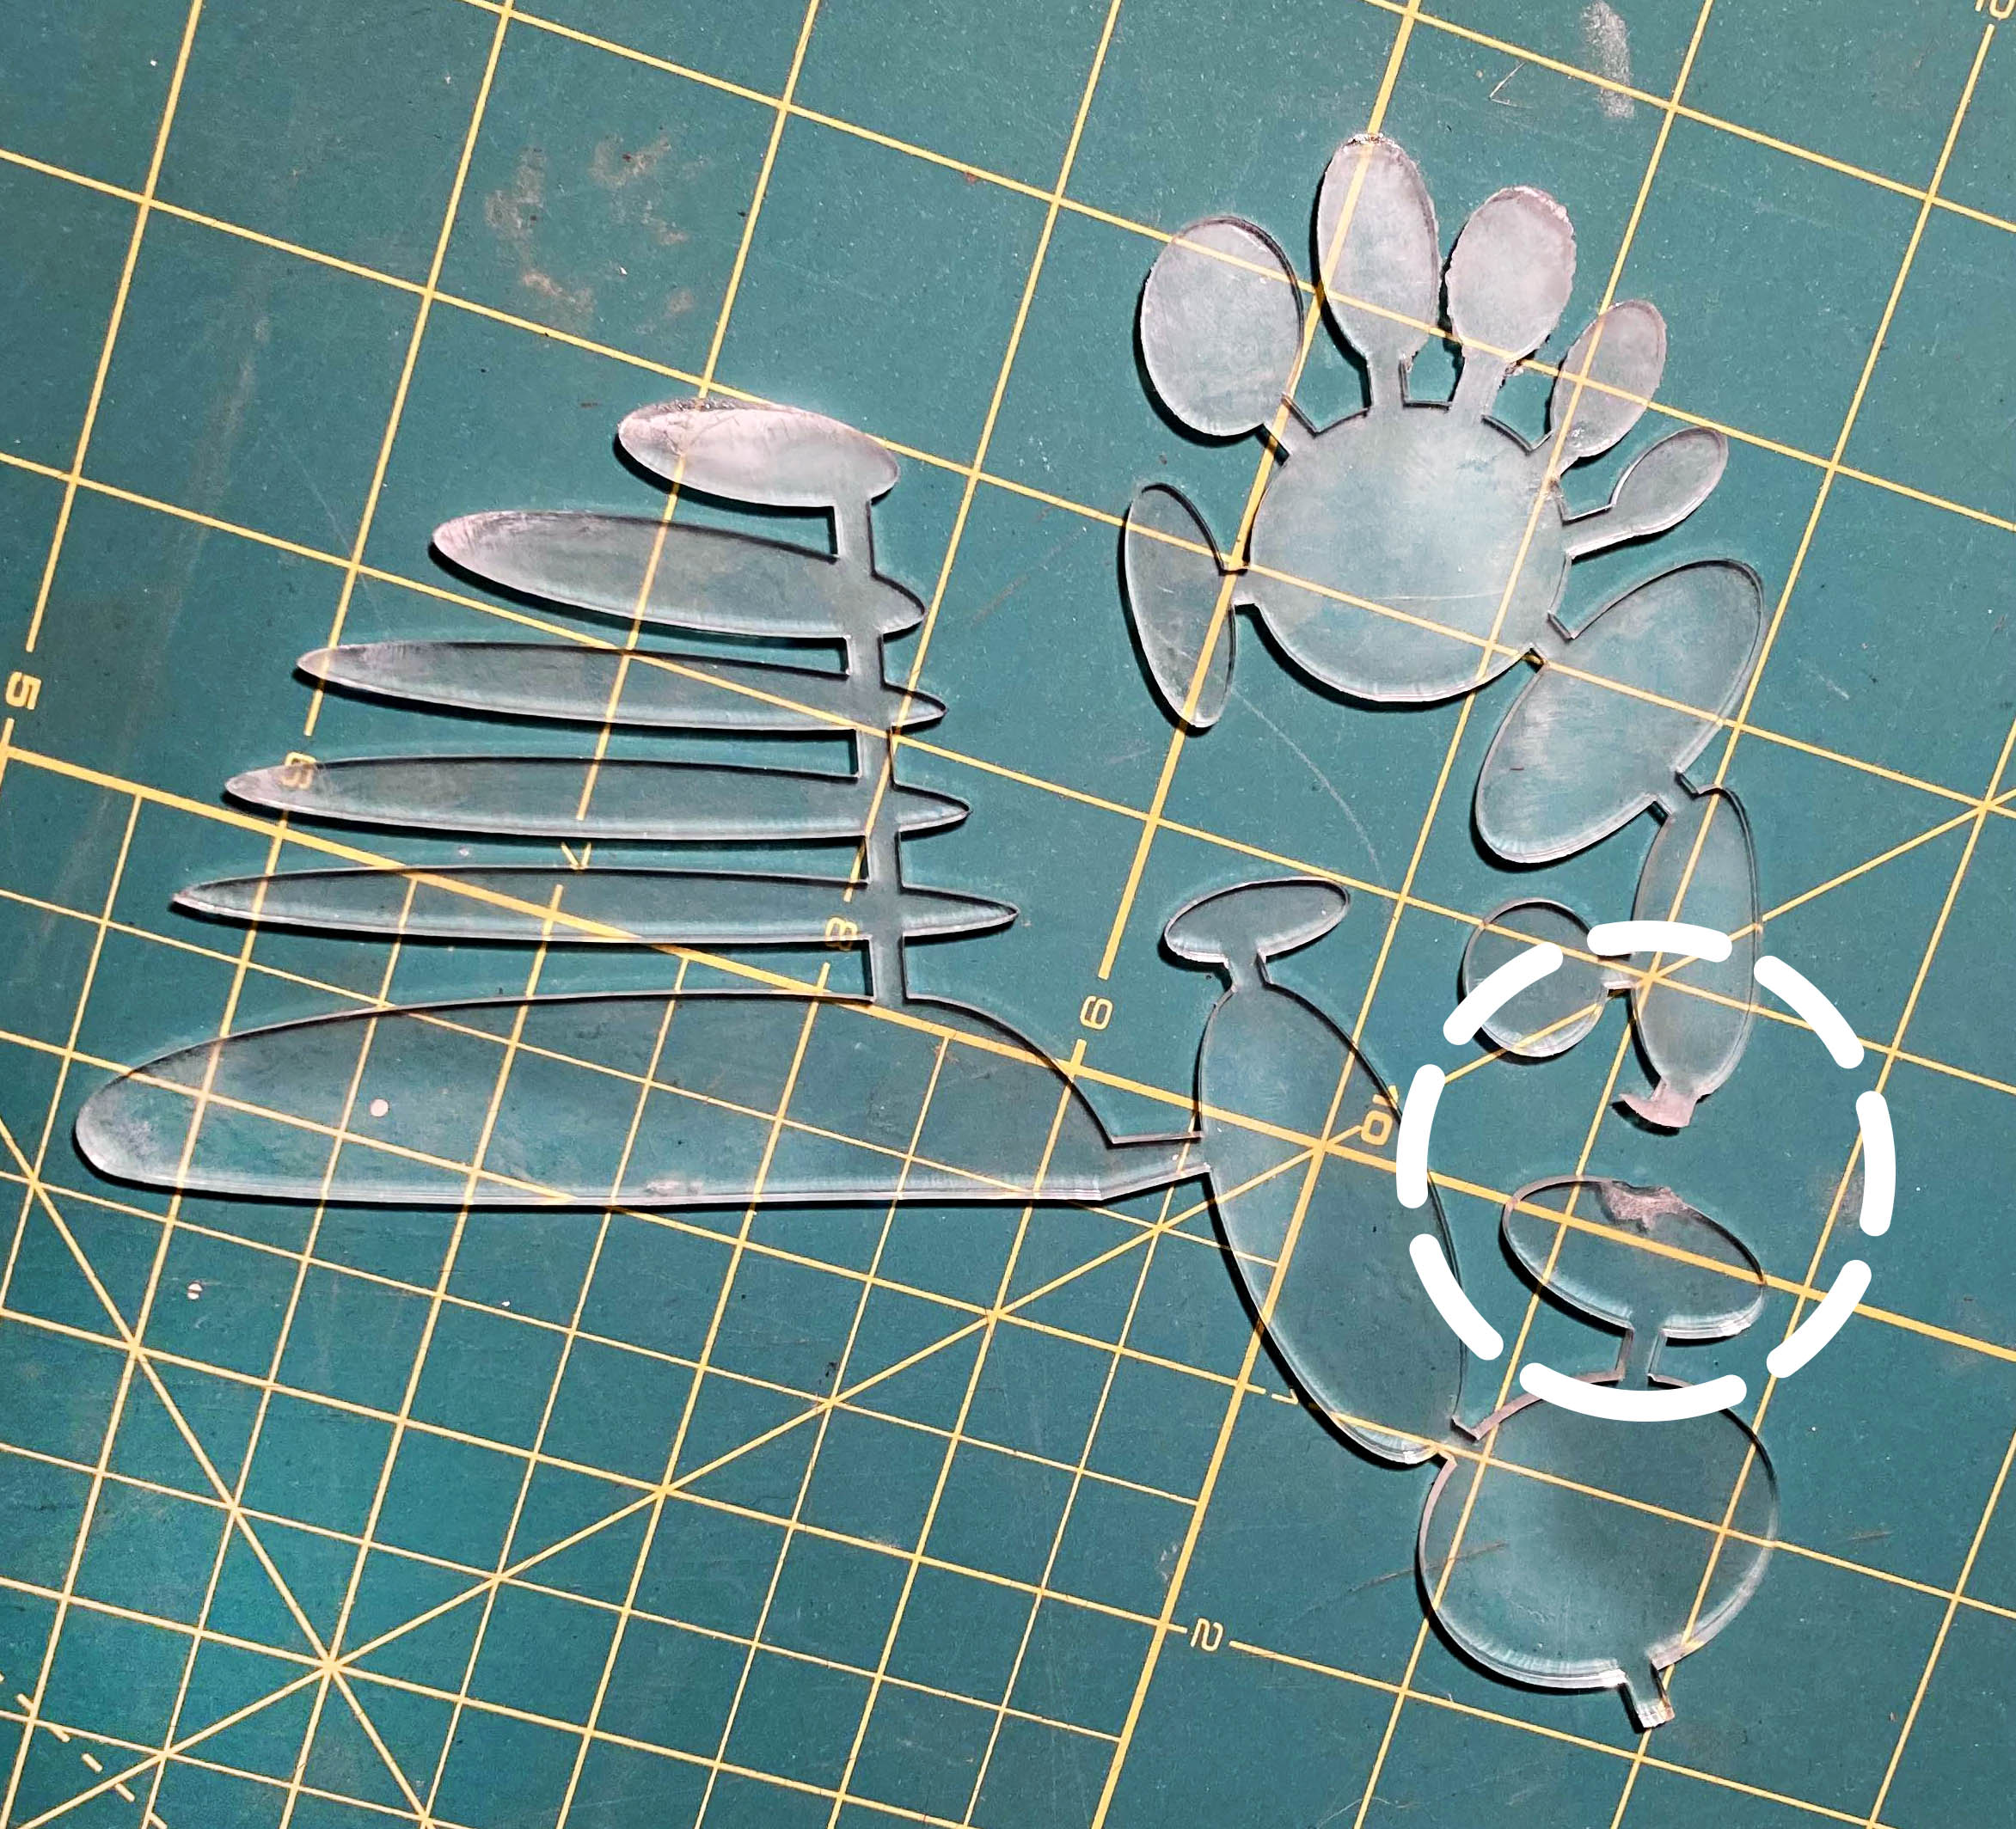
When we have the 6 pieces cut for both molds, we could continue assembling them with super glue. Wait until it's strongly connected.

Let's prepare the Silicone:

Ecoflex Silicone recomended:
- 00-30
- 00-35
These have a lot of elasticity to easily inflate.
Preparation:
- First of all, we need to calculate the volume of silicone we will need (cmd Volume) for the outside and inside (inflatable part) of the mold in Rhino. Make the difference between them (mm3).
- Go to Unit Converter to change the mm3 to a ml.
- Divide the result into two parts. Remember to get the silicone you should mix parts A and B in equal proportions.
- Mix properly A and B. Be careful to do not to create bubbles. If not the shape it's not going to blow up because of the little holes and the air will escape.
- Pour the mix into the molds.
- Let them dry for 4 hours (The dry time could change depending on the brand/type of silicone, so read the instructions).
In my case for the top layer, I will need 33ml in total so 16.5ml for each part A and B. On the other hand, for the layer which is going to be inflated, I will need 40ml, so 20ml for each A and B. The results are rounded up.
Workflow example 2:
Casting with silicone de Emma
In this example, we create the acrylic mold, the one that has the gaps to be inflatable and for the top layer we pour the silicone on the top of the fabric.
We will use the fabric to get a rigid layer and not let the sample be inflated on this side.
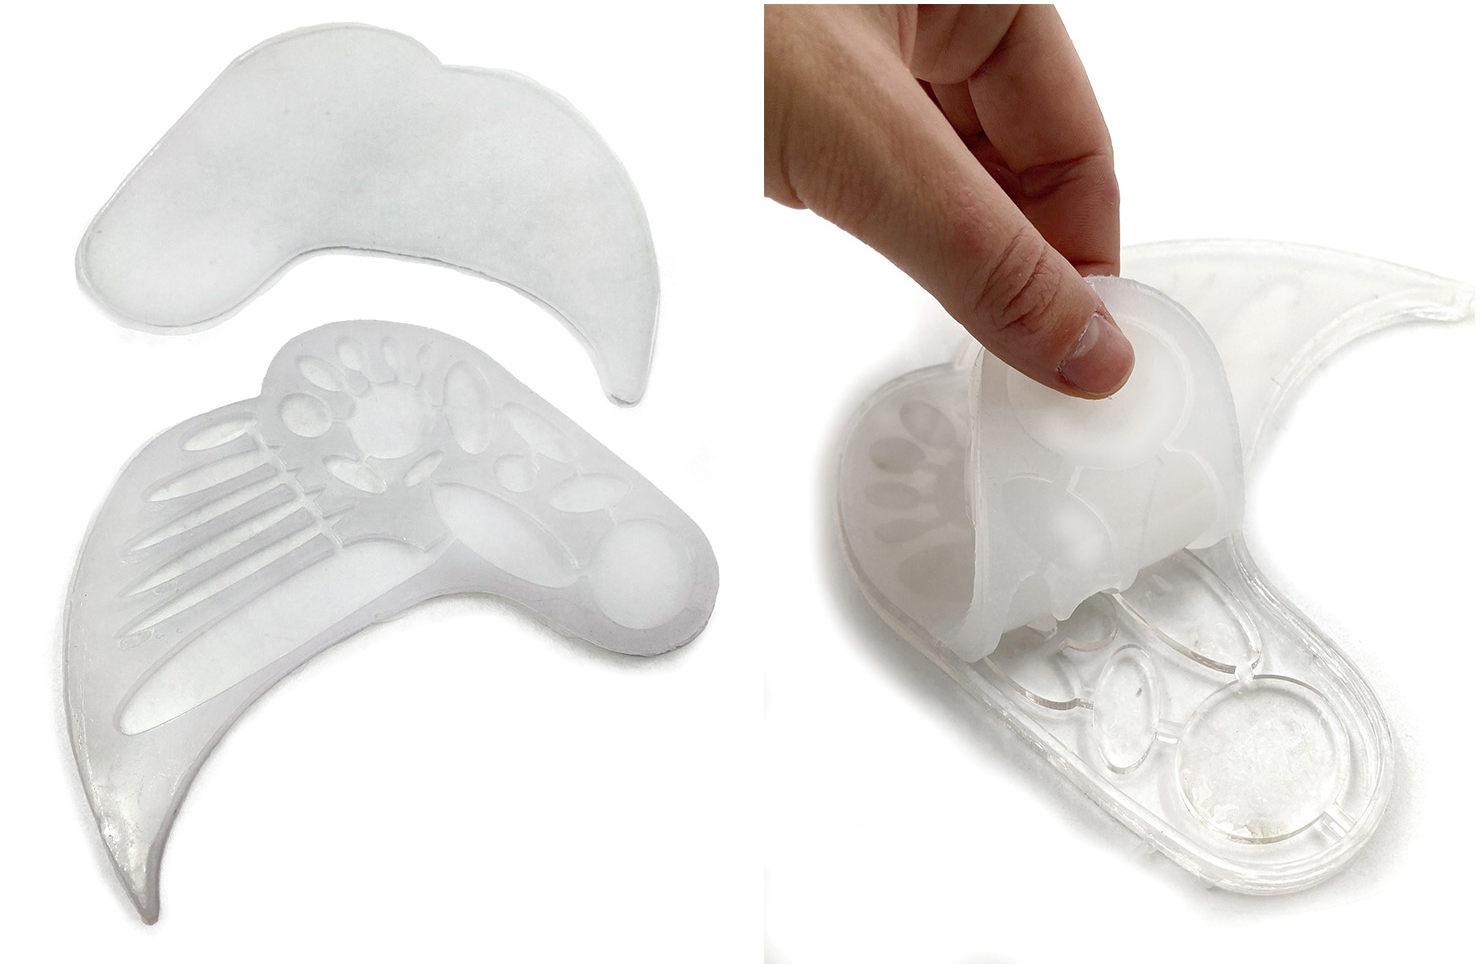
- Remove the silicone sample from the mold when it is completely dry (4 hours minimum).
- Prepare some Silicone just to use as glue to join the two parts. Make sure to add a little layer of silicone all around the shapes, if not you will lose the pattern to inflate.
- Wait 4 more hours to join and dry properly.
- Test the sample with a syringe if it's blown up.
Testing the bubbles forms:
Inflatable with Silicone de Emma
After the good result tests of the plane silicone, I could continue building the shoe.
- Make a little bit more silicone to join the pattern on the exterior side of the mule and get the shoe shape.
- Attach with some clothespins the silicone to get it closed. Make sure which side of the shoe grows more to let it in the outside (The thinner layer).
- Pour the silicone into the side to be glued with a little spatula. Be gentle, to not create a mess in the sample.
- Let it dry for 4 hours.
- Take out the clothespins. Check if the shoe is already joined and with scissors remove the little solidified silicone pieces that have been left around the pliers.
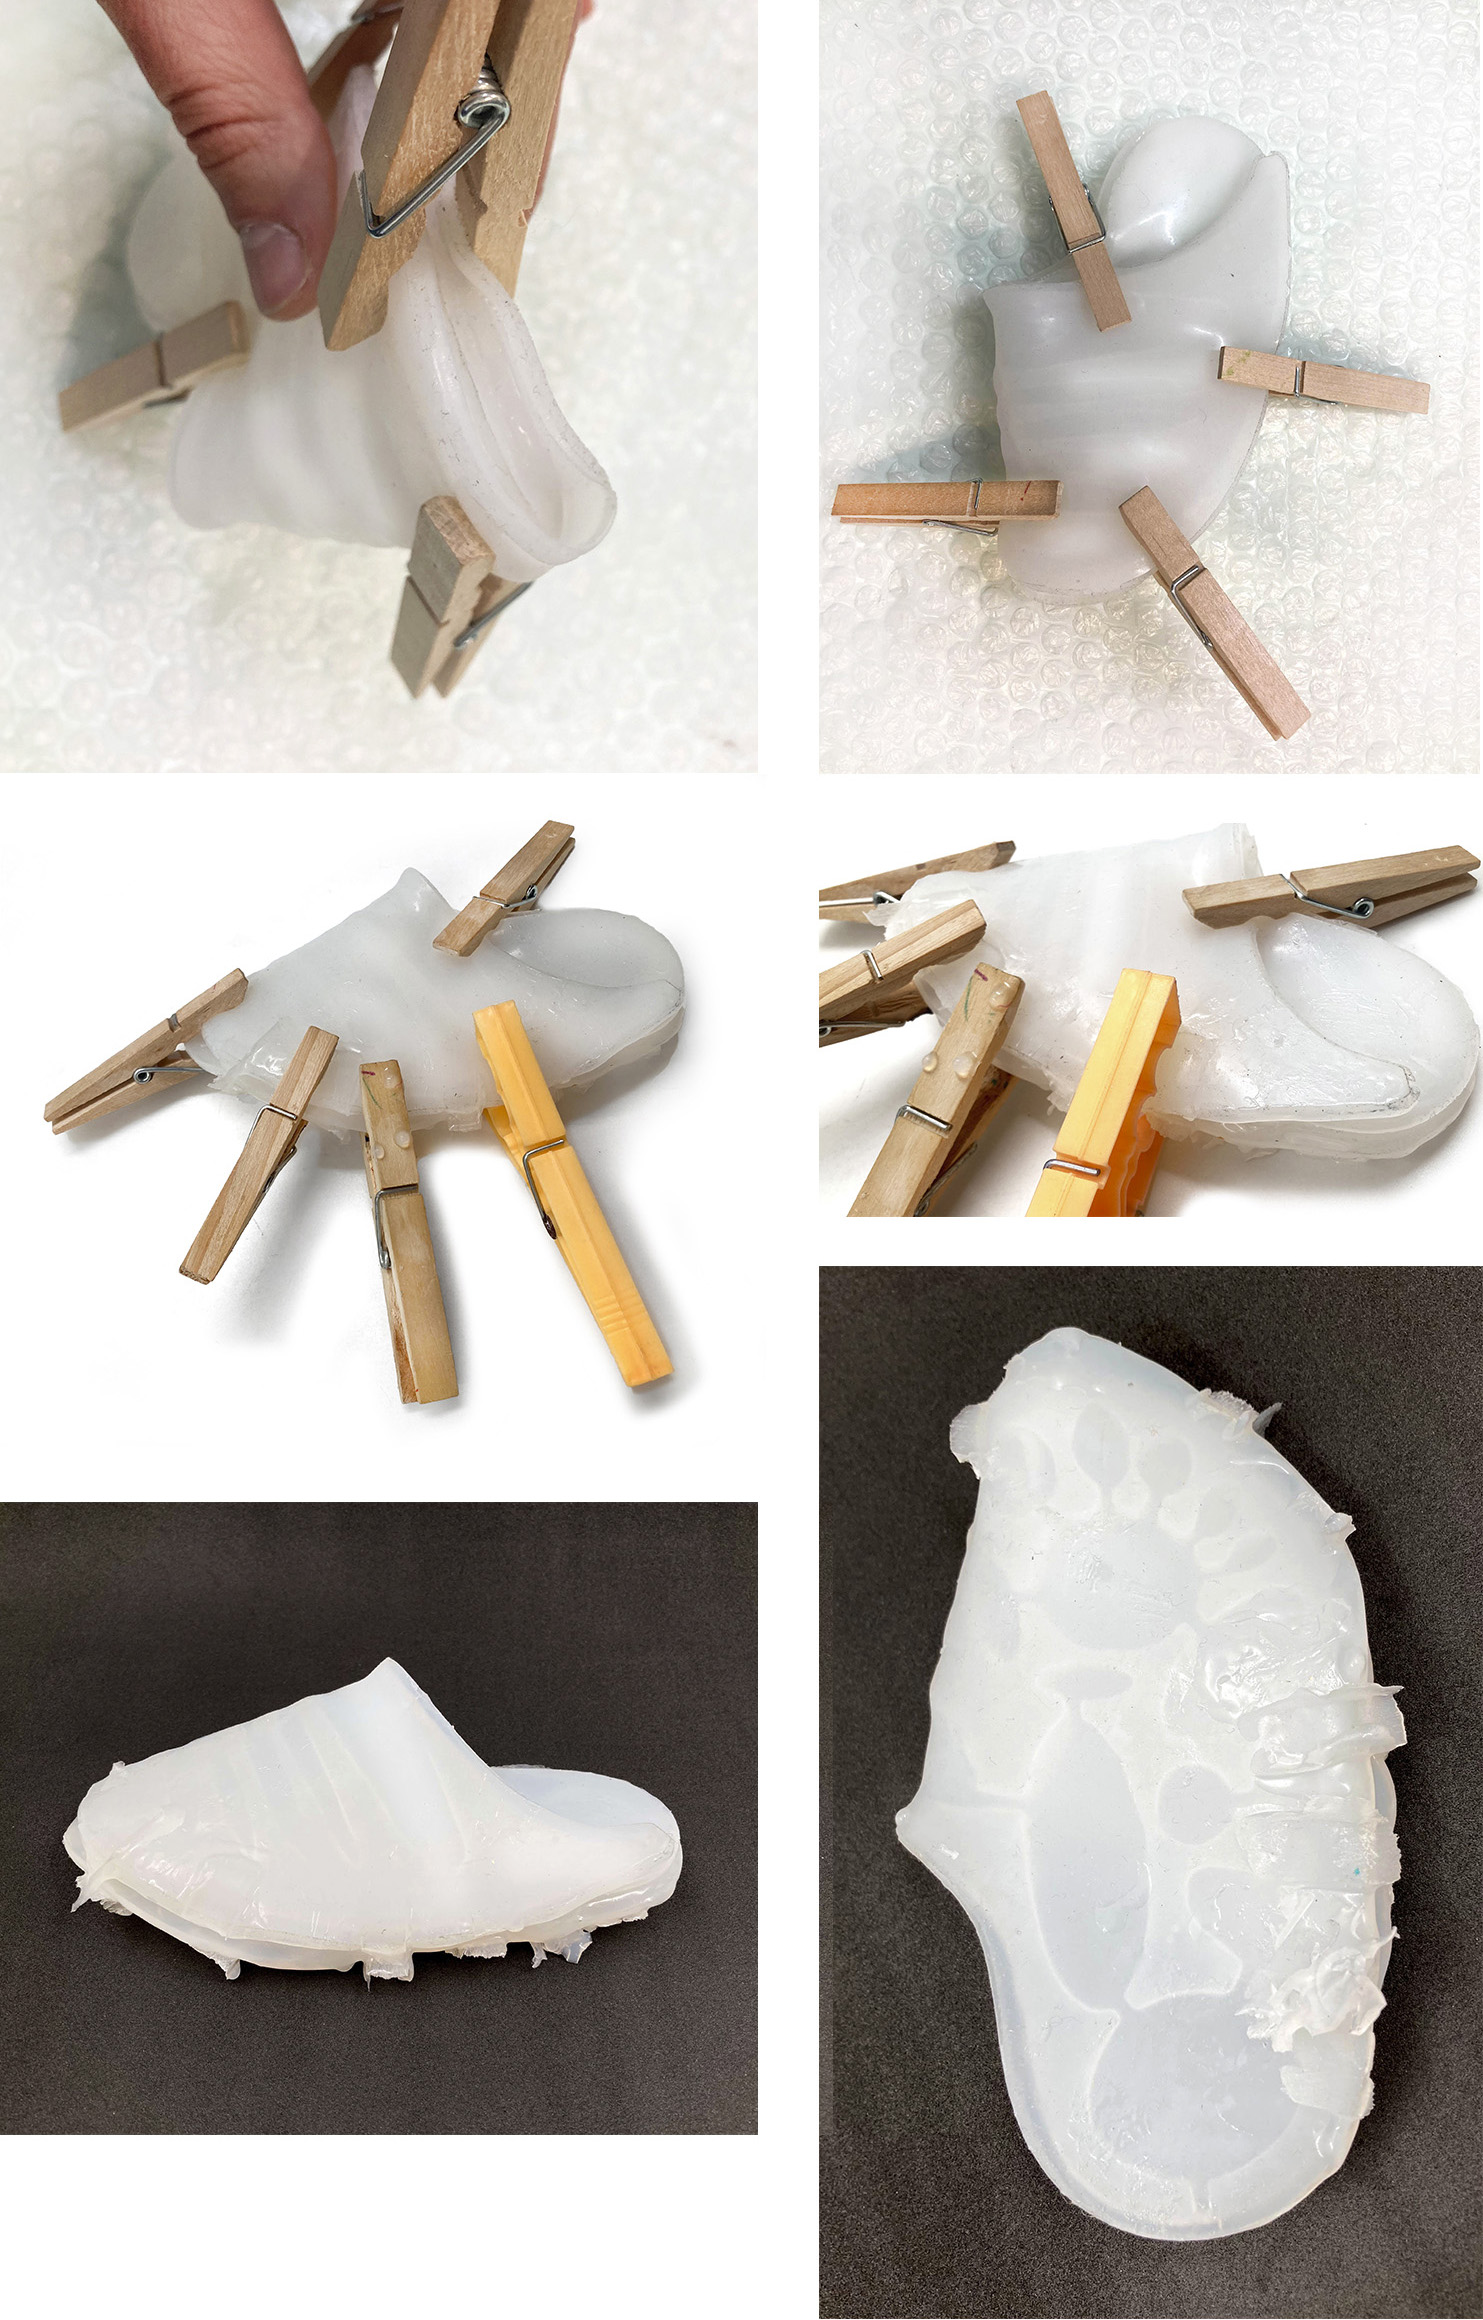
At last, we have the shoe form!
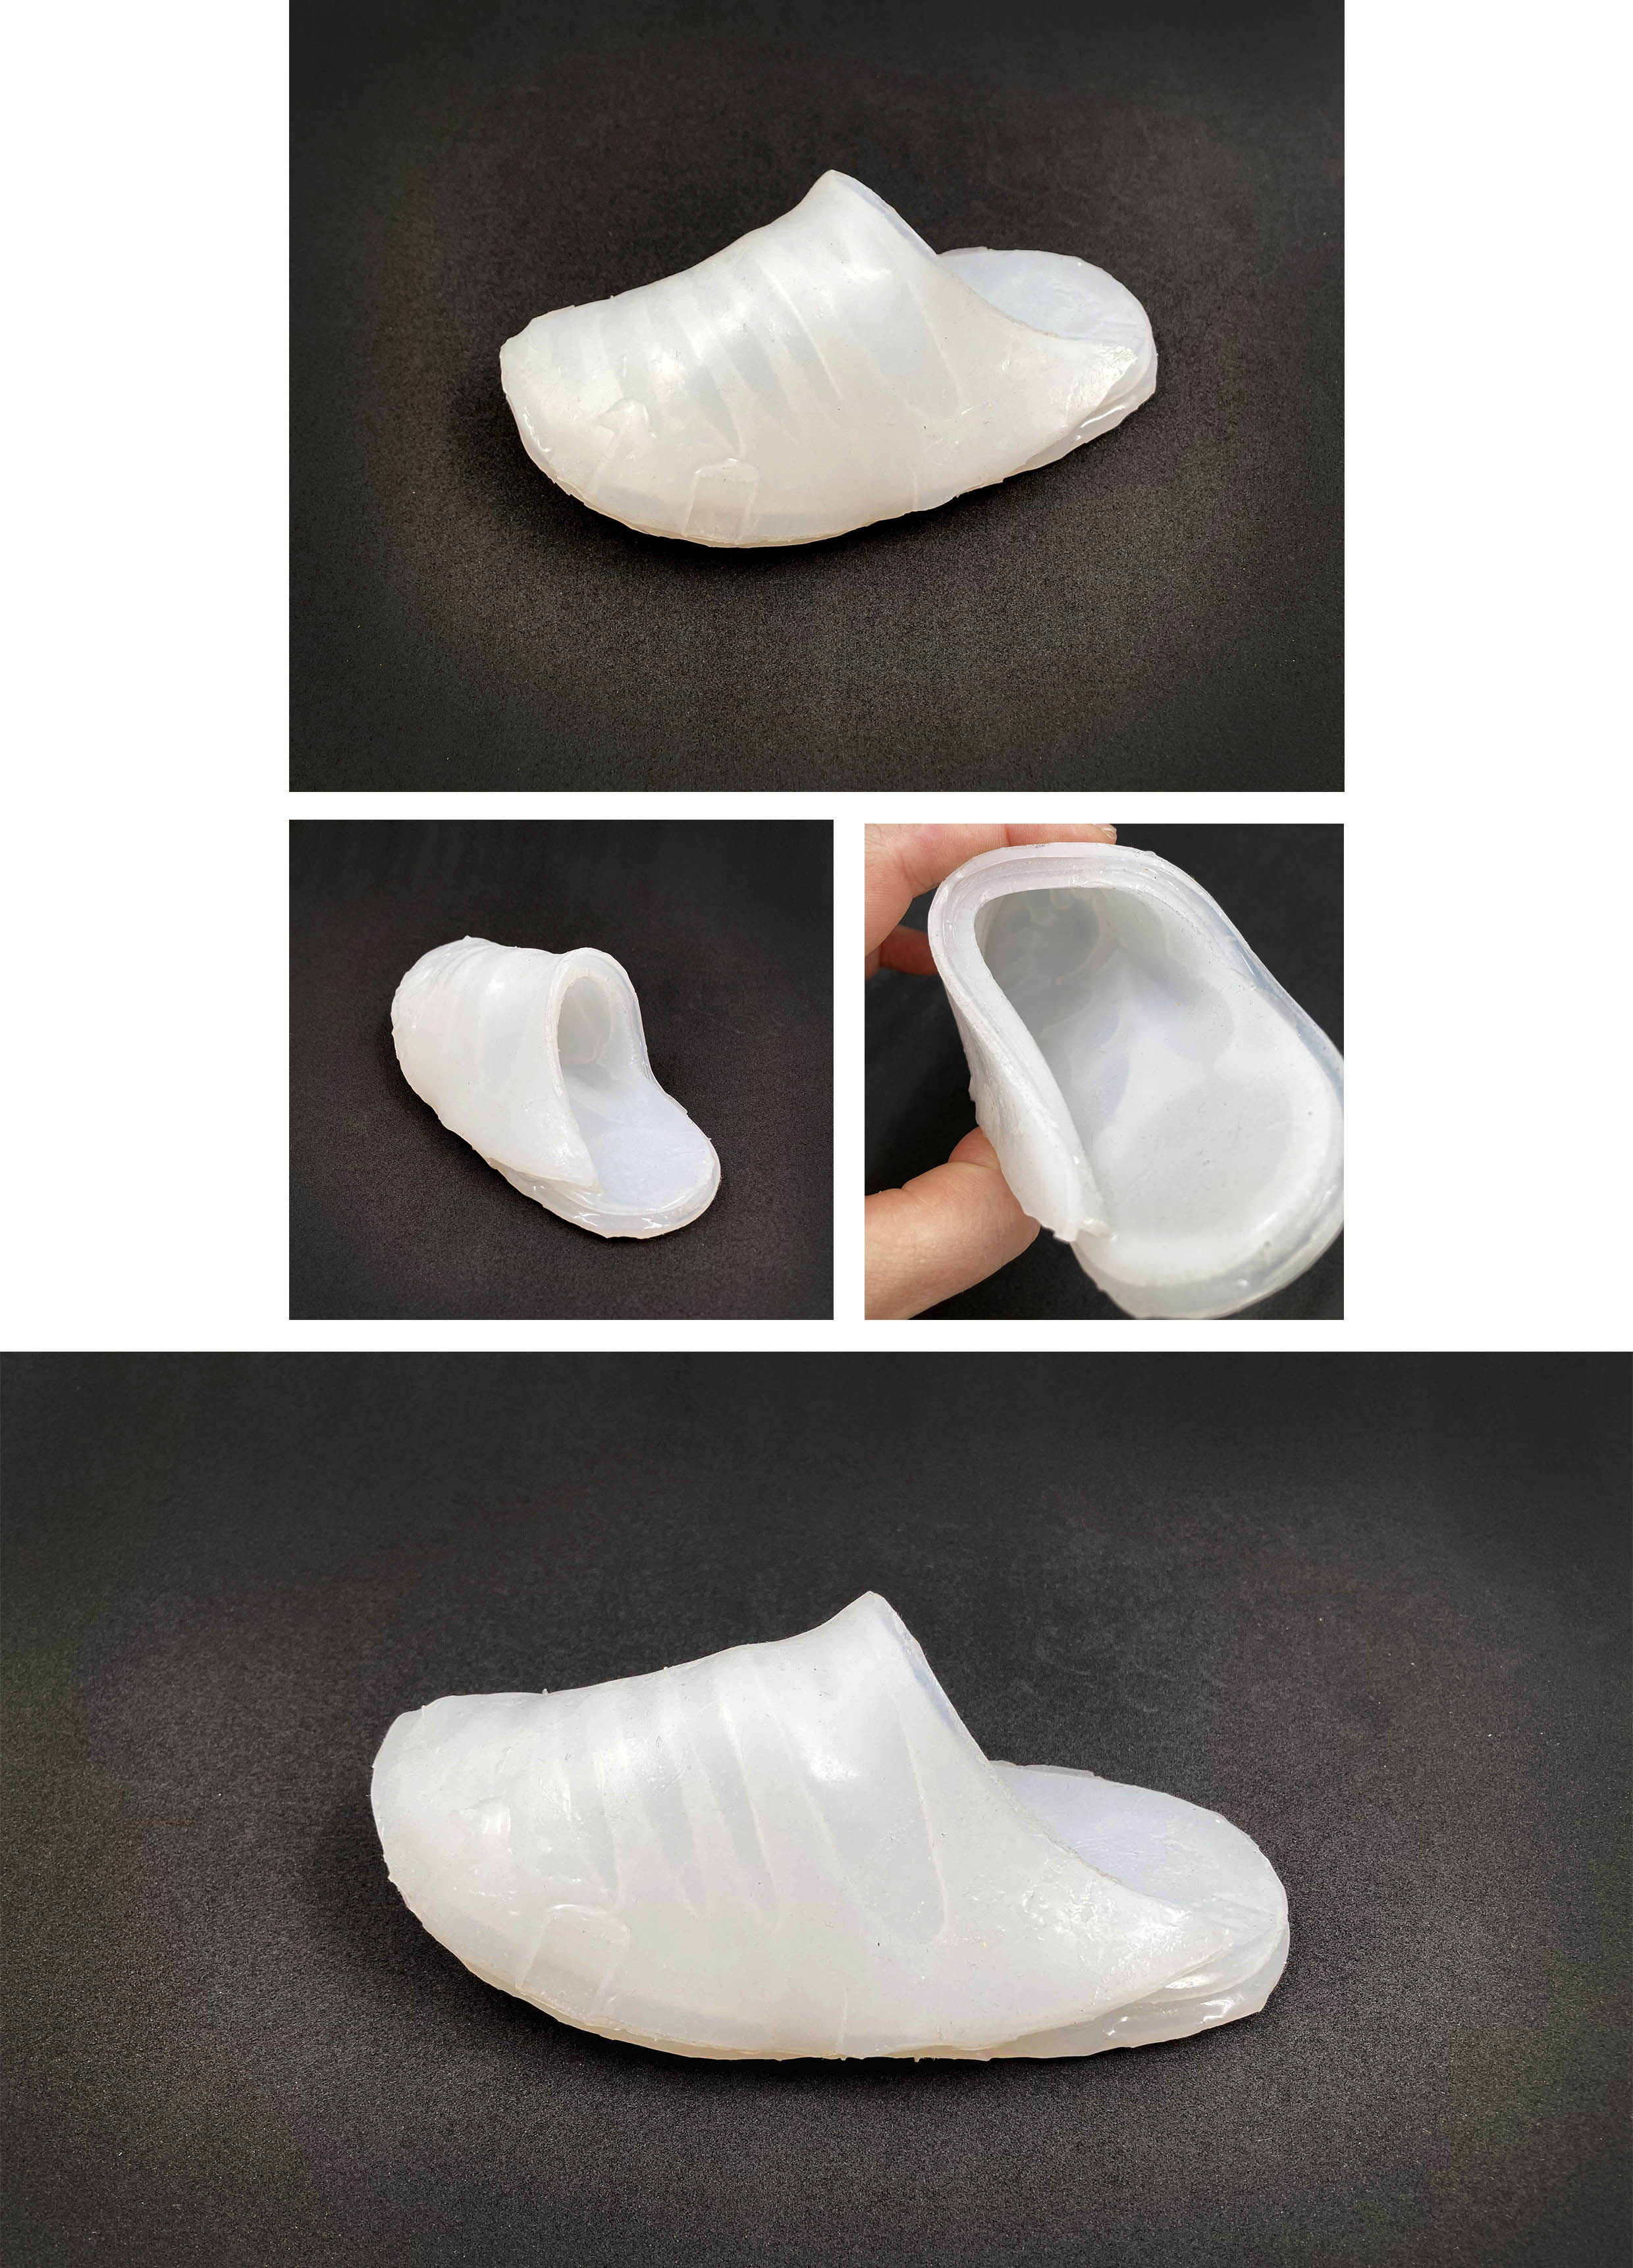
Testing the final shoe with air:
Inflatable silicone mule de Emma
Finally, I test the mule with water and spirulina to get a colored form:
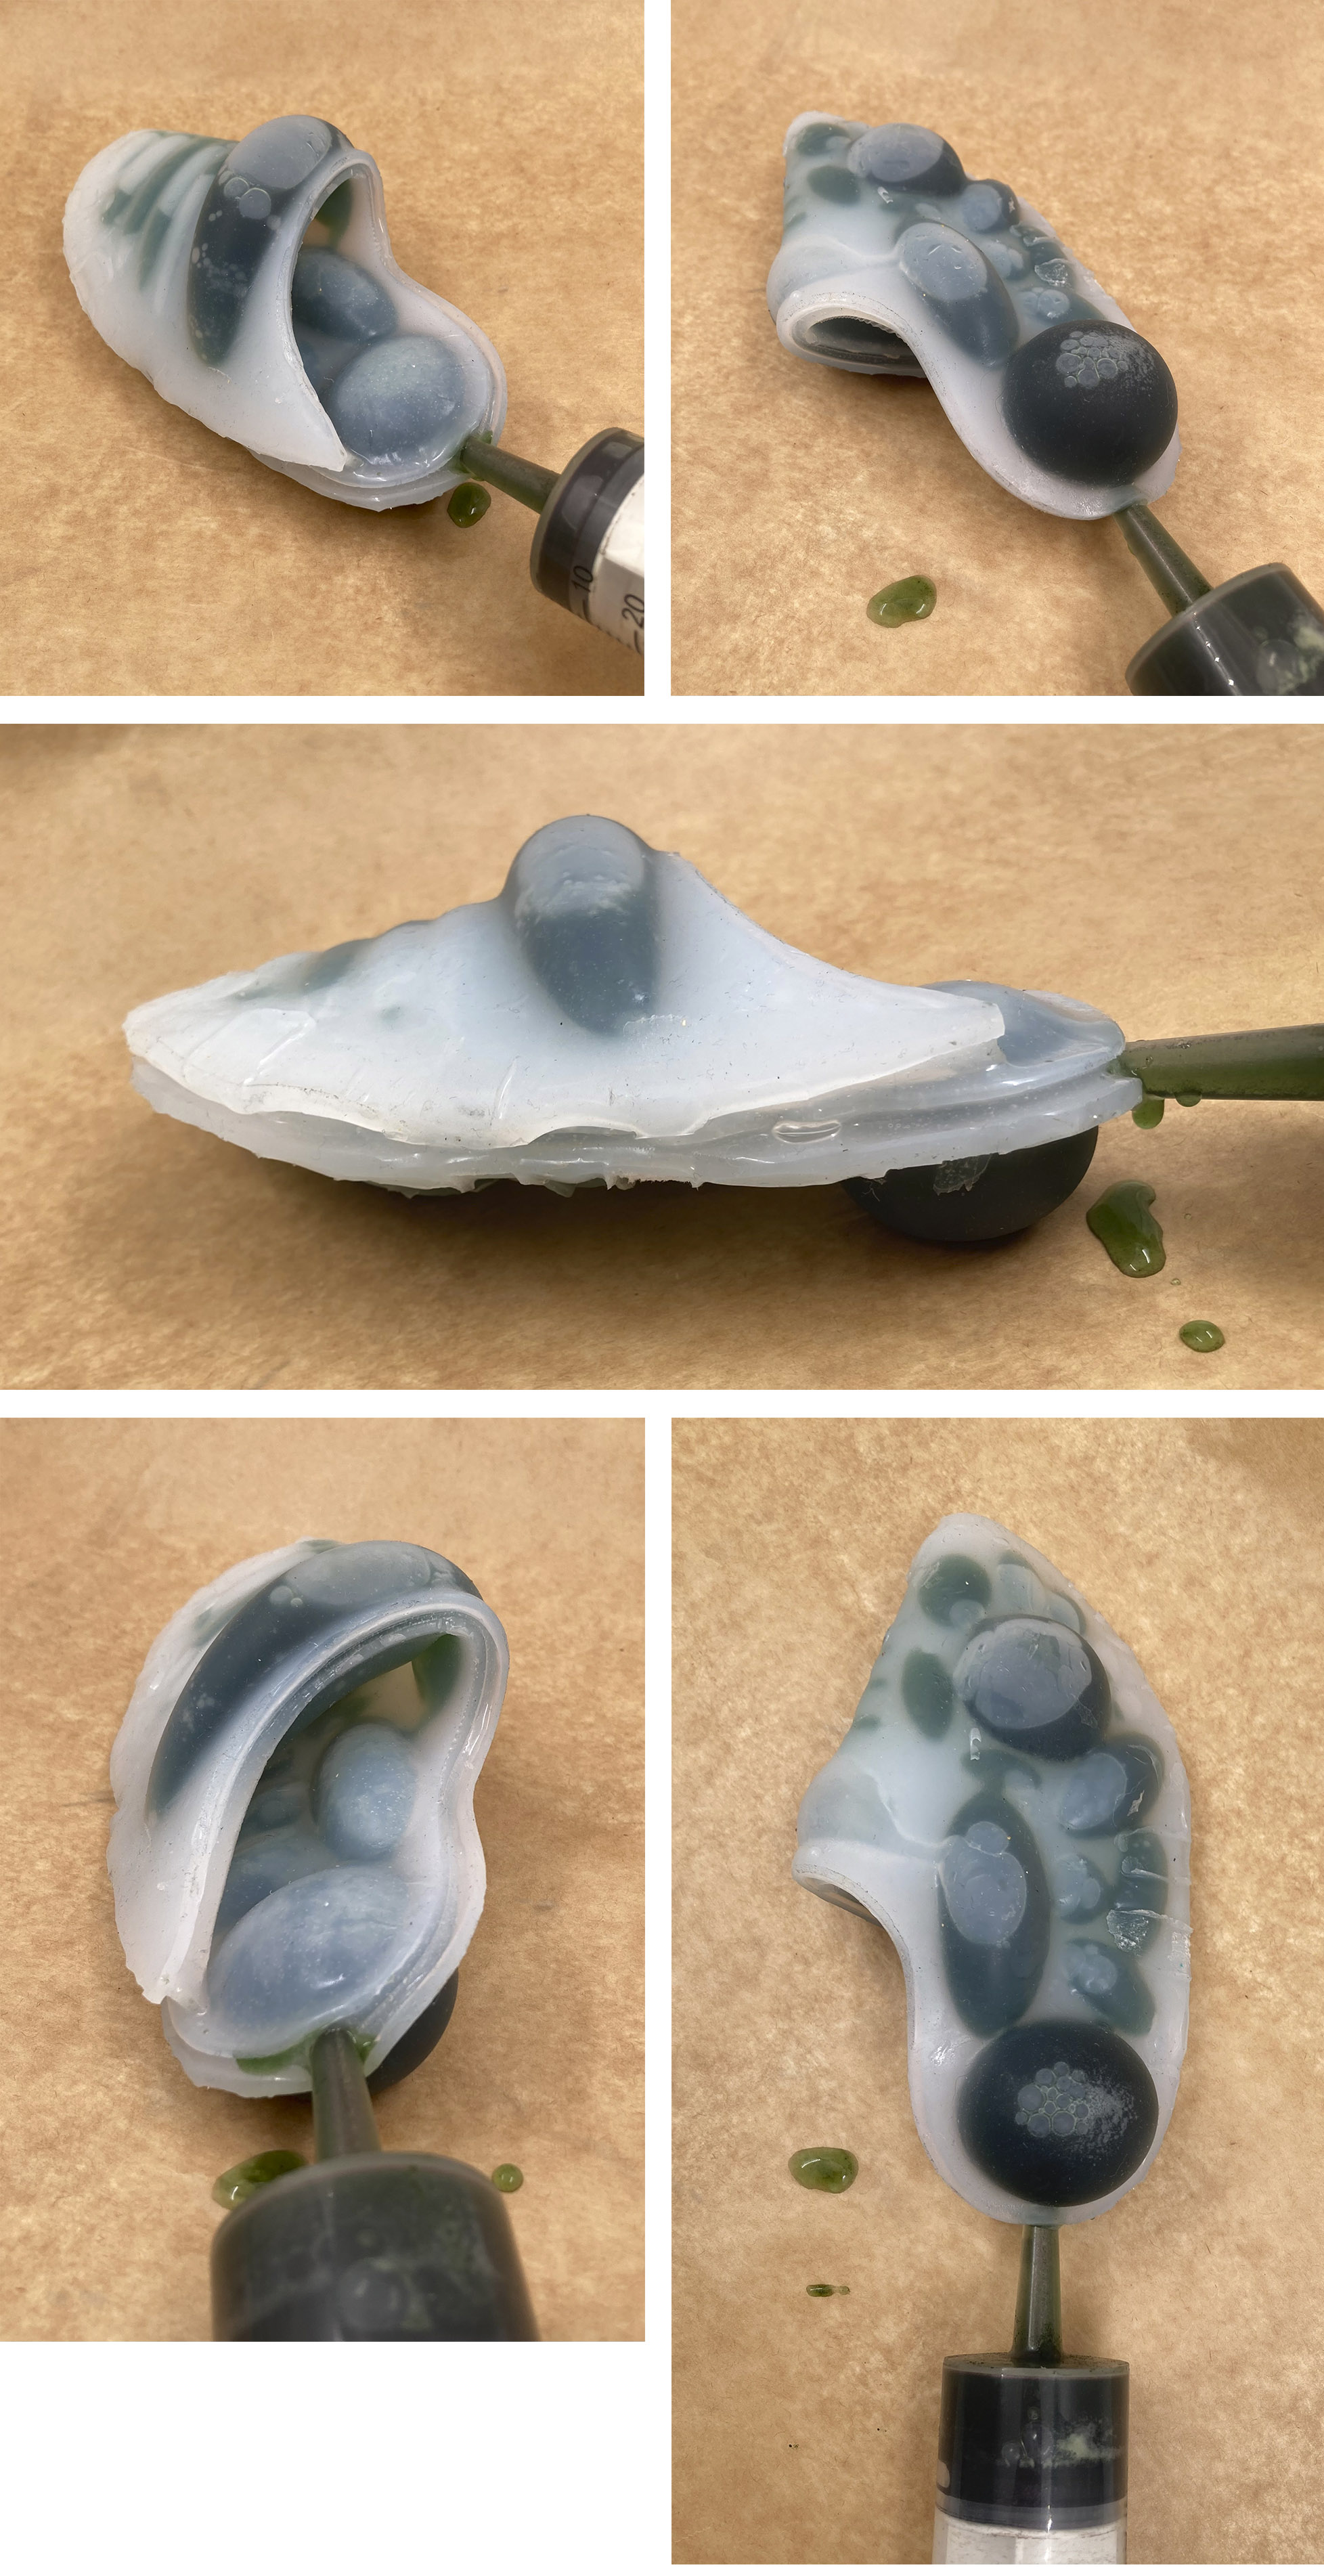
Procedure gets the colorant:
- Calculate the water you will need to inflate your sample. Use a syringe and pour all the water into a pot.
- Mix the water with some spirulina powder.
- Start with a few, the color gets easily dark. When you get the tone you wish you are ready to inflate your project.
Final test shoe with water and spirulina:
Inflatable mule with spirulina de Emma
To conclude,
I am really excited to finally get the little mule. Honsetly, I am having my doubts to make it work, especially because I make a little scale so it's dedicated to don't joining or blocking some tunnels while I am assembling. Also, another point I was worried about was when I blend the silicone (to get the shoe shape) to block the tunnel air from the shoe top. However, it blows up!
The next step will be to create a real-size shoe and create a blockage to try the mule as a real shoe functions and see if the pattern shapes I design are comfortable enough.
Engaging week!
Create movement with air or a material reaction it's just a new pattern, as always I would like to have some time to experiment with more materials such as gelatin and BIG SCALE inflatables to try some furniture and explore shapes growing...
🌬🎈See you the following week!💉💨