13. Skin Electronics
The last week.
Still don't believe it!
We will work in Skin Electronics, some similarities with the Wearables week, but is more permanent somehow.
WHAT IS SKIN ELECTRONICS?
A circuit "embedded" into the skin. A circuit that interacts with the body, the body is a part of it, an interface, an output, an input.
Therefore, this week we will work on the human body and we will generate personal data about our private life, so we should rethink the impact of our projects on human life and not forget an ethical way.
Research and inspiration

Some interestings projects about Skins electronics:
Neil Harbisson a cybor artist from Barcelona, who has a chromatic aberration, so he see the world in grayscale since a child. However, since he has implanted an aerial in his head, he can listen to the frequencies of the colors.
Some aplications with a capacitor sensor, Touché, developed in Disney laboratories.
Interaction with your hair to be able to send a missage, record a conversation, performance display with the movements... Take a look!
Useful links for the week:
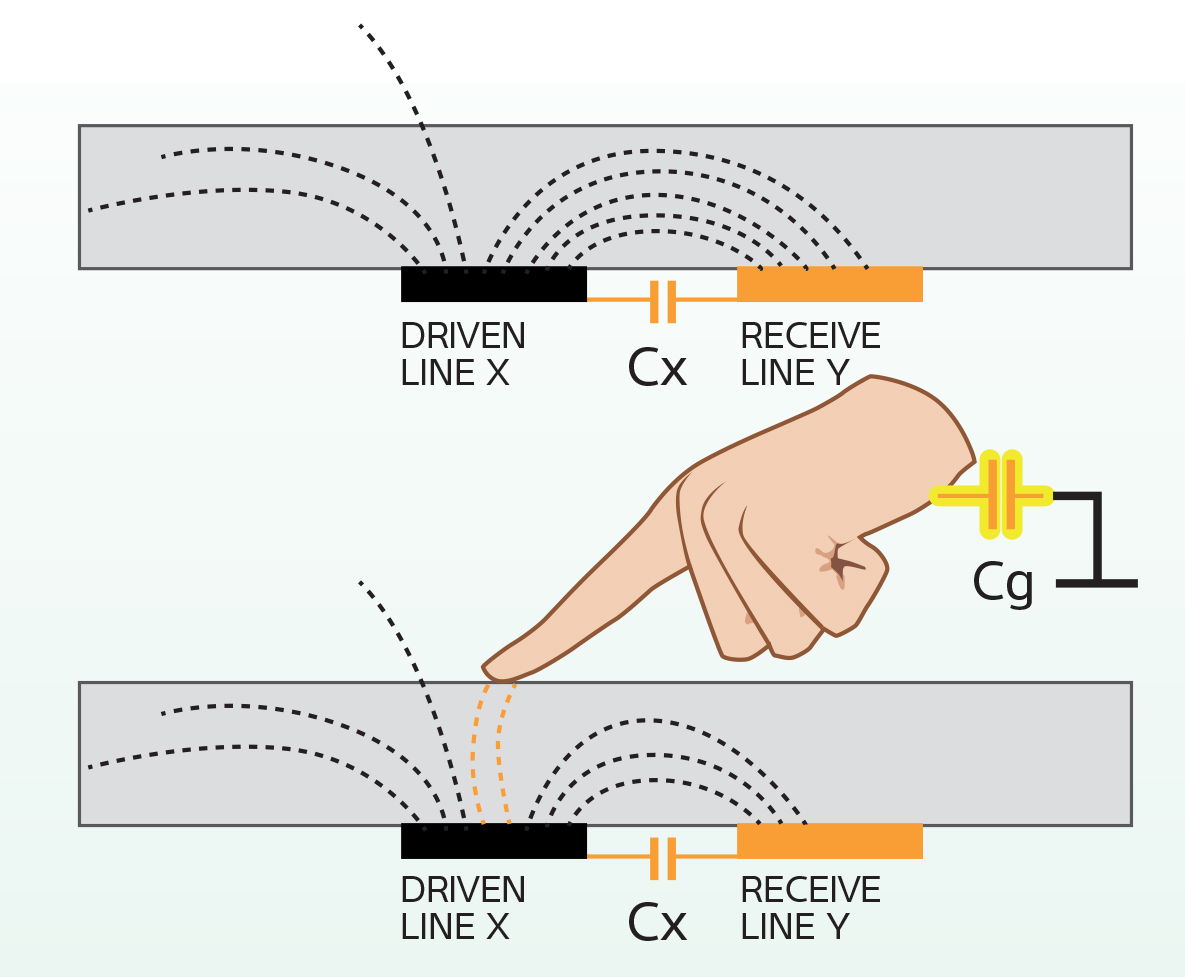
Capacitive sensor
A Capacitive sensor can detect and measure anything that is conductive. There are many types of sensors: to detect and measure proximity, pressure, position and displacement, force, humidity, fluid level, and acceleration. Also, it could use the human body as an interface device based on capacitive sensings, such as touchpads. In addition, it could also replace mechanical buttons.
Touching sensor code
void setup() {
  // put your setup code here, to run once:
  Serial.begin(9600);
}

void loop() {
  // put your main code here, to run repeatedly:
  int sensor = touchRead(T0);

  Serial.println(sensor);

  if (sensor < 30) { // Note that when we touch, the value is lower!
    Serial.println("Touching!!!");
  } else {
    Serial.println("Nothing there!!!");
    // }
    delay (50);
  }
}
Capacitor sensor de Emma
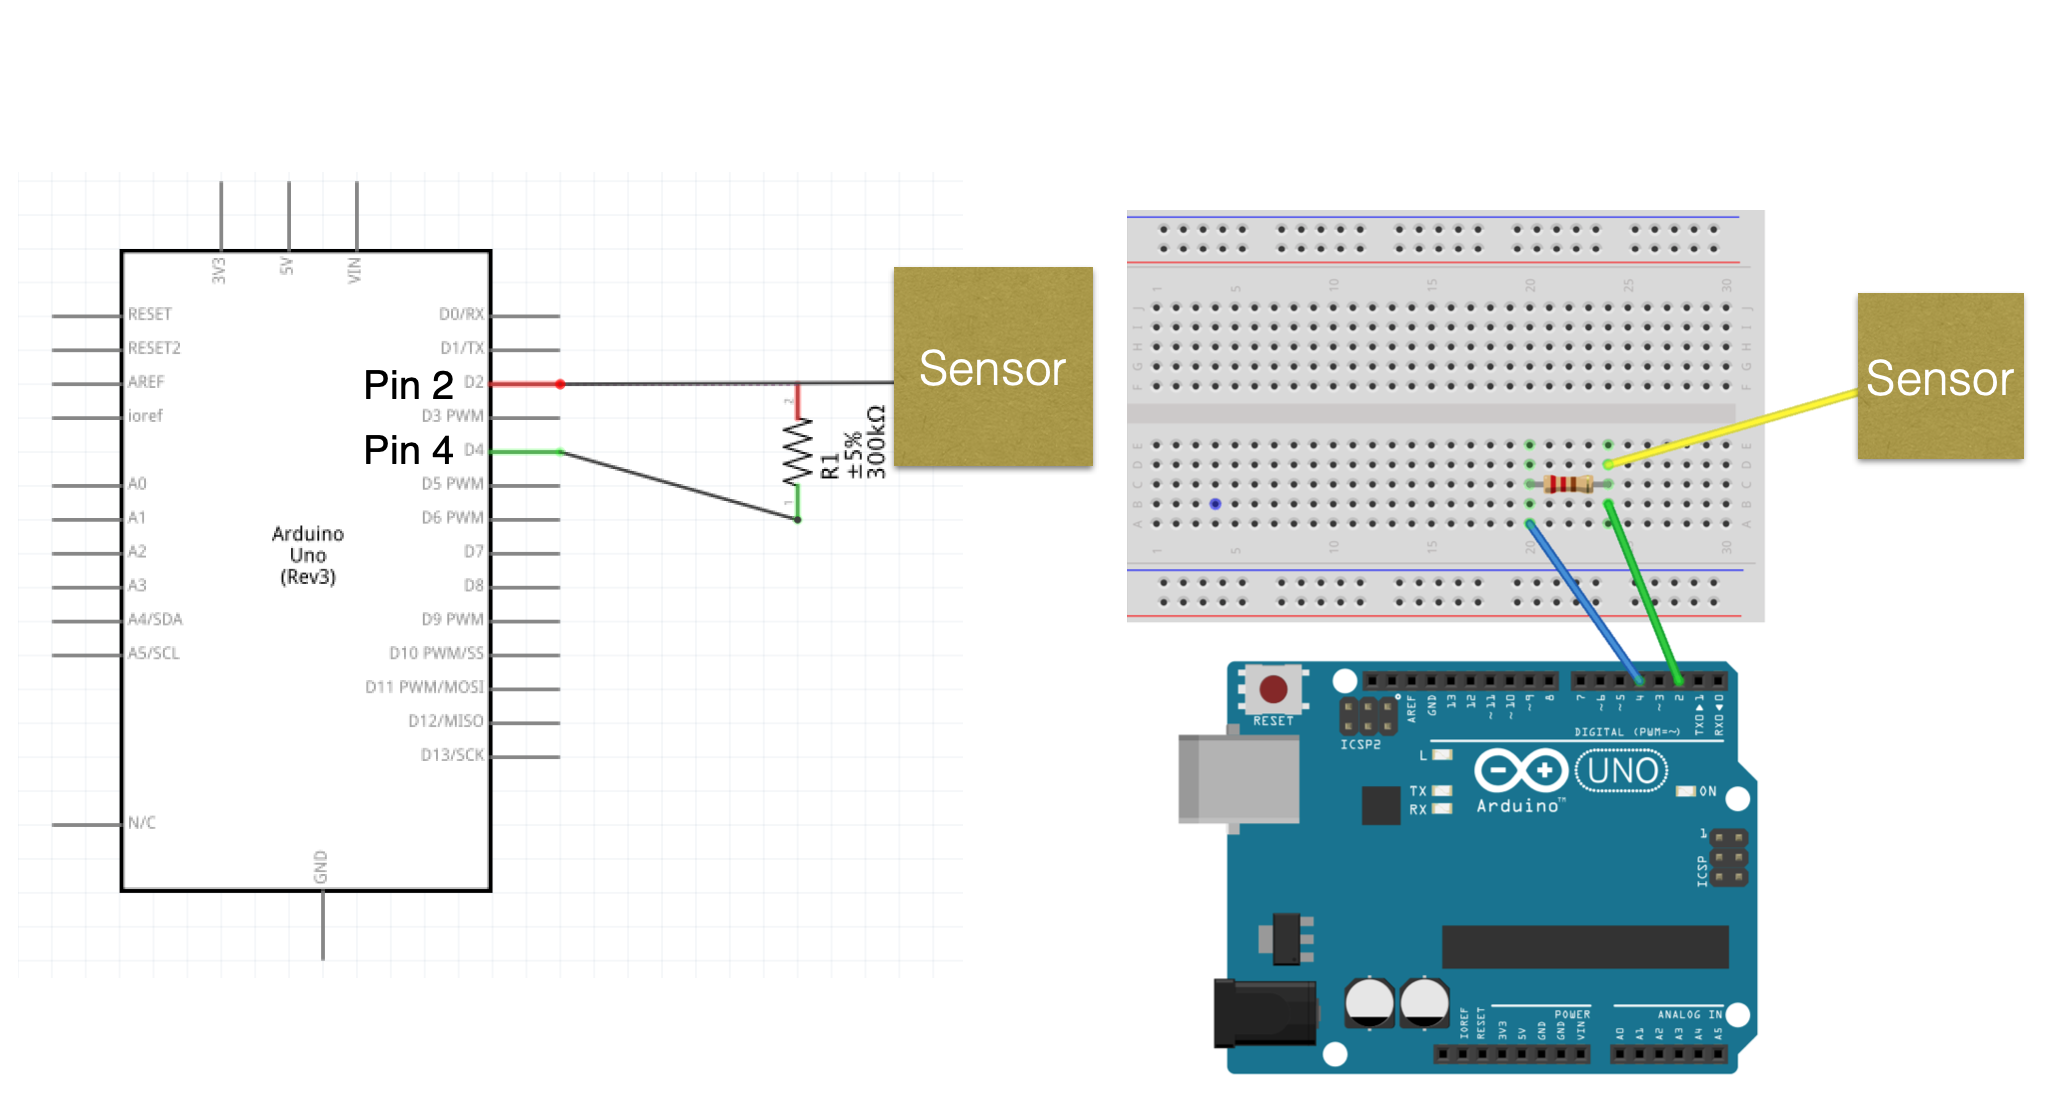
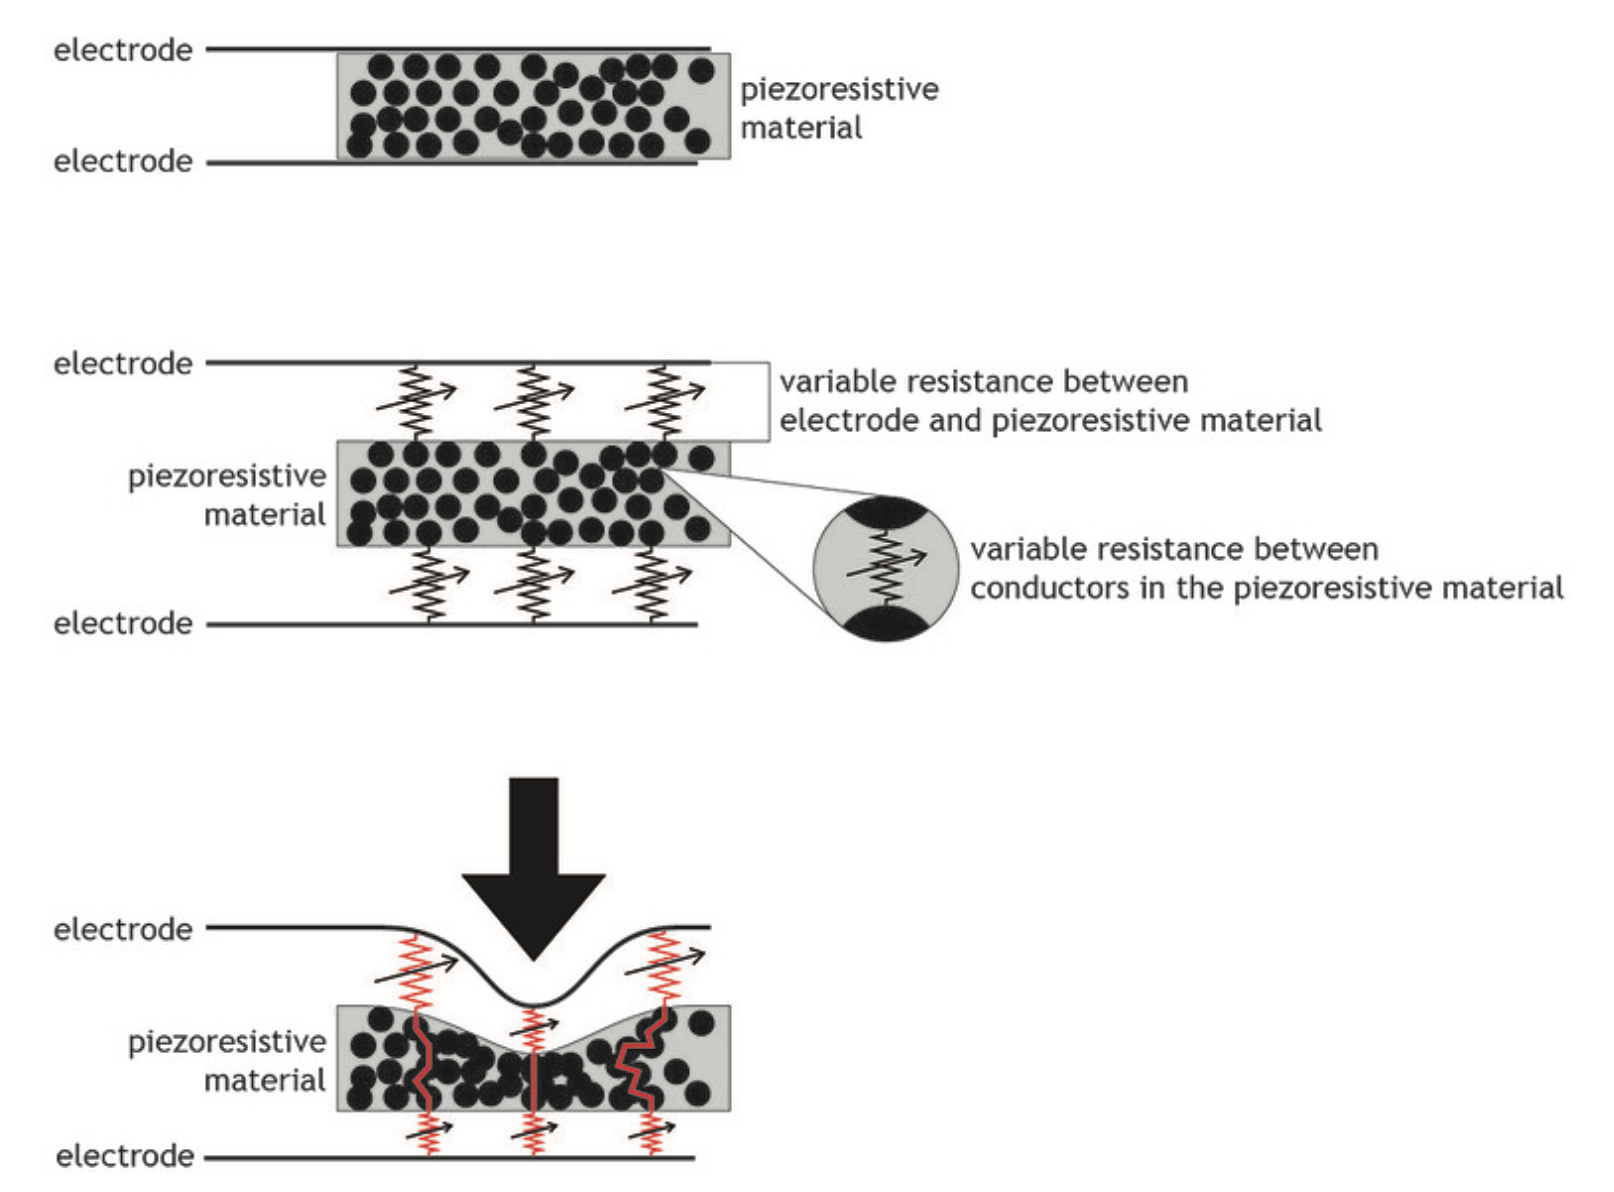
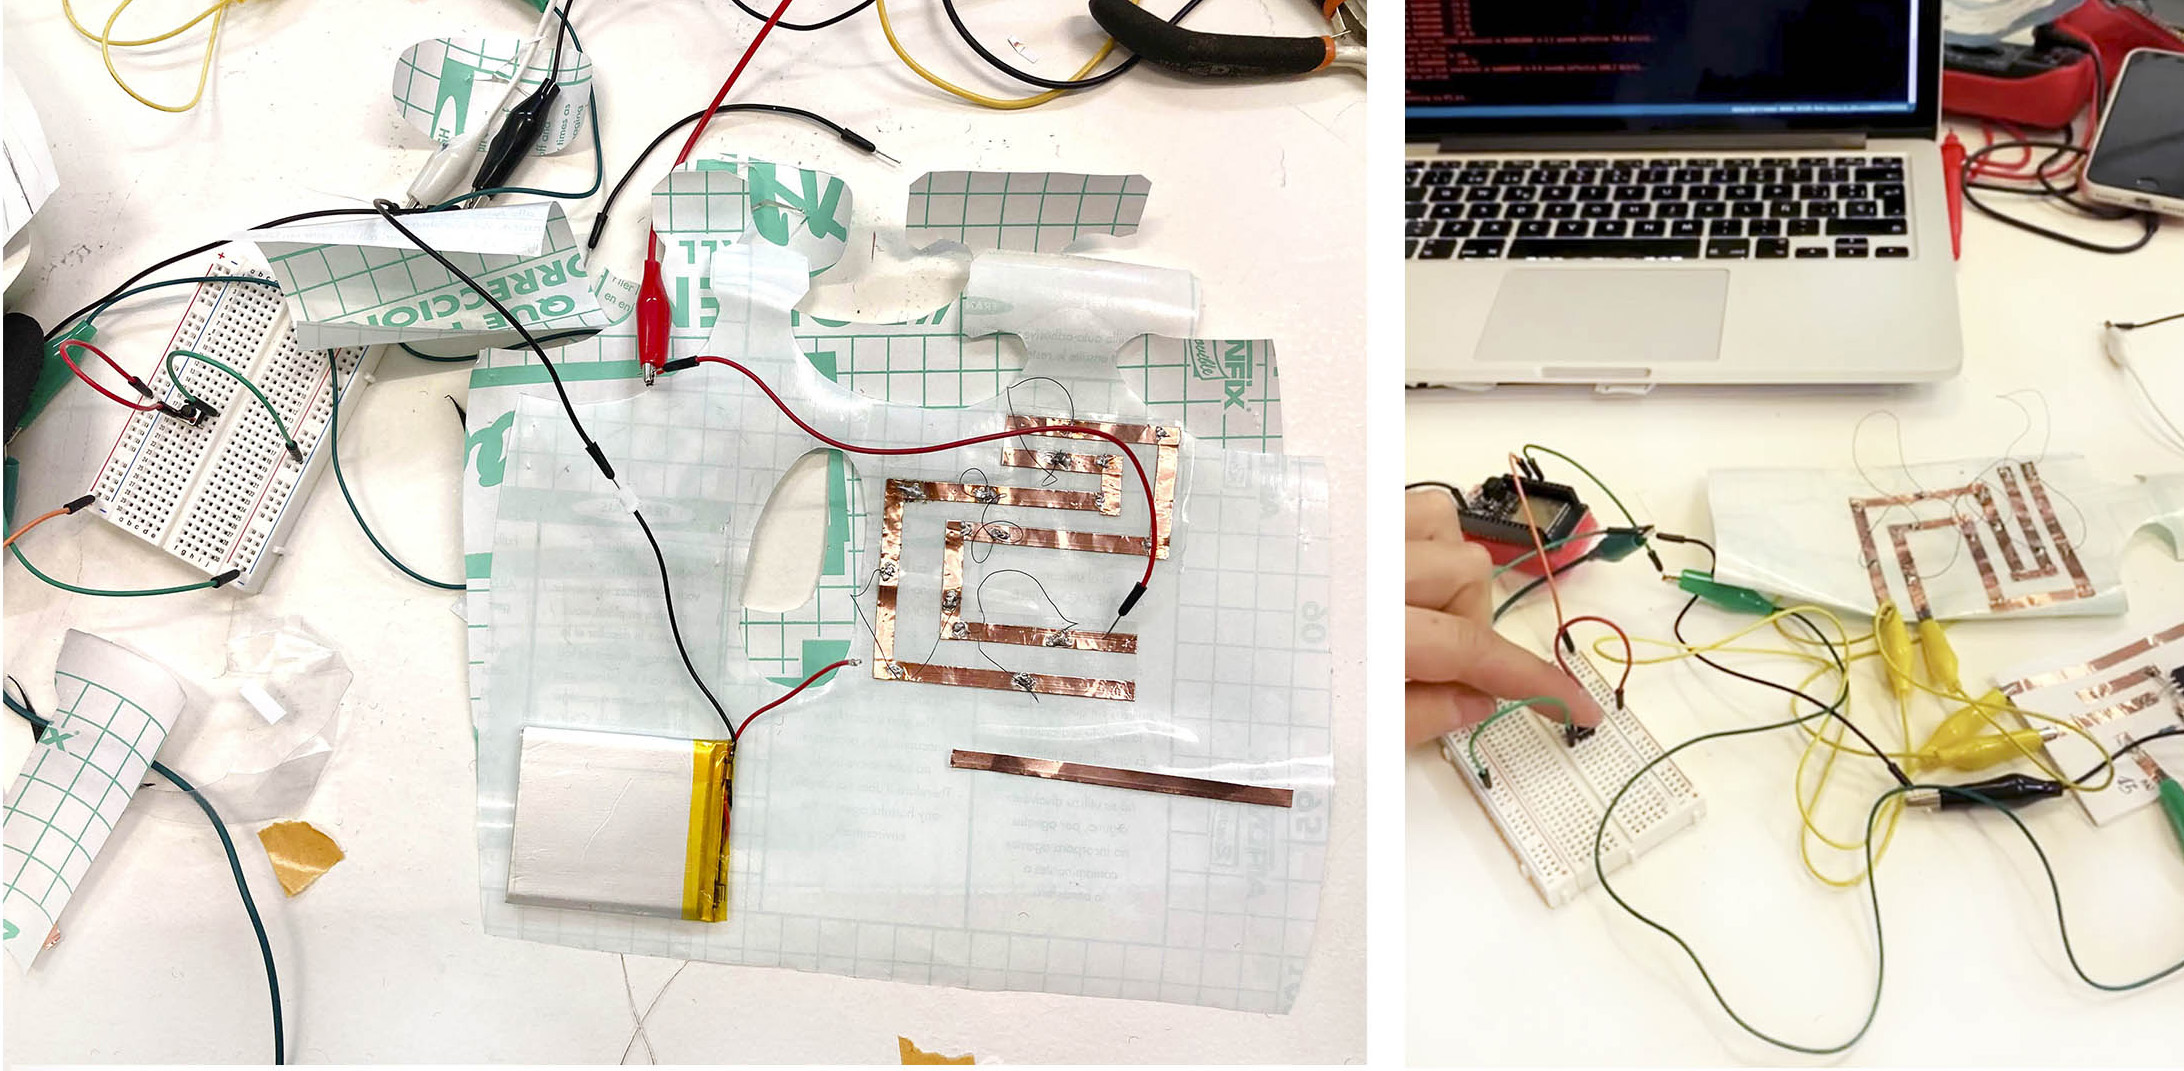
During the lecture with Emma we make a Pressure Matrix, creating a grid of conductive copper tape rows and columns with a piezoresistive material as Eeonyx or Velostat in between to have resistance.
More about Pressure Matrix
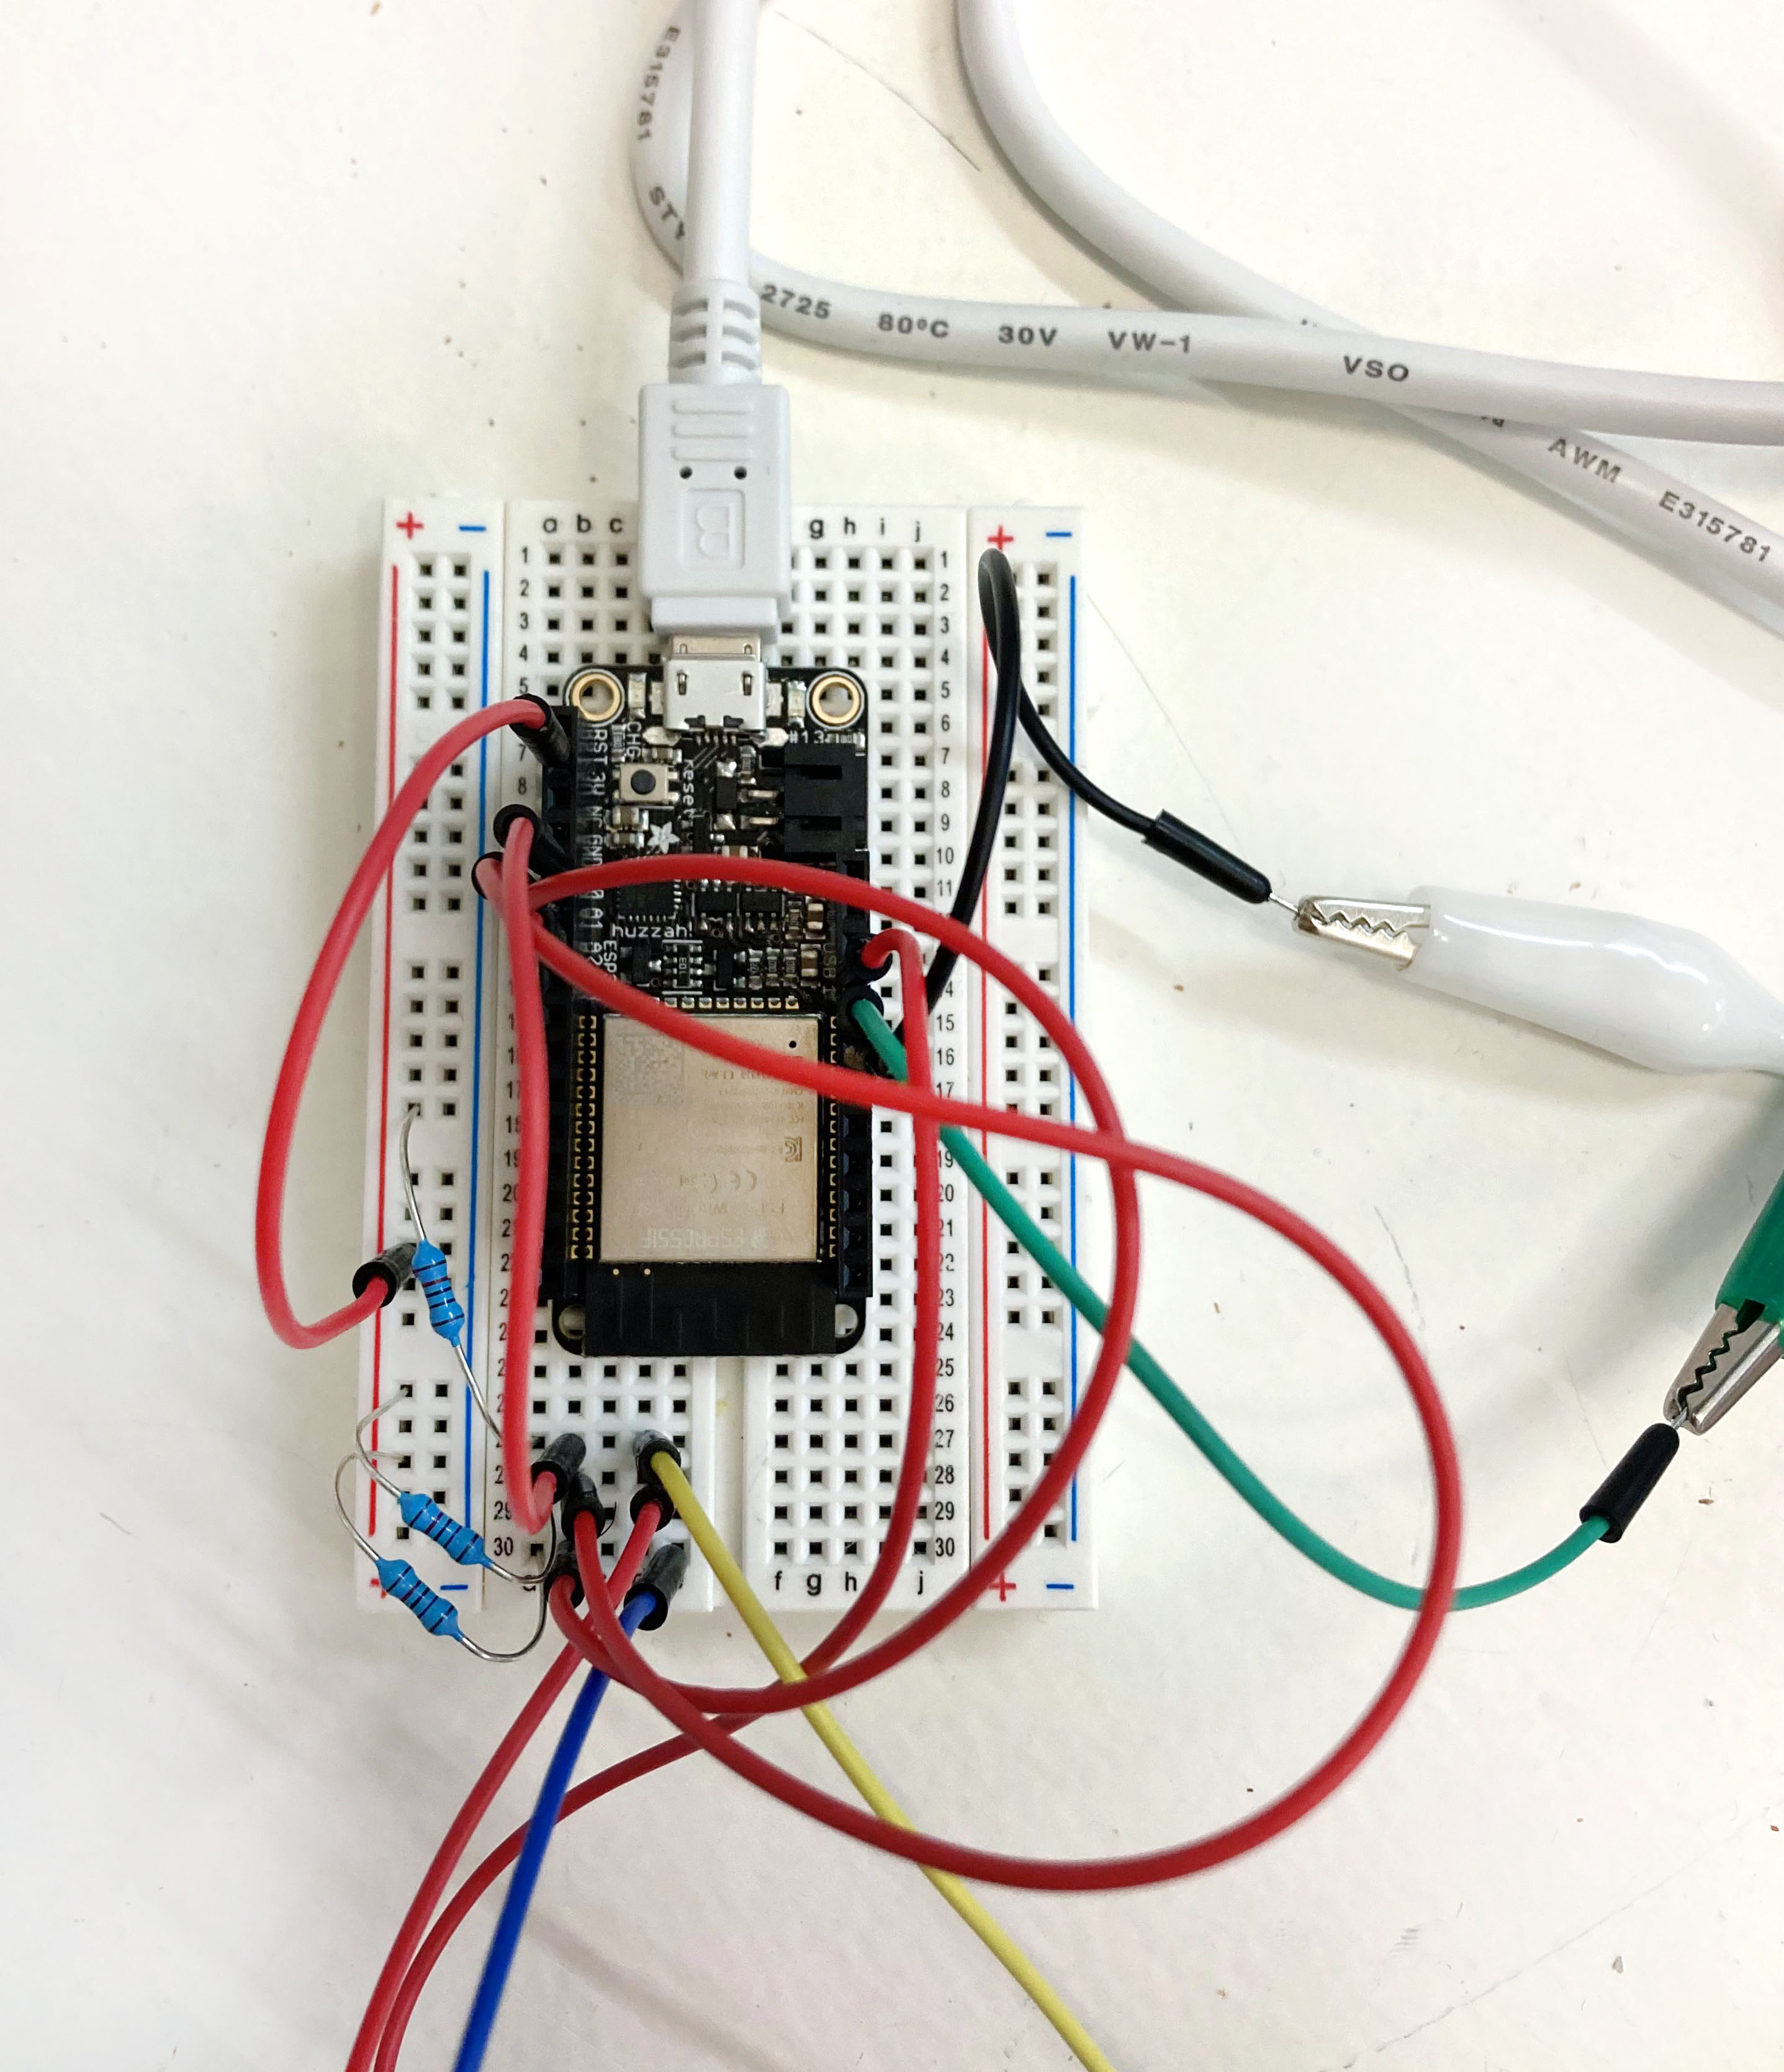
Matrix code
#define numRows 3
#define numCols 3
#define sensorPoints numRows*numCols

int rows[] = {A0, A1, A2};
int cols[] = {13,12,27};
int incomingValues[sensorPoints] = {};

void setup() {
// set all rows and columns to INPUT (high impedance):
for (int i = 0; i < numRows; i++) {
  pinMode(rows[i], INPUT_PULLUP);
}
for (int i = 0; i < numCols; i++) {
  pinMode(cols[i], INPUT);
}
  Serial.begin(9600);
}

void loop() {

for (int colCount = 0; colCount < numCols; colCount++) {
  pinMode(cols[colCount], OUTPUT); // set as OUTPUT
  digitalWrite(cols[colCount], LOW); // set LOW

  for (int rowCount = 0; rowCount < numRows; rowCount++) {
  incomingValues[colCount * numRows + rowCount] = analogRead(rows[rowCount]); // read INPUT
}// end rowCount

pinMode(cols[colCount], INPUT); // set back to INPUT!

}// end colCount

// Print the incoming values of the grid:
for (int i = 0; i < sensorPoints; i++) {

  Serial.print(incomingValues[i]);
  if (i < (sensorPoints-1)) {
    Serial.print("\t");}
//    Serial.println("");}
  }


Serial.println();
delay(10);
}
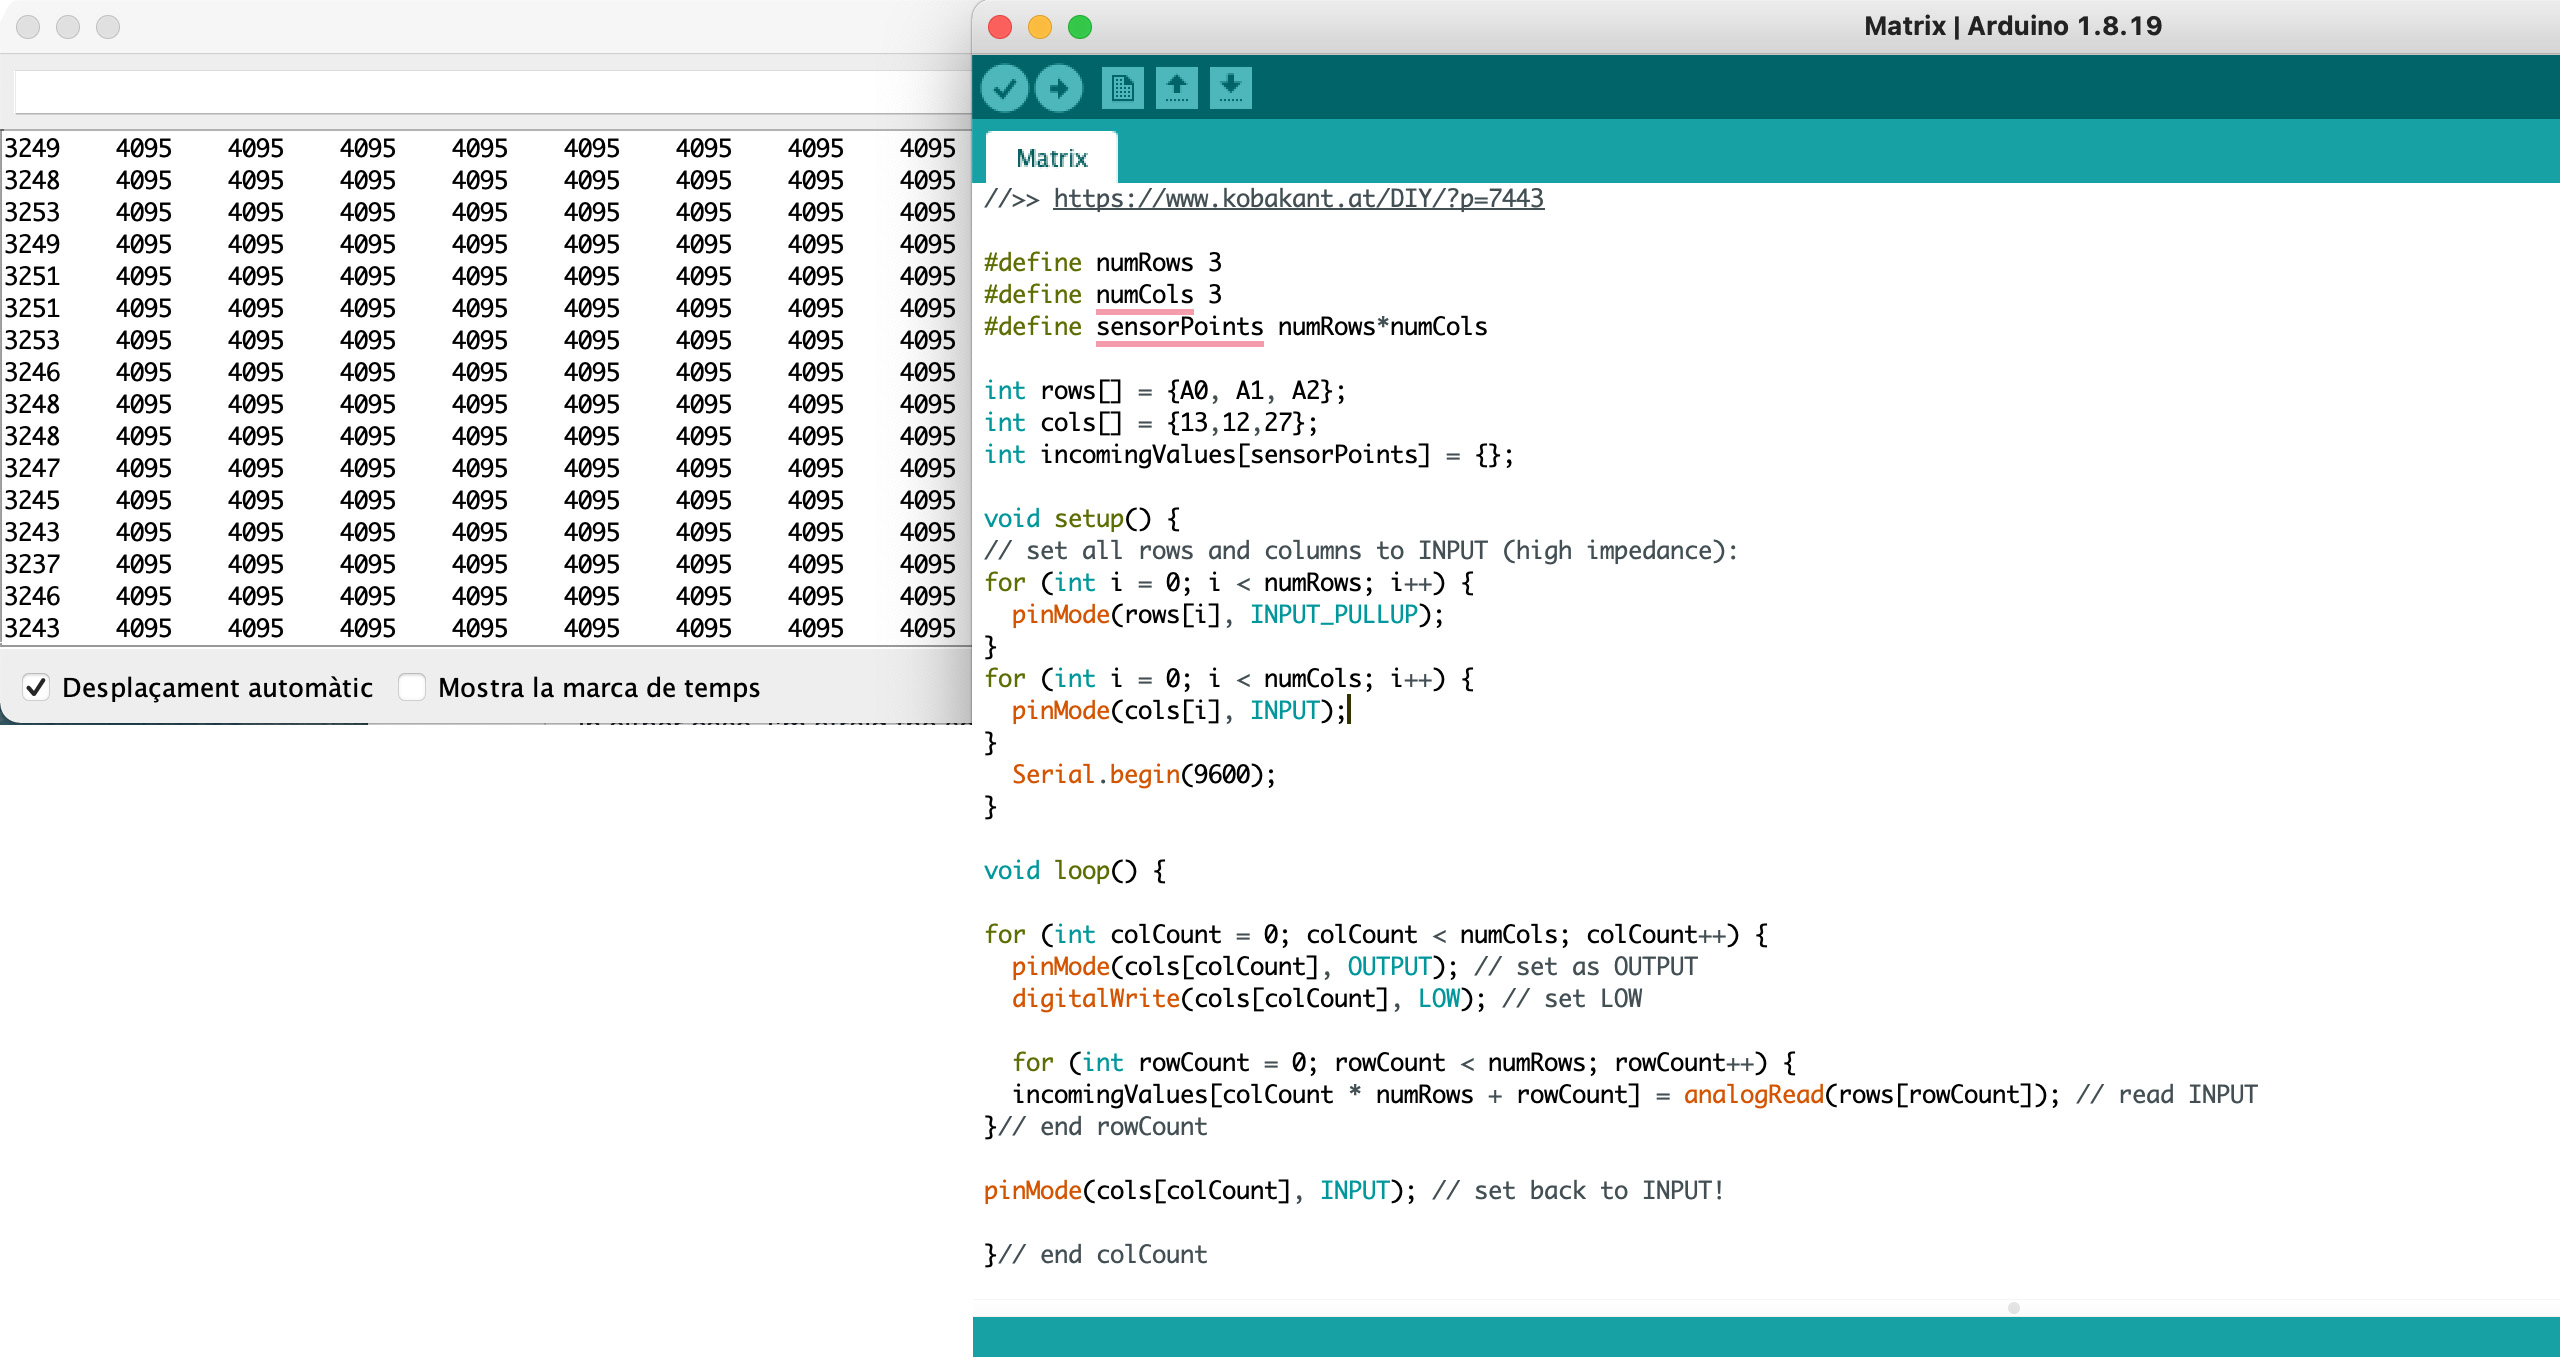
In this Ardunio screenshot, you could see the different values when you press a certain point of the grid. In this case, the lower value is where I am pushing.
Project
During the Wearables week in the Lab, we hadn't had the opportunity to work with the Flexionol, so this week I was super excited to try how it.
Some inspiration forms and movements for the project:
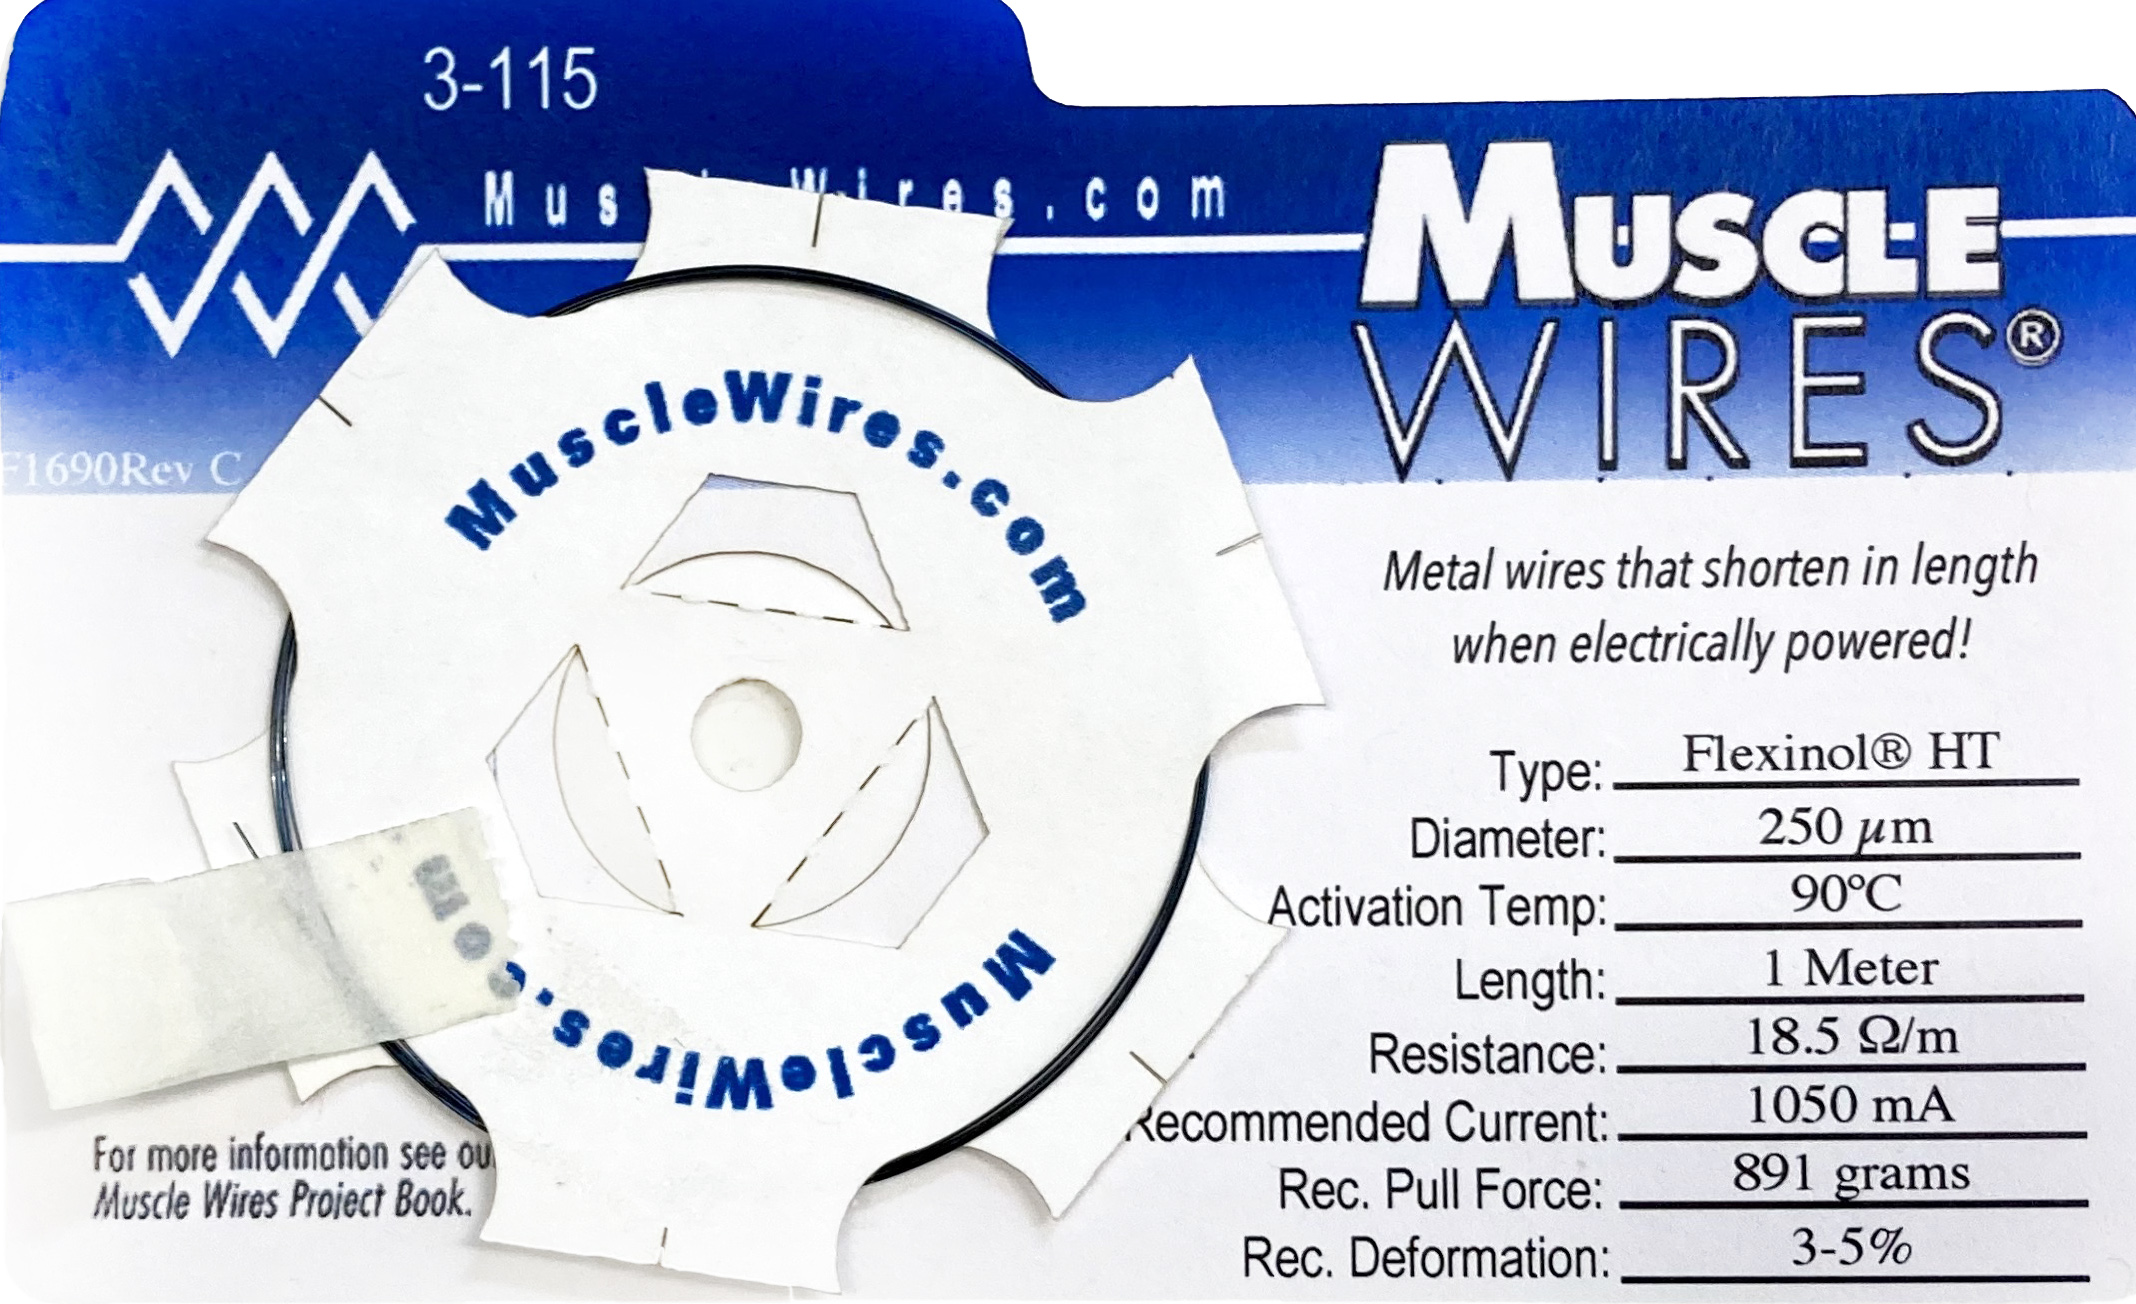
Muscle Wire paper.
Liza Stark sample of Flexionol to generate movement with a pieces of paper and the circuit she makes:
Flexinol from Liza Stark on Vimeo.
So, after seeing some examples of what can I do with this material and what should I need, I started thinking about it.
Finally, I get an idea for the week:
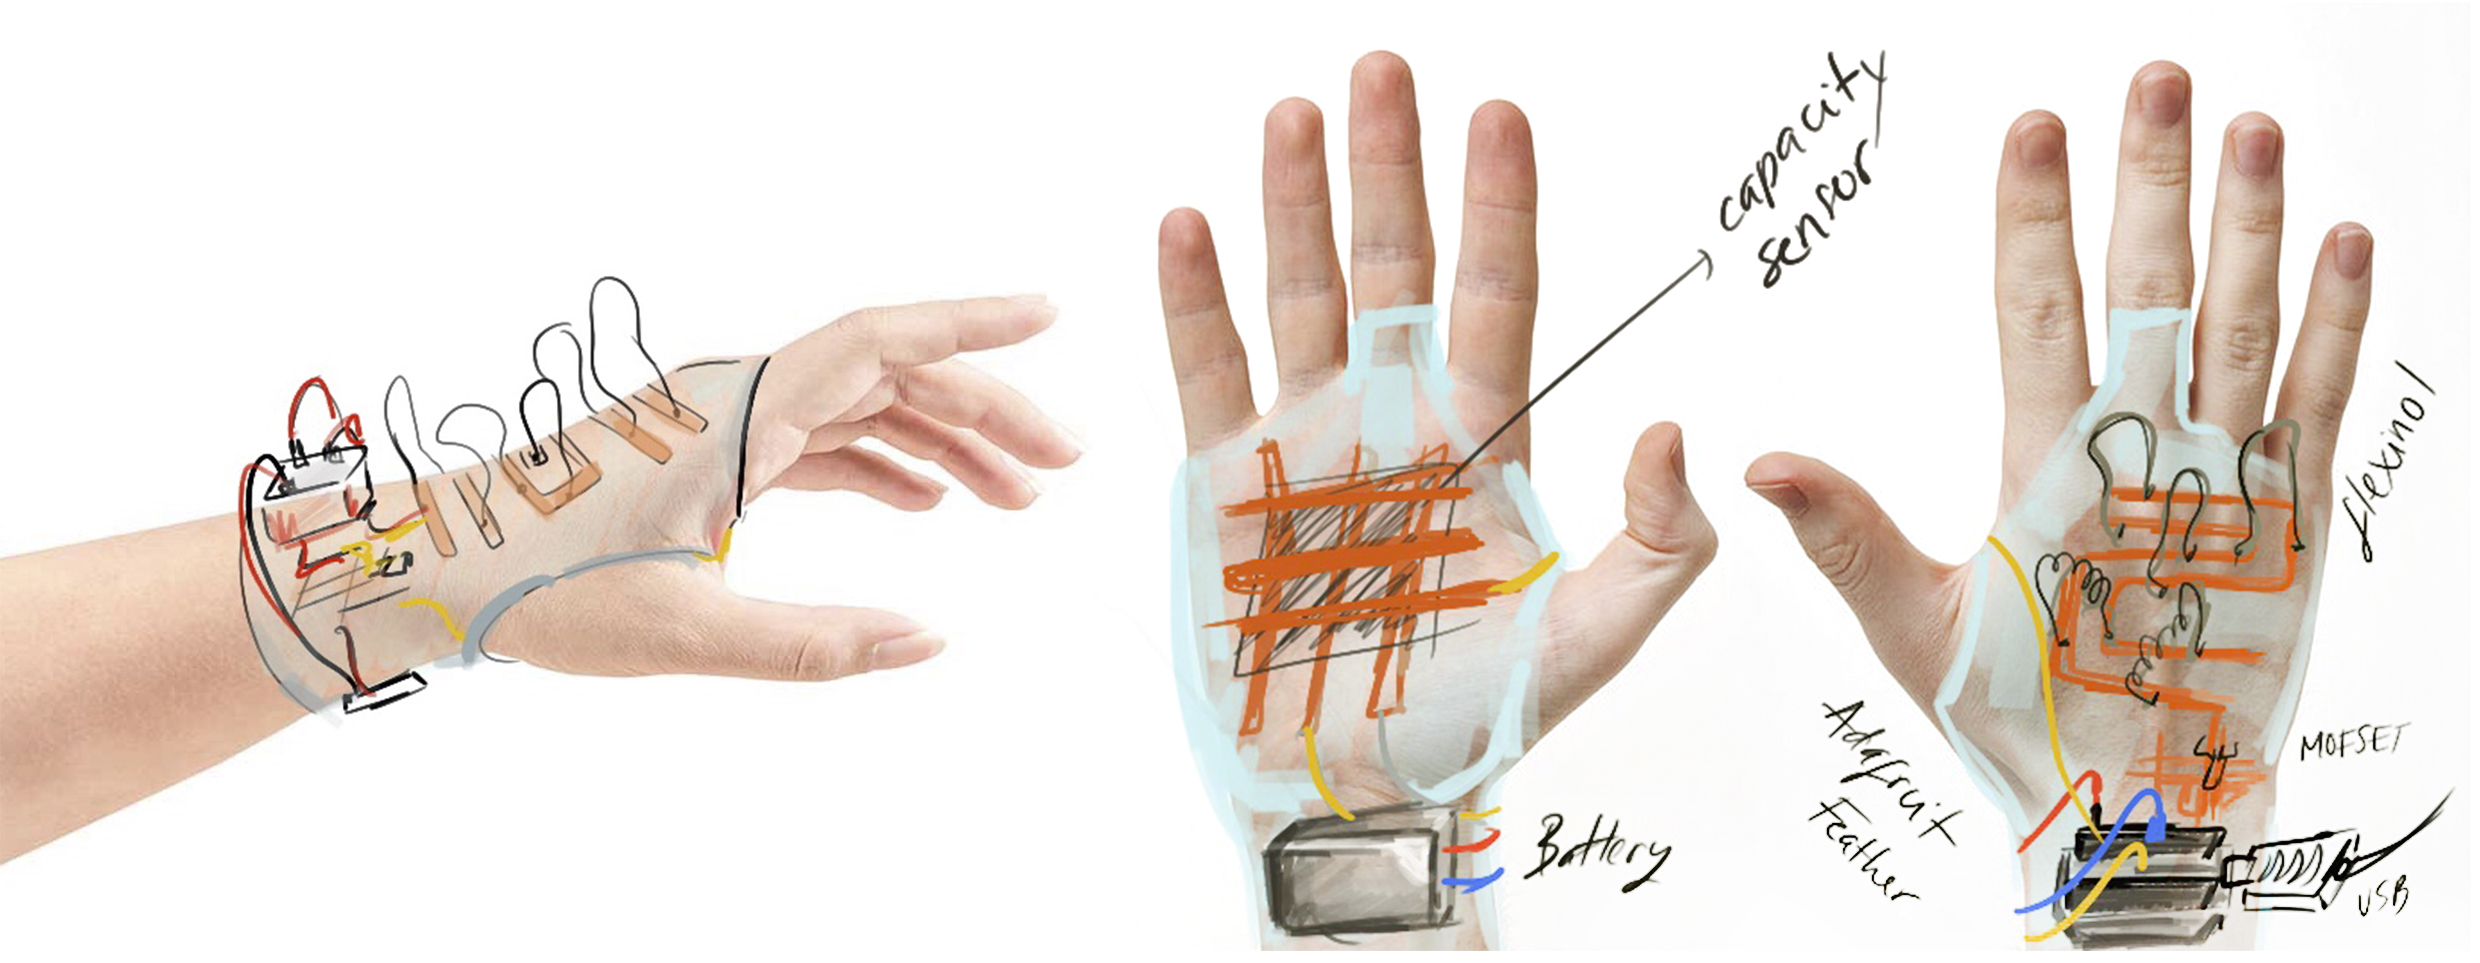
Create a glove and when you close your hand the Flexiol shapes move. As a performance idea, I was super excited to film a conceptual final video.
Let's start!
My fisrt idea for the project is to create the glove with Silicone and encapsulate the circuit on it. However, because of the short time me have and the unability to remove in case I have something wrong in the circuit, I decided to use Aeoronfix to get a a similar result for the prototype.
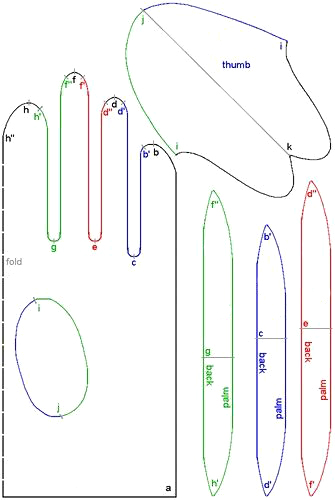
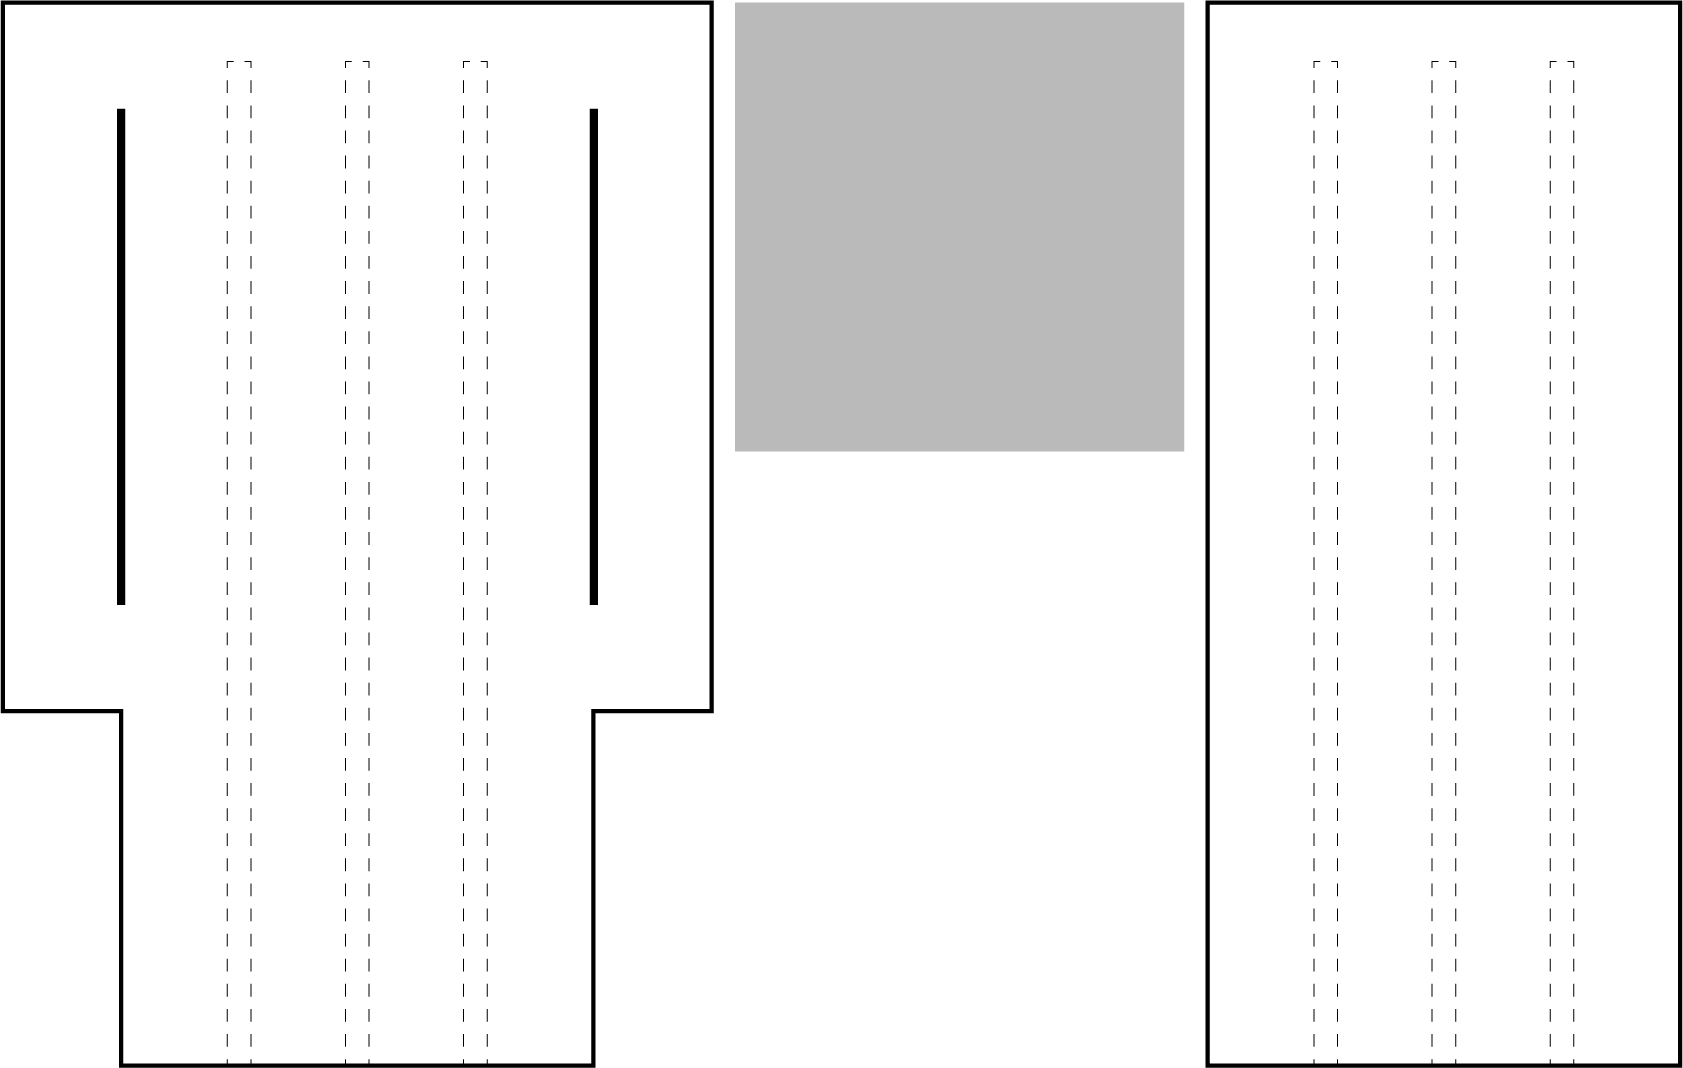
To work easily and faster, I create a glove pattern to know the area I have to build the circuit.
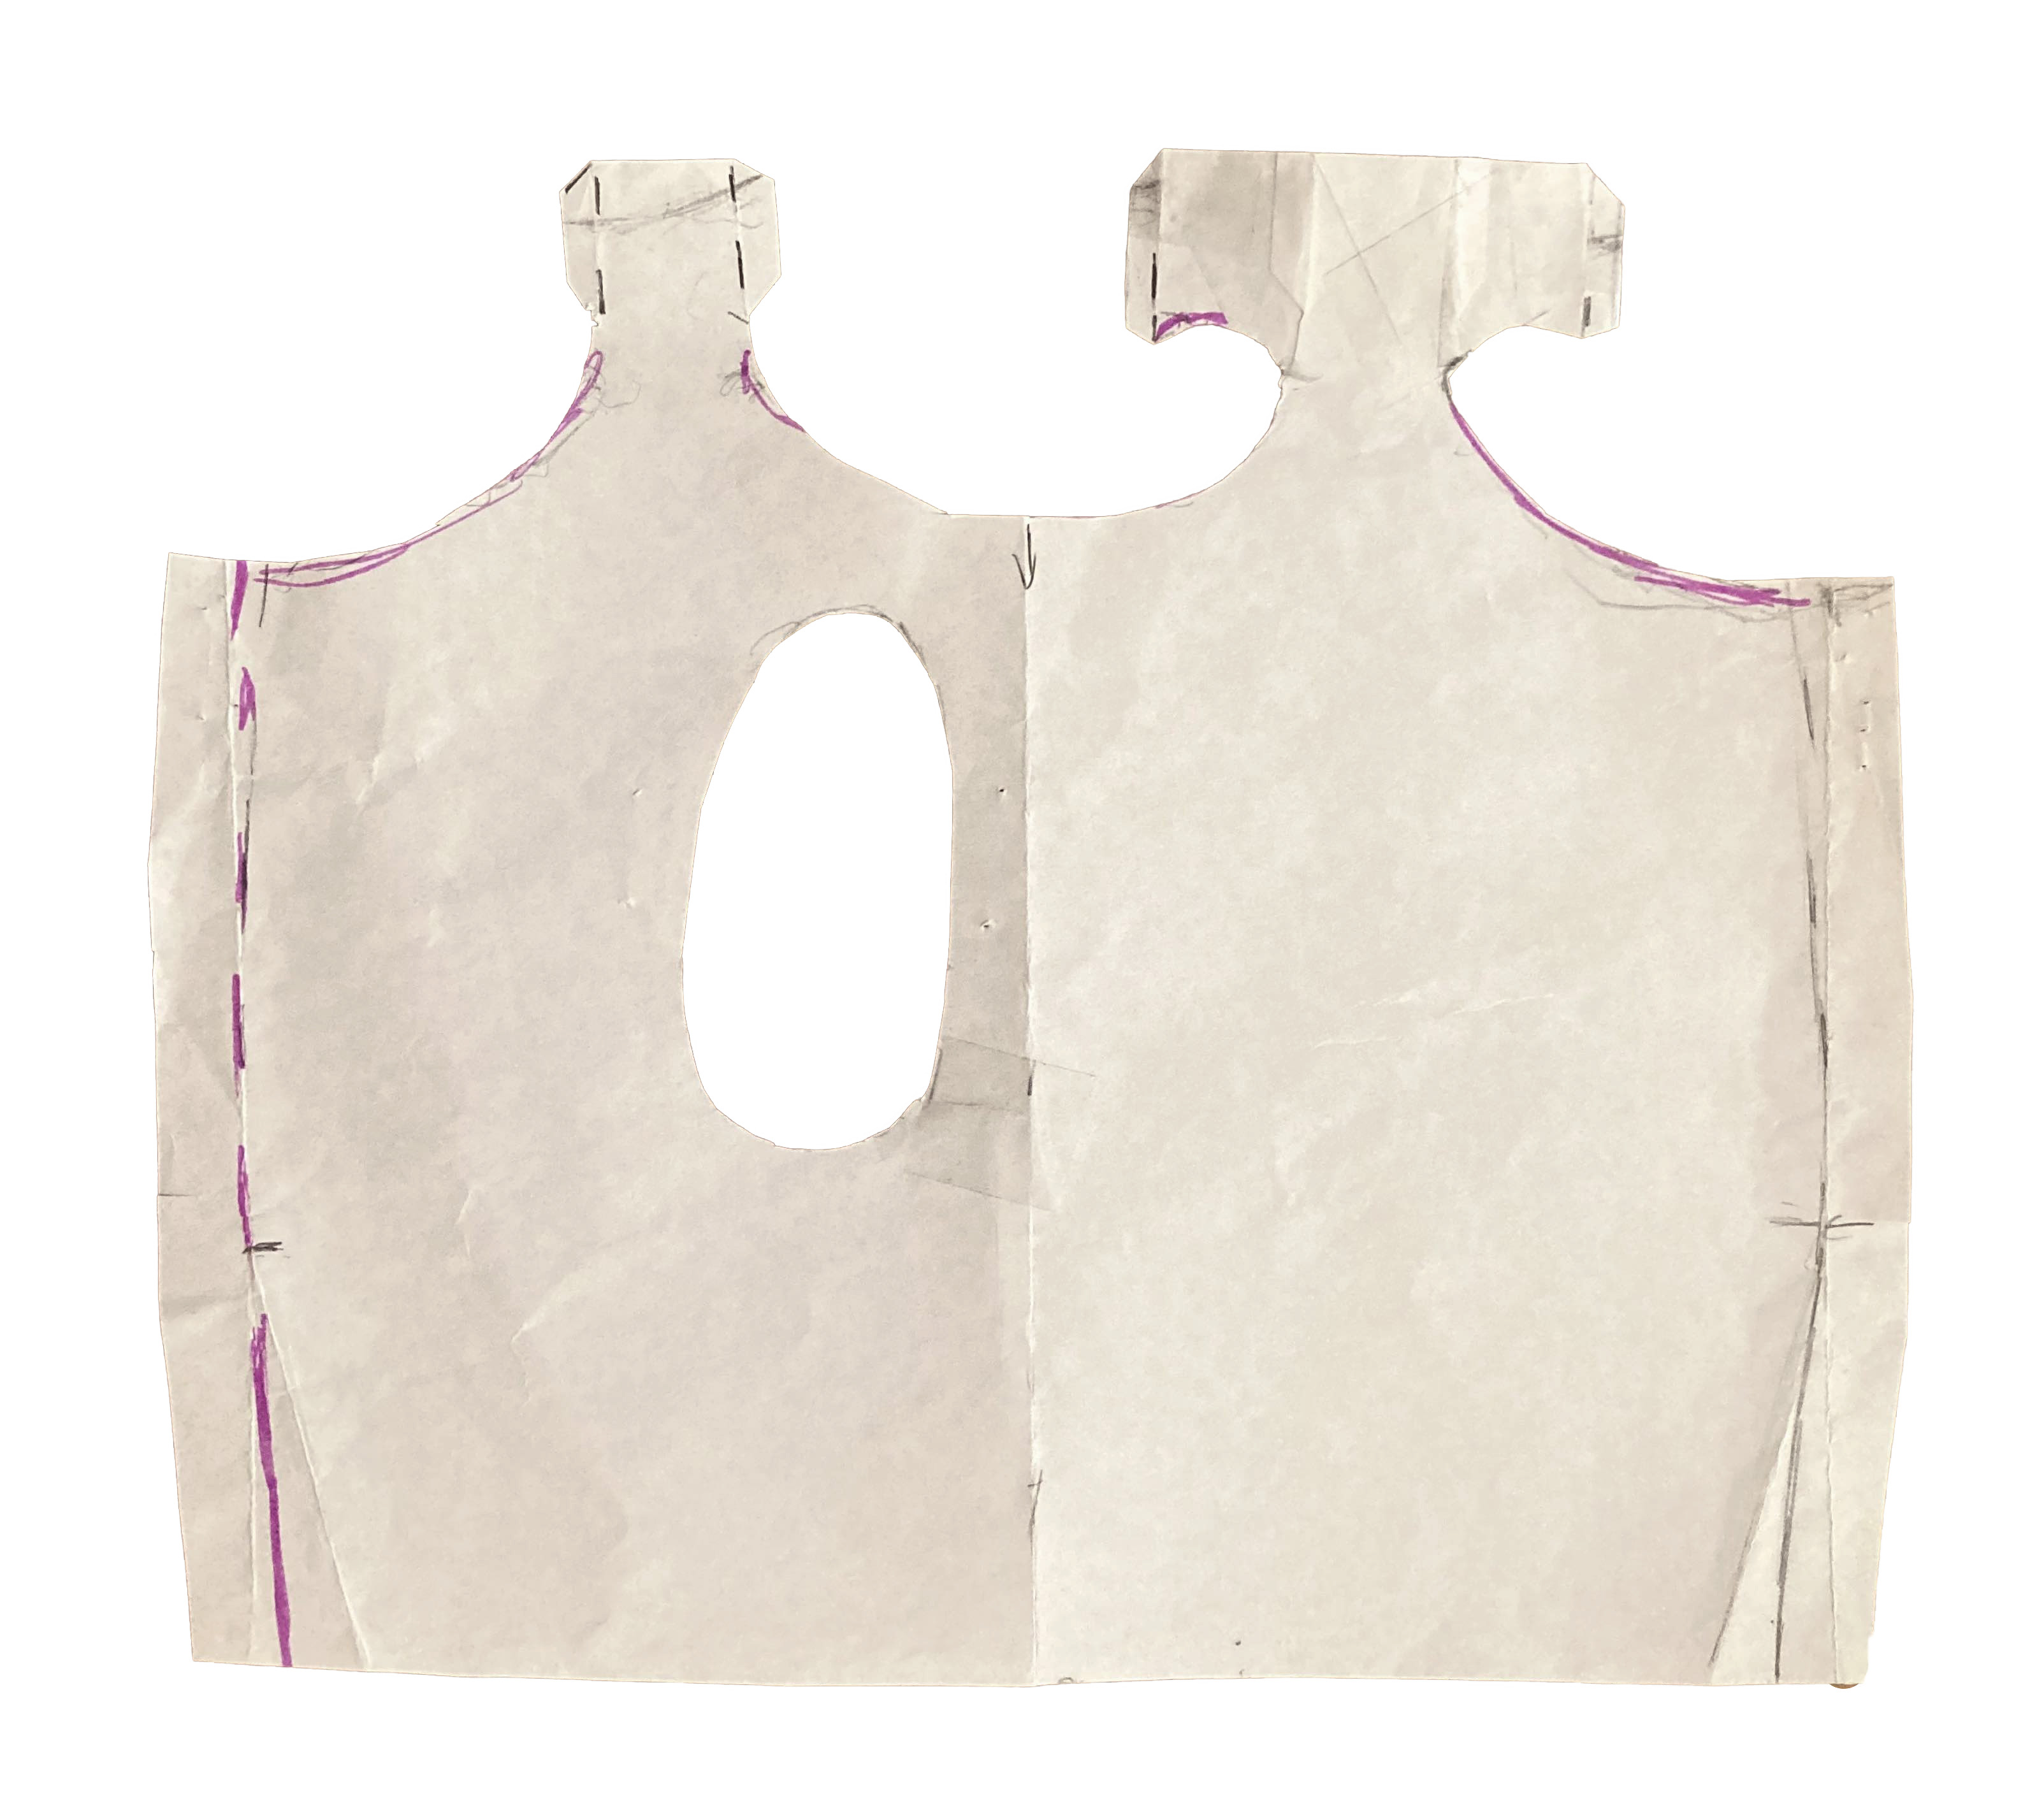
Keep in mind the scale: the size hand and the gadgets I will need!
Training Flexionol
First of all, we have to train the Flexionol.
Process:
- Make the shape. Roll the thread in some object you could heat. I used a screw and two nuts to block the Flexionol to unroll when it's getting warm.
- Heat with the gun during 8'.
- Put the screw inside a cold water pot to stop the process. Be careful, to do not scald your fingers!
-
Take out the Flexionl to the shape.
-
To know if you did a good train. Put the Flexionol in a hot water, close to boil.
In my case, when I let it in the hot water, the Flexiol try to straight.
- Then, take out from the hot water with a plier. The shape must change.
For my part, the Flexinol shrink and take the shape of the screw.
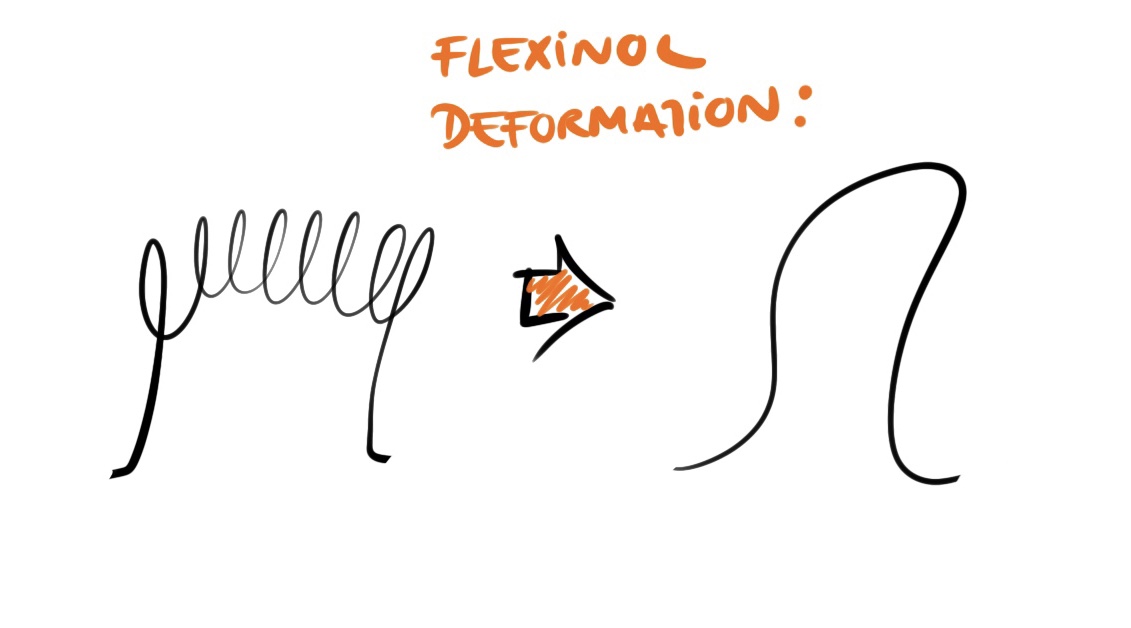
We have the Flexionol trained!
So, when we apply current to the Flexionol, it will stretch the shape and when we turn it off, it will shrink.
Flexinol train de Emma For the prototype I made one piece of thread to train and then, I cut it to the same size to create the deformations in the circuit.
Check the properties of the Flexinol to know how many Volts we will need in the following document: Muscle Wires PDF
Circuit
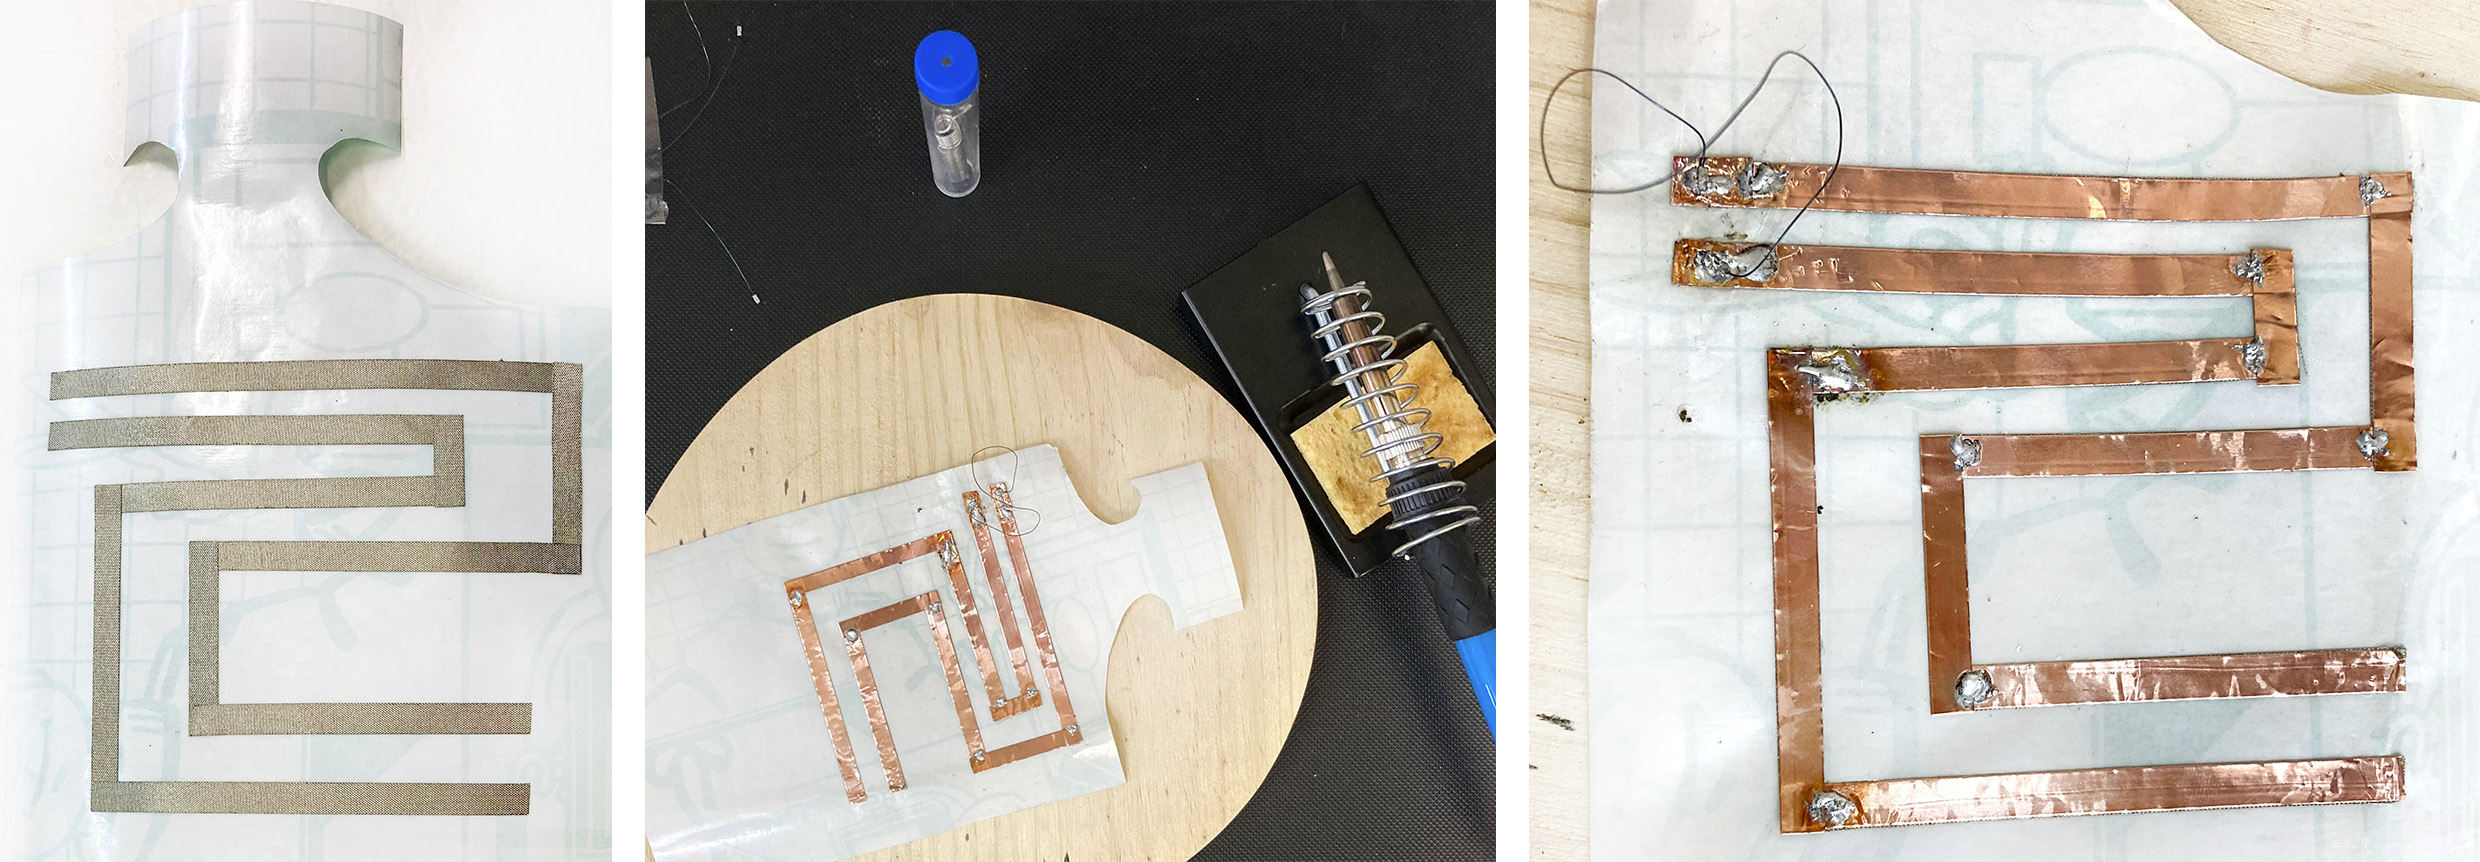
First I start the parallel circuit for the Flexinol with a conductive fabric tape to get a flexible prototype, I connected them with the same tape, but I do not get a proper connection between them (testing with multimeter), even though I sewed them strongly to get more pressure. As a result, Flexionol doesn't have any reaction.
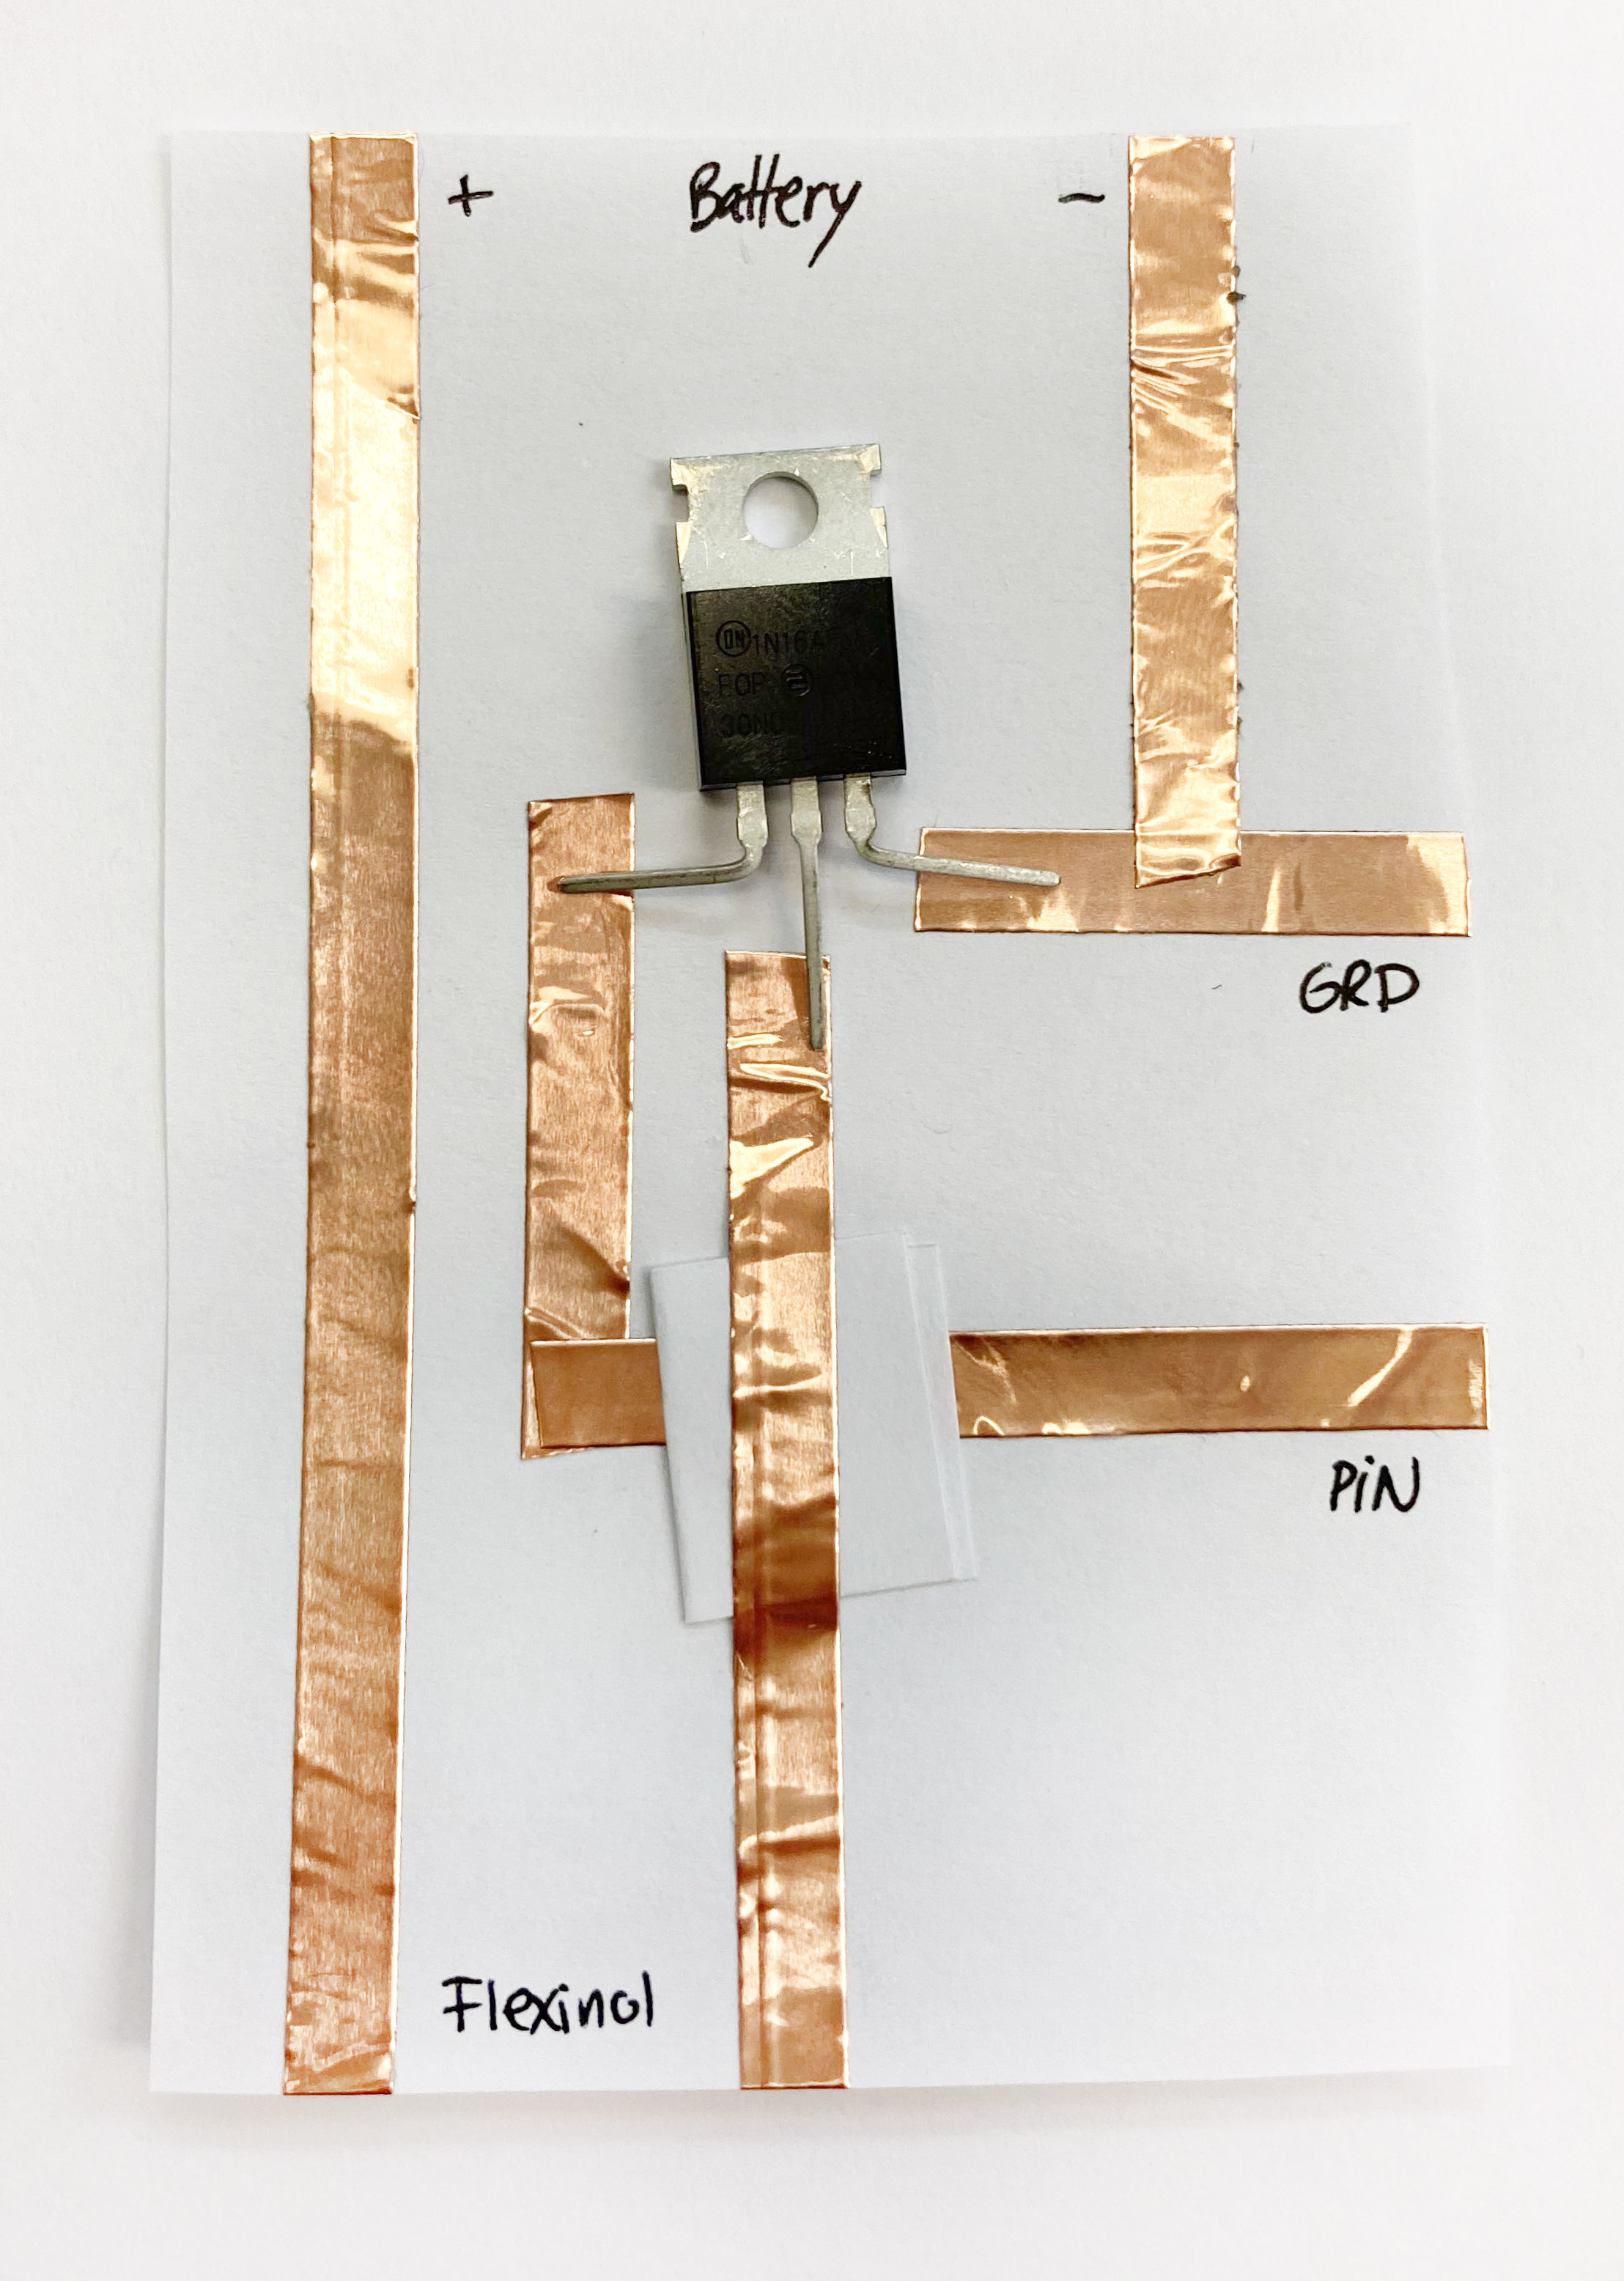
Consequently, I need to redo the circuit in copper tape and it will let me be able to solder. Moreover, cause the Flexinol thread was not available to solder directly I add a little piece allowing me to melt it and get the weld.
When we have the parallel circuit with all the solder connections already made, we could proceed to try with the power supplier to know how many Volts it will need to move the shapes. In my case, between 3-5V the Flexionol play.
Flexinol movement test de Emma
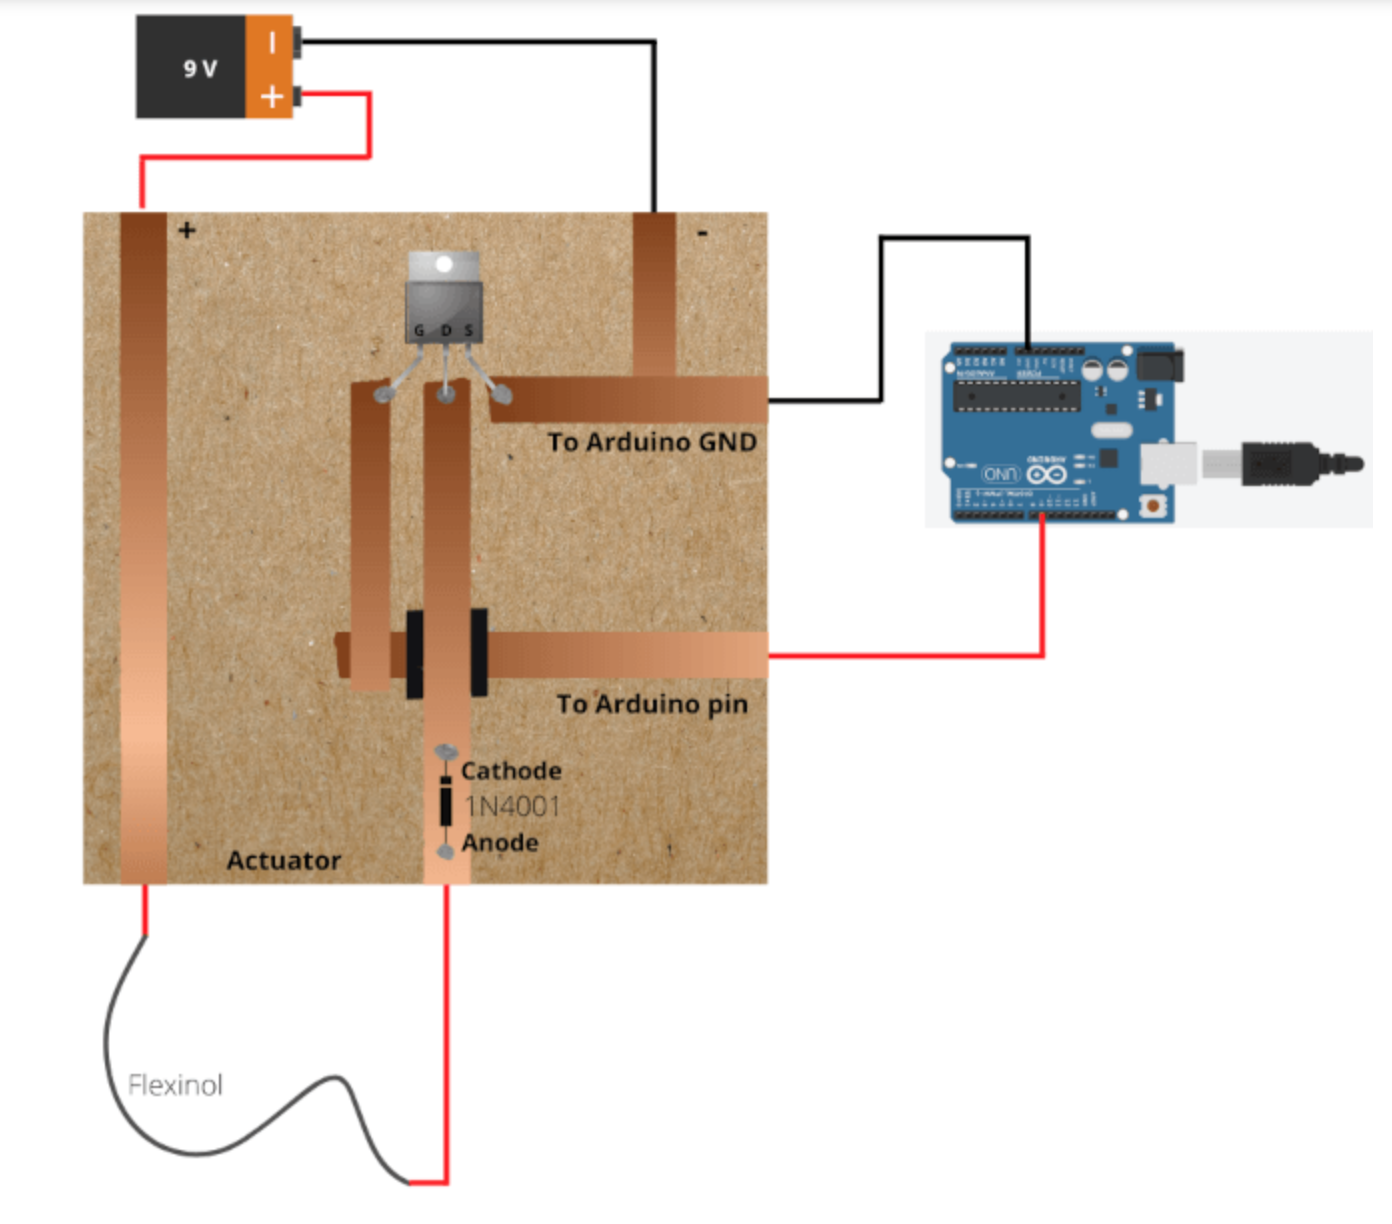
Following step is to create the circuit for the Flexionol. We will need the MOSFET one.
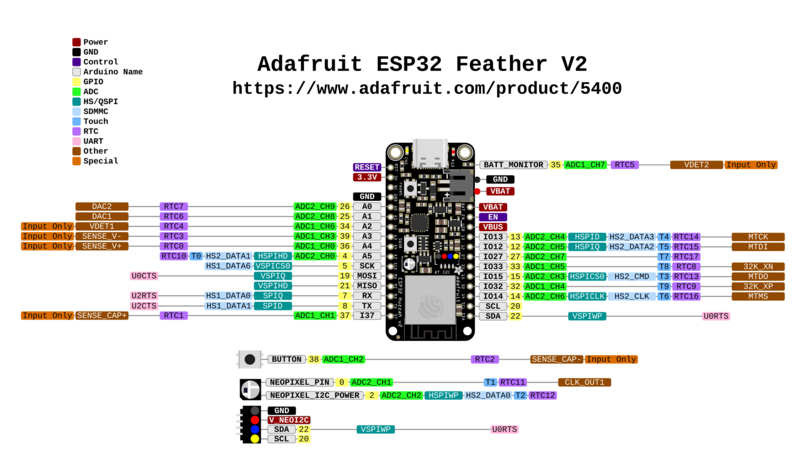
And the microcontroller ADA Fruit ESP32 Feather to control our circuit with Arduino software.
Test the circuit in the Arduino.
I use a simple code to verify the circuit:
const int flexinolPin = 15; // the number of the flexinol pin
void setup() {

  pinMode(flexinolPin, OUTPUT); // initialize flexinol as an output.
}

void loop() {
  digitalWrite(flexinolPin,255);  // Flexinol contraction
  delay(6500);          // wait for a 1.5 second
  digitalWrite(flexinolPin,0);    // Flexinol relaxation
  delay(6500);          // wait for a 1.5 second
}
Now it's time to add an input to control the circuit.
I was thinking to use the capacitor sensor during the lecture class with Emma, altought in my case, as I made the Flexionol circuit in parallel it's doesn't matter the differnets point I will press, because the result will we the same. To get various results/shapes depending on the point of the hand I will be pressing, I should do different circuits from each Flexionl. Unfortunately, I didn't feel that I have enough time to control each circuit.
Consequently, I decided to fabricate an ON/OFF switch with the fabric copper and some neoprene fabric between them, as I made in Wearables week.

Before add the handmade switch to the Flexionol circuit I try it with a switch in the breadboard. So I upload a new Arduino code to be able to control with the input.
Code for the Flexinol and the INPUT:
bool heated = false;

void setup() {
  // put your setup code here, to run once:
  Serial.begin(9600);
  pinMode(27, INPUT_PULLUP);
  pinMode(15, OUTPUT);

}

void loop() {
  // put your main code here, to run repeatedly:
  if ((digitalRead (27) == LOW )) {
    if (heated == false) {
      digitalWrite (15, HIGH);
      Serial.println("Move ON");
      delay(6500);
      Serial.println("Move HEATED");
      digitalWrite (15, LOW);
      heated = true;
    }
    else {
      delay(12000);
      heated = false;
    }
    Serial.println("Move HEATED");
  }
  else {
    digitalWrite (15, LOW);
    heated = false;
    Serial.println("Move Off");
  }
}
Flexinol circuit with a button de Emma
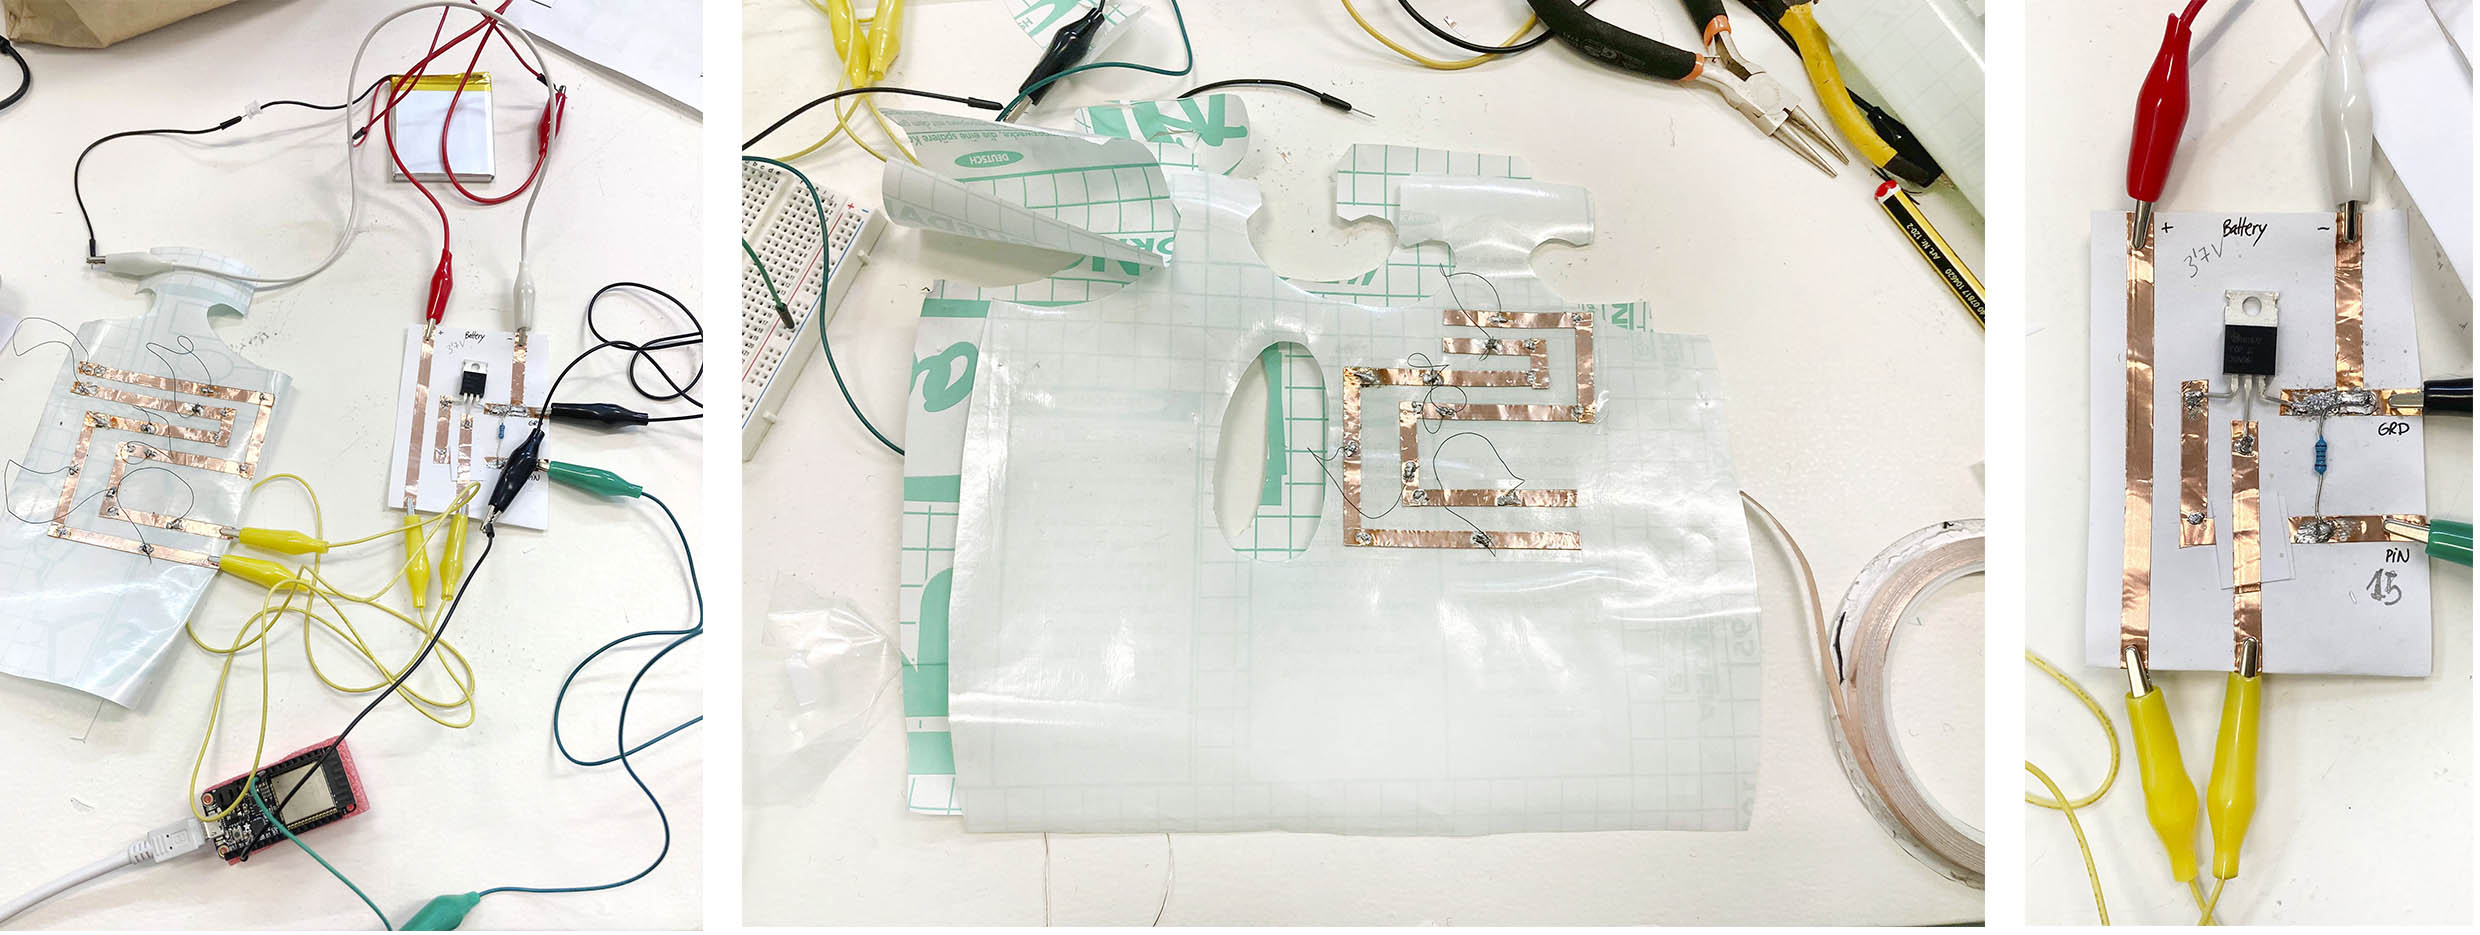
Finally, when everything it's working in the breadboard I transferred to a real circuit to be able to the Flexionl dance without any USB connection and make the glove a wearable project.
Remember: Before connecting to the Arduino, test each connection with the multimeter to make sure the solder connections work.
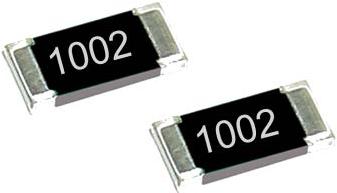
In order to has a circuit more comfortable, it's recomended to use the SMD resistors instead of the resistor.
To solder it, I used a thinner solder (thread) to be more precise when I melt it.
The following step is to connect the Lipo battery in the circuit. I built the cirucit with one Lipo battery connecting it in the Ada Fruit Feather, but it wasn't enough Amperes for the Flexionol circuit even thought I have the Volts it needs it. So it doesn't work. Also because of this, the battery run out super fast and get heat.
For the purpose to have enough Amperes and we able to use the circuit a cople of hours without damage the batteries, I will need 3 of them.
So, next step was to charge them, connecting one by one in the Ada Fruit Feather to the computer. While charging the little light it's ON and after 4 hours, when the battery is full the light turn OFF. As a result, I have to wait 12 hours to get them charged.
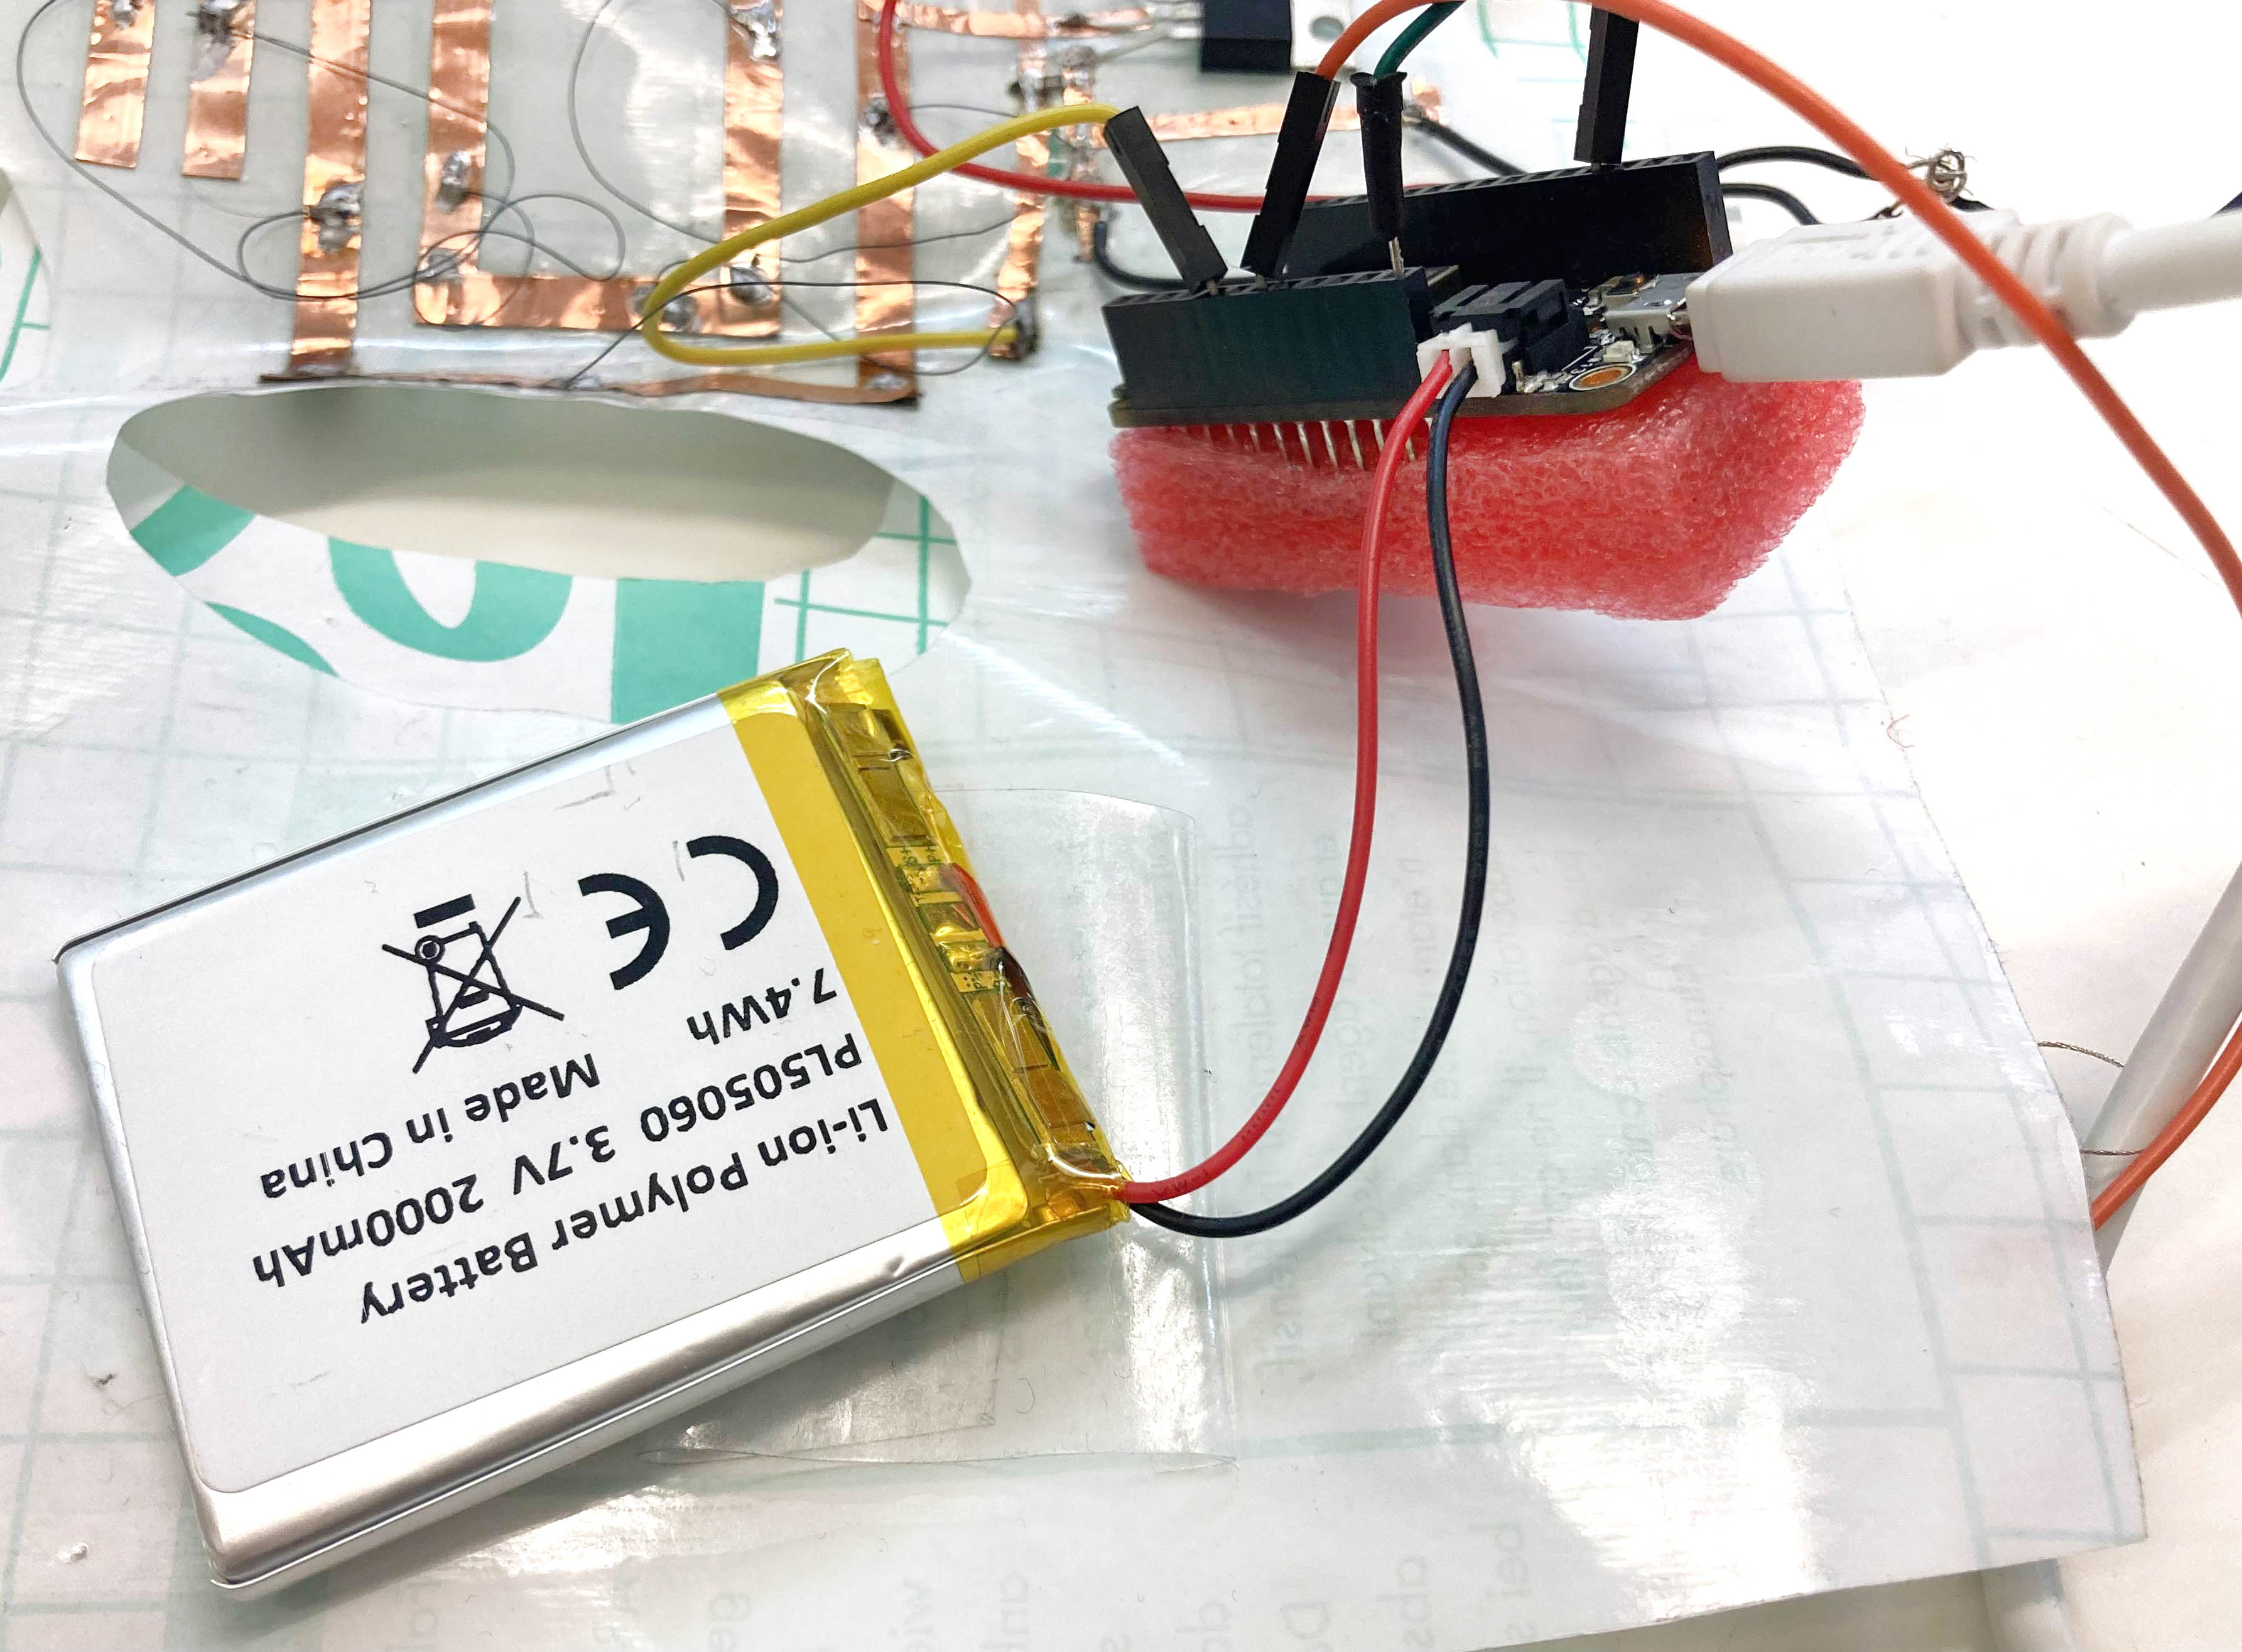
Then I connect the lipo battery connections in paralel. I used the same entrance to be able to connect directly to the board.

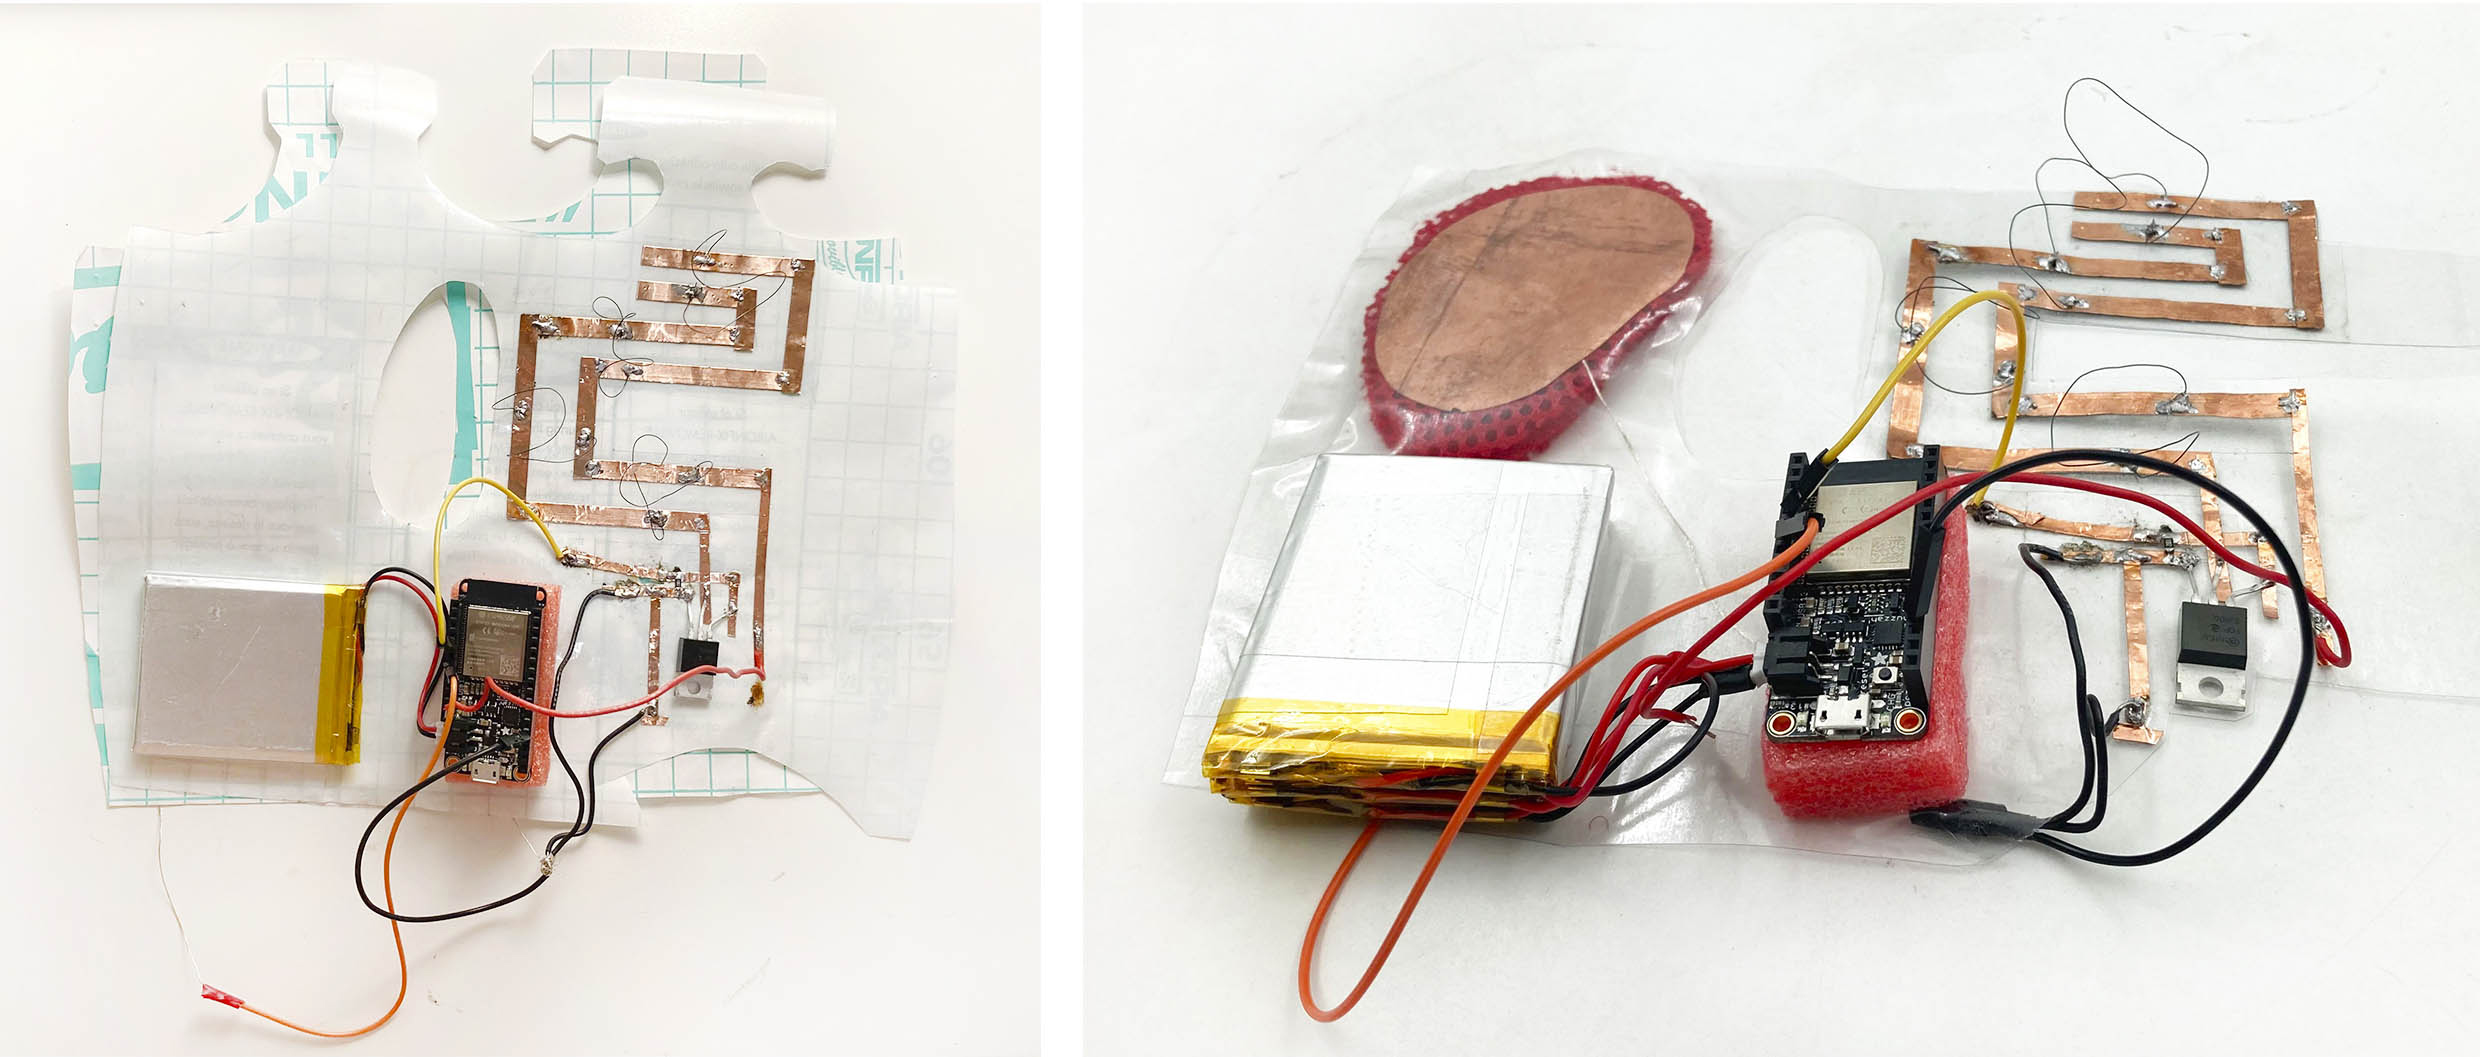
Finally, developing the final circuit:
For the MOSFET circuit, I connect the + of the battery to the BATTERY PIN (red wire). Then, I connect with the wire the PIN 15 with the Flexinol circuit (yellow wire). The swatch with the PIN 27 (orange wire). The both GRD (Ground) of the MOSFET circuit and the swatch ground joined in one, to be able to unite with the GRD of the ADAFruit Feather (black wires).
After the circuit is completed and well working, I join both sides of the Aeoronfix glove pattern to let the switch circuit between them. On the other hand, we have the Flexinol circuit placed on the top of the hand. A useful development to protect the circuit from your skin, moreover when I am using 3 batteries to heat the Flexinol wires.
Last final test before wearing the glove:
Flexinol with a switch de Emma
How to solder:
Practical tips.
Arduino final code
Useful Arduino definitions to remind:
- Serial.begin: This is the speed we seed and receive devices. The number is the number of times it read for a second.
- Serial.print: Allow to read in the serial monitor. When you open it, and you have your switch already connected, you can see your values On/Off, true/false if it's a digital read or values if it's an analog read.
- Set up(): Functions when the sketch starts. It's only run once, after we poWerup on the Arduino board.
- Loop: Functions after the setup, this once will be doing consecutevely. You coyuld change the actions and the times of each once in Arduino.
- If: Statement checks for a condition and excecutes the following statment if the consditiion in true.
- else: The action that will do in case the condition "If" is false. As an example: "If" the switch is on, the "If" code is activated// else the switch is off, the code is disabled.
- //: Add information to Arduino, not a code.
- i: Is the draw / the variable.
- ++: This means to add one more.
- delay: Pause
Final code for the Flexinol and the INPUT:
bool heated = false;

void setup() {
  // put your setup code here, to run once:
  Serial.begin(9600);
  pinMode(27, INPUT_PULLUP);
  pinMode(15, OUTPUT);

}

void loop() {
  // put your main code here, to run repeatedly:
  if ((digitalRead (27) == LOW )) {
    if (heated == false) {
      digitalWrite (15, HIGH);
      Serial.println("Move ON");
      delay(6500);
      Serial.println("Move HEATED");
      digitalWrite (15, LOW);
      heated = true;
    }
    else {
      delay(12000);
      heated = false;
    }
    Serial.println("Move HEATED");
  }
  else {
    digitalWrite (15, LOW);
    heated = false;
    Serial.println("Move Off");
  }
}
-
The PIN 27 is the switch to turn ON/OFF the Flexinol dancing.
-
The PIN 15 is the circuit for the 4 Flexinol threads connected in the MOSFET.
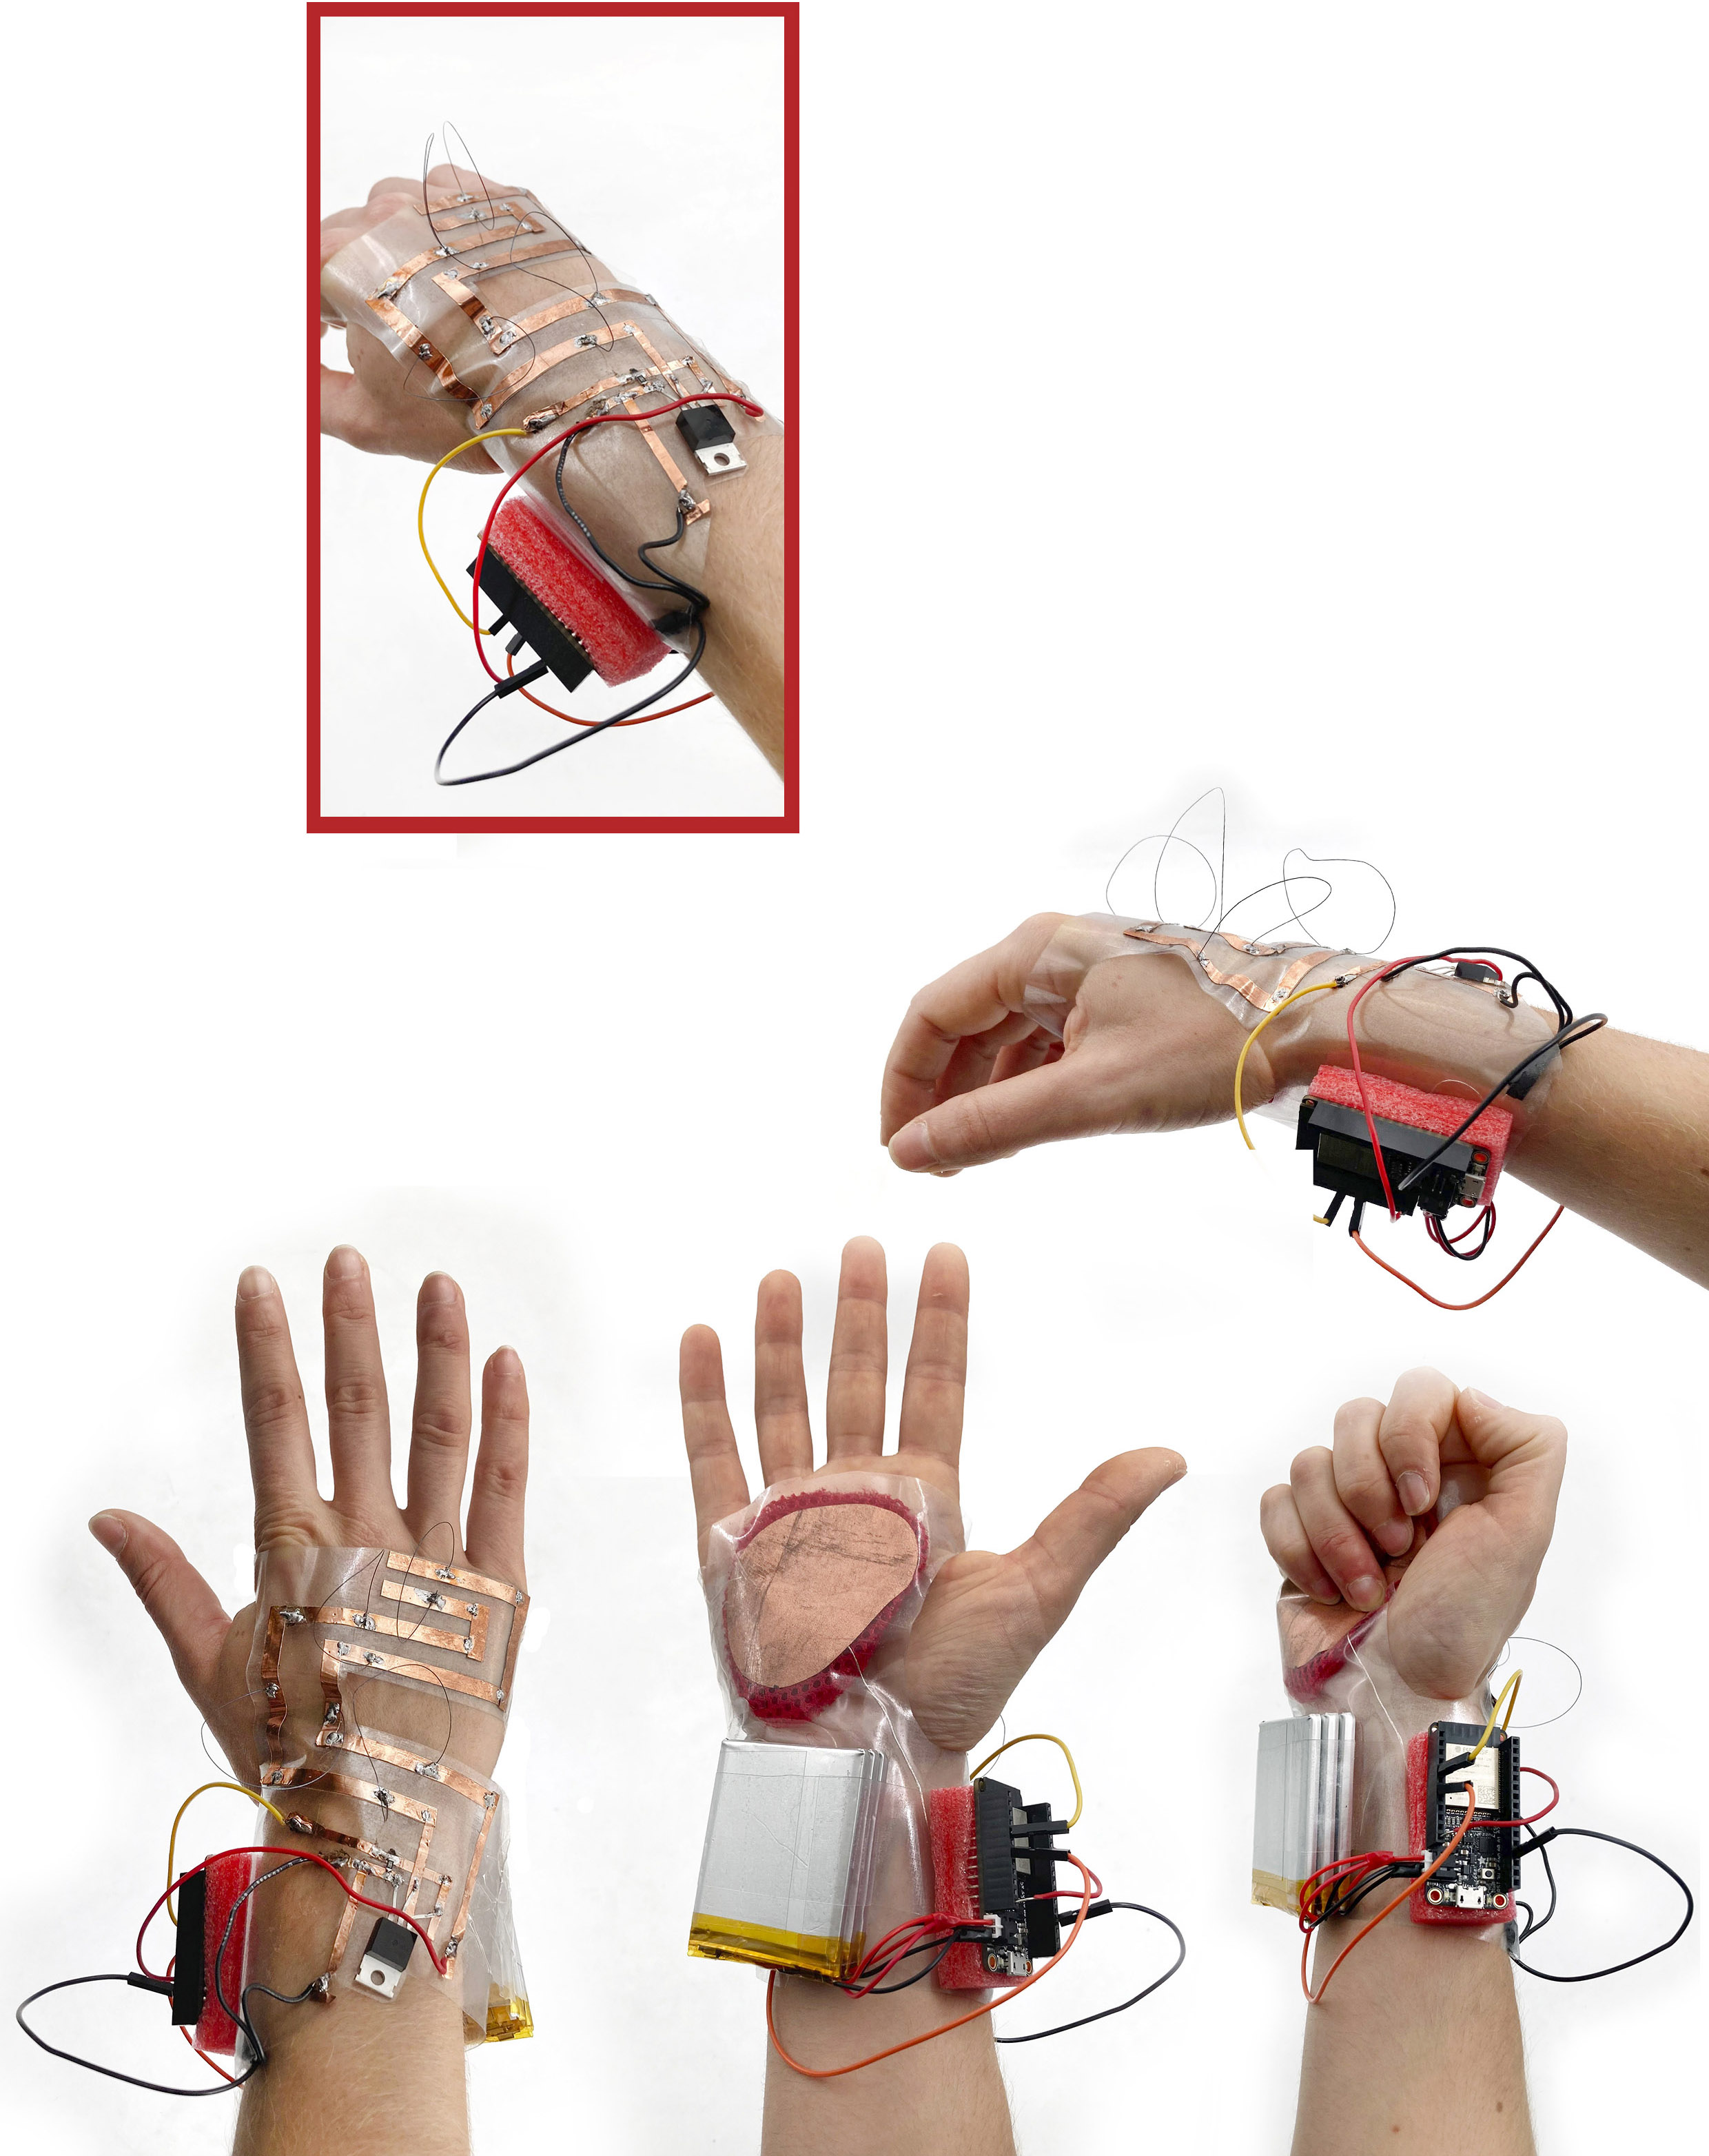
Result
The final project for the Skin Electronics week:
Final video
Time for dance!
Flexinol glose result de Emma
To conclude:
The first idea I had in mind was to do a glove with a lot of Flexinol thread moving around the hand.
Thinking about, some kind of grass movements:

However, in my project, I just have 4 to test as a prototype and they need 3 batteries. I don't want to imagine how much power I would need for the full hand!
Also, I thought that I could control more the shapes of the Flexinol and be more detailed and playful. However, I achieve moving them when there are current.
Very thankful to the FabLab team to show me how to work with the Lipo Batteries and small-scale circuits.
Still not producing explosions! :P
After these nonstop assignments weeks, I am super glad and satisfied to be part of the Fabricademy 2022/23 with all my sweetie classmates and instructors.
As well, and not less, to have been able to experience and learn new concepts, methods, and topics to continue growing and investigating further.
I feel that I am just on the top of the iceberg!
See you in January with my project development.
🎄🗻🎁 Happy Christmas Holidays Penguins! 👑👑👑