8. Wearables
Let's start the week expanding a little bit more about E-textiles knowledge, coding, and circuits to an upper level with actuators and transistors.
What if we go deep into the concept👇
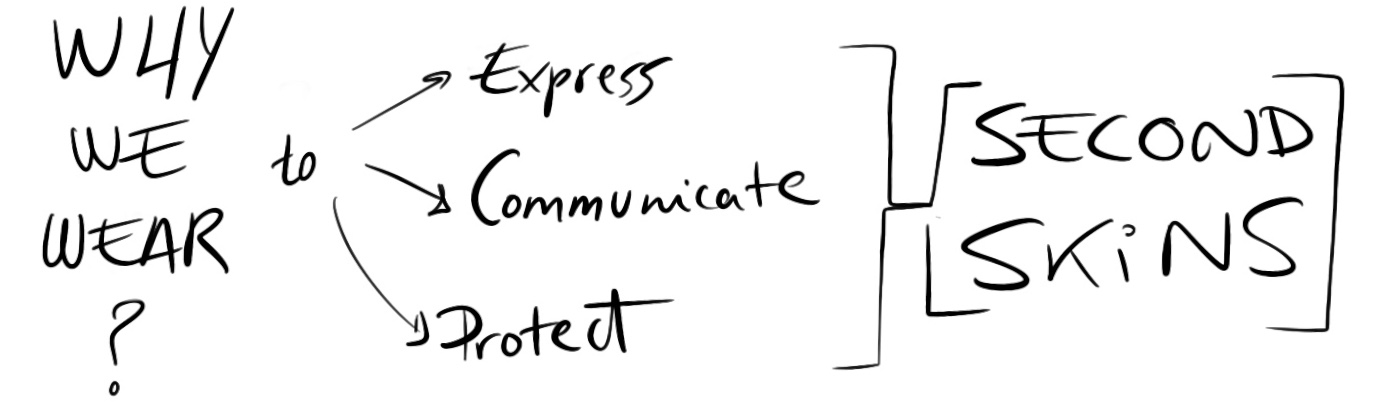
Inspiration
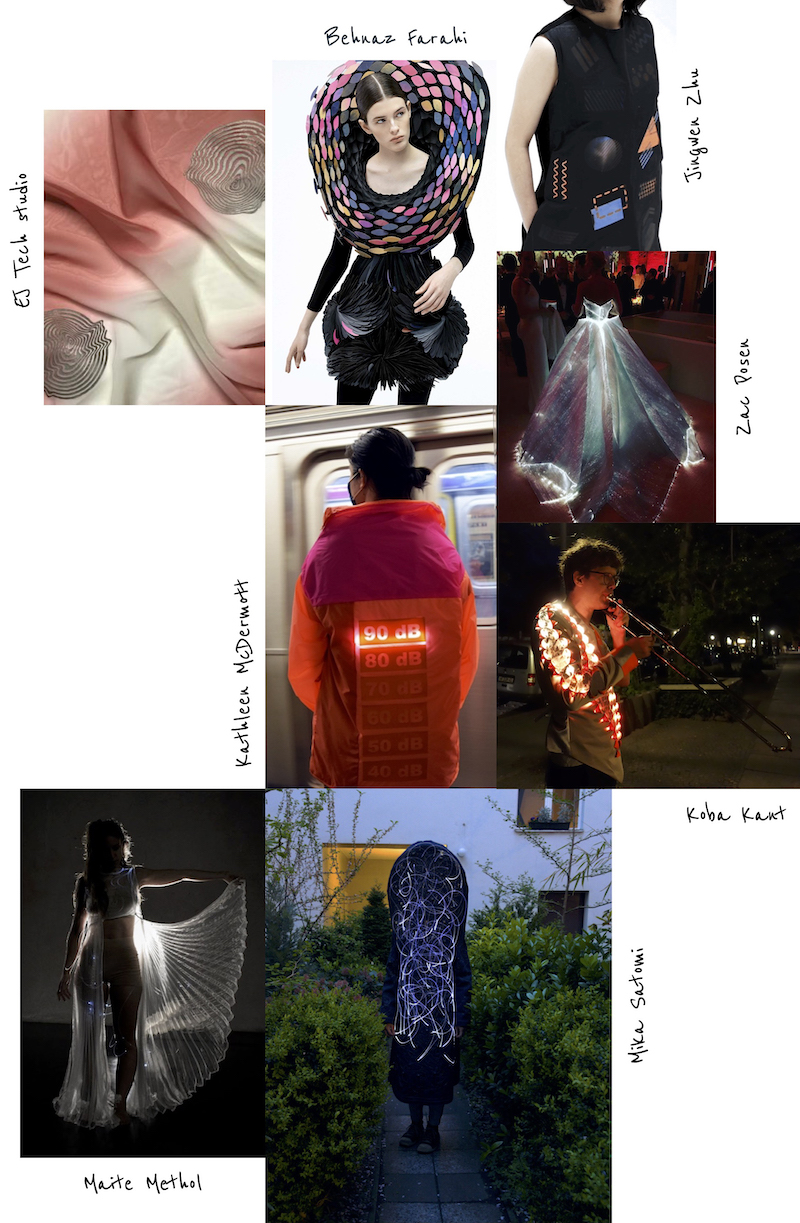
IRIDESCENCE || Color & Shape Changing Emotive Collar from BEHNAZ FARAHI on Vimeo.
More about:
- Kathleen Mc Dermott
- Maite Methol
- Koba Kant
- Mika Satomi
- Jingwen Zhu
- "Tejidos inteligentes para diseñadores" book
Actuators
What is an actuator? Is a component of a circuit that moves or controls another part based on input?
There are 3 types:
- Visual
- Sound
- Motion
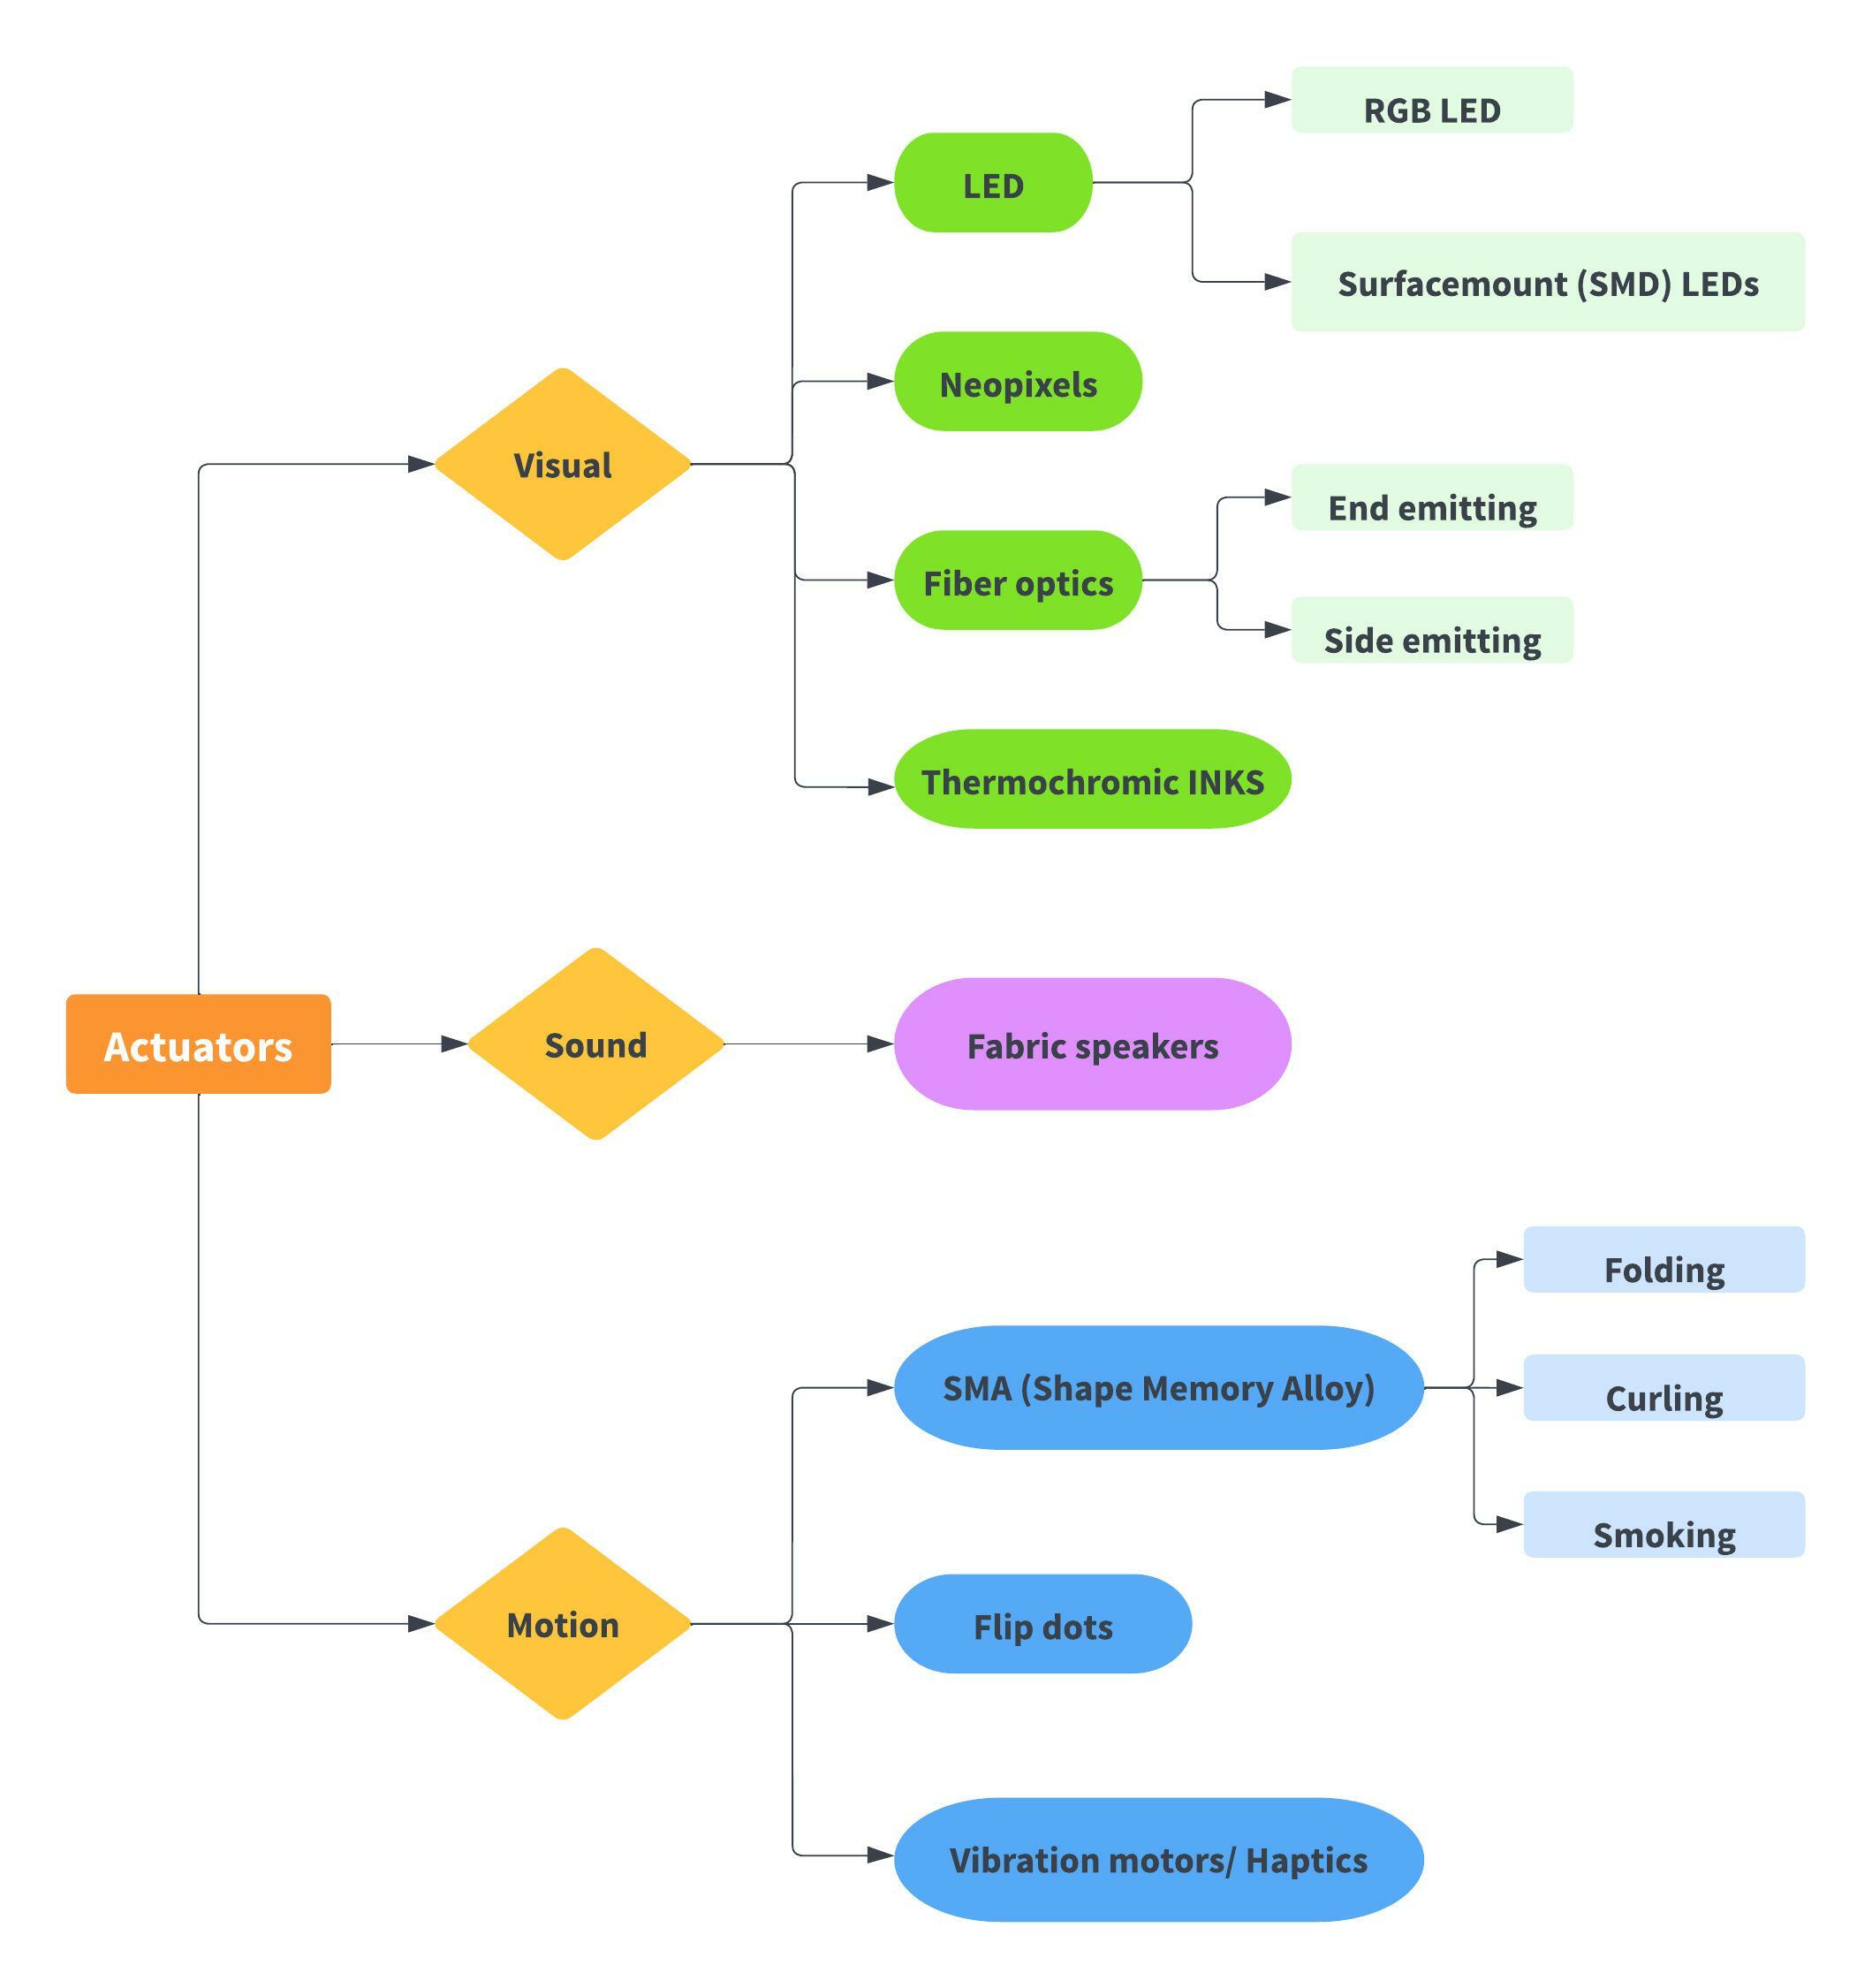
Visual
- Neopixels: are RGB LEDs with drivers embedded in the chip. This allows them to be addressable - you can control individual LEDs on a long strip. This is awesome because it lets you have LOTS of LEDs and only takes up three pins on your microcontroller. They do not light up on their own with just a battery. You have to connect them to a microcontroller like the Arduino and program them to light up.
Code:
#include <Adafruit_NeoPixel.h>

// Which pin on the Arduino is connected to the NeoPixels?
#define PIN            27

// How many NeoPixels are attached to the Arduino?
#define NUMPIXELS      10


// Declare our NeoPixel pixels object:
Adafruit_NeoPixel pixels = Adafruit_NeoPixel(NUMPIXELS, PIN, NEO_GRB + NEO_KHZ800);
// Argument 1 = Number of pixels in NeoPixel strip
// Argument 2 = Arduino pin number (most are valid)
// Argument 3 = Pixel type flags, add together as needed:
//   NEO_KHZ800  800 KHz bitstream (most NeoPixel products w/WS2812 LEDs)
//   NEO_KHZ400  400 KHz (classic 'v1' (not v2) FLORA pixels, WS2811 drivers)
//   NEO_GRB     Pixels are wired for GRB bitstream (most NeoPixel products)
//   NEO_RGB     Pixels are wired for RGB bitstream (v1 FLORA pixels, not v2)
//   NEO_RGBW    Pixels are wired for RGBW bitstream (NeoPixel RGBW products)

int delayval = 500; // delay for half a second

void setup() {

  pixels.begin(); // This initializes the NeoPixel library.
  pixels.show();            // Turn OFF all pixels ASAP
  pixels.setBrightness(64); //from 0 to 255, use it only in setup

}

void loop() {

  pixels.setPixelColor(0, 255, 0, 0); //red
  pixels.show();  //display the color
  delay(delayval);

  pixels.setPixelColor(0, 0, 255, 0); //green
  pixels.show();  //display the color
  delay(delayval);

  pixels.setPixelColor(0, 0, 0, 255); //blue
  pixels.show();  //display the color
  delay(delayval);

  pixels.setPixelColor(0, 255, 255, 255); //white
  pixels.show();  //display the color
  delay(delayval);

  pixels.setPixelColor(0, 0, 0, 0); //off
  pixels.show();  //display the color
  delay(delayval);

}
Example during the class:
Neopixels.
- Fiber optics: Light shines in one end, travels down the strand, and emerges at the other end.
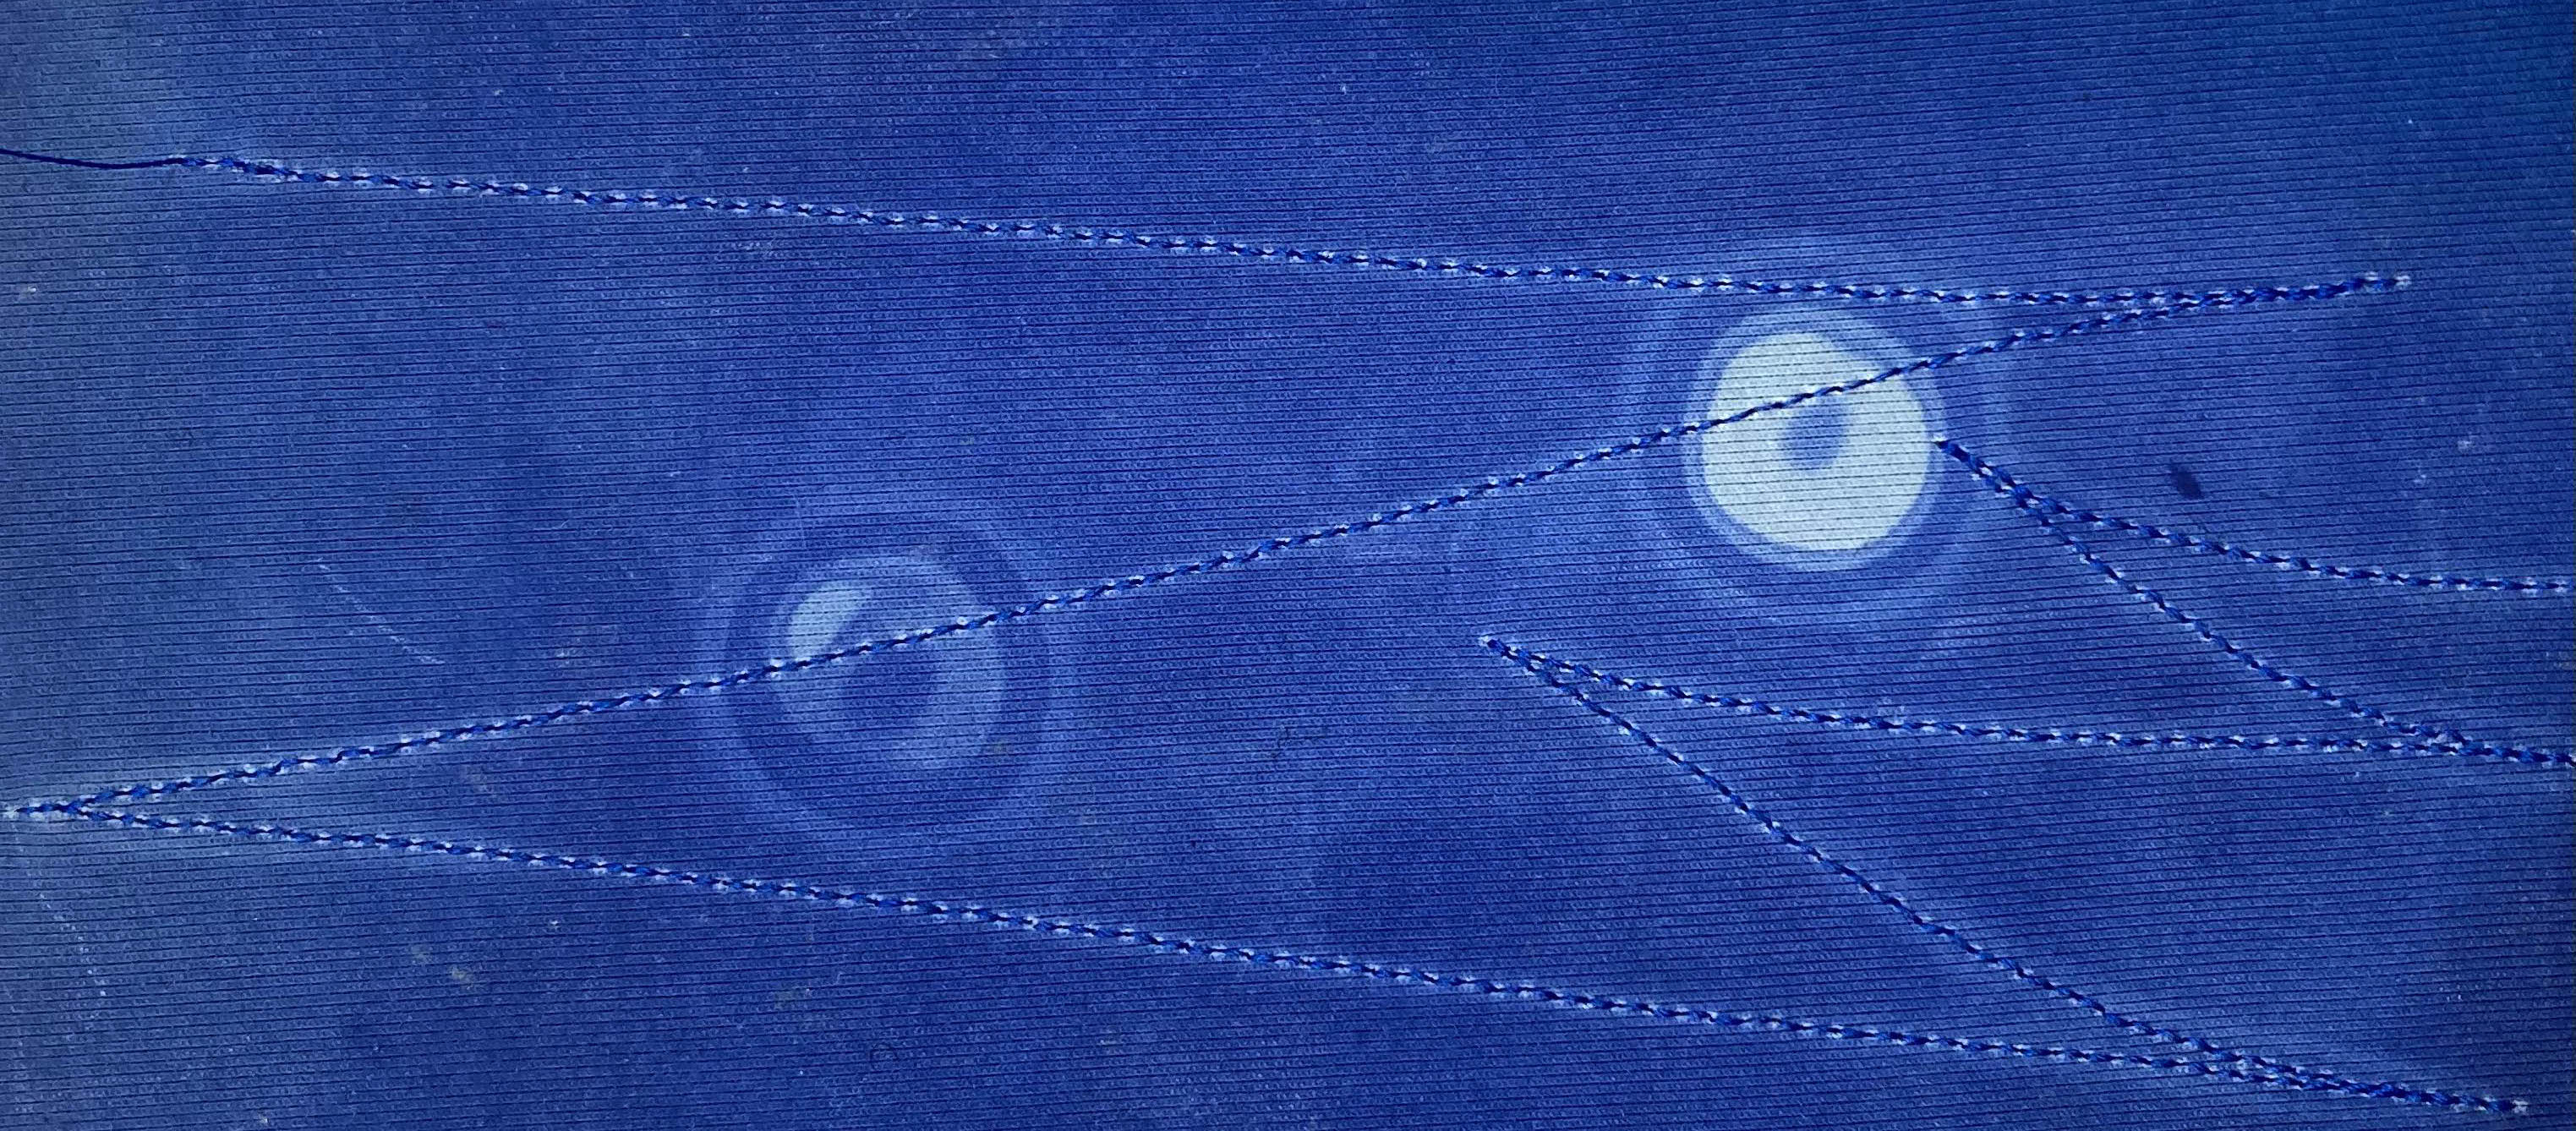
- Thermochromic inks or pigments: It changes the color in the presence of heat. The inks become colorless. Pigments can be mixed with different substrates like paint, glue, Polymorph, etc.
Remember: If you have a higher ratio of pigment to base, it may take more time and/or energy to change.
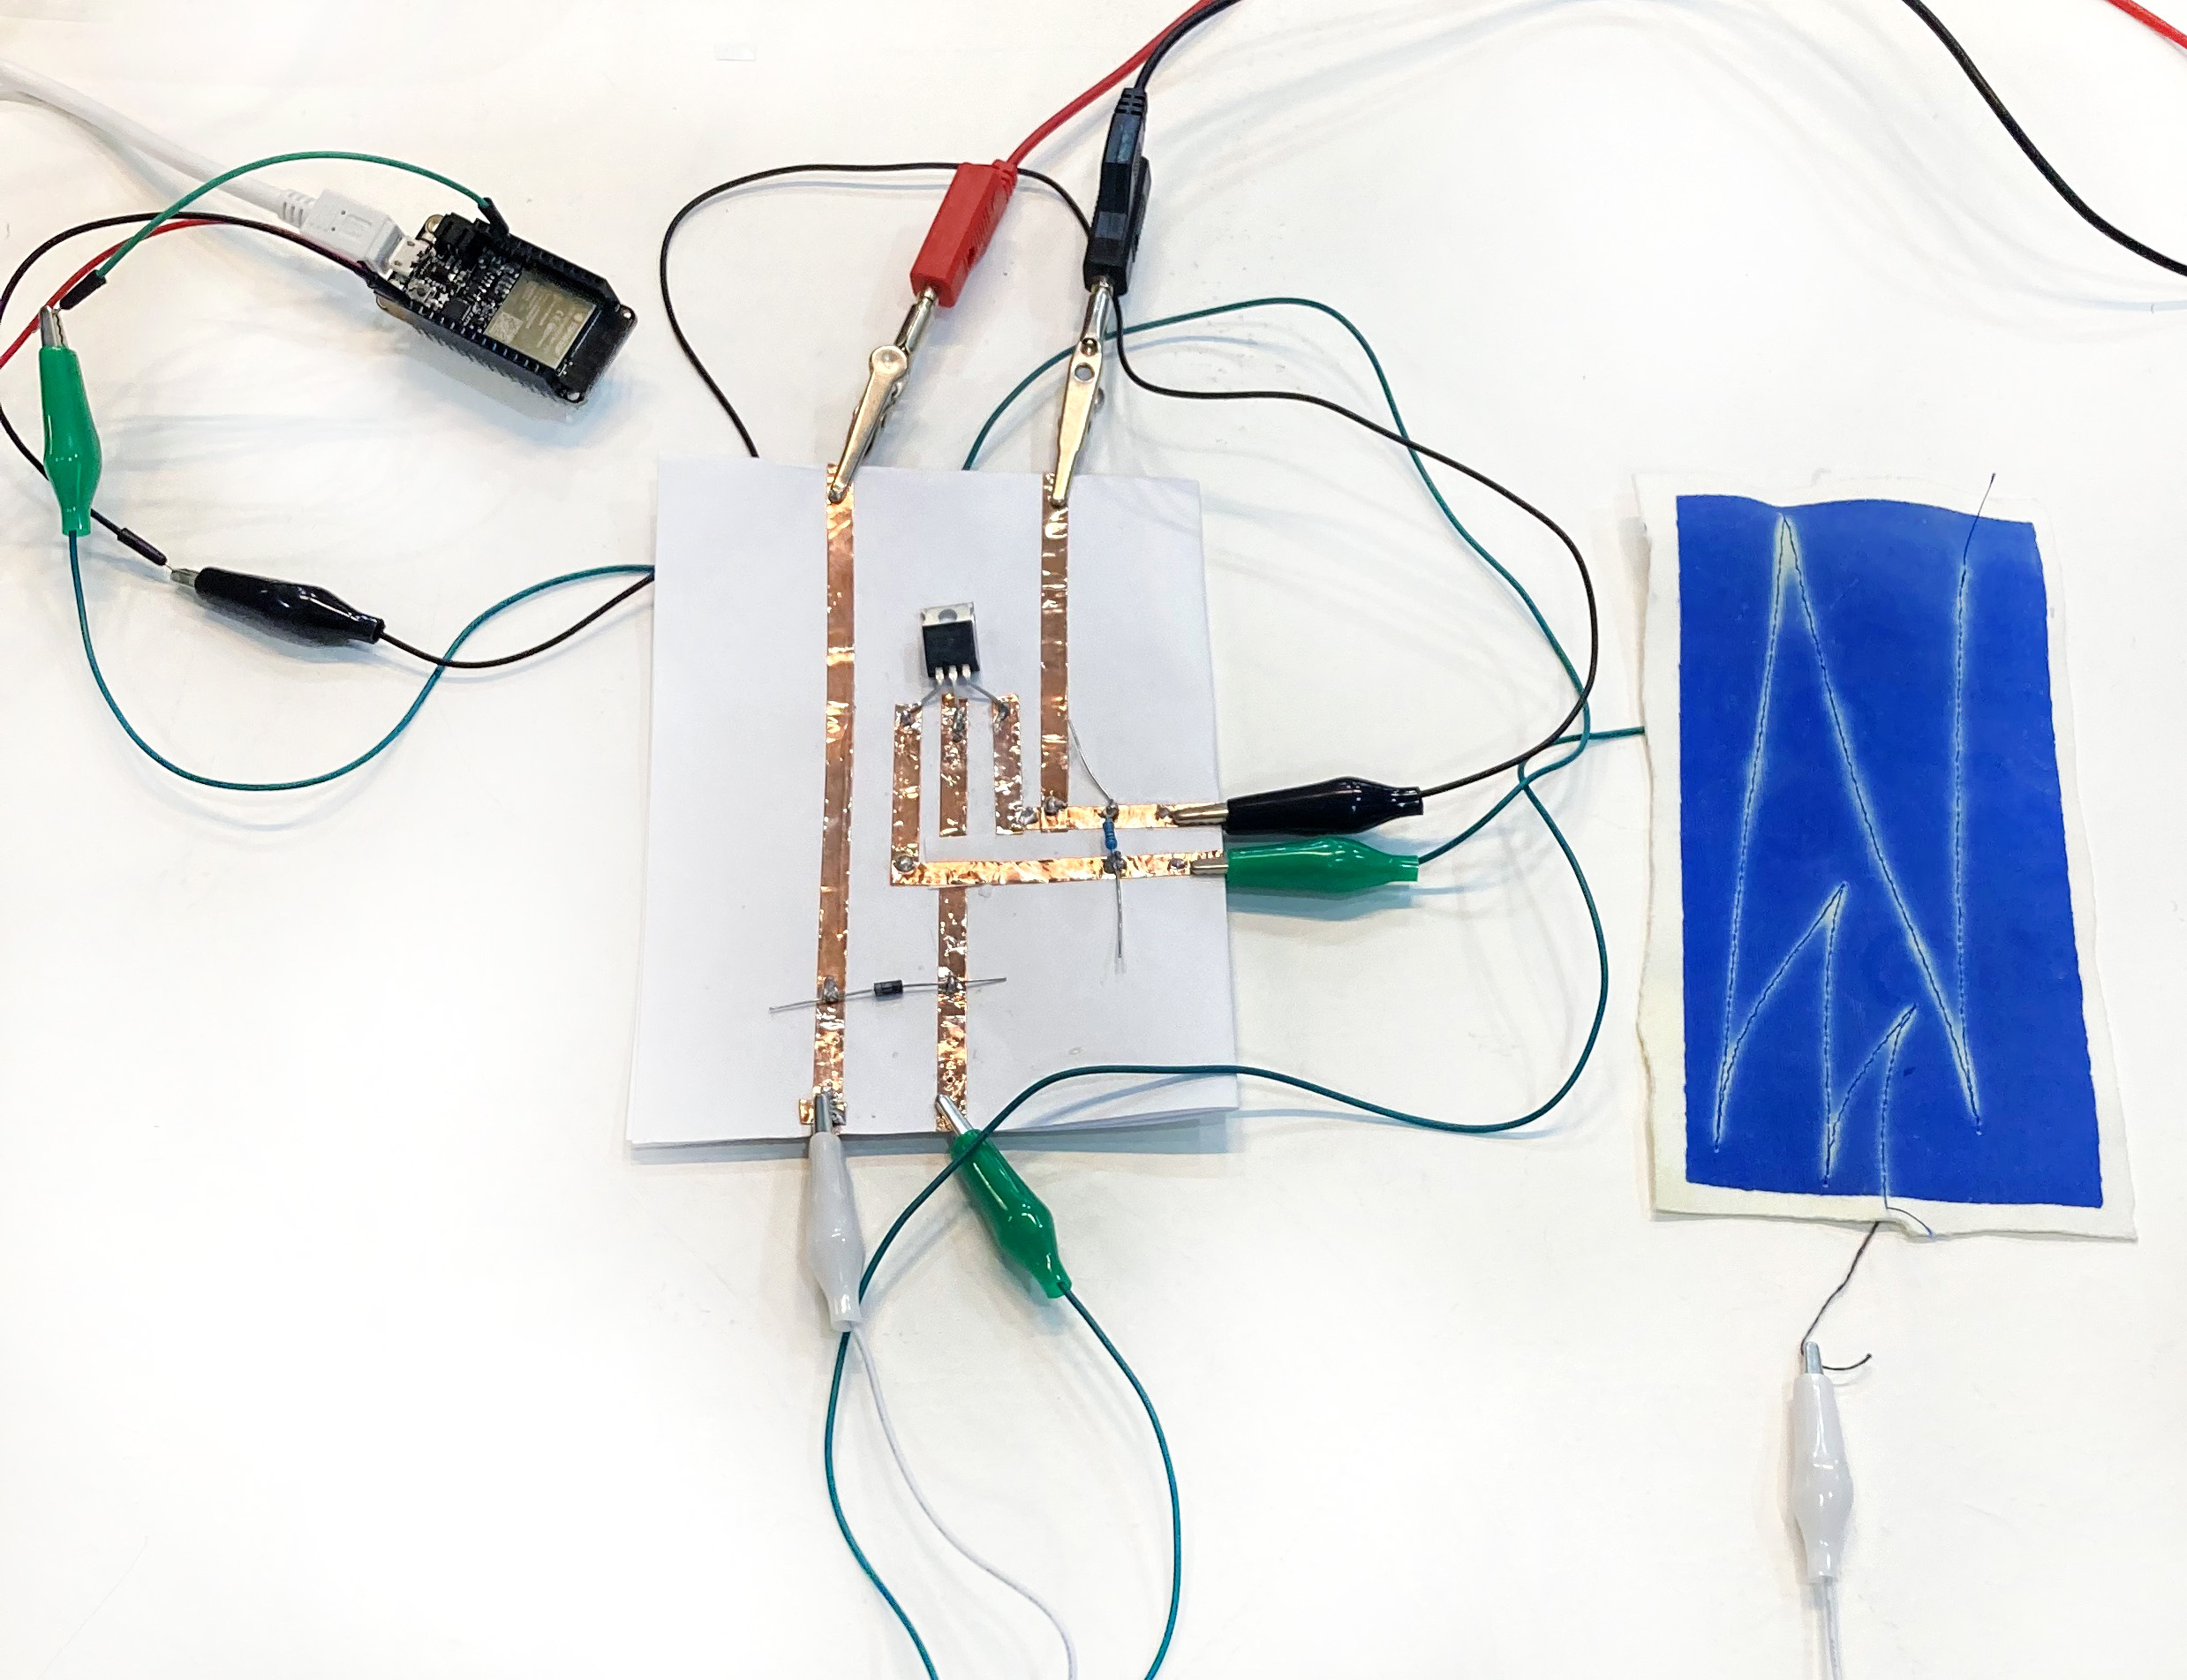
Option 1:
Option 2:

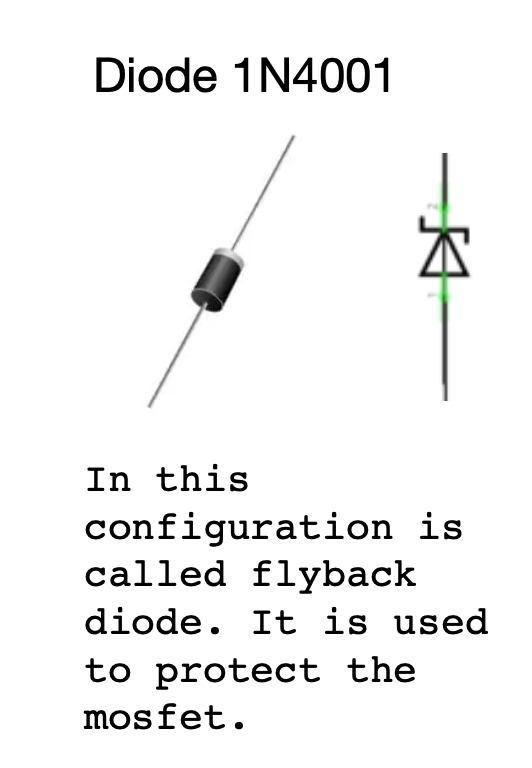
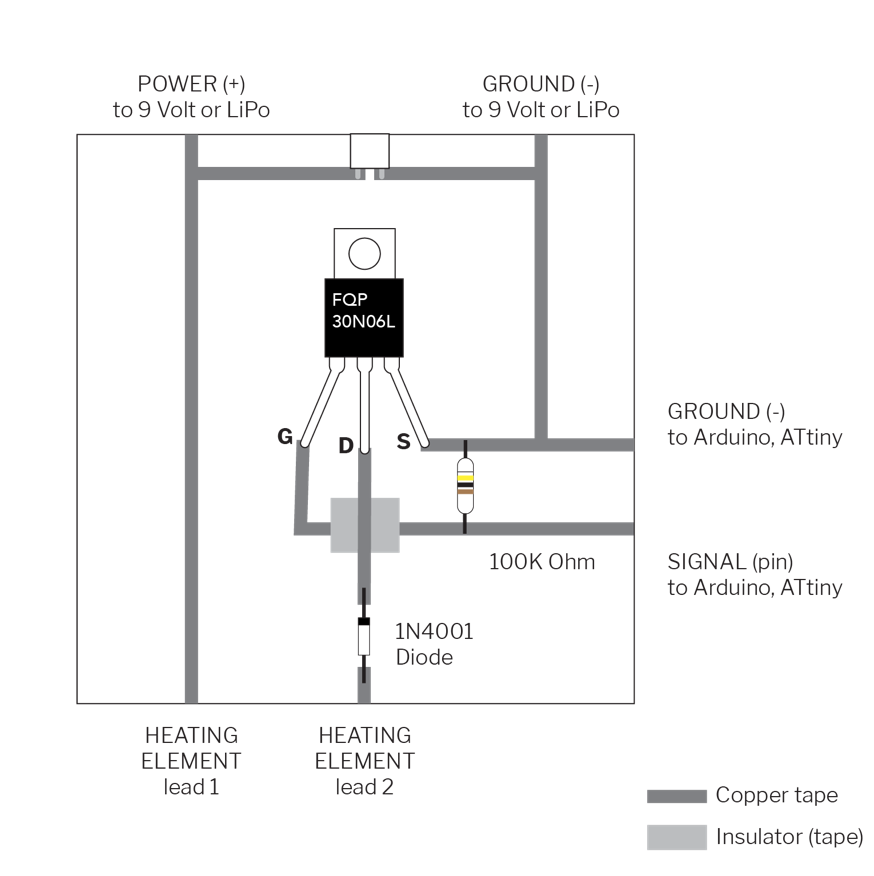
The transistor works as an electrical switch. So we apply a small amount of voltage to the gate using Arduino, and the current can flow between the drain and the source.
More about:
Sound
Sound is a type of energy made when something vibrates.
- Electromagnets speakers: When you connect an audio signal to either end of your electromagnet (the coil), it forms a magnetic field. The magnetic field fluctuates based on the electrical frequencies of the audio signal. If you place a strong permanent magnet near the electromagnet, the electromagnet’s field will attract and repel to the magnet’s field. The membrane will vibrate as the fields attract and repel, causing the air around it to move. This creates the waves that our brain interprets as sound!
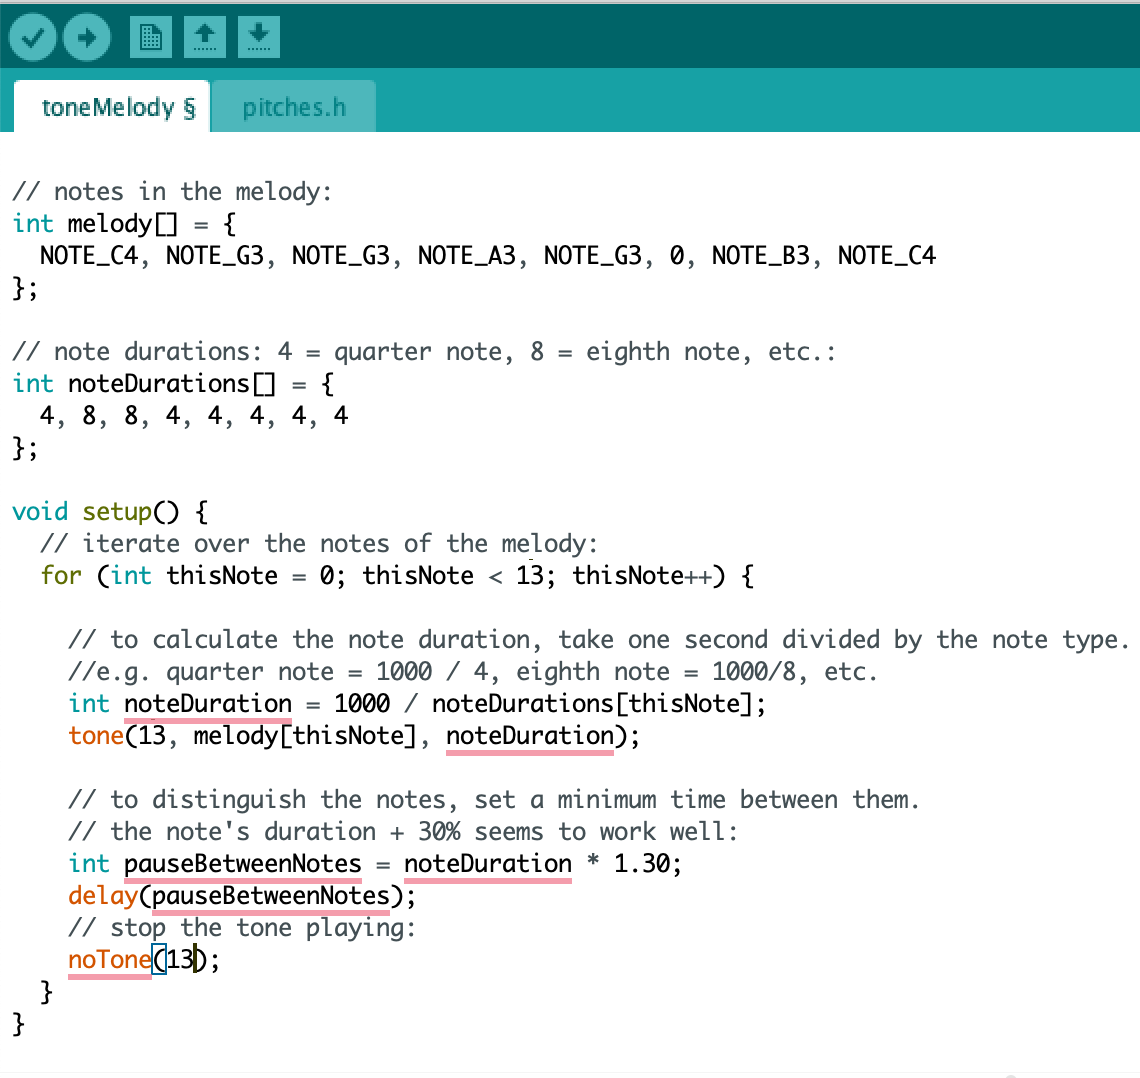
Tone Melody code example:
Sound de Emma
Motion
- SMA: Shape memory alloys (SMAs) are metals that change shape when they are heated to a certain temp. They behave like regular metals when cool and return to preset shape when heated.
Untrained: When you apply heat in the Flexinol this contract by 10% of its length.
Trained: Flexinol also contracts by 10% but has been “trained” into a shape through a heating process. So,when heated, it will return to the shape you trained it to.
- Flip drops:
The magnetic hematite bead flips back and forth when we run current through the coil. It creates an electromagnetic field that attracts or repels the bead depending on the direction of the current.
- Vibration motors and Haptics:
Haptic sensing involves the sense of limb positioning and movement. Unlike other senses, haptic sensing is bidirectional. The information we can extract about an object’s properties is linked to the movements made to perceive those properties.
Embodisuit from rachel freire on Vimeo.
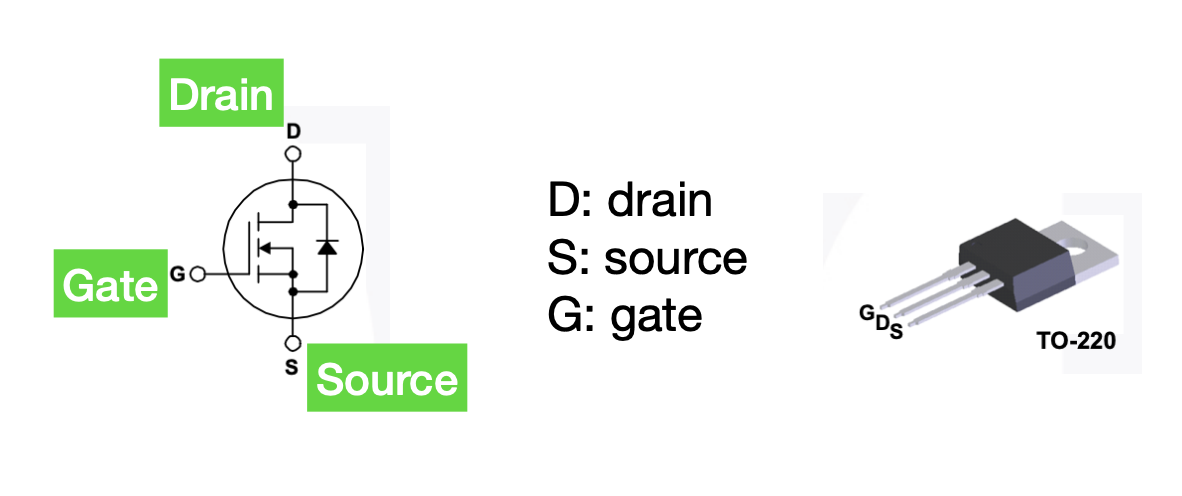
Transistor
Heating takes a LOT of power (current) so the Arduino pins cannot provide the power we need to warm a heating element. So we need a secondary power source: a transistor as an electrical switch. By applying a small amount of voltage to the gate using the Arduino, current can flow between the drain and the source.
There are 2 types: Mosfet and Bipolar.
More about:
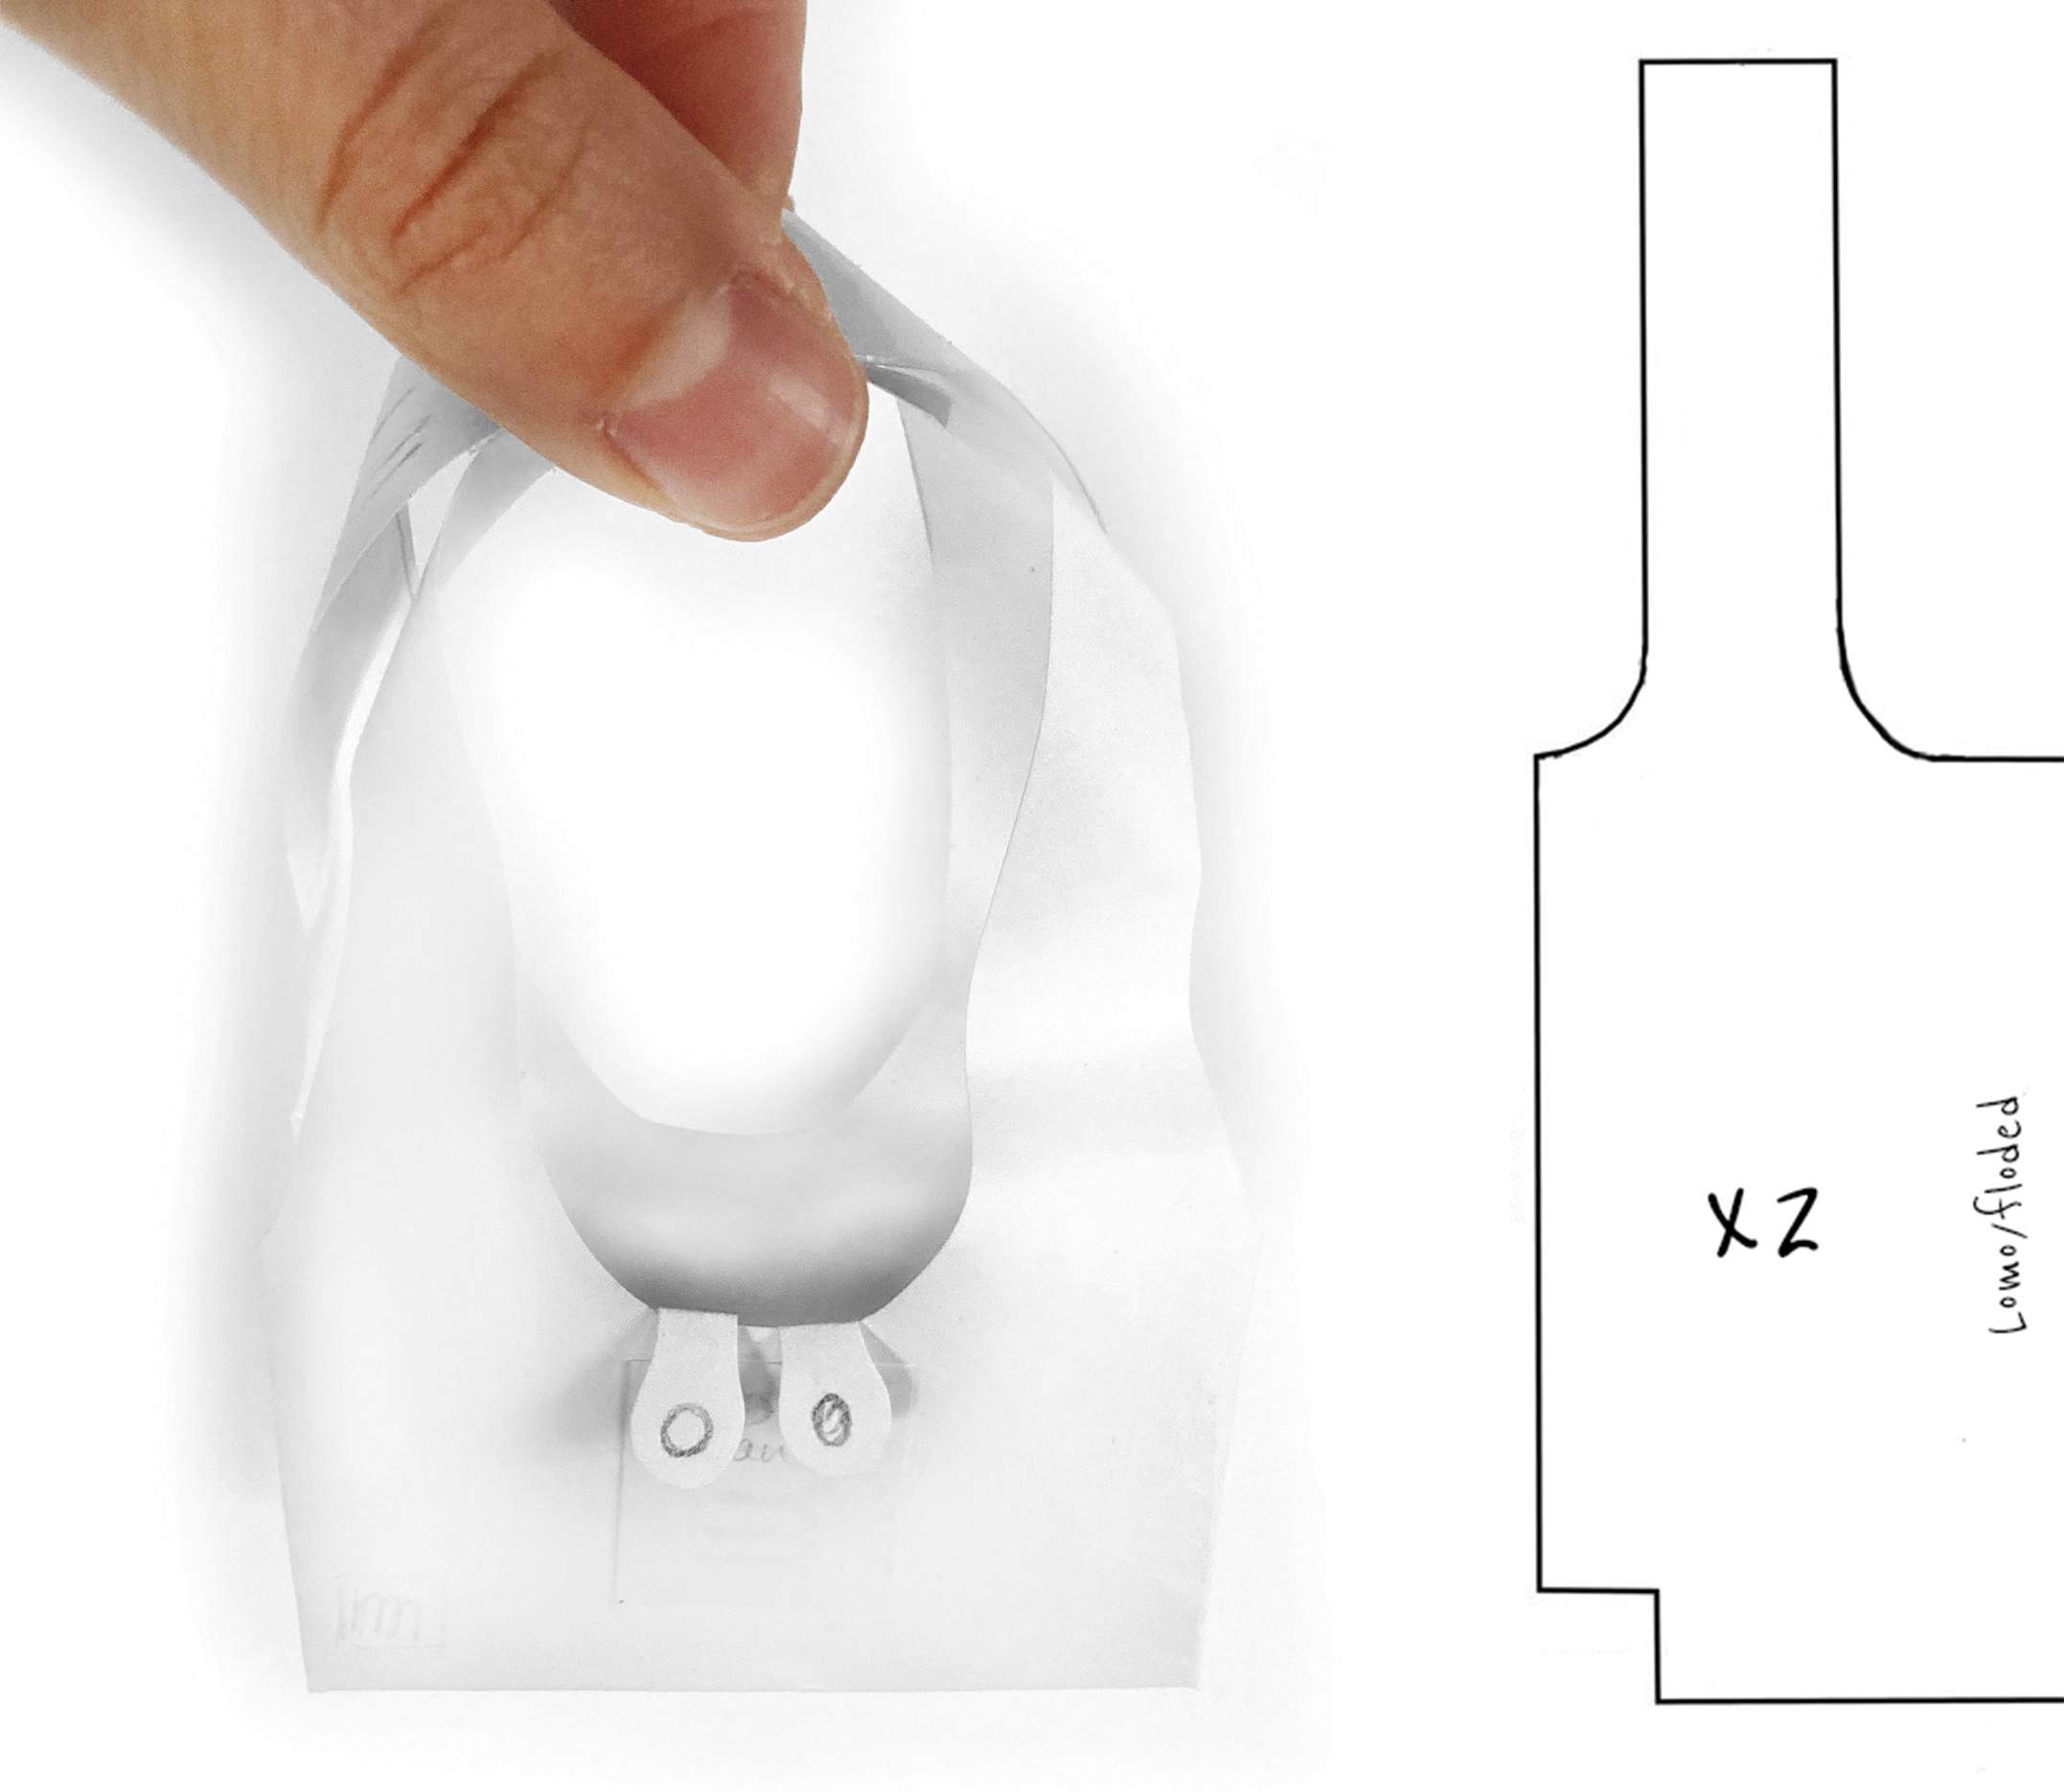
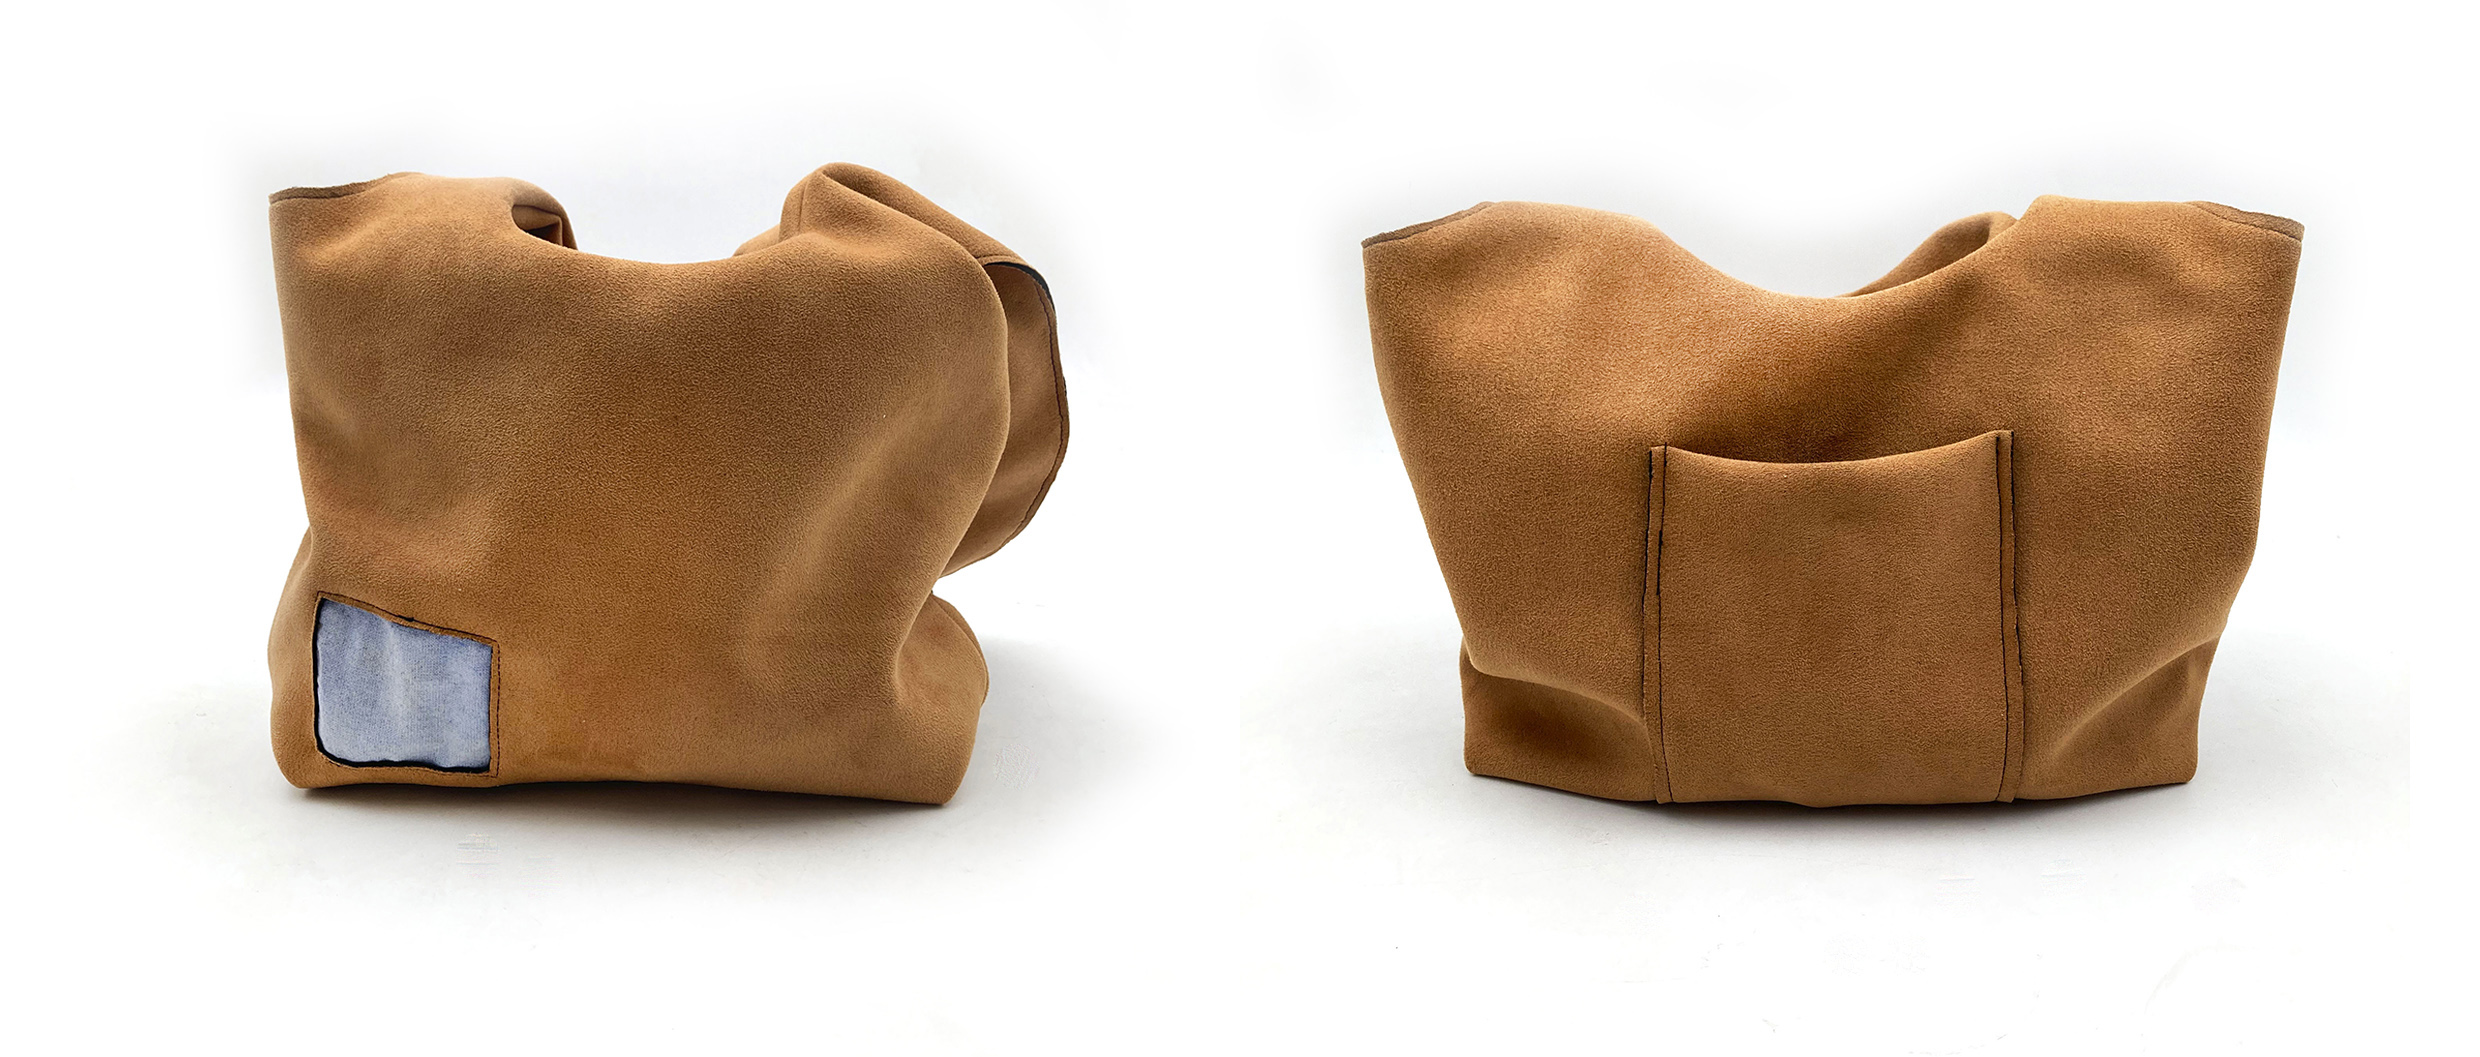
My project
The idea for this week was to create a funcional e-handbag.
The applications will be, in one side, the logo of the brand which opens up when you carry the bag. And in the other hand, the idea to close the bag with a magnet while you are useing it.
All hands on deck!
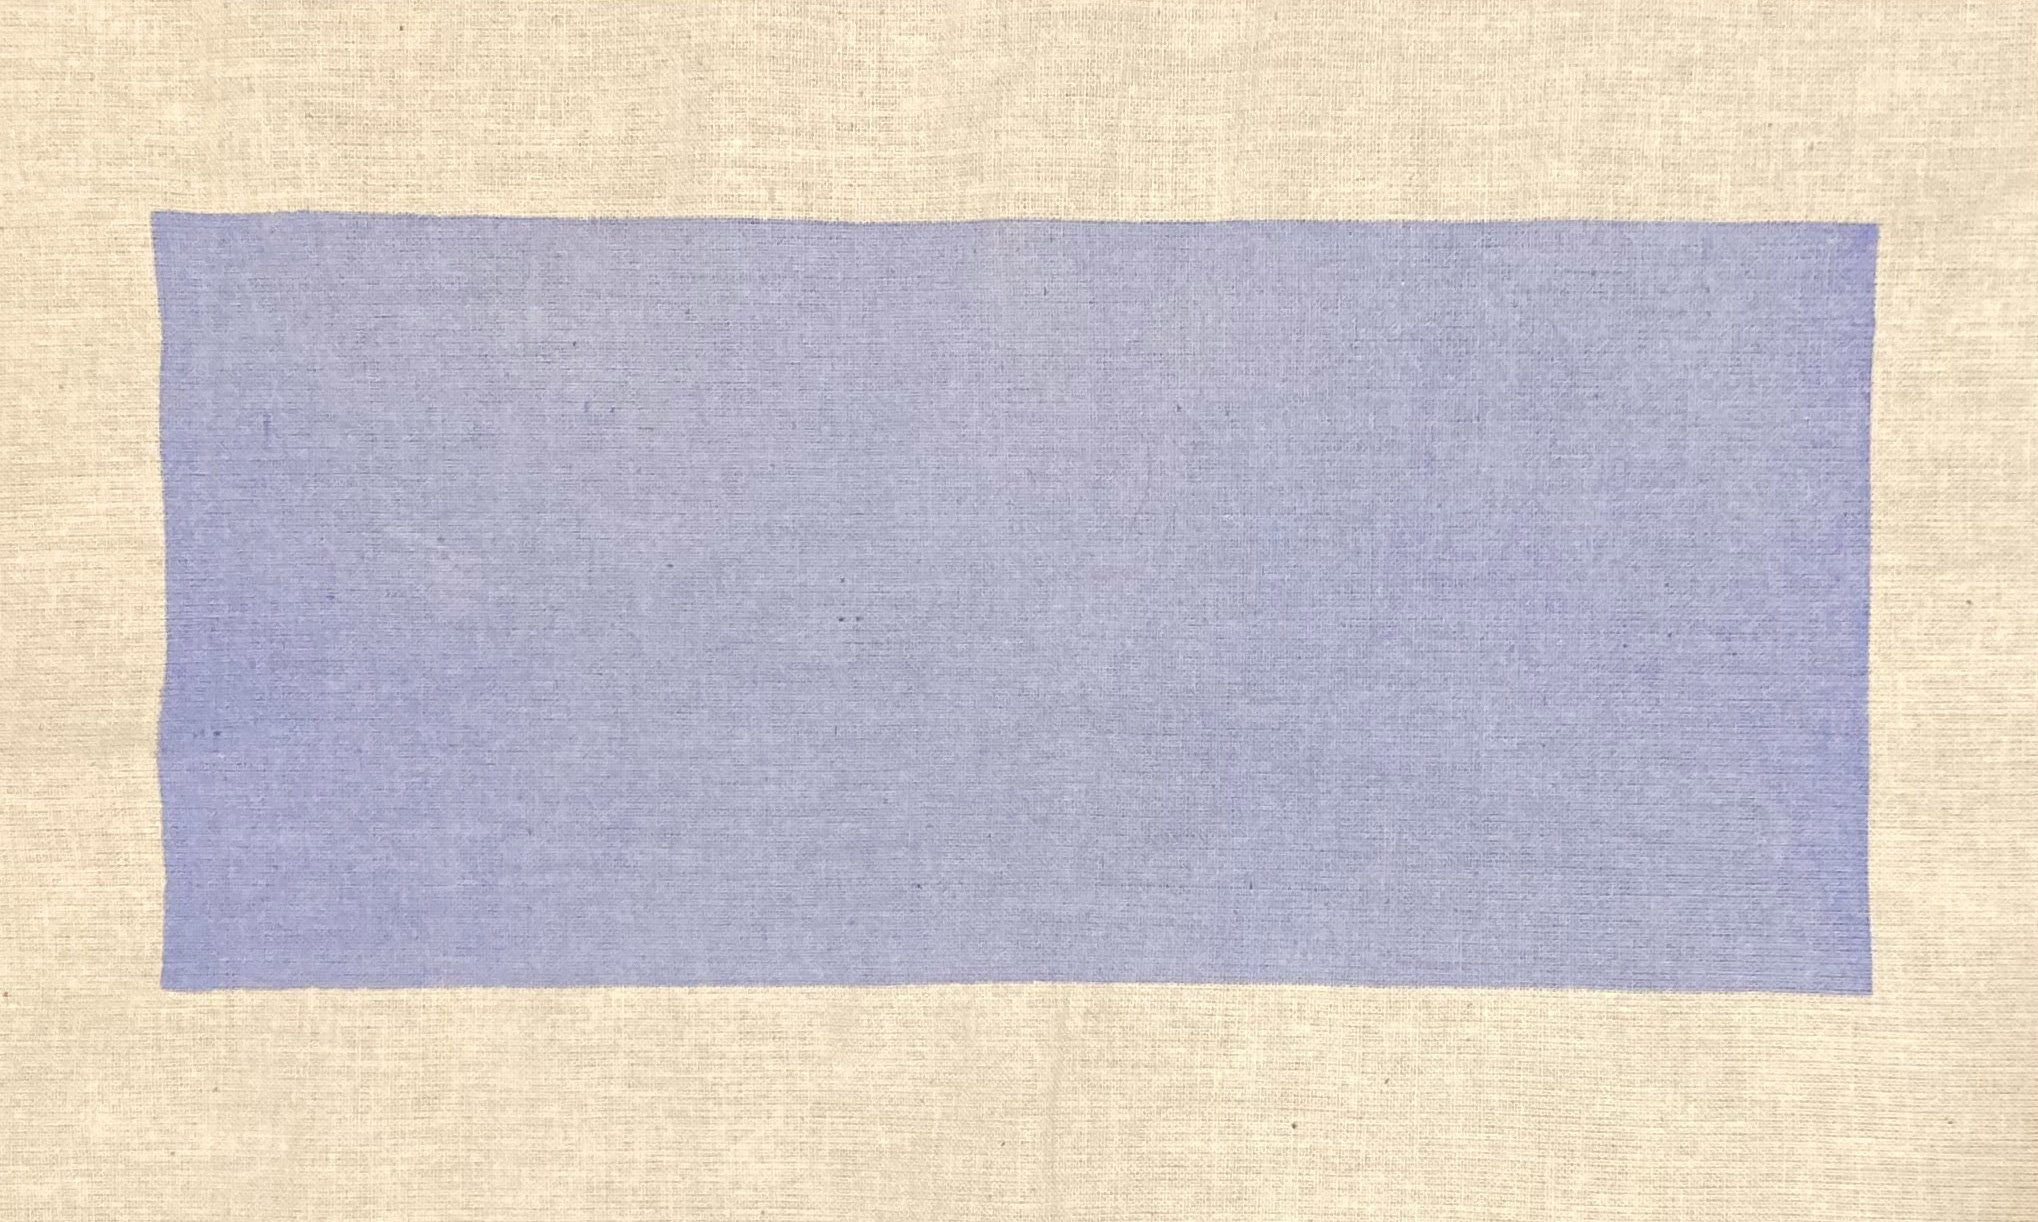
Thermochromic INKS
The recipe:
* Acramina Base
* Water
* Blue pigment
* Digital scale
* Pot/Vessel
* Spoon
* Fabric
* Silk screen
* Mix all ingredients into a mixing cup with a spoon until the pigment has dissolved, as a yogurt texture.
* Prepare the silk screen to print.
* Put the textile under the silk screen.
* Apply the paint to the top with a spoon.
* Make one coat on the screen without pressure.
* Place screen flat on top of textile.
* Pressure the screen and pass on the top.
* When you have your paint result wash the screen immediately with pressure water.
* Let the sample dry.
Process:
Thermochromic INKS de Emma
In this case, we use a thin cotton fabric for the sample.
TEST Thermochromic INKS result de Emma
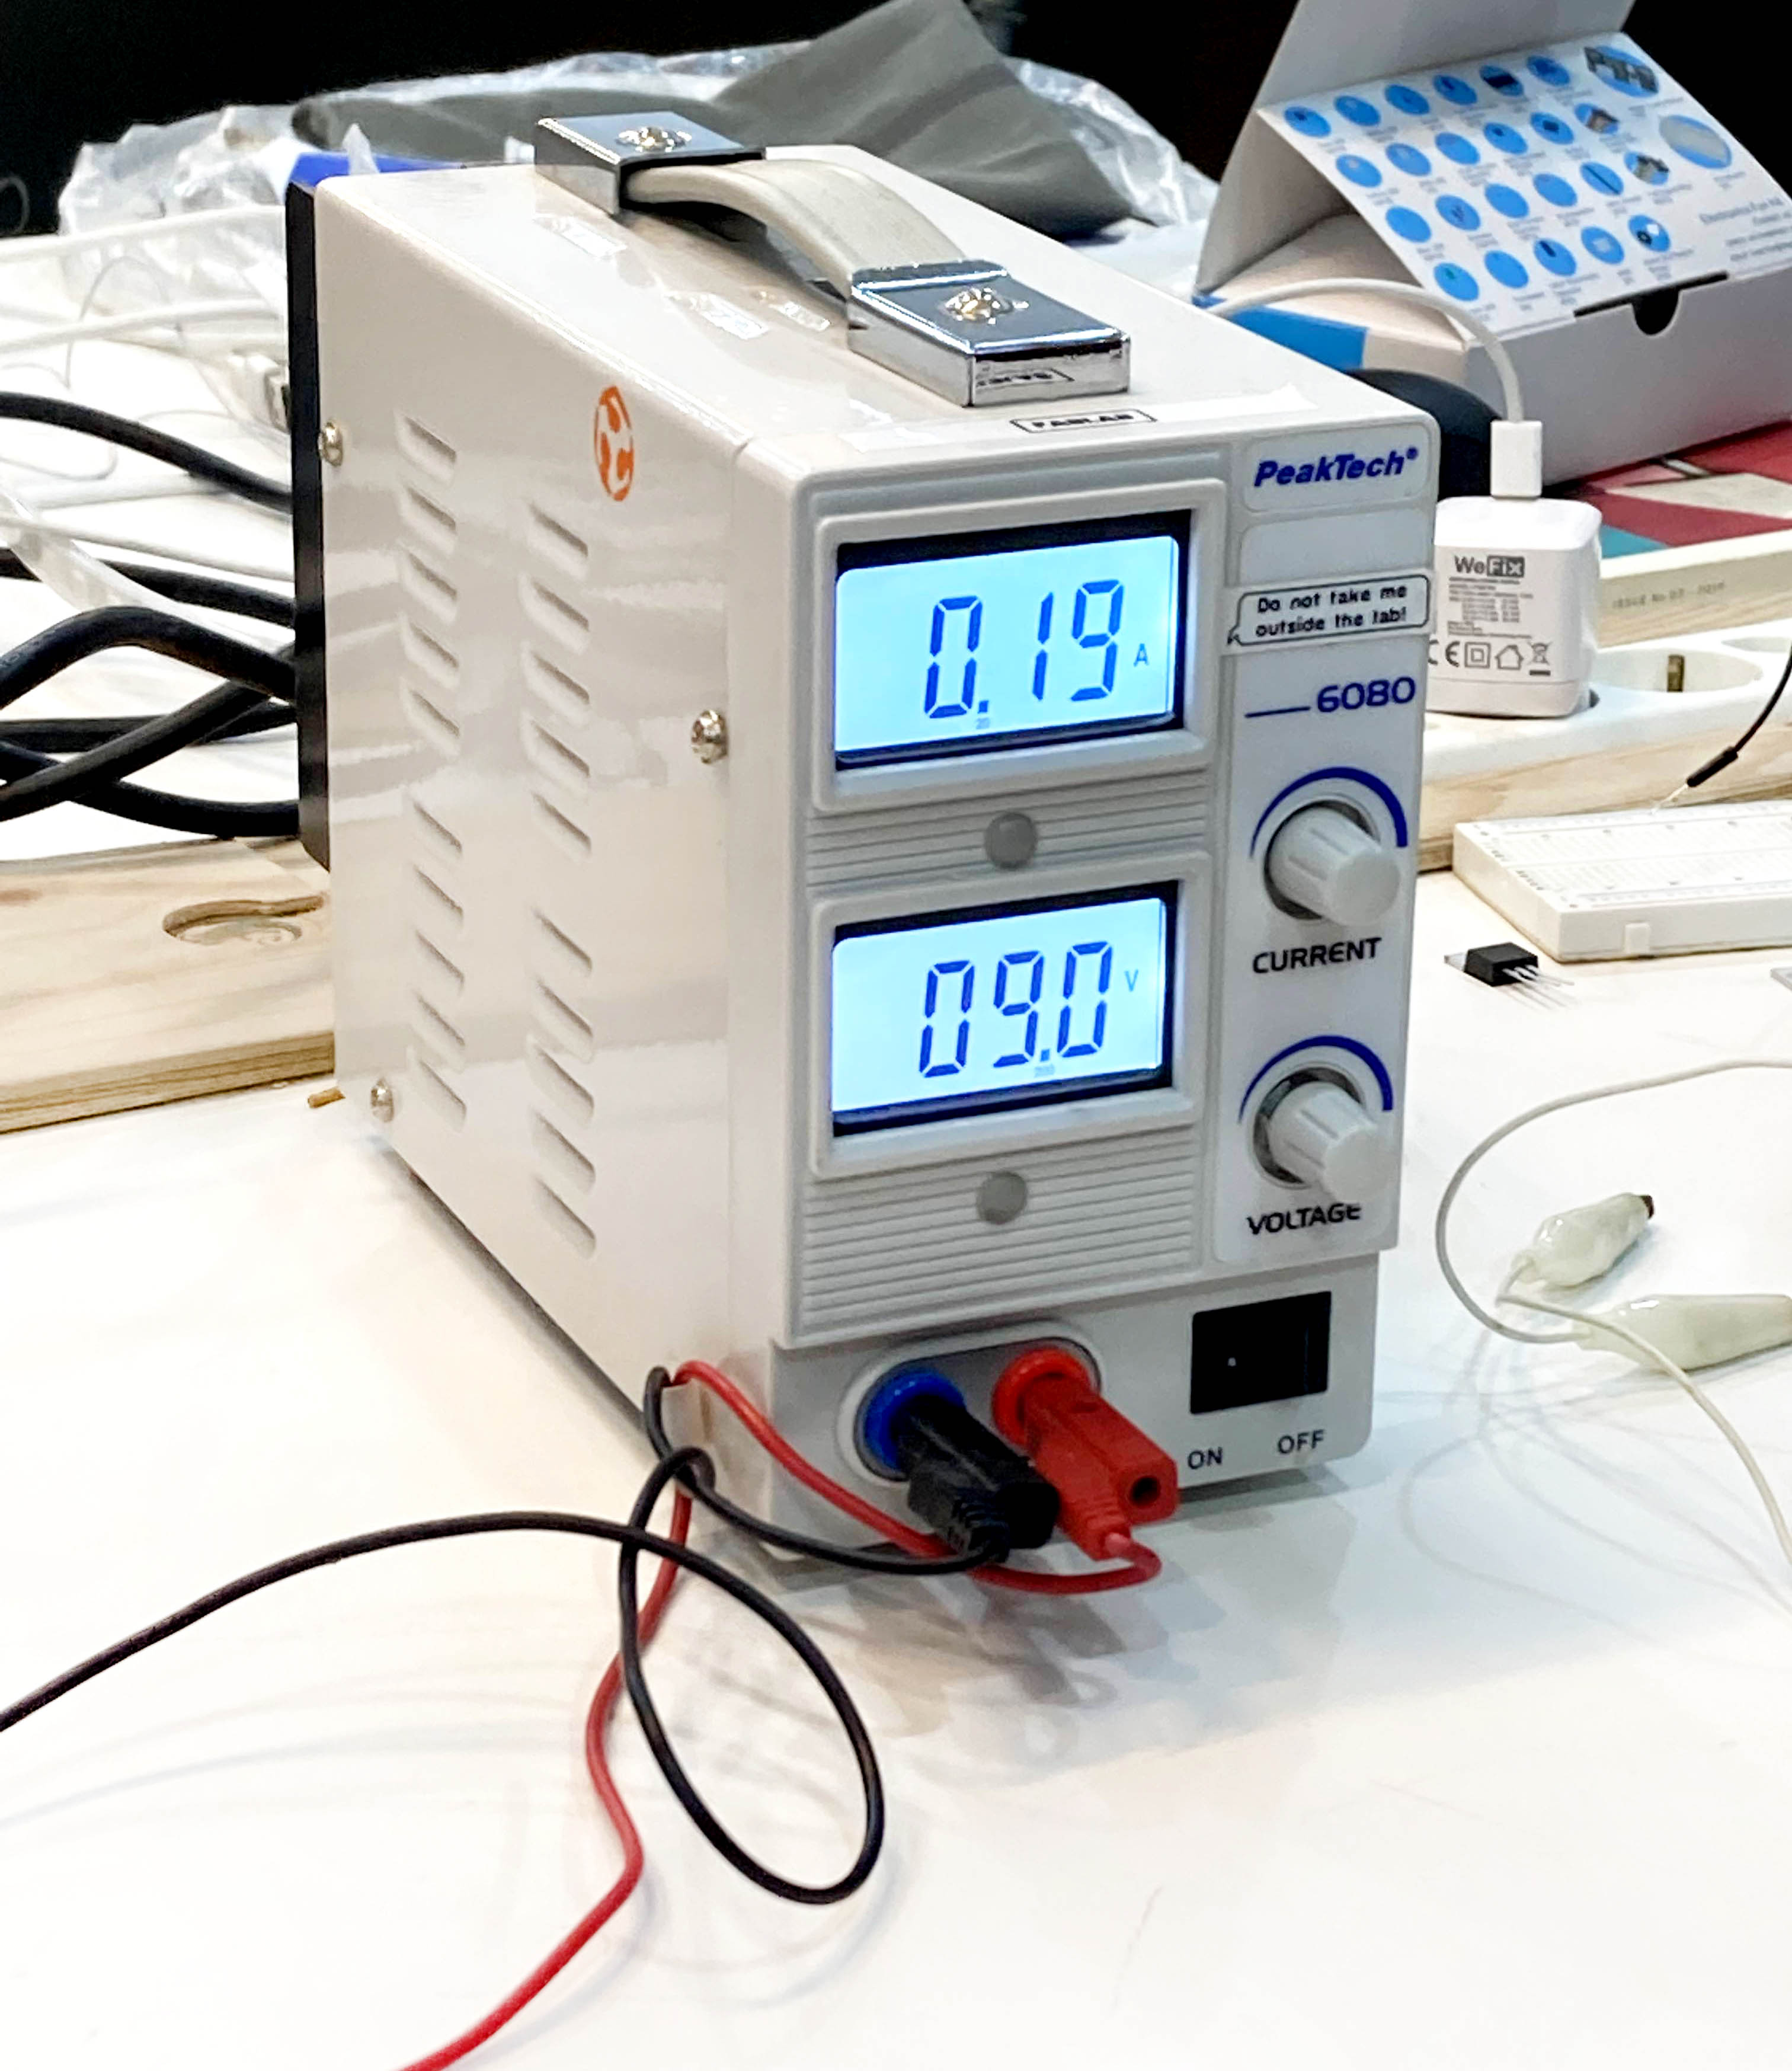
When we have the sample dry, we try the thermochromic fabric, before use in our circuit with the laboratory power supplier and know how much power we will need, and if it's working or not. Cause sometimes the fabric is too thick or there isn't enough pigment to pass the warm of the conductive thread.
Embroidery
For the handbag, I am going to use the embroidery machine to create the logo with the conductive thread on the bottom.
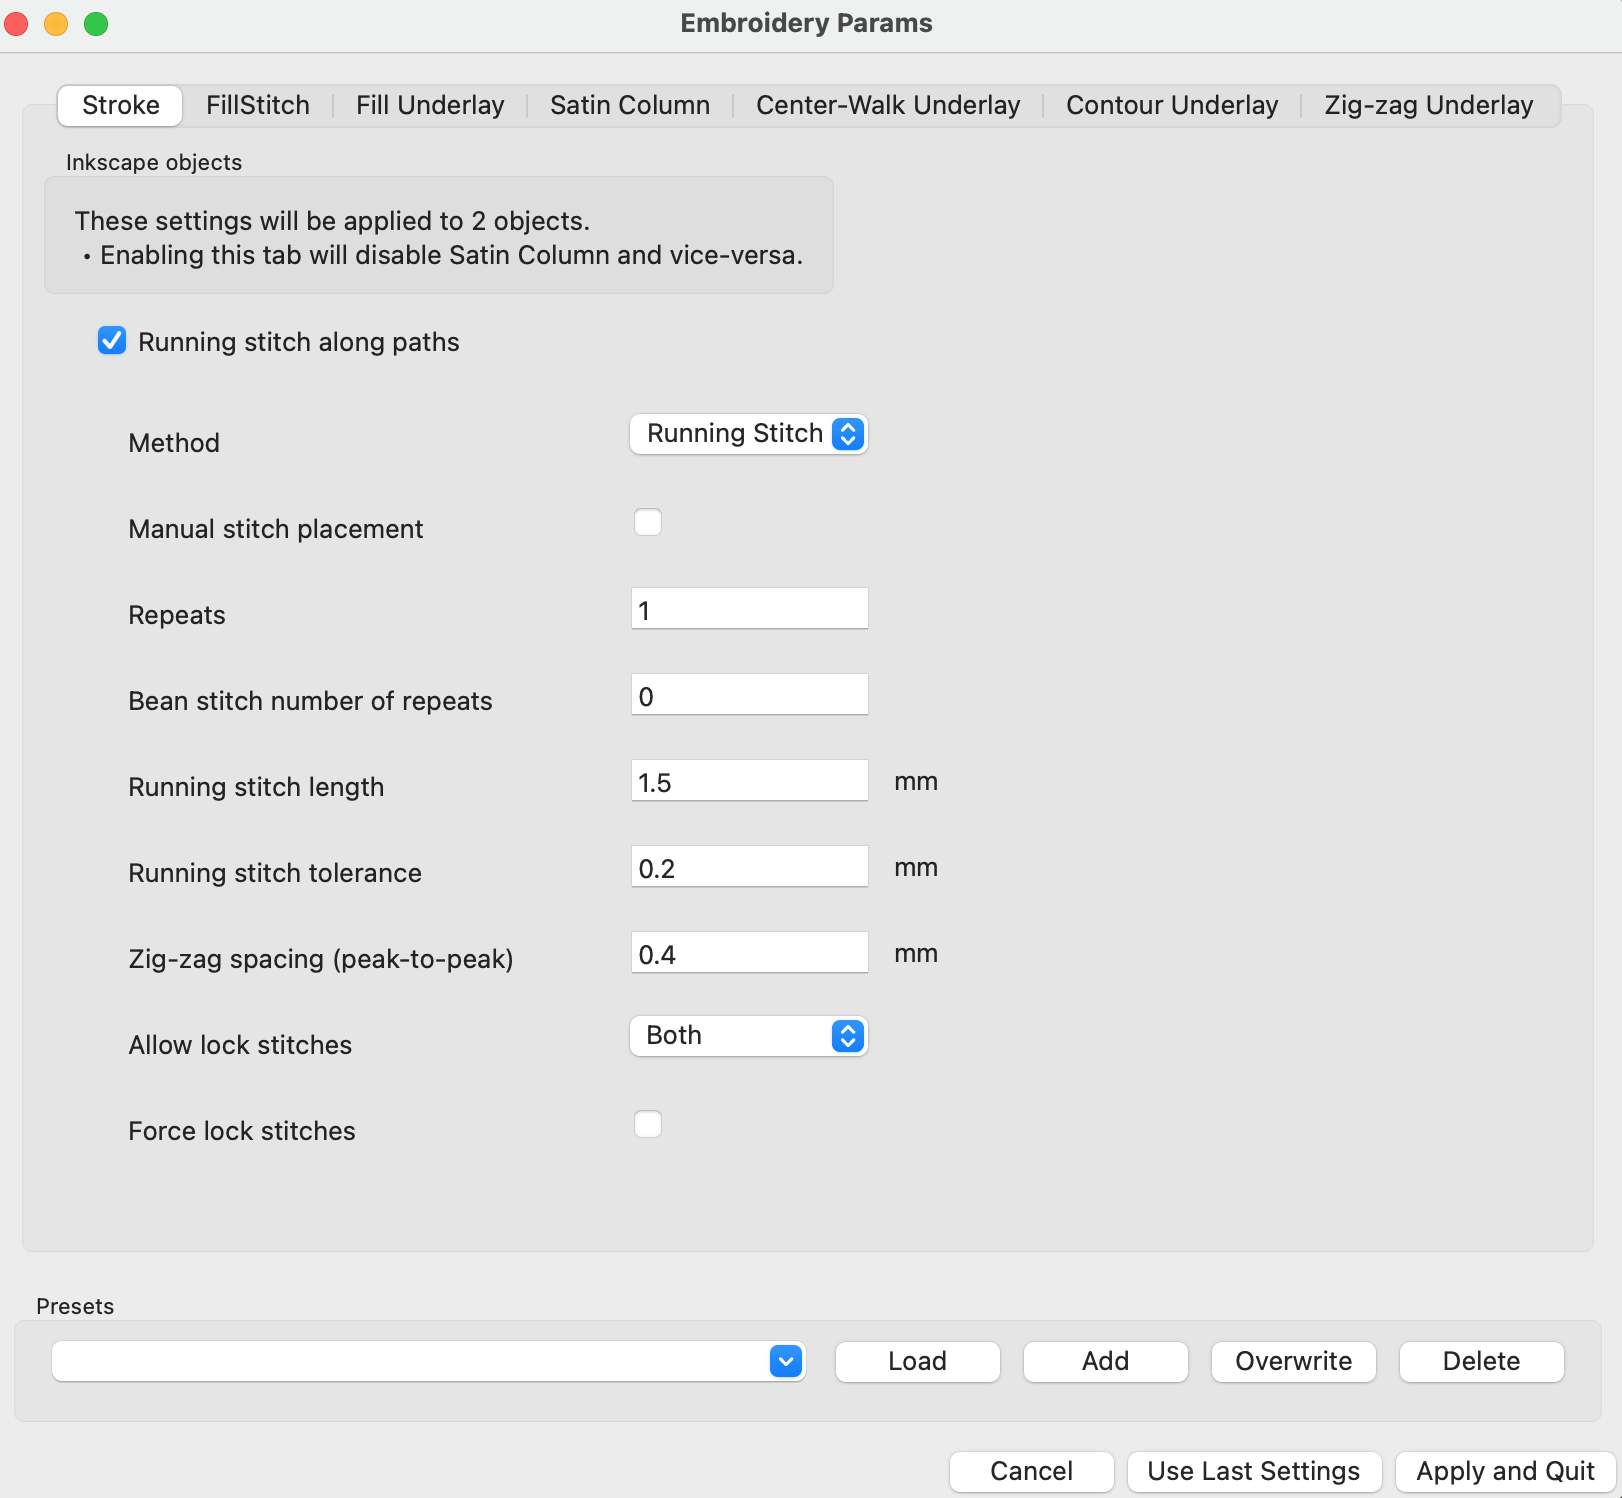
So first I have to prepare the. JPG photo in Illustrator, to get the vector file. Then I import it to the InkStitck software to create the stitches of the embroidery (.SVG).
The following images are the params for embroidery, so you can see the difference between them:
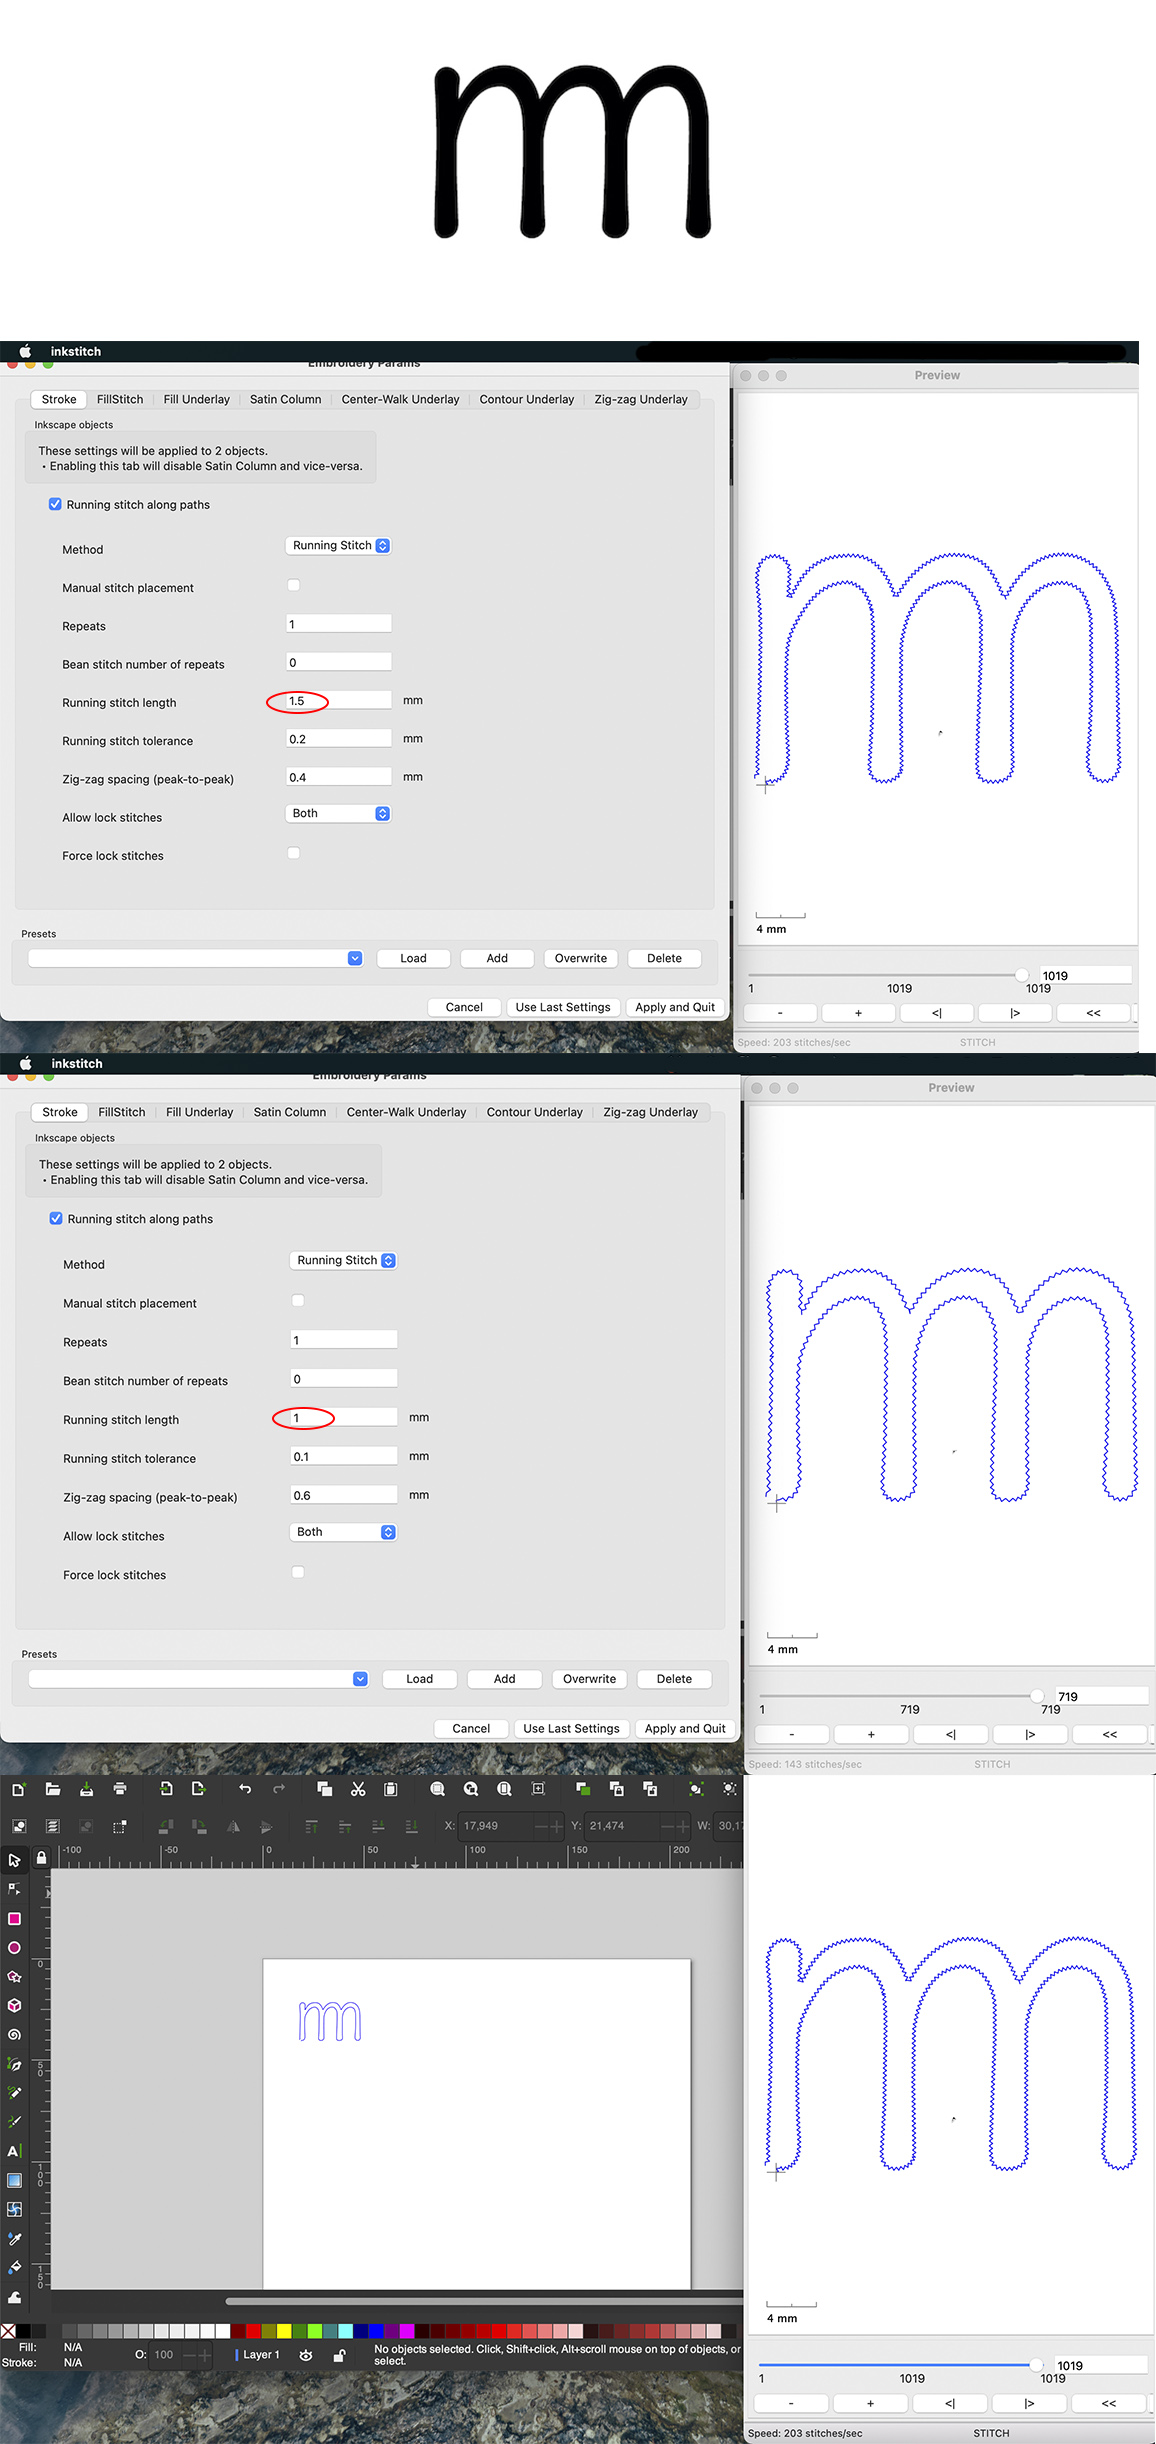
How the embroidery machine will work:
For this sample, I flip the logo cause I will use the conductive thread side to heat the blue thermochromic fabric.
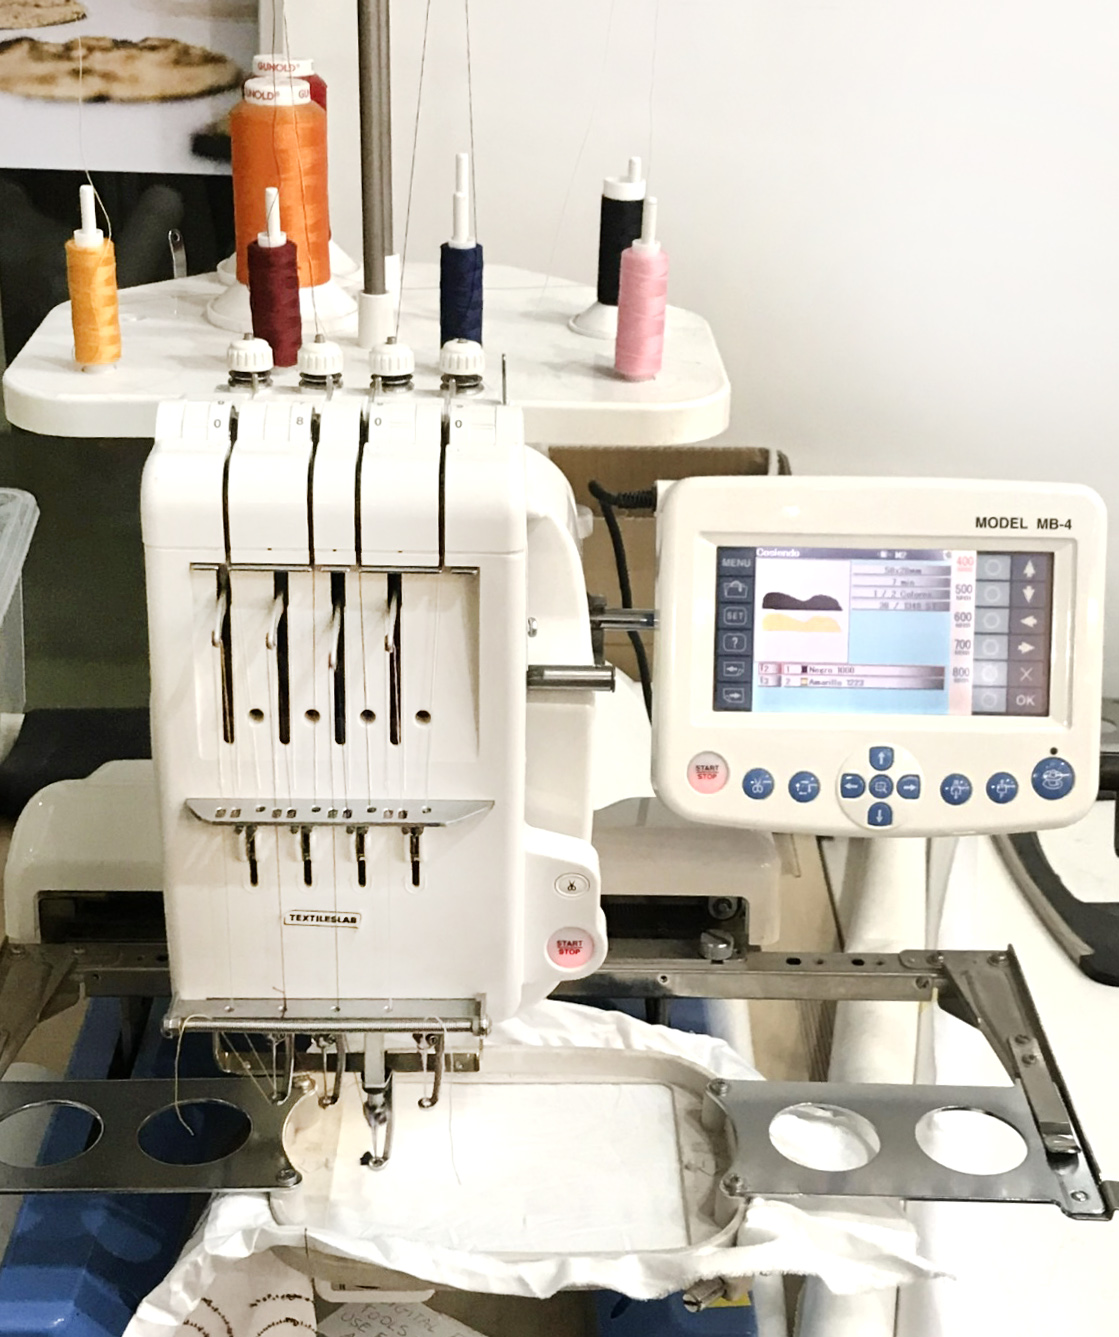
For this machine, you could use 3 different threads at the same time. Moreover, it has 3 different drum sizes to fit better for your design.
Embroidery de Emma
The result:
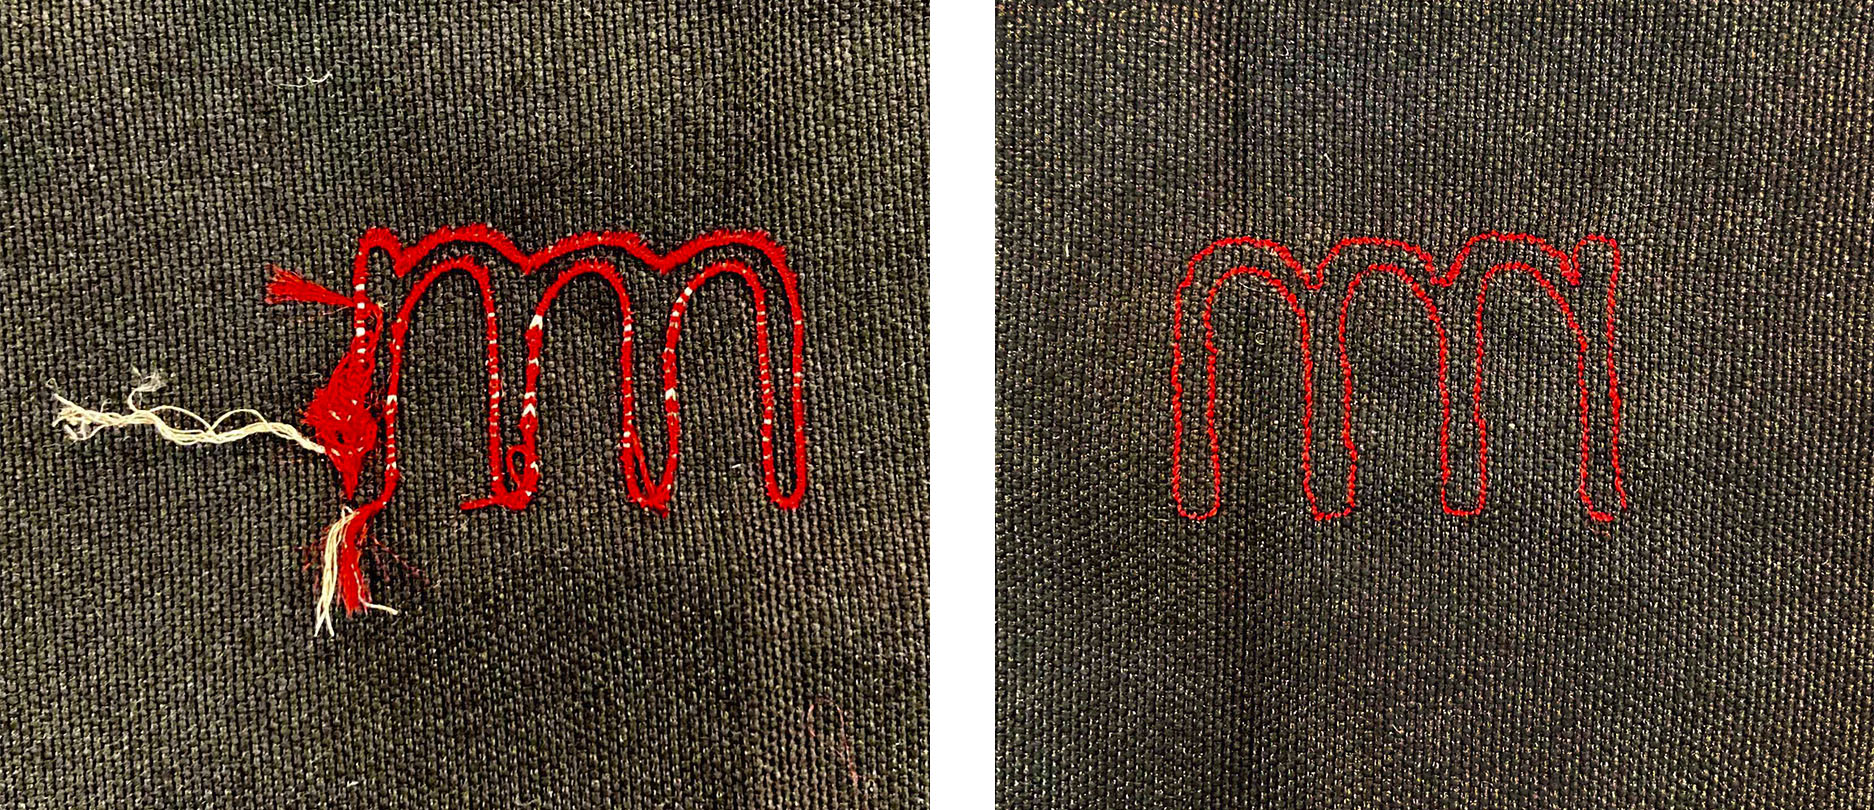
On one side I have the conductive thread to heat the fabric and on the other side, there is just the red normal thread.
To check the voltage that I will need for the embroidery I used a laboratory power supply.
More about:
Flip dots
How to create a coil:
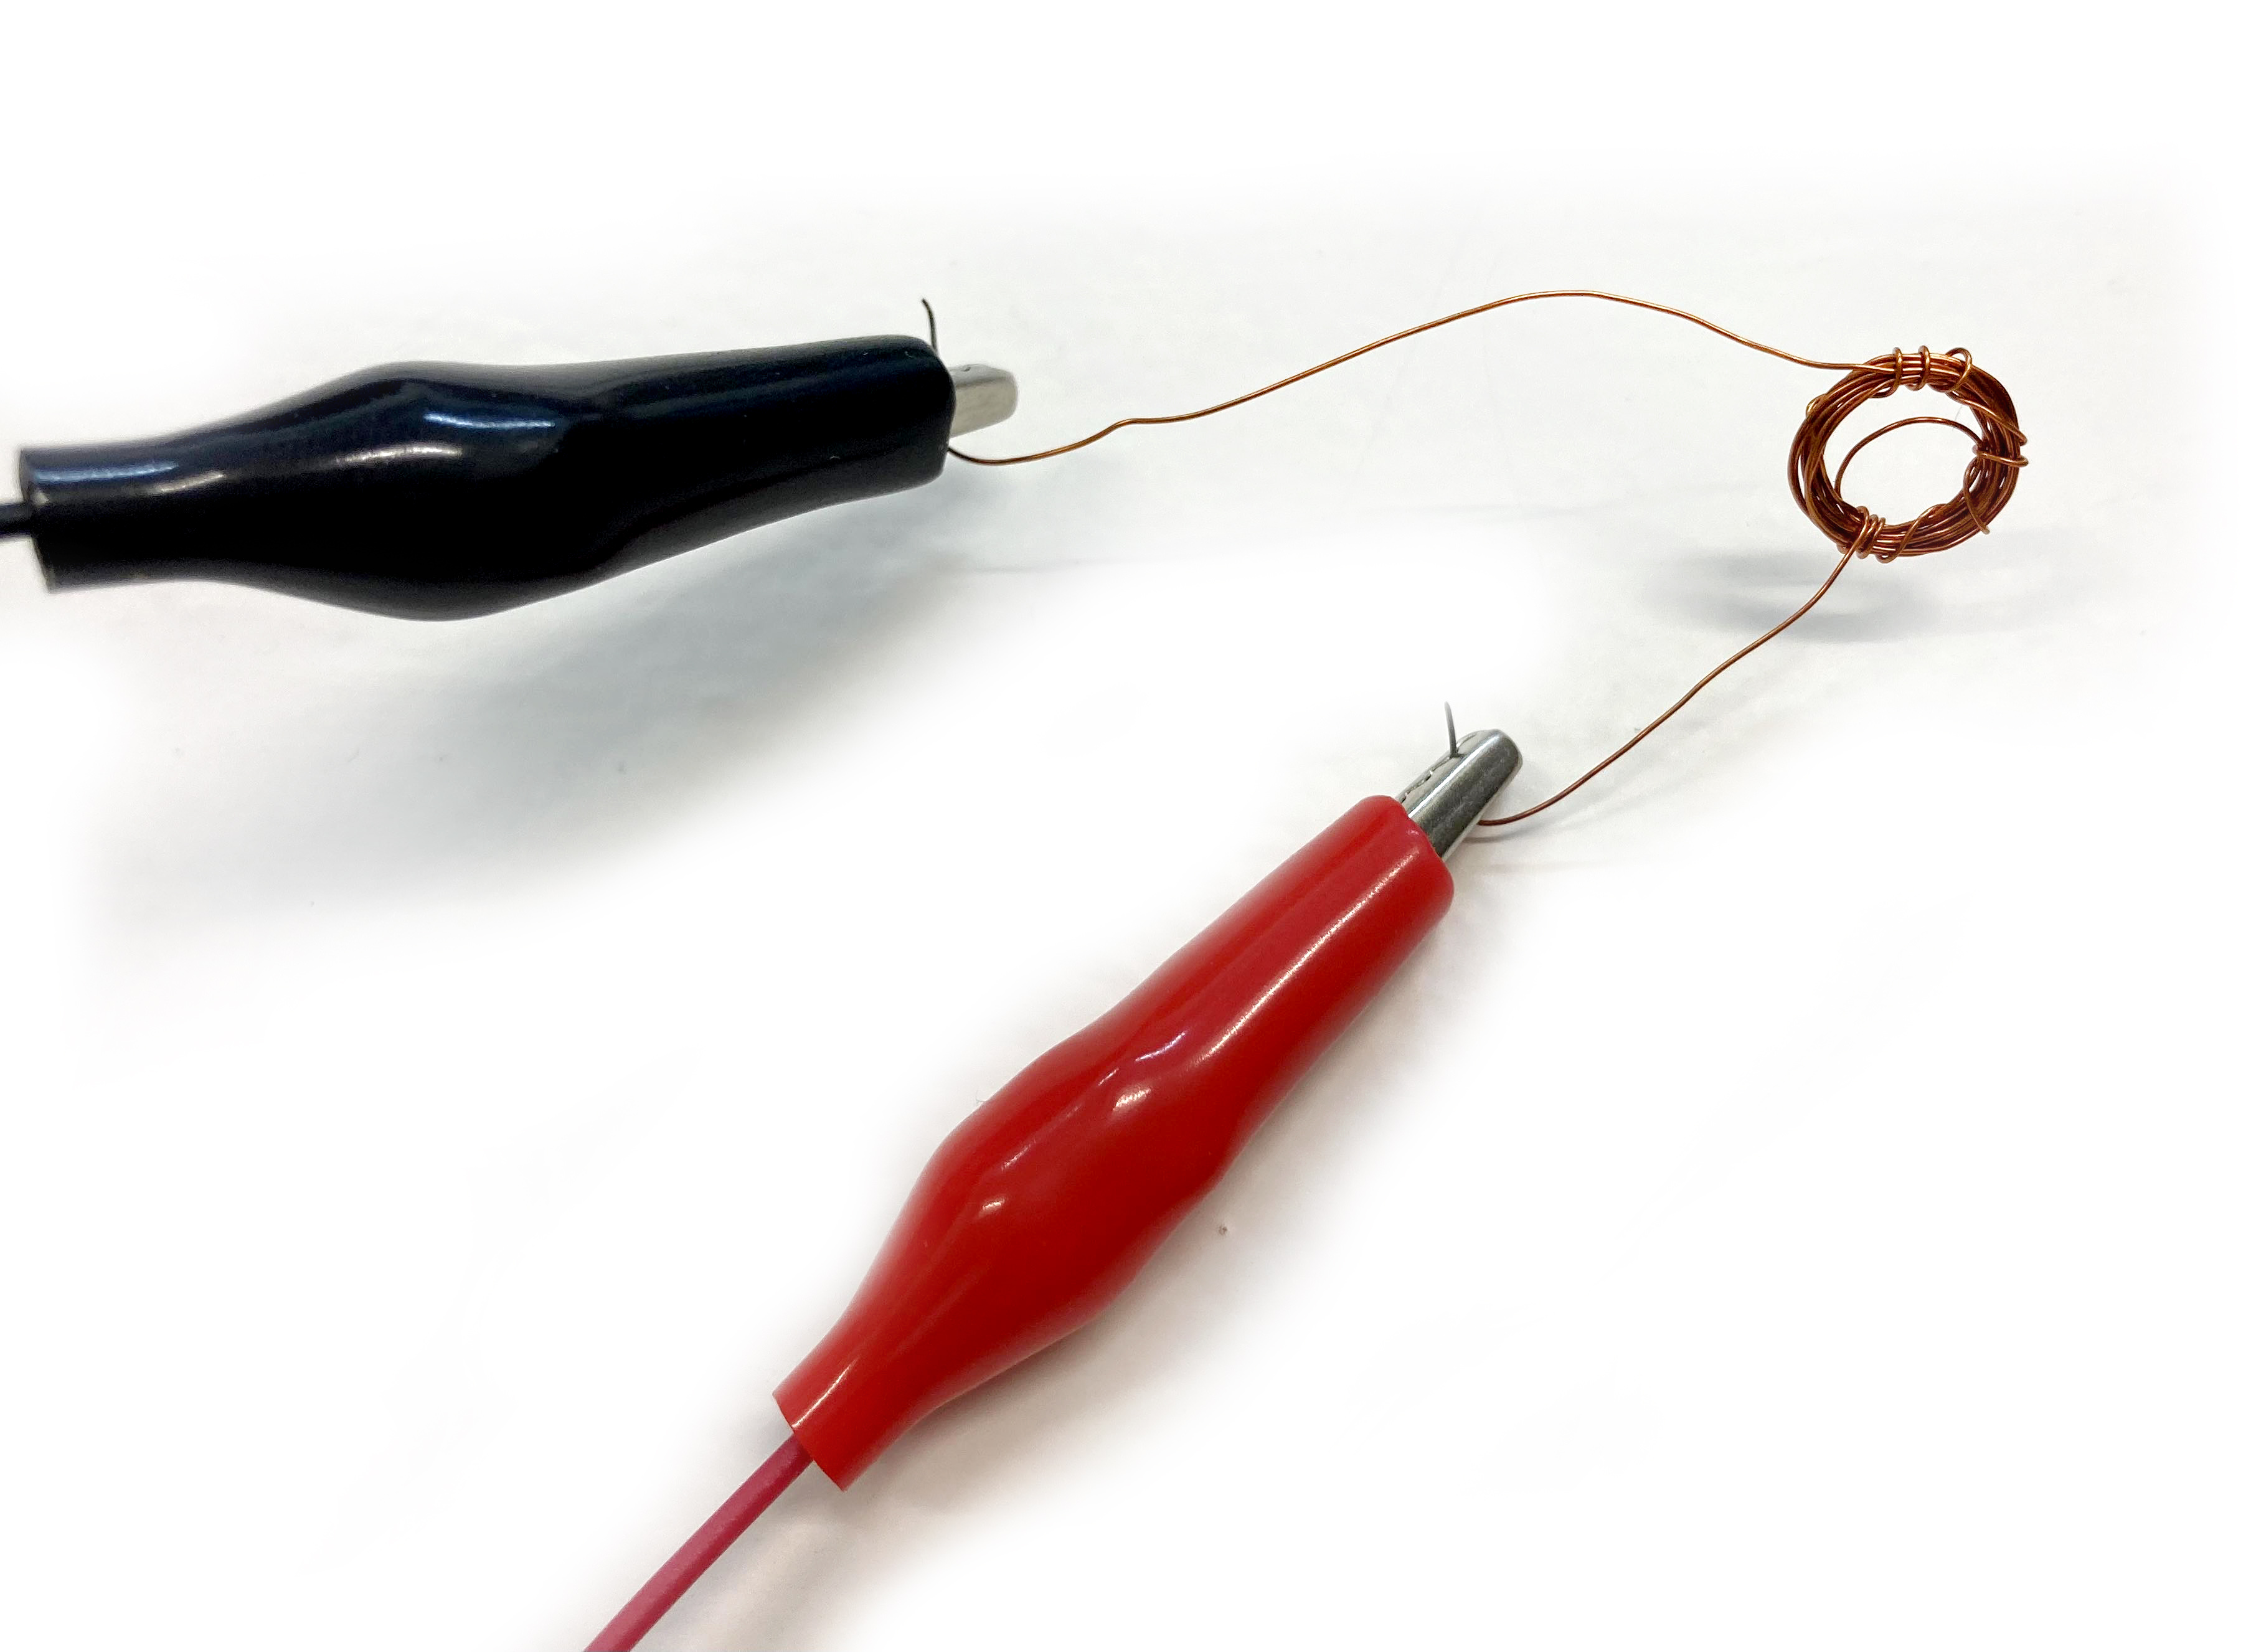
- Wrap the copper thread 50 - 100 times.
- Wrap the end piece around the loop to secure the wire in a circle.
- Burn off the enamel and solder the ends.
- Sew the loop into fabric/paper.
- Connect or solder the two wires to your fabric pads.
- Sew the hematite bead near the loop.
- Test it.
The magnetic hematite bead flips back and forth when we run current through the coil. It creates an electromagnetic field that attracts or repels the magnet based on the direction of the current.
In this circuit the coil just has one direction to flip. So when it has the power it will create the magnet, so it moves. Be careful when you will assemble the final circuit to add the magnet on the correct side, to not have the repel direction.
Process
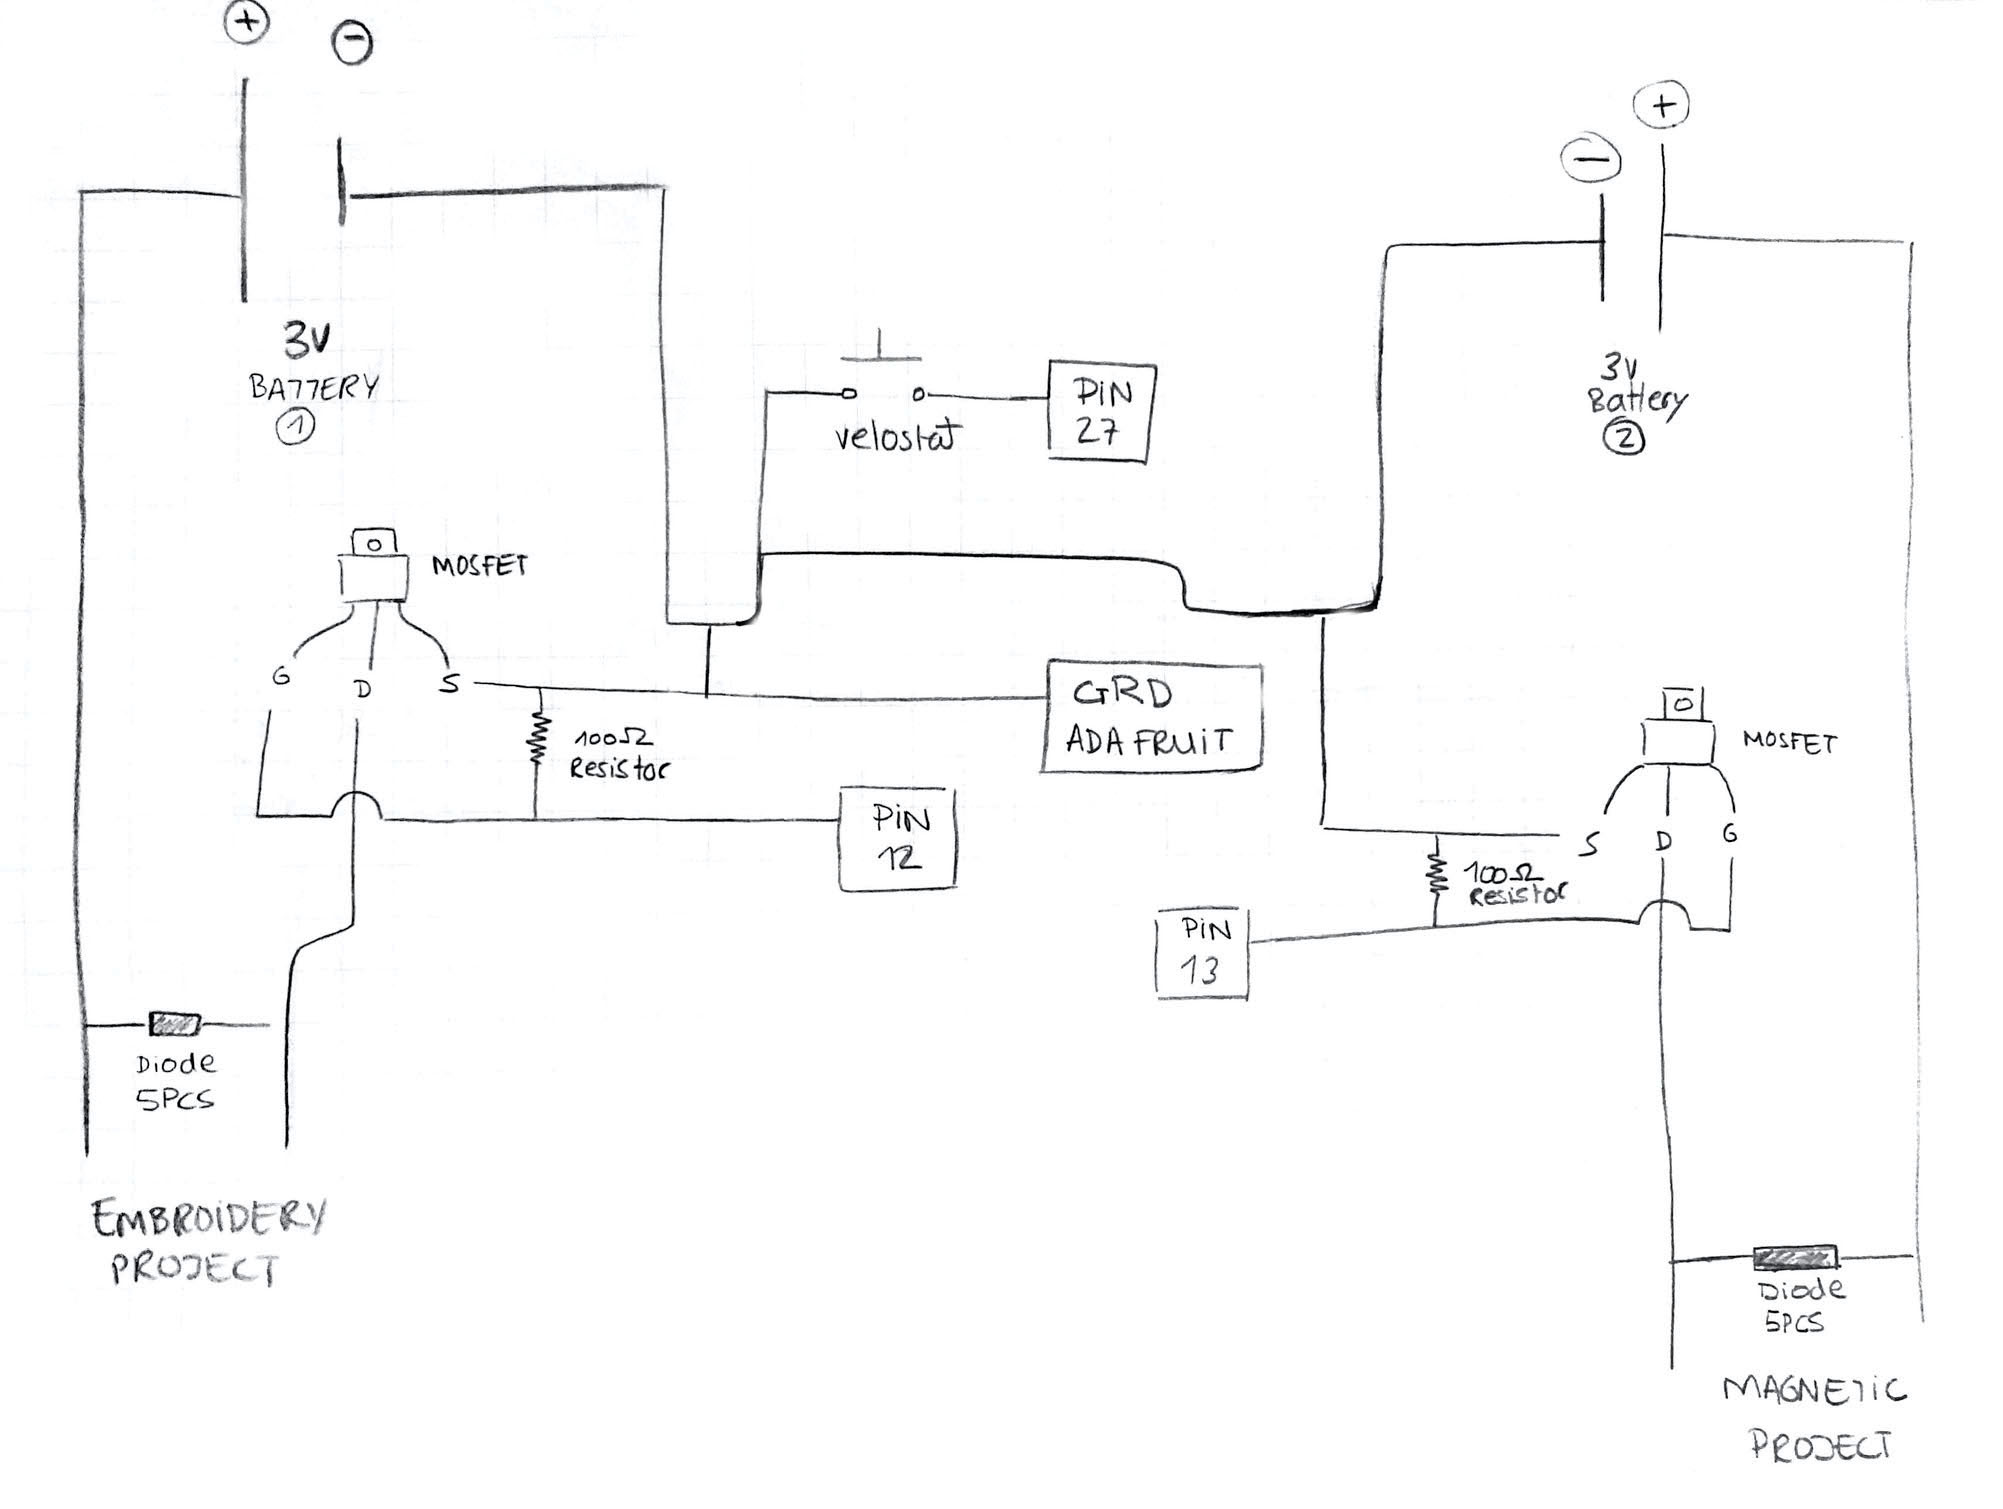
Create a MOSFET circuit in a paper to incorporate into the circuit. In my case, I will need two, one for the magnet and the other for the Thermochromic.

Let's solder!
Be careful to do not burn, it's hot!
First, prepare the sponge with some water to get the supplier cold down and clean while you are working. Turn on the Soldering Iron at 400ºC. Melt the material on the top of each connection and the legs of the MOSFET.
Remember to solder each union of the copper tape to have a proper connection. If not the circuit is not going to work!
The prototype for the circuit with both switches:
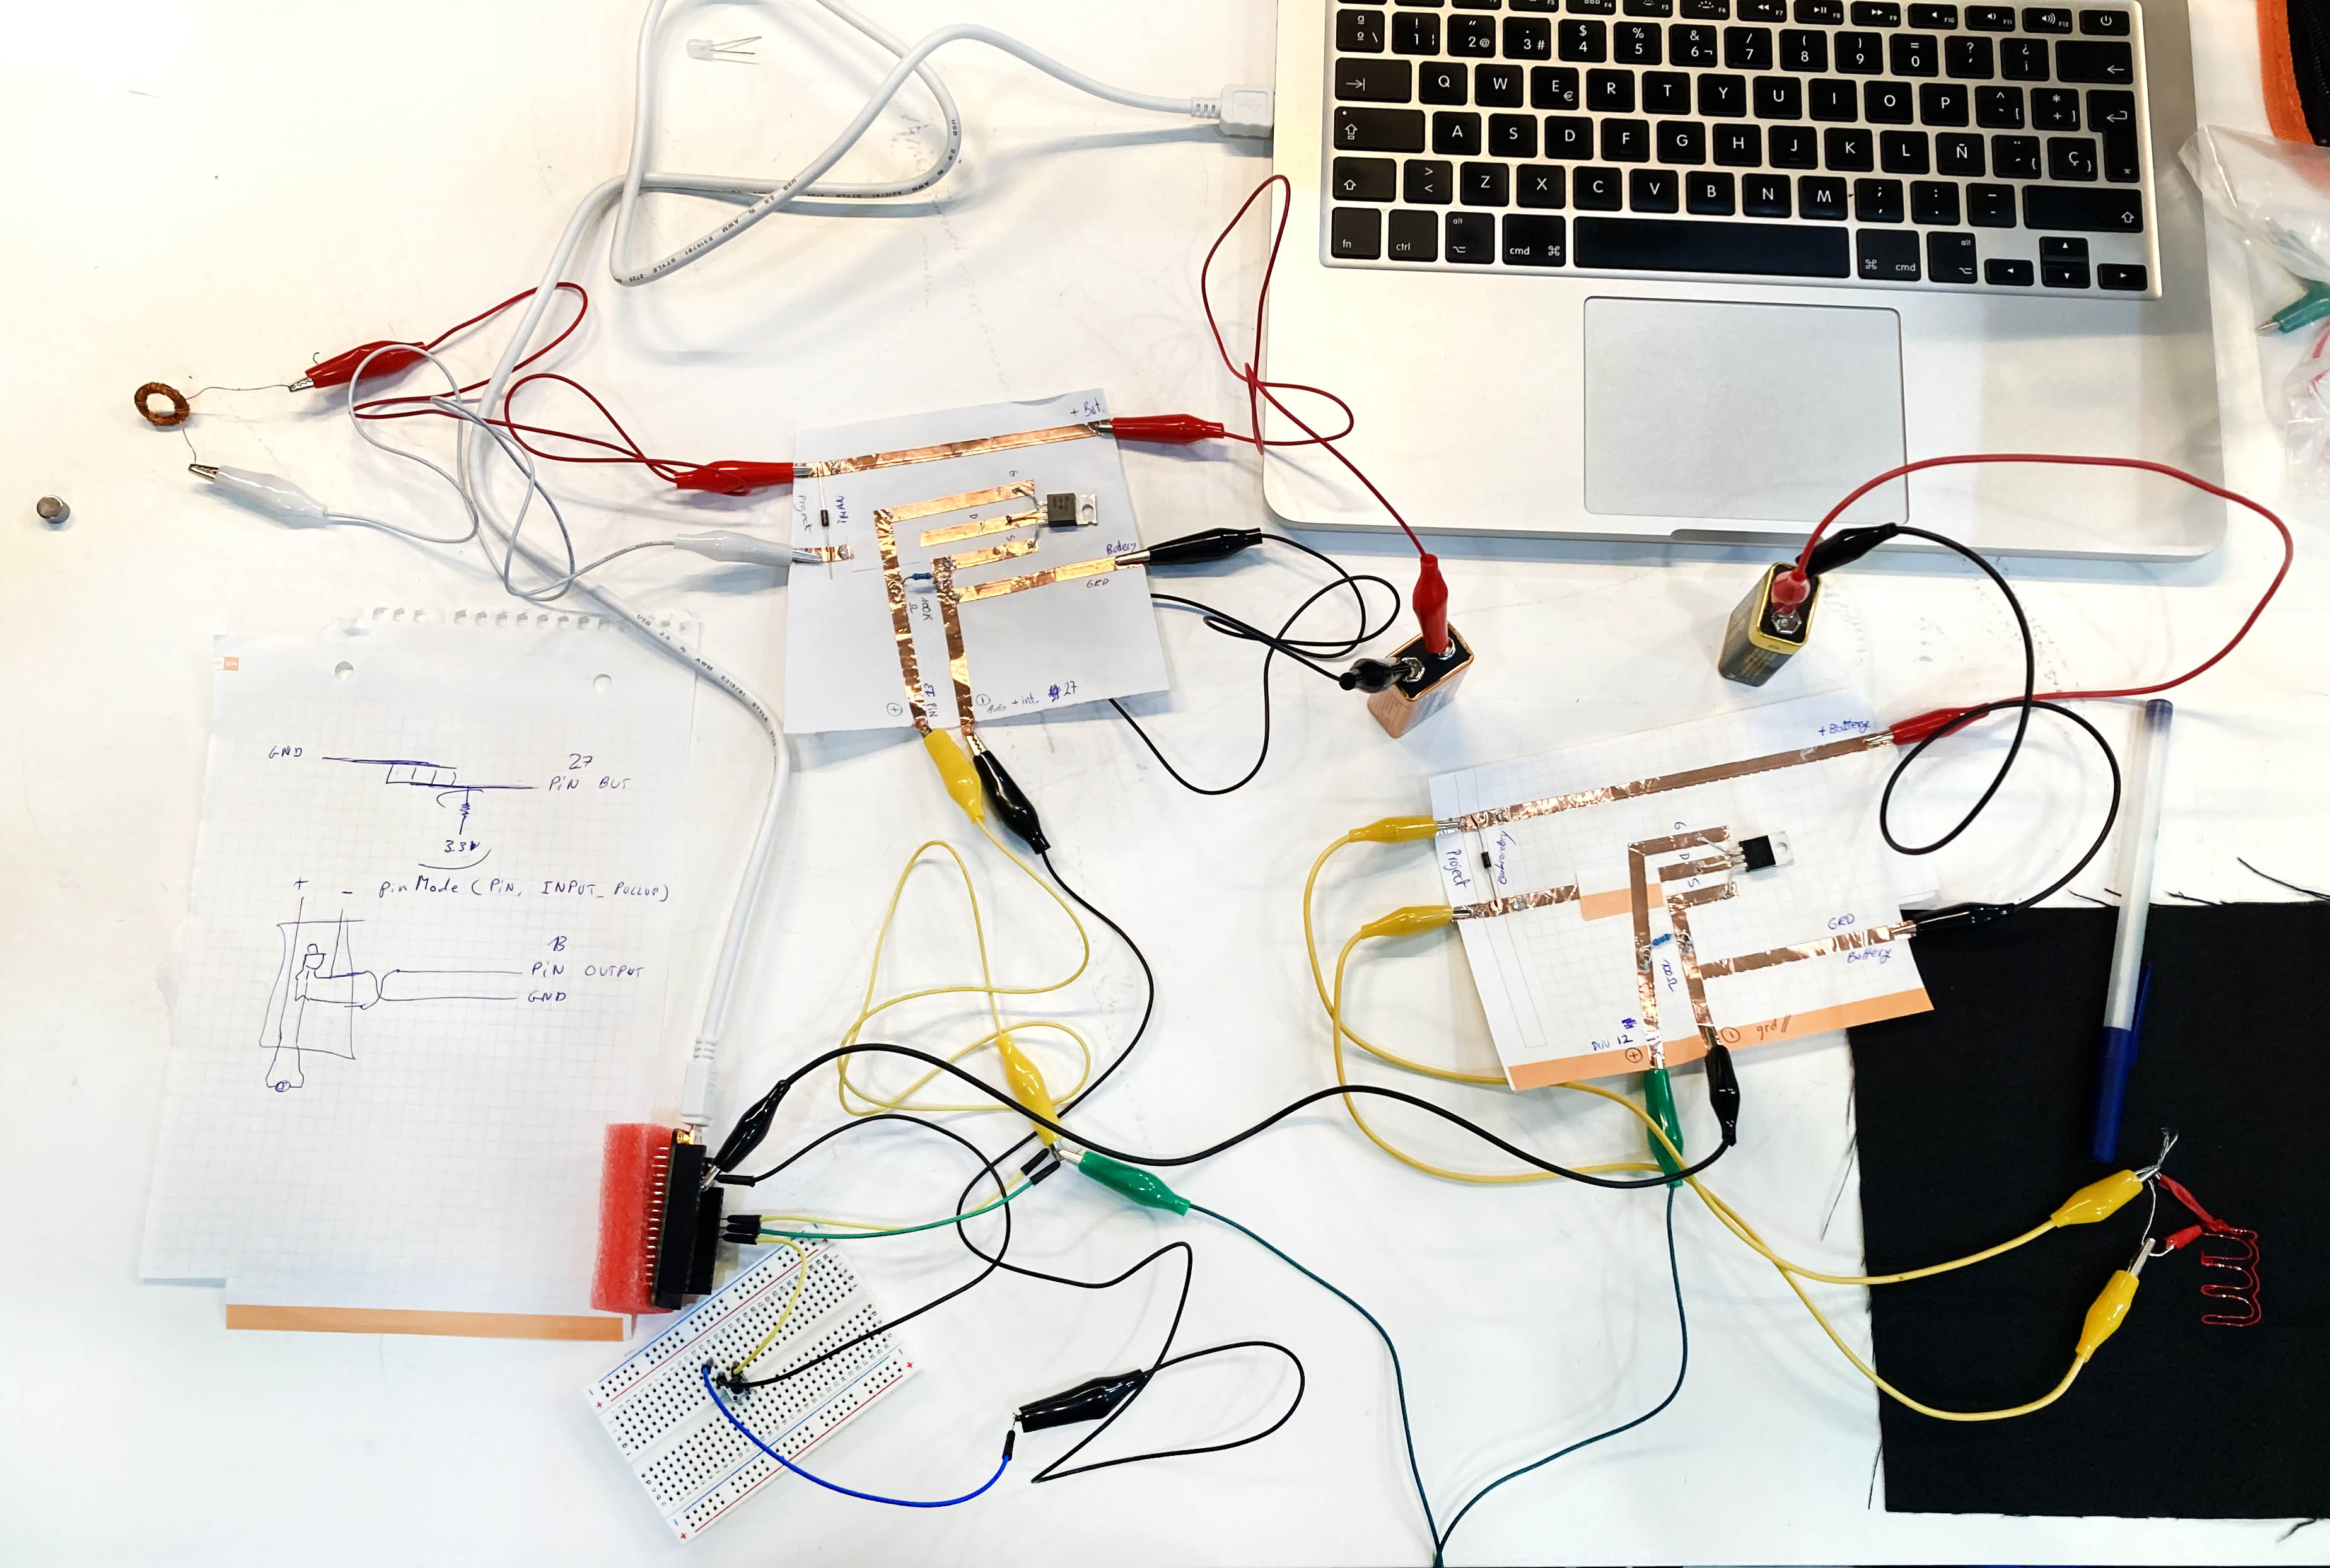
In this case, I used a button from the electronic kit and also two batteries, because I need a lot of power to get magnetic and the thermochromic to work in just one. After, I realized that was because the batteries were too old, so if I used a new one fortunately I just really need one!
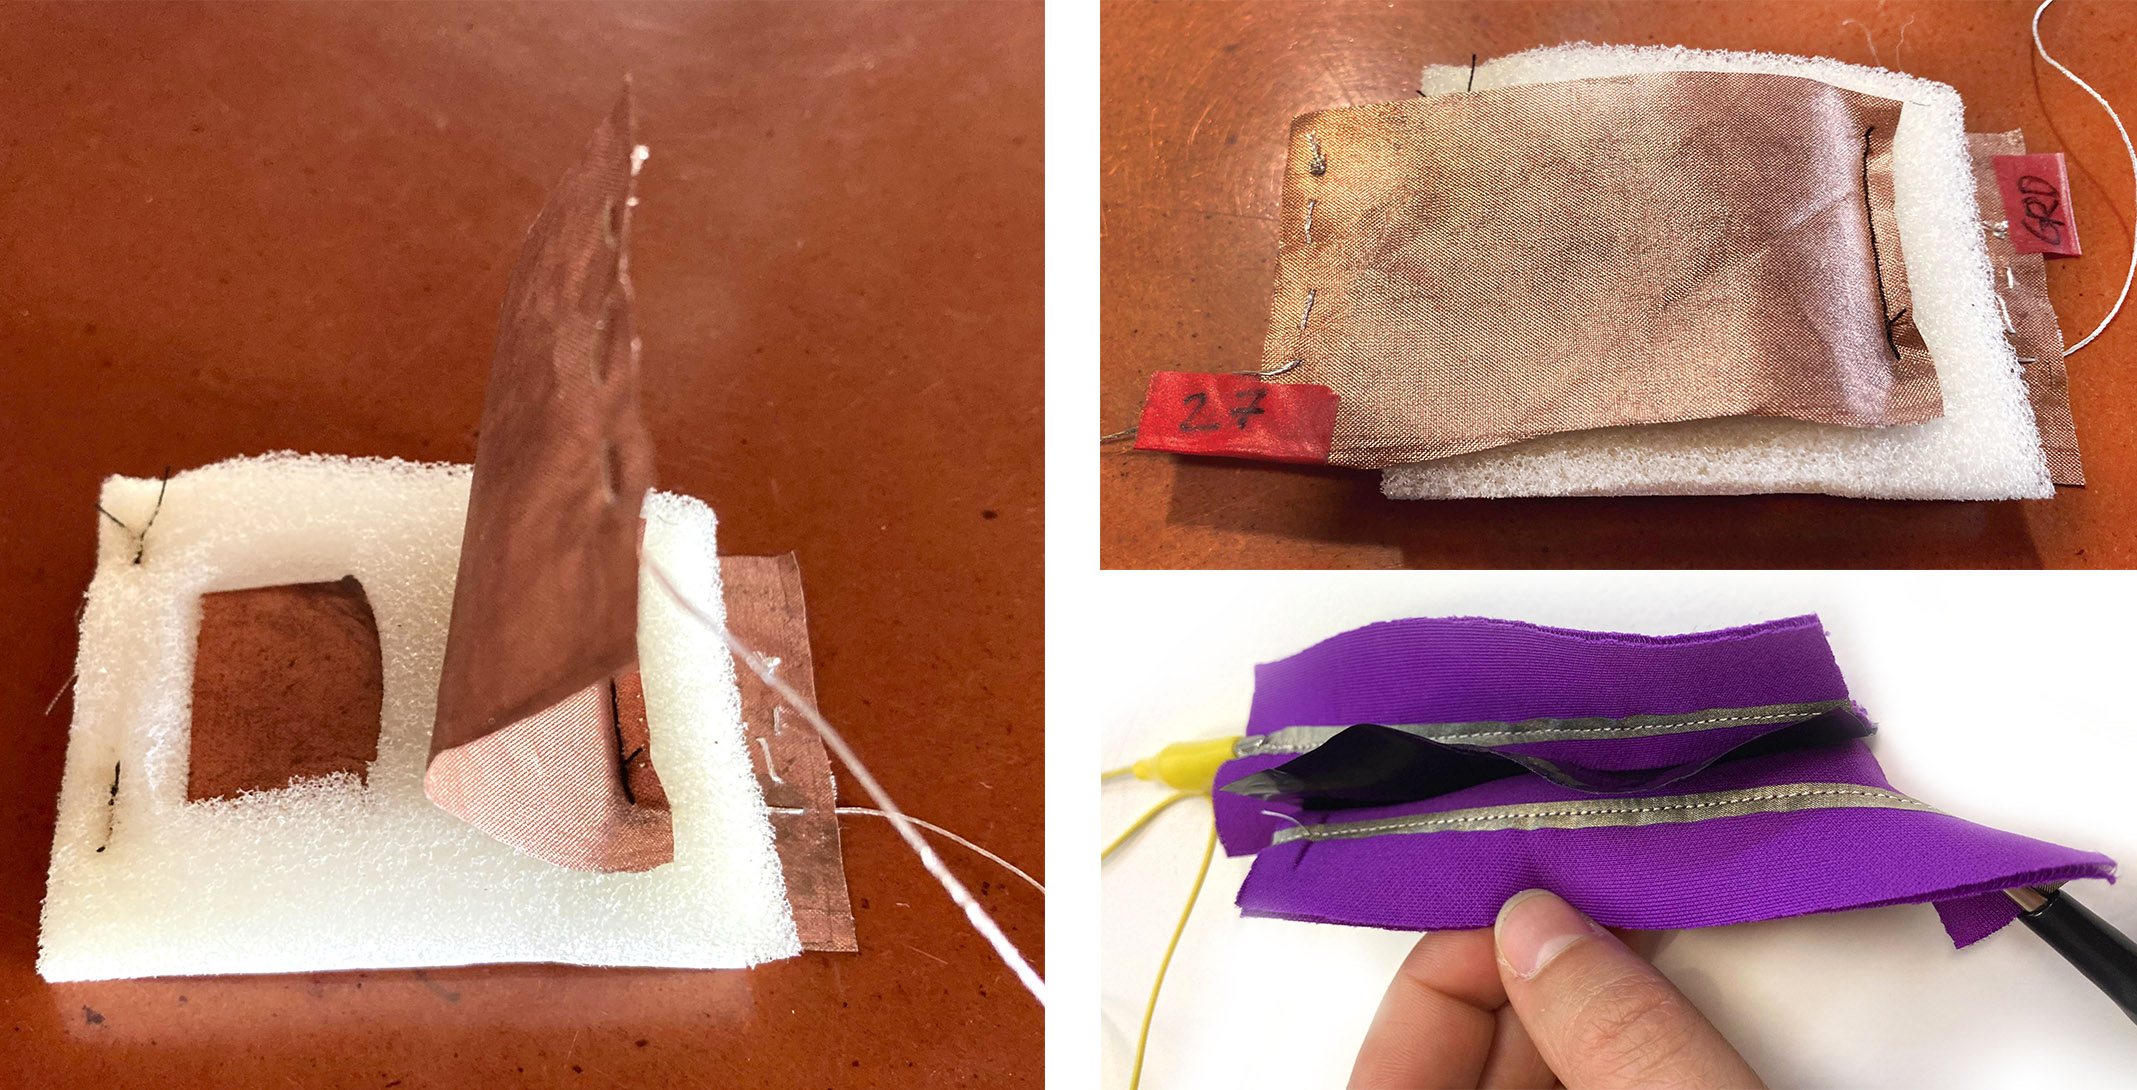
I fabricate a switch with copper fabric and foam with a gap in the middle, as a sandwich. It has two states ON/OFF. In the beginning, I tested with a velostat switch but it wasn't a good option because it's more difficult to flow the current between them and I lost a lot of power.
Assemble the pieces:
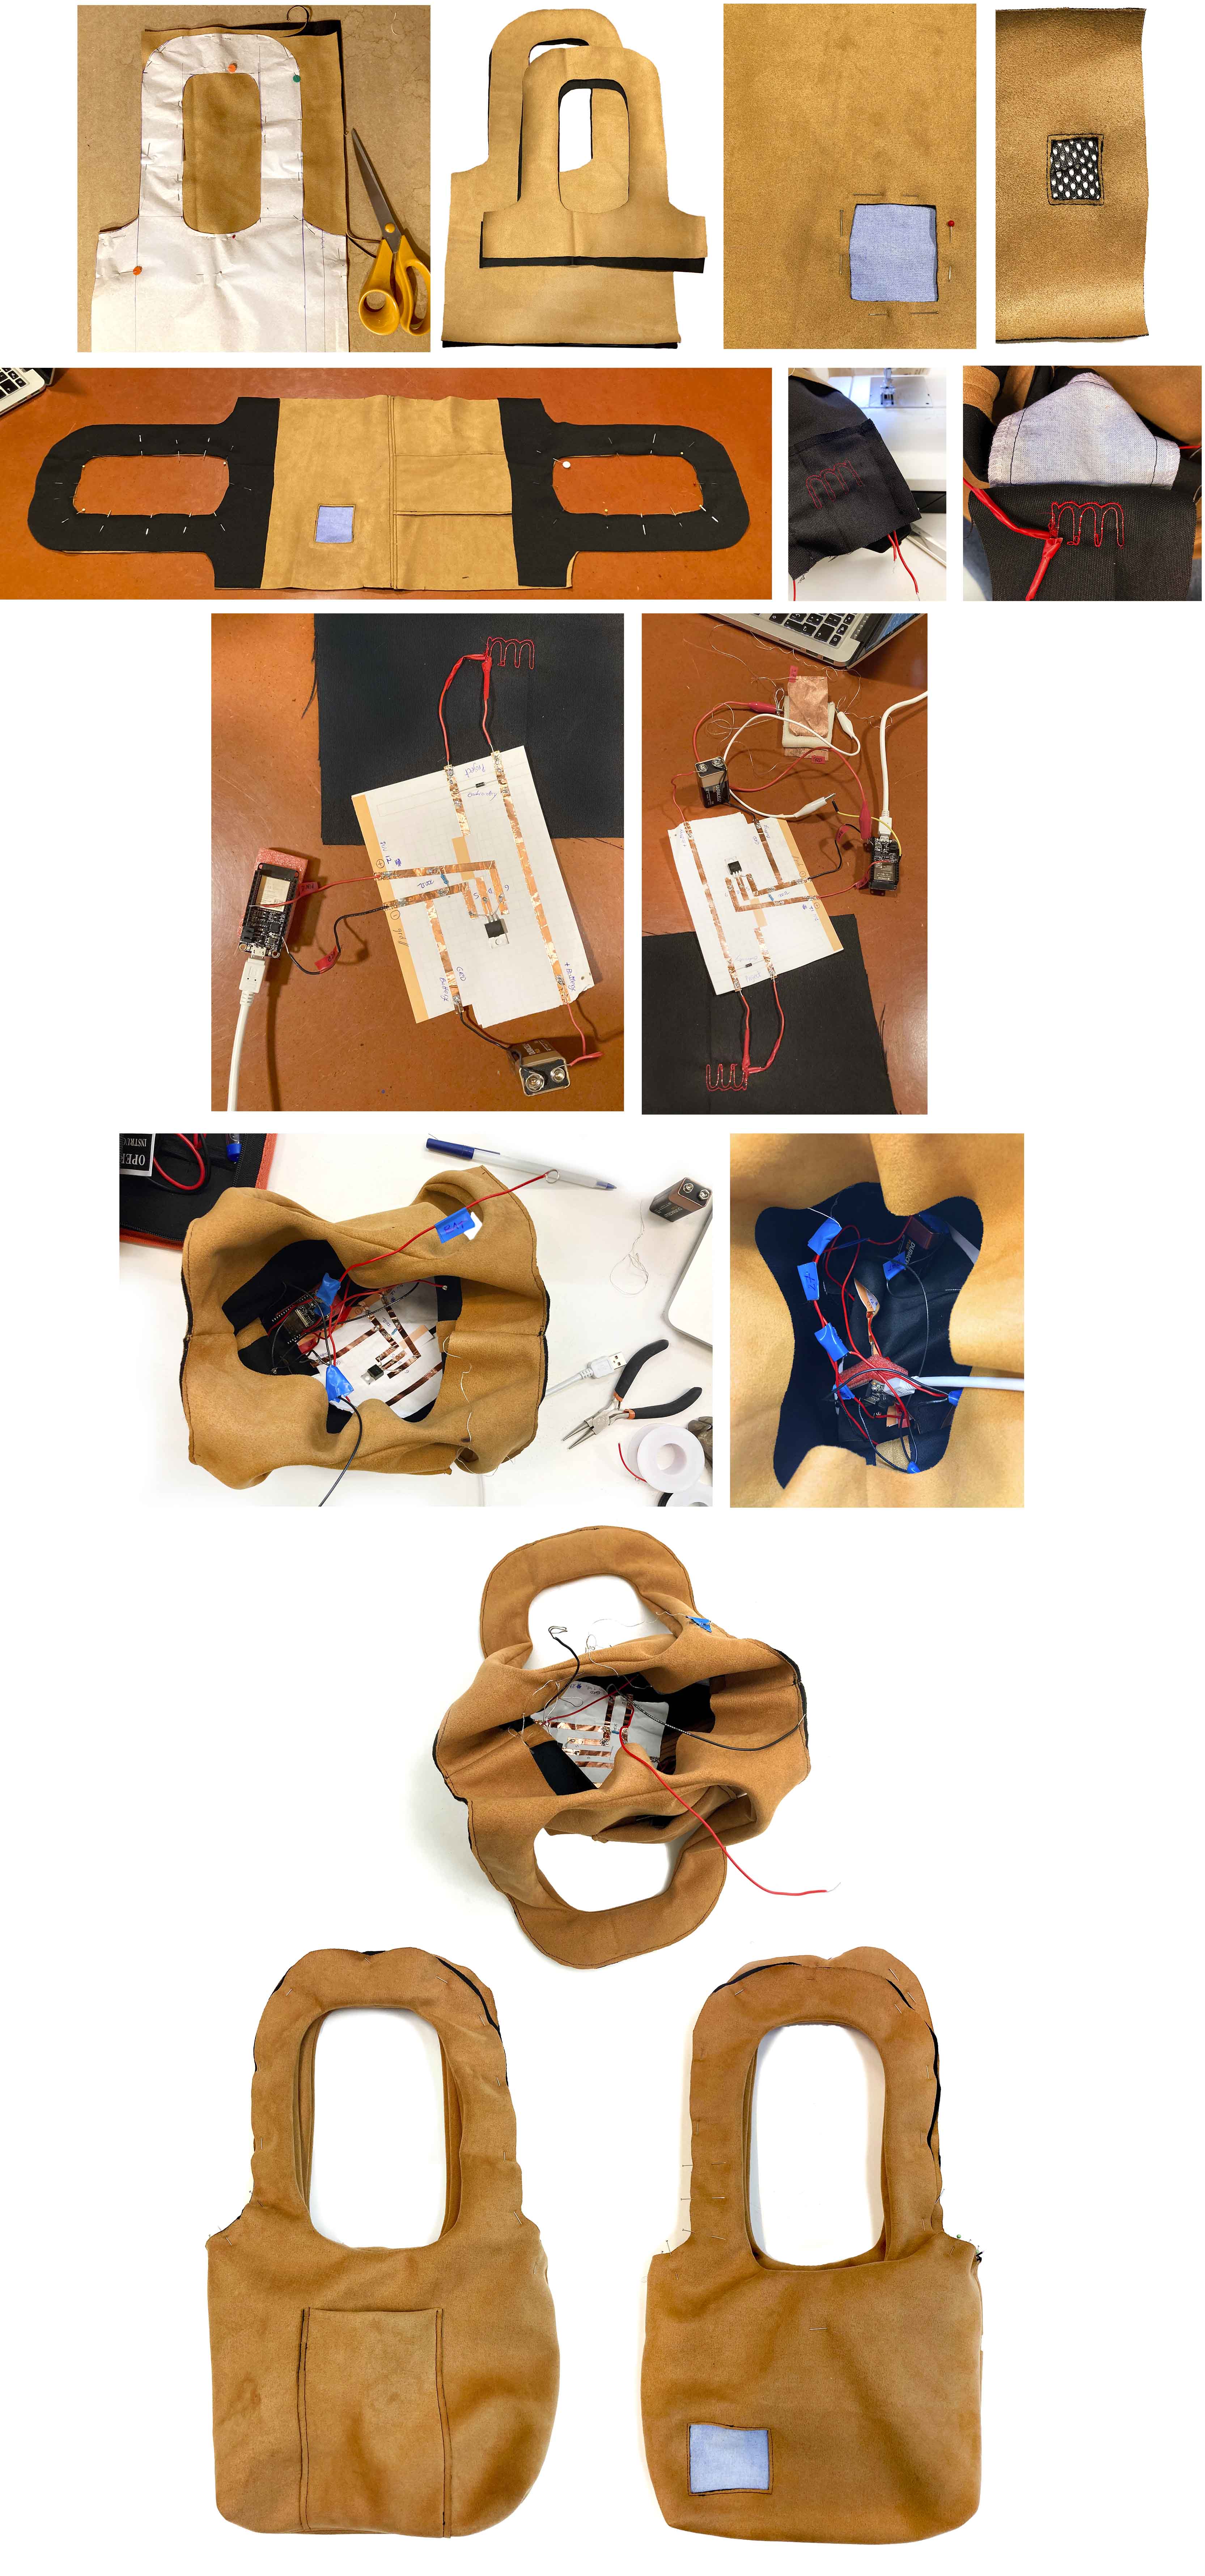
Cut the neoprene fabric with the paper pattern to get both sides of the bag and the inside ones. Prepare the pleaces for the magnetic and the pocket with the coil insede and the thermochromic window with the emboridery. Then, sew the pieces of the handle. Do not forget to add the switch to turn your ON/OFF circuit. When you have the handbag assembled, transform your prototype circuit into a final one. Do not forget any connections. Place the circuit inside the bag, do not let them touch between them, if not, you will have a short circuit!
Now it's time to finish the E-handbag testing in Arduino.
Arduino
Some keywords:
-
INPUT PULLUP: It monitors the state of a switch by establishing serial communication between your Arduino/ Adafruit ESP32-S3 Feather and your computer over USB. Additionally, when the input is HIGH, the onboard LED attached to pin 13 will turn on; when LOW, the LED will turn off.
-
PIN OUT: Is a cross-reference between the contacts, or pins, of an electrical connector or electronic component, and their functions.
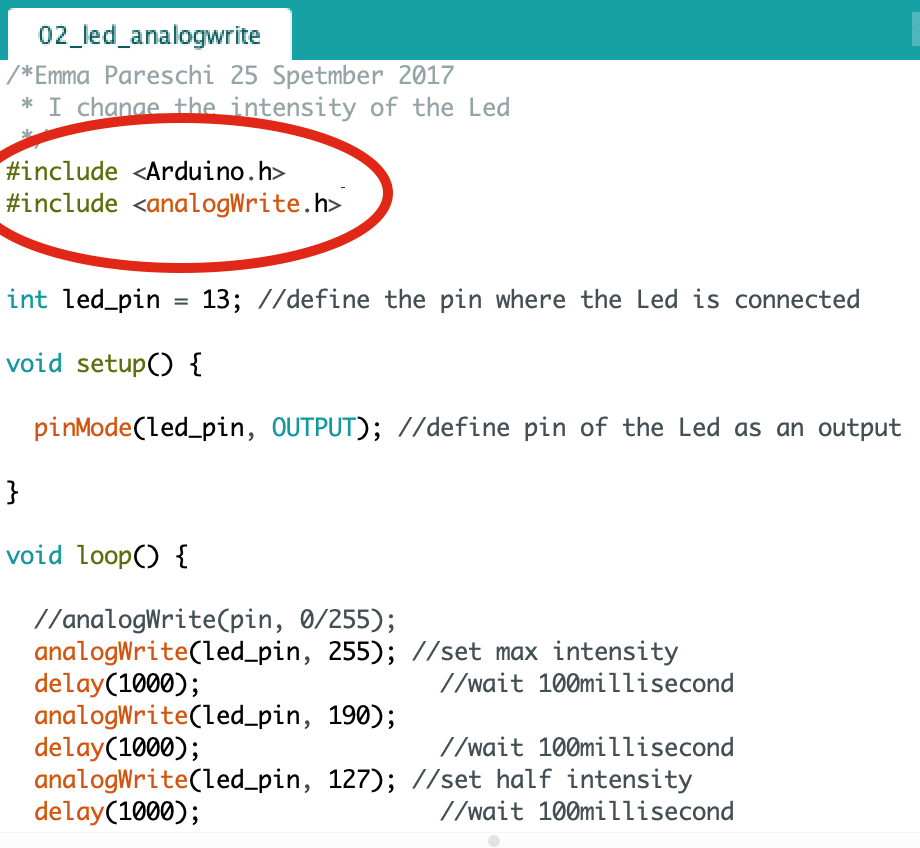
Sometimes, when you download a code from your library it doesn't work cause needs to add the AnalogWrite.
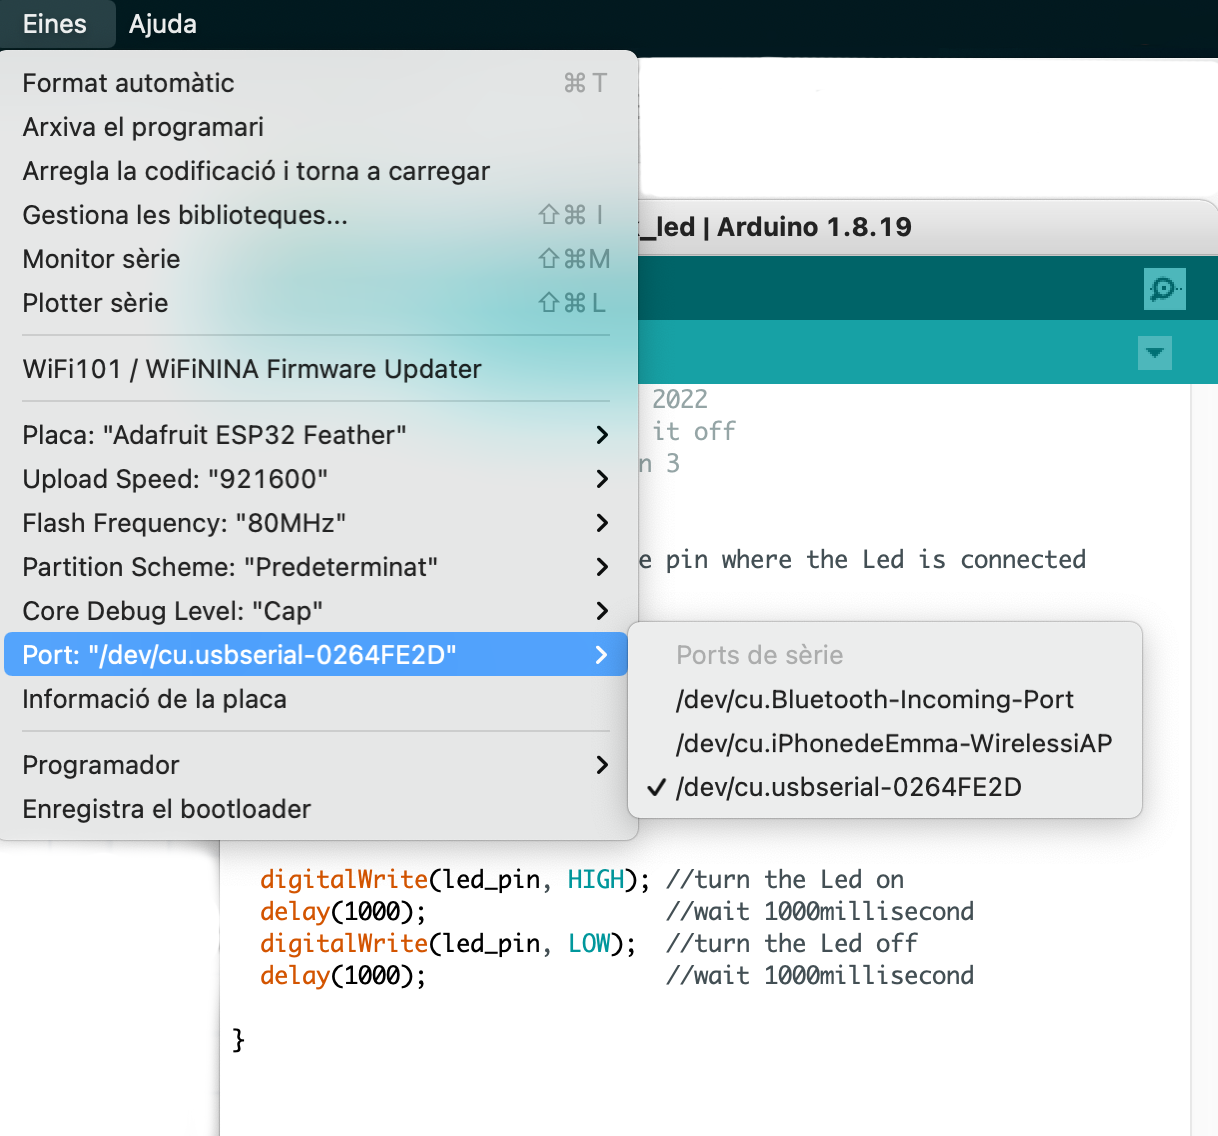
It took me a while because I uploaded the code to test in my ADA Feather but the circuit does not work. The problem's just becaseuse I have the code uploaded to another port...
For this prototype I has two differetns circuits so I start testing the circuit separately to make sure that it's work and then I joined in one.
Embroidery code:
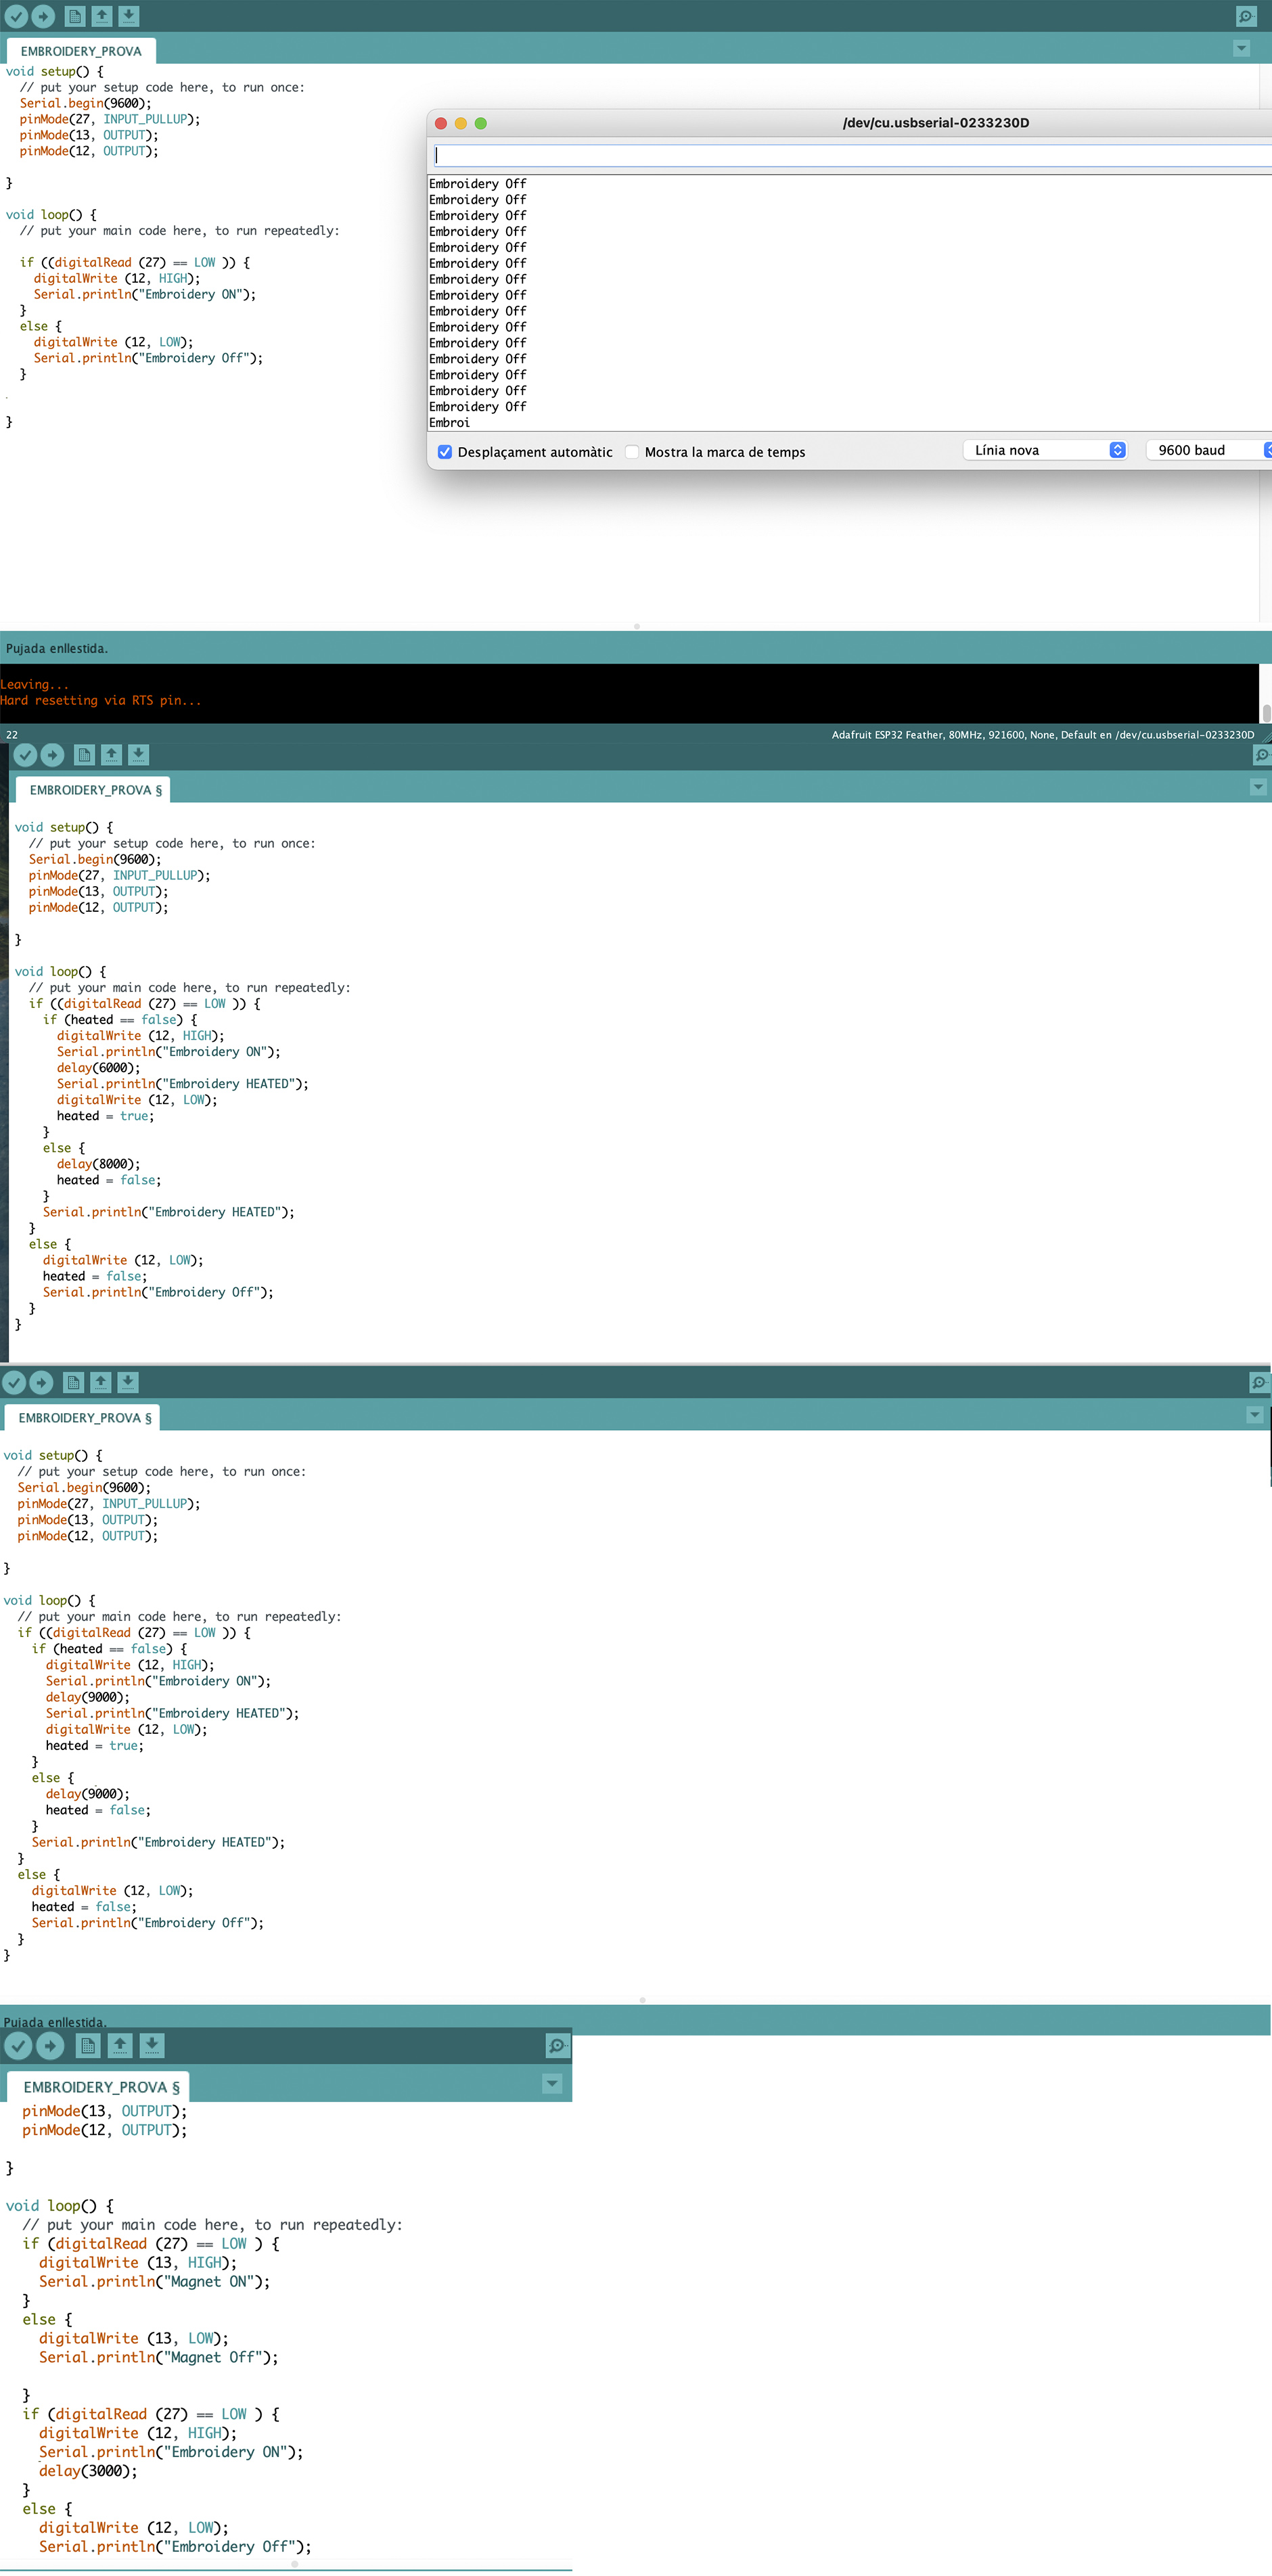
Magnetic code:
When I had the circuits working individually I unified them, there are different options to code them.
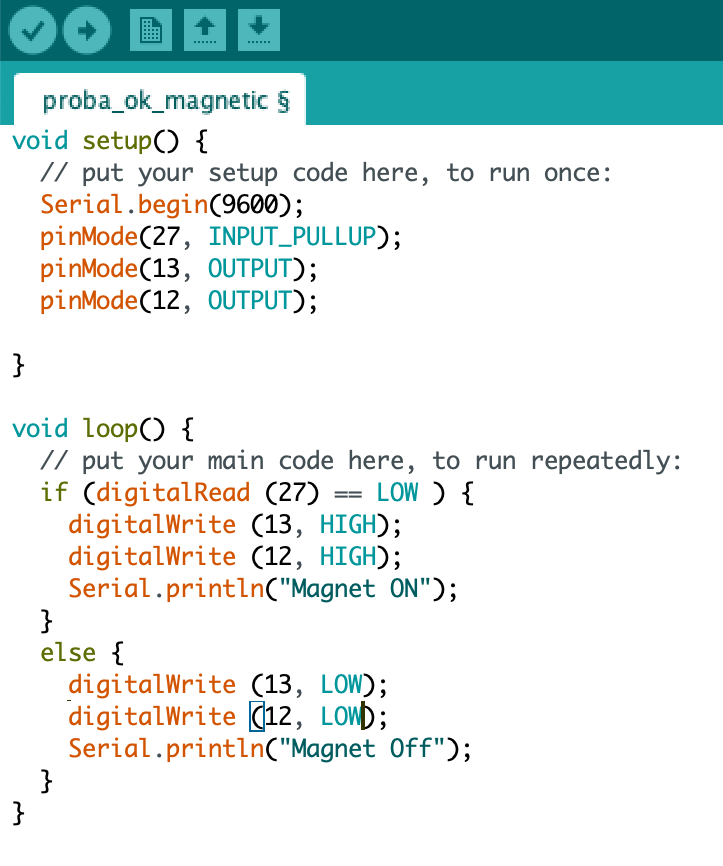
The two following options are magnetic it turns on when you carry the handbag with a button inside the handle.
- Code Option 1: In this case, the embroidery just opens up once, when you grab the handbag, and then it turns off.
bool heated = false;

void setup() {
  // put your setup code here, to run once:
  Serial.begin(9600);
  pinMode(27, INPUT_PULLUP);
  pinMode(13, OUTPUT);
  pinMode(12, OUTPUT);

}

void loop() {
  // put your main code here, to run repeatedly:
  if (digitalRead (27) == LOW ) {
    digitalWrite (13, HIGH);
    Serial.println("Magnet ON");
    if (heated == false) {
      digitalWrite (12, HIGH);
      Serial.println("Embroidery ON");
      delay(6000);
      Serial.println("Embroidery HEATED");
      digitalWrite (12, LOW);
      heated = true;
    }
    Serial.println("Embroidery HEATED");
  }
  else {
    digitalWrite (13, LOW);
    Serial.println("Magnet Off");
    digitalWrite (12, LOW);
    heated = false;

    Serial.println("Embroidery Off");
  }
}
- Code Option 2: In this example, when you take the handbag, the embroidery opens up during an interval of time, then turns off for a while to not burn the conductive thread, and returns on, as a loop while you carry the bag.
bool heated = false;

void setup() {
  // put your setup code here, to run once:
  Serial.begin(9600);
  pinMode(27, INPUT_PULLUP);
  pinMode(13, OUTPUT);
  pinMode(12, OUTPUT);

}

void loop() {
  // put your main code here, to run repeatedly:
  if (digitalRead (27) == LOW ) {
    digitalWrite (13, HIGH);
    Serial.println("Magnet ON");
    if (heated == false) {
      digitalWrite (12, HIGH);
      Serial.println("Embroidery ON");
      delay(6000);
      Serial.println("Embroidery HEATED");
      digitalWrite (12, LOW);
      heated = true;
    }
    else {
      delay(8000);
      heated = false;
    }
    Serial.println("Embroidery HEATED");
  }
  else {
    digitalWrite (13, LOW);
    Serial.println("Magnet Off");
    digitalWrite (12, LOW);
    heated = false;

    Serial.println("Embroidery Off");
  }
}
Further more, there are a 3th option, more specific for my E-handbag, but was desastimeted bacsuse of the time: Blink without delay.
More about:
Result
The E-handbag ready to wear!
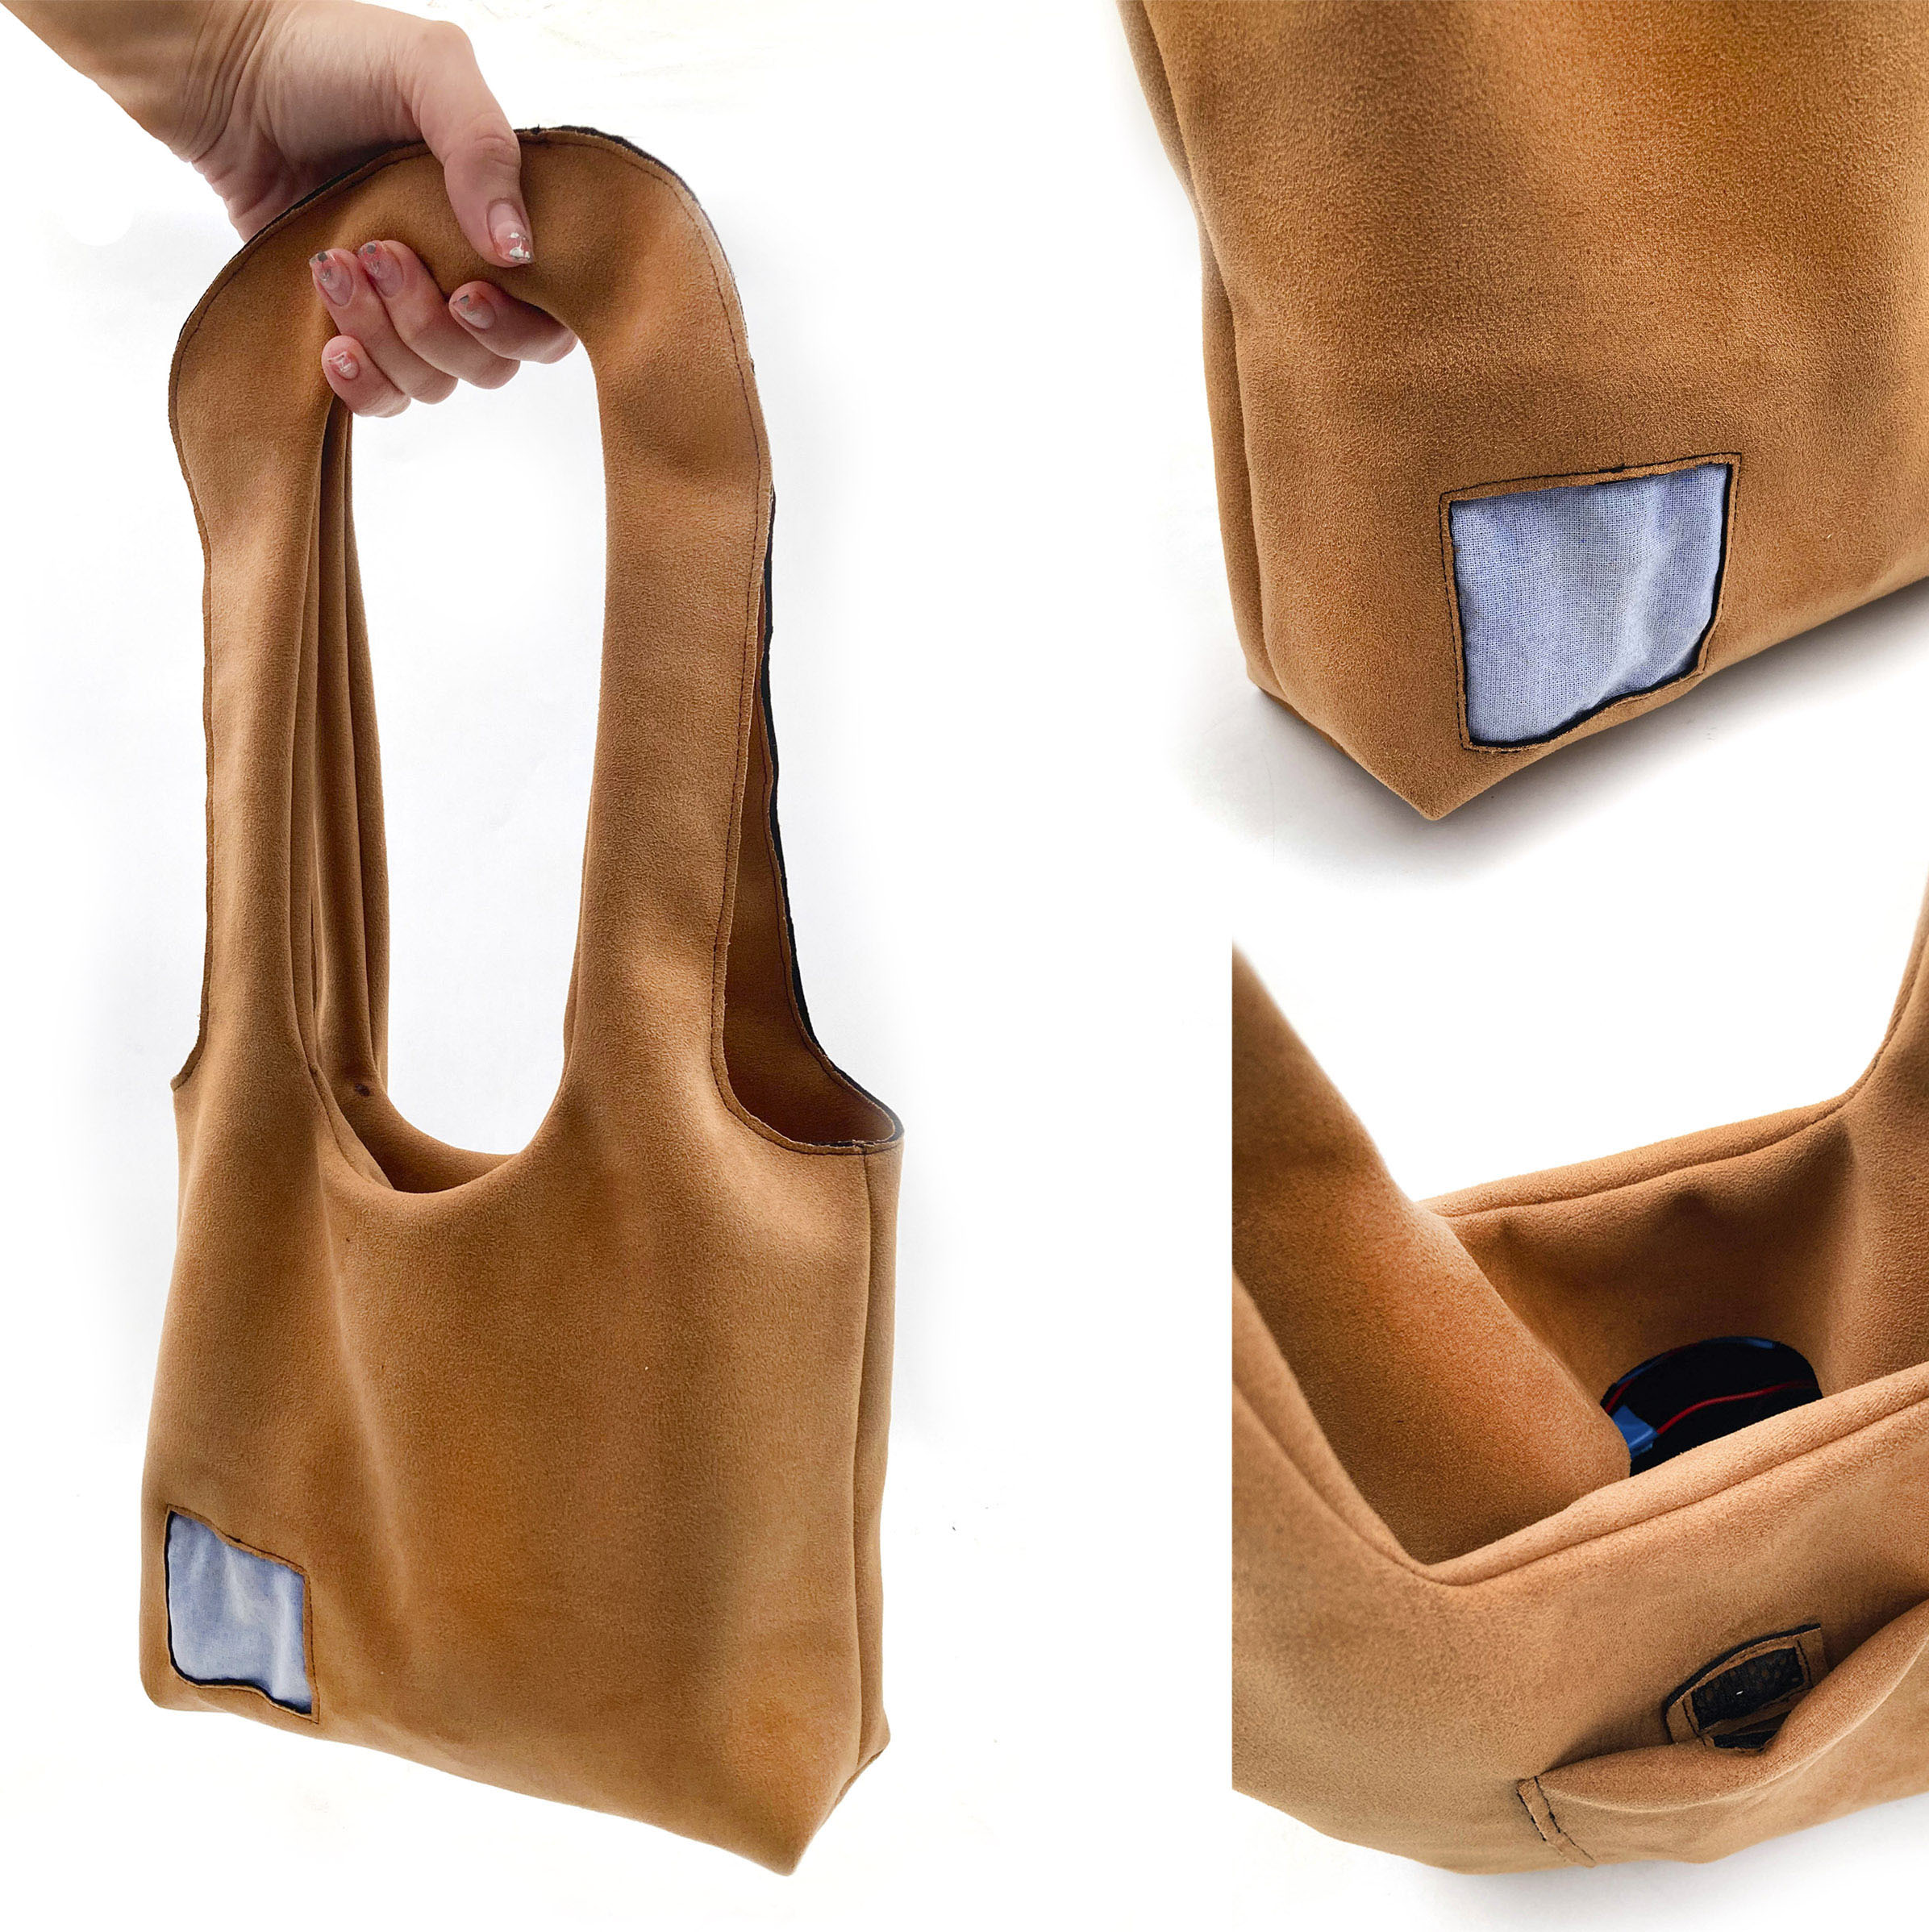
In the following video you could see the functions of the handbag when you press the handle switch:
E-handbag de Emma
So happy to get it there!
For another time, I will improve the embroidery by making it bigger to get the Thermochromic INK detailed instead of a spot. Also, I will add more pigment in the fabric to get a greater color contrast between the heat part.
In a conclusion:
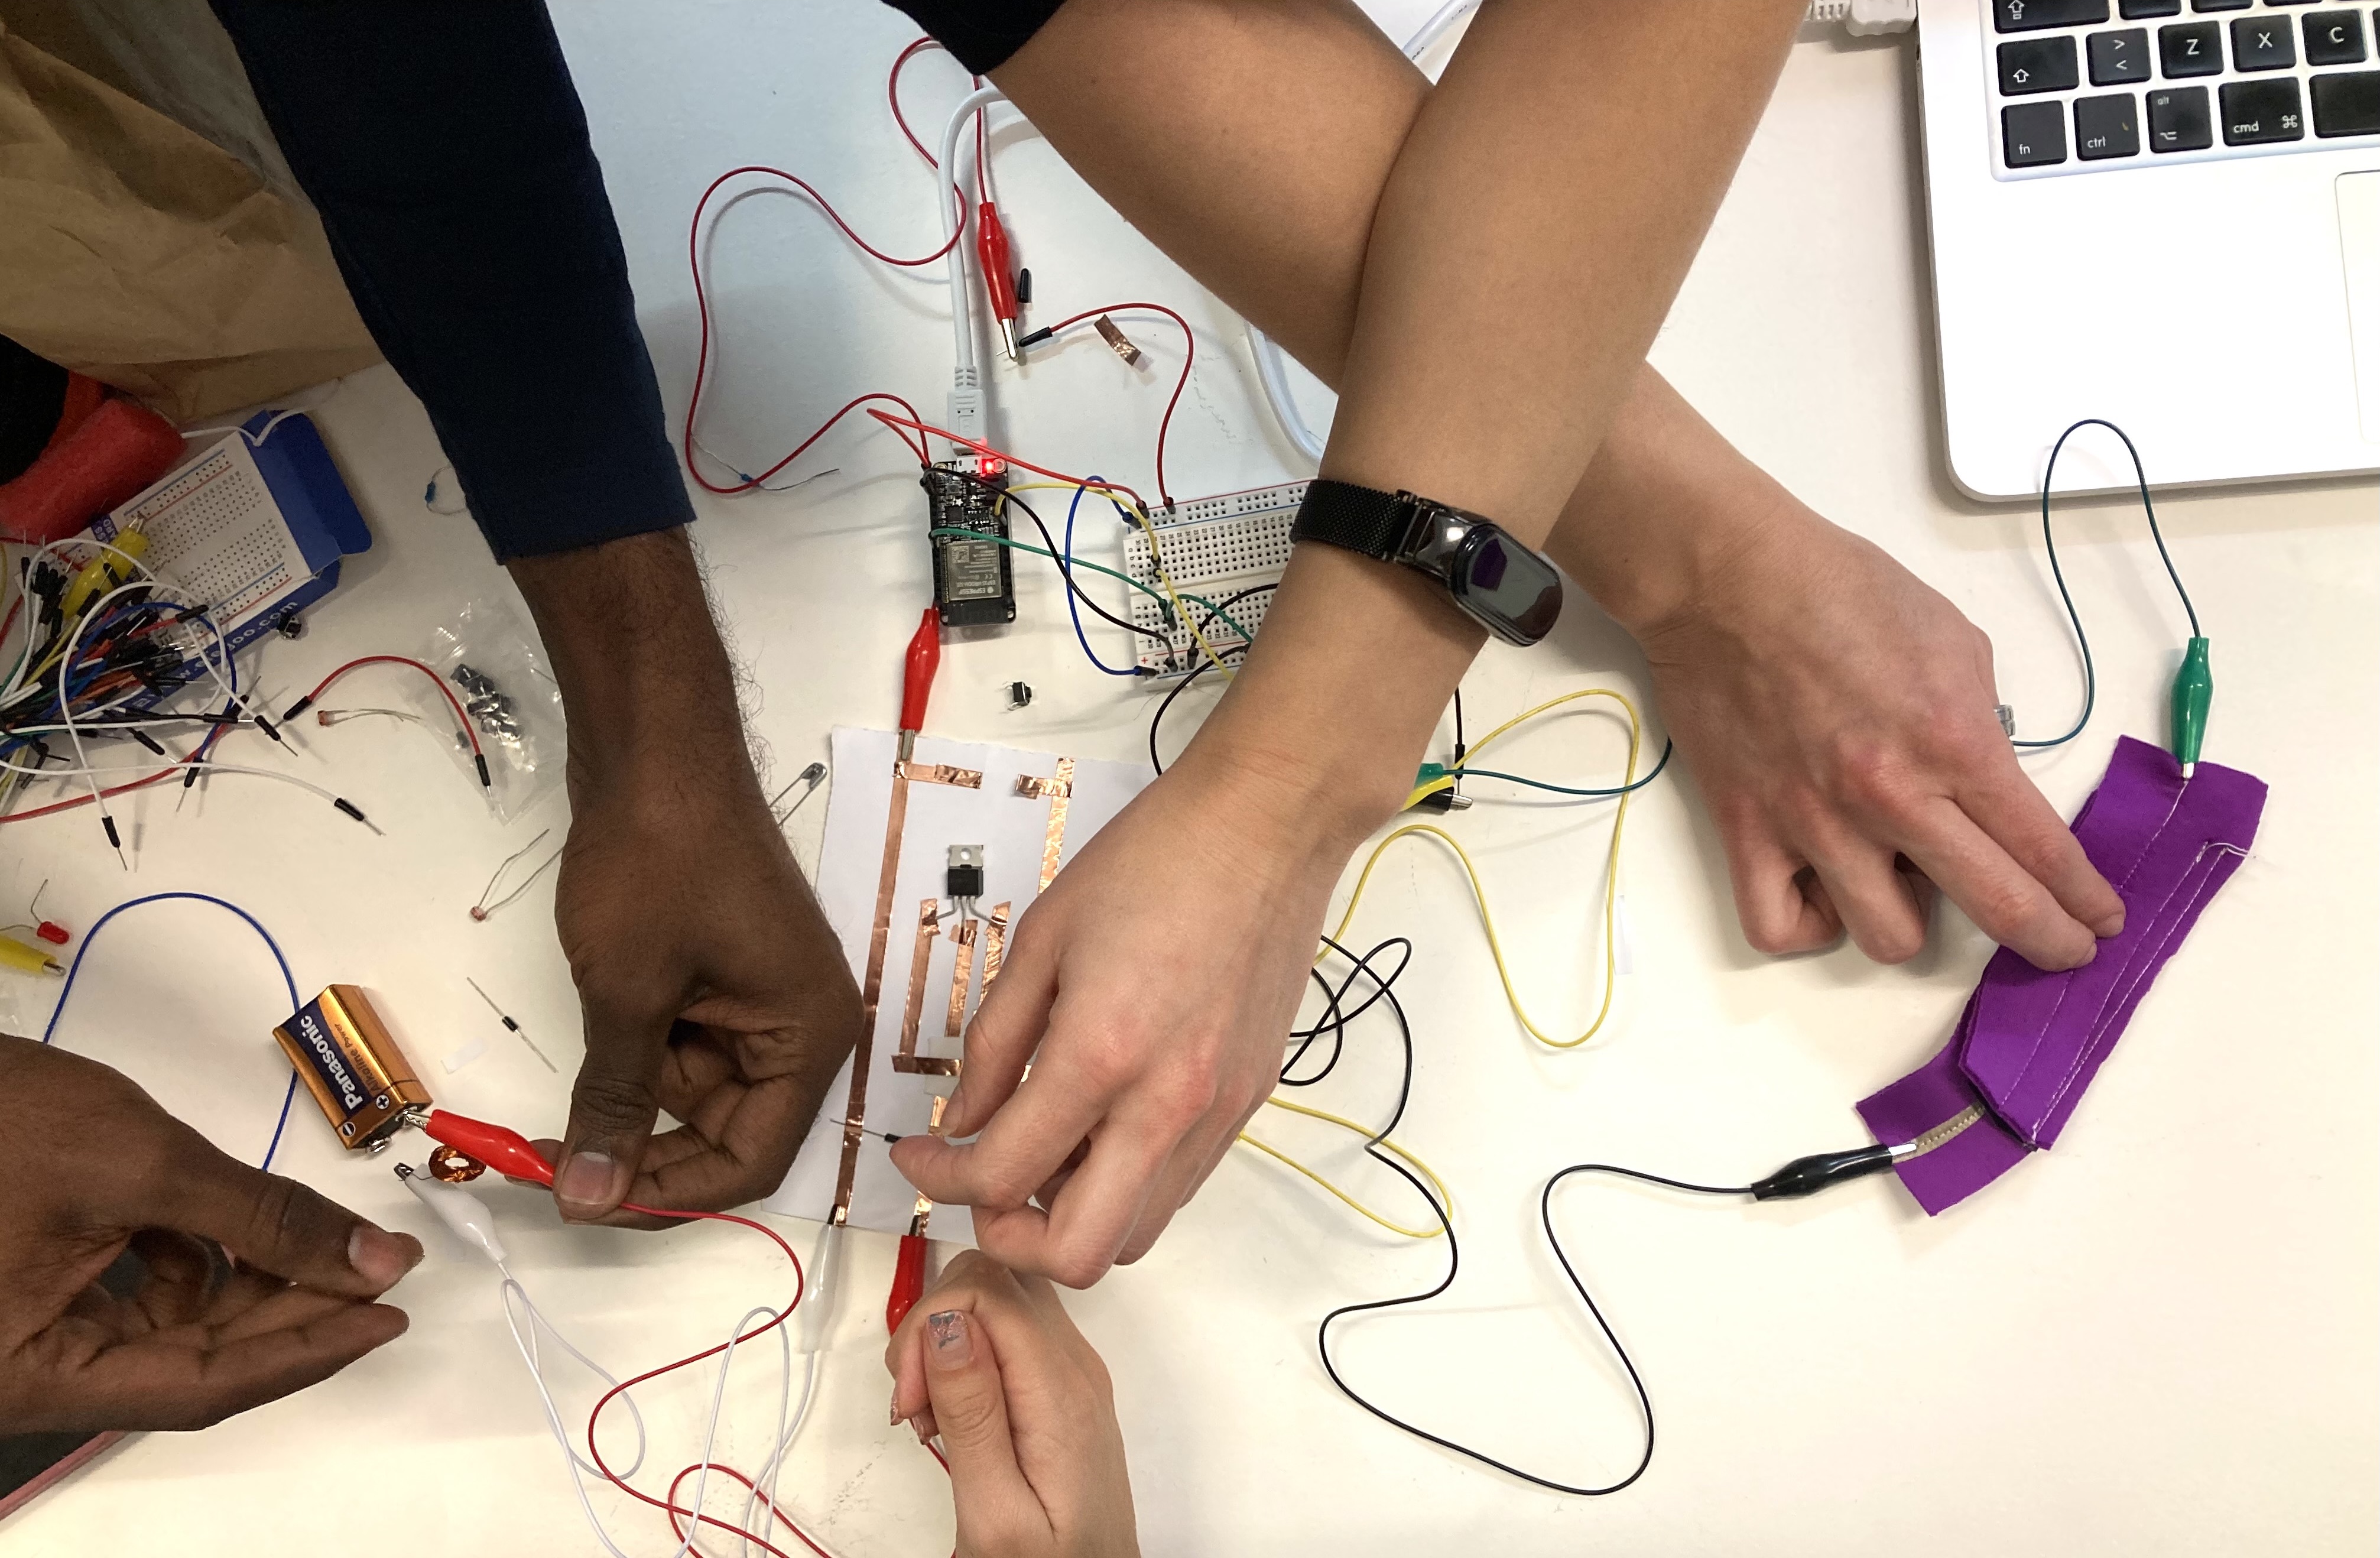
So many hands/eyes to find the problem of a circuit. Could be a defective solder, the Arduino code, the battery... I mean, countless things...
However, when you successfully get your final result it's just FABULOUS!!!
Meanwhile, you just running your time trying and sometimes creating an unexpected little bomb!
PD: This week I am super grateful to Josep's instructor for his patience and useful solutions to get the prototype to come up.
🔋⚡See you the following week💥💻